Table of Contents
Advertisement
Quick Links
Advertisement
Table of Contents

Related Manuals for CipherLab 9200


Summary of Contents for CipherLab 9200
- Page 1 Windows Embedded Handheld 6.5 Computer 9200 / 9200C Version 0.8...
- Page 2 Due to continued product development this information may change without notice. The information and intellectual property contained herein is confidential between CIPHERLAB and the client and remains the exclusive property of CIPHERLAB CO., LTD. If you find any problems in the documentation, please report them to us in writing.
-
Page 3: Important Notices
IMPORTANT NOTICES FOR USA This device complies with Part 15 of the FCC Rules. Operation is subject to the following two conditions: (1) This device may not cause This equipment has been tested and found to comply with the limits for a Class B digital harmful interference, and (2) this device must accept any interference received, including interference that may cause undesired device, pursuant to Part 15 of the FCC Rules. -
Page 4: For Product With Laser
DISPOSE OF USED BATTERIES ACCORDING TO THE INSTRUCTIONS. The use of any batteries or charging devices, which are not originally sold or manufactured by CipherLab, will void your warranty and may cause damage to human body or the product itself. - Page 5 If you want to put away the mobile computer for a period of time, download the collected data to a host computer, and then remove the battery pack from the mobile computer’s battery compartment. Store the mobile computer and battery pack separately.
- Page 6 Europe – EU Declaration of Conformity This device complies with the essential requirements of the R&TTE Directive 1999/5/EC. The following test methods have been applied in order to prove presumption of conformity with the essential requirements of the R&TTE Directive 1999/5/EC: EN 60950-1: 2001 EN 60950-1/A1: 2010 EN 60950-1/A11: 2009...
- Page 7 EN 300 328 V1.7.1: 2006 Electromagnetic compatibility and Radio spectrum Matters (ERM); Wideband Transmission systems; Data transmission equipment operating in the 2,4 GHz ISM band and using spread spectrum modulation techniques; Harmonized EN covering essential requirements under article 3.2 of the R&TTE Directive EN 301 893 V1.6.1: 2011 Broadband Radio Access Networks (BRAN);...
- Page 8 0560 esky [Jméno výrobce] tímto prohlašuje, že tento [typ za ízení] je ve shod se základními požadavky a dalšími p íslušnými ustanoveními sm rnice 1999/5/ES. [Czech] Dansk Undertegnede [fabrikantens navn] erklærer herved, at følgende udstyr [udstyrets typebetegnelse] overholder de væsentlige krav og øvrige relevante krav i direktiv 1999/5/EF. [Danish] Deutsch Hiermit erklärt [Name des Herstellers], dass sich das Gerät [Gerätetyp] in Übereinstimmung mit den...
-
Page 9: Release Notes
RELEASE NOTES Version Date Notes Aug 22, 2013 Draft release... - Page 10 Power On/Off Mobile Computer ..............8 Connecting Headset ................8 Charging & Communication ................9 Using Wireless Networks ................9 Using Snap-on Cable ................10 Using Cradle ..................11 USING THE 9200 MOBILE COMPUTER ............... 13 1.1. Battery................14 1.1.1. Battery Status Indications ............15 1.1.2.
- Page 11 Explore Device..............47 2.5. Suspend & Reset ..............48 2.5.1. Suspension ................48 2.5.2. Hardware Reset (Cold Boot)............49 CONFIGURING 9200 MOBILE COMPUTER ............51 3.1. CipherLab Smart Shell............. 52 3.1.1. Exit CipherLab Smart Shell ............54 3.2. Settings ................56 3.2.1.
- Page 12 4.1.3. Configuration Tabbed Page............72 4.1.4. Diagnostics Tabbed Page ............87 USING BLUETOOTH..................95 5.1. Bluetooth Power ..............96 5.1.1. Power On BT via Wireless Manager..........96 5.2. Search Devices ..............98 5.3. Pair Devices ................100 5.3.1. Pair ..................100 5.3.2. Unpair................102 5.4.
- Page 13 8.4. Camera Settings ..............153 8.5. Pictures & Videos ..............155 8.5.1. View an Image ..............155 8.5.2. Playback a Video ..............157 8.5.3. Advanced Settings ..............158 MORE APPLICATIONS................. 161 9.1. GPS Receiver...............162 9.2. Button Assignment ..............163 9.2.1. Reassign Physical Keys ............163 9.2.2. Reset Physical Keys to Default..........165 9.3.
- Page 14 HF RFID READER ..................213 RFID Tag Default Block ................213...
-
Page 16: Introduction
Specifically designed to work as an industrial PDA, the 9200 Mobile Computer provides rich options of data collection, voice and data communication, long-lasting working hours, and so on. -
Page 17: Features
9200 Mobile Computer Reference Manual FEATURES Built tough to survive drop test and sealed against moisture/dust to industrial standard IP65 Microsoft Windows Embedded Handheld 6.5 operating system with a powerful Qualcomm MSM7225-1 528 MHz processor 512 MB NAND flash memory to store OS and software programs... -
Page 18: Quick Start
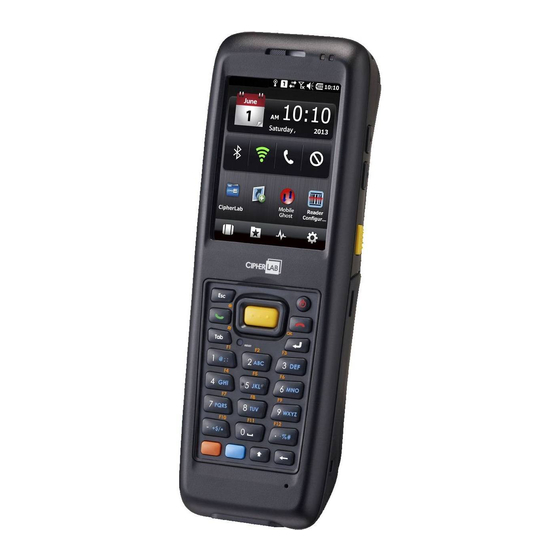
QUICK START OVERVIEW Description Description Receiver Status LEDs for scanner good read (left) and battery charging (right) Touch Screen Volume Buttons Side Triggers, user-definable Power Key Scan Key, user-definable Reset Button Battery Cover Battery Cover Latch... - Page 19 9200 Mobile Computer Reference Manual Speaker Charging and Communication Port Microphone Digital Camera Scanning Window Stylus Slot Headset Jack Application Key, user-definable...
-
Page 20: Installing Battery
Quick Start INSTALLING BATTERY For shipping and storage purposes, the mobile computer and the main battery are saved in separate packages. Note: Any improper handling may reduce the battery life. Push down the clip on top of the battery cover to unlock it. Lift up and remove the battery cover. -
Page 21: Inserting Sim Card
9200 Mobile Computer Reference Manual INSERTING SIM CARD Inserting Card Push down the clip on top of the battery cover to unlock it. Remove the battery cover as well as the battery. Insert SIM card into the SIM card slot as the icon engraved in the battery compartment shows. -
Page 22: Using Memory Card
Quick Start USING MEMORY CARD The micoSD card slot is located at the top of the battery compartment. Inserting Card Push down the clip on top of the battery cover to unlock it. Remove the battery cover as well as the battery. Insert memory card into the micoSD card slot as the icon engraved in the battery compartment shows. -
Page 23: Power On/Off Mobile Computer
9200 Mobile Computer Reference Manual POWER ON/OFF MOBILE COMPUTER POWER ON To power on the mobile computer, press and hold the power button located on the upper right of the keypad. The mobile computer opens to show the Home Screen. -
Page 24: Charging & Communication
Quick Start CHARGING & COMMUNICATION The main battery may not be charged to full for shipment. When you first receive the kit package, you will need to charge the main battery to full before using the mobile computer. You may use the Snap-on Cable or Charging & Communication Cradle along with a power adapter to charge the mobile computer. -
Page 25: Using Snap-On Cable
9200 Mobile Computer Reference Manual USING SNAP-ON CABLE Fasten the Snap-on Charging and Communication Cable to the lower end of the mobile computer. Insert the adapter DC plug into the power jack on the Snap-on Cable. Connect one end of the power cord to the adaptor, and the other end to an electrical outlet. -
Page 26: Using Cradle
If necessary, connect the Cradle and your PC with the USB cable provided for data transmission. Note: You may connect the Charging & Communication Cradle to your PC for simultaneous data communication and charging. 9200 LED Indicator Status Description Charging... - Page 27 9200 Mobile Computer Reference Manual...
-
Page 28: Using The 9200 Mobile Computer
Chapter 1 USING THE 9200 MOBILE COMPUTER This chapter explains the features and usage of the mobile computer. IN THIS CHAPTER 1.1 Battery ..............14 1.2 Memory ..............17 1.3 Keypad..............18 1.4 Touch Screen ............22 1.5 Notifications .............. 25... -
Page 29: Battery
9200 Mobile Computer Reference Manual 1.1. BATTERY Main Battery The mobile computer is powered by a rechargeable 3.7 V/3300mAh Li-ion battery pack, and it takes approximately 4 hours to charge it to full from the power adaptor or approx. 8 hours using the Snap-on Cable (at 500mA). However, the charging time may vary by working condition. -
Page 30: Battery Status Indications
Chapter 1 Using the 9200 Mobile Computer 1.1.1. BATTERY STATUS INDICATIONS The battery pack is the only power source for the mobile computer to work. Therefore, when the main battery level goes low, you need to replace the battery pack with a charged one or charge it as soon as possible. -
Page 31: Power Management
9200 Mobile Computer Reference Manual 1.1.2. POWER MANAGEMENT For any portable device, power management is a critical issue especially when you are on the road. Below are some tips to help you save battery power. Warning: Using backlight, wireless connectivity, and peripheral devices while on battery power will substantially reduce battery power. -
Page 32: Memory
Chapter 1 Using the 9200 Mobile Computer 1.2. MEMORY Flash Memory (ROM) 512 MB flash memory for storing OS (Windows Embedded Handheld 6.5) and custom application programs. Yet a portion of the memory is referred to as Flash Disk (folder), which can store data and programs that you wish to retain even after hardware reset. -
Page 33: Keypad
9200 Mobile Computer Reference Manual 1.3. KEYPAD The Alphanumeric keypad includes alphanumeric, call/end keys, navigation keys, function keys, and so on. This keypad is set to numeric mode by default. Shift key Alpha key Function key... -
Page 34: Keypad Settings
Chapter 1 Using the 9200 Mobile Computer 1.3.1. KEYPAD SETTINGS Go to Start Screen | Settings | System, and tap Keypad Backlight to configure related settings. The keypad backlight is set to be automatically turned on for 5 seconds when any key is pressed. -
Page 35: Alpha Key
9200 Mobile Computer Reference Manual 1.3.2. ALPHA KEY This alphanumeric keypad is set to numeric mode by default. The Alpha key [ ] serves as a switch key between numeric and alpha (lower-case alphabetic) input modes. Note: Press [ ] key to switch between numeric and lower-case alphabetic modes. -
Page 36: Function Key
Chapter 1 Using the 9200 Mobile Computer 1.3.4. FUNCTION KEY The Function key [Fn] serves as a specified key, and the functionality of each key combination is application-dependent. 1) To enable this special key, press [Fn] on the keypad. Its icon will appear on the status bar. -
Page 37: Touch Screen
9200 Mobile Computer Reference Manual 1.4. TOUCH SCREEN The mobile computer comes with a 2.8” TFT graphic LCD, 240 by 320 pixels resolution (QVGA). The LED backlight of screen, which helps ease reading under dim environments, can be controlled manually and automatically. -
Page 38: Screen Settings
Chapter 1 Using the 9200 Mobile Computer 1.4.2. SCREEN SETTINGS The LCD is also a touch screen that can be calibrated through screen alignment. Go to Start Screen | Settings | System, and tap Screen to configure related settings. You may re-calibrate the touch screen, smooth the font edges or adjust the text size displayed on the screen if necessary. -
Page 39: Calibration
9200 Mobile Computer Reference Manual 1.4.3. CALIBRATION The mobile computer’s touchscreen needs to be calibrated after a period of use to ensure its accuracy. Calibration will align a set of coordinates on the touch panel and LCD underneath. Tap Settings | System | Screen to open the Alignment tabbed page. Tap Align Screen to start touchscreen calibration. -
Page 40: Notifications
Chapter 1 Using the 9200 Mobile Computer 1.5. NOTIFICATIONS 1.5.1. STATUS LED Two LED indicators located above the touch screen provide information about charging status, scanner light beam, and scanner "Good Read" during data collection. LED Indicators Status Description Green, solid... - Page 41 9200 Mobile Computer Reference Manual...
-
Page 42: Vibrator
Chapter 1 Using the 9200 Mobile Computer 1.5.3. VIBRATOR The mobile computer is integrated with a vibrator, which is software programmable for tactile feedback. This can be helpful when working in noisy environments. Tap the top of the screen to invoke the title bar drop-down list, and then tap the volume setting icon to change the system volume or phone ringing volume. -
Page 43: Data Capture
9200 Mobile Computer Reference Manual 1.6. DATA CAPTURE 1.6.1. BARCODE READER A selection of scan engines is available for delivering flexibility to meet different requirements. Depending on the scan engine integrated, the mobile computer is capable of scanning barcodes of a number of symbologies that are enabled by default while running the ReaderConfig.exe utility. -
Page 44: Snap-On Charging & Communication Cable
Chapter 1 Using the 9200 Mobile Computer 1.7. SNAP-ON CHARGING & COMMUNICATION CABLE The Snap-on Charging & Communication Cable provides a convenient way to charge your mobile computer and also connect it to your PC. Slide and “click” to attach; press release buttons and pull to detach... -
Page 45: Charging & Communication Cradle
9200 Mobile Computer Reference Manual 1.8. CHARGING & COMMUNICATION CRADLE The Charging & Communication Cradle charges your mobile computer and a spare battery at the same time. You may also use the cradle for data transmission between your PC. Presents charging compartment for mobile computer and spare battery... -
Page 46: Learning Windows Embedded Handheld Basics
Chapter 2 LEARNING WINDOWS EMBEDDED HANDHELD BASICS This chapter mainly describes the basic skills to work with the 9200 Mobile Computer. The add-on utilities for applications regarding data collection, processing, and transmission, are introduced in the following chapters. The mobile computer is specifically designed for real-time data collection in the Windows Embedded Handheld 6.5 environment. -
Page 47: Getting Started
9200 Mobile Computer Reference Manual 2.1. GETTING STARTED 2.1.1. HOME SCREEN When the mobile computer is fully charged, press the Power key for three seconds to turn on the mobile computer and wait for the Home Screen to come up. -
Page 48: Title Bar
Chapter 2 Learning Windows Embedded Handheld Basics 2.1.2. TITLE BAR The icons at the top of the screen are explained below. Icon Description External power source is connected. Battery power remaining: more bars indicate more power in the battery. Keypad is in default numeric mode or alphabetic mode. Shift [ ] is enabled in numeric mode/numeric lock mode. -
Page 49: Title Bar Drop-Down List
9200 Mobile Computer Reference Manual 2.1.3. TITLE BAR DROP-DOWN LIST The title bar drop-down list is hidden at the top of the screen, and can be expanded by tapping the title bar: Tap the title bar to reveal the drop-down list. - Page 50 Chapter 2 Learning Windows Embedded Handheld Basics Tap it to receive incoming Bluetooth beams. Bluetooth A2DP profile is in use. Tap it to access the Bluetooth devices list. Tap it to view a missed call. Tap it to check a new e-mail. Tap it to check a new voicemail.
-
Page 51: Start Screen
9200 Mobile Computer Reference Manual 2.1.4. START SCREEN to open the Start Screen. You can tap to access application programs and useful utilities developed by CipherLab, or configure system settings. The icons provided on the Start Screen are depicted as follows: Icon... - Page 52 Chapter 2 Learning Windows Embedded Handheld Basics Internet Explorer Browses world wide web. Wireless Manager Quick sets the power for phone, Bluetooth and Wi-Fi, and opens each of the settings pages. Calendar Creates and manages events, meetings, and appointments. Settings Accesses system settings.
- Page 53 9200 Mobile Computer Reference Manual Adobe Reader LE Browses PDF files. File Explorer Browses and manages the files on local storage. ActiveSync Synchronizes Microsoft Office Outlook data between the mobile computer and another Windows-based computer. Internet Sharing Shares the mobile computer’s mobile data connection with another computer through a USB or RS-232 cable.
-
Page 54: Device Lock
If the Lock screen is enabled, the Volume adjustment keys on the left side will be unavailable. Lock 9200 Open Start Screen, and tap the lock icon on the softkey bar to protect your mobile computer. -
Page 55: Input Methods
9200 Mobile Computer Reference Manual 2.2. INPUT METHODS The keyboard icon at the middle bottom of the screen is for Software Input Panel (SIP). Tap the icon to show or hide the on-screen keyboard. Data entry can be performed by the following methods. -
Page 56: Managing Programs
Chapter 2 Learning Windows Embedded Handheld Basics 2.3. MANAGING PROGRAMS Tap the Start button to open the Start Screen. Tap a program to launch it. To add a new program or subfolder to the Start Screen, you can either use File Explorer on the mobile computer or ActiveSync on your PC. -
Page 57: End A Program
9200 Mobile Computer Reference Manual 2.3.4. END A PROGRAM In general, the system manages memory automatically, and there is no need to exit a program in order to open another or to conserve memory. However, random access memory (RAM) may be used up when too many programs are running simultaneously. As a result, it will slow down system operation or cause program errors. -
Page 58: Find A File
Chapter 2 Learning Windows Embedded Handheld Basics 2.3.5. FIND A FILE Tap Start Screen | Search Phone. In the “Search for” box, enter the file name, keyword, or other information you want to search for. If you have searched for this item before, tap the drop-down list and select it. -
Page 59: Using Activesync
9200 Mobile Computer Reference Manual 2.4. USING ACTIVESYNC Microsoft’s syncing tools enables users to update or back up the data on their handheld devices to desktop computers. Two syncing tools are featured by Microsoft - ActiveSync and Windows Mobile Device Center (WMDC). -
Page 60: Add/Remove Programs
Chapter 2 Learning Windows Embedded Handheld Basics 2.4.2. ADD/REMOVE PROGRAMS On your PC, open ActiveSync and click Tools | Add/Remove Programs to install a program that is designed to be used on a mobile device running Windows Embedded Handheld. If a previously installed user program is no longer desired, you may also remove it from the system. - Page 61 9200 Mobile Computer Reference Manual Aside from using the Add/Remove Programs menu option to manage programs, you can also install and remove programs by copying and pasting the installation file (or executable file) to the location of interest. Alternative for Installing New Programs (Copy & Paste) Follow these steps to install a new program manually.
-
Page 62: Explore Device
Chapter 2 Learning Windows Embedded Handheld Basics 2.4.3. EXPLORE DEVICE Add a Program to Start Screen Establish USB connection between your mobile computer and your PC. On your PC, open ActiveSync and click Explore on the taskbar. Navigate through file folders to find the program you desire. Right-click the program and select Create Shortcut from the pop-up menu. -
Page 63: Suspend & Reset
9200 Mobile Computer Reference Manual 2.5. SUSPEND & RESET 2.5.1. SUSPENSION The mobile computer operates continuously once it is powered on. To minimize power consumption, suspend the mobile computer if you are not actively using it. When the mobile computer enters suspension, the system is in a power-saving status and can be quickly awoken to operate as needed. -
Page 64: Hardware Reset (Cold Boot)
Chapter 2 Learning Windows Embedded Handheld Basics 2.5.2. HARDWARE RESET (COLD BOOT) When the mobile computer runs slower than normal or when it stops responding to input, reset it with a hardware reset, also known as cold boot. This will restart the mobile computer and initialize RAM. - Page 65 9200 Mobile Computer Reference Manual...
-
Page 66: Configuring 9200 Mobile Computer
CONFIGURING 9200 MOBILE COMPUTER In this chapter, a brief on the system settings is provided for your reference. IN THIS CHAPTER 3.1 CipherLab Smart Shell ..........52 3.2 Settings ..............56 3.3 Device Name ............. 65 to open the Start Screen, and tap Settings to configure related settings. -
Page 67: Cipherlab Smart Shell
9200 Mobile Computer Reference Manual 3.1. CIPHERLAB SMART SHELL CipherLab Smart Shell is an optional OS interface that features a Home Screen and a set of screen views with programs and services arranged based on their properties. By switching between 3D carousel view or tiles view, you can easily access commonly used programs and settings, or manage your tasks, calendar, and contacts. - Page 68 Chapter 3 Configuring 9200 Mobile Computer Icon Description Tap it for a 3D carousel view. Provide a fast and convenient way to access your favorite or recently used items and services. Tap to close any launched programs, or switch to a running program.
-
Page 69: Exit Cipherlab Smart Shell
9200 Mobile Computer Reference Manual 3.1.1. EXIT CIPHERLAB SMART SHELL If you would like to exit Smart Shell and return to the built-in OS interface, follow the steps below: Tap the “Launcher” icon on the Smart Shell homepage. Tap the Settings icon to open the system settings page. - Page 70 Chapter 3 Configuring 9200 Mobile Computer Tap the Sbp Mobile Shell icon to open Smart Shell Settings. Tap the Settings icon seated on the lower right of the screen. Tap Exit Shell to exit Smart Shell and show the OS Home Screen.
-
Page 71: Settings
9200 Mobile Computer Reference Manual 3.2. SETTINGS Tap Start Screen | Settings to access the settings menu for configuring system time, layout, sounds and notifications, power, wireless connection, and more. Bluetooth Refer to Using Bluetooth. Clock & Alarms Time tab: Change the date, time and time zone settings. By default, the time zone settings will be automatically synchronized and updated by notification. - Page 72 Chapter 3 Configuring 9200 Mobile Computer period of time, either on battery or external power. Sounds & Notifications Refer to Note: For Scanner decode and Scanner beam LED to function, LED notification must be enabled in Reader Configuration. See 198HEnable LED Notification.
-
Page 73: Connections
9200 Mobile Computer Reference Manual 3.2.1. CONNECTIONS Go to Start Screen | Settings | Connections. Beam Tap it to receive incoming Bluetooth beams. Connections Refer to Configuring GPRS Network. Domain Enroll Connects to an SCMDM server with an enrollment ID and password, allowing company deployment on multiple mobile computers. - Page 74 Chapter 3 Configuring 9200 Mobile Computer Wi-Fi Refer to Using 802.11 Radio. Wireless Manager Tap it to enable/disable the Wi-Fi, Bluetooth or Phone Power. For related information, refer to Power On BT via Wireless Manager Power On Phone via Wireless...
-
Page 75: Personal
9200 Mobile Computer Reference Manual 3.2.2. PERSONAL Go to Start Screen | Settings | Personal. Buttons Tap it to adjust the character input repeat delay and rate, move the slider to right or left for repeat speed. Owner Information Identification tab: Enter your contact information. -
Page 76: System
Chapter 3 Configuring 9200 Mobile Computer 3.2.3. SYSTEM Go to Start Screen | Settings | System. About Version tab: Displays information of OS software, processor, etc. Device ID tab: Enter a name and description for identifying the mobile computer. Copyrights tab: Displays important statements on copyrights. - Page 77 Main tab: View the current capacity and usage of the onboard RAM, which is divided into file storage and program usage. Storage Card tab: View memory usage of the Flash Disk folder or storage card. Reader Configuration CipherLab’s scanning utility which allows configuration of symbology, scan settings, and output and notification settings.
- Page 78 Chapter 3 Configuring 9200 Mobile Computer Regional Settings Region tab: Customize the appearance and formatting to your geographic region. Number tab: Customize the number format. Currency tab: Customize the currency format. Time tab: Customize the time format. Date tab: Customize the date format.
- Page 79 9200 Mobile Computer Reference Manual USB to PC Disable this to switch USB connection from RNDIS to PPP. When the mobile computer is connected to your PC through USB connection, internet sharing to the mobile device will be enabled and ActiveSync connection might be interrupted. Disable advanced network...
-
Page 80: Device Name
Chapter 3 Configuring 9200 Mobile Computer 3.3. DEVICE NAME 3.3.1. CHANGE DEVICE NAME Go to Start Screen | Settings | System, and tap About to change the device name on the Device ID tab to make the device more recognizable. -
Page 81: Update Os Image
9200 Mobile Computer Reference Manual 3.4. UPDATE OS IMAGE Upgrading the OS image helps optimize the mobile computer’s performance and functionality. The upgrading process relies on a memory card, and an .nb0 OS image file. On your PC, copy the latest OS image file to the microSD card. - Page 82 Chapter 3 Configuring 9200 Mobile Computer When OS upgrade is complete, the mobile computer will restart. After system startup, tap the screen to enter calibration. OS upgrade complete Restart and enter Calibration Start to upgrade firmware! 100% Status : Firmware updated complete.
- Page 83 9200 Mobile Computer Reference Manual...
-
Page 84: Using 802.11 Radio
Chapter 4 USING 802.11 RADIO The Wi-Fi module integrated on the mobile computer lets you configure and connect to network wirelessly. IN THIS CHAPTER 4.1 Wi-Fi Power............... 70... -
Page 85: Wi-Fi Power
9200 Mobile Computer Reference Manual 4.1. WI-FI POWER The mobile computer is capable of Wi-Fi, a wireless networking technology making use of an access point, also known as “hotspot”, to connect to a wireless local area network. To use Wi-Fi, the mobile computer has to connect to a hotspot. Some hotspots are open for connection while others request a key to authenticate access. -
Page 86: Status Tabbed
Chapter 4 Using 802.11 Radio 4.1.2. STATUS TABBED PAGE The Status tabbed page provides basic information on WLAN connection and Bluetooth status. Wi-Fi settings can be configured in Configuration Tabbed Page. Wi-Fi status Bluetooth status (service not available now) Note: SCU does not currently support viewing or configuring Bluetooth settings. -
Page 87: Configuration Tabbed
9200 Mobile Computer Reference Manual 4.1.3. CONFIGURATION TABBED PAGE TURN ON/OFF WI-FI POWER Select the Wi-Fi checkbox to turn on Wi-Fi power. Deselect it to shut down Wi-Fi. Turn on Wi-Fi power Note: Wi-Fi connection status will be reflected under Wireless Manager, which can be accessed by tapping the Title bar | Wireless Manager icon, or Start Screen | Settings | Connections | Wireless Manager. - Page 88 Chapter 4 Using 802.11 Radio ACTIVE PROFILE A profile is a set of parameters that define the manner which a device associates to a wireless LAN (WLAN) infrastructure. A profile contains information including the System Set Identifier (SSID, the "name" of the WLAN infrastructure), means of data encryption, authentication type, and security credentials.
- Page 89 9200 Mobile Computer Reference Manual CREATE WI-FI PROFILE To create a Wi-Fi Profile: Open SCU as described in Launch SCU. Tap the Configuration tab to show the Configuration tabbed page. Tap Scan to view a list of access points that are broadcasting their SSIDs. You may sort the list by tapping the column headers.
- Page 90 Chapter 4 Using 802.11 Radio A profile settings page opens showing detailed radio settings. Tap each item and adjust its Value to suit your needs. When finished fine-tuning all settings, tap Commit to save the profile. Tap OK on the softkey bar to close Profile Settings page and return to Configuration settings.
- Page 91 9200 Mobile Computer Reference Manual MANAGE WI-FI PROFILE To manage your profiles: Open SCU’s Configuration tabbed page as described in Create Wi-Fi Profile. Tap Manage Profiles to open the Profile settings page. Item Description Profile When SCU is first launched, “Default”...
- Page 92 Chapter 4 Using 802.11 Radio Tap New and enter a unique name for the profile. Configure the Radio settings, Encryption, EAP Type, and other settings for this new profile. The name for each profile must be unique You can define up to 20 profiles Delete Select a profile from the drop-down menu and tap Delete.
- Page 93 9200 Mobile Computer Reference Manual Property Description Profile Name Tap to rename the selected profile. Up to 32 characters allowed. SSID Service Set Identifier (SSID) for the WLAN infrastructure to which the radio will connect. If no SSID is specified, the radio will only associate to an access point that broadcasts its SSID.
- Page 94 Chapter 4 Using 802.11 Radio throughput. It is recommended when AC power is in use. Maximum In Max Power Savings (Max PSP) mode, access point buffers incoming messages for the radio, which wakes periodically connects to the access point to see if any buffered messages are waiting.
- Page 95 9200 Mobile Computer Reference Manual A rates 6, 9, 12, 18, 24, 36, 48, and 54 only Mbps, plus N rates if supported. ABG rates All A rates and all B and G rates, with full A rates (the 802.11a radio) preferred, plus N if supported.
- Page 96 Chapter 4 Using 802.11 Radio Encryption CKIP CKIP is supported for use only with static WEP. For CKIP, encryption keys need to defined SCU; CKIP-EAP, encryption keys are derived dynamically from an EAP authentication. Authentication This is the protocol used to authenticate the device and its user if the WLAN uses the Enterprise version of Wi-Fi Protected Access (WPA) and WPA2.
- Page 97 9200 Mobile Computer Reference Manual EAP-TLS Credentials values for EAP-TLS and PEAP-TLS: User: Username or Domain/Username (up to 64 characters) User Cert: Filename and extension of user certificate residing in the PEAP-TLS Microsoft certificate store. See Certificates. CA Cert: Filename and extension...
- Page 98 Chapter 4 Using 802.11 Radio MANAGE GLOBAL SETTINGS Global settings include radio and security settings that apply to all profiles in SCU. To open the Global settings page: Open SCU’s Configuration tabbed page as described in Create Wi-Fi Profile. Tap Manage Profiles to open the Profile settings page. Tap the Globals tab to open the Global settings page.
- Page 99 9200 Mobile Computer Reference Manual Full All channels 1, 6, 11 The most commonly used 2.4 GHz channels 1, 7, 13 For ETSI and TELEC radios only Custom Indicates the system registry has been edited to include a value other than those...
- Page 100 Chapter 4 Using 802.11 Radio Changing this setting requires suspend/resume of the mobile computer to take effect. Auth Server Type of authentication server being used for EAP authentication. Value: Type 1 Cisco Secure ACS or another server that uses PEAPv1 for PEAP with EAP-MSCHAPV2 (PEAP-MSCHAP) Type 2 A different authentication server, such as...
- Page 101 9200 Mobile Computer Reference Manual Indicates whether or not an LED is used. Value: On, Off Default: Off Tray Icon Whether to enable the system tray icon or not. Value: On, Off Default: On Admin Password Auth Timeout (s) Specifies how long it will wait for an EAP authentication request to succeed or fail.
-
Page 102: Diagnostics Tabbed
Chapter 4 Using 802.11 Radio 4.1.4. DIAGNOSTICS TABBED PAGE Perform diagnostic tests to troubleshoot connection issues when necessary. To open the Diagnostics page: Open SCU as described in Launch SCU. Tap the Diagnostics tab to show the Diagnostics page. Diagnostics status for Wi-Fi and Bluetooth shows, along with on-screen buttons to open Advanced settings and view software version information. - Page 103 9200 Mobile Computer Reference Manual ADVANCED DIAGNOSTICS To access Advanced diagnostics settings: Open Diagnostics Tabbed Page. Tap the Advanced button to open advanced diagnostics settings. CHECK STATUS To check diagnostics status, select Status in the drop-down bar. Select Status to check...
- Page 104 Chapter 4 Using 802.11 Radio USE PING TOOLS To perform ping tests, select Ping Tools in the drop-down bar. Select Ping Tools to diagnose the connection Device IP address AP Name Item Description Destination Enter the address to ping. Ping Payload The amount of data to be transmitted on a ping.
- Page 105 9200 Mobile Computer Reference Manual Start Ping When an active ping is initiated, the screen displays a ping indicator that blinks in green (for a successful ping) or red (for an unsuccessful ping). The ping indicator is hidden when the screen is switched to a tab other than Diags or...
- Page 106 Chapter 4 Using 802.11 Radio (Re)connect Disable and enable the radio, apply or re-apply the current profile, attempt to associate and authenticate to the wireless network, and log all activity in the output area at the bottom.
- Page 107 9200 Mobile Computer Reference Manual USE DEBUG TOOLS To check debug settings, select Debug in the drop-down bar. Select Debug to check debug settings Item Description Driver Debug Select whether to debug the WLAN driver, and the output mode for driver debug.
- Page 108 Chapter 4 Using 802.11 Radio SOFTWARE VERSION INFORMATION To check software version information: Open Diagnostics Tabbed Page. Tap the About button to view information about SCU version, device driver, and software developer.
- Page 109 9200 Mobile Computer Reference Manual...
-
Page 110: Using Bluetooth
Chapter 5 USING BLUETOOTH The 9200 Mobile Computer lets you configure Bluetooth settings and manage Bluetooth services provided on remote devices. Bluetooth Profiles Supported Serial Port Profile (SPP) supports Server/Client Object Push Profile (OPP) supports Server/Client Dial-Up Networking Profile (DUN) -
Page 111: Bluetooth Power
9200 Mobile Computer Reference Manual 5.1. BLUETOOTH POWER 5.1.1. POWER ON BT VIA WIRELESS MANAGER Go to Start Screen | Wireless Manager as shown below. Tap All or Bluetooth to turn on the power. - Page 112 Chapter 5 Using Bluetooth To make the mobile computer discoverable to other Bluetooth devices, tap Menu | Bluetooth Settings | Mode tab, and check “Make this device visible to other devices”. Tap OK to confirm. The Bluetooth status becomes “Visible” under Wireless Manager, meaning Bluetooth is turned on and deployment is enabled.
-
Page 113: Search Devices
9200 Mobile Computer Reference Manual 5.2. SEARCH DEVICES In the Bluetooth configurations screen, on the Devices mode tab you can search for other Bluetooth device or go to Start Screen | Settings | Bluetooth for the same settings. Tap Add new device…or Add on the softkey bar to search for other Bluetooth... - Page 114 Chapter 5 Using Bluetooth Wait for a few seconds, and it will list the discovered devices. If you do not see the device that you wish to connect, make sure it is set as discoverable. Tap Refresh to search again.
-
Page 115: Pair Devices
9200 Mobile Computer Reference Manual 5.3. PAIR DEVICES 5.3.1. PAIR Select a device to connect and tap Next. If necessary, enter the password to establish a secure connection. Make sure a consistent password is entered on both devices. Tap Next. - Page 116 Chapter 5 Using Bluetooth The two devices become connected via Bluetooth. Tap Done. Once paired successfully, the device will appear in the device list. Tap it to view available Bluetooth services or modify its display name.
-
Page 117: Unpair
9200 Mobile Computer Reference Manual 5.3.2. UNPAIR On the Devices tab, tap and hold the desired device to select Delete from the pop-up menu. Note: The mobile computer must be unpaired on the remote device as well. Remove it from the device list on the remote device as well. (Both devices must be unpaired... -
Page 118: Serial Port Service
Chapter 5 Using Bluetooth 5.4. SERIAL PORT SERVICE On the Devices tab, tap and hold the desired device to select Edit from the pop-up menu. Make sure the Serial Port service is enabled for use on the remote Bluetooth device. For PC example, you can launch the Bluetooth Device configuration utility and in the Bluetooth Device configuration screen, tap COM Ports tab, tap Add as below. - Page 119 9200 Mobile Computer Reference Manual The searched COM port will be showed on the screen, select the connected COM port then tap OK. Note: On the PC, you can use applications such as HyperTerminal to confirm the connection between your PC and mobile computer. In HyperTerminal, the COM port No.
- Page 120 Chapter 5 Using Bluetooth On the COM Ports tab, tap New Outgoing Port. Select the remote device, and then tap Next.
- Page 121 9200 Mobile Computer Reference Manual Select a COM port, and then tap Finish. (For Bluetooth, please select COM0 or COM3 for connection. A new Bluetooth serial port is created. Tap OK. The mobile computer is ready to transmit data via Bluetooth.
-
Page 122: Object Push Via Beam
Chapter 5 Using Bluetooth 5.5. OBJECT PUSH VIA BEAM 5.5.1. SEND A FILE Tap Start Screen | File Explorer. Navigate to the folder containing the file you wish to send to the Bluetooth device. Tap and hold the file and select Beam file from the pop-up menu. Tap the remote device of interest to send the file via Bluetooth. -
Page 123: Receive A File
9200 Mobile Computer Reference Manual 5.5.2. RECEIVE A FILE Pair the mobile computer will the remote device as described in Pair Devices. Tap Start Screen | Settings | Connections | Beam, and make sure “Receive all incoming beams” is enabled in order to receive incoming files. -
Page 124: Activesync Via Bluetooth
Chapter 5 Using Bluetooth 5.6. ACTIVESYNC VIA BLUETOOTH To use Bluetooth via ActiveSync, first configure Bluetooth settings correctly on your computer first. Configure Bluetooth settings for your computer, such as “Turn discovery on” and add a COM port (incoming), the COM port value depending on your computer. Pair the mobile computer with the remote computer via Bluetooth as described in Pair Devices. - Page 125 9200 Mobile Computer Reference Manual After ActiveSync service is set on the remote computer, enable ActiveSync service on the mobile computer’s Bluetooth partnership settings. Tap Refresh if the option does not appear in the list. On the mobile computer, tap Start Screen | ActiveSync | Menu and select Connect via Bluetooth in the option menu.
-
Page 126: Using The Phone
Chapter 6 USING THE PHONE The 9200 Mobile Computer allows making phone calls and connecting to the network over General Packet Radio Service (GPRS). Insert the SIM card before turning on the power. Refer to Inserting SIM Card. Note: If the SIM card is not in position, you may make emergency calls if the service is supported. -
Page 127: Phone Power
9200 Mobile Computer Reference Manual 6.1. PHONE POWER 6.1.1. POWER ON PHONE VIA WIRELESS MANAGER Phone power is turned on by default. If not, go to Start Screen | Wireless Manager to access Wireless Manager. Wireless Manager Tap All or Phone to turn on the power. - Page 128 Chapter 6 Using the Phone When the power is turned on, the Phone status appears as “On”, and an antenna signal icon will be displayed on the title bar. Tap Menu | Phone Settings to configure related settings if necessary. Note: Phone Settings are only available when the phone power has been turned on.
-
Page 129: Sim Card Missing
9200 Mobile Computer Reference Manual 6.1.2. SIM CARD MISSING On the Home Screen, the notification icon on the title bar shows that the SIM card is missing. Tap Phone or press the [SEND] button on the physical keypad to access the phone application. -
Page 130: Phone Application
Chapter 6 Using the Phone 6.2. PHONE APPLICATION 6.2.1. PHONE INTERFACE After the phone application is launched, the antenna signal icon the title bar indicates whether you are connected to your service provider’s network. As the strength of the signal diminishes, so will the number of bars in the icon, which ranges from no signal to excellent signal (four-bars). -
Page 131: Buttons
9200 Mobile Computer Reference Manual 6.2.2. BUTTONS The phone keypad features the following buttons: Button Description [Backspace] button allows you to delete the last input. [Speed Dial] button allows you to view, edit the speed dial list and pick the number you want to call. - Page 132 Chapter 6 Using the Phone IN-CALL VOLUME During a call, you can adjust the in-call volume by tapping the speaker icon in the title bar drop-down list, or by pressing the volume buttons on the right side of the mobile computer.
-
Page 133: Phone Settings
9200 Mobile Computer Reference Manual 6.3. PHONE SETTINGS Menu | Options to configure phone settings if necessary. Sounds tab Tap the Sounds tab to adjust phone ring type, ring tone, and keypad sound. - Page 134 Chapter 6 Using the Phone Security tab Tap the Security tab to change SIM card security and PIN code setting. Note: The PIN verification on the mobile computer allows three chances to input the correct PIN code. If input fails three times, the SIM card will be locked, and you will need to obtain the PUK code from your network operator to unlock it Services tab Tap the Services tab to get phone service settings from your network operator.
- Page 135 9200 Mobile Computer Reference Manual Network tab Tap the Network tab to change phone network settings and edit your preferred networks. Others tab Tap the Others tab to configure GPRS authentication type, broadcast channels, and SMS transmission settings.
- Page 136 Chapter 6 Using the Phone Band tab Tap the Band tab to change the band type and the local band in your geographic region.
-
Page 137: Making Phone Calls
9200 Mobile Computer Reference Manual 6.4. MAKING PHONE CALLS The phone features allow you to make or receive phone calls and assign a Speed Dial number to a contact. “1” indicates the reserved Speed Dial number for the contact (or Voicemail) 6.4.1. -
Page 138: Make A Call
Chapter 6 Using the Phone 6.4.2. MAKE A CALL Dialling Out Tap the green [Talk] button on the phone keypad, or press [SEND] from the physical keypad. Hanging up Tap the red [End] button on the phone keypad, or press [END] from the physical keypad. -
Page 139: Answer A Call
9200 Mobile Computer Reference Manual During a Call During a call, you may select to turn on the speaker, mute the receiver, or hold the line by tapping the respective on-screen buttons. Alternatively you may place another call by the Add Call button, or open the Contacts application. - Page 140 Chapter 6 Using the Phone Ignoring a Call Tap Ignore button or press [END] from the physical keypad. Viewing a Missing Call When you have a missed call, will be displayed on the title bar. Tapping it will reveal a missed call icon .
- Page 141 9200 Mobile Computer Reference Manual On the Today Screen, an uppercase number “1” will appear next to the “Phone” label to indicate you have 1 missed call. Tap Notification on the softkey bar to view the notification message. When the notification message pops-up, tapping the icon on the softkey bar will open the Call History page, where you can check information about the missed call.
-
Page 142: Configuring Gprs Network
Chapter 6 Using the Phone 6.5. CONFIGURING GPRS NETWORK Tap Start Screen | Settings | Connections and select Connections. Initially, you have to configure the GPRS settings. Tap Add a new modem connection and follow the on-screen instructions to enter the connection name and modem types. - Page 143 9200 Mobile Computer Reference Manual Enter the connection name and select “Cellular Line (GPRS, 3G)” from the drop-down list. Tap Next. Specify the GPRS AP name for the mobile computer to connect to, for example, “internet”. Tap Next.
- Page 144 Chapter 6 Using the Phone Enter user name, password and domain information as necessary. Tap Advanced to access TCP/IP and server settings. When all settings are completed, tap Finish. Note: You must connect to the GPRS modem specified by the mobile phone operator. Performing hardware reset will not affect the wireless connection settings made under Wireless Manager.
- Page 145 9200 Mobile Computer Reference Manual...
-
Page 146: Using Reader Configuration Utility
Chapter 7 USING READER CONFIGURATION UTILITY The Reader Configuration utility allows you to manage the barcode reader integrated on the mobile computer. IN THIS CHAPTER 7.1 Launch Reader Configuration ........132 7.2 Configure Reader Settings ..........133... -
Page 147: Launch Reader Configuration
9200 Mobile Computer Reference Manual 7.1. LAUNCH READER CONFIGURATION Tap Start Screen | Settings | System | Reader Configuration to open the Reader Configuration Utility. Configure the associated reader settings and barcode settings on General tabbed page according to your needs. Perform a test scan and view the barcode and decoded data in the content field. -
Page 148: Configure Reader Settings
Chapter 7 Using Reader Configuration Utility 7.2. CONFIGURE READER SETTINGS The mobile computer is capable of reading printed barcodes. The reader modules can be either a CCD reader, laser (1D) reader, or 2D imager. The mobile computer is installed with Reader Configuration to set the scan engine built within. Use Reader Configuration to create a profile of settings that best suit your needs. - Page 149 9200 Mobile Computer Reference Manual CCD READER SETTINGS Barcode Reader Description CCD Reader Tap the Barcode Reader button to configure reader settings for the CCD scan engine. Refer to the Reader Settings Table in Appendix II - (SM1). Decode Session Timeout Sets the maximum time (configurable from 1 to 9 sec) for the decoding process during a scan attempt.
- Page 150 Chapter 7 Using Reader Configuration Utility Redundancy Level Sets how many successful readings should be done before linear barcodes such as Codabar, MSI, and Interleaved 2 of 5 can be decoded. Levels 1 to 4 available. The readings needed for each level are as follows: Level 1 The following barcodes must be successfully read twice before being decoded: Codavar, MSI, Industrial...
- Page 151 9200 Mobile Computer Reference Manual Redundancy Level Sets how many successful readings should be done before certain barcodes are decoded. Levels 1 to 4 available; default setting is Level 1. The readings needed for each level are as follows: Level 1...
-
Page 152: Rfid Reader
Chapter 7 Using Reader Configuration Utility 7.2.2. RFID READER When an RFID reader is detected, the RFID Reader option is available on General tab of the reader settings page. The RFID Reader check box is selected by default. Deselect it to disable the RFID reader on the mobile computer. This is occasionally needed when you only want to read printed barcodes, lest RFID tags are read and decoded. - Page 153 9200 Mobile Computer Reference Manual Display hex values Displays decoded data in hex values. Deselected Generally the readable RFID data lies in a user block. If the data to collect is located in a non-user block such as the lock block, select Display hex values in case the data to collect involves any invisible character.
-
Page 154: Mifare Key
Chapter 7 Using Reader Configuration Utility 7.2.3. MIFARE KEY MIFARE KEYS Mifare Keys setting changes the security keys A and/or B for a Mifare tag’s data block. Keys A and B are two keys that enable the RFID reader to access (read or write) a Mifare tag’s data block. - Page 155 9200 Mobile Computer Reference Manual To change the value of key A and/or B: Open Reader Configuration as described in Launch Reader Configuration Tap Mifare Keys on General tabbed page. Configure which key to change, how it is changed to, and the block to apply the change.
-
Page 156: Data Output
Chapter 7 Using Reader Configuration Utility 7.2.4. DATA OUTPUT Tap the Data Output button on the General tabbed page to access settings for data output after decoding as well as configure the associated settings. To access data output settings: Open Reader Configuration as described in Launch Reader Configuration. - Page 157 Call Windows API (ReadMsgQueue) in your application to retrieve the decoded data. Note: Refer to 9200 .NET or C/C++ Programming Guide for details on Windows Message and Windows Event. Sample programs are provided by request. For the use with a barcode decoding program other than ReaderConfig.exe, a dynamic-link library (DLL) file is provided.
-
Page 158: Notifications
Chapter 7 Using Reader Configuration Utility 7.2.5. NOTIFICATIONS The Notifications page allows you to configure how you want to be notified of a successful decoding. To access notification settings: Open Reader Configuration as described in Launch Reader Configuration. Tap Notifications on General tabbed page. Sound / Vibration Default Good Read via... -
Page 159: Reset To Default
9200 Mobile Computer Reference Manual 7.2.6. RESET TO DEFAULT Tap Restore Default on the reader settings page to reset all settings back to default. 7.2.7. AUTO-START READER CONFIGURATION If you would like to auto-start the Reader Configuration application next time the mobile computer is powered on, select the “Auto start when powered on”... -
Page 160: Symbology Settings
Chapter 7 Using Reader Configuration Utility 7.2.8. SYMBOLOGY SETTINGS On the Symbologies tab, determine whether to enable or disable a specific symbology. Note: The symbology settings vary by the scan engine (CCD, 1D laser or 2D imager) installed. Open Reader Configuration as described in Launch Reader Configuration. -
Page 161: About
9200 Mobile Computer Reference Manual 7.2.9. ABOUT This tabbed page delivers the software version, developer info, and copyright information. Open Reader Configuration as described in Launch Reader Configuration. Tap About tabbed page. -
Page 162: Using Camera
Chapter 8 USING CAMERA The Camera utility allows taking still images or videos from the built-in digital camera. Tap Start Screen | Camera to open the Camera utility. IN THIS CHAPTER 8.1 Camera Interface ............148 8.2 Taking a Picture ............149 8.3 Shooting a Video............151 8.4 Camera Settings ............153 8.5 Pictures &... -
Page 163: Camera Interface
9200 Mobile Computer Reference Manual 8.1. CAMERA INTERFACE The Camera application supports still image capturing and video recording. Still mode Video mode The icons on top of the screen indicate camera status and image properties. Icon Description In Still mode: number of pictures that can be taken. -
Page 164: Taking A Picture
Chapter 8 Using Camera 8.2. TAKING A PICTURE When launched, the camera is set to Still mode by default for picture taking, and a preview screen is displayed. Aim at the object you want to shoot. Drag the slider to zoom in (+) or zoom out (-) an image. - Page 165 9200 Mobile Computer Reference Manual Before the camera utility jumps back to the preview screen, you may tap the advanced buttons at the bottom of the review screen, which will be retained for about five seconds. to delete the image file.
-
Page 166: Shooting A Video
Chapter 8 Using Camera 8.3. SHOOTING A VIDEO When switching to Video mode, a preview screen will be displayed. Hold still and take aim at the object you want to shoot Available recording time Press [Scan] or [Enter] on the physical keypad to start recording a video. Remaining recording time... - Page 167 9200 Mobile Computer Reference Manual Press [Scan] or [Enter] on the physical keypad to end recording. Otherwise, it will stop automatically after reaching the time limit. Refer to Advanced Settings. to delete the image file. to send the picture via text message or e-mail.
-
Page 168: Camera Settings
Chapter 8 Using Camera 8.4. CAMERA SETTINGS On the softkey bar, tap the button to configure camera settings if necessary. Brightness, Contrast, Sharpness Adjusts brightness, contrast, and sharpness for the picture to take. Mode Sets a scene mode for the picture to take. By default, no special mode is applied. Options are: Icon Description... - Page 169 9200 Mobile Computer Reference Manual GPS tagging Enables/disables GPS tagging for the picture to take. Options are: Enable, Disable Quality Sets quality for the picture to take. Options are: High, Medium Size Select the image size for the picture to take. Options are:...
-
Page 170: Pictures & Videos
Chapter 8 Using Camera 8.5. PICTURES & VIDEOS Tap Start Screen | Pictures & Videos to open the default image folder \My Device\My Documents\My Pictures. 8.5.1. VIEW AN IMAGE Locate the target folder and the desired picture. The subfolders are named with the date YYMMDD (2-digit year, 2-digit month and 2-digit date) which images were taken. - Page 171 9200 Mobile Computer Reference Manual Select a desired picture and tap View at the bottom of the screen. Tap Menu on the softkey bar to set the picture as background, start a slide show, beam pictures, edit or rotate pictures, etc. Refer to Advanced Settings.
-
Page 172: Playback A Video
Chapter 8 Using Camera 8.5.2. PLAYBACK A VIDEO Locate the target folder and the desired videos. The subfolders are named with the date YYMMDD (2-digit year, 2-digit month and 2-digit date) when videos were recorded. Subfolders in date format Select a desired video and tap Play on the softkey bar.. Tap Menu on the softkey bar to edit, send or beam videos, etc. -
Page 173: Advanced Settings
9200 Mobile Computer Reference Manual 8.5.3. ADVANCED SETTINGS Under My Pictures or My Video screen, tap Menu | Tools | Options to open advanced settings. General tab When sending a picture by e-mail, it can be resized in favor of the transfer speed. You may tap the drop-down list to select a desired picture size if necessary. - Page 174 Chapter 8 Using Camera Slide Show tab By default, slide shows are played in Portrait view. You may change to use landscape view instead to make pictures properly fit the screen. If you select “Play screensaver when connected to my PC and idle for 2minutes”, pictures stored in the default image folder “\My Device\My Documents\My Pictures”...
- Page 175 9200 Mobile Computer Reference Manual Video tab While recording a video, audio sound will be included. You may disable the check box or set a time limit for videos so that the file size can be reduced. Tap [OK] to save the current settings and return to the previous window.
-
Page 176: More Applications
Chapter 9 MORE APPLICATIONS This chapter introduces manufacturer-developed applications that are preinstalled on the mobile computer to strengthen system management and make the mobile computer more competent. IN THIS CHAPTER 9.1 GPS Receiver............162 9.2 Button Assignment ............163 9.3 Mobile Ghost ............166 9.4 Time Sync Utility............170 9.5 Signature Utility............172... -
Page 177: Gps Receiver
Reference Manual 9.1. GPS RECEIVER The 9200 Mobile Computer is equipped with a GPS antenna for obtaining location and time information from the Global Positioning System (GPS). Since the mobile computer does not come with any preinstalled navigation software, you may need to purchase third-party navigation software separately. -
Page 178: Button Assignment
Chapter 9 More Applications 9.2. BUTTON ASSIGNMENT Use Button Assignment to re-define the functions of physical keys to have them trigger different functions. For instance, you can assign a key to simulate another key’s behaviour, to launch a specific program, or to deliver effects of a specific key code. Reassignable keys include: Side triggers (Left and right scan keys) Application key (App Key) - Page 179 9200 Mobile Computer Reference Manual Tap the label of the key you wish to reassign. Available options include: Default: Recovers the default settings. Assign a key: Defines a certain key to act as another key. Select the desired function in the drop-down list. Options...
-
Page 180: Reset Physical Keys To Default
Chapter 9 More Applications Fn+ESC(0xF5) F13~24 Home(VK_LWIN+VK_APP) Launch a program: Defines a key to quick-launch an application. Use the Browse button to select an executable file to open after pressing the key, or manually enter the path of the desired file. User-defined key code: Allows users to change the key function as desired by entering the hex value of the target key. -
Page 181: Mobile Ghost
To open the Mobile Ghost, tap Start Screen | CipherLab Utilities | Mobile Ghost. Two screen options show for creating a backup image, or restoring a previously created one. -
Page 182: Create Backup Image
Insert a microSD card into the SD card slot as described in Using Memory Card. Open Mobile Ghost by tapping Start Screen | CipherLab Utilities | Mobile Ghost. Check Create backup image and tap OK. A warning message shows notifying that... -
Page 183: Restore Backup Image
9200 Mobile Computer Reference Manual 9.3.2. RESTORE BACKUP IMAGE Restoring a backup image will change system settings back to the conditions when the backup image was created. To restore a backup image which was previously created, make sure the microSD card containing the desired backup image is inserted on the mobile computer. - Page 184 Chapter 9 More Applications Device storage begins formatting. Once completed, restoration starts using the selected backup image. When restoration is completed, the mobile computer will restart with system registry and settings of the selected backup image applied.
-
Page 185: Time Sync Utility
9200 Mobile Computer Reference Manual 9.4. TIME SYNC UTILITY Use this to sync system time with a server, either via wireless connection to an NTP server or via GPS signal detection. To synchronize system time on the mobile computer: Open time sync utility by tapping Start Screen | Settings | System | TimeSync. - Page 186 Chapter 9 More Applications To sync time via GPS signal, open GPS tab and tap Sync Time. The mobile computer will start to detect available GPS signals and identify the correct time. Satellite count and time results will appear in the content field below. Note: To sync time via GPS signal, make sure your mobile computer is located in an open area with a clear view of the sky, and the GPS software port is correctly set under...
-
Page 187: Signature Utility
9200 Mobile Computer Reference Manual 9.5. SIGNATURE UTILITY Signature utility captures, views, and edits signature files stored on the mobile computer. Signature utility is provided in two file formats, .cab and .exe, on the CD-ROM shipped along with the mobile computer. Install the application on the mobile computer according to your needs. - Page 188 Chapter 9 More Applications Signature utility is installed on the mobile computer’s Start Screen.
- Page 189 9200 Mobile Computer Reference Manual .EXE FILE INSTALLATION Insert the product CD into the CD-ROM drive on your PC. Connect the mobile computer with your PC via ActiveSync. On your PC, double-click the .exe file to start the installation. An installation...
- Page 190 Chapter 9 More Applications Signature utility is installed on the mobile computer’s Start Screen..
-
Page 191: Capturing A Signature
9200 Mobile Computer Reference Manual 9.5.1. CAPTURING A SIGNATURE After installing Signature utility on your mobile computer, open the application from Start Screen | Signature. The application opens showing a toolbar and a signing area. Toolbar Signing area Toolbar functions include:... - Page 192 Chapter 9 More Applications Use the stylus to sign your signature in the signing area. to clear the signature and sign a new one if necessary. to save the signature as an image file. Tap OK to exit the program.
-
Page 193: Viewing A Signature
9200 Mobile Computer Reference Manual 9.5.2. VIEWING A SIGNATURE To view a signature image, tap on the menu bar and select an image to load. The image will be displayed along with a message asking whether you would like to modify the picture. -
Page 194: Changing Signature Settings
Chapter 9 More Applications 9.5.3. CHANGING SIGNATURE SETTINGS to configure signature settings if necessary Pen Width tab: Set the pen width (1-5 pixels) for signing. The default pen width is 1. Pen Colors tab: Set the pen color using the available colors, or enter a new color in RGB value (0-255). - Page 195 9200 Mobile Computer Reference Manual After done configuring signature settings, tap OK on the softkey bar to save the changes.
-
Page 196: Specifications
SPECIFICATIONS PLATFORM, PROCESSOR & MEMORY Operating System & CPU Windows Version Microsoft Windows Embedded Handheld 6.5 Qualcomm MSM7225-1 at 528 MHz Memory 512 MB NAND flash memory 256 MB DDR SDRAM Expansion Slot One microSD card slot (256MB to 4GB) SDHC supported (4GB to 32 GB) COMMUNICATION &... -
Page 197: Electrical Characteristics
9200 Mobile Computer Reference Manual ELECTRICAL CHARACTERISTICS Batteries Main Battery Pack Rechargeable Li-ion battery – 3.7 V, 3300 mAh Power Adaptor Power Supply Cord with Input AC 100~240 V, 50/60 Hz Universal Power Adaptor Output DC 5 V, 4 A Working Time (Laser, testing cycle = 20 seconds) Conditions include: scanning complete within one second, backlight on during scanning. -
Page 198: Environmental Characteristics
Software Development Kit Microsoft SDK System API (DLL) for system configuration Reader API (DLL) for reader configuration Software & Utilities Reader Configuration CipherLab Software Package Signature AppLock MIRROR Browser for web application Terminal Emulation SOTI MobiControl for remote device control Third-party Software Naurtech CETerm –... -
Page 199: Accessories
9200 Mobile Computer Reference Manual ACCESSORIES Accessory Options LCD Protective Film Snap-on Charging & Communication Cable (USB or RS-232) Charging & Communication Cradle...
Need help?
Do you have a question about the 9200 and is the answer not in the manual?
Questions and answers