Vega VEGABAR 53 Operating Instructions Manual
Pressure transmitter
Hide thumbs
Also See for VEGABAR 53:
- Product information (32 pages) ,
- Operating instructions manual (72 pages) ,
- Operating instructions manual (72 pages)
Table of Contents
Advertisement
Advertisement
Table of Contents

Subscribe to Our Youtube Channel
Related Manuals for Vega VEGABAR 53


Summary of Contents for Vega VEGABAR 53
-
Page 1: Operating Instructions
Operating Instructions VEGABAR 53 Profibus PA... -
Page 2: Table Of Contents
Menu schematic ..... . . Saving the parameter adjustment data ..VEGABAR 53 - Profibus PA... - Page 3 10.5 Industrial property rights....Supplementary operating instructions manuals Information: VEGABAR 53 is available in different versions and is supplied order-specifically. Depending on the selected version, sup- plementary operating instructions manuals come with the shipment.
-
Page 4: About This Document
1 About this document 1.1 Function This operating instructions manual has all the information you need for quick setup and safe operation of VEGABAR 53. Please read this manual before you start setup. 1.2 Target group This operating instructions manual is directed to trained personnel. -
Page 5: For Your Safety
2.2 Appropriate use VEGABAR 53 is a pressure transmitter for measurement of gauge pressure, absolute pressure and vacuum. 2.3 Warning about misuse Inappropriate or incorrect use of the instrument can give rise to application-specific hazards, e.g. -
Page 6: Safety Information For Ex Areas
The environment man- agement system is certified acc. to DIN EN ISO 14001. Please help us fulfil this obligation by observing the environ- mental instructions in this manual: Chapter "Storage and transport" Chapter "Disposal" VEGABAR 53 - Profibus PA... -
Page 7: Product Description
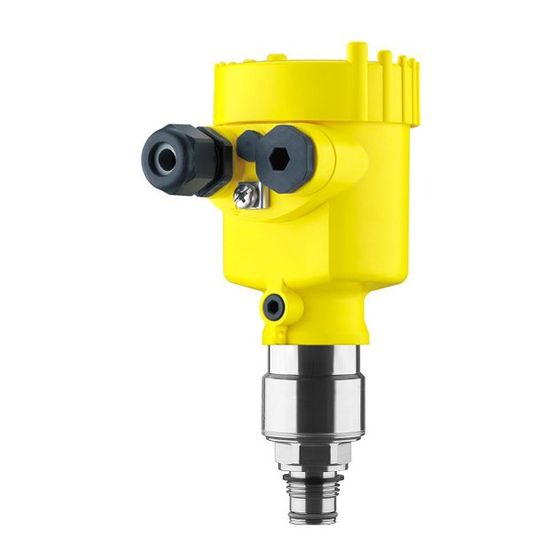
Housing cover, optionally available with indicating and adjustment module PLICSCOM The components are available in different versions. Fig. 1: Example of a VEGABAR 53 with manometer connection G½A acc. to EN 837 and plastic housing Housing cover with integrated PLICSCOM (optional) Housing with electronics Process fitting with measuring cell... -
Page 8: Principle Of Operation
Description) is also required to enable the full range of sensor functions (also available as a download).A CD with the appropriate files can be ordered via e-mail under info@de. vega.com or by phone from one of the VEGA agencies under the order number "DRIVER.S". 3.3 Adjustment VEGABAR 53 can be adjusted with three different adjustment... -
Page 9: Storage And Transport
"Oxygen! Use no Oil". Remove this foil just before mounting the instrument! Storage and transport temperature see "Supplement – Storage and transport tem- perature Technical data – Ambient conditions" Relative humidity 20 … 85 % VEGABAR 53 - Profibus PA... -
Page 10: Mounting
Use the recommended cable (see chapter "Connecting to Moisture power supply") and tighten the cable gland. You can give your VEGABAR 53 additional protection against moisture penetration by leading the connection cable down- ward in front of the cable entry. Rain and condensation water can thus drain off. -
Page 11: Mounting Information
We recommend using lock fittings, measuring instrument holders and siphons from the line of VEGA accessories. 4.3 Mounting procedure To mount VEGABAR 53, a welded socket is necessary. Use Welding the socket components from the line of VEGA mounting accessories: Welded socket G1B front flush, max. - Page 12 Mounting Warning: The housing must not be used to screw the instrument in! Applying tightening force to the housing can damage its internal mechanical components. VEGABAR 53 - Profibus PA...
-
Page 13: Connecting To Power Supply
The exact range is stated in the "Technical data" in the "Supplement". VEGABAR 53 is connected with screened cable acc. to the Selecting the connection ca- Profibus specification. Power supply and digital bus signal are carried over the same two-wire connection cable. -
Page 14: Connection Procedure
5 Insert the cable into the sensor through the cable entry 6 Lift the opening levers of the terminals with a screwdriver (see following illustration) 7 Insert the wire ends into the open terminals according to the wiring plan VEGABAR 53 - Profibus PA... -
Page 15: Wiring Plans, Single Chamber Housing
12 Screw the housing cover back on The electrical connection is finished. 5.3 Wiring plans, single chamber housing The following illustrations apply to the non-Ex as well as to the Ex ia version. VEGABAR 53 - Profibus PA... - Page 16 Fig. 5: Electronics and connection compartment, single chamber housing Plug connector for VEGACONNECT (I²C interface) Spring-loaded terminals for connection of the external indication VEGADIS Ground terminal for connection of the cable screen Spring-loaded terminals for power supply VEGABAR 53 - Profibus PA...
-
Page 17: Wiring Plans, Double Chamber Housing
Blind stopper or plug M12x1 for VEGADIS 61 (option) Housing cover, electronics compartment Filter element for pressure compensation or blind stopper with version IP 66/ IP 68, 1 bar Cable entry or plug Version IP 66/IP 68, 1 bar not with four-wire instruments VEGABAR 53 - Profibus PA... - Page 18 Terminals for VEGADIS 61 Connection compartment I 2 C Fig. 9: Connection compartment, double chamber housing Plug connector for VEGACONNECT (I²C interface) Ground terminal for connection of the cable screen Spring-loaded terminals for power supply VEGABAR 53 - Profibus PA...
-
Page 19: Wiring Plans, Version Ip 66/Ip 68 (1 Bar)
(+) and bl (–) for power supply or to the processing system Screen 5.6 Switch on phase After VEGABAR 53 is connected to power supply, the Switch on phase instrument carries out a self-test for approx. 30 seconds. The... -
Page 20: Setup With The Indicating And Adjustment Module Plicscom
4 Screw housing cover with inspection window tightly back Removal is carried out in reverse order. PLICSCOM is powered by the sensor, an additional con- nection is not necessary. VEGABAR 53 - Profibus PA... - Page 21 Setup with the indicating and adjustment module PLICSCOM Fig. 12: Installation of PLICSCOM Note: If you intend to retrofit VEGABAR 53 with a PLICSCOM for continuous measured value indication, a higher cover with an inspection glass is required. VEGABAR 53 - Profibus PA...
-
Page 22: Adjustment System
The functions of the individual keys are shown in the above illustration. Approx. 10 minutes after the last pressing of a key, an automatic reset to measured value indication is triggered. Any values not confirmed with [OK] will not be saved. VEGABAR 53 - Profibus PA... -
Page 23: Setup Procedure
find a detailed description in the operating instructions manual of PLICSCOM or in the online help of PACTware™ or DTM. VEGABAR 53 can be used for process pressure as well as for Process pressure or level measurement level measurement. Default setting is process pressure measurement. - Page 24 2 Set the requested offset value, e.g. the actual measured value with reciprocal sign with [–>] and [+]. 3 Confirm with [OK] and move to min. (zero) adjustment with Selection options: mbar, bar, psi, Pa, kPa, MPa, inHg, mmHg, inH VEGABAR 53 - Profibus PA...
- Page 25 (in the above example 1.0 bar = 1000 mbar). 2 Set the requested mbar value with [–>] and [OK]. 3 Confirm with [OK] and move to the menu overview with [ESC]. The span adjustment is finished. VEGABAR 53 - Profibus PA...
- Page 26 [ESC] or the displayed limit value can be accepted with [OK]. The setup of VEGABAR 53 for process pressure measure- ment is finished. All other menu items are described in the separate operating instructions manual of the indicating and adjustment module PLICSCOM.
- Page 27 Setup with the indicating and adjustment module PLICSCOM VEGABAR 53 is preset to application "Process pressure Select application "Level measurement" measurement". Proceed as follows when switching over to application "Level measurement": 1 Push the [OK] button in the measured value display, the menu overview is displayed.
- Page 28 The adjustment unit is now changed from bar to m. Proceed as follows: Carry out position correction 1 Edit the offset value in the menu item "Position correction" with [OK]. Position correction Offset = +0000.0 mbar 53.0 mbar VEGABAR 53 - Profibus PA...
- Page 29 Information: The displayed pressure for 100 % corresponds to the nominal measuring range of the sensor (in the above example 1.0 bar = 1000 mbar). 2 Set the requested % value with [–>] and [OK]. VEGABAR 53 - Profibus PA...
- Page 30 [ESC] or the displayed limit value can be accepted with [OK]. The setup of VEGABAR 53 is finished. All other menu items are described in the separate operating instructions manual of the indicating and adjustment module PLICSCOM.
-
Page 31: Menu Schematic
Span Linearization curve Channel Damping 100.00 % Linear PV (lin.perc.) 1000 mbar 53 mbar Sensor-TAG Sensor Display Basic adjustment ▶ Display Diagnostics Service Info Displayed value PA-Out Diagnostics Basic adjustment Display ▶ Diagnostics Service Info VEGABAR 53 - Profibus PA... - Page 32 Basic adjustment Display Diagnostics Service ▶ Info Sensor type Date of manufacture Date of last change using PC Sensor details VEGABAR 5x 27. Sept. 2004 Software version Display now? Serial number 3.xx.xx 27. Sept. 2004 12345678 VEGABAR 53 - Profibus PA...
-
Page 33: Saving The Parameter Adjustment Data
They are hence available for multiple use or service purposes. If VEGABAR 53 is equipped with an indicating and adjustment module PLICSCOM, the most important data can be read out of the sensor into PLICSCOM. The procedure is described in the operating instructions manual "Indicating and adjustment... -
Page 34: Setup With Pactware™ And Other Adjustment Programs
A detailed description is available in the online help of PACTware™ and the VEGA-DTMs. Note: Keep in mind that for setup of VEGABAR 53, DTM-Collection 10/2003 or a newer version must be used. VEGABAR 53 - Profibus PA... -
Page 35: Parameter Adjustment With Pdm
All currently available VEGA-DTMs are provided in the DTM Collection on CD and can be obtained from the responsible VEGA agency for a token fee. This CD includes also the up-to- date PACTware™ version. The basic version of this DTM Collection incl. -
Page 36: Maintenance And Fault Rectification
Maintenance and fault rectification 8 Maintenance and fault rectification 8.1 Maintenance When used as directed in normal operation, VEGABAR 53 is completely maintenance-free. 8.2 Fault rectification VEGABAR 53 offers maximum reliability. Nevertheless faults Causes of malfunction can occur during operation. These may be caused by the following, e.g.:... - Page 37 In Ex applications, the regulations for the wiring of intrinsically safe circuits must be observed. E013 Error messages via PLICSCOM no measured value available à return instrument for repair Fault message can come up if the pressure is higher than the nominal range VEGABAR 53 - Profibus PA...
-
Page 38: Exchanging The Electronics
à Repair 8.3 Exchanging the electronics The electronics of VEGABAR 53 consists of the measuring cell electronics and the processing electronics. The measuring cell electronics in the process fitting is not accessible to the user. The processing electronics is in the form of a module in the housing. -
Page 39: Instrument Repair
Maintenance and fault rectification without serial number includes no order-specific data. The serial number can be found on the type label of VEGABAR 53 or on the delivery note. In both cases, the function of VEGABAR 53 is ensured. 8.4 Instrument repair... -
Page 40: Dismounting
Take note of chapters "Mounting" and "Connecting to power supply" and carry out the listed steps in reverse order. 9.2 Disposal VEGABAR 53 consists of materials which can be recycled by specialised recycling companies. We have purposely de- signed the electronic modules to be easily separable. Mark the instrument as scrap and dispose of it according to national government regulations (e.g. -
Page 41: Supplement
For meas. ranges up to 16 bar, FDA-listed for food processing industry. For meas. ranges from 25 bar dry meas. cell. Generally for oxygen applications, not with vacuum meas. ranges, not with absolute meas. range < 1 bar VEGABAR 53 - Profibus PA... - Page 42 860 … 1060 mbar (86 … 106 kPa/ 12.5 … 15.4 psi) Determination of characteristics limit point adjustment acc. to DIN 16086 Characteristic Linear Calibration position upright, diaphragm points downward Influence of the installation position depending on the isolating diaphragm version VEGABAR 53 - Profibus PA...
- Page 43 -10 … +70°C (14 … +158°F) Relating to the nominal range, incl. hysteresis and repeatability, determined acc. to the limit point method. Relating to the adjusted span, incl. hysteresis and reproducibility. Acc. to IEC 60770-1 relating to the nominal range. VEGABAR 53 - Profibus PA...
- Page 44 Vibration resistance mechanical vibrations with 4 g and 5 … 100 Hz up to +60°C (+140°F). Version for oxygen applications up to +60°C (+140°F). Tested acc. to the regulations of German Lloyd, GL directive 2 VEGABAR 53 - Profibus PA...
- Page 45 Electromechanical data – version IP 66/IP 68, 1 bar Version IP 66/IP 68, 1 bar is only available for instruments with absolute pressure measuring ranges. Depending on the version M12x1, acc. to DIN 43650, Harting, Amphenol- Tuchel, 7/8" FF VEGABAR 53 - Profibus PA...
- Page 46 (I²C bus) Indication LC display in full dot matrix Adjustment elements 4 keys Protection - unassembled IP 20 - mounted into the sensor without IP 40 cover Materials - Housing - Inspection window Polyester foil VEGABAR 53 - Profibus PA...
- Page 47 Instruments with gauge measuring ranges can no longer detect the ambient pressure when being submerged, e.g. in water. This can falsify the meas- ured value. Deviating data with Ex applications: see separate safety instructions. Depending on order specification. VEGABAR 53 - Profibus PA...
-
Page 48: Information On Profibus Pa
GSD file, PNO provides also a general so-called profile-specific GSD file. For VEGABAR 53 you have to use the general GSD file PA139701.GSD. If the general GSD file is used, the sensor must be set to the profile-specific ident number via the DTM software. - Page 49 Target Source for Scaling Alarms Damping mode Mode scaling PA-Out Select additional cyclic value Fig. 15: VEGABAR 53: Block diagram with AI (PA-OUT) value and additional cyclical value Sensor characteristics PROFIBUS PA-output Failure Target Source for Scaling Alarms Damping mode...
- Page 50 Status Temperature Status Value PA-OUT Additional Cyclic (FB1) (FB2) (FB2) (FB1) Value Fig. 17: Telegram configuration example 1 Example 2 with pressure value and temperature value without additional cyclical value: AI (PA-OUT) Temperature Free Place VEGABAR 53 - Profibus PA...
- Page 51 -10 -11 -12 -13 -14 -15 -16 -17 -18 -19 -20 -21 -22 -23 Sign Significant Significant Exponent Significant (Exponent - 127) Value = (-1) (1 + Significant) Fig. 21: Data format of the measured value VEGABAR 53 - Profibus PA...
- Page 52 (non-cascade) – active ad- Hi-Alarm visory alarm – high limited 0x8d good (non-cascade) – active crit- Lo-Lo-Alarm ical alarm – low limited 0x8e good (non-cascade) – active crit- Hi-Hi-Alarm ical alarm – high limited VEGABAR 53 - Profibus PA...
-
Page 53: Dimensions
M20x1,5 M20x1,5/ ½ NPT Fig. 23: Housing versions in protection IP 66/IP 68, 1 bar (with integrated PLICSCOM the housing height increases by 9 mm/0.35 in) Stainless steel housing Aluminium double chamber housing Aluminium housing VEGABAR 53 - Profibus PA... - Page 54 ¼“NPT ") Fig. 24: VEGABAR 53 GV = G 1/2A manometer connection, GF = G 1/2A flush, GC = G 1A flush, GE = G 1A flush up to 150°C acc. to. EHEDG, GN = 1/2 NPT VEGABAR 53 - Profibus PA...
- Page 55 Supplement VEGABAR 53, hygienic fitting ø64mm ø78mm ") ") Fig. 25: VEGABAR 53 CA = Tri-Clamp 2", LA = hygienic fitting with compression nut VEGABAR 53 - Profibus PA...
-
Page 56: Certificate
Supplement 10.4 Certificate CE declaration of conformity Fig. 26: CE declaration of conformity VEGABAR 53 - Profibus PA... - Page 57 Supplement Manufacturer declaration Fig. 27: Manufacturer declaration VEGABAR 53 - Profibus PA...
-
Page 58: Industrial Property Rights
Supplement 10.5 Industrial property rights VEGABAR 53 - Profibus PA... - Page 59 Supplement VEGABAR 53 - Profibus PA...
- Page 60 All statements concerning scope of delivery, application, practical use and operating conditions of the sensors and processing systems correspond to the information avail- able at the time of printing. © VEGA Grieshaber KG, Schiltach/Germany 2005 Technical data subject to alterations 28250-EN-051004...
Need help?
Do you have a question about the VEGABAR 53 and is the answer not in the manual?
Questions and answers