Table of Contents
Advertisement
Quick Links
fi-7600/fi-7700/fi-7700S
Operator's Guide
Thank you for purchasing our image scanner.
This manual explains about the basic operations and handling of the scanner.
For information on scanner installation and connection, refer to the Quick Installation Sheet.
P3PC-6092-01ENZ0
Explains the names and functions of parts
and basic scanner operation.
Explains how to load documents on the
scanner.
Explains how to use the operator panel.
Explains about various ways of scanning.
Explains how to clean the scanner.
Explains how to how to replace the
consumables.
Explains about troubleshooting.
Explains how to configure settings in the
Software Operation Panel.
How to Use This Manual
TOP
Contents
Index
Introduction
Scanner
Overview
How to Load
Documents
How to Use the
Operator Panel
Various Ways to
Scan
Daily Care
Replacing the
Consumables
Troubleshooting
Operational
Settings
Appendix
Glossary
Advertisement
Table of Contents
Troubleshooting

Related Manuals for Fujitsu FI-7600


Summary of Contents for Fujitsu FI-7600
- Page 1 P3PC-6092-01ENZ0 Contents Index fi-7600/fi-7700/fi-7700S Introduction Explains the names and functions of parts Scanner and basic scanner operation. Overview Operator's Guide Explains how to load documents on the How to Load scanner. Documents Explains how to use the operator panel. How to Use the Thank you for purchasing our image scanner.
-
Page 2: How To Use This Manual
How to Use This Manual Contents How to Use This Manual Index Introduction Scanner The following shows the tips for using this manual. - Contents Page Overview ® ® To display or print this manual, either Adobe Acrobat (7.0 or later) ®... -
Page 3: Introduction
Scanning speed (*2) Make sure to read this manual before Daily Care using the scanner. Flatbed (*1) The PDF version is included in the Setup fi-7600 ADF: Simplex 100 ppm DVD-ROM. ADF: Duplex 200 ipm Replacing the Quick Installation Sheet... - Page 4 Introduction Contents Trademarks Manual Description Index Microsoft, Windows, Windows Server, Excel, and SharePoint Error Recovery Guide Details the status of the scanner and Introduction (HTML Help) explains how to resolve problems are either registered trademarks or trademarks of Microsoft encountered. Corporation in the United States and/or other countries.
-
Page 5: Conventions
Conventions Contents Conventions Index Introduction Scanner Safety Information Abbreviations Used in This Manual Overview The attached "Safety Precautions" manual contains important The operating systems and products in this manual are information about the safe and correct use of this product. indicated as follows. - Page 6 Conventions Contents Arrow Symbols in This Manual Name Indication Index Right-arrow symbols () are used to separate icons or menu ® Windows 10 Windows 10 Home (32-bit/64-bit) Introduction (*1) options you should select in succession. ® Windows 10 Pro (32-bit/64-bit) Example: Click [Start] menu ...
-
Page 7: Table Of Contents
Chapter 1 Scanner Overview ........................14 Main Features ................................15 How to Use the Parts and Functions ..............................17 Operator Panel fi-7600 .................................... 17 fi-7700/fi-7700S ................................19 Various Ways to Scan Common Parts for All Models............................21 Turning the Power ON/OFF ............................23 How to Turn the Power ON ............................ - Page 8 Contents Contents 1.11 Bundled Software ............................... 35 Index Overview of the Bundled Software ..........................35 Introduction System Requirements ..............................36 Installing the Bundled Software............................37 Scanner Overview Chapter 2 How to Load Documents ......................39 Loading Documents in the ADF ..........................40 How to Load Preparation..................................
- Page 9 Contents Contents Settings Menu ................................62 Index How to Use Settings Menu............................. 63 Introduction Items Configurable in the Settings Menu ........................72 Function Selection ..............................80 Scanner How to Use the Function Selection ..........................80 Overview Item Configurable in Function Selection......................... 81 How to Load Chapter 4 Various Ways to Scan .........................
- Page 10 Contents Contents Cleaning the Outside ..............................105 Index fi-7600 ..................................105 Introduction fi-7700/fi-7700S ................................105 Cleaning the Inside ..............................106 Scanner Cleaning the ADF (with Cleaning Paper) ........................106 Overview Cleaning the ADF (with Cloth) ............................107 Cleaning the Flatbed [fi-7700/fi-7700S]........................111...
- Page 11 Contents Contents Situation in which the document is not fed into the ADF occurs frequently..............146 Index Paper protection is set off frequently..........................147 Introduction Paper jams/pick errors occur frequently........................148 Scanned images turn out elongated..........................149 Scanner A shadow appears at the top or the bottom of the scanned image................150 Overview There are black traces on the document.
- Page 12 Contents Contents Settings Related to Scanning ........................... 178 Index Adjusting the Position to Start the Scan [Offset Setting/Vertical magnification Adjustment] ........178 Introduction Removing Shadows/Streaks that Appear around the Scanned Image [Page Edge Filler (ADF)]/[Page Edge Filler (FB)] (fi-7700/fi-7700S) ................ 180 Scanner Removing a Color from the Scanned Image [Dropout color]..................
- Page 13 Appendix ..............................208 Basic Specification ..............................209 How to Load Installation Specification ............................211 Documents Outer Dimensions ..............................213 fi-7600 ..................................213 How to Use the Operator Panel fi-7700/fi-7700S ................................214 Scanner Options ................................ 215 Various Ways to Uninstalling the Software ............................216 Scan Notes on Repackaging [fi-7700/fi-7700S] ........................
-
Page 14: Chapter 1 Scanner Overview
Contents Index Chapter 1 Scanner Overview Introduction Scanner Overview How to Load This chapter explains about the names and functions of the scanner components, as well as the methods for basic Documents operations. How to Use the 1.1 Main Features.............................15 Operator Panel 1.2 Parts and Functions............................17 1.3 Turning the Power ON/OFF........................23... -
Page 15: Main Features
Imprinter option [fi-7600] Troubleshooting Imprinter is available as an option, which is often demanded for The scanner mounts the LCD that displays the operational settings for managing/verifying documents. - Page 16 Chapter 1 Scanner Overview Contents Centralized management of multiple scanners Index The bundled "Scanner Central Admin Agent" application allows you to manage multiple scanners together. For example, you can update the Introduction scanner settings and drivers, as well as monitor the operating status of each scanner.
-
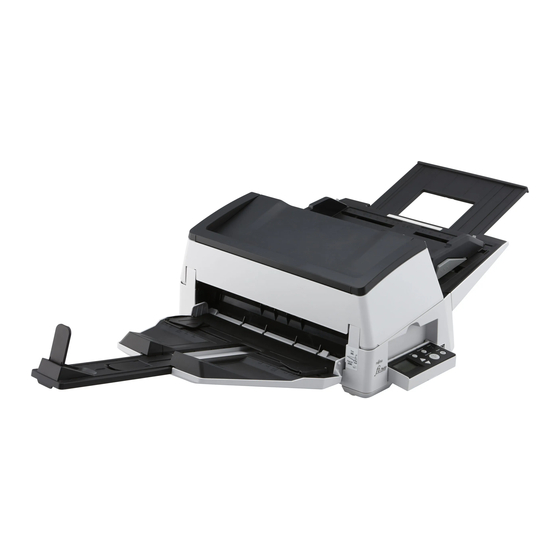
Page 17: Parts And Functions
Chapter 1 Scanner Overview Contents Index 1.2 Parts and Functions Introduction This section shows the names of the scanner parts. Scanner fi-7600 Overview ■Front How to Load ADF Paper Chute (Feeder) Subtray Documents Holds the documents to be scanned. Allows you to temporarily place documents to be scanned. -
Page 18: How To Use The Operator Panel
Chapter 1 Scanner Overview Contents ■Back Index ADF Release Tabs Introduction Lift up these tabs to unlock and open the ADF. Scanner Overview Feed Mode Switch Slide the feed mode switch to the left to switch the feed mode to Manual/Single mode. How to Load Side Guide Locks Documents... - Page 19 Chapter 1 Scanner Overview Contents fi-7700/fi-7700S Index ■Front Introduction ADF (Automatic Document Feeder) Subtray Scanner Pulls and feeds the documents one sheet at a time from the ADF Allows you to temporarily place Overview paper chute (feeder). documents to be scanned. For the fi-7700, it allows you to scan both sides of a document at the same time.
- Page 20 Chapter 1 Scanner Overview Contents ■Back Index Side Guide Locks Introduction Lock the side guides. ADF Release Tabs Scanner Lift up these tabs to unlock and open the ADF. Overview Feed Mode Switch How to Load Slide the feed mode switch to the left to switch the feed mode to Manual/Single mode. Documents How to Use the Power Connector...
-
Page 21: Common Parts For All Models
Chapter 1 Scanner Overview Contents Common Parts for All Models Index ■Inside (ADF) Introduction Scanner Overview Separation Level Switch This switch is set to "A" as the factory default. How to Load Documents Brake Roller How to Use the Operator Panel Microphones Various Ways to Ultrasonic Sensors... - Page 22 Chapter 1 Scanner Overview Contents ■Removable Parts Index Brake Roller Introduction Stacker Scanner Overview How to Load Documents How to Use the Operator Panel Pick Roller Various Ways to Scan Daily Care Replacing the Consumables Troubleshooting ADF Paper Chute (Feeder) Operational Settings Appendix...
-
Page 23: Turning The Power On/Off
Overview The method by which the scanner is powered on/off can be specified Press the [Power] button on the operator panel. from one of the following: [fi-7600] [fi-7700/fi-7700S] How to Load Press the [Power] button on the operator panel. -
Page 24: Opening/Closing The Adf
Chapter 1 Scanner Overview Contents Index 1.4 Opening/Closing the ADF Introduction How to Close the ADF This section describes how to open and close the ADF. Scanner How to Open the ADF Overview Close the ADF. Remove all documents from the ADF paper chute Push the center of the ADF until it locks in place. -
Page 25: Opening/Closing The Document Cover [Fi-7700/Fi-7700S]
Chapter 1 Scanner Overview Contents Index 1.5 Opening/Closing the Document Cover [fi-7700/fi-7700S] Introduction How to Close the Document Cover This section describes how to open and close the document Scanner cover. Overview How to Open the Document Cover Take hold of the handle and gently close the document cover. -
Page 26: Adjusting The Position Of The Adf [Fi-7700/Fi-7700S]
Chapter 1 Scanner Overview Contents Index 1.6 Adjusting the Position of the ADF [fi-7700/fi-7700S] Introduction This section explains how to adjust the position of the ADF. Remove the two ADF lock screws and insert them into the Scanner lock screw storage holes. The available positions are as follows: Overview The ADF is fixed with the ADF lock screws in place. - Page 27 Chapter 1 Scanner Overview Contents Gently close the document cover. HINT Index For details, refer to "1.5 Opening/Closing the Document Cover [fi- Remove the document pad if the ADF lock screws are difficult 7700/fi-7700S]" (page 25). to remove. Introduction ...
- Page 28 Chapter 1 Scanner Overview Contents To change position 1 to position 3 Index Slide the ADF to the center of the scanner, and then rotate it counterclockwise by 180 degrees. Introduction Scanner Overview How to Load Documents How to Use the Operator Panel •...
-
Page 29: Setting Up The Adf Paper Chute (Feeder)
Chapter 1 Scanner Overview Contents Index 1.7 Setting Up the ADF Paper Chute (Feeder) Introduction Documents loaded in the ADF paper chute (feeder) are fed Scanner into the ADF one by one when scanning starts. Overview Using the chute extension as described in the following procedure will keep the documents straight and feed them How to Load smoothly. -
Page 30: Setting Up The Stacker
Chapter 1 Scanner Overview Contents Index 1.8 Setting Up the Stacker Introduction Documents loaded in the ADF paper chute (feeder) are HINT Scanner ejected onto the stacker one by one when scanning starts. When scanning short documents such as business cards, lift up Overview the right stopper. - Page 31 Chapter 1 Scanner Overview Contents HINT HINT Index Adjust the height of the stacker according to the paper type of You can place the stacker in the upper position smoothly if you the document. hold both sides of the stacker firmly and push it forward while Introduction Select the lower position for ordinary use.
-
Page 32: Power Saving Mode
Chapter 1 Scanner Overview Contents Index 1.9 Power Saving Mode Introduction Power saving mode keeps the power consumption low when ATTENTION Scanner the scanner has not been used for a certain period of time. The scanner may not enter power saving mode if there is a Overview document remaining on the paper path. -
Page 33: Basic Flow Of Scanning Operation
Chapter 1 Scanner Overview Contents Index 1.10 Basic Flow of Scanning Operation Introduction This section explains about the basic flow of performing a Scanning procedures and operations slightly vary depending Scanner scan. on the image scanning application. Overview In order to perform a scan, you need a scanner driver and an For details, refer to the image scanning application manual. - Page 34 Chapter 1 Scanner Overview Contents Select a scanner. Index Make sure to select the scanner model that is connected to the computer. Introduction For some image scanning applications, selection of a scanner may not be needed. Scanner Overview In the setup window for the scanner driver, configure the scan settings.
-
Page 35: Overview Of The Bundled Software
Chapter 1 Scanner Overview Contents Index 1.11 Bundled Software Introduction Overview of the Bundled Software Error Recovery Guide Scanner Details the status of the scanner and explains how to resolve problems encountered. It is installed together with the PaperStream Overview HINT IP driver. -
Page 36: System Requirements
Chapter 1 Scanner Overview Contents System Requirements fi Series Online Update Index This application checks for the latest software and firmware updates The system requirements are as follows: for fi Series and applies them. Introduction For details, refer to the fi Series Online Update Help. Operating ®... - Page 37 Chapter 1 Scanner Overview Contents Installing the Bundled Software Display 1024 × 768 pixels or more, 65,536 colors or more Index resolution This section explains about the procedure to install the Introduction Hard disk 2.2 GB or more of free hard disk space (*2) software from the bundled Setup DVD-ROM.
- Page 38 Chapter 1 Scanner Overview Contents ■Installation (Custom) HINT Index If the [fi Series Setup] window does not appear, double-click In the same way as in "Installation (Recommended)" "Setup.exe" in the Setup DVD-ROM via [Windows Explorer] or Introduction (page 37), perform steps through 3.
- Page 39 Contents Index Chapter 2 How to Load Introduction Documents Scanner Overview How to Load Documents This chapter explains how to load documents on the scanner. How to Use the Operator Panel 2.1 Loading Documents in the ADF........................40 Various Ways to 2.2 Placing a Document on the Flatbed [fi-7700/fi-7700S] ................46 Scan 2.3 Documents for Scanning ..........................47...
-
Page 40: Loading Documents In The Adf
Chapter 2 How to Load Documents Contents Index 2.1 Loading Documents in the ADF Introduction This section explains how to load documents in the ADF. Fan the documents. Scanner 1 Take out a stack of documents, according to the thickness in the Preparation following guidelines: Overview... - Page 41 Chapter 2 How to Load Documents Contents ■ How to Load Documents Loading Documents at the Center of the ADF Paper Index Chute (Feeder) There are two ways to load documents. Introduction Loading documents at the center of the ADF paper chute (feeder) Adjust the ADF paper chute (feeder) according to the This way is used mainly when the documents are of the same size.
- Page 42 Chapter 2 How to Load Documents Contents ■ Adjust the side guides to the width of the documents. Loading Documents to the Left or Right Side of the ADF Index Move the side guides by pressing the side guide button so that there Paper Chute (Feeder) is no space between the side guides and the documents.
- Page 43 Chapter 2 How to Load Documents Contents Load the documents in the ADF paper chute (feeder) so ATTENTION Index that the narrowest document can be picked by the pick Make sure that all documents are placed underneath the pick rollers.
- Page 44 Chapter 2 How to Load Documents Contents Adjust the side guides to the width of the documents. Adjust the other side guide to the intended position by Index pressing the side guide button. Move the side guides by pressing the side guide button so that there is no space between the side guides and the widest document.
- Page 45 Chapter 2 How to Load Documents Contents HINT Index The procedure to unlock the side guides and change the position of the side guides so that you can place documents in the center of Introduction the ADF chute (feeder) is as follows: 1 Slide the side guide lock of the side guide that is locked in the Scanner direction of the arrow.
- Page 46 Chapter 2 How to Load Documents Contents Index 2.2 Placing a Document on the Flatbed [fi-7700/fi-7700S] Introduction Open the document cover. Gently close the document cover. Scanner For details, refer to "1.5 Opening/Closing the Document Cover [fi- For details, refer to "1.5 Opening/Closing the Document Cover [fi- Overview 7700/fi-7700S]"...
-
Page 47: Documents For Scanning
Chapter 2 How to Load Documents Contents Index 2.3 Documents for Scanning Introduction Paper Size Paper Weight (Thickness) Scanner Overview Documents with the following paper weights can be scanned: The following paper sizes can be scanned: 20 to 413 g/m (5.3 to 110 lb) How to Load ... - Page 48 Chapter 2 How to Load Documents Contents Documents other than paper/plastic card such as fabric, metal foil When you scan documents with the ADF, all documents must be flat Index and OHP film on the leading edge. Make sure that curls on the leading edge of the documents are kept within the following range: ...
- Page 49 Chapter 2 How to Load Documents Contents If there is dirt on the surface of the card, such as grease marks Index (fingerprints), perform scanning after wiping the dirt off. Plastic cards cannot be scanned when the imprinter is connected. Introduction ...
- Page 50 Chapter 2 How to Load Documents Contents Loading Capacity Index The number of sheets that can be loaded in the ADF paper chute (feeder) is determined by the paper size and paper weight. See Introduction the graph below. Scanner A4/Letter size or smaller Overview Size larger than A4/Letter size How to Load...
-
Page 51: Area Not To Be Perforated
Chapter 2 How to Load Documents Contents Area Not to Be Perforated How to Load Documents with a Tab or Non- Index Rectangular Documents An error may occur when there are punched holes in the area Introduction shaded in light blue in the figure below. When scanning documents with a tab or non-rectangular Scanner Use the flatbed (fi-7700/fi-7700S) to scan such documents. -
Page 52: Conditions For Multifeed Detection
Chapter 2 How to Load Documents Contents Conditions for Multifeed Detection Index ATTENTION The above condition applies when the document is set to the center Multifeed is an error where two or more sheets are fed through Introduction of the pick roller width. the ADF at once. -
Page 53: Conditions For Mixed Batch Scanning
Chapter 2 How to Load Documents Contents Conditions for Mixed Batch Scanning Paper Size Index When you scan a mixed batch with different sizes, not feeding the The following conditions apply when a mixed batch of documents straight may cause troubles such as paper jams or part of Introduction the image to appear missing. - Page 54 Chapter 2 How to Load Documents Contents Combinations of Standard Paper Sizes in a Mixed Batch Index Refer to the table below for a guideline of the range available for mixed batch scanning. Introduction However, note that not feeding the documents straight may cause troubles such as paper jams or part of the image to appear missing. It is recommended that you check the documents thoroughly before scanning and also check the image if the document was skewed.
- Page 55 Chapter 2 How to Load Documents Contents Conditions for Automatic Page Size Detection *1: The figure below shows how to load the widest and the narrowest Index documents of the batch between the side guides. Center [Automatic Page Size Detection] does not work with the Introduction following types of documents: Maximum width...
- Page 56 Contents Index Chapter 3 How to Use the Introduction Operator Panel Scanner Overview How to Load Documents This chapter explains how to use the operator panel. How to Use the Operator Panel 3.1 Operator Panel ............................57 Various Ways to 3.2 Settings Menu.............................62 Scan 3.3 Function Selection ............................80 Daily Care...
- Page 57 Scanner Overview ■ fi-7600 The scanner carries an operator panel on each side. You can use whichever is convenient for you. The operator panel can be How to Load fitted into the side of the scanner when it is not used.
- Page 58 Chapter 3 How to Use the Operator Panel Contents ■ fi-7700/fi-7700S Index Introduction Indicates the status of the scanner. Switches off when the scanner enters power saving mode. Scanner LED Indicator Overview Lights in orange when an error occurs. Flashes when the ADF is open, when consumables reach the end of their life cycle, How to Load or when the value specified for the cleaning cycle or the regular maintenance time is Documents...
-
Page 59: Indications On Lcd
Chapter 3 How to Use the Operator Panel Contents Indications on LCD Display Description Index A function item can be Introduction Title Display Description selected. When you press the [] or Processing initialization. Scanner Items [] button while the Overview [Ready] screen is displayed, the [Function Selection] screen is... - Page 60 When this alarm occurs, How to Use the turn the power off then Operator Panel back on. If the problem still persists, contact your FUJITSU scanner dealer or Various Ways to an authorized FUJITSU Scan scanner service provider. When the scanner has not...
- Page 61 Chapter 3 How to Use the Operator Panel Contents Indicator Index Information Introduction flashes when there is a message for replacing consumables/cleaning/glass cleaning/regular maintenance. Scanner [Consumables], [Cleaning], [Clean glass!], or [maintenance] also flashes on the second line in the [Ready] screen. Overview For information regarding appropriate actions to take when "3.2 Settings Menu"...
-
Page 62: Settings Menu
Chapter 3 How to Use the Operator Panel Contents Index 3.2 Settings Menu Introduction This section explains about the Settings Menu. Scanner When you press the [Menu] button while the [Ready] screen is Overview displayed, the [Settings Menu] screen is displayed. The Settings Menu can be used to configure various How to Load operational settings upon scanning. -
Page 63: How To Use Settings Menu
Chapter 3 How to Use the Operator Panel Contents How to Use Settings Menu Index This section explains how to use the Settings Menu of the operator panel by the following categories. Introduction Operation Description Item User Administrator Scanner menu menu Overview Yes: Available... - Page 64 Chapter 3 How to Use the Operator Panel Contents Operation Description Item User Administrator Index menu menu Introduction Yes: Available -: Not Available Scanner Operational settings You can configure various settings for operating the 15: Pick pressure Overview scanner and using the operator panel. 16: Manual/Continuous Feed For more details, refer to "Operational Settings"...
-
Page 65: Index Introduction
Chapter 3 How to Use the Operator Panel Contents Operation Description Item User Administrator Index menu menu Introduction Yes: Available -: Not Available Scanner Counting documents You can count the number of scanned documents in 12: Doc Counting Mode Overview Doc Counting Mode. - Page 66 Contents ■ Press the [Power] button on the operator panel. Checking the Guidance Contents Index The [Ready] screen is displayed on the LCD. [fi-7600] Introduction Press the [Menu] button. The [Settings Menu] screen is displayed on the LCD. Scanner Overview...
- Page 67 Contents ■ Press the [Power] button on the operator panel. Checking the Information Index The [Ready] screen is displayed on the LCD. [fi-7600] Introduction Press the [Menu] button. The [Settings Menu] screen is displayed on the LCD. Scanner Overview Press the [...
- Page 68 How to Use the For regular maintenance and inspection on the scanner by a service Operator Panel engineer, contact your FUJITSU scanner dealer or an authorized FUJITSU scanner service provider. Various Ways to Scan Daily Care...
- Page 69 ] or [ ] button and select a parameter, then Operational Settings Index press the [Scan/Enter] button to confirm. [fi-7600] For more details about the setting parameters, refer to "Items Introduction Configurable in the Settings Menu" (page 72). Scanner...
- Page 70 ■ Press the [Power] button on the operator panel. Checking and Resetting the Sheet Counters Index The [Ready] screen is displayed on the LCD. [fi-7600] Introduction Press the [Menu] button. The [Settings Menu] screen is displayed on the LCD. Scanner...
- Page 71 ■ Load a document in the ADF paper chute (feeder), and Counting Documents Index press the [Scan/Enter] button. [fi-7600] The number of sheets that are scanned is counted. Introduction The number of counted sheets is displayed in Count. Scanner ATTENTION...
-
Page 72: Items Configurable In The Settings Menu
Chapter 3 How to Use the Operator Panel Contents Items Configurable in the Settings Menu Index Introduction Item Description Parameter (*1)/Value Factory Default Scanner (*2) Overview -: No parameters/values Guidance Displays the way to reset the page counter. 1: Clear counter 1: Clear How to Load counter... - Page 73 Chapter 3 How to Use the Operator Panel Contents Item Description Parameter (*1)/Value Factory Index Default (*2) Introduction -: No parameters/values Scanner 3: Test Print Use this option to run a test print when the Imprinter No. of sheets scanned: (*3) Overview is installed.
- Page 74 Chapter 3 How to Use the Operator Panel Contents Item Description Parameter (*1)/Value Factory Index Default (*2) Introduction -: No parameters/values Scanner 5: Language Specify the language in which data is displayed. 1: Japanese 2: English Overview 2: English 3: French How to Load 4: German Documents...
- Page 75 Chapter 3 How to Use the Operator Panel Contents Item Description Parameter (*1)/Value Factory Index Default (*2) Introduction -: No parameters/values Scanner 10: Low-speed Specify whether or not to reduce the scanning 1: Enable 2: Disable Overview Feed Mode speed to prevent paper damage. 2: Disable This setting can also be configured from the How to Load...
- Page 76 Chapter 3 How to Use the Operator Panel Contents Item Description Parameter (*1)/Value Factory Index Default (*2) Introduction -: No parameters/values Scanner 15: Pick pressure Set the pick pressure for feeding paper. 1: Weak 2: Normal Overview This setting can also be configured from the 2: Normal Software Operation Panel.
- Page 77 Chapter 3 How to Use the Operator Panel Contents Item Description Parameter (*1)/Value Factory Index Default (*2) Introduction -: No parameters/values Scanner 18: Paper Select a paper protection detection method. 1: Disable 2: Feeding Overview Protection This function can reduce the risk of having the 2: Feeding accuracy accuracy documents damaged by detecting a feeding error...
- Page 78 Chapter 3 How to Use the Operator Panel Contents Item Description Parameter (*1)/Value Factory Index Default (*2) Introduction -: No parameters/values Scanner 19: Vertical streak Select whether to enable or disable vertical streak 1: Enable 2: Disable Overview detection detection. 2: Disable Sensitivity: After enabling this setting,...
- Page 79 Chapter 3 How to Use the Operator Panel Contents Item Description Parameter (*1)/Value Factory Index Default (*2) Introduction -: No parameters/values Scanner 21: Ope. Panel Initialize the settings of the operator panel. 1: Yes (*4) Overview Initialization Note that the language setting and any items 2: No without a factory default setting are not initialized.
-
Page 80: Function Selection
The setup is completed when the LCD displays the [Ready] screen. Scan The indicator displays the configured parameter. In this example, the indicator displays "F02" because "No.02" is [fi-7600] selected. Daily Care HINT When "No.00" to "No.50" are selected, the indicator displays Replacing the 2 []/[] Button... -
Page 81: Item Configurable In Function Selection
Chapter 3 How to Use the Operator Panel Contents Item Configurable in Function Selection Index Introduction Item Description Setting Factory Default Scanner Function Configure the application you want to launch when you press the No.00 to No.50/SOP (*1) Overview Selection [Scan/Enter] button while the [Ready] screen is displayed. -
Page 82: Chapter 4 Various Ways To Scan
Contents Index Chapter 4 Various Ways to Scan Introduction Scanner Overview How to Load This chapter explains how to configure scanner settings and scan different types of documents with the image scanning Documents application. How to Use the 4.1 Summary ..............................83 Operator Panel 4.2 Scanning Documents of Different Types and Sizes..................84 4.3 Advanced Scanning............................90... -
Page 83: Summary
Chapter 4 Various Ways to Scan Contents Index 4.1 Summary Introduction This section lists the main ways of scanning documents. Scanner Scanning Documents of Different Types and Sizes Overview " Scanning Documents with Different Widths" (page 84) "Scanning Documents Folded in Half" (page 85) How to Load "Scanning Documents such as Envelopes or Multi-Layered Transfer ... -
Page 84: Scanning Documents Of Different Types And Sizes
Chapter 4 Various Ways to Scan Contents Index 4.2 Scanning Documents of Different Types and Sizes Introduction Scanning Documents with Different Widths ATTENTION Scanner Make sure that all documents are placed underneath the pick Overview roller. Otherwise, some documents may be skewed or not fed into ATTENTION the ADF. -
Page 85: Scanning Documents Folded In Half
Chapter 4 Various Ways to Scan Contents Scanning Documents Folded in Half Adjust the stacker to fit the longest document. Index For details, refer to "1.8 Setting Up the Stacker" (page 30). Sliding the feed mode switch to the left to switch the feed Introduction In the scanner driver, configure the scan settings to detect mode to Manual/Single mode allows you to scan a document... - Page 86 Chapter 4 Various Ways to Scan Contents Load a document folded in half in the ADF paper chute The following screen is displayed on the LCD of the operator panel. Index (feeder). Secure the documents folded in half with the side guides to avoid Introduction skewing.
-
Page 87: Scanning Documents Such As Envelopes Or Multi-Layered Transfer Paper
Chapter 4 Various Ways to Scan Contents Scanning Documents such as Envelopes or Feed Mode Index Multi-Layered Transfer Paper Switch Introduction Sliding the feed mode switch to the left to switch the feed Scanner mode to Manual/Single mode allows you to scan documents Overview such as envelopes and multi-layered transfer paper. -
Page 88: Long Page Scanning
Chapter 4 Various Ways to Scan Contents Long Page Scanning ATTENTION Index - Removing Documents with a length up to 5,588 mm (220 in.) can be Secure enough space around the stacker to prevent the Introduction ejected sheet from falling off the stacker. scanned by long page scanning. -
Page 89: Scanning A Book [Fi-7700/Fi-7700S]
Chapter 4 Various Ways to Scan Contents Scanning a Book [fi-7700/fi-7700S] Gently close the document cover. Index For details, refer to "1.5 Opening/Closing the Document Cover [fi- 7700/fi-7700S]" (page 25). Introduction Open the document cover. HINT For details, refer to "1.5 Opening/Closing the Document Cover [fi- Scanner ... -
Page 90: Advanced Scanning
Chapter 4 Various Ways to Scan Contents Index 4.3 Advanced Scanning Introduction Using a Button on the Scanner to Start Scanning Settings on a Computer Scanner Overview Confirm that the scanner is connected to the computer, The [Scan/Enter] button on the operator panel can be used to then turn on the scanner. - Page 91 Chapter 4 Various Ways to Scan Contents Click the [Events] tab and select an event. Select an action and an application to be launched by the Index scanner button event. From the [Select an event] drop-down list, select an event from which you want to launch an application.
- Page 92 Settings on the Scanner Press the [] or [] button and select a parameter, then Index press the [Scan/Enter] button to confirm. [fi-7600] []/[] Button Configure the application you want to launch when you press the Introduction [Scan/Enter] button while the [Ready] screen is displayed.
-
Page 93: Feeding Documents Manually In The Adf
Chapter 4 Various Ways to Scan Contents Feeding Documents Manually in the ADF Enable manual feeding. Index When scanning more than one document in succession manually 1 Perform one of the following operations: Documents can also be loaded manually one sheet at a time Introduction - Select the Enable option for [16: Manual/Continuous Feed in the ADF. -
Page 94: Troubleshooting
Chapter 4 Various Ways to Scan Contents Load a document in the ADF paper chute (feeder). Repeat step until all documents are scanned. Index Load the document face-down in the ADF paper chute (feeder). Scanning will stop if no document is loaded within the set time. To scan a multi-layered transfer paper, position the bound edge first Introduction when loading the paper. -
Page 95: In Which The Images Scanned In Duplex Scanning Mode Are Arranged [Fi-7700S]
Chapter 4 Various Ways to Scan Contents Sorting the Images Scanned in Simplex Scanning Load the documents with the back side face-down in the Index ADF paper chute (feeder). Mode in the Same Order in Which the Images For details, refer to "Chapter 2 How to Load Documents"... -
Page 96: Scanning Documents With The Document Cover Open [Fi-7700/Fi-7700S]
Chapter 4 Various Ways to Scan Contents Scanning Documents with the Document Cover In the scanner driver, configure the scan settings for the Index flatbed so that the ambient light can be removed. Open [fi-7700/fi-7700S] For details, refer to the scanner driver's Help. Introduction The scanner allows you to scan documents with the document ATTENTION... -
Page 97: Customizing The Scanner Settings
Chapter 4 Various Ways to Scan Contents Index 4.4 Customizing the Scanner Settings Introduction Ignoring Multifeed for a Set Pattern Intelligent Multifeed Function Scanner The following three modes are available: Overview If you attempt to scan a document with an attachment such as Mode Description sticky note, receipt, or photo while multifeed detection is... - Page 98 -------------------------------- How to Use the Operational Procedure detection for the next document can be Detect: Scan/Enter Operator Panel enabled/disabled from the [Menu] (Switch:Menu) [fi-7600] [Menu] Button button. Various Ways to Multifeed detected (Overlap) Specify whether to [Scan/Enter] Button Scan Press the [Scan/Enter] button to eject memorize the pattern.
- Page 99 Chapter 4 Various Ways to Scan Contents If you open the ADF to remove the document, close it. detected as multifeed, and continues scanning. When a paper Index attachment of the same length or shorter is detected, multifeed For details, refer to "1.4 Opening/Closing the ADF"...
-
Page 100: Disabling Paper Protection For A Single Scan After Paper Protection Is Set Off
Enable:Scan/Enter Operational Procedure Paper protection (feeding accuracy) (Switch:Menu) How to Use the Remove and check the document, and [fi-7600] [Menu] Button Operator Panel then try again carefully. [Scan/Enter] Button Various Ways to When the ADF is open, it might close Scan accidentally. - Page 101 Chapter 4 Various Ways to Scan Contents Press the [Menu] button and confirm that the LCD displays Index [Disable], and then either press the [Scan/Enter] button or Introduction perform a scan from the computer. From this point, note that the indication on the LCD switches between [Enable][Disable] every time you press the [Menu] button.
-
Page 102: Chapter 5 Daily Care
Contents Index Chapter 5 Daily Care Introduction Scanner Overview How to Load This chapter describes how to clean the scanner. Documents Do not use aerosol spray or spray that contains alcohol. Paper How to Use the dust blown up by strong air from the spray may enter inside the Operator Panel scanner which may cause the scanner to fail or malfunction. -
Page 103: Cleaning Materials And Locations That Require Cleaning
For more information about the cleaning materials, contact Cleaner F1 PA03950-0352 100 ml How to Load Liquid cleaner to use for your FUJITSU scanner dealer or an authorized FUJITSU Documents removing dirt and stains scanner service provider. How to Use the Operator Panel... -
Page 104: Location And Frequency
Chapter 5 Daily Care Contents Location and Frequency Index Introduction Location Frequency Scanner Brake roller Every 10,000 sheets Overview Pick roller Rubber roller How to Load Documents Chute roller Paper path How to Use the Glass Operator Panel Ultrasonic sensor Various Ways to Document sensor Scan... -
Page 105: Cleaning The Outside
It may take a long time to dry if an excessive amount of Cleaner F1/ Cleaning Wipe mild detergent is used. Use it in small quantity. Wipe off the cleaner Various Ways to completely to leave no residue on the cleaned parts. Scan fi-7600 Daily Care Cloth Cleaner F1 Replacing the or Mild Detergent... -
Page 106: Cleaning The Inside
Chapter 5 Daily Care Contents Index 5.3 Cleaning the Inside Introduction Cleaning the ADF (with Cleaning Paper) Select [1: Cleaning Paper] by the [] or [] button, and Scanner press the [Scan/Enter] button to confirm. Overview The ADF can be cleaned with a sheet of Cleaning Paper A message is displayed on the LCD. -
Page 107: Cleaning The Adf (With Cloth)
Chapter 5 Daily Care Contents Cleaning the ADF (with Cloth) Adjust the side guides to the width of the Cleaning Paper. Index Move the side guides by pressing the side guide buttons so that there is no space between the side guides and the Cleaning Paper. The ADF can be cleaned with a piece of cloth moistened with Introduction Otherwise, the Cleaning Paper may be fed skewed. - Page 108 Chapter 5 Daily Care Contents Open the ADF. Index For details, refer to "1.4 Opening/Closing the ADF" (page 24). Paper Path (× 2) Introduction When the ADF is open, it might close accidentally. Be careful not to get your Scanner fingers caught.
- Page 109 Chapter 5 Daily Care Contents Brake Roller (× 2) Ultrasonic Sensor (× 2)/Document Sensor (× 8) Index Remove the roller from the scanner. Gently wipe the dirt and dust off the surface of the ultrasonic/document For details about removing the brake roller, refer to "6.2 Replacing the Introduction sensors.
- Page 110 6 When you press the [Scan/Enter] button, the feed/eject rollers roller will affect the feeding performance. rotate a certain amount. As a guideline, pressing the [Scan/Enter] button seven times will rotate the feed/eject rollers one revolution. [fi-7600] Operational Settings Appendix [Scan/Enter] Button...
-
Page 111: Cleaning The Flatbed [Fi-7700/Fi-7700S]
Chapter 5 Daily Care Contents Cleaning the Flatbed [fi-7700/fi-7700S] Close the ADF. Index For details, refer to "1.4 Opening/Closing the ADF" (page 24). The flatbed can be cleaned with a piece of cloth moistened Introduction with Cleaner F1, or a sheet of Cleaning Wipe. Be careful not to get your fingers caught when closing the ADF. -
Page 112: Chapter 6 Replacing The Consumables
Contents Index Chapter 6 Replacing the Introduction Consumables Scanner Overview How to Load Documents This chapter describes how to replace the consumables for the scanner. How to Use the Operator Panel The inside of the ADF becomes very hot when the scanner is being used. -
Page 113: Consumables And Replacement Cycles
PICK ROLLER SET PA03740-K011 250,000 sheets or one year cleaned. Daily Care HINT Only use the specified consumables. Replacing the Consumables To purchase the consumables, contact your FUJITSU scanner dealer or an authorized FUJITSU scanner service provider. Troubleshooting Operational Settings Appendix Glossary... -
Page 114: Operator Panel
Chapter 6 Replacing the Consumables Contents Index 6.2 Replacing the Brake Roller Introduction Replace the brake roller in following procedure. Remove the brake roller. Scanner Lift the left side of the roller in the direction of the arrow first, then Overview Turn off the scanner and wait for at least 15 minutes. - Page 115 Chapter 6 Replacing the Consumables Contents Attach a new brake roller on the shaft. Attach the shaft. Index Insert the protrusion on the shaft into the slot. Insert the right end of the shaft into the hole in accordance with the Introduction hole shape in the direction of the arrow , and then attach the left...
- Page 116 Chapter 6 Replacing the Consumables Contents Plug in the power cable and turn on the scanner. Index For details, refer to "1.3 Turning the Power ON/OFF" (page 23). Introduction Reset the brake roller counter. Reset the counter by performing one of the following actions: Scanner ...
-
Page 117: Replacing The Pick Roller
Chapter 6 Replacing the Consumables Contents Index 6.3 Replacing the Pick Roller Introduction Open the sheet guide. Replace the pick roller in following procedure. Scanner Slide the side guides all the way by pressing the side guide buttons, ATTENTION and pull the sheet guide open from the dip. Overview There are two types of pick rollers. - Page 118 Chapter 6 Replacing the Consumables Contents Remove the pick roller closer to you. 3 Remove the pick roller. Index 1 Rotate the bushing (× 2) on the shaft in the direction of the arrow. Pick Roller Shaft Introduction Scanner Overview How to Load Documents How to Use the...
- Page 119 Chapter 6 Replacing the Consumables Contents Remove the pick rollers (× 2) from the shaft one at a time. 2 Lift up the bushing in direction (about 5 mm), and slide the Index 1 Pull out the pick roller from the shaft as you lift the retaining clip. shaft in direction to pull out the leading end from the slot, then Introduction...
- Page 120 Chapter 6 Replacing the Consumables Contents Attach new pick rollers (× 2) on the shaft on at a time. Install the shaft of the pick roller in the side away from Index you. 1 Hold the bushing of the shaft in one hand and the pick roller with the retaining clip facing towards you in the other hand, and then put 1 Insert the left end of the shaft into the slot, and lower the other end Introduction...
- Page 121 Chapter 6 Replacing the Consumables Contents Install the new pick roller in the side closer to you. 3 Fit the protrusion on the right shaft into the notch on the pick roller Index and slide the bushing on the right shaft in the direction of the arrow. 1 Insert the protrusion (×...
- Page 122 Chapter 6 Replacing the Consumables Contents Close the sheet guide. Index Make sure that both ends of the sheet guide are locked firmly. Introduction ATTENTION Confirm that the pick rollers are installed properly. Otherwise, it Scanner may cause feeding errors such as paper jams. Overview Close the ADF.
-
Page 123: Chapter 7 Troubleshooting
Contents Index Chapter 7 Troubleshooting Introduction Scanner Overview How to Load This chapter explains about the countermeasures against paper jams and other troubles, items to check before contacting Documents your scanner service provider, and how to read the product labels on the scanner. How to Use the ATTENTION Operator Panel... -
Page 124: Paper Jam
Chapter 7 Troubleshooting Contents Index 7.1 Paper Jam Introduction When your document is jammed inside the scanner, remove Remove the jammed document. Scanner the document in the following procedure: Overview Do not use force to pull out the jammed document, and make sure to open the ADF first. -
Page 125: Error Indications On Operator Panel
([Ready] status) in the scanner. If the Error Recovery Guide is installed in the computer, the Daily Care [fi-7600] [Stop/Clear] Button Error Recovery Guide window appears when the Windows LED Indicator operating system is started up. -
Page 126: Temporary Errors
Chapter 7 Troubleshooting Contents Temporary Errors Error Error messages Action Index code The following are lists of temporary errors which can be Introduction J0:51 Paper protection 1 Remove the jammed document. recovered by operators. (feeding For details, refer to "7.1 Paper Jam" Scanner accuracy) (page... - Page 127 Chapter 7 Troubleshooting Contents Error Error messages Action Error Error messages Action Index code code Introduction J2:55 Multifeed 1 Press the [Scan/Enter] button on the J2:56 Multifeed 1 Press the [Scan/Enter] button on the detected operator panel to eject the documents. detected (Length) operator panel to eject the documents.
-
Page 128: Device Errors
If the problem persists, write Replacing the down the displayed error code U7:B9 Imprinting area Adjust the imprinting start position and and contact your FUJITSU Consumables (*3) error the imprinter strings to fit the imprinting scanner dealer or an authorized area in the document. - Page 129 Overview after turning the power back on, please inform your FUJITSU scanner dealer or an 2 Turn the scanner off then back on. back on, please inform your service provider authorized FUJITSU scanner...
- Page 130 How to Load back on, please inform your FUJITSU scanner dealer or an back on, please inform your FUJITSU scanner dealer or an Documents your service provider...
- Page 131 H0:83 Motor circuit error Turn the scanner off then back on. Overview If the problem persists your FUJITSU scanner dealer or an H1:80 If the problem persists If the problem persists, write down after turning the power authorized FUJITSU scanner...
- Page 132 760PRB Imprinter your service provider of down the displayed error code Consumables Operator's Guide. the above error code. and contact your FUJITSU 4 Turn the scanner off then scanner dealer or an back on. authorized FUJITSU scanner Troubleshooting If the problem persists, write service provider.
- Page 133 If the problem persists, write your service provider Documents down the displayed error code of the above error and contact your FUJITSU code. scanner dealer or an authorized How to Use the FUJITSU scanner service Operator Panel provider.
-
Page 134: Troubleshooting
Scanner Service Provider" (page 152), and then contact your "A shadow appears at the top or the bottom of the scanned image." Documents FUJITSU scanner dealer or an authorized FUJITSU scanner (page 150) service provider. How to Use the "There are black traces on the document." (page 151) -
Page 135: Scanner Cannot Be Powered On
Documents If the problem persists, check the items in "7.4 Before You Contact the Scanner Service Provider" (page 152) first, then contact your FUJITSU scanner dealer or How to Use the an authorized FUJITSU scanner service provider. Operator Panel Various Ways to... -
Page 136: The Lcd Or The [Power] Button Light Or Both Switch Off
Daily Care Replacing the If the problem persists, check the items in "7.4 Before You Contact the Scanner Service Provider" (page 152) first, then contact your FUJITSU scanner dealer or Consumables an authorized FUJITSU scanner service provider. Troubleshooting Operational Settings... -
Page 137: Scanning Does Not Start
Replacing the Consumables If the problem persists, check the items in "7.4 Before You Contact the Scanner Troubleshooting Service Provider" (page 152) first, then contact your FUJITSU scanner dealer or an authorized FUJITSU scanner service provider. Operational Settings Appendix Glossary... -
Page 138: Scanning Takes A Long Time
"Chapter 5 Daily Care" (page 102). Troubleshooting If the problem persists, check the items in "7.4 Before You Contact the Scanner Service Provider" (page 152) first, then contact your FUJITSU scanner dealer or Operational an authorized FUJITSU scanner service provider. Settings Appendix Glossary... -
Page 139: Image Quality Is Poor
"7.4 Before You Contact the Scanner Operator Panel Service Provider" (page 152) first, then contact your FUJITSU scanner dealer or an authorized FUJITSU scanner service provider. Various Ways to *1: The scanned image may differ from the original image significantly if you simply "binarize" (output in black & white) a picture or a photo. -
Page 140: Quality Of Scanned Text Or Lines Is Unsatisfactory
Daily Care If the problem persists, check the items in "7.4 Before You Contact the Scanner Service Provider" (page 152) first, then contact your FUJITSU scanner dealer or an authorized FUJITSU scanner service provider. Replacing the Consumables *1: When you scan in grayscale or in color mode, the scanned image may not become sharp and clear. -
Page 141: Images Are Distorted Or Not Clear
Smooth out the wrinkles or curls on the document. Replacing the Consumables If the problem persists, check the items in "7.4 Before You Contact the Scanner Service Provider" (page 152) first, then contact your FUJITSU scanner dealer or Troubleshooting an authorized FUJITSU scanner service provider. Operational Settings Appendix... -
Page 142: Vertical Streaks Appear On The Scanned Image
Scan If the problem persists, check the items in "7.4 Before You Contact the Scanner Daily Care Service Provider" (page 152) first, then contact your FUJITSU scanner dealer or an authorized FUJITSU scanner service provider. Replacing the Consumables Troubleshooting Operational... -
Page 143: An Error (Error Code "U0:10", "U4:40" Or "U5:4A") Is Already Displayed In The Lcd After Power-On
"7.4 Before You Contact the Scanner Service Provider" (page Daily Care 152) first, then contact your FUJITSU scanner dealer or an authorized FUJITSU scanner service provider. Replacing the If the problem persists, check the items in "7.4 Before You Contact the Scanner... -
Page 144: Multifeed Error Occurs Frequently
Chapter 7 Troubleshooting Contents Multifeed error occurs frequently. Index Introduction Do the documents meet the requirements described in Use documents that meet the requirements. "2.3 Documents for Scanning" (page 47)? For details, refer to "2.3 Documents for Scanning" (page 47). Scanner Overview If multifeed detection is enabled, does the batch of... - Page 145 "7.4 Before You Contact the Scanner How to Use the Service Provider" (page 152) first, then contact your FUJITSU scanner dealer or Operator Panel an authorized FUJITSU scanner service provider. *1: "Consumables" refers to the brake roller and the pick roller.
-
Page 146: Situation In Which The Document Is Not Fed Into The Adf Occurs Frequently
If the problem persists, check the items in "7.4 Before You Contact the Scanner Settings Service Provider" (page 152) first, then contact your FUJITSU scanner dealer or an authorized FUJITSU scanner service provider. *1: "Consumables" refers to the brake roller and the pick roller. Appendix... -
Page 147: Paper Protection Is Set Off Frequently
187). If the problem persists, check the items in "7.4 Before You Contact the Scanner Service Provider" (page 152) first, then contact your FUJITSU scanner dealer or Appendix an authorized FUJITSU scanner service provider. Glossary *1: "Consumables" refers to the brake roller and the pick roller. -
Page 148: Paper Jams/Pick Errors Occur Frequently
Troubleshooting If the problem persists, check the items in "7.4 Before You Contact the Scanner Service Provider" (page 152) first, then contact your FUJITSU scanner dealer or Operational an authorized FUJITSU scanner service provider. Settings *1: "Consumables" refers to the brake roller and the pick roller. -
Page 149: Scanned Images Turn Out Elongated
Daily Care If the problem persists, check the items in "7.4 Before You Contact the Scanner Service Provider" (page 152) first, then contact your FUJITSU scanner dealer or an authorized FUJITSU scanner service provider. Replacing the Consumables *1: "Consumables" refers to the brake roller and the pick roller. -
Page 150: A Shadow Appears At The Top Or The Bottom Of The Scanned Image
Various Ways to Scan If the problem persists, check the items in "7.4 Before You Contact the Scanner Service Provider" (page 152) first, then contact your FUJITSU scanner dealer or an authorized FUJITSU scanner service provider. Daily Care Replacing the Consumables... -
Page 151: There Are Black Traces On The Document
Operator Panel If the problem persists, check the items in "7.4 Before You Contact the Scanner Service Provider" (page 152) first, then contact your FUJITSU scanner dealer or an authorized FUJITSU scanner service provider. Various Ways to Scan Daily Care... -
Page 152: Before You Contact The Scanner Service Provider
Contents Index 7.4 Before You Contact the Scanner Service Provider Introduction Error Status Please check the following items before contacting your Scanner FUJITSU scanner dealer or an authorized FUJITSU scanner Overview ■ service provider. Computer Connection Issues Item Findings General... - Page 153 Chapter 7 Troubleshooting Contents ■ Image Quality Issues Index Item Findings Introduction Scanner driver and version Scanner Overview Interface controller Operating system How to Load (Windows) Documents Application Example: PaperStream Capture How to Use the Operator Panel Scanning sides Example: front, back, both Various Ways to Resolution Scan...
-
Page 154: Checking The Product Labels
Scanner Location Overview The label is located on the place indicated in the following How to Load figures: Documents ■ fi-7600 How to Use the Operator Panel Various Ways to Label Scan Label (example): Shows the scanner information. Scanner Name Daily Care Serial No. -
Page 155: Chapter 8 Operational Settings
Contents Index Chapter 8 Operational Settings Introduction Scanner Overview How to Load This chapter explains how to use the Software Operation Panel to configure the scanner settings. Documents 8.1 Starting Up the Software Operation Panel....................156 How to Use the 8.2 Password Setting for the Software Operation Panel ................158 Operator Panel 8.3 Configuration Items ..........................164 Various Ways to... -
Page 156: Starting Up The Software Operation Panel
Chapter 8 Operational Settings Contents Index 8.1 Starting Up the Software Operation Panel Introduction The Software Operation Panel is installed together with the Display the [Software Operation Panel] window. Scanner Windows Server 2008/Windows 7 PaperStream IP driver. Click [Start] menu [All Programs] [fi Series] [Software Overview This application allows you to configure various settings such Operation Panel]. -
Page 157: Various Ways To Scan
Chapter 8 Operational Settings Contents The Software Operation Panel icon is displayed in the menu that Index appears when you click in the notification area. To have the Software Operation Panel icon always displayed in the Introduction notification area, drag the icon and drop it onto the notification area. -
Page 158: Password Setting For The Software Operation Panel
Chapter 8 Operational Settings Contents Index 8.2 Password Setting for the Software Operation Panel Introduction By setting a password, the Software Operation Panel can run Enter a new password then again to confirm, and click the Scanner [OK] button. in [View Only mode] which allows users to only view the Overview Up to 32 characters can be used for the password. -
Page 159: Setting [View Only Mode]
Chapter 8 Operational Settings Contents Setting [View Only mode] HINT Index In [View Only mode], a check mark appears next to [View Only Set the Software Operation Panel to [View Only mode] in the mode] in the menu that is displayed by right-clicking the Software Introduction Operation Panel icon in the notification area. -
Page 160: Exiting [View Only Mode]
Chapter 8 Operational Settings Contents Exiting [View Only mode] You exited [View Only mode], and the scanner settings can now be Index changed. Exit [View Only mode] in the following procedure: Introduction Right-click the Software Operation Panel icon in the Scanner notification area, and select [View Only mode] from the Overview... - Page 161 Chapter 8 Operational Settings Contents Changing the Password Enter a new password then again to confirm, and click the Index [OK] button. Up to 32 characters can be used for the password. Change the password in the following procedure: Introduction Note that only alphanumeric characters (a to z, A to Z, 0 to 9) are allowed.
-
Page 162: Clearing The Password
Chapter 8 Operational Settings Contents Clearing the Password Leave both fields blank and click the [OK] button. Index Clear the password in the following procedure: Introduction Right-click the Software Operation Panel icon in the Scanner notification area, and select [Password Setting] from the Overview menu. -
Page 163: Resetting The Password
Chapter 8 Operational Settings Contents Resetting the Password Enter a new password then again to confirm, and click the Index [OK] button. Up to 32 characters can be used for the password. In case you forgot your password, it can be reset in the Introduction Note that only alphanumeric characters (a to z, A to Z, 0 to 9) are following procedure:... -
Page 164: Configuration Items
Chapter 8 Operational Settings Contents Index 8.3 Configuration Items Introduction The Software Operation Panel allows the configuration of the Scanner following settings for the scanner that is connected to the Overview computer. Device Setting How to Load Documents Start up the Software Operation Panel. How to Use the For details, refer to "8.1 Starting Up the Software Operation Panel"... - Page 165 Chapter 8 Operational Settings Contents Item Description Parameter/Value Factory Default Index Count Check the counters to determine when to replace Total Count(ADF)/Total Count (FB) [fi-7700/fi-7700S]/After Introduction (page 173) the consumables and to perform cleaning. cleaning/Brake Roller/Pick Roller Also use it to reset the counters when you have Scanner Remaining Ink (when the imprinter is installed) Only displayed...
-
Page 166: Device Setting 2
Chapter 8 Operational Settings Contents Device Setting 2 HINT Index The Software Operation Panel settings can be restored to the factory default. Introduction Start up the Software Operation Panel. To restore the settings to the factory default, click the [Default] button. - Page 167 Chapter 8 Operational Settings Contents Item Description Parameter/Value Factory Default Index Multifeed Specify a method for multifeed detection. Detect None/Check Overlapping (Ultrasonic)/Check None Introduction (page 195) multifeeds by monitoring the overlap, document Length/Check Overlapping and Length length, or the combination of both. Length: 10 mm Scanner This setting can also be configured in the...
- Page 168 Chapter 8 Operational Settings Contents Item Description Parameter/Value Factory Default Index Document check area Selected range: Select this item to restrict the [Selected range] check box Not selected Introduction specification for Multifeed area to run multifeed detection. Detection Scanner Enable/Disable (Middle): Specify whether to Enable/Disable Disable (page 197)
- Page 169 Chapter 8 Operational Settings Contents Item Description Parameter/Value Factory Default Index Number of paper feeding retries Configure this setting to change the number of 1 to 12 times 3 times Introduction (page 183) feeding retries when a pick error occurs. This setting can also be configured with the Scanner operator panel.
- Page 170 Chapter 8 Operational Settings Contents Item Description Parameter/Value Factory Default Index Manual Feeding Select whether to enable or disable the Disable/Enable Disable Introduction (page 201) continuous feed mode. This setting can also be configured with the Scanner operator panel. Overview Timeout Time: Specify the waiting time for the 5, 10, 20, 30, 40, 50, 60, 70, 80, 90, 100, 10 seconds...
- Page 171 Chapter 8 Operational Settings Contents Item Description Parameter/Value Factory Default Index Paper Protection Sensitivity Specify the sensitivity level to detect anomalies Detect: Feeding Accuracy/Feeding Noise Normal Introduction (page 187) upon feeding the documents when paper Low/Normal/High protection is enabled. Scanner This setting can also be configured with the Overview operator panel.
- Page 172 Chapter 8 Operational Settings Contents Item Description Parameter/Value Factory Default Index Low-speed Feed Mode Specify whether or not to reduce the scanning Disable/Enable Disable Introduction (page 193) speed to prevent paper damage. This setting can also be configured with the Scanner operator panel.
-
Page 173: Settings Related To Sheet Counters
Chapter 8 Operational Settings Contents Index 8.4 Settings Related to Sheet Counters Introduction Checking and Resetting the Sheet Counters Start up the Software Operation Panel. Scanner For details, refer to "8.1 Starting Up the Software Operation Panel" (page 156). Overview ■... - Page 174 Chapter 8 Operational Settings Contents ■ Resetting the Sheet Counters Item Description Index When you have replaced or cleaned a consumable part, reset the Pick Roller Number of sheets scanned after the pick Introduction corresponding counter by using the following procedure: roller is replaced Scanner Remaining Ink...
- Page 175 Chapter 8 Operational Settings Contents ■ Messages for Cleaning or Replacing Consumables Also, while this message appears, flashes on the Index The following message may appear while the scanner is in LCD. Introduction use: Depending on the message, one of the following indications Example message for replacing consumables appears on the second line in the [Ready] screen.
-
Page 176: Scanner Cleaning Cycle [Cleaning Cycle]
Chapter 8 Operational Settings Contents Scanner Cleaning Cycle [Cleaning Cycle] Replacement Cycle of Consumables [Life Index Counter Alarm Setting] The cleaning cycle for the scanner can be specified. Introduction The background color of the counter after cleaning in [Device The replacement cycle for each consumable can be specified. Scanner Setting] turns yellow when the sheet count after cleaning is The background color of the brake roller/pick roller counter in... - Page 177 Chapter 8 Operational Settings Contents Specify a value as the replacement cycle for each of the Index consumables (brake roller and pick roller). The value can range from 10,000 to 2,550,000 sheets (in increments Introduction of 10,000). Scanner Overview How to Load Documents How to Use the Operator Panel...
-
Page 178: Settings Related To Scanning
Chapter 8 Operational Settings Contents Index 8.5 Settings Related to Scanning Introduction Adjusting the Position to Start the Scan From the listing on the left, select [Device Setting] and Scanner click the [Offset] button. [Offset Setting/Vertical magnification Overview Adjustment] How to Load When the output position of the scanned image is not correct Documents or the image appears shortened/elongated (vertically), adjust... - Page 179 Chapter 8 Operational Settings Contents Adjust the level of offset/vertical magnification as needed. Vertical Description Index magnification Adjustment Introduction Vertical Adjusts the vertical (length) magnification. Scanner magnification The value can range from -3.1 to +3.1% (in Overview Adjustment increments of 0.1). (Sub: length) How to Load Documents...
-
Page 180: [Page Edge Filler (Adf)]/[Page Edge Filler (Fb)] (Fi-7700/Fi-7700S)
Chapter 8 Operational Settings Contents Removing Shadows/Streaks that Appear around Specify the width of each margin to fill in: top/bottom/left/ Index right. the Scanned Image Introduction [Page Edge Filler (ADF)]/[Page Edge Filler (FB)] T: top = 0 to 15 mm (fi-7700/fi-7700S) Scanner B: bottom = -7 to 7 mm... -
Page 181: Removing A Color From The Scanned Image [Dropout Color]
Chapter 8 Operational Settings Contents Removing a Color from the Scanned Image HINT Index [Dropout color] The color of the background is normally white. You can change the background to black in the scanner driver. Introduction For details, refer to the scanner driver's Help. With "Dropout color", you can select either green, red, blue ... -
Page 182: Shortening The Scanning Intervals [Pre-Pick]
Chapter 8 Operational Settings Contents From the listing on the left, select [Device Setting 2] Shortening the Scanning Intervals [Pre-Pick] Index [Dropout color]. "Pre-pick" refers to feeding the document to the starting Introduction position for scanning before the next scan. Scanner Enabling [Pre-Pick] shortens the interval between scanning Overview... -
Page 183: Number Of Paper Feeding Retries
Chapter 8 Operational Settings Contents Number of Paper Feeding Retries Specify whether or not to enable pre-pick. Index Select [Yes] or [No]. Configure this setting to change the number of feeding retries Introduction HINT when a pick error occurs. If you cancel in the middle of scanning while pre-pick is Scanner enabled, you will have to remove the pre-picked document, then load the document again. -
Page 184: Document Feed Speed [Pick Speed]
Chapter 8 Operational Settings Contents Document Feed Speed [Pick Speed] Specify the document feed speed. Index Normal: Normal document feed speed When multifeeds and paper jams occur frequently, you may be Introduction Slow: The document feed speed is slower than normal able to improve the performance by slowing down the speed ATTENTION Scanner... -
Page 185: Cropping The Image Boundary [Autocrop Boundary]
Chapter 8 Operational Settings Contents Cropping the Image Boundary Select whether to include or exclude the fractional data. Index Select [Optimize] to prevent any exclusion of fractional data from [AutoCrop Boundary] scanned images. Introduction Some fractional data may be generated in the images in the ATTENTION Scanner process of scanning. -
Page 186: Protecting The Documents From Being Damaged [Paper Protection]
Chapter 8 Operational Settings Contents Protecting the Documents from Being Damaged From the listing on the left, select [Device Setting 2] Index [Paper Protection]. [Paper Protection] Introduction Select a paper protection detection method. Scanner Feeding errors during scanning could damage or tear valuable Overview documents. -
Page 187: Specifying The Sensitivity Level For Paper Protection [Paper Protection Sensitivity]
Chapter 8 Operational Settings Contents Specifying the Sensitivity Level for Paper ATTENTION Index Protection Note that paper protection is a function that suppresses the documents from being damaged, and does not guarantee all Introduction [Paper Protection Sensitivity] documents to be saved. ... - Page 188 Chapter 8 Operational Settings Contents From the listing on the left, select [Device Setting 2] Select a paper protection detection method which you Index [Paper Protection Sensitivity]. want to change the sensitivity level for. Feeding Accuracy: Select this to detect a document that is unusually Introduction warped when a feeding error occurs.
-
Page 189: [Scan Setting For Document With Tab (Automatic Page Size Detection)]
Chapter 8 Operational Settings Contents Scan Setting for Documents with Tabs or Non- Select [Non-rectangular document], [Document with tab], Index or [Document without tab]. Rectangular Documents Introduction [Scan Setting for Document with Tab (Automatic Detection Description Method Page Size Detection)] Scanner Non- Scan extra 120 mm from the detected bottom... -
Page 190: Adjusting The Paper Picking Pressure [Pick Pressure]
Chapter 8 Operational Settings Contents Adjusting the Paper Picking Pressure [Pick Set the pick pressure for feeding paper. Index Low: Select this option for thick or curled paper Pressure] Default: Default paper picking pressure. Keep this setting for normal Introduction use. -
Page 191: Adjusting The Output Result For Overscan [Overscan Control]
Chapter 8 Operational Settings Contents Adjusting the Output Result for Overscan Start up the Software Operation Panel. Index For details, refer to "8.1 Starting Up the Software Operation Panel" [Overscan Control] (page 156). Introduction The scanner can be configured to increase the amount of From the listing on the left, select [Device Setting 2] ... -
Page 192: Scanning At High Altitude [High Altitude Mode]
Chapter 8 Operational Settings Contents Scanning at High Altitude [High Altitude Mode] Setting the Image Quality for Scanning [Image Index Quality Mode] Select whether to enable or disable high altitude mode. Introduction Low atmospheric pressure at high altitudes may lower the Set the image quality mode. -
Page 193: Low-Speed Scan At Lower Resolution [Low-Speed Feed Mode]
Chapter 8 Operational Settings Contents Low-speed Scan at Lower Resolution Select whether to disable or enable [Low-speed Feed Index Mode]. [Low-speed Feed Mode] Introduction HINT When scanning at a lower resolution (less than 400 dpi), you This setting can also be configured with the operator panel. Scanner can configure the scanner to scan documents slowly Overview... -
Page 194: Specifying The Paper Ejecting Speed [Stacking Control]
Chapter 8 Operational Settings Contents Specifying the Paper Ejecting Speed [Stacking Select whether to enable or disable [Stacking Control]. Index Control] ATTENTION Introduction The scanning speed slows down if the Stacking Control is enabled. This option allows you to slow down the ejecting speed when Scanner documents are ejected, preventing scanned documents from HINT... -
Page 195: Settings Related To Multifeed Detection
Chapter 8 Operational Settings Contents Index 8.6 Settings Related to Multifeed Detection Introduction Specifying a Multifeed Detection Method From the listing on the left, select [Device Setting 2] [Multifeed]. Scanner [Multifeed] Overview Multifeed is an error where two or more sheets are fed through the ADF at once. - Page 196 Chapter 8 Operational Settings Contents Select a detection method. Method Description Index Method Description Check Detects multifeed by the combination of [Check Introduction Overlapping Overlapping (Ultrasonic)] and [Check Length]. None Does not detect multifeed. and Length Note that multifeeds cannot detected Scanner accurately when a mixed batch of different sizes...
-
Page 197: Specifying The Area To Detect Multifeed [Document Check Area Specification For Multifeed Detection]
Chapter 8 Operational Settings Contents Specifying the Area to Detect Multifeed Specify the detection range. Index [Document check area specification for Multifeed Range Description Introduction Detection] Selected range Select the check box to specify the detection range (colored in light blue) in the Scanner The following setting is only available when you specified picture below. - Page 198 Chapter 8 Operational Settings Contents Example 1: Range Description Index Position: Middle Start Displays the start position of the detection Introduction Selected range = Enable, Start = 50 mm, End = 200 mm (Middle) by the length from the leading edge of the document.
- Page 199 Chapter 8 Operational Settings Contents Example 2: Example 3: (Bad Example) Index Position: Middle Position: Middle Introduction Selected range = Enable, Start = 0 mm, End = 300 mm Selected range = Enable, Start = 100 mm, End = 102 mm Scanner Overview How to Load...
-
Page 200: Specifying An Area Not To Detect Multifeed [Intelligent Multifeed Function]
Chapter 8 Operational Settings Contents Specifying an Area Not to Detect Multifeed Specify an operation mode. Index [Intelligent Multifeed Function] Mode Description Introduction Manual mode Ignores the multifeed when you load the When there is paper of the same size attached to a documents back in the ADF paper chute Scanner designated location on the page, the scanner memorizes the... -
Page 201: Settings Related To Waiting Time
Chapter 8 Operational Settings Contents Index 8.7 Settings Related to Waiting Time Introduction Waiting Time in Manual Feeding From the listing on the left, select [Device Setting 2] Scanner [Manual Feeding]. [Manual Feeding] Overview When you scan by manually loading one sheet at a time, you How to Load can specify the waiting time (interval) for loading the next Documents... -
Page 202: Waiting Time For The Scanner To Enter Power Saving Mode [Power Saving]
Chapter 8 Operational Settings Contents Waiting Time for the Scanner to Enter Power Index Saving Mode [Power saving] HINT Introduction When [Continuous Feed Mode] is enabled, the scanner will wait for the next document to be loaded until the specified time The waiting time for the scanner to enter power saving mode elapses even if you start scanning with no document in the ADF Scanner... - Page 203 Chapter 8 Operational Settings Contents Use the slider to specify the waiting time for the scanner Index to enter power saving mode. The value can range from 5 to 235 minutes (in increments of 5). Introduction HINT Scanner Selecting the [Power off after a certain period of time] check box Overview turns the power off automatically if the scanner is left on for a certain period of time without being used.
-
Page 204: Settings Related To Power On/Off
Chapter 8 Operational Settings Contents Index 8.8 Settings Related to Power ON/OFF Introduction Method of Turning the Scanner ON/OFF [Power Select one of the following: Scanner [Enable power switch]: Press the [Power] button on the operator SW Control] panel. Overview [Disable power switch]: Use an AC power strip to control the power The method by which the scanner is powered on/off can be supply for peripherals such as a scanner in... -
Page 205: Settings Related To Scanner Maintenance
Chapter 8 Operational Settings Contents Index 8.9 Settings Related to Scanner Maintenance Introduction Detecting Vertical Streaks [Vertical Streak Start up the Software Operation Panel. Scanner For details, refer to "8.1 Starting Up the Software Operation Panel" Detection] (page 156). Overview Select whether to enable or disable vertical streak detection. -
Page 206: Specifying The Sensitivity Level For Vertical Streak Detection [Vertical Streak Sensitivity]
Chapter 8 Operational Settings Contents Specifying the Sensitivity Level for Vertical Specify the sensitivity level. Index Low: Decreases the sensitivity level to detect dirt on the glass. Streak Detection Normal: Monitors dirt on the glass with normal sensitivity. Introduction [Vertical Streak Sensitivity] Keep this setting for normal use. -
Page 207: Scanner Maintenance And Inspection Cycle [Maintenance And Inspection Cycle]
Scan the Information" (page 67). For regular maintenance and inspection on the scanner by a service engineer, contact your FUJITSU scanner dealer or an Daily Care authorized FUJITSU scanner service provider. Replacing the Select whether to enable or disable [Maintenance and Consumables Inspection Cycle]. -
Page 208: Appendix
Contents Index Appendix Introduction Scanner Overview How to Load This appendix provides the following information. Documents A.1 Basic Specification ...........................209 How to Use the A.2 Installation Specification........................... 211 Operator Panel A.3 Outer Dimensions ............................213 Various Ways to A.4 Scanner Options ............................215 Scan A.5 Uninstalling the Software .........................216 A.6 Notes on Repackaging [fi-7700/fi-7700S] ....................217... -
Page 209: Basic Specification
Appendix Contents Index A.1 Basic Specification Introduction Scanner Item Specification Notes Overview fi-7600 fi-7700 fi-7700S How to Load Scanner type ADF + flatbed Manual feeding (Single/ Documents Continuous) is available with the ADF. How to Use the Image sensor Color CCD × 2 (front, Color CCD ×... -
Page 210: How To Load
Appendix Contents Item Specification Notes Index fi-7600 fi-7700 fi-7700S Introduction Flatbed Binary (black & white) 0.9 sec./sheet 300 dpi Scanner Scanning Grayscale speed Overview (A4 portrait) Color (*4) How to Load Loading capacity (*5) A4/Letter size documents or smaller: 300 sheets... -
Page 211: Installation Specification
Index A.2 Installation Specification Introduction Scanner Item Specification Overview fi-7600 fi-7700 fi-7700S How to Load Outer dimensions (W × D × H)(*1) 640 × 432 × 214 mm/25.20 × 706 × 500 × 345 mm/27.80 × 19.69 × 13.58 in. - Page 212 Appendix Contents *2: The depth excludes the operator panel. Index *3: The required installation space is a reference for scanning A3 size documents. *4: Includes the package weight. Introduction Scanner Overview How to Load Documents How to Use the Operator Panel Various Ways to Scan Daily Care...
-
Page 213: Outer Dimensions
Appendix Contents Index A.3 Outer Dimensions Introduction The outer dimensions are as follows: Scanner fi-7600 Overview How to Load Documents How to Use the Operator Panel Various Ways to 236 (9.29) Scan 640 (25.20) 194 (7.64) 138 (5.43) Daily Care... - Page 214 Appendix Contents fi-7700/fi-7700S Index Introduction 194 (7.64) 640 (25.20) 138 (5.43) Scanner Overview How to Load Documents How to Use the Operator Panel Various Ways to 706 (27.80) Scan Daily Care Replacing the Consumables Troubleshooting Operational Settings 500 (19.69) Unit: mm (in.) Appendix Glossary...
-
Page 215: Scanner Options
It can be used to automatically correct skewed images or accurately detect the size of the scanned document when scanning with the flatbed. Daily Care For details about purchasing the scanner options and more information, contact your FUJITSU scanner dealer or an authorized FUJITSU scanner service provider. Replacing the... -
Page 216: Uninstalling The Software
Index A.5 Uninstalling the Software Introduction Turn on the computer and log onto Windows as a user When Uninstalling Error Recovery Guide Select [Error Recovery Guide for fi-7600/7700/7700S]. Scanner with administrator privileges. When Uninstalling PaperStream Capture Overview Exit all running software. -
Page 217: Notes On Repackaging [Fi-7700/Fi-7700S]
Appendix Contents Index A.6 Notes on Repackaging [fi-7700/fi-7700S] Introduction Remove the stacker in the following procedure: Fixing the Transport Lock Scanner 1 Check that the stacker is placed in the lower position. Overview Fix the transport lock so that the flatbed is not damaged during 2 Hold the center ( ) of the stacker and slightly bend it to remove transport. -
Page 218: Fixing The Adf
Appendix Contents Fixing the ADF Remove the two ADF lock screws from the lock screw Index storage holes and attach them to the points to lock the Fix the ADF in place with the ADF lock screws so that the ADF Introduction ADF. - Page 219 Appendix Contents Index HINT Remove the document pad if the ADF lock screws are difficult Introduction to remove. If you remove the document pad, attach the document pad in the following procedure: Scanner 1 Place the document pad against the upper left corner on the Overview document bed.
-
Page 220: Installing The Adf Paper Chute (Feeder) And The Stacker
Appendix Contents Installing the ADF Paper Chute (Feeder) and the Install the stacker in the following procedure: Index Stacker 1 Insert the protrusion on the right side of the stacker into the slot Introduction and then push the left side of the stacker along the slot The procedure to install the ADF paper chute (feeder) and the the direction of the arrow. -
Page 221: Contact For Inquiries
For other inquiries regarding the scanner, refer to the following Operational web page: Settings http://imagescanner.fujitsu.com/g-support.html If the solution to your problem cannot be found on the above web page, refer to the contact information for your Fujitsu office on the following web page: Appendix http://imagescanner.fujitsu.com/warranty.html Glossary... - Page 222 Glossary Contents Glossary Index Introduction Scanner Dropout color Moiré patterns Ultrasonic sensor A4 size Overview Duplex scanning mode Multi Image A5 size How to Load Edge Extract Multifeed White reference sheet A6 size Documents Eject roller Noise removal A7 size Emphasis OCR (Optical Character A8 size...
- Page 223 Glossary Contents A4 size Index A standard paper size which is 210 × 297 mm (8.27 × 11.7 in.). Introduction A5 size A standard paper size which is 148 × 210 mm (5.83 × 8.27 in.). Scanner Overview A6 size A standard paper size which is 105 ×...
- Page 224 Glossary Contents CCD (Charge-Coupled Device) Image Sensor Index A sensor which perceives the light reflected from the document and converts it into digital form. CCD technology is the basis Introduction of high quality image acquisition in scanners, cameras and other devices. Default setting Scanner (Hardware)
- Page 225 Glossary Contents Edge Extract Index A function which traces the boundaries between black and white areas, and extracts them as outlines. Introduction Eject roller Rollers that feed documents from the ADF onto the stacker. Scanner Overview Emphasis A function which decreases the density of bright colors (except for white) around black areas. Increasing the value for this How to Load function removes dotted image noise and also produces "softened"...
- Page 226 Glossary Contents Gamma Index A unit which indicates the changes in the brightness of an image. It is expressed as a function of the electric input power to Introduction devices (such as a scanner and a display) and the brightness of the image. If the gamma rate is larger than 1, the brightness of an image increases and vice versa.
- Page 227 Glossary Contents Job Separator Index A sheet to insert between documents in a batch for separating different jobs. Introduction The following types of job separators are available: Scanner Job separator with patch codes: Overview A sheet with patch codes printed. Job separator with barcodes: How to Load A sheet with barcodes printed.
- Page 228 Glossary Contents OCR (Optical Character Recognition) Index A device or a technology that recognizes the text on documents and converts them into text data that can be edited. The Introduction shape of the characters are recognized by the differences in the light reflected off the documents. Operator panel Scanner A panel that consists of a display and buttons.
- Page 229 Glossary Contents Pre-pick Index Refers to feeding the document in advance to the position to start scanning. Introduction It shortens the interval between setting the document and feeding the document to the starting position. Resolution Scanner A measurement to indicate the quality (fineness) of an image. Resolution is displayed by the number of pixels within an Overview inch.
- Page 230 Glossary Contents Index USB (Universal Serial Bus) is a standard for interfaces used to connect devices such as keyboards and scanners. Up to 127 Introduction devices can be connected by this interface. It can be connected and disconnected without powering off the devices. For USB 3.1 Gen 1/USB 3.0, the data transfer rate is a maximum of 480 Mbps in Hi-Speed and a maximum of 5 Gbps in Scanner Super-Speed mode.
-
Page 231: Index
Index Contents Index Index Introduction Scanner Overview advanced scanning............error indications on operator panel....... How to Load Documents basic flow of scanning operation ........features ................basic specification ............fi-575BK................ How to Use the before you contact the scanner service provider..fi-760PRB .............. - Page 232 Index Contents scanning documents of different types and sizes... Index setting up the ADF paper chute (feeder) ......loading documents (ADF)..........setting up the stacker ............. locations that require cleaning........Introduction Settings Menu ..............settings related to multifeed detection......Scanner settings related to power on/off ........
-
Page 233: Pfu Limited
Scanner Overview How to Load Documents How to Use the Operator Panel Various Ways to Scan Daily Care fi-7600/fi-7700/fi-7700S Image Scanner Operator's Guide Replacing the Consumables P3PC-6092-01ENZ0 Issue date: January 2017 Troubleshooting Issued by: PFU Limited Operational The contents of this manual are subject to change without notice.
Need help?
Do you have a question about the FI-7600 and is the answer not in the manual?
Questions and answers