Table of Contents
Advertisement
Quick Links
Advertisement
Table of Contents
Troubleshooting

Related Manuals for Solid State Logic AWS 900+ SE


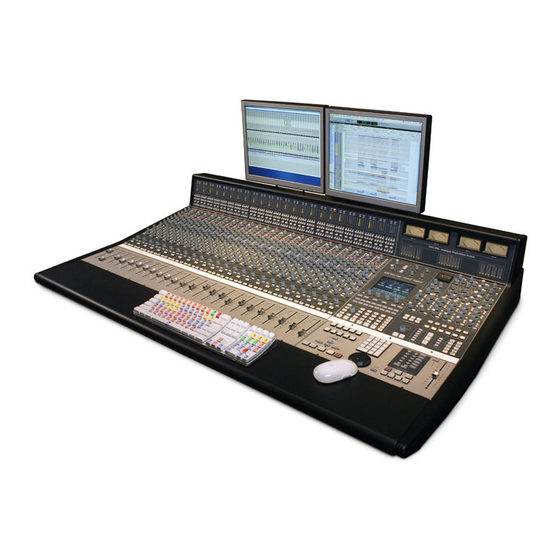
Summary of Contents for Solid State Logic AWS 900+ SE
- Page 1 Owner’s Manual 82S6AWS030B...
- Page 2 Initial release (0A) March 2006 Section 5A added June 2006 Updated to AWS900+ SE January 2009 As research and development is a continual process, Solid State Logic reserves the right to change the features and specifications described herein without notice or obligation. E&OE...
-
Page 3: Table Of Contents
Caution FFC Notice WEEE Directive Information Standards Conformance About This Manual Conventions Used Contacting Solid State Logic 2 Introduction to the AWS 900+ SE Analogue Workstation System Design Concepts Key Features Summary SuperAnalogue Audio Quality Console Feature Summary Exceptional Signal Processing... - Page 4 DAW Status Indicators 4-11 Channel Meters 4-11 Overload Indicators 4-11 Track Bus Routing 4-11 Dynamics Assignment 4-11 Signal Processor Routing 4-12 Centre Section 4-15 Introduction 4-15 Power Supply Indicators 4-15 Main Output Functions 4-15 AWS 900+ SE Owner’s Manual TOC-2...
- Page 5 Channel Banking Controls DAW Window Buttons DAW Utility Buttons The Default Button Channel Functions DAW Meters Status Indicator Channel Fader Channel Solo and Cut Tile Channel D-Pot Solo and Cut Buttons Channel Select Button AWS 900+ SE Owner’s Manual TOC-3...
- Page 6 Plug-in Display Modes 5-17 Viewing Current Inserts (Insert Mode) 5-17 Assigning a Plug-in or I/O Insert (Assign Mode) 5-17 Assigning the Same Plug-in to all Channels 5-17 Assigning the Same Plug-in to Selected Channels 5-17 AWS 900+ SE Owner’s Manual TOC-4...
- Page 7 AWS Sonar Control Screen 5-37 Mackie Control Surface Steinberg Overlay 5-38 The Digital Performer Template 5-39 Digital Performer Control Key Layout 5-39 AWS Digital Performer Control Screen 5-41 Mackie Control Surface Digital Performer Overlay 5-42 AWS 900+ SE Owner’s Manual TOC-5...
- Page 8 AutoTakeover Cut Automation Copy and Swap 7-10 Automation Setup Options 7-11 Fader Links 7-12 Pro Tools Setup Notes 7-13 Saving Mix Passes to a Mac or PC via Legacy MIDI SysEx 7-16 Installation 7-17 AWS 900+ SE Owner’s Manual TOC-6...
- Page 9 The Channel Meter Panel A-14 Centre Section Cards A-14 Trouble Shooting Chart - Channel Bay A-16 Trouble Shooting Chart - Centre Section A-17 Glossary Of Terms A-18 Link Options A-19 Environmental Specification A-20 Block Diagrams A-21 AWS 900+ SE Owner’s Manual TOC-7...
- Page 10 Console Operator’s Guide AWS 900+ SE Owner’s Manual TOC-8...
-
Page 11: Safety And Installation Considerations
Section 1 – Safety and Installation Considerations This section contains definitions, warnings, and practical information necessary to ensure a safe working environment. Please take time to read this section before installing or using your AWS 900+ SE. Please do not dispose of these instructions. -
Page 12: Power Safety
(PE). • Use only the Solid State Logic provided power cord. Use of any other power cord is not covered by your warranty and may cause fire or explosion. •... -
Page 13: Caution
To reduce the risk of fire, replace internal fuses only with identical type and rating. AWS 900+ SE may contain a lithium battery (CPU assembly 629645). There is a danger of explosion if the battery is incorrectly fitted. Replace only with the same or equivalent type. -
Page 14: About This Manual
If you have not previously used an SSL console, you are advised to read an introduction to the AWS 900+ SE in Section 2. Those of you who have experience of SSL’s legendary range of analogue consoles will have little difficulty getting to grips with the operation of this console. -
Page 15: Analogue Workstation System
Controllers etc.) to produce professional results from a modern DAW. Design Concepts The AWS 900+ SE is the only console that provides the dual benefits of a fully featured SuperAnalogue signal path, coupled with a comprehensive DAW controller. The product is a result of extensive customer and market feedback. -
Page 16: Exceptional Signal Processing
For most users, finding an integrated solution that answers all of their working needs is strongly desired. The AWS 900+ SE achieves this to an extent and quality that has previously been unavailable. -
Page 17: Pre-Installation Requirements
Console Control Surface The AWS 900+ SE console is a self contained system; there are no remote power supplies or I/O racks. The frame is not fitted with cooling fans. See the following page for a drawing of the console footprint. - Page 18 Installation AWS 900+ SE Owner’s Manual...
-
Page 19: Unpacking The Console
Unpacking The Console The AWS 900+ SE is supplied in a wooden crate with the legs in a smaller separate crate. Using a large screwdriver or pry-bar carefully open the crate containing the console. The crate is not designed to be reusable so does not have to be removed intact. - Page 20 Installation AWS 900+ SE Owner’s Manual...
-
Page 21: Removing The Trim
(visible from beneath the buffer). Top Trim The top trim is clipped over the front of the meter panels and secured onto the back panels by four M3 screws. AWS 900+ SE Owner’s Manual... - Page 22 Drawn: All inputs are active low (ie connect to 0V to activate). Inputs are pulled up to +4V via 3K9 resistor © Solid State Logic Inputs are diode clamped to 0V and +4V to protect the console circuitry Connector Panel Ref: All tallies are open collector with 47R series resistor.
-
Page 23: Studio Integration
This starpoint can then be returned – via a thick grounding cable (6mm sq. or greater) – to the chassis stud on the rear of the AWS 900+ SE console. This will reduce the risk of earth loops within the installation. -
Page 24: Connecting A Patchbay
Connecting a Patchbay The AWS 900+ SE may, of course, be fully or partially integrated to an external patchbay. 3rd party options are available, and SSL can provide patchbay solutions as cost options – contact your local SSL distributor for further information. -
Page 25: Daw Connection
Ethernet option a third party ipMIDI software driver must be installed on the DAW computer. Which Using these methods of communication allows the AWS 900+ SE to be used with a wide variety of DAW applications on a wide variety of platforms. The AWS 900+ SE uses Mackie control or a ‘HUI’ compatible protocol, and so any DAW program that can be configured to use three HUI devices can access the full power of the AWS 900+ SE. -
Page 26: Aws 900+ Se Owner's Manual
This would use the network settings provided by your Internet Service Provider or network administrator. You can easily switch between network Locations by going to the Apple Menu and scrolling down to Location. AWS 900+ SE Owner’s Manual 3-10... - Page 27 If your Macintosh features multiple network ports, you should set the priority of these so that the Ethernet port connected to your AWS is at the top of the list. To do this, choose Set Service Order from the Actions pop–up menu: AWS 900+ SE Owner’s Manual 3-11...
- Page 28 Alternatively, if you have already created a separate Location for your existing network you can simply delete the unused ports (Airport, Firewire) from the AWS900 location so that only the network port connected to AWS is remaining. AWS 900+ SE Owner’s Manual 3-12...
-
Page 29: Direct Network Connection (Pc)
Click on OK on both windows to save. Back in your network connection list, right click on your adaptor and ensure that it is enabled. If it is disabled, the enable option will appear in the list. Click on enable. AWS 900+ SE Owner’s Manual 3-13... -
Page 30: Enabling Ipmidi On Your Aws
If your console does not appear in the list, it suggests you have a network related issue. Please follow the steps in the network trouble shooting section at the end of this document to resolve the issue. AWS 900+ SE Owner’s Manual 3-14... -
Page 31: Setting Your Workstation(S) To Communicate Via Ipmidi
Installation Setting your workstation(s) to communicate via ipMIDI The AWS 900+ SE software uses 10 virtual MIDI ports which are pre-assigned as follows: Port Layer Assignment Port Layer Assignment Faders 1–8 – AWS Midi port 1 Faders 9–16 – AWS Midi port 2 Faders 17–24... -
Page 32: Pro Tools 7
4 if you are using the console MIDI ports): Also, set the MMC midi port in the Machine Control tab to ipMIDI port 7 (or AWS MIDI port 4 if you are using the console MIDI ports): AWS 900+ SE Owner’s Manual 3-16... -
Page 33: Logic Pro 8
MIDI Out port and Input assigned. As described above, normally only one layer should be set to Logic Handshake. Full details can be found in the online Logic Pro 8 Control Surfaces Support guide in the Logic Help Menu. AWS 900+ SE Owner’s Manual 3-17... -
Page 34: Preferences/Control Surfaces Setup Menu
If you have AWSomation, set the MMC midi port in File/Project Settings/Synchronisation/MIDI to ipMIDI port 7 (or AWS MIDI port 4 if you are using the console MIDI ports): For other DAWs, please refer to the program’s manual for details about configuring MIDI controllers. AWS 900+ SE Owner’s Manual 3-18... -
Page 35: Network Trouble Shooting
–c4 192.168.1.2 In both cases your host computer will try to establish communications with your console. In the resultant terminal text, check that the console responded to every message sent by your workstation. AWS 900+ SE Owner’s Manual 3-19... -
Page 36: Larger Networks
The NetGear FS108 (an eight port switch) has been used successfully. Most systems can be easily configured with a direct connection between AWS900+ SE and the controlling computer. AWS 900+ SE Owner’s Manual 3-20... -
Page 37: Assigning The Aws900+ Se Ip Address
<CR> where ‘nnn...’ is the subnet mask 192.168.1.1. Note that this should match other devices local to the console. setgate nnn nnn nnn nnn <CR> where ‘nnn...’ is the gateway address e.g. ‘10 1 1 1’ AWS 900+ SE Owner’s Manual 3-21... -
Page 38: Enabling The Aws Logictivity Features On Your Console
IN and OUT socket). To connect a port, the output of the MIDI interface unit port 1 should connect to the MIDI 1 input port of the AWS 900+ SE and the MIDI output of the AWS 900+ SE port 1 should connect to the input of your MIDI interface unit port 1. -
Page 39: Console Operator's Guide
The AWS 900+ SE uses SuperAnalogue™ technology from SSL’s flagship music console, the XL 9000 K Series. The AWS 900+ SE retains all of its sonic benefits and maintains a control surface that will be familiar to any recording engineer who has previously used our 4000 or 9000 range of analogue audio consoles. - Page 40 CUE A/B POST ChannelMo dule Channel Module Rear Connector Panel FX 3/4 SENDS INST FX 1/2 SENDS DAW LINE LEVEL OUTPUTS LINE auto FLIP Insert Send / Return Stereo Externa DIRECT l Rack PRE/EFX SENDS TO THE DAW Direct Outputs EFX BUS EFX BUS STEREO RETURNS 1-4...
-
Page 41: Routing And Signal Flow
DAW. Connect the DAW outputs to stereo External B input three (which is labelled DAW) on the AWS 900+ SE to allow the DAW output to be monitored and to used as a part of the foldback mix. -
Page 42: Daw I/O Labelling
Custom Combinations As you can see, a wide variety of connections are possible between the AWS 900+ SE and a DAW. It is worth taking some time and thought as to the best way to connect up your system for a flexible work flow that suits your studio’s requirements. -
Page 43: Example Methods Of Operation
Select SUM, EXT B and MIX monitor source buttons on the Monitor Control Panel. Adjust the monitor level using the main monitor level pot. Switch to DAW focus mode and adjust the DAW monitor mix using the AWS 900+ SE faders. - Page 44 Using the four FX send busses, external FX processing such as reverbs and delays, can be used. FX unit outputs can be returned back into the AWS 900+ SE via the four Stereo Return inputs in the console centre section. These can be routed to either of the foldback mixers, and to the record and mix busses.
-
Page 45: Mixing
There are three main methods of mix down available when using an AWS 900+ SE and DAW combination – mix down within the DAW, mix down via the AWS 900+ SE channel modules and a hybrid of the two previous methods. -
Page 46: Channel Strip
Finally, each channel strip is fitted with a long-throw (100mm) moving fader (shown later). At your first introduction to the AWS 900+ SE console, you will immediately see that the channel strip controls are presented in a pleasingly familiar manner. The following pages describe each control in detail, with brief coverage of the routing possibilities. -
Page 47: Channel Input Section
Track busses and Cue Stereo right to even busses. Mono FX sends are routed to all Track busses. Note that only one of the channel aux send controls may feed the EFX system. AWS 900+ SE Owner’s Manual... -
Page 48: Channel Output
(see Section 5 for more details). Moving Fader 100mm moving fader controls the analogue channel, or assigned DAW track, or send level. The required function is selected via the Master Control Panel (see Section 5 for details). AWS 900+ SE Owner’s Manual 4-10... -
Page 49: Daw Status Indicators
The dynamics sections normally receives a post EQ, pre insert signal. The IP and OP buttons place the dynamics section as the first or last element in the channel processing chain. See page 4-12 for more details. AWS 900+ SE Owner’s Manual 4-11... -
Page 50: Signal Processor Routing
Console Operator’s Guide Signal Processor Routing In keeping with SSL’s legendary range of large-format consoles, the AWS 900+ SE provides comprehensive signal processor routing facilities. Each channel strip has access to up to three separate signal processing devices: • 4-band parametric equaliser and high pass filter •... - Page 51 Signal Processor Routing This page is intentionally blank AWS 900+ SE Owner’s Manual 4-13...
- Page 52 Console Operator’s Guide AWS 900+ SE Owner’s Manual 4-14...
-
Page 53: Centre Section
Record bus outputs with the Mix bus for further processing. This insert point for each bus is pre main fader and compressor (see below). The insert send and returns are connected via 6.35mm jacks on the centre section connector panel (Send/Return, Left/Right). AWS 900+ SE Owner’s Manual 4-15... -
Page 54: Console Operator's Guide (Continued)
Stereo Compressor The AWS 900+ SE features a new version of SSL’s legendary G Series (aka Quad) compressor. The compressor can be assigned to either the Record or Mix bus (not both) using the COMP button in the main bus select matrix (see previous page). -
Page 55: Centre Section Dynamics
Gate/Expander reduces the signal level once it has passed below the threshold. Note that this control interacts with the Range control. HOLD – Determines the time after the signal has decayed below the threshold before the gate starts to close. Variable from 0 to 4 seconds. AWS 900+ SE Owner’s Manual 4-17... -
Page 56: Metering
Track outputs will route the odd numbered output to the left AFL bus and the even numbered output to the right AFL bus. A set of LCD bargraph meters in the centre section are dedicated to metering the bus outputs. AWS 900+ SE Owner’s Manual 4-18... -
Page 57: Monitoring
The CUT button cuts the monitor feeds to whichever set of monitors is selected. CUT is activated automatically by the SLATE talkback button. CUT and DIM can also be activated externally via the GPIO/Talkback connector. AWS 900+ SE Owner’s Manual 4-19... -
Page 58: External Source Selectors
Inputs to the external source selectors are connected via 25-way D-types (four for External A, one for External B) on the connector panel. It is also possible to rename the consoles ‘External Sources’. Please see chapter 8 - The AWS Console & Logictivity for further information. AWS 900+ SE Owner’s Manual 4-20... -
Page 59: Monitor Insert
Main B output. This can be useful in rooms that work on both music, using full bandwidth separate surround speakers, and film using multiple lower powered surround speakers. AWS 900+ SE Owner’s Manual 4-21... -
Page 60: Bass Management
BMB – Uses the Alt 5.1 subwoofer instead of the main subwoofer for bass management when MINI B is selected and BMN is on. RTRN – Returns you to the top layer of the MONITOR OPTIONS selection. AWS 900+ SE Owner’s Manual 4-22... -
Page 61: Monitor Level Calibration
Monitor Level Calibration The monitor calibration system enables the level of any loudspeaker connected to the AWS 900+ SE to be trimmed by ±10db. Note that with the monitor gain at maximum a trim level of +10dB corresponds to unity gain through the monitor section. -
Page 62: Monitor Level Display And Calibrated Listening Level
The third option setting ‘Gain’ allows a range of volume level settings where the maximum value is 0dB. All other values are reductions of this level through to ‘OFF’. AWS 900+ SE Owner’s Manual 4-24... -
Page 63: Solo/Afl/Pfl
D-type connector on the centre section connector panel. The mono FX sends are also available on 6.35mm jacks on the connector panel. A dedicated set of LCD bargraphs just above the master controls provides metering of the Cue and FX busses. AWS 900+ SE Owner’s Manual 4-25... -
Page 64: Foldback And Headphone Outputs
Two headphone sockets are provided below the motion control panel. The level of this output is set using the PHONES button in the ‘MISC LEVELS’ section of the monitor panel, in conjunction with the main monitor pot. AWS 900+ SE Owner’s Manual 4-26... -
Page 65: Stereo Fx Returns
REC – Routes all channels to the Record bus. A second press un-routes all channels from the Record bus. MIX – Routes all channels to the Mix bus. A second press un-routes all channels from the Mix bus. AWS 900+ SE Owner’s Manual 4-27... -
Page 66: Communications
Note: The talkback switch functions are all duplicated on the Talkback/GPIO connector on the rear of the console as are the monitor CUT and DIM switches. See Section 3 for more information. AWS 900+ SE Owner’s Manual 4-28... -
Page 67: Oscillator
The oscillator may be routed to the TRACK busses, the MIX bus and the RECord bus (individually or simultaneously). The oscillator output is also available on an XLR on the centre section connector panel. AWS 900+ SE Owner’s Manual 4-29... -
Page 68: Centre Section Metering
CLR – Press this to clear the currently held peak readings. Further meter scaling available in ‘SSL / Misc’ menu. Options are as follow; 24 dbu = 0dBFS / 22 dbu = 0dBFS / 20 dbu = 0dBFS / 18 dbu = 0dBFS. AWS 900+ SE Owner’s Manual 4-30... -
Page 69: Daw Control
The following three options are detailed in 4-27. The range of settings is shown below. Talkback switches are: Momentary / Latching / Auto (Play) / Auto (Record) Listen switch is: Latching / Auto (Play) / Auto (Record) Red light switch: Manual / Auto (Play) / Auto (Record) AWS 900+ SE Owner’s Manual 4-31... - Page 70 It is possible to do this without reaching the Power switch at the rear of the console through the addition of a soft menu RESTART. When you select this you will be prompted to CONFIRM and your console will reboot. AWS 900+ SE Owner’s Manual 4-32...
-
Page 71: Daw Control Guide
When connected to a Digital Audio Workstation which support either the HUI or Mackie Control Universal (MCU) protocols, the AWS 900+ SE becomes a powerful digital work surface controller, giving direct access to the most important controls within the DAW. The console faders can be used to control the workstation faders and sends, the 24 channel D-Pots can be used to control pans, sends and I/O functions and the Master Control Panel and plug-in controller provide easy access to a range of other parameters. -
Page 72: Communication With Your Daw
Communication with your DAW The AWS 900+ SE connects to your chosen DAW via three MIDI ports at the rear of the console or via MIDI over Ethernet. Each AWS 900+ SE DAW layer emulates three HUI or MCU controllers. The HUI and Mackie Control (MCU) protocol are widely supported by DAW manufacturers. -
Page 73: Console Focus
Control Panel. This switches the channel meters, faders, solo and cut buttons between control of the analogue signal path and the DAW. When the Console Focus button is illuminated, the AWS 900+ SE is in ‘Analogue Focus Mode’. When the focus mode button is not illuminated, the AWS 900+ SE is in ‘DAW Focus Mode’. -
Page 74: Digital In-Line Mode
The AWS 900+ SE console has 24 touch sensitive moving faders, however, if the DAW session has more faders than this, the AWS 900+ SE can ‘bank flip’ its faders to control any number of virtual faders within the DAW. -
Page 75: Daw Window Buttons
ALT increases the resolution of rotary controls and inverts switch selections when held down. It is a direct equivalent of the Macintosh keyboard Option key. CTRL disengages grouping when held down. It is a direct equivalent of the Macintosh keyboard Ctrl key. AWS 900+ SE Owner’s Manual... -
Page 76: The Default Button
OPTION and press DEFAULT to perform a reset across all sends. Resetting Plug-ins Hold the DEFAULT button and press COMPARE (the Plug-In Editor function). The plug-in default value is either the factory setting or user setting determined within the DAW. AWS 900+ SE Owner’s Manual... -
Page 77: Channel Functions
CTRL button or by touching one fader in a group while adjusting another fader’s level. Relative fader levels are maintained upon release of the fader. AWS 900+ SE Owner’s Manual... -
Page 78: Channel Solo And Cut Tile
Scribble Strip Displays When an AWS 900+ SE channel fader is controlling a DAW fader level, the channel scribble strip will indicate a four character version of the DAW channel name. When controlling the analogue channel it displays the number of the fader, eg ‘Fader 23’. -
Page 79: Channel Sel Button -Track Arming/Edit/Select
Master Control Panel changes the channel SEL buttons to BYPASS buttons. Pressing a channel SEL switch will bypass all plug-ins on that channel. The channel EDIT flag will light to show that all plug-ins are bypassed. AWS 900+ SE Owner’s Manual... -
Page 80: Select Mode
Holding down the ALT button allows you to make fine adjustments to the gain. See page 5-10 for information on using faders to set Send levels. 5-10 AWS 900+ SE Owner’s Manual... -
Page 81: Setting Sends Pre/Post Fader
D-Pot will toggle the Send pre/post selection on that channel. The green LED below the D-Pot lights to show PRE is selected. The fader SOLO button will solo the channel, not the send. SOLO 5-11 AWS 900+ SE Owner’s Manual... -
Page 82: Input Output And Send Routing
3. Turn a channel D-Pot to scroll through a list of available DAW inputs or outputs (names are derived from the DAW I/O settings not the AWS 900+ SE). The list will appear in the channel scribble strip. The green LED below the D-Pot will flash. -
Page 83: Motion Control Panel
Cycle through Record Modes (Normal, Quickpunch, TrackPunch, Loop) CTRL + RECORD Cycle through Machine Control Masters (accessible via the transport window) CTRL + ONLINE SHIFT + Back slash(/) Link or Unlink the Edit and Timelines 5-13 AWS 900+ SE Owner’s Manual... -
Page 84: Setting Pre And Post Roll
Hold down ALT and press the PRE or POST button to highlight the left hand numeric field of the pre-roll or post- roll time window. The time is displayed on the AWS 900+ SE TFT screen in place of the DAW position. The selected numeric field will flash. -
Page 85: Zoom, Navigation And Selection Modes
The arrow keys now become horizontal and vertical zoom controls for the edit/arrange window on your DAW. Fixed edit/arrange zoom settings can be saved or recalled from the AWS 900+ SE numeric keypad: To save a zoom setting – press SHIFT + numeric keypad number To recall a zoom setting –... -
Page 86: Shuttle/Scrub Wheel
To Recall a Marker/Cue point – press a number followed by the decimal point button (Numeric Keypad in Classic mode) or a decimal point followed by a number followed by the decimal point button (Numeric Keypad in Transport mode). 5-16 AWS 900+ SE Owner’s Manual... -
Page 87: Plug-In Editor
Pro Tools HUI Control Guide Plug-In Editor The AWS 900+ SE comes with a powerful Plug-in Editor located in the console centre section. From here, plug- ins and hardware inserts can be assigned, and plug-in parameters can be edited. Plug-In Editor Display... -
Page 88: Plug-In Display Modes
SHIFT and pressing the channel SEL keys. Follow steps 1 and 2 above to select a plug-in, then hold down OPTION + SHIFT before pressing the D-Pot switch to assign the plug-in to the selected channels. 5-18 AWS 900+ SE Owner’s Manual... -
Page 89: Selecting A Plug-In To Edit
Holding down the ALT button will enable a finer resolution scroll. In Velocity-sensitive mode the speed of scrolling is dependent upon how quickly you turn the D-Pot. To toggle between the two modes press the F5 button in the Fkys menu. 5-19 AWS 900+ SE Owner’s Manual... -
Page 90: Aws 900+ Se Owner's Manual
(9-16). The menus are ordered as follows: 1. Automation Enables Automation Enable modes (AuEn) globally engage or disengage automation for the following items: Faders, Pans, Plug-Ins, Mutes (cuts), Sends and Send Muting. See page 5-22 for more details. 5-20 AWS 900+ SE Owner’s Manual... -
Page 91: Automation Modes Menu
Suspend – Fader/Mix groups can be suspended at any time by selecting SUSPEND; they are now disengaged from their respective grouping arrangements. Pressing SUSPEND a second time re-enables the groups. 5-21 AWS 900+ SE Owner’s Manual... -
Page 92: Function Keys Menu
Copy, Paste and Delete. 8. SSL Menu This menu is used to access additional optional AWS 900+ SE features such as Console Setup, AWSomation and Total Recall. Information regarding these features will be found in the appropriate section of this manual. -
Page 93: Working With Automation
Working with Automation The AWS 900+ SE’s touch sensitive moving faders can be used to write automation for the DAW fader. Most automation functions can be enabled from the soft key matrix below the console’s display screen. Within this are menus for Automation Enables, Automation Modes, Grouping and Editing functions. -
Page 94: Suspending Automation
If a plug-in parameter is enabled for automation the red ‘LED’ below the on-screen D-Pot will flash. When writing automation data, the ‘LED’ will light continuously. Refer to your DAW manual for more information on all aspects of its automation system 5-24 AWS 900+ SE Owner’s Manual... -
Page 95: Implementation
MCU based DAW Control Guide Mackie Control (MCU) Emulation The AWS 900+ SE expands available DAW control options by emulating the Mackie Control MIDI protocol as an alternative to the HUI protocol emulation. The AWS software includes dedicated front panel function key mappings for Logic, Nuendo, Sonar and Digital Performer. - Page 96 The Jog Wheel together with the Scrub function key, and the Cursor keys and Cursor mode switch are active in all templates. The outer Jog Wheel is not supported, neither is the numeric keypad. However the 1-8 keys replicate F1 - F8 Function keys in certain templates. 5-26 AWS 900+ SE Owner’s Manual...
-
Page 97: Daw Control Function Key Overview
Channel and Control surface banking – identical to the HUI Mode. Project/Menu Keys – Similar style functions to HUI mode but template specific. Modifier keys – Layout and Name template specific. Dedicated Function(s) – Template specific. 5-27 AWS 900+ SE Owner’s Manual... -
Page 98: The Logic Template
‘flip’ parameters on to the fader but the encoder itself has no function. The Display indicates D-Pot mode with a two-character label. Plug Ins are controlled from the channel D-Pots so there is no longer an ‘EDIT’ select mode for the channel SEL key. 5-28 AWS 900+ SE Owner’s Manual... -
Page 99: Aws Logic Control Screen
Fkys are the eight functions keys as on the HUI interface. These are also permanently mapped to the numeric keypad, which is not supported in the Mackie Control protocol. A ‘ Rude’ Solo tally is displayed in the on-screen Status area. This corresponds to the front panel LED on a MCU. 5-29 AWS 900+ SE Owner’s Manual... - Page 100 DAW Control Guide Standard Mackie Control Front Panel Layout 5-30 AWS 900+ SE Owner’s Manual...
-
Page 101: The Nuendo/Cubase Template
Mackie Extender, so three Mackie Control units are entered in to the device list with the top most unit corresponding to AWS channels 17-24 and the other units mapped to the remaining channels in descending order. 5-31 AWS 900+ SE Owner’s Manual... -
Page 102: Nuendo Control Key Layout
CHANNEL is unchanged and assigns the AWS channel gain element or DAW channel to the D-Pot according to the state of the Console Focus key. The Encoder switch is used to ‘flip’ parameters on to the faders as before but now includes all processing parameters not just send levels. 5-32 AWS 900+ SE Owner’s Manual... -
Page 103: Aws Nuendo Control Screen
The AWS Nuendo Control screen Fkeys are the eight functions keys. These are also mapped to the numeric keypad, which is not supported in Logic Control. Fkys Grps are the eight Fader Group keys. Fkys 5-33 AWS 900+ SE Owner’s Manual... -
Page 104: Mackie Control Surface Steinberg Overlay
DAW Control Guide Mackie Control Surface Steinberg Overlay MASTER UNDO REDO READ WRITE SENDS INSTRUMENTS SAVE REVERT PROJECT MIXER MOTORS SOLO DEFEAT SHIFT LEFT RIGHT CYCLE PUNCH PREVIOUS NEXT 5-34 AWS 900+ SE Owner’s Manual... -
Page 105: The Sonar Template
NAME VALUE AUTO SAVE CHANNEL SMPTE READ BEATS The majority of functions are controlled via dedicated keys with less reliance on the 8x8 key matrix located beneath the screen than with the HUI version. 5-35 AWS 900+ SE Owner’s Manual... - Page 106 Sonar overlay and the 4 TRACKS keys. ENTER mimics the main ENTER Key, and CLR the CANCEL Key. A second operation of the KEYPAD key inhibits the Numeric key pad outputting MIDI codes and should send an EDIT ON, EDIT OFF command to cancel the mode. 5-36 AWS 900+ SE Owner’s Manual...
-
Page 107: Aws Sonar Control Screen
Fkys Trks AUTO Snap Darm Ofst Trks bring the four TRACKS function keys on to the bottom row of soft keys. Fkys Trks AUTO NAud NMid FitA FitP 5-37 AWS 900+ SE Owner’s Manual... - Page 108 NEXT WIN CLOSE WIN NEW AUDIO BACK MODIFIERS AUTOMATION CONTROL GROUP READ/OFF SNAPSHOT TRACK MAIN DISARM DISARM OFFSET OFFSET SAVE SAVE UNDO UNDO REDO REDO MARKER LOOP SELECT PUNCH JOG PARAM. LOOP ON/OFF HOME 5-38 AWS 900+ SE Owner’s Manual...
-
Page 109: The Digital Performer Template
SMPTE CMND EDIT OPTION BEATS TRACKS CHANNEL ENTER ESCAPE The majority of functions are controlled via dedicated keys with less reliance on the 8x8 key matrix located beneath the screen than the HUI interface. 5-39 AWS 900+ SE Owner’s Manual... - Page 110 The Keys above the Motion controls are assigned to related transport functions as on the HUI interface. EDIT PRE/ SOLO GRID SYNC LINK POST CYCLE PUNCH SELECT MARKER On screen tallies are provided for the Marker Key, together with a second tally for the MCU ‘Rude Solo’ indicator. 5-40 AWS 900+ SE Owner’s Manual...
-
Page 111: Aws Digital Performer Control Screen
Two sets of menu keys are accessed via the 8x8 soft key matrix. AUTO calls up the six Automation modes. AUTO READ TOUCH TRIMT OWRT LATCH TRIML REC are the Record set-up functions. AUTO ODUB THRU CLEAR CLICK COUNT 5-41 AWS 900+ SE Owner’s Manual... -
Page 112: Mackie Control Surface Digital Performer Overlay
PRE / POST THRU CLIP EXT SYNC LINK ROLL MODIFIERS AUTOMATION PROJECT SHIFT CONTROL READ/OFF TOUCH TRIM TOUCH SAVE AUDIBLE MODE OPTION COMMAND OVERWRITE LATCH TRIM LATCH UNDO REDO MARKER EDIT GRID CYCLE PUNCH SELECT SOLO 5-42 AWS 900+ SE Owner’s Manual... -
Page 113: Total Recall
See page 6-4. Up to 32 different TR setups can be stored in local memory on the AWS 900+ SE. An unlimited number can be saved via Logictivity through the AWS Remote browser or for Legacy use as a System Exclusive dump to a sequencer, MIDI librarian or workstation. -
Page 114: The Sel Menu
Total Recall SEL menu The SEL menu is the main file menu for the Total Recall system. The main window shows a list of stored setups. The setup which is being displayed has the word ‘selected’ next to it. selected shows which setup Total Recall TR 1 selected is currently being displayed... -
Page 115: Total Recall Via Logictivity
Total Recall Total Recall via Logictivity Note: Please see chapter 8 for further details on the Logictivity browser. The Total Recall tab will show you all Total Recall setups for your current project. If you would like to Rename one of your Total Recall set ups, please highlight the one which you would wish to change and press the Rename TR Setup button or right click on your selection and select Rename. -
Page 116: Saving Legacy Midi Setups To A Mac Or Pc
Press the Load soft key. • Play through the SysEx block of data. As soon as the AWS 900+ SE detects the start of valid data it will delete all the current setups and replace them with the stored ones from the MIDI track. -
Page 117: Total Recall Display Pages
Total Recall Total Recall Display Pages There are four Total Recall display pages. These are selected using soft keys as described below. In all cases controls that are in different positions from the stored values are highlighted in white (faders and rotary controls) or yellow (switches). - Page 118 Total Recall Centre section displays Compressor and Foldback ComPressor & Foldback Pressing CmFb or pressing the master fader status switch will display the centre section compressor, the master fader and foldback sections. A double press on the fader status switch will reset the REC and MIX fader positions and the REC and MIX processing switches.
-
Page 119: Installation Of Total Recall Option
Legacy Total Recall data can be transferred to and from a PC or Mac using MIDI port 4 on the AWS 900+ SE. This must be connected to a spare MIDI port on your MIDI interface and added to your MIDI setup before you can save or load Total Recall. - Page 120 Total Recall AWS 900+ Owner’s Manual...
-
Page 121: Awsomation
AWSomation™ is a fully featured automation package, developed from SSL's renowned G and K Series Ultimation systems, but with a feature set designed specifically for the AWS 900+ SE. AWSomation™ utilises the classic SSL look and feel, familiar to thousands of engineers worldwide, to add dynamic fader and cut automation to the console. -
Page 122: Operation
The left D-Pot can be used to scroll through the list of AWSomation Mix Passes. A yellow cursor indicates which Mix Pass is currently chosen to be modified. The D-Pot’s push-push switch can be used to either start a New Mix, or select a previous Mix Pass to modify. AWS 900+ SE Owner’s Manual... -
Page 123: Awsomation Data Management Via Logictivity
Delete. Deleting Mix Passes from the Console Mix Passes can be deleted from memory by highlighting the Mix Pass you wish to delete, holding down the Delete soft key and pressing the Confirm soft key. AWS 900+ SE Owner’s Manual... -
Page 124: Creating A Mix Pass
(i.e.reference mix). Also, if you are writing automation in a section that had no previous mix data, when you drop out of write the faders go back to their original levels. AWS 900+ SE Owner’s Manual... -
Page 125: Mix Running
DAW was rewound (the ‘rollback point’, and the Mix status will return to Mix Running. Whilst in Mix Review you may rollback as many AWS 900+ SE Owner’s Manual... -
Page 126: Join And Revise
If the system is in play or stopped following a Rollback operation with any faders or cuts in Absolute mode, Discard clears any data made since the start of the Rollback pass and forces all channels in Absolute back to Replay. The Discard label is only shown when there is Mix data to discard. AWS 900+ SE Owner’s Manual... -
Page 127: Updating A Mix Pass
If the motors are Off, the fader can be positioned at a suitable reference point on the scale before entering the Trim update status by pressing the fader switch. AWS 900+ SE Owner’s Manual... -
Page 128: Tlock
Moff - Motors Off - this mode suspends the motorised playback of Mix data via the moving faders. In this mode it will emulate a VCA automation system. Moff automatically activates the fader SuspdAll Links function (see later). AWS 900+ SE Owner’s Manual... -
Page 129: Snap Mode
Cut. Match and Play are mutually exclusive. If one is active, selecting the alternate function cancels the first one. Match and Play are automatically deselected after each operation unless the Latching option is enabled in the Setup Menu. AWS 900+ SE Owner’s Manual... -
Page 130: Copy And Swap
Copy is to a single channel only. To copy to multiple channels, repeat the Copy operation as many times as required. The new Mix data is not saved until the subsequent Mix Pass is Ended. AWS 900+ SE Owner’s Manual 7-10... -
Page 131: Automation Setup Options
Choices are: • Automation Mode - shows Manual, Safe or Auto • Channel names in mix running - After pressing Execute will display channel names • Channel names - will always display channel names AWS 900+ SE Owner’s Manual 7-11... -
Page 132: Fader Links
SuspdAll will suspend all links in the list. Moff automatically activates the SuspdAll function. Touching two faders in the same link group will suspend all faders within that group. Delete To delete a Link highlight the Link, then use the Delete and Confirm keys. AWS 900+ SE Owner’s Manual 7-12... -
Page 133: Pro Tools Setup Notes
MTC messages. It will quite happily attempt to play out stored mix data to incoming timecode with a different frame rate, but this will result in small but potentially annoying timing errors in automation playback. AWS 900+ SE Owner’s Manual 7-13... - Page 134 Leave the ID as 127 (this sends to all connected devices). Setup/Preferences Enable these options Enable the two options circled above. This ensures that the MMC locate messages are transmitted correctly from Pro Tools. AWS 900+ SE Owner’s Manual 7-14...
- Page 135 When mixing with the AWS 900+ SE it is advisable to enable the two options circled above. This ensures that a Rollback operation will occur following a locate or rewind operation in Pro Tools. If the first options are not enabled, then Pro Tools does not send a locate command following a Stop command even though the desk counter will show the position that Play last occurred from and where Play will resume from.
-
Page 136: Saving Mix Passes To A Mac Or Pc Via Legacy Midi Sysex
• Play through the SysEx block of data. As soon as the AWS 900+ SE detects the start of valid data it will delete all the current Mix Passes and replace them with the stored ones from the MIDI track. -
Page 137: Installation
If your AWS does not have AWSomation, an AWSomation activated version of the current AWS 900+ SE software must be downloaded from the SSL website to a Mac or PC that is connected to the AWS 900+ SE MIDI port. - Page 138 AWSomation AWS 900+ SE Owner’s Manual 7-18...
-
Page 139: Logictivity And Projects
Existing AWS 900 and AWS 900+ consoles can benefit from the feature set of the AWS 900+SE, by the purchase of an upgrade kit . The AWS 900+ SE Upgrade is sold through SSL Console Distributors. To locate your local SSL Console Distributor visit http://www.solidstatelogic.com/locator/... -
Page 140: The Aws 900 Remote
‘AWS 900 Connected - AWS 900 SN XXX’ message will appear in the Status field: Once you have successfully connected to the console the Browser pages will become populated with the current data stored on the console. AWS 900+ SE Owner’s Manual... -
Page 141: Total Recall Tab
Each Project contains: • Multiple Mixes (number limited by available memory) • Multiple Total Recall Setups (number limited by available memory) • Fader Link setup • Channel scribble strip text • Project Notes, Artist, Engineer etc details AWS 900+ SE Owner’s Manual... - Page 142 Clicking on Save will allow you to save the track sheet as a .xml file, which can be opened and edited with a standard software package. Clicking on OK will close this pop up window. AWS 900+ SE Owner’s Manual...
- Page 143 To rename one of your Mix passes, highlight the one which you would wish to change and press the Rename Mix button or right click on your selection and select Rename. To delete a Mix Pass, highlight the one which you would like to delete and press the Delete Mix button. AWS 900+ SE Owner’s Manual...
- Page 144 Rename TR Setup button or right click on your selection and select Rename. If you would like to delete a Total Recall set up, highlight the one which you would like to delete and press the Delete TR Setup button. AWS 900+ SE Owner’s Manual...
-
Page 145: Channels Tab
Furthermore you can use your computer keyboard’s ‘TAB’ or ‘SHIFT’ + ◄ ► to browse the felds. The channel names are stored as part of each project, so loading a different project will automatically reset the channel scribble strips to the stored set of names. AWS 900+ SE Owner’s Manual... -
Page 146: Externals Tab
Furthermore you can use your computer keyboards ‘TAB’ or ‘SHIFT’ + ◄ ► to browse the felds. Note: External names are stored in the console in non-volatile RAM so they are retained after restarting or powering off. AWS 900+ SE Owner’s Manual... -
Page 147: About Tab
Logictivity, Projects and Data Management The About Tab The ‘About’ Tab shows the current software versions of both console and browser and provides links to the SSL Support, FAQ’s, Downloads and Registration areas of the SSL website. AWS 900+ SE Owner’s Manual... - Page 148 Section 8 The AWS Console & Logictivity AWS 900+ SE Owner’s Manual 8-10...
-
Page 149: Appendices
+20/–10mm (+0.8/–0.4 inches) Width 1,445mm (57 inches) Depth (maximum) 873mm (34.4 inches) Heat Dissipation Less than 600 Watts Supply Voltage 90 - 250 Volts, Auto Ranging Supply Current 5.5 - 2.0 Amps Power Factor 0.95 AWS 900+ SE Owner’s Manual... -
Page 150: Service & Warranty Information
Follow the instructions in the Troubleshooting section (page A-6), to confirm that the fault lies within the AWS 900+ SE system. If this suggests there is a fault with the AWS 900+ SE, then contact your local distributor who will either supply a replacement assembly or arrange for a visit from an engineer to resolve the problem. -
Page 151: Audio Connectors And Pinouts
Hot (+ve) Ring Cold (–ve) Pinout as used for unbalanced audio (Instrument Inputs only): Sleeve Screen/Ground Hot (+ve) Pinout as used for Foot Switch Inputs : Sleeve Screen/Ground Control Input - pull to ground to activate AWS 900+ SE Owner’s Manual... - Page 152 Stereo Cue BL Alt LFE Bus 4 Stereo Cue BR Alt Left Surround Bus 5 FX 1 Alt Right Surround Bus 6 FX 2 Mini BL Bus 7 FX 3 Mini BR Bus 8 FX 4 AWS 900+ SE Owner’s Manual...
- Page 153 Inputs are diode clamped to 0V and +4V to protect the console circuitry. All tallies are open collector with a 47R series resistor. Red Light contacts rated at 125V AC @ 0.5A; 30V DC @ 1A; 110V DC maximum. AWS 900+ SE Owner’s Manual...
-
Page 154: Midi Implementation Chart
System Real–time Clock (F8) Commands Local on/Off Aux Messages All Notes Off Active Sensing System Reset Mode 1:Omni On, Poly Mode 2: Omni On, Mono x: Yes Mode 3:Omni Off, Poly Mode 4: Omni Off, Mono 0: No AWS 900+ SE Owner’s Manual... - Page 155 Appendices A blank page AWS 900+ SE Owner’s Manual...
-
Page 156: Troubleshooting
You should always check external equipment first (unless the fault is obviously within the console – such as loss of signal when the EQ is switched in). The AWS 900+ SE spends the majority of its life in a stationary position, whereas microphones, their cables and effects devices etc. -
Page 157: Control Faults
When monitoring the Track Busses you notice that the audio can only be heard on the left monitor output. Your first step is to refer to the AWS 900+ SE Centre Section block schematic. From this you will see that the channel’s output passes through five different modules before reaching the monitors. We can halve the problem by checking the signal path halfway through the chain. - Page 158 Once again refer to the AWS 900+ SE Control Block Schematic. From the diagram you can see that Multidrop Bus data for Bay 2 is connected to socket PL2 on the 629645X1 CPU. Power down the console and remove the channel meter from Bay 3 (refer to Replacing Modules on page A-10 for details).
-
Page 159: Replacing Modules
Having identified the source of the problem, you are now in a position to replace the faulty part. If you purchased an AWS 900+ SE spares kit, then locate the relevant assembly and follow the replacement instructions below. If, however, you do not have a replacement card to hand, you should contact your local SSL distributor who will be able to supply you with a replacement. -
Page 160: The Channel Strip
Using both the puller, and the finger hole next to the bottom screw, pull the channel strip clear from its edge connectors. AWS 900+ SE Owner’s Manual A-12... -
Page 161: The Channel Fader
Then, unscrew the six countersunk screws and remove the top plate. Each fader can then be lifted clear from its connector on the bus card. When reassembling, the top plate has locating pins that locate into each fader to ensure its correct positioning. AWS 900+ SE Owner’s Manual A-13... -
Page 162: The Channel Meter Panel
A-10. Each meter panel is secured by four screws across the top. Remove these and lift the meter panel clear, taking care to disconnect the ribbon connectors. Centre Section Cards AWS 900+ SE Owner’s Manual A-14... - Page 163 Dynamics 1 to differentiate between the two modules. For fault finding purposes the two Dynamics cards (629918X1 and X2) may be swapped with each other. When exchanging the two modules ensure that only the module fitted in the Dynamics 1 slot has links LK1, LK2 and LK3 fitted. AWS 900+ SE Owner’s Manual A-15...
-
Page 164: Trouble Shooting Chart - Channel Bay
All channel strips in one bay Refering to Control Overview diagram, Re-seat as required. do not function. ensure that the Multidrop Bus connector between the Channel Backplane and the CPU is seated correctly. AWS 900+ SE Owner’s Manual A-16... -
Page 165: Troubleshooting Chart - Centre Section
Centre Section meter does Is the connector labelled IN on the Meter If no, re-seat as required. not function. Panel seated correctly? Is the connector labelled PL11 on the CPU If no, re-seat as required. seated correctly? AWS 900+ SE Owner’s Manual A-17... -
Page 166: Glossary Of Terms
The four rotary encoders below the TFT screen. Track Busses Eight console-wide mono busses that can be used as feeds to your DAW inputs, as FX sends, or pretty much anything else you can think of. AWS 900+ SE Owner’s Manual A-18... -
Page 167: Link Options
Right Surround 80Hz lo-pass filter rolls off at 24dB/octave 629654X2 only LK12* Fitted • Bass management switches Hi Pass filters in to surround Not fitted Surround Hi Pass filters disabled *Use in conjunction with LK10 on 629653X2 card AWS 900+ SE Owner’s Manual A-19... -
Page 168: Environmental Specification
< 0.2G (3 - 100Hz.) Non-operating, power off: < 0.4G (3 - 100Hz.) Shock Operating: < 2G (10mSec. Max.) Non-operating: < 10G (10mSec. Max.) Altitude (above sea level) Operating: 0 to 3000m Non-operating: 0 to 12000m AWS 900+ SE Owner’s Manual A-20... -
Page 169: Block Diagrams
Following this page you should find four block diagrams. Two show signal flow in the AWS 900+ channel strip and centre section; two cover the power and control circuits. If any drawing is missing, please contact your local SSL distributor for a replacement. AWS 900+ SE Owner’s Manual A-21... - Page 170 Appendices AWS 900+ SE Owner’s Manual A-22...
- Page 171 Solid State Logic Solid State Logic Owner’s Owner’s 71mm Manual 71mm Manual 82S6AWS030B 82S6AWS030B 30mm 30mm Fonts Heading: Optima, bold in 10pt Logo: AWS 900 Spine Logo.tiff, shrunk to 29% and centred Title: BankGothic Md BT, normal in 18pt Part No.:...
Need help?
Do you have a question about the AWS 900+ SE and is the answer not in the manual?
Questions and answers