Table of Contents
Advertisement
Advertisement
Table of Contents

Subscribe to Our Youtube Channel
Related Manuals for Solid State Logic SSL UF1


Summary of Contents for Solid State Logic SSL UF1
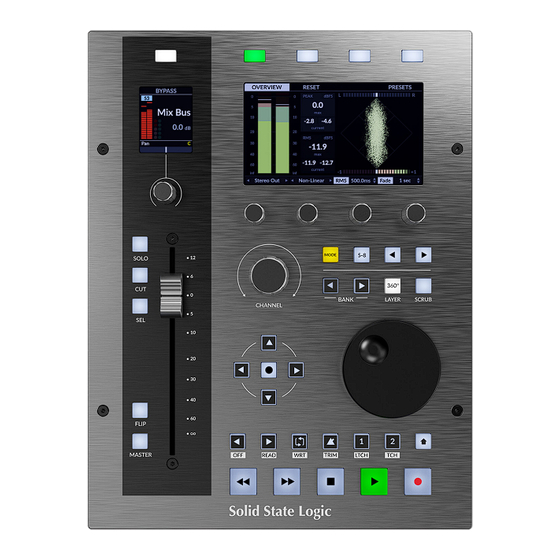
- Page 1 SSL UF1 User Guide SSL UF1...
- Page 2 As research and development is a continual process, Solid State Logic reserves the right to change the features and specifications described herein without notice or obligation. Solid State Logic cannot be held responsible for any loss or damage arising directly or indirectly from any error or omission in this manual.
-
Page 3: Table Of Contents
Contents Table of Contents Overview What is SSL UF1? Features Safety Notices Get-Started Unpacking UF1 Physical Specification Fitting The Stands (Optional) Connecting Your UF1 Hardware Downloading SSL 360° Software and the SSL Meter Plug-in Installing SSL 360° Software System Requirements... - Page 4 SSL Chanel Strip Soft Key & V-Pot Assignments Large LCD Layout - Meter Mode Overview Analogue 31- Band Real-Time Analyser (RTA) UF1 LCD Messages SSL 360° Software Messages SSL Support - FAQs, Ask a Question and Compatibility Safety Notices SSL UF1 User Guide...
-
Page 5: Overview
Overview Overview What is SSL UF1? UF1 is an incredibly powerful one-fader control surface that goes above and beyond the competition. It boasts not one but two high quality displays, a 100 mm fully motorised 100 mm fader, premium soft-feel durable rubber keys and a weighted jog wheel, all encased in a durable metal chassis. -
Page 6: Get-Started
12V, 2A AC/DC Power Adapter with swappable plugs for various regions UF1 Physical Specification Dimensions Width 205 mm x Height 265.9 mm x Depth 62.5 mm Weight Unboxed (unit only) - 1.8 kg Boxed - 2.88 kg SSL UF1 User Guide... -
Page 7: Fitting The Stands (Optional)
If you need a steeper angle of elevation, you can rotate the stands and fix them to the chassis using the shorter side. This gives you three additional angle options to choose from. 1. Unscrew the rubber feet and move to the other end 2. Rotate the stands so that the short side fixes to the chassis SSL UF1 User Guide... -
Page 8: Connecting Your Uf1 Hardware
USB port on your computer. The same applies regarding the use of USB hubs; the UF1 may need to be plugged directly into a different USB port on your computer. Tip: The THRU port can also be used to plug in USB dongles for DAW software or plug-in licenses. SSL UF1 User Guide... -
Page 9: Downloading Ssl 360° Software And The Ssl Meter Plug-In
Proceed with the installation, following the on- screen instructions. screen instructions. System Requirements Computer operating systems and hardware are constantly changing. Please search for 'UF1 Compatibility' in our online FAQs to check if your system is currently supported. SSL UF1 User Guide... -
Page 10: Registering Your Uf1 - Redeeming And Authorising Your Meter Plug-In License
Once logged into your account, click on REGISTER PRODUCT on the Dashboard page and on the following page choose REGISTER HARDWARE PRODUCT. SSL UF1 Choose SSL UF1 and complete the form. SSL UF1 User Guide... - Page 11 On this page, enter your iLok User ID into the box, wait for your iLok account to be validated and then click DEPOSIT LICENSE. Finally, open iLok License Manager, locate the SSL Meter plug-in license and right-click Activate onto your computer or physical iLok. SSL UF1 User Guide...
-
Page 12: Uf1 Youtube Tutorials
Product Overview & Features UF1 YouTube Tutorials The SSL YouTube channel hosts in-depth tutorials on how to setup and use UF1 with your DAW. SSL UF1 User Guide... -
Page 13: Keyboard Identify (Mac Only)
STEP 5: Select your region and click 'Done'. STEP 4: When presented with the message 'Press the key immediately to the right of the Shift Key', press and hold the 360° key on UF1 and then press MacKeyID. SSL UF1 User Guide... -
Page 14: Uf1 Hardware Layout
This section will help familiarise yourself with the front panel controls of the UF1 surface. It is intended to be an overview, rather than a comprehensive explanation of each function or mode. For more detail on the integration of features with each DAW, please refer to the DAW Tutorials sections of this User Guide. SSL UF1 User Guide... - Page 15 The MODE key toggles between various control states dependant on your DAW, as well as providing direct access to the SSL Meter Plug-In control. The 5-8 key expands the V-pot controls beyond the 1st 4 channels of the selection to the 5 to 8 Channels of the bank of 8. SSL UF1 User Guide...
- Page 16 Engaging the SHIFT key re-purposes the secondary transport keys to access various DAW automation modes such as Off, Read, Write, Trim, Touch and Latch (DAW dependant). Use in conjunction with the SEL key to select a DAW track and then put it into the desired automation mode. SSL UF1 User Guide...
-
Page 17: Connector Panel
Please use a foot-switch designed for 'normally closed' operation and also, to ensure full compatibility use a momentary action foot-switch, or choose a foot-switch that can be set to momentary. This will ensure correct operation with assigned DAW commands. SSL UF1 User Guide... -
Page 18: Ssl 360° Software Overview
3 - Connected Units This area shows any 360°-enabled devices (including UF1) connected to your computer, along with their respective serial numbers. Please allow 10-15 seconds for units to be discovered once they are plugged in. SSL UF1 User Guide... - Page 19 9 - SSL 360° Software Version Number This area displays the version number of SSL 360° that is running on your computer. Clicking on the version text will take you to the Release Notes information on the SSL website. SSL UF1 User Guide...
-
Page 20: Control Setup Page
DAW's Transport commands. The DAW that drives (the one that is linked to) these buttons on UF1 must be selected from the drop-down list here. You'll be able to choose from any of the 3 DAWs you have nominated in the DAW CONFIGURATION section. SSL UF1 User Guide... -
Page 21: Switching The Control Layer From Uf1 (Layer Set Up)
Plug-in Mixer). To do this, hold down the 360° Button. Whilst keeping it held, select the desired DAW (or Plug-in Mixer) using the soft keys at the top of the UF1. STEP Select desired DAW layer via the associated Soft Key. STEP 1: Enter UF1 Layer Mode by pressing & holding the 360° key. SSL UF1 User Guide... - Page 22 Allows you to revert this Layer to the factory-shipped DAW profile. 5 - DAW Command/Keyboard Shortcut Assignments Clicking on the pen symbol will allow you to change the assignment of any of the user-assignable keys. See the next page for more information. SSL UF1 User Guide...
- Page 23 CLEAR ALL button. Alternatively, you can use the individual X buttons to delete particular lines. The SHORT LABEL text field allows you to enter the label you want to appear on the LCD to accompany this keyboard shortcut sequence. SSL UF1 User Guide...
- Page 24 DAW metering on the LCD at all times. If TRIM is engaged, the indication will flash between TRIM and READ or TRIM and WRITE. "I wish I was blank, I wish I was blank, I wish I could thank, I wish I was blank" - Blank, The Smashing Pumpkins. SSL UF1 User Guide...
-
Page 25: Daw Communication
The functions and labelling of the buttons dynamically change, as appropriate, depending on the currently loaded DAW profile. NATIVE INTEGRATION (SSL 360° Plug-in Mixer) Control of the SSL 360° Plug-in Mixer is done natively via our own proprietary protocol and therefore uses neither HUI or MCU. SSL UF1 User Guide... -
Page 26: Pro Tools With Uf1 - Tutorial
STEP 3 : Enable SSL V-MIDI Port(s) in Pro Tools. STEP 5 : Configure the UF1 unit as a HUI type. Set Receive From as SSL V-MIDI Port 1 and Send To as SSL V-MIDI Port 1. SSL UF1 User Guide... -
Page 27: Small Lcd Layout
Track Metering Power Tip: The F1 command, available in the DAW commands list SSL 360° will clear clips on the track metering. You can assign this command to any of the configurable soft keys on UF1. Alternatively, you'll find this command preassigned to the 2nd soft key in Soft Key Page 7. SSL UF1 User Guide... -
Page 28: Large Lcd Layout
Low Scribble - Displays a label or value readout for the parameter currently assigned to the V-Pot. V-Pot Readout Bar - Displays the position of the currently assigned V-Pot function. V-Pots - 4 x V-Pots that control the assigned parameters. SSL UF1 User Guide... -
Page 29: Tutorial
Sends can be flipped to the fader using the FLIP key. This is useful for riding Send levels or creating headphone mixes. In FLIP mode, the V-Pot will control the Pan of the currently selected Send. Master Master is disabled in Pro Tools and has no function. SSL UF1 User Guide... - Page 30 In Pro Tools, simply right-click with your mouse in the selected track area (white area) and choose 'Scroll Into View'. There is a super-handy keyboard shortcut for Scroll Into View, that is: Shift+Ctrl+Mouse click in the selected track area (white area) of the Pro Tools GUI. SSL UF1 User Guide...
- Page 31 The bank keys move the fader selection in multiples of 8, with the 1st channel of the 8 appearing on both the Main Fader and the 1st of the channels to appear across the 4 V-Pots unless 5-8 is selected. SSL UF1 User Guide...
- Page 32 Pressing the Mode key again, the left and right cursors move between audio clip edit points, or, tab between transients if Tab To Transient is active in Pro Tools. Up and down will move the edit cursor between tracks. SSL UF1 User Guide...
- Page 33 Shifted Functions of the Secondary Transport Keys - Automation Modes You will notice that there are additional labels beneath the Secondary Transport keys. These functions are accessed by pressing the SHIFT button and provide access to the automation modes within Pro Tools. SSL UF1 User Guide...
- Page 34 Within SSL 360°, on the UF1 page under ADVANCED there is the tick-box option for Show Auto State. Enabling this will provide a constant indication of the current automation state of each track in the top-left of the LCD - READ, WRITE or TRIM. SSL UF1 User Guide...
- Page 35 If you prefer the FINE behaviour and would like FINE mode to be engaged automatically every time you turn a V-Pot in Pan or Send modes, you can enable the 'Always Fine Pan' and/or 'Always Fine Sends' in SSL 360°, on the UF1 page under ADVANCED settings. SSL UF1 User Guide...
- Page 36 2 - Small LCD Soft Key - press to toggle pre/post state for the channel on the fader strip. 3 - Large LCD V-Pots - push the V-Pots beneath the large screen to control pre/post states on these channels. SSL UF1 User Guide...
- Page 37 2 - Small LCD Soft Key - press to toggle send mute on/off for the channel on the fader strip. 3 - Large LCD V-Pots - push the V-Pots beneath the large screen to control send mutes on these channels. SSL UF1 User Guide...
- Page 38 STEP 2: Use a SEL key to slot using the V-Pot to scroll select the track. through the insert slots A-E and push to load. STEP 4: Use the Page keys to move through the plug-in parameter pages. SSL UF1 User Guide...
- Page 39 Meter plug-in mode allows direct control of the SSL Meter plug-in via SSL 360° (not via HUI plug-in control). Because this mode is generic across all DAWs, please refer to the SSL Meter control section at the end of this user guide for more information. SSL UF1 User Guide...
- Page 40 SOFT KEYS PAGE 2 SOFT KEYS PAGE 3 SOFT KEYS PAGE 4 SOFT KEYS PAGE 5 SOFT KEYS PAGE 6 SOFT KEYS PAGE 7 SOFT KEYS PAGE 8 SOFT KEYS PAGE 9 SOFT KEYS PAGE 10 SSL UF1 User Guide...
- Page 41 Send B Quick Punch Send C Forward Send D Rewind Send E Stop Play Mute Record Red/Rdy Next Marker Rec/Rdy ALL Previous Marker Loop Last Marker Click Reset Marker UF1 Send Default Edit Capture Edit Separate SSL UF1 User Guide...
-
Page 42: Logic With Uf1 - Tutorial
Help Tags' tab, ensure that 'Parameter Options' section. per Parameter' is set to '1' and 'Only when name' and 'Parameter value' are both all parameters fit on one page' is unticked. unticked. Set 'Maximum MIDI Bandwidth' to 100%. SSL UF1 User Guide... - Page 43 If you do not see the device setup options list on the left-hand side, press 'i' on your computer keyboard to show it. Ensure that 'Channel Strip View Mode' is set to 'Arrange' in the device setup options list, to ensure that UF1 follows the order of tracks in your Logic arrangement. SSL UF1 User Guide...
-
Page 44: Small Lcd Layout
Logic using UF1, please refer to the Logic Help Menu > Logic Pro Control Surface Support document. Open the document and go to the Mackie Control section. The Mackie Control section of the Logic Pro Control Surfaces Support contains a full Mackie Control Protocol guide. SSL UF1 User Guide... -
Page 45: Large Lcd Layout
Low Scribble - Displays a label or value readout for the parameter currently assigned to the V-Pot. V-Pot Readout Bar - Displays the position of the currently assigned V-Pot function. V-Pots - 4 x V-Pots that control the assigned parameters. SSL UF1 User Guide... -
Page 46: Tutorial
V-Pot parameters such as Send levels or Plug-in parameters on the fader instead of the V-Pots. The Flip mode used is configured in the Mackie Control Surface Setup. Master The Master Key enables the UF1 fader to control Logic's Master Fader,. SSL UF1 User Guide... - Page 47 The CHANNEL encoder controls the system volume level, if the audio device you are using can be controlled by the operating system's volume up/down. For example, if you're on the road with your headphones plugged into the computer's built-in audio output. SSL UF1 User Guide...
- Page 48 360° button, in conjunction with a press of the it held down, you can switch to a different Layer by relevant top-row soft key allows you to switch to a different DAW pressing the relevant top-row soft key. or Plug-in Mixer Layer. SSL UF1 User Guide...
- Page 49 V-Pot assignment modes (Sends, Plug-ins etc). The next page of this User Guide provides more information on using the cursor keys in conjunction with 'Channel View' and 'Mixer View' in Logic's Mackie Control implementation. SSL UF1 User Guide...
- Page 50 Shifted Functions of the Secondary Transport Keys - Automation Modes You will notice that there are additional labels beneath the Secondary Transport keys. These functions are accessed by pressing the SHIFT button and provide access to the automation modes within Logic Pro. SSL UF1 User Guide...
- Page 51 STEP 2: Engage the SHIFT KEY to re-purpose the secondary transport keys to be automation keys. STEP 1: Use the SEL key to select the track. STEP 3: press to select the automation mode you wish to set the track to. SSL UF1 User Guide...
- Page 52 V-Pot 2, so pushing V-Pot 2 (whilst keeping SEND held down), assigns the V-Pots to control Send levels. This offers an alternative method of achieving the same task as using the cursor keys in 'Mixer View'. SSL UF1 User Guide...
- Page 53 Mute) on the even numbered send slots e.g. Send 2, 4, 6, 8 etc. Use the 5-8 key in conjunction with the left and right cursor keys to access all available sends. The Name/Value function (preassigned to Quick Key 2 key) is also useful to alternate the displays between showing the names or values of the send functions. SSL UF1 User Guide...
- Page 54 Soft Keys Page 2 Soft Keys Page 3 Soft Keys Page 4 Soft Keys Page 5 Soft Keys Page 6 Soft Keys Page 7 Soft Keys Page 8 Soft Keys Page 9 Soft Keys Page 10 SSL UF1 User Guide...
- Page 55 Record Foot-switch SMPTE/Beats Rec/Rdy Previous Marker Next Marker MIDI Tracks Inputs Audio Tracks Audio Instruments Busses Outputs User Shift Option Control Read Write Touch Latch Trim Save Undo Group Cancel Enter Marker Nudge Cycle Drop Replace Click SSL UF1 User Guide...
-
Page 56: Cubase/Nuendo With Uf1 - Tutorial
V-MIDI Port 1 Source and set MIDI Output to SSL V-MIDI Port 1 Destination. Click Apply. STEP 5 : Add a Mackie Control STEP 4 : Open the Studio > Studio and configure MIDI Input and MIDI Setup... menu in Cubase. Output to SSL V-MIDI Port 1. Click Apply. SSL UF1 User Guide... -
Page 57: Small Lcd Layout
FaderdB - Provides a readout of the current fader position. LowLCD - Displays name or value information for the V-Pots, depending on which mode or page is selected. V-Pot Readout Bar - Displays the position of the currently assigned V-Pot (encoder) function. SSL UF1 User Guide... -
Page 58: Large Lcd Layout
LowLCD - Displays name or value information for the V-Pots, depending on which mode or page is selected. DAW Track Metering - 12-segment track metering + clip. V-Pot Readout Bar - Displays the position of the currently assigned V-Pot (encoder) function. V-Pots - 4 x V-Pots that control the assigned parameters. SSL UF1 User Guide... -
Page 59: Tutorial
Pressing the FLIP key switches the functions of the V-Pots and faders. This is useful for various reasons, including tasks such as controlling Send levels or Plugin parameters on the fader instead of the V-Pots Master The Master Key enables the UF1 fader to control Cubase's Master Fader,. SSL UF1 User Guide... - Page 60 The CHANNEL encoder controls the system volume level, if the audio device you are using can be controlled by the operating system's volume up/down. For example, if you're on the road with your headphones plugged into the computer's built-in audio output. SSL UF1 User Guide...
- Page 61 Layer by press of the relevant top-row soft key allows you to switch to a pressing the relevant top-row soft key. different DAW or Plug-in Mixer Layer. SSL UF1 User Guide...
- Page 62 Pressing the Mode key again, the up and down and left and right cursor keys are used to navigate through channels in the Edit Window, and the Left & Right keys moving to the start and end point of the currently selected track's current region. SSL UF1 User Guide...
- Page 63 SHIFT button and provide access to the automation modes within Cubase. Note that READ and WRITE are the only automation keys that apply to Cubase, so all other keys in this section are disabled. Modes unavailable in Cubase MCU SSL UF1 User Guide...
- Page 64 With the MCU Shift key held (preassigned to Quick Key 2) the Fader Bank keys apply specific channel types (Audio, Groups, FX Channels,MIDI etc) to the UF1 surface. Please reference Cubase Remote Control Devices documentation for more information. SSL UF1 User Guide...
- Page 65 Strictly speaking, the NAME/VALUE (preassigned to Quick Key 1) function is not a V-Pot assignment mode by itself but it does have the useful function of displaying parameter values on the LCDs. Without engaging this, parameter values are only shown when a V-Pot is turned. SSL UF1 User Guide...
- Page 66 Press the FX SEND key. This mode allows you to control all the Send parameters for the currently selected track using the V-Pots - e.g. all the Send levels on the selected track. • Use the PAGE < > keys to move between parameter pages. SSL UF1 User Guide...
- Page 67 Use the PAGE < > keys to move between parameter pages. Each V-Pot assignment mode may vary slightly in terms of how it operates so it's important to refer to the Mackie MCU Pro section of Steinberg's Remote Control Devices PDF for more information. SSL UF1 User Guide...
- Page 68 - choose a category and then a command from that category. Each F key can be shifted using the MCU Shift key, giving you a total of 16 user commands plus the optional 'User A' and 'User B' foot pedals. SSL UF1 User Guide...
- Page 69 Fader Bank 5 Fader Bank 6 Fader Bank 7 Fader Bank 8 Undo Redo Save Revert Read Write Project Mixer Sends (FX IFX 1st Insert) Instruments (VSTs) Master (Insert) Motors Solo Defeat Shift Left Right Cycle Punch Previous SSL UF1 User Guide...
-
Page 70: Ableton Live With Uf1 - Tutorial
SSL V-MIDI Port 1 Destination. STEP 4 : Add a MackieControl and STEP 3 : Go the Preferences menu configure for SSL V-MIDI Port 1 on and click on the Link MIDI tab. Input and Output SSL UF1 User Guide... -
Page 71: Small Lcd Layout
LowLCD - Displays a label or value readout for the parameter currently assigned to the V-Pot, unless a fader is moved, in which case the fader dB value is shown. DAW Track Metering - 12-segment track metering + clip V-Pot readout bar - Displays the position of the currently assigned V-Pot (encoder) function. SSL UF1 User Guide... -
Page 72: Large Lcd Layout
Low Scribble - Displays a label or value readout for the parameter currently assigned to the V-Pot, unless a fader is moved, in which case the fader dB value is shown. V-Pot Readout Bar - Displays the position of the currently assigned V-Pot function. V-Pots - 4 x V-Pots that control the assigned parameters. SSL UF1 User Guide... -
Page 73: Tutorial
Pressing the FLIP key switches the functions of the V-Pots and faders. This is useful for various reasons, including tasks such as controlling Send levels on the fader instead of the V-Pots. Master The Master Key enables the UF1 fader to control Live's Master Fader. SSL UF1 User Guide... - Page 74 The CHANNEL encoder controls the system volume level, if the audio device you are using can be controlled by the operating system's volume up/down. For example, if you're on the road with your headphones plugged into the computer's built-in audio output. SSL UF1 User Guide...
- Page 75 Layer by press of the relevant top-row soft key allows you to switch to a pressing the relevant top-row soft key. different DAW or Plug-in Mixer Layer. SSL UF1 User Guide...
- Page 76 The Soft key labelled LNCH SCENE (Soft Key Page 1) is programmed to execute the Launch Scene function in Live. Simply use the cursor keys to navigate to the scene you want and press the LNCH SCENE key to launch the scene. SSL UF1 User Guide...
- Page 77 Shifted Functions of the Secondary Transport Keys - Automation Modes You will notice that there are additional labels beneath the Secondary Transport keys. These functions normally relate to a DAW's automation modes but this is not applicable for Live. SSL UF1 User Guide...
- Page 78 4 - I/O Allows you to set the I/O settings for each track on the V-Pots. Pressing the I/O key repeatedly will cycle through the following options: Input Type, Input Source, Output Type and Output Destination. SSL UF1 User Guide...
- Page 79 Soft Key Page 3 Soft Key Page 4 Soft Key Page 5 Soft Key Page 6 Soft Key Page 7 (Unassigned) Soft Key Page 8 (Unassigned) Soft Key Page 9 (Unassigned) Soft Key Page 10 (Unassigned) SSL UF1 User Guide...
- Page 80 Browser Detail Undo BTA (Back To Arrangement) Draw Redo Add Locator Follow Previous Loc (Locator) Next Loc (Locator) Cycle Punch In Punch Out Start Rewind Forward Stop Play Record Launch Clip Launch Scene Rec/Rdy Meter Readout SSL UF1 User Guide...
-
Page 81: Studio One With Uf1 - Tutorial
SSL V-MIDI Port 1 Destination. Click OK. STEP 3 : Go the Preferences menu STEP 4 : Add a Mackie Control and and click on the External Devices configure for SSL V-MIDI Port 1 on tab. Receive From and Send To. SSL UF1 User Guide... -
Page 82: Small Lcd Layout
LowLCD - Displays a fader value or value readout for the parameter currently assigned to the V-Pot, depending on the current mode. DAW Track Metering - 12-segment track metering + clip V-Pot readout bar - Displays the position of the currently assigned V-Pot (encoder) function. SSL UF1 User Guide... -
Page 83: Large Lcd Layout
Low Scribble - Displays a label or value readout for the parameter currently assigned to the V-Pot, or the fader dB value if the V-Pot assignment mode is Pan. V-Pot Readout Bar - Displays the position of the currently assigned V-Pot function. V-Pots - 4 x V-Pots that control the assigned parameters. SSL UF1 User Guide... -
Page 84: Tutorial
Pressing the FLIP key switches the functions of the V-Pots and faders. This is useful for various reasons, including tasks such as controlling Send levels on the fader instead of the V-Pots. Master The Master Key enables the UF1 fader to control Studio One's Master Fader. SSL UF1 User Guide... - Page 85 The CHANNEL encoder controls the system volume level, if the audio device you are using can be controlled by the operating system's volume up/down. For example, if you're on the road with your headphones plugged into the computer's built-in audio output. SSL UF1 User Guide...
- Page 86 UF1 & all other SSL 360° powered devices. A long press and hold of the 360° button, in conjunction with a press of the relevant top-row soft key allows you to switch to a different DAW or Plug-in Mixer Layer. SSL UF1 User Guide...
- Page 87 When the Zoom key is lit the left and right cursor keys perform horizontal and vertical track zooming. Pressing the Zoom key again, the up and down cursor keys change the selected track and the left and right cursor keys change the selected audio clip in the Arrangement View. SSL UF1 User Guide...
- Page 88 Shifted Functions of the Secondary Transport Keys - Automation Modes You will notice that there are additional labels beneath the Secondary Transport keys. These functions are accessed by pressing the SHIFT button and provide access to the automation modes within Studio One. SSL UF1 User Guide...
- Page 89 STEP 1: Use the SEL key to select the track. STEP 3: press to select the automation mode you wish to set the track to. TRIM automation mode is not applicable to Studio One and as such, the key is disabled. SSL UF1 User Guide...
- Page 90 V-Pot 6 - Send Slot 2 Bypass (5-8 key engaged to access) • V-Pot 7 - Send Slot 3 Bypass (5-8 key engaged to access) • V-Pot 8 - Send Slot 4 Bypass (5-8 key engaged to access) SSL UF1 User Guide...
- Page 91 1. Open up a plug-in you want to configure to be controlled by UF1's V-Pots and click the cog near the top-right. Click the cog 2. Click the small down arrow near the top-left and make sure 'Recently Touched' is ticked from the drop-down list. Click the down arrow Tick 'Recently Touched' SSL UF1 User Guide...
- Page 92 4. The External Devices Window will appear. Each blue block within the window represents a V-Pot. Each block represents a V-Pot 5. With your mouse, adjust a plug-in parameter that you want to assign to one of the V-Pots. Adjust a parameter - in this example, we're moving the Input Gain SSL UF1 User Guide...
- Page 93 7. The control has been successfully assigned to the first V-Pot. Repeat the process with other parameters and other plug-ins as you desire. Use the 5-8 key to access V-Pots 5-8. Successfully assigned control to V-Pot 1 SSL UF1 User Guide...
- Page 94 Soft Key Page 2 Soft Key Page 3 Soft Key Page 4 Soft Key Page 5 Soft Key Page 6 Soft Key Page 7 Soft Key Page 8 Soft Key Page 9 (Unassigned) Soft Key Page 10 (Unassigned) SSL UF1 User Guide...
- Page 95 F8 (Toggle Floating Window) Stop Audio Tracks Play Audio Instruments Record Aux (FX Channels) Play Foot-switch Busses Record Foot-switch Outputs Rec/Rdy User (Remote Banks) Previous Device in Plug-In Editor Shift Next Device in Plug-In Editor Option Control SSL UF1 User Guide...
-
Page 96: Luna With Uf1 - Tutorial
Device select SSL V-MIDI Port 1 Destination. Select the box in the ON column to enable the control surface. Configure LUNA's MCU options as you desire, such as SURFACE SHOWS TRACKS FROM, BANK TO SELECTED TRACK, SCROLL LUNA WHEN BANKING etc. SSL UF1 User Guide... -
Page 97: Small Lcd Layout
LowLCD - Displays a value readout for the parameter currently assigned to the V-Pot, or, the fader gain if the fader is moved. DAW Track Metering - 12-segment track metering + clip V-Pot readout bar - Displays the position of the currently assigned V-Pot (encoder) function. SSL UF1 User Guide... -
Page 98: Large Lcd Layout
Low Scribble - Displays a value readout for the parameter currently assigned to the V-Pot. V-Pot Readout Bar - Displays the position of the currently assigned V-Pot function. V-Pots - 4 x V-Pots that control the assigned parameters. SSL UF1 User Guide... -
Page 99: Tutorial
Pressing the FLIP key switches the functions of the V-Pots and faders. This is useful for various reasons, including tasks such as controlling Send levels on the fader instead of the V-Pots. Master The Master Key enables the UF1 fader to control LUNA's Master Fader. SSL UF1 User Guide... - Page 100 The CHANNEL encoder controls the system volume level, if the audio device you are using can be controlled by the operating system's volume up/down. For example, if you're on the road with your headphones plugged into the computer's built-in audio output. SSL UF1 User Guide...
- Page 101 UF1 & all other SSL 360° powered devices. A long press and hold of the 360° button, in conjunction with a press of the relevant top-row soft key allows you to switch to a different DAW or Plug-in Mixer Layer. SSL UF1 User Guide...
- Page 102 When the Zoom key is lit the left and right cursor keys perform horizontal and vertical track zooming. Pressing the Zoom key again, the up and down cursor keys change the selected track and the left and right cursor keys move you between markers. SSL UF1 User Guide...
- Page 103 Shifted Functions of the Secondary Transport Keys - Automation Modes You will notice that there are additional labels beneath the Secondary Transport keys. These functions are accessed by pressing the SHIFT button and provide access to the automation modes within LUNA. SSL UF1 User Guide...
- Page 104 STEP 1: Use the SEL key to select the track. STEP 3: press to select the automation mode you wish to set the track to. WRITE automation mode is not applicable to LUNA and as such, the key is disabled. SSL UF1 User Guide...
- Page 105 (SENDS or CUES). Or you can push and hold either key and whilst keeping the key held, push the relevant V-Pot to control a particular send slot. Use in conjunction with the 5-8 key to access all send parameters or send slots SSL UF1 User Guide...
- Page 106 Audio Tracks - Has no function Rewind Audio Instruments - Has no function Stop Aux - Has no function Play Busses - Has no function Record Outputs - Has no function Scrub User - Has no function Rec/Rdy SSL UF1 User Guide...
-
Page 107: Pyramix With Uf1 - Tutorial
In the Controller drop-down menu, select SSL UF8 MackieCtrl. Press OK to close the different windows. STEP 4: Enter a name for the controller and set the Driver to OASIS. STEP 3: Access the Settings > All Settings menu. Go to Remote Control > Controller, click on Add. SSL UF1 User Guide... -
Page 108: Small Lcd Layout
UpLCD - Displays the track name or V-Pot parameter value when the V-Pot is being turned. LowLCD - Unused by Pyramix. DAW Track Metering - 12-segment track metering + clip. V-Pot Readout Bar - Displays the position of the currently assigned V-Pot (encoder) function. SSL UF1 User Guide... -
Page 109: Large Lcd Layout
1-4 or 5-8 of the current controller bank. Low Scribble - Unused by Pyramix. V-Pot Readout Bar - Displays the position of the currently assigned V-Pot function. V-Pots - 4 x V-Pots that control the assigned parameters. SSL UF1 User Guide... -
Page 110: Tutorial
This section guides you through using UF1 with Pyramix. Before You Start... SSL UF1 MackieCtrl implementation has been available since Pyramix 14.0.4 Hotfix but please ensure that you are running the latest version of Pyramix, as it may have addressed any MCU bugs present in the 14.0.4 Hotfix version. - Page 111 The CHANNEL encoder controls the system volume level, if the audio device you are using can be controlled by the operating system's volume up/down. For example, if you're on the road with your headphones plugged into the computer's built-in audio output. SSL UF1 User Guide...
- Page 112 UF1 & all other SSL 360° powered devices. A long press and hold of the 360° button, in conjunction with a press of the relevant top-row soft key allows you to switch to a different DAW or Plug-in Mixer Layer. SSL UF1 User Guide...
- Page 113 Shift + Left / Right : Nudge +/- 1frame (user defines in All Settings > Application > Editing >Nudge settings) Up / Down : Zoom In/Out Shift + Up / Down : Fit in window / Previous zoom SSL UF1 User Guide...
- Page 114 Shifted Functions of the Secondary Transport Keys - Automation Modes You will notice that there are additional labels beneath the Secondary Transport keys. These functions are accessed by pressing the SHIFT button and provide access to the automation modes within Pyramix. SSL UF1 User Guide...
- Page 115 Alt modifier). This modifier allows you to perform 'secondary' Pyramix MCU functions - keep it held down whilst pressing MCU commands that offer an alternative function. Further V-Pot assignment modes are available via Soft Key Pages 1 and 2. The Pan Key is located on the Soft Key above the Small LCD. SSL UF1 User Guide...
- Page 116 Soft Key Page 2 Soft Key Page 3 Soft Key Page 4 Soft Key Page 5 Soft Key Page 6 Soft Key Page 7 Soft Key Page 8 Soft Key Page 9 Soft Key Page 10 SSL UF1 User Guide...
- Page 117 Pyramix Tutorial HUI F1 to F8 can be assigned via the keyboard shortcuts window of Pyramix. Duplicate (not usable): Alt, Group, Marker, Nudge, Track, Send SSL UF1 User Guide...
- Page 118 Cur to Mark in Cur to Mark out Mark in to Cur Mark out to Cur Cur to Start Cur to End Cur to Next Mark Cur to Prev Mark Read Write Touch Latch Trim Undo / Redo SSL UF1 User Guide...
-
Page 119: Uf1 & 360°-Enabled Plug-Ins
London's famous Townhouse Studio 2, 'The Stone Room'. Connect to as many instances of 4K B as you like on UF1/in the 360° Plug-in Mixer. SSL UF1 User Guide... -
Page 120: Plug-In Mixer Overview
Use the left and right arrows either side of ANALOGUE to switch between Overview, Analogue and RTA views for the selected plug-in instance. Use the 8 buttons at the bottom to select the desired plug-in instance. SSL UF1 User Guide... -
Page 121: Plug-In Mixer - Tutorial
UF1 and UC1 together, with the intention that you would leave UF1 set to Soft Key Page 1 of 8, as it hosts all the channel strip parameters that are in UC1's Extended Functions menu, therefore giving you easy access to all the parameters across UF1 and UC1. SSL UF1 User Guide... -
Page 122: Plug-In Mixer Transport Setup
Pan Value - Displays the value of the pan control on that instance of channel strip. V-Pot Readout Bar - Displays the position of the Pan. You can adjust the Pan position from the V-Pot encoder directly below the small LCD. Push the V-Pot to reset the Pan to centre. SSL UF1 User Guide... - Page 123 The Flip key has no function in the Plug-In Mixer layer and is therefore disabled. Master The Master Key in the Plug-In Mixer decouples the fader from the UC1 selected channel, allowing UF1 to control an entirely different channel strip, selectable with the Channel Encoder. SSL UF1 User Guide...
- Page 124 UF1 & all other SSL 360° powered devices. A long press and hold of the 360° button, in conjunction with a press of the relevant top-row soft key allows you to switch to a different Layer. SSL UF1 User Guide...
- Page 125 DAW) and Quick Key 2 toggles the V-Pot encoders between normal and fine resolution modes. Quick Key 1 Quick Key 2 Unassigned Loop Solo Clear Fine Unassigned Rewind Forward Stop Play Record SSL UF1 User Guide...
-
Page 126: Large Lcd Layout - Channel Strip Mode
Fine Encoder Mode Indication - Informs you of whether the encoders are in FINE resolution mode or not. Quick Key 2 allows you to toggle this on/off. Channel Strip V-Pot Parameters - Displays the names and values of the channel strip parameters on the current page. Use the 4 V-Pots to adjust the parameters. SSL UF1 User Guide... -
Page 127: Ssl Chanel Strip Soft Key & V-Pot Assignments
In Trim High Pass Low Pass LF BELL LF Gain LF Freq LMF Gain LMF Freq HMF Gain HMF Freq HF BELL HF Gain HF Freq S/C LISTEN DYNAMICS Ratio Threshold Release EXPAND DYNAMICS Range Threshold Release SSL UF1 User Guide... -
Page 128: Large Lcd Layout - Meter Mode
Page Meter Plug-in Selector Parameter Control 1 Parameter Control 2 Parameter Control 3 Digital Meter Type RMS Integration Time Lissajous Fade Time Scroll to select the Meter plug-in instance Peak Hold Time True Peak Mode On/Off SSL UF1 User Guide... -
Page 129: Analogue
Page Meter Plug-in Selector Parameter Control 1 Parameter Control 2 Parameter Control 3 VU / PPM 0 VU Line-Up Reference Level Scroll to select the Meter plug-in instance Max Needle Setting Stereo / Mid-Side Global Delay SSL UF1 User Guide... -
Page 130: 31-Band Real-Time Analyser (Rta)
Page Meter Plug-in Selector Parameter Control 1 Parameter Control 2 Parameter Control 3 Select Frequency Scale Top Scale Bottom Scroll to select the Meter Peak Hold Time Weighting RTA Averaging plug-in instance Analysis Source SSL UF1 User Guide... -
Page 131: Uf1 Lcd Messages
You may also see this message if you are yet to plug a USB cable from your UF1 into your computer. SSL UF1 User Guide... - Page 132 'Waiting For DAW' (Pro Tools only) If you have configured a Layer for Pro Tools but Pro Tools is closed or you have yet to configure UF1 as a MIDI controller in Pro Tools, then you will see this message. SSL UF1 User Guide...
- Page 133 The LCD message above means that communication between SSL 360° and UF1 has been lost. If you experience this, then check that your USB cable connecting UF1 and 360° has not been removed. Re-connect if so. SSL UF1 User Guide...
-
Page 134: Ssl 360° Software Messages
If the HOME page of SSL 360° is displaying the message 'SOMETHING WENT WRONG... PLEASE EXIT AND RE-LAUNCH SSL 360°', then please quit SSL 360° and re-launch. If that does not work then restart your computer. SSL UF1 User Guide... -
Page 135: Ssl Support - Faqs, Ask A Question And Compatibility
Troubleshooting & FAQs SSL Support - FAQs, Ask a Question and Compatibility Visit the Solid State Logic Help Centre to check compatibility with your system and find answers to your questions: support.solidstatelogic.com Thank you Don’t forget to register your UF1 for the best possible experience. -
Page 136: Safety Notices
Protect the adapter and power cord from being walked on or crushed. CAUTION! No user-serviceable parts inside. In the event of damage to the unit or power supply contact your Solid State Logic retailer. Service or repair must be done by qualified service personnel only. (EN only) UKCA... - Page 137 Industry Canada Compliance This Class B digital apparatus complies with Canadian ICES-003. Cet appareil numérique de la classe B est conforme à la norme NMB-003 du Canada. WARNING: Cancer and Reproductive Harm - www.P65Warnings.ca.gov. (EN, FR, ES only) SSL UF1 User Guide...
- Page 138 Environmental Temperature: Operating: +1 to 40 degrees Celsius. Storage: -20 to 50 degrees Celsius. Further information For additional information, install and user guides, knowledge base and technical support visit www.solidstatelogic.com SSL UF1 User Guide...
- Page 139 SSL UF1...
Need help?
Do you have a question about the SSL UF1 and is the answer not in the manual?
Questions and answers