Sign In
Upload
Manuals
Brands
NTI Manuals
Monitor
SPLITMUX-4K-4RT-2R
User Manuals: NTI SPLITMUX-4K-4RT-2R Quad Multiviewer
Manuals and User Guides for NTI SPLITMUX-4K-4RT-2R Quad Multiviewer. We have
1
NTI SPLITMUX-4K-4RT-2R Quad Multiviewer manual available for free PDF download: Installation And Operation Manual
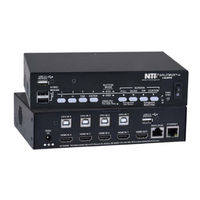
NTI SPLITMUX-4K-4RT-2R Installation And Operation Manual (78 pages)
Quad Screen 4K Multiviewer
Brand:
NTI
| Category:
Monitor
| Size: 4 MB
Table of Contents
Table of Contents
3
Introduction
7
Supported Web Browsers
8
Materials
8
Connectors and Leds
9
Mounting
10
Figure 1- Attach Ear Brackets to Front Corners or Rear Corners
10
Figure 2- Attach Cable Tray (if Applicable)
10
Figure 3- Attach Rack Ears
11
Figure 4- Assembled Unit, Ready to Mount in Rack
11
Single-SPLITMUX Mounting
11
Dual-SPLITMUX Mounting
12
Figure 5- Attach Ears and Connector Plate
12
Figure 6- Attach Cable Tray Connector
12
Figure 7- Assembly Method for SPLITMUX with Cables Facing Forward
13
Figure 8- Assembled SPLITMUX-4K-4RT-2R
13
Reversible Mounting Assembly
13
Installation
14
Figure 9- Video Source/Display Connections-SPLITMUX-4K-4RT
14
Figure 10- Video Source\Display Connections- SPLITMUX-USB4K-4RT
15
Ethernet Connection for Remote User Control
16
Figure 11- RS232 Terminal Connection
16
Figure 12- Ethernet Connection
16
Terminal Connection for RS232
16
Power on
17
Figure 13- Power Switch and LED
17
Control Methods
18
Front Panel Buttons
18
Standard Mode
18
OSD Mode
20
Reset Resolution
20
Figure 14- Front Panel Button Functions
20
Device Discovery Tool
21
How to Use the Device Discovery Tool
21
Figure 15- Device Discovery Tool
21
Use and Operation Via Web Interface
22
Log in and Enter Password
22
Figure 16- Login Prompt to Access Web Interface
22
Figure 17- Initial Page- Administrator
23
Figure 18- Initial Page- Non-Admin User
23
Administration-System
24
Figure 19- System Configuration
24
Administration-Network
26
Figure 20- Network Configuration
26
Administration- Input Settings
27
Figure 21- Input Settings
27
Administration- Output Settings
28
Figure 22- Output Settings
28
Audio Level and Gain
29
Audio Mode Settings
29
Figure 23- Display with Sound Level Indications
29
Administration-Mode Settings
30
Figure 24- Mode Settings
30
Figure 25- PIP Screen Mode Settings
31
Administration- Custom Settings
32
Figure 26- Custom Screen Mode Settings
32
Alignment Tools
33
Figure 27- Pan and Crop Enabled
33
Preset Layouts and Display Preview
33
Channel Settings
34
Enable/Disable Channels
34
Save/Restore Layouts
35
Cascade Settings
36
Figure 28- Cascading Splitmuxs
36
Figure 29- Cascade Settings
36
Administration-User Config
38
Figure 30- User Configuration
38
Administration- Firmware
39
Figure 31- Firmware Update
39
Administration- System Information
40
Logout
40
Figure 32- System Information Page
40
Support
41
Reboot
41
Command Line Interface
42
RS232 Control
42
Baud Rate
42
RS232 Command Protocol
43
Telnet Control
44
Using the Text Menu
45
Text Menu Navigation
45
Figure 33- Text Menu- Login Screen
45
Current Mode
46
Figure 34- Text Menu-Main Menu
46
Figure 35- Text Menu-Current Mode Selection
46
System Configuration
47
Figure 36- Text Menu- System Configuration
47
Figure 37- Text Menu- Unit Settings
47
Figure 38- Text Menu- Serial Port Settings
48
Figure 39- Text Menu- OSD Screen Settings
48
Network Configuration
49
Figure 40- Text Menu- Restore Default Settings
49
Figure 41- Text Menu- Network Configuration
49
Figure 42-Text Menu- Ipv4 Network Settings
50
User Configuration
51
Figure 43- Text Menu-Server Settings
51
Figure 44- Text Menu- Users List
51
Figure 45- Text Menu- Account Settings
52
Figure 46- Text Menu- User Account Settings
52
Input Configuration
53
Figure 47- Text Menu- Input Configuration
53
Output Configuration
54
Figure 48- Text Menu- Output Configuration
54
Figure 49- Text Menu- Audio Output Configuration
55
Mode Configuration
56
Figure 50- Text Menu- Mode Settings Menu
56
Figure 51- Text Menu- Default Mode Configuration
56
Figure 52- Text Menu- Full Screen Mode Settings
57
Figure 53- Text Menu- Quad Mode Settings
57
Figure 54- Text Menu- PIP Mode Settings
58
Load/Save Layout
59
Figure 55- Text Menu- Custom Mode Settings
59
Figure 56- Text Menu- Load/Save Layout
59
System Information
60
Figure 57- Text Menu- System Information
60
Using OSD
61
Navigating the OSD Menus
61
Figure 58- Front Panel Button OSD Functions
61
Figure 59- the OSD Menu
61
System Configuration
62
Figure 60- OSD System Configuration
62
Network Configuration
63
Figure 61- OSD Network Configuration
63
Figure 62- OSD IP Settings
64
Figure 63- OSD Server Settings
64
Input Configuration
65
Figure 64- OSD Input Configuration
65
Figure 65- OSD Input Settings
65
Output Configuration
66
Figure 66- OSD Output Settings
66
Mode Configuration
67
Figure 67- OSD Mode Settings
67
Figure 68- Default, Full Screen and Quad Screen Settings
68
Figure 69- PIP Screen Mode Settings
69
Load / Save Layout
70
Figure 70- OSD- Custom Screen Mode Settings
70
Figure 71- OSD- Load/Save Layout Functions
70
System Information
71
Figure 72- Save or Load a Custom Layout
71
Figure 73- OSD- System Information Page
71
Infrared Remote Control
72
Materials
72
Buttons
72
Operation
72
Changing Ports
73
Save and Recall
73
Multiple Switch Control
73
Technical Specifications for IRT-UNV
73
Troubleshooting the IRT-UNV
73
Figure 74- View of Cascaded Configuration from Master
74
Example of Cascaded Configuration
74
Figure 75- View of Cascaded Configuration from Slave at IP 192.168.3.173
75
Figure 76- View of Cascade Configuration from Slave at IP 192.168.3.125
75
Figure 77- View of Custom Configuration of Slave at IP 192.168.3.183
76
Figure 78- Current Output Mode Selection
76
Specifications
77
Troubleshooting
78
Index
78
Advertisement
Advertisement
Related Products
NTI SPLITMUX-4K-4RT
NTI SPLITMUX-4K-4RT-R
NTI SPLITMUX-USB4K-4RT
NTI SPLITMUX-4K18GB-4
NTI SPLITMUX-USB4K-4RT-2R
NTI SPLITMUX-USB4K-4RT-R
NTI SPLITMUX Series SPLITMUX-HD-4RT-R
NTI SPLITMUX Series
NTI SPLITMUX-VWC-4HD4KI
NTI RACKMUX SPLITMUX-3GSDI-9
NTI Categories
Extender
Boiler
Switch
Media Converter
Cables and connectors
More NTI Manuals
Login
Sign In
OR
Sign in with Facebook
Sign in with Google
Upload manual
Upload from disk
Upload from URL