Xerox WorkCentre 4265 User Manual
Hide thumbs
Also See for WorkCentre 4265:
- System administrator manual (163 pages) ,
- Quick use manual (20 pages) ,
- Secure installation and operation (10 pages)
Table of Contents
Advertisement
Quick Links
Xerox
WorkCentre
®
Multifunction Printer
Imprimante multifonction
User Guide
Guide d'utilisation
Italiano
Guida per l'utente
Deutsch
Benutzerhandbuch
Español
Guía del usuario
Português
Guia do usuário
Nederlands
Gebruikershandleiding
Svenska
Användarhandbok
Dansk
Betjeningsvejledning
Suomi
Käyttöopas
Norsk
Brukerhåndbok
Русский
Руководство пользователя
4265
®
Čeština
Uživatelská příručka
Polski
Przewodnik użytkownika
Magyar
Felhasználói útmutató
Türkçe
Kullanıcı Kılavuzu
Ελληνικά
Εγχειρίδιο χρήστη
Advertisement
Table of Contents
Troubleshooting

Related Manuals for Xerox WorkCentre 4265


Summary of Contents for Xerox WorkCentre 4265
-
Page 1: Multifunction Printer
Xerox WorkCentre 4265 ® ® Multifunction Printer Imprimante multifonction User Guide Guide d'utilisation Svenska Italiano Guida per l’utente Användarhandbok Čeština Uživatelská příručka Dansk Deutsch Benutzerhandbuch Betjeningsvejledning Polski Przewodnik użytkownika Suomi Español Käyttöopas Magyar Felhasználói útmutató Guía del usuario Português Norsk Brukerhåndbok... - Page 2 © 2014 Xerox Corporation. All rights reserved. Unpublished rights reserved under the copyright laws of the United States. Contents of this publication may not be reproduced in any form without permission of Xerox Corporation. Copyright protection claimed includes all forms of matters of copyrightable materials and information now allowed by statutory or judicial law or hereinafter granted, including without limitation, material generated from the software programs which are displayed on the screen such as styles, templates, icons, screen displays, looks, and so on.
-
Page 3: Table Of Contents
More Information ................................31 Installation and Setup Installation and Setup Overview ..........................34 Selecting a Location for the Printer .......................... 35 Configuring the Printer at Setup ..........................36 Connecting the Printer..............................38 ® ® Xerox WorkCentre 4265 Multifunction Printer User Guide... - Page 4 Loading Envelopes in a 520-Sheet Feeder (Trays 1-4) ................64 Loading Envelopes in the Bypass Tray ......................65 Labels ..................................... 66 Transparencies ................................67 Printing Printing Overview ................................70 Selecting Printing Options ............................. 71 Print Driver Help ................................ 71 ® ® Xerox WorkCentre 4265 Multifunction Printer User Guide...
- Page 5 Basic Scanning ................................. 102 Document Glass ..............................103 Document Feeder ..............................103 Document Feeder Guidelines ..........................103 Adjusting Scanning Settings ............................104 Setting the Output Color ............................. 104 Setting the Scan Resolution ..........................104 ® ® Xerox WorkCentre 4265 Multifunction Printer User Guide...
- Page 6 Adding an Individual Entry to the Device Address Book ............... 129 Editing an Individual Address Book Entry ....................129 Maintenance Cleaning the Printer ............................... 132 General Precautions ............................... 132 Cleaning the Exterior ............................. 133 ® ® Xerox WorkCentre 4265 Multifunction Printer User Guide...
- Page 7 Getting Help ..................................173 Control Panel Messages ............................173 Online Support Assistant ............................. 174 Using the Integrated Troubleshooting Tools ..................... 175 Specifications Printer Configurations and Options ........................178 Standard Configurations ............................. 178 ® ® Xerox WorkCentre 4265 Multifunction Printer User Guide...
- Page 8 New Zealand ................................199 Material Safety Data Sheets............................200 Recycling and Disposal All Countries ..................................202 North America .................................. 203 European Union ................................204 Domestic/Household Environment ......................... 204 Professional/Business Environment ........................ 204 ® ® Xerox WorkCentre 4265 Multifunction Printer User Guide...
-
Page 9: Workcentre ® 4265 Multifunction Printer
Contents Collection and Disposal of Equipment and Batteries ................205 Battery Symbol Note ............................. 205 Battery Removal ..............................205 Other Countries................................206 ® ® Xerox WorkCentre 4265 Multifunction Printer User Guide... -
Page 11: Safety
• Environmental, Health, and Safety Contact Information .................. 18 Your printer and the recommended supplies have been designed and tested to meet strict safety requirements. Attention to the following information ensures the continued safe operation of your Xerox printer. ®... -
Page 12: Electrical Safety
The printer causes a circuit breaker, fuse, or other safety device to activate. If any of these conditions occur, do the following: Turn off the printer immediately. Disconnect the power cord from the electrical outlet. Call an authorized service representative. ® ® Xerox WorkCentre 4265 Multifunction Printer User Guide... -
Page 13: Power Cord
Emergency Turn Off If any of the following conditions occur, turn off the printer immediately and disconnect the power cord from the electrical outlet. Contact an authorized Xerox service representative to correct the problem if: • The equipment emits unusual odors or makes unusual noises. -
Page 14: Operational Safety
Ozone is heavier than air and is not produced in amounts large enough to harm anyone. Install the printer in a well-ventilated room. For more information in the United States and Canada, go to www.xerox.com/environment. In other markets, please contact your local Xerox representative or go to www.xerox.com/environment_europe. -
Page 15: Printer Supplies
Total Satisfaction Guarantee do not cover damage, malfunction, or degradation of performance caused by use of non-Xerox supplies, or the use of Xerox supplies not specified for this printer. The Total Satisfaction Guarantee is available in the United States and Canada. Coverage could vary outside these areas. -
Page 16: Maintenance Safety
Do not burn any consumables or routine maintenance items. ® • For information on Xerox supplies recycling programs, go to www.xerox.com/gwa. WARNING: Do not use aerosol cleaners. Aerosol cleaners can cause explosions or fires when used on electromechanical equipment. ®... -
Page 17: Printer Symbols
Do not touch the part or area of the printer. Warning: Wait for the printer to cool for the specified time before touching the fuser. This item can be recycled. For details, see Recycling and Disposal on page 201. ® ® Xerox WorkCentre 4265 Multifunction Printer User Guide... -
Page 18: Environmental, Health, And Safety Contact Information
Safety Environmental, Health, and Safety Contact Information For more information on Environment, Health, and Safety in relation to this Xerox product and supplies, contact the following customer help lines: United States and Canada: 1-800-ASK-XEROX (1-800-275-9376) Europe: +44 1707 353 434 For product safety information in the United States and Canada, go to www.xerox.com/environment. -
Page 19: Features
Features This chapter includes: • Parts of the Printer................................20 • Information Pages ................................27 • Power Saver Mode ................................28 • Administration Features ..............................29 • More Information ................................31 ® ® Xerox WorkCentre 4265 Multifunction Printer User Guide... -
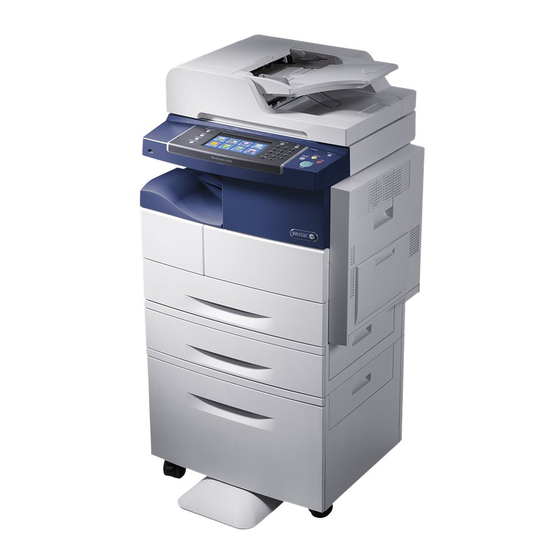
Page 20: Parts Of The Printer
Tray 1 with 520-sheet capacity Control Panel Document Output Tray with 500-Sheet Side Door Capacity Bypass tray with 100-sheet capacity USB Port Front Door Document Feeder with 100-Sheet Capacity Document Feeder Top Cover ® ® Xerox WorkCentre 4265 Multifunction Printer User Guide... - Page 21 13. Optional Feeder Tray 2 with 520-Sheet Capacity Control Panel 14. High-Capacity Feeder Outside Cover Side Door 15. High-Capacity Feeder Inside Cover Bypass tray with 100-sheet capacity 16. Optional 2100-Sheet High-Capacity Feeder ® ® Xerox WorkCentre 4265 Multifunction Printer User Guide...
- Page 22 1. Bypass tray with 100-sheet capacity 4. Optional 520-Sheet Feeder Tray 3 2. Tray 1 with 520-sheet capacity 5. Optional 520-Sheet Feeder Tray 4 3. Optional Feeder Tray 2 with 520-Sheet Capacity ® ® Xerox WorkCentre 4265 Multifunction Printer User Guide...
-
Page 23: Rear View
Red LED 13. Direct Connect Port for USB Printing Card Reader Slot 14. Handset Extension Connector for Optional Fax Kit Green LED 15. Fax Line In for Optional Fax Kit Finisher Interface ® ® Xerox WorkCentre 4265 Multifunction Printer User Guide... -
Page 24: Internal Components
1. Toner Cartridge 5. Document Feeder 2. Drum Cartridge 6. Fuser 3. Smart Kit Drum Cartridge 7. Transfer Roller 4. Document Glass Optional 500-Sheet Finisher Finisher Connector Cable Finisher Front Door Staple Cartridge ® ® Xerox WorkCentre 4265 Multifunction Printer User Guide... -
Page 25: Control Panel
This button starts the selected copy, scan, fax, or Print From job, such as Print from USB. This button stops the current job temporarily. To cancel or resume your job, follow the Stop Button onscreen instructions. ® ® Xerox WorkCentre 4265 Multifunction Printer User Guide... - Page 26 This button enters and exits the low-power mode. Help Button This button displays information about the current selection on the touch screen. Log In/Out Button This button provides access to password-protected features. ® ® Xerox WorkCentre 4265 Multifunction Printer User Guide...
-
Page 27: Information Pages
To print an information page, select an option, then touch Print. Note: To scroll through the list of available items, touch and drag your finger up or down on the menu. Touch Close. ® ® Xerox WorkCentre 4265 Multifunction Printer User Guide... -
Page 28: Power Saver Mode
You open any door or cover on the printer. • You load media in the document feeder or bypass tray. • You insert a thumb drive or an access card into a port. ® ® Xerox WorkCentre 4265 Multifunction Printer User Guide... -
Page 29: Administration Features
Automatic Data Collection .............................. 30 • Billing and Usage Information ............................30 For details, see the System Administrator Guide at www.xerox.com/office/WC4265docs. CentreWare Internet Services CentreWare Internet Services is the administration and configuration software installed on the embedded Web server in the printer. It allows you to configure and administer the printer from a Web browser. -
Page 30: Finding The Ip Address Of The Printer
Xerox cannot read, view, or download the content of your documents residing on or passing through your printer or any of your information management systems. -
Page 31: More Information
You can obtain more information about your printer from these sources: Resource Location Installation Guide Packaged with the printer. Other documentation for your printer www.xerox.com/office/WC4265docs Technical support information for your printer; www.xerox.com/office/WC4265support including online technical support, Online Support Assistant, and driver downloads. Information about menus or error messages Press the control panel Help (?) button. -
Page 33: Installation And Setup
• Installing the Software ..............................43 • Installing the Printer as a Web Service on Devices ....................47 See also: Installation Guide packaged with your printer. System Administrator Guide at www.xerox.com/office/WC4265docs. ® ® Xerox WorkCentre 4265 Multifunction Printer User Guide... -
Page 34: Installation And Setup Overview
Routers, network hubs, network switches, modems, Ethernet cables, and USB cables are not included with your printer and must be purchased separately. Xerox recommends an Ethernet connection because it is typically faster than a USB connection, and it provides access to CentreWare Internet Services. -
Page 35: Selecting A Location For The Printer
Clearance Requirements on page 180. • After positioning the printer, you are ready to connect it to the power source and computer or network. ® ® Xerox WorkCentre 4265 Multifunction Printer User Guide... -
Page 36: Configuring The Printer At Setup
Attach the power cord to the printer, plug the cord into an electrical outlet, then turn on the printer. The Installation wizard starts on the control panel the first time that you turn on the printer. ® ® Xerox WorkCentre 4265 Multifunction Printer User Guide... - Page 37 Back. 10. When the Services screen appears, the printer is ready for use. If the printer prompts you for Supplies Plan Activation during setup, enter your activation code. ® ® Xerox WorkCentre 4265 Multifunction Printer User Guide...
-
Page 38: Connecting The Printer
A USB connection offers fast data speeds, but typically not as fast as an Ethernet connection. In addition, a USB connection does not provide access to CentreWare Internet Services. • Telephone: To send and receive faxes, the multifunction printer must be connected to a dedicated telephone line. ® ® Xerox WorkCentre 4265 Multifunction Printer User Guide... -
Page 39: Physically Connecting The Printer To The Network
Connect a standard RJ11 cable, No. 26 American Wire Gauge (AWG) or larger, to the Line port on the back of the printer. Connect the other end of the RJ11 cable to an operating telephone line. Enable and configure the Fax functions. For details, see the System Administrator Guide at www.xerox.com/office/WC4265docs. ® ® Xerox... -
Page 40: Turning The Printer On And Off
Do not plug or unplug the power cord while the printer is powered on. Note: When all of the control panel lights are off, the printer power off sequence is complete. Turning the power switch off is optional. ® ® Xerox WorkCentre 4265 Multifunction Printer User Guide... -
Page 41: Configuring Network Settings
IP address to every computer and printer on the network that is configured to use DHCP. If you use a Cable or DSL router, see the documentation for your router for information on IP addressing. ® ® Xerox WorkCentre 4265 Multifunction Printer User Guide... -
Page 42: Enabling The Printer For Scanning
Note: If your printer is connected using the USB cable, you cannot scan to an email address or a network location, such as a shared folder on your computer. For details, see the System Administrator Guide at www.xerox.com/office/WC4265docs. ® ®... -
Page 43: Installing The Software
For details, see www.xerox.com/office/WC4265drivers. Installing Drivers and Utilities for Windows ® ® To access all the features of your printer, install the Xerox print driver and the Xerox scan driver. To install the print and scan driver software: Insert the Software and Documentation disc into the appropriate drive on your computer. The installer starts automatically. -
Page 44: Installing Print Drivers For Macintosh Os X Version 10.7 And Later
12. To complete the installation, click Finish. Installing Print Drivers for Macintosh OS X Version 10.7 and Later Install the Xerox print driver to access all features of your printer. To install the print driver software: ® ®... -
Page 45: Installing Scan Drivers For Macintosh
Installing Scan Drivers for Macintosh To install the scan driver software: To download the latest driver, go to www.xerox.com/office/WC4265drivers. Download the appropriate package for your operating system. To view the .dmg file for your printer, double-click the disc icon on your desktop. -
Page 46: Installing The Print Drivers For Unix And Linux
To begin downloading, click the Start button. In the notes below the driver package that you selected, click the Installation Guide link, then follow the installation instructions. Other Drivers The following drivers are available for download at www.xerox.com/office/WC4265drivers. ® • The Xerox Global Print Driver works with any printer on your network, including those printers made by other manufacturers. -
Page 47: Installing The Printer As A Web Service On Devices
10. For sharing, enter a share name, location, and comments to identify the printer, then click Next. 11. To set the printer as the default, select an option. To test the connection, click Print a Test Page. 12. Click Finish. ® ® Xerox WorkCentre 4265 Multifunction Printer User Guide... -
Page 49: Paper And Media
Paper and Media This chapter includes: • Supported Paper ................................... 50 • Loading Paper ..................................56 • Printing on Special Paper ..............................63 ® ® Xerox WorkCentre 4265 Multifunction Printer User Guide... -
Page 50: Supported Paper
For best results, use Xerox paper and media recommended for your printer. Ordering Paper To order paper or other media, contact your local reseller or visit www.xerox.com/office/WC4265supplies. General Paper Loading Guidelines •... -
Page 51: Paper That Can Damage Your Printer
Warranty, Service Agreement, or Xerox Total Satisfaction Guarantee does ® not cover damage caused by using unsupported paper or special media. The Xerox Total Satisfaction Guarantee is available in the United States and Canada. Coverage could vary outside these areas. Contact your Xerox representative for details. -
Page 52: Supported Paper Types And Weights
90 g/m² Optional 2100-Sheet High-Capacity Feeder Plain 70–90 g/m² Lightweight 60–69 g/m² Bond 105–120 g/m² Hole Punched 60–90 g/m² Pre-Printed 75–85 g/m² Recycled 60–85 g/m² Cardstock 90–163 g/m² Cotton Letterhead 90 g/m² ® ® Xerox WorkCentre 4265 Multifunction Printer User Guide... -
Page 53: Supported Standard Paper Sizes
Supported Custom Paper Sizes Tray Width Length Trays 1-4 and Bypass Tray Only 98–216 mm (3.9–8.5 in.) 148–356 mm (5.8–14 in.) All Trays 182–216 mm (7.2–8.5 in.) 152.4–356 mm (6–14 in.) ® ® Xerox WorkCentre 4265 Multifunction Printer User Guide... -
Page 54: Supported Paper Types And Weights For Automatic 2-Sided Printing
The following standard paper types are supported for automatic stapling. Paper Type Weight Lightweight 60–70 g/m² Recycled 60–85 g/m² Plain 70–90 g/m² Letterhead Hole Punched Custom Pre-Printed 75–85 g/m² Bond 105–120 g/m² Lightweight Cardstock 106–163 g/m² ® ® Xerox WorkCentre 4265 Multifunction Printer User Guide... - Page 55 Custom paper sizes within the following ranges are supported for automatic stapling. Tray Width Length Tray 1 and Bypass Tray 182–216 mm (7.2–8.5 in.) 148–356 mm (5.8–14 in.) Trays 1 and 2 182–216 mm (7.2–8.5 in.) 152.4–356 mm (6–14 in.) ® ® Xerox WorkCentre 4265 Multifunction Printer User Guide...
-
Page 56: Loading Paper
Open the bypass tray. If the bypass tray is loaded with paper already, remove any paper that is a different size or type. Move the width guides to the edges of the tray. ® ® Xerox WorkCentre 4265 Multifunction Printer User Guide... - Page 57 Adjust the width guides until they touch the edges of the paper. If the control panel prompts you, verify the paper size, type, and color in the Paper Settings screen. 10. When finished, touch Confirm. ® ® Xerox WorkCentre 4265 Multifunction Printer User Guide...
-
Page 58: Loading Paper In A 520-Sheet Feeder (Trays 1-4)
Flex the sheets back and forth and fan them, then align the edges of the stack on a level surface. This procedure separates any sheets that are stuck together and reduces the possibility of jams. ® ® Xerox WorkCentre 4265 Multifunction Printer User Guide... - Page 59 Adjust the paper guides in the tray to match the size of the paper. Close the tray. If the control panel prompts you, verify the paper size, type, and color in the Paper Settings screen. Touch Confirm. ® ® Xerox WorkCentre 4265 Multifunction Printer User Guide...
-
Page 60: Loading Paper In The 2100-Sheet High-Capacity Feeder
To load paper in the high-capacity feeder: Pull out the tray until it stops. To unlock the paper guides, lift, turn, then remove the locking pins from the side paper guides. ® ® Xerox WorkCentre 4265 Multifunction Printer User Guide... - Page 61 Flex the sheets back and forth and fan them, then align the edges of the stack on a level surface. This procedure separates any sheets that are stuck together and reduces the possibility of jams. ® ® Xerox WorkCentre 4265 Multifunction Printer User Guide...
- Page 62 Do not load paper above the maximum fill line. Overfilling the tray can cause the printer to jam. Close the tray. If the control panel prompts you, verify the paper size, type, and color in the Paper Settings screen. When finished, touch Confirm. ® ® Xerox WorkCentre 4265 Multifunction Printer User Guide...
-
Page 63: Printing On Special Paper
Labels ......................................66 • Transparencies ..................................67 To order paper, transparencies, or other media, contact your local reseller or go to www.xerox.com/office/WC4265supplies. Envelopes You can print envelopes from the bypass tray or a 520-sheet feeder only. For details, see Supported Standard Paper Sizes on page 53. -
Page 64: Loading Envelopes In A 520-Sheet Feeder (Trays 1-4)
Adjust the paper guides so they rest lightly against the edges of the envelopes. Close the tray. If the control panel prompts you, verify the paper size, type, and color in the Paper Settings screen. When finished, touch Confirm. ® ® Xerox WorkCentre 4265 Multifunction Printer User Guide... -
Page 65: Loading Envelopes In The Bypass Tray
Flatten them to avoid jams. To load envelopes with long-edge flaps, place the envelopes with the short edge going into the printer, flaps up, and to the right. ® ® Xerox WorkCentre 4265 Multifunction Printer User Guide... -
Page 66: Labels
Before loading labels, remove all other paper from the tray. CAUTION: Do not use any sheet where labels are missing, curled, or pulled away from the backing sheet. It could damage the printer. ® ® Xerox WorkCentre 4265 Multifunction Printer User Guide... -
Page 67: Transparencies
In the print driver software, select Transparency as the paper type. • Do not load more than 20 transparencies. Overloading the tray can cause the printer to jam. • Do not fan transparencies. ® ® Xerox WorkCentre 4265 Multifunction Printer User Guide... -
Page 69: Printing
• Printing Features .................................. 78 • Special Job Types ................................. 81 • Saved Jobs ....................................83 • Held Print Jobs ..................................84 • Printing from a USB Flash Drive ............................ 85 ® ® Xerox WorkCentre 4265 Multifunction Printer User Guide... -
Page 70: Printing Overview
Windows or CMD+P for Macintosh. Select your printer. To access the print driver settings for Windows, select Properties or Preferences. For Macintosh ® select Xerox Features. Select the desired options. Click Print to send the job to the printer. -
Page 71: Selecting Printing Options
Printing options, also called print driver software options, are specified as Printing Preferences in ® Windows, and Xerox Features in Macintosh. Printing options include settings for 2-sided printing, page layout, and print quality. Printing options that are set from Printers and Faxes Printing Preferences become the default setting. -
Page 72: Windows Printing Options
The title of the button varies depending on your application. Click a tab in the Properties window, then make selections. To save your selections and close the Properties window, click OK. To send the job to the printer, click OK. ® ® Xerox WorkCentre 4265 Multifunction Printer User Guide... -
Page 73: Macintosh Printing Options
Click Print. Selecting Finishing Options for Macintosh ® If your printer has a finisher installed, select finishing options in the Xerox Features of the print driver. To select finishing options in the Macintosh print driver: With the document open in your application, click File > Print. -
Page 74: Linux Printing Options
You can also submit print requests through the command line using lp/lpr. For more information about Linux ® printing, click the Help (?) button in the Xerox GUI print driver. To print from a Linux workstation: Create a print queue. - Page 75 Printing The following commands are examples of how to print using a job ticket: • lp -d{Target_Queue} -oJT={Absolute_Path_To_Job_Ticket} {Path_To_Print_File} • lp -dMyQueue -oJT=/tmp/DuplexedLetterhead /home/user/PrintReadyFile • lp -dMyQueue -oJT=/tmp/Secure -oSecurePasscode=1234 /home/user/PrintReadyFile ® ® Xerox WorkCentre 4265 Multifunction Printer User Guide...
-
Page 76: Managing Jobs
The system administrator can restrict users from deleting jobs. If a system administrator has restricted job deletion, you can view the jobs, but not delete them. • Only the user that sent the job or the system administrator can delete a secure print job. ® ® Xerox WorkCentre 4265 Multifunction Printer User Guide... -
Page 77: Managing Secure And Held Print Jobs
You can view a list of active jobs and delete print jobs from the Active Jobs list in CentreWare Internet Services. You can also print, copy, move, or delete saved jobs. For details, see the Help in CentreWare Internet Services. ® ® Xerox WorkCentre 4265 Multifunction Printer User Guide... -
Page 78: Printing Features
You can specify the page layout for 2-sided printing, which determines how the printed pages turn. These settings override the application page orientation settings. Portrait Landscape Portrait Portrait Landscape Landscape 2-Sided Print 2-Sided Print, Flip on Short 2-Sided Print 2-Sided Print, Flip on Short Edge Edge ® ® Xerox WorkCentre 4265 Multifunction Printer User Guide... -
Page 79: Selecting Paper Options For Printing
You can reduce the image to as little as 25% of its original size or enlarge it as much as 400%. In Windows, you can find the Scale Options in the print driver on the Printing Options tab. 100% 200% ® ® Xerox WorkCentre 4265 Multifunction Printer User Guide... -
Page 80: Printing Booklets
Draft Mode saves toner or ink, producing lower-quality images. − This mode reduces the amount of toner used for print jobs. − You can use this feature for draft quality output. ® ® Xerox WorkCentre 4265 Multifunction Printer User Guide... -
Page 81: Special Job Types
Use the Personal Print job type to save a print job under your user name and print it from the printer control panel. You do not need to enter a job name or passcode. ® ® Xerox WorkCentre 4265 Multifunction Printer User Guide... -
Page 82: Sample Set
At the printer control panel, press the Job Status button. Touch the corresponding print job from the Active Jobs tab. Touch Release. The job prints, then is deleted from the printer hard drive. ® ® Xerox WorkCentre 4265 Multifunction Printer User Guide... -
Page 83: Saved Jobs
Touch the name of the saved job that you want to print. Touch OK. Select the number of copies. Press the green Start button. After the job prints, to return to the list of saved jobs, touch Browse. ® ® Xerox WorkCentre 4265 Multifunction Printer User Guide... -
Page 84: Held Print Jobs
To determine why a job was held, touch the job, then touch Details. To release a held job, touch the job, then touch Release. To release all held jobs, touch Release All Jobs. ® ® Xerox WorkCentre 4265 Multifunction Printer User Guide... -
Page 85: Printing From A Usb Flash Drive
• The system administrator must set up this feature before you can use it. For details, see the System Administrator Guide at www.xerox.com/office/WC4265docs. To print from a USB Flash drive: Insert your USB Flash drive in a USB port on the printer. The Print from USB window appears. -
Page 87: Copying
Copying This chapter includes: • Basic Copying ..................................88 • Selecting Copy Settings ..............................94 ® ® Xerox WorkCentre 4265 Multifunction Printer User Guide... -
Page 88: Basic Copying
• The document glass accommodates original sizes up to 216 x 356 mm (8.5 x 14 in.). • The document glass automatically detects Legal or Letter/A4 and smaller paper sizes. ® ® Xerox WorkCentre 4265 Multifunction Printer User Guide... -
Page 89: Document Glass Guidelines
Adjust the paper guides so that they fit against the originals. • Only Insert paper in the duplex automatic document feeder when ink on the paper is dry. • Do not load originals above the MAX fill line. ® ® Xerox WorkCentre 4265 Multifunction Printer User Guide... -
Page 90: Adjusting Copying Options
For details, see Basic Copying on page 91. You can also modify the default settings for many options. For details, see Selecting Default Copy Settings on page 94. ® ® Xerox WorkCentre 4265 Multifunction Printer User Guide... -
Page 91: Basic Settings
Adjust the sliders up or down as needed. Touch OK. Setting 2-Sided Copying At the printer control panel, press the Services Home button. Touch Copy. Under the Copy tab, touch 2-Sided Copying. Touch an option. Touch OK. ® ® Xerox WorkCentre 4265 Multifunction Printer User Guide... - Page 92 To change this setting: Press the Services Home button, then touch Copy. Touch More Features > Background Suppression. Under Background Suppression, touch Auto Suppression. Touch OK. ® ® Xerox WorkCentre 4265 Multifunction Printer User Guide...
- Page 93 Stapling Copies If your printer has a finisher, it can staple your copies. To select stapling: Press the Services Home button, then touch Copy. Touch Finishing, then select an option. Touch OK. ® ® Xerox WorkCentre 4265 Multifunction Printer User Guide...
-
Page 94: Selecting Copy Settings
Preset Scan Area: You can specify the area to scan when it matches a standard paper size. Custom Scan Area: You can specify the height and width of the area to scan. − Mixed Size Originals: You can scan standard-size originals of varying sizes. − Touch OK. ® ® Xerox WorkCentre 4265 Multifunction Printer User Guide... -
Page 95: Page Layout
To change the placement of the image: Press the Services Home button, then touch Copy. Touch More Features > Image Shift. Select an option. Touch OK. ® ® Xerox WorkCentre 4265 Multifunction Printer User Guide... -
Page 96: Output Format Settings
In this mode, the printer scans all of the originals before printing the copies. To create a booklet: Press the Services Home button, then touch Copy. Touch More Features> Booklet Creation. Touch On. Make selections as needed. Touch OK. ® ® Xerox WorkCentre 4265 Multifunction Printer User Guide... - Page 97 Blank: This option inserts a blank page between the transparencies. − − Printed: This option inserts a printed sheet of paper between the transparencies. Under Paper Supply, touch the desired tray. Touch OK. ® ® Xerox WorkCentre 4265 Multifunction Printer User Guide...
-
Page 98: Id Card Copying
Turn over the document and position it in the upper left corner of the document glass. Press the green Start button. 10. Lift the document cover and remove the ID card or document. ® ® Xerox WorkCentre 4265 Multifunction Printer User Guide... -
Page 99: Advanced Copying
10. At any time, you can touch Delete All Segments to modify the job. 11. When all of the segments have been programmed and copied, touch Submit the Job. If necessary, touch Delete > Delete Job to cancel the job. ® ® Xerox WorkCentre 4265 Multifunction Printer User Guide... -
Page 101: Scanning
Scanning to a Computer ..............................115 The system administrator must set up this feature before you can use it. For details, see the System Administrator Guide at www.xerox.com/office/WC4265docs. If the system administrator enables Remote Start in CentreWare Internet Services, you can scan images directly from the scanner to a PC. -
Page 102: Basic Scanning
At the printer control panel, press Clear All, then press Services Home. Touch Workflow Scanning. Select a template from the list. To change the scan setting, touch an option. For more options, touch the More Features tab. Press the green Start button. ® ® Xerox WorkCentre 4265 Multifunction Printer User Guide... -
Page 103: Document Glass
Adjust the paper guides so that they fit against the originals. • Only Insert paper in the duplex automatic document feeder when ink on the paper is dry. • Do not load originals above the MAX fill line. ® ® Xerox WorkCentre 4265 Multifunction Printer User Guide... -
Page 104: Adjusting Scanning Settings
To set the scan resolution: At the printer control panel, press Clear All, then press Services Home. Touch Scan To, then select an option. Touch More Features > Resolution. Select an option. Touch OK. ® ® Xerox WorkCentre 4265 Multifunction Printer User Guide... -
Page 105: Selecting 2-Sided Scanning
To select Auto Suppression: At the printer control panel, press Clear All, then press Services Home. Touch Scan To, then select an option. Touch More Features > Background Suppression. Touch Auto Suppression. Touch OK. ® ® Xerox WorkCentre 4265 Multifunction Printer User Guide... -
Page 106: Specifying The Original Size
At the printer control panel, press Clear All, then press Services Home. Touch Scan To, then select an option. Touch More Features > Scan to Edge. To change the Edge Erase settings, select an option. Touch OK. ® ® Xerox WorkCentre 4265 Multifunction Printer User Guide... -
Page 107: Building A Scan Job
11. At any time, you can touch Delete All Segments to modify the job. 12. When all of the segments have been programmed and scanned, touch Submit the Job. If necessary, touch Delete > Delete Job to cancel the job. ® ® Xerox WorkCentre 4265 Multifunction Printer User Guide... -
Page 108: Selecting Filing Options
Document Management and Add File Destinations can be modified only after scanning to network file repositories or scanning to home are set up. For details, see the System Administrator Guide at www.xerox.com/office/WC4265docs. To select filing options: At the printer control panel, press Clear All, then press Services Home. -
Page 109: Sending A Scanned Image To A Destination
Select an option. Select the desired name from the list, then touch OK. Change scan settings as needed. Press the green Start button. For details, see Adjusting Scanning Settings on page 104. ® ® Xerox WorkCentre 4265 Multifunction Printer User Guide... -
Page 110: Scanning To A Shared Folder On A Network Computer
Select Share this folder. Click Permissions. Select the Everyone group, and verify that all permissions are enabled. Click OK. Note: Remember the Share name for later use. Click OK again. Click Close. ® ® Xerox WorkCentre 4265 Multifunction Printer User Guide... -
Page 111: Sharing A Folder Using Macintosh Os X Version 10.7 And Later
Press the Services Home button, then touch Workflow Scanning. Select a template from the list. Change scan settings as needed. For details, see Adjusting Scanning Settings on page 104. To begin the scan, press Start. ® ® Xerox WorkCentre 4265 Multifunction Printer User Guide... -
Page 112: Scanning To Your Home Directory
At the printer control panel, press Clear All, then press Services Home. Touch Workflow Scanning. Select the template that the system administrator created. Change scan settings as needed. Press the green Start button. ® ® Xerox WorkCentre 4265 Multifunction Printer User Guide... -
Page 113: Scanning To An Email Address
To modify the default subject, touch X to delete it, or type over the existing text. Touch OK. To change any of the scan settings, use options on the More Features tab. Press the green Start button. ® ® Xerox WorkCentre 4265 Multifunction Printer User Guide... -
Page 114: Scanning To A Usb Flash Drive
Do not remove the USB Flash drive until prompted. If you remove the Flash drive before the transfer is complete, the file can become unusable and other files on the drive can be damaged. ® ® Xerox WorkCentre 4265 Multifunction Printer User Guide... -
Page 115: Scanning To A Computer
At your computer, click Start > Programs > Microsoft Office > Microsoft Office Tools > Microsoft Clip Organizer. Click File > Add Clips to Organizer > From Scanner or Camera. Click Device > Xerox TWAIN Driver. Click Custom Insert. If multiple scanners are installed on your computer, click Select Scan Device, select the scanner, then click Select. -
Page 117: Faxing
Printing or Deleting Stored Faxes ..........................128 • Using the Address Book ..............................129 The system administrator must set up this feature before you can use it. For details, see the System Administrator Guide at www.xerox.com/office/WC4265docs. ® ® Xerox WorkCentre... -
Page 118: Basic Faxing
• The document glass accommodates original sizes up to 216 x 356 mm (8.5 x 14 in.). • The document glass automatically detects Legal or Letter/A4 and smaller paper sizes. ® ® Xerox WorkCentre 4265 Multifunction Printer User Guide... -
Page 119: Document Feeder
Adjust the paper guides so that they fit against the originals. • Only Insert paper in the duplex automatic document feeder when ink on the paper is dry. • Do not load originals above the MAX fill line. ® ® Xerox WorkCentre 4265 Multifunction Printer User Guide... -
Page 120: Selecting Fax Options
Touch the Hour field, then touch the arrows to set a number. Touch the Minute field, then touch the arrows to set a number. If your printer is set to display the 12-hour clock, touch AM or PM. Touch OK. ® ® Xerox WorkCentre 4265 Multifunction Printer User Guide... -
Page 121: Automatically Suppressing Background Variation
Sending Header Text The system administrator must set up this feature before you can use it. For details, see the System Administrator Guide at www.xerox.com/office/WC4265docs. To include the fax header text: At the printer control panel, press Clear All, then press Services Home. -
Page 122: Building A Fax Job
Repeat the previous step for each remaining segment. When all of the segments have been programmed and scanned, touch Submit the Job. 10. On the Job Progress screen, touch Job Details to view a summary of the job. ® ® Xerox WorkCentre 4265 Multifunction Printer User Guide... -
Page 123: Storing A Fax In A Local Mailbox
Storing a Fax in a Local Mailbox The system administrator must create a mailbox before you can use this feature. For details, see the System Administrator Guide at www.xerox.com/office/WC4265docs. To store a fax in a local mailbox: At the printer control panel, press Clear All, then press Services Home. -
Page 124: Printing Local Mailbox Documents
123. To print local mailbox documents: At the printer control panel, press Clear All, then press Services Home. Touch Fax > Mailboxes. Touch Print From Mailbox. Touch an option. Touch Print. ® ® Xerox WorkCentre 4265 Multifunction Printer User Guide... -
Page 125: Sending A Fax To A Remote Mailbox
Sending a Fax to a Remote Mailbox At the printer control panel, press Clear All, then press Services Home. Touch Fax > Mailboxes. Touch Store To Mailbox > Remote Mailbox. Touch an option, then touch OK. ® ® Xerox WorkCentre 4265 Multifunction Printer User Guide... -
Page 126: Storing A Fax For Local Or Remote Polling
To store a fax: At the printer control panel, press Clear All, then press Services Home. Touch Fax > Polling. Touch Store Locally for Remote Polling. Touch an option. Touch Save. ® ® Xerox WorkCentre 4265 Multifunction Printer User Guide... -
Page 127: Polling A Remote Fax
To poll a remote fax: At the printer control panel, press Clear All, then press Services Home. Touch Fax > Polling. Touch Retrieve/Print Remote Files. Type the fax number. Touch Print. ® ® Xerox WorkCentre 4265 Multifunction Printer User Guide... -
Page 128: Printing Or Deleting Stored Faxes
Faxing Printing or Deleting Stored Faxes At the printer control panel, press Clear All, then press Services Home. Touch Fax > Polling. Touch Local File Management, then select an option. ® ® Xerox WorkCentre 4265 Multifunction Printer User Guide... -
Page 129: Using The Address Book
At the printer control panel, press Clear All, then press Services Home. Touch Fax > Device Address Book. Touch the address book entry. Touch OK. Touch the contact name. To edit the fields, touch Details. To delete the contact, touch Remove. ® ® Xerox WorkCentre 4265 Multifunction Printer User Guide... -
Page 131: Maintenance
Maintenance This chapter includes: • Cleaning the Printer ................................132 • Ordering Supplies ................................136 • Managing the Printer ............................... 140 ® ® Xerox WorkCentre 4265 Multifunction Printer User Guide... -
Page 132: Cleaning The Printer
Do not touch the electrical contacts or gears. Doing so could damage the printer and cause the print quality to deteriorate. • Ensure any parts removed during cleaning are replaced before you plug in the printer. ® ® Xerox WorkCentre 4265 Multifunction Printer User Guide... -
Page 133: Cleaning The Exterior
Keep the feed rollers clean to ensure the best possible copies and scans. Cleaning the Document Cover Slightly dampen a soft, lint-free cloth with water. Remove any paper from the document feeder. Open the document cover. ® ® Xerox WorkCentre 4265 Multifunction Printer User Guide... - Page 134 At the printer control panel, press the Machine Status button. On the Machine Information tab, touch Self Help. For Videos, select Clean Feeder to Improve Quality. To view the video, touch Play Video. ® ® Xerox WorkCentre 4265 Multifunction Printer User Guide...
-
Page 135: Cleaning The Interior
Switch off the printer immediately and wait 30 minutes for the fuser to cool. After the printer cools, try to remove the jammed paper. If the error persists, contact your Xerox representative. ®... -
Page 136: Ordering Supplies
Recycling Supplies ................................139 Consumables Consumables are printer supplies that get depleted during the operation of the printer. The consumable ® supply for this printer is the genuine Xerox Black Toner Cartridge. Notes: Each consumable includes installation instructions. -
Page 137: When To Order Supplies
Total Satisfaction Guarantee do not cover damage, malfunction, or degradation of performance caused by use of non-Xerox supplies, or the use of Xerox supplies not specified for this printer. The Total Satisfaction Guarantee is available in the United States and Canada. Coverage could vary outside these areas. -
Page 138: Toner Cartridges
Use a damp cloth to wipe off spilled toner. Never use a vacuum cleaner to remove spills. Electric sparks inside the vacuum cleaner can cause a fire or explosion. If you spill a large volume of toner, contact your local Xerox representative. •... -
Page 139: Recycling Supplies
Replace Toner Cartridge The toner cartridge is empty. Open the side door and then the front door, then replace the toner cartridge. Recycling Supplies ® For more information on the Xerox supplies recycling program, go to: www.xerox.com/gwa. ® ® Xerox... -
Page 140: Managing The Printer
Turn off the printer and disconnect the power cord and other cables from the back of the printer. For details, see Turning the Printer On and Off on page 40. Remove any paper or other media from the output tray. For ease of transport, remove the finisher. ® ® Xerox WorkCentre 4265 Multifunction Printer User Guide... -
Page 141: Billing And Usage Information
• Repack the printer and its options using the original packing material and boxes or a Xerox Repackaging Kit. For a repacking kit and instructions, go to www.xerox.com/office/WC4265support. -
Page 143: Troubleshooting
General Troubleshooting ..............................144 • Paper Jams .................................... 150 • Print-Quality Problems ..............................166 • Copy and Scan Problems ..............................170 • Fax Problems ..................................171 • Getting Help ..................................173 ® ® Xerox WorkCentre 4265 Multifunction Printer User Guide... -
Page 144: General Troubleshooting
Internal parts of the printer can be hot. Use caution when doors and covers are open. • To avoid personal injury or printer damage, wait 30 minutes for the fuser to cool. ® ® Xerox WorkCentre 4265 Multifunction Printer User Guide... -
Page 145: Restarting The Printer
Touch Power Down. To restart the printer, turn on the power switch. Note: If restarting the printer does not resolve the problem, see the table in this chapter that best describes the problem. ® ® Xerox WorkCentre 4265 Multifunction Printer User Guide... -
Page 146: Printer Fails To Power On
Turn off the printer, then turn it on again. Print the Error History report from the Information Pages menu. If the error persists, contact your Xerox representative. The printer is connected to an uninterruptible Turn off the printer, then connect the power cord to a suitable power supply. -
Page 147: Automatic 2-Sided Printing Problems
For additional help, contact the system administrator. The job is complex. Wait. No action needed. The print-quality mode in the driver is set to Change the print-quality mode in the print driver to Standard. Enhanced. ® ® Xerox WorkCentre 4265 Multifunction Printer User Guide... -
Page 148: Printer Fails To Print
Solutions The printer has an error. • To clear the error, follow the onscreen prompts. • If the error persists, contact your Xerox representative. The printer is out of paper. Load paper into the tray. A toner cartridge is empty. -
Page 149: Condensation Has Formed Inside The Printer
The relative humidity of the room is too high. • Reduce the humidity in the room. • Move the printer to a location where the temperature and relative humidity are within the operating specifications. ® ® Xerox WorkCentre 4265 Multifunction Printer User Guide... -
Page 150: Paper Jams
Troubleshooting Paper Jams ............................164 Minimizing Paper Jams The printer is designed to function with minimal paper jams using Xerox supported paper. Other paper types can cause jams. If supported paper is jamming frequently in one area, clean that area of the paper path. -
Page 151: Locating Paper Jams
30 minutes for the fuser to cool. After the printer cools, try to remove the jammed paper. If the error persists, contact your Xerox representative. The following illustration shows where paper jams can occur along the paper path: 1. -
Page 152: Clearing Paper Jams
To resolve the error displayed on the control panel you must clear all paper from the paper path. Remove Tray 1 from the printer. Remove any crumpled paper from the tray and any remaining paper jammed in the printer. ® ® Xerox WorkCentre 4265 Multifunction Printer User Guide... - Page 153 Insert tray 1 into the printer, then push it in all the way. If the control panel prompts you, verify the paper size, type, and color in the Paper Settings screen. Touch Confirm. ® ® Xerox WorkCentre 4265 Multifunction Printer User Guide...
-
Page 154: Clearing Paper Jams From Trays 2-4
Remove tray 2 from the printer. Remove any crumpled paper from the tray and any remaining paper jammed in the printer. Insert tray 2 into the printer, then push it all the way in. ® ® Xerox WorkCentre 4265 Multifunction Printer User Guide... -
Page 155: Clearing Paper Jams From The 2100-Sheet High-Capacity Feeder
Before removing the paper tray from the printer, look at the jam message on the control panel. If another jam is shown, clear that jam first. Open the high-capacity feeder tray then remove any damaged paper. ® ® Xerox WorkCentre 4265 Multifunction Printer User Guide... - Page 156 Push the tray back into the printer completely, then close the inside and outside covers. If the control panel prompts you, verify the paper size, type, and color in the Paper Settings screen. Touch Confirm. ® ® Xerox WorkCentre 4265 Multifunction Printer User Guide...
-
Page 157: Clearing Jams In The Optional Finisher
To access the finisher, release lever 1c, then slide the finisher unit to the left. CAUTION: To avoid dropping the finisher, do not slide the finisher too far to the left Remove any jammed paper from inside the finisher area. ® ® Xerox WorkCentre 4265 Multifunction Printer User Guide... -
Page 158: Clearing Paper Jams From The Document Feeder
To return the finisher to its original position, lift slightly and push to the right until the finisher clicks into place. Clearing Paper Jams from the Document Feeder Remove any paper from the document feeder. Open the document feeder top cover. ® ® Xerox WorkCentre 4265 Multifunction Printer User Guide... - Page 159 To access the document feeder to remove jammed paper, lift the document feeder cover. To open the document feeder inside cover, gently pull the green lever. Remove any paper or debris from the paper path. ® ® Xerox WorkCentre 4265 Multifunction Printer User Guide...
- Page 160 Press the document feeder inside cover into its original position, then ensure that the lever is locked in place. Note: Ensure that the magnetic edge of the white plastic strip rests securely against the metal strip. Close the document feeder cover. ® ® Xerox WorkCentre 4265 Multifunction Printer User Guide...
-
Page 161: Clearing Paper Jams From The Fuser Area
To access jammed paper in the fuser area, open the right side door. Gently remove any paper from the fuser area. WARNING: The area around the fuser can be hot. Use caution to avoid injury. Close the right side door. ® ® Xerox WorkCentre 4265 Multifunction Printer User Guide... -
Page 162: Clearing Paper Jams From The Duplex Area
Clearing Paper Jams from the Duplex Area To access paper jams in the duplex area, open the right side door. Gently remove any paper from the duplex area. Close the right side door. ® ® Xerox WorkCentre 4265 Multifunction Printer User Guide... -
Page 163: Clearing Paper Jams At The Bypass Tray
If the paper is torn, check inside the printer for pieces of paper, then gently remove them. If you cannot remove the paper fragments easily, contact your Xerox representative. WARNING: The area around the fuser can be hot. Use caution to avoid injury. -
Page 164: Troubleshooting Paper Jams
Remove the paper from the tray, and replace it with new dry paper. Too much static electricity is present. • Try a new ream of paper. • Do not fan transparencies before loading in tray. Use only Xerox approved paper. For details, see Supported Paper Using unsupported paper. page 50. -
Page 165: Label And Envelope Misfeeds
Check for, and remove, torn pieces of paper in the paper path. Jams During Automatic 2-Sided Printing Probable Causes Solutions Using paper of the wrong size, thickness, or • Use only Xerox approved paper. For details, see Supported Paper type. Sizes and Weights for Automatic 2-Sided Printing on page 54. -
Page 166: Print-Quality Problems
When the print quality is poor, select the closest symptom from the following table and see the corresponding solution to correct the problem. You can also print a Demo Page to more precisely determine the print-quality problem. If the print quality does not improve after carrying out the appropriate action, contact your Xerox representative. Note: To maintain print quality, the toner cartridge is designed to provide a warning message when the toner level is low. - Page 167 • Verify that the toner cartridge is approved for use in this printer, and replace it as needed. For best results, use a genuine Xerox toner cartridge. • Ensure that the print quality mode is not set to Toner Saver. Toner Saver us useful for draft quality output.
- Page 168 Solutions The output is blank. • Turn off the printer, then turn it on again. • If the error persists, contact your Xerox representative. Streaks appear in the output. • Replace the Smart Kit Drum Cartridge. • Contact your Xerox representative.
- Page 169 • Verify that the toner cartridge is approved for use in this printer, and replace it as needed. For best results, use a genuine Xerox toner cartridge. • Replace the Smart Kit Drum Cartridge. The output print is wrinkled or •...
-
Page 170: Copy And Scan Problems
Turn on Background Suppression. the copy or scan. Image is too light or too dark. To lighten, darken, or adjust contrast, touch the More Features tab. If the problem persists, for online support information, go to www.xerox.com/office/WC4265support. ® ® Xerox... -
Page 171: Fax Problems
The fax is not installed or is not Verify that the fax is installed and enabled. enabled. Server Fax is enabled. Make sure that Server Fax is disabled. If the problem persists, for online support information, go to www.xerox.com/office/WC4265support. ® ® Xerox WorkCentre 4265 Multifunction Printer... -
Page 172: Problems Receiving Faxes
Make a copy to verify that your printer machine of the sender. is operating correctly. If the copy prints correctly, have the recipient verify their fax machine is operating correctly. If the problem persists, for online support information, go to www.xerox.com/office/WC4265support. ® ® Xerox WorkCentre... -
Page 173: Getting Help
Online Support Assistant ..............................174 • Using the Integrated Troubleshooting Tools ......................175 Xerox provides several automatic diagnostic utilities to help you maintain productivity and print quality. Control Panel Messages The printer control panel provides information and troubleshooting help. When a fault or warning condition occurs, the control panel displays a message informing you of the problem. -
Page 174: Online Support Assistant
The Online Support Assistant is a knowledge base that provides instructions and troubleshooting help to solve your printer problems. You can find solutions for print-quality problems, paper jams, software installation issues, and more. To access the Online Support Assistant, go to www.xerox.com/office/WC4265support. ® ®... -
Page 175: Using The Integrated Troubleshooting Tools
Customer Assistance Report The Customer Assistance Report provides a summary of relevant information that you can provide to a Xerox support representative when you call for assistance. Demo Page The Demo page provides a demonstration of the current print quality. - Page 176 You can obtain more information about your printer from these sources: Resource Location Installation Guide Packaged with the printer. Other documentation for your printer www.xerox.com/office/WC4265docs Technical support information for your printer; www.xerox.com/office/WC4265support including online technical support, Online Support Assistant, and driver downloads. Information Pages •...
-
Page 177: Specifications
Specifications This appendix includes: • Printer Configurations and Options ........................... 178 • Physical Specifications ..............................180 • Environmental Specifications ............................184 • Electrical Specifications ..............................185 • Performance Specifications ............................186 ® ® Xerox WorkCentre 4265 Multifunction Printer User Guide... -
Page 178: Printer Configurations And Options
Specifications Printer Configurations and Options Standard Configurations Model Includes WorkCentre 4265/S Multifunction Printer Standard features WorkCentre 4265/X Multifunction Printer • Standard features • Fax WorkCentre 4265XF Multifunction Printer • Standard features • Fax • 500-sheet finisher • 2100-sheet high-capacity feeder •... - Page 179 • XPS Control panel 4.3 inch LCD touch screen and keypad navigation • Universal Serial Bus (USB 2.0) Connectivity • USB Flash drive • Ethernet 10/100/1000Base-T Remote access CentreWare Internet Services ® ® Xerox WorkCentre 4265 Multifunction Printer User Guide...
-
Page 180: Physical Specifications
Specifications Physical Specifications Clearance Requirements for Standard Configuration ® ® Xerox WorkCentre 4265 Multifunction Printer User Guide... -
Page 181: Clearance Requirements For Standard Configuration With Optional Finisher
Specifications Clearance Requirements for Standard Configuration with Optional Finisher ® ® Xerox WorkCentre 4265 Multifunction Printer User Guide... -
Page 182: Clearance Requirements For Standard Configuration With Optional Feeders
Specifications Clearance Requirements for Standard Configuration with Optional Feeders ® ® Xerox WorkCentre 4265 Multifunction Printer User Guide... -
Page 183: Clearance Requirements For Standard Configuration With Optional Finisher And Feeders
62.17 cm (24.5 in.) Depth 51.13 cm (20.1 in.) Height 62.40 cm (24.6 in.) Weight 42.41 kg (93.63lb.) S configuration Weight 42.53 kg (93.89 lb.) X configuration Weight 92.39 kg (203.9 lb.) XF configuration ® ® Xerox WorkCentre 4265 Multifunction Printer User Guide... -
Page 184: Environmental Specifications
Minimum–Maximum Humidity Range: 10–90%, less than 90% when in the packaging • Optimum Humidity: 30–70% • Operating Humidity: 20–80% Relative Humidity Elevation For optimum performance, use the printer at elevations below 3100 m (10,170 ft.). ® ® Xerox WorkCentre 4265 Multifunction Printer User Guide... -
Page 185: Electrical Specifications
® ENERGY STAR settings are preset on Xerox equipment at the factory to switch to Energy Saver Modes after 5 minutes from the last copy or print. -
Page 186: Performance Specifications
Paper size: Letter (8.5 x 11 in.) and A4 (210 x 297 mm) sizes share the fastest print speed. • Paper type: Plain paper prints faster than Cardstock or Heavyweight. • Paper weight: Lightweight prints faster than heavier paper, such as Cardstock and Labels. ® ® Xerox WorkCentre 4265 Multifunction Printer User Guide... -
Page 187: Regulatory Information
Regulatory Information This appendix includes: • Basic Regulations ................................188 • Copy Regulations ................................193 • Fax Regulations .................................. 196 • Material Safety Data Sheets ............................200 ® ® Xerox WorkCentre 4265 Multifunction Printer User Guide... -
Page 188: Basic Regulations
• Consult the dealer or an experienced radio/TV technician for help. Changes or modifications to this equipment not approved by Xerox can void the authority of the user to operate this equipment. Note: To ensure compliance with Part 15 of the FCC rules, use shielded interface cables. -
Page 189: European Union
This printer, if used properly in accordance with the instructions, is not dangerous for the consumer or for the environment. To ensure compliance with European Union regulations, use shielded interface cables. A signed copy of the Declaration of Conformity for this printer can be obtained from Xerox. European Union Lot 4 Imaging Equipment Agreement Environmental Information... - Page 190 Regulatory Information Environmental Benefits of Duplex Printing Most Xerox products have duplex printing, also known as 2-sided printing, capability. This enables you to print on both sides of the paper automatically, and therefore helps to reduce the use of valuable resources by reducing your paper consumption.
-
Page 191: Germany
This product is certified to Environmental Choice standard for office machines, meeting all requirements for reduced environmental impact. As part of achieving certification, Xerox Corporation has proven this product meets the Environmental Choice criteria for energy efficiency. Certified copier, printer, multifunctional device, and fax products must also meet criteria such as reduced chemical emissions and demonstrate compatibility with recycled supplies. -
Page 192: Turkey Rohs Regulation
(2) this device must accept any interference received, including interference that may cause undesired operation. Changes or modifications to this device not specifically approved by the Xerox Corporation may void the user's authority to operate this equipment. ®... -
Page 193: Copy Regulations
“fair use” or library reproduction rights provisions of the copyright law. Further information of these provisions may be obtained from the Copyright Office, Library of Congress, Washington, D.C. 20559. Ask for Circular R21. ® ® Xerox WorkCentre 4265 Multifunction Printer User Guide... -
Page 194: Canada
Canada or a department, board, Commission, or agency established by the Government of Canada or of a province or of a government of a state other than Canada ® ® Xerox WorkCentre 4265 Multifunction Printer User Guide... -
Page 195: Other Countries
• Postage stamps and other negotiable instruments This list is not inclusive and no liability is assumed for either its completeness or accuracy. In case of doubt, contact your legal counsel. ® ® Xerox WorkCentre 4265 Multifunction Printer User Guide... -
Page 196: Fax Regulations
US:AAAEQ##TXXXX. The digits represented by ## are the REN without a decimal point (for example, 03 is a REN of 0.3). For earlier products, the REN is separately shown on the label. ® ® Xerox WorkCentre 4265 Multifunction Printer User Guide... - Page 197 Ask your local Telephone Company for the modular jack type installed on your line. Connecting this machine to an unauthorized jack can damage telephone company equipment. You, not Xerox, assume all responsibility and/or liability for any damage caused by the connection of this machine to an unauthorized jack.
-
Page 198: Canada
DTMF signaling for more reliable and faster call setup. Modification of this product, connection to external control software, or connection to an external ® control apparatus not authorized by Xerox will invalidate its certification. South Africa This modem must be used in conjunction with an approved surge protection device. -
Page 199: New Zealand
For correct operation, total of the RNs of all devices connected to a single line at any time should not exceed five. ® ® Xerox WorkCentre 4265 Multifunction Printer User Guide... -
Page 200: Material Safety Data Sheets
Material Safety Data Sheets For Material Safety Data information regarding your printer, go to: • North America: www.xerox.com/msds • European Union: www.xerox.com/environment_europe For the Customer Support Center phone numbers, go to www.xerox.com/office/worldcontacts. ® ® Xerox WorkCentre 4265 Multifunction Printer User Guide... -
Page 201: Recycling And Disposal
Recycling and Disposal This appendix includes: • All Countries ..................................202 • North America ..................................203 • European Union .................................. 204 • Other Countries ................................... 206 ® ® Xerox WorkCentre 4265 Multifunction Printer User Guide... -
Page 202: All Countries
Recycling and Disposal All Countries If you are managing the disposal of your Xerox product, please note that the printer may contain lead, mercury, perchlorate, and other materials whose disposal may be regulated due to environmental considerations. The presence of these materials is fully consistent with global regulations applicable at the time that the product was placed on the market. -
Page 203: North America
North America Xerox operates an equipment take-back and reuse/recycle program. Contact your Xerox representative (1-800-ASK-XEROX) to determine if this Xerox product is part of the program. For more information about Xerox environmental programs, visit www.xerox.com/environment, or for recycling and disposal information, contact your local authorities. -
Page 204: European Union
In accordance with European legislation, end of life electrical and electronic equipment subject to disposal must be managed within agreed procedures. Prior to disposal, please contact your local reseller or Xerox representative for end of life take-back information. ®... -
Page 205: Collection And Disposal Of Equipment And Batteries
This wheeled bin symbol may be used in combination with a chemical symbol. This establishes compliance with the requirements set out by the Directive. Battery Removal Batteries should only be replaced by a manufacturer-approved service facility. ® ® Xerox WorkCentre 4265 Multifunction Printer User Guide... -
Page 206: Other Countries
Recycling and Disposal Other Countries Please contact your local waste management authority to request disposal guidance. ® ® Xerox WorkCentre 4265 Multifunction Printer User Guide...
Need help?
Do you have a question about the WorkCentre 4265 and is the answer not in the manual?
Questions and answers