
Related Manuals for Aleratec LightScribe Duplicator SA 260201


Summary of Contents for Aleratec LightScribe Duplicator SA 260201
- Page 1 ® USER GUIDE Aleratec 1:3 Blu-ray/DVD/CD LightScribe Duplicator SA ™ Part No. 260201...
- Page 2 Aleratec, Inc. 9851 Owensmouth Avenue Chatsworth, CA 91311 U.S.A. Aleratec is a registered trademark, and 1:3 Blu-ray/DVD/CD LightScribe ® Duplicator SA™ is a trademark of Aleratec, Inc Check out Aleratec Online! • aleratec.com • facebook.com/Aleratec • twitter.com/Aleratec • youtube.com/Aleratec Please record the following information to help expedite any warranty claim: Model No.
- Page 3 TV reception. The user is cautioned that changes and/or modifications made to this equipment, without the approval of manufacturer, could void the user’s authority to operate this equipment. www.aleratec.com...
- Page 4 The use of optical instruments with this product will increase eye hazard. This BD/DVD/CD Duplicator is classified as a CLASS 1 LASER PRODUCT. The CLASS 1 LASER PRODUCT label is located on top of the internal drive enclosure. CLASS 1 LASER PRODUCT LASER KLASSE 1 PRODUKT www.aleratec.com...
-
Page 5: Table Of Contents
Audio CD Editing ....................42 Introduction to Manage Accounts ..............50 Manage Accounts: Overview ................51 Introduction to Duplication Mode ..............54 Using AUTOCOPY ....................57 Menu Overview ...................59 Troubleshooting ..................66 Recommended Media ................70 Technical Support ..................71 Service and Support ...................73 Technical Support FAX Back Form ............75 www.aleratec.com... - Page 6 ® www.aleratec.com...
-
Page 7: Introduction
• Removable Hard Disk Drive to store disc images and label files.* • Aleratec only USB fast key instantly connects Hard Drive to a PC. • BD/DVD/CD source drive for fast on the fly copies. • Laser burns disc labels.* •... -
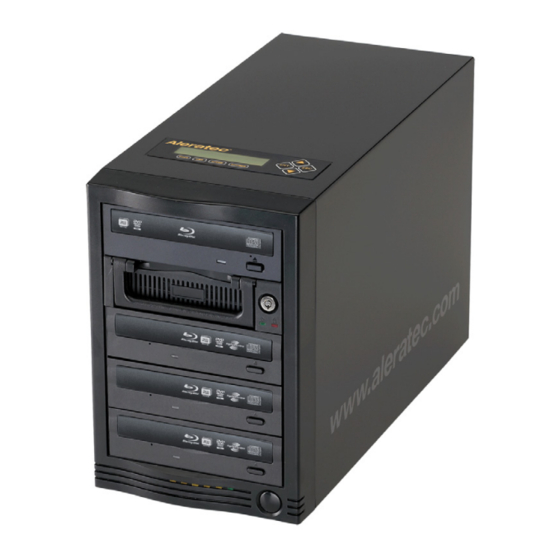
Page 8: Key Items - 1:3 Blu-Ray/Dvd/Cd Lightscribe Duplicator Sa
Introduction Key Items – 1:3 Blu-ray/DVD/CD LightScribe Duplicator SA Control Panel BD/DVD/CD Source Drive Removable Hard Disc Drive (see page 4) BD/DVD/CD RW LightScribe Drives* *Note: There is currently no LightScribe Blu-ray media available. www.aleratec.com... -
Page 9: 1:3 Blu-Ray/Dvd/Cd Lightscribe Duplicator Sa: Lcd Front Panel
Master Discs. The default for this option is the BD/DVD/CD source drive. (See page 33 for more information) UP arrow is used to scroll up through functions or menus DOWN arrow is used to scroll down through functions or menus www.aleratec.com... -
Page 10: 1:3 Blu-Ray/Dvd/Cd Lightscribe Duplicator Sa: Removable Hard Disk Drive
Note: The HDD will not work unless it is secured in position with the carriage lever and locked with the key. Do not unlock the HDD during operation, as you will destroy any copies you are making. www.aleratec.com... -
Page 11: Precautions
This means that you cannot copy a single layer DVD disc onto a double/dual layer DVD disc or vice versa. The recordable blanks must be the same format and maximum capacity as the Master Disc you intend to duplicate. www.aleratec.com... - Page 12 Transportation Please keep the original packing materials for future moving or shipping of the 1:3 Blu-ray/DVD/CD LightScribe Duplicator SA. Shipping the 1:3 Blu-ray/DVD/CD LightScribe Duplicator SA without proper packaging will void the warranty. www.aleratec.com...
-
Page 13: Overview
1.1, as this will greatly affect system performance. If Windows displays a message that a fast USB device is detected on a slow USB port, then you will need to upgrade your computer by adding a USB 2.0 port. www.aleratec.com... -
Page 14: Lightscribe Software Installation
LightScribe Software Installation Minimum System Requirements: PC running Windows 2000, XP, Vista or 7 Install the Aleratec File System Manager. First write down the key code labeled “Product Key” on the front of the disc and then put the disc into your PC. - Page 15 Then, press the ENT key to confirm the selection. You will be prompted to restart the system. For this guide make sure that the USB mode is enabled. Note: While in USB mode, the duplicator cannot access the hard drive only the PC can. www.aleratec.com...
- Page 16 The “dup” folder is where “.iso” files, “.nrg” files and folders of data can be put in for disc burning.* The “label” folder is where “.lsi” files created by the LightScribe Template Labeler program will be placed. * Duplicating from folders on the Duplicator HDD is only supported for CDs and DVDs. www.aleratec.com...
- Page 17 ▪ Click the shortcut on your desktop, or go to: Start → All Programs→ LightScribe Direct Disc Labeling → LightScribe Template Labeler. Note: Ignore the “LightScribe Disc Insertion” shown below by pressing the OK button. Select a Template. You must choose a template before moving to the next step. www.aleratec.com...
- Page 18 ▪ Select the “Best” contrast mode for the darkest print. ▪ Select the label surface color you wish to label onto. Note: The “LightScribe Duplicator Label Writer” must be selected in the drive menu. ▪ When you are satisfied with the preview, click “Print”. www.aleratec.com...
-
Page 19: Using The Lightscribe Labeling Software
Create a name for the file and click the “Save” button. The image writing process will begin. When the image process has completed the file should now be located on the “Duplicator” drive in the label folder. www.aleratec.com... - Page 20 The display will prompt you to “Go”. Press the ENT button and the printing process will begin. 10. When the disc printing is complete the drives will automatically eject. If you are printing additional discs, reload the trays and close them manually to continue. www.aleratec.com...
-
Page 21: Other Label Printing Related Options
This operation allows you reveal the ID code of the media’s label surface for tech support troubleshooting purposes. Menu 12.5: Select Loading Drive This operation allows you to choose the default drive to read the label file(s) on to the duplicator’s hard drive when you perform the Load Label operation. www.aleratec.com... -
Page 22: Control Functions
13. Mix Audio Tracks 14. Setup Language Auto Start Read Error Skip CD Writing Mode Max Audio Buzzer Start Up Menu Screen Saver Duplication Mode 10. Counter 11. DVD+R High Compatibility 12. IRSC 13. Disable Drivers 14. USB Connection 15. Overburn www.aleratec.com... -
Page 23: Stand-Alone Duplicator Sa: Tutorials
Master Disc and lower recording speeds maybe necessary to ensure high success and quality duplications rates. Turn on the duplicator. After the duplicator has booted up, you will see the following display: Aleratec 1.00 1. COPY COPY... - Page 24 To specify a number less than 4 digits, fill the leading spaces with “0”s (any leading “0” will be skipped). For example, “0234” will give you two hundred and thirty four copies, and “0010” will give you ten copies. www.aleratec.com...
- Page 25 Now, “0021” is displayed, press ENT once and the cursor moved to OK. ix. Then, press ENT once to submit your counter value. Now you will see the following screen: Preparing... Waiting for Master COPY PRINT SOURCE Preparing... Waiting for Blanks COPY PRINT SOURCE www.aleratec.com...
- Page 26 ENT to confirm. You will see the following display: Processing... Please Wait COPY PRINT SOURCE Note: Give the duplicator 10-15 seconds to recognize all the blank discs. If the number of blank discs you inserted doesn’t match the number of discs detected... www.aleratec.com...
- Page 27 Waiting for Blanks ESC ENT COPY PRINT SOURCE “PASS 3” indicates that you’ve just made 3 successful copies. “FAIL 0” indicates that you have no failure in this run. “3” indicates that you’ve successfully copied 3 copies so far. www.aleratec.com...
-
Page 28: Load Source Files Onto The Hard Drive
Billion Bytes), the Duplication System capacity is actually 74.5 Billion Bytes (74.5GB). ▪ In addition, we round off all fractions of a GB to the lower whole number. That means for a hard drive that has a 74.5GB system capacity, we only recognize and utilize 74GB. www.aleratec.com... - Page 29 “root” directory for burning onto a disc. You will not be able to navigate into the folder when selecting a partition to create discs. * Duplicating from folders on the Duplicator HDD is only supported for CDs and DVDs. www.aleratec.com...
-
Page 30: Load Master Disc Onto The Hard Drive
It is very important to make sure the Source is set for the Hard Drive in order to avoid unnecessary error messages. To check what the Source is set to, please do the following: Use UP or DOWN arrow button to navigate to the following screen. Aleratec 1.00 9. Select Source ... - Page 31 Press ENT to enter “Load Partition” menu and you will see the following display: Load Partition [ 228GB] Load-> New Partition COPY PRINT SOURCE The “228GB” indicates the available capacity of your hard drive in term of GB. www.aleratec.com...
- Page 32 With the partition name “FUN” displayed press ENT consecutively until the cursor is moved to OK. viii. Press ENT once to submit your name selection. You will see the following confirmation screen: Load Partition? [FUN ] OK? COPY PRINT SOURCE www.aleratec.com...
- Page 33 Disc that has been loaded. Once your Master Disc has been loaded completely, you will see the following display: Load Partition OK! Press OK to Continue COPY PRINT SOURCE Press the ENT button to go back to the “Hard Drive Setup” menu. www.aleratec.com...
-
Page 34: Rename Existing Hard Drive Partition Name
You can rename it at anytime afterwards (including the Reserved Partition). To rename your existing hard drive partition name, do the following: Use the UP or DOWN arrow button to navigate to the following screen. Aleratec 1.00 11. Hard Drive Setup ... - Page 35 Press ENT once to submit your name selection. When you are done you will see the following display: Partition FUN2 Renamed! COPY PRINT SOURCE You will be directed back to “Hard Drive Setup” menu. Hard Drive Setup 3. Rename Partition COPY PRINT SOURCE www.aleratec.com...
-
Page 36: Delete Existing Hard Drive Partition Permanently
Delete Existing Hard Drive Partition Permanently If for some reason you need to delete your existing hard drive partition permanently, do the following: Use the UP or DOWN arrow button to navigate to the following screen. Aleratec 1.00 11. Hard Drive Setup ... - Page 37 Stand-Alone Duplicator SA: Tutorials Delete Existing Hard Drive Partition Permanently - continued You will be directed back to the “Hard Drive Setup” menu. You will see the following display: Hard Drive Setup 4. Delete Partition COPY PRINT SOURCE www.aleratec.com...
-
Page 38: How To Make Copies From The Hard Drive
Load a master disc to the HDD if it is not already loaded and make sure Source is set to the Hard Drive. Go back to “COPY” Menu. Use UP or DOWN arrow button to navigate to the following screen. Aleratec 1.00 1.0 COPY ... - Page 39 Press DOWN button consecutively until “0” is displayed. iv. Press ENT button once to move the cursor to the next position. Press DOWN button consecutively until “2” is displayed. vi. Press ENT button once to move the cursor to the next position. www.aleratec.com...
- Page 40 Then press ENT (if you are not using Auto Start or wish to speed up the process) to confirm and the following Processing screen will appear. Processing... Please Wait COPY PRINT SOURCE www.aleratec.com...
- Page 41 Waiting for Blanks ESC ENT COPY PRINT SOURCE “PASS 3” indicates that you’ve just made 3 successful copies. “FAIL 0” indicates that you have no failure in this run. “3” indicates that you’ve successfully copied 3 copies so far. www.aleratec.com...
- Page 42 You can continue to copy or you can eject the extras. Note: Failed discs will not be ejected automatically. You will need to manually eject these. Throw away any failed write-once discs. www.aleratec.com...
-
Page 43: Select Burn Speed
If you have time, it is a good choice to lower down the speed to produce the best quality duplicates. Turn on your duplicator. After it has finished booting up, you will see the following display. Aleratec 1.00 1. COPY ... - Page 44 Once your selection has been changed successfully, you will see the following screen for 2 seconds. DVD to DVD Speed: Adjusted to COPY PRINT SOURCE Then you will be directed back to the main menu: DUPLICATOR 1.00 8. Select Burn Speed COPY PRINT SOURCE www.aleratec.com...
-
Page 45: Select The Source Drive
When you turn on your duplicator, after it has booted up, you should see the following signifying your duplicator is ready. 1.00 1. COPY COPY PRINT SOURCE Navigate to Source Selection Menu. Press UP or DOWN arrow button to navigate to the following screen. 1.00 9. Select Source COPY PRINT SOURCE www.aleratec.com... - Page 46 Once your selection has been changed successfully, you will see the following screen for 2 seconds: Drive 1 Port 0.0 Selected! COPY PRINT SOURCE Then you will be directed back to the main menu: DUPLICATOR 1.00 9. Select Source COPY PRINT SOURCE www.aleratec.com...
-
Page 47: Change The Setup Settings
Note: The default “Setup” is set for optimal performance. It is unnecessary to change this setting if you are satisfied with your duplicator performance. Use the UP or DOWN arrow button to navigate to the following screen. Aleratec 1.00 14. Setup ... -
Page 48: Audio Cd Editing
CD-R you’ve inserted. After you are finished, you will be instructed to finalize the CD-R disc. Turn on the duplicator. After the bootup is complete, you will see the following display: Aleratec 1.00 1. COPY ... - Page 49 Once you have finished selecting the tracks to be copy, press the UP or DOWN arrow button until you see “ARE YOU DONE?”. You will see the following display: Total 6 Trk 26m : 17s Are you done? COPY PRINT SOURCE www.aleratec.com...
- Page 50 CD with additional music files. If you choose to insert another audio CD with additional music files, press the DOWN arrow button until you see the following display: Total 6 Trk 26m : 17s Insert Next Master? COPY PRINT SOURCE www.aleratec.com...
- Page 51 When the whole process completes, your mixed copy will be ejected and you will see the following display: Job Completed! Press OK to Finish COPY PRINT SOURCE You will then be directed back to the main menu: Aleratec 1.00 13. Mix Audio Tracks COPY PRINT SOURCE www.aleratec.com...
- Page 52 In this example we will be creating a new Audio CD from 2 different discs: ▪ CD1: song 2, and song 4 ▪ CD2: song 3, song 4 and song 5 Go to function 13 “Mix Audio Tracks”. Aleratec 1.00 13. Mix Audio Tracks ...
- Page 53 Press ENT to confirm. A “*” symbol will appear on the left of “Track 3”. You will see the following display: Total: 3 Trk 14m : 35s *Track 3: 4m : 47s COPY PRINT SOURCE www.aleratec.com...
- Page 54 COPY PRINT SOURCE 19. When you have finished selecting all of our tracks, press the ENT button to finalize. You will see the following display: Total: 5 Trk 24m : 29s Confirm to Finalize? COPY PRINT SOURCE www.aleratec.com...
- Page 55 21. When the process is complete, your mixed copy will be ejected. You will see the following display: Job Completed! Press OK to Finish COPY PRINT SOURCE You will then be directed back to the main menu: 1.00 13. Mix Audio Tracks COPY PRINT SOURCE www.aleratec.com...
-
Page 56: Introduction To Manage Accounts
Enable the “Manage Accounts” feature by turning on the “Password on Boot UP” setting. Please refer to “Password on Bootup” on page 55 of this User Guide for more information. Note: This duplicator comes with standard license which allows you to create up to 32 users. www.aleratec.com... -
Page 57: Manage Accounts: Overview
Stand-Alone Duplicator SA: Tutorials Manage Accounts: Overview To access the “Manage Accounts” feature, perform the following steps: Turn on the duplicator. After the bootup is complete, you will see the following display: Aleratec 1.00 1. COPY COPY PRINT SOURCE... -
Page 58: View User
Manage Accounts 3. Edit User Info COPY PRINT SOURCE Press the ENT button to enter into this menu. Press the ESC button to go back to the main menu or cancel the current selection. www.aleratec.com... -
Page 59: Delete User
During this process, you will be asked to select ON or OFF (enable/disable). Manage Accounts 5. Password on Bootup COPY PRINT SOURCE Press ENT button to enter into this menu. Press the ESC button to go back to the main menu or cancel the current selection. www.aleratec.com... -
Page 60: Introduction To Duplication Mode
“Load and Copy” or “on the Fly”. If you set Duplication Mode to “Load and Copy” or “On the Fly”, you will not be prompted when you go to 1. Copy. The duplicator will do what you have selected in Duplication Mode. www.aleratec.com... - Page 61 However, if you prefer not to be prompted each time, you can always go to “14. Setup” and select sub-menu 9 and manually reset it. To do so, preform the following steps: Turn on the duplicator. After the bootup is complete, you will see the following display: Aleratec 1.00 1. COPY COPY...
- Page 62 Prompt COPY PRINT SOURCE Press the ENT button once to submit your selection. You will see the following display: Setup 9. Duplication Mode COPY PRINT SOURCE Press ESC button once to go back to the main menu. www.aleratec.com...
-
Page 63: Using Autocopy
It is the simplest way to make BD/CD/DVD copies. The following tutorial will show you how to use this feature. Use the UP or DOWN arrow button to navigate to the following screen. Aleratec 1.00 17. AutoCopy ... - Page 64 Master Disc, remove the old master and load the new Master Disc prior to loading any new blank discs into the Writer Trays. Note: Failed discs will not be ejected automatically. You will need to manually eject these. Throw away any failed write-once discs. www.aleratec.com...
-
Page 65: Menu Overview
This menu will guide you to perform a bit-by-bit comparison between the Master Reading Source and all the copied discs inside the Writer Tray. The purpose of the Compare function is to ensure that all of your copies have exactly same information as your Master Reading Source. www.aleratec.com... - Page 66 Loading, Renaming, or Deleting your images. 12. Print Setup This menu has the utilities for setting up a print job and managing labels. ▪ Load Label ▪ Rename Label ▪ Delete Label ▪ Print Surface Info ▪ Label Info ▪ Select Loading Drive www.aleratec.com...
- Page 67 *This function will not fix the error; it will only skip it to make the rest of the data readable. www.aleratec.com...
- Page 68 14.10 Counter This option allows you to enable/disable the Counter feature by turning this feature ON or OFF. This feature will notify you how many discs have been copied and how many discs are left to complete your project. www.aleratec.com...
- Page 69 This feature will identify your blank recordable Media’s format, capacity, manufacture ID as well as the Media’s certified writing speed. This function (Disc Info) can be found in the “Utility” menu. Note: This feature only applies to media in the recording trays. www.aleratec.com...
- Page 70 ENT button. We strongly suggest you to not upgrade your duplicator’s firmware unless your duplicator is getting unstable. 15.7 Save This function will save all the settings you’ve modified since last time the system is booted. www.aleratec.com...
- Page 71 This function will make sure it is safe to turn off your duplicator. Once you see “Ready to Power OFF” message, then you can safely turn off the machine via Power Switch. Turning off your duplicator without perform this function will increase the risk of damaging your duplicator. www.aleratec.com...
-
Page 72: Troubleshooting
▪ Quality of blank disc may be poor. ▪ Quality of your Master Disc may be poor. 6. Do I need to upgrade my duplicator’s firmware? ▪ Unless your system is getting unstable, we strongly suggest not upgrading your duplicator’s firmware. Please contact our Tech Support if your system is getting unstable. www.aleratec.com... - Page 73 ▪ No, your duplicator’s Hard Drive has a unique file system that computers will not recognize. Thus, you can’t perform any read/write operations to the Hard Drive from your computer. 9. How do I reset my duplicator back to default? Use UP or DOWN arrow button to navigate to the following screen. Aleratec 1.00 15. Utilities COPY...
-
Page 74: Error Codes
This format can not The blank media you’ve inserted does not support be tested! TEST function You need to use either CD-R or DVD-R/RW media to perform TEST function. DVD is not The system does NOT support DVD format. supported! www.aleratec.com... - Page 75 The update file you are trying to update is not compatible for your system. Unknown flash model This is a system error during the System Firmware Update. Please contact Tech Support for assistance. User Abort The system has acknowledged the Abort command. www.aleratec.com...
-
Page 76: Recommended Media
Recommended Media Certified LightScribe media is required for burning direct-to disc LightScribe labels. For best results, Aleratec Duplicator Grade LightScribe media is recommended. CD-R LightScribe V1.2 Duplicator Grade Media 100 Pack™ Part No. 110116 CD-R LightScribe V1.2 Duplicator Grade Media 600 Pack™... -
Page 77: Technical Support
After reading this User Guide, if you need additional assistance with this product, please contact Aleratec Technical Support. Our technical staff will be happy to assist you, but they may need your help to better assist you. Calling Aleratec Technical Support without all the necessary information can be both time consuming and frustrating. - Page 78 If the product fails during normal and proper use within the warranty period, Aleratec, Inc. will, at its option, repair or replace the product at no cost (except shipping and insurance). This limited warranty does not include service to...
-
Page 79: Service And Support
(even if Aleratec, Inc. has been advised of the possibility of such damages). - Page 80 Any service outside the scope of this limited warranty will be at Aleratec, Inc.’s or its Authorized Service Provider’s rates and terms then in effect. This warranty gives you specific legal rights; you may also have other rights which vary from state to state.
-
Page 81: Technical Support Fax Back Form
I am experiencing the following problems with my 1:3 Blu-ray/DVD/CD LightScribe Duplicator SA : ____________________________________________________________________ ____________________________________________________________________ ____________________________________________________________________ ____________________________________________________________________ ____________________________________________________________________ By answering these questions, your problem will be solved more rapidly. Make copies as necessary. You can reach us electronically at: www.aleratec.com on the internet. www.aleratec.com... - Page 82 ® Document Number: 260201_UG_ENG_Rev. A Copyright © 2011 Specifications subject to change without notice. Aleratec, Inc. 9851 Owensmouth Avenue Chatsworth, CA 91311 U.S.A. www.aleratec.com...
Need help?
Do you have a question about the LightScribe Duplicator SA 260201 and is the answer not in the manual?
Questions and answers