
Related Manuals for Aleratec 330120


Summary of Contents for Aleratec 330120
- Page 1 USER GUIDE Aleratec USB HDD Duplicator Family 1:7 USB HDD Copy Cruiser SA ™ Part # 330120 1:23 USB HDD Copy Tower SA ™ Part # 330121 1:31 USB HDD Copy Tower SA ™ Part # 330122...
- Page 2 9851 Owensmouth Avenue Chatsworth, CA 91311 U.S.A. www.aleratec.com Aleratec is a registered trademark and 1:7 USB HDD Copy Cruiser SA™, 1:23 USB HDD Copy Tower SA™, and 1:31 USB HDD Copy Tower SA™ are trademarks of Aleratec, Inc. Check out Aleratec Online! • google.com/+AleratecInc...
- Page 3 Operation with non-approved equipment or unshielded cables is likely to result in interference to radio and TV reception. The user is cautioned that changes and/or modifications made to this equipment, without the approval of manufacturer, could void the user’s authority to operate this equipment. www.aleratec.com...
- Page 4 Safety Regulations WARNING To prevent fire or shock hazard, do not expose the unit to rain or moisture. To avoid electrical shock, do not open the cabinet. Refer servicing to authorized personnel only. www.aleratec.com...
-
Page 5: Table Of Contents
Main Menu ....................9 Copy ....................9 Compare ..................12 Copy+Compare ................15 Overwrite ..................19 Information ..................23 Utility ..................... 25 Setup ....................33 Specifications .................41 Technical Support ................42 Service and Support...............43 Technical Support FAX Back Form ..........46 www.aleratec.com... - Page 6 www.aleratec.com...
-
Page 7: Introduction
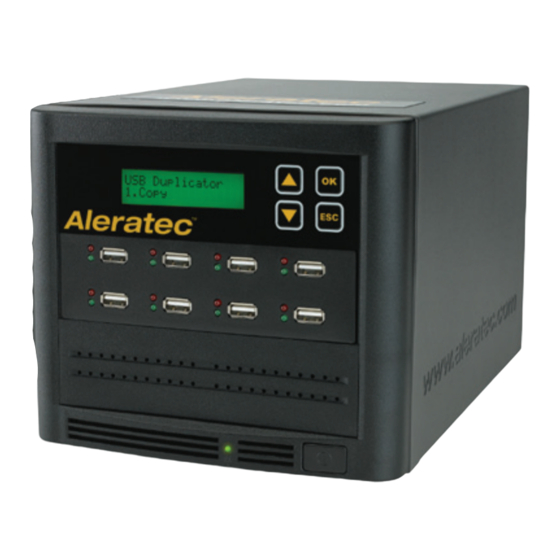
1. Do not place near heat sources such as radiators or air ducts, or in a place subject to direct sunlight, excessive dust, mechanical vibration or shock. 2. Good care will help assure maximum product life. Improper operating environment and misuse may void the warranty. www.aleratec.com... - Page 8 Key Items – 1:23 USB HDD Copy Tower SA™ Display Panel Controller Source Drive Drive LEDs Target Drives Power Switch Key Items – 1:31 USB HDD Copy Tower SA™ Display Panel Controller Source Drive Drive LEDs Target Drives Power Switch www.aleratec.com...
-
Page 9: Display Panel
Display shows all functions and messages UP arrow is used to scroll up through functions or menus DOWN arrow is used to scroll down through functions or menus OK button is used to execute a selected function ESC button is used to cancel a selected function www.aleratec.com... -
Page 10: Precautions
Operating the duplicator immediately after a sudden increase in temperature may result in a malfunction during playback or writing operations. Transportation Keep the original packing materials for future moving or shipping of the USB HDD Duplicator. www.aleratec.com... -
Page 11: Overview
USB Duplicator 1. Copy USB Duplicator 2. Compare USB Duplicator 3. Copy+Compare USB Duplicator 4. Overwrite USB Duplicator 5. Information USB Duplicator 6. Utility USB Duplicator 7. Setup www.aleratec.com... -
Page 12: Subfunctions Of Main Menu Items 5, 6, And 7
The main menu “Utility” function has 2 subfunctions. These are: USB Duplicator 6. Utility 6.1.1 Auto Format 6.1.2 FAT16 Format [ Utility ] 6.1.3 FAT32 Format 6.1 Do Format 6.1.4 Set FAT16 Cluster Size 6.1.5 Set FAT32 Cluster Size [ Utility ] 6.2 System Update www.aleratec.com... - Page 13 The main menu “Setup” function has 8 subfunctions. These are: 7.1 Startup Menu 7.2 Copy Area 7.3 Button Sound 7.4 Target Tolerance USB Duplicator 7. Setup 7.5 Asynchronous 7.6 Power Off Time between copy and compare 7.7 Language 7.8 Set to Default www.aleratec.com...
-
Page 14: Using The Usb Duplicator
When this process is used the source data is read into systems buffer first. You can check the size of the data source USB flash drive by inserting it into the USB Duplicator and using the arrow keys to first select “Information”, then select “USB Info”. www.aleratec.com... -
Page 15: Main Menu
The number to the right is the size occupied by files or images. 3. Load the blank target flash drives into the USB Duplicator. The LCD will display the number of blank media loaded and ready for copying. USB(963M) 450M 3 to start... www.aleratec.com... - Page 16 Load the source flash drive into the USB Duplicator. Use the UP or DOWN arrow to scroll through the menu until Copy is displayed on the LCD screen. USB Duplicator 1. Copy (Data) or (Whole) www.aleratec.com...
- Page 17 Note: During Asynchronous Copying you can use the UP and DOWN arrow keys to check each flash drives copying status. 5. When copying is complete the display will show the total, and the number that pass and fail. Pass: 5 Copy Fail: 0 www.aleratec.com...
-
Page 18: Compare
Note: When Compare is in process the Green LED on the front panel is blinking. Do not take out the drive while it is running a comparison. When Compare is finished the Green LED stays on (no blinking). If an error occurs during the copy process a Red LED will display. www.aleratec.com... - Page 19 Note: When compare is in process the Green LED on the front panel is blinking. Do not take out the drive while it is comparing. When comparing is finished the Green LED stays on (no blinking). If an error occurs during the process a Red LED will display. www.aleratec.com...
- Page 20 Note: During Asynchronous Compare you can use the UP and DOWN arrow keys to check each flash drives comparison status. 5. When Compare is complete the display will show the total, and the number that pass and fail. Pass: 5 Compare Fail: 0 www.aleratec.com...
-
Page 21: Copy+Compare
The number to the right is the size occupied by files or images. 3. Load the blank target flash drives into the USB Duplicator. The LCD will display the number of media loaded and ready for Copy+Compare. USB(963M) 450M 3 to start... www.aleratec.com... - Page 22 Note: When Copy+Compare is in process the Green LED on the front panel is blinking. Do not take out the drive while it is working. When Copy+Compare is finished the Green LED stays on (no blinking). If an error occurs during the process a Red LED will display. www.aleratec.com...
- Page 23 Note: When copying is in process the Green LED on the front panel is blinking. Do not take out the drive while it is copying. When copying is finished the Green LED stays on (no blinking). If an error occurs during the copy process a Red LED will display. www.aleratec.com...
- Page 24 Note: When Copy+Compare is in process the Green LED on the front panel is blinking. Do not take out the drive while it is working. When Copy+Compare is finished the Green LED stays on (no blinking). If an error occurs during the process a Red LED will display. www.aleratec.com...
-
Page 25: Overwrite
1-Pass, 3-Pass, or 7-Pass Overwrite. [ Overwrite ] 1. 1-Pass Wipe [ Overwrite ] 2. 3-Pass Wipe [ Overwrite ] 3. 7-Pass Wipe Note: The source drive does not perform an overwrite. www.aleratec.com... - Page 26 A2. Press OK to confirm the 1-Pass erase process. The following screen will be displayed during the erase process. Pass: 0 1-Wipe Fail: 0 A3. When the process is finished, the following screen will be shown. Pass: 1 1-Wipe Fail: 0 www.aleratec.com...
- Page 27 B2. Press OK to confirm the 3-Pass erase process. The following screen will be displayed during the erase process. Pass: 0 3-Wipe Fail: 0 B3. When the process is finished, the following screen will be shown. Pass: 1 3-Wipe Fail: 0 www.aleratec.com...
- Page 28 C2. Press OK to confirm the 7-Pass erase process. The following screen will be displayed during the erase process. Pass: 0 7-Wipe Fail: 0 C3. When the process is finished, the following screen will be shown. Pass: 1 7-Wipe Fail: 0 www.aleratec.com...
-
Page 29: Information
Using the USB Duplicator Main Menu Information This function includes 2 subfunctions. These are: 5.1 USB Info USB Duplicator 5. Information 5.2 System Info www.aleratec.com... - Page 30 1. Use UP or DOWN arrow to scroll through the Information subfunction menu until System Info is displayed on the LCD screen. [ Information ] 2. System Info Press the OK to view the USB HDD Duplicator’s system information. Press ESC twice to return to the Main Menu. www.aleratec.com...
-
Page 31: Utility
The main menu Utility function has 2 subfunctions. These are: USB Duplicator 6. Utility 6.1.1 Auto Format 6.1.2 FAT16 Format [ Utility ] 6.1.3 FAT32 Format 1. Do Format 6.1.4 Set FAT16 Cluster Size 6.1.5 Set FAT32 Cluster Size [ Utility ] 2. System Update www.aleratec.com... - Page 32 1. Load the flash drives into the USB Duplicator. Use the UP or DOWN arrow to scroll through the menu until “Auto Format” is displayed on the LCD screen. Press the OK button to initiate the Auto Format process. [ Utility ] 1. Do Format www.aleratec.com...
- Page 33 The following screen will be displayed during the erase process. Pass: 0 Format Fail: 0 When the process is finished, the following screen will be shown. Pass: 4 Format Fail: 0 Note: The source port is excluded from the format operation. www.aleratec.com...
- Page 34 Do FORMAT Confirm? The following screen will be displayed during the erase process. Pass: 0 Format 16 Fail: 0 When the process is finished, the following screen will be shown. Pass: 4 Format 16 Fail: 0 www.aleratec.com...
- Page 35 Do FORMAT Confirm? The following screen will be displayed during the erase process. Pass: 0 Format 32 Fail: 0 When the process is finished, the following screen will be shown. Pass: 4 Format 32 Fail: 0 www.aleratec.com...
- Page 36 Do FORMAT Confirm? The following screen will be displayed during the erase process. Pass: 0 Format 16 Fail: 0 When the process is finished, the following screen will be shown. Pass: 4 Format 16 Fail: 0 www.aleratec.com...
- Page 37 Do FORMAT Confirm? The following screen will be displayed during the erase process. Pass: 0 Format 32 Fail: 0 When the process is finished, the following screen will be shown. Pass: 4 Format 32 Fail: 0 www.aleratec.com...
- Page 38 2. Use the UP and DOWN arrow keys to scroll to the System Update screen. Press the OK button to update the duplicator’s firmware. [ Utility ] 2. System Update 3. After updating the firmware, turn off the unit and wait 5 seconds before turning it back on. www.aleratec.com...
-
Page 39: Setup
This function includes 8 subfunctions. These are: 7.1 Startup Menu 7.2 Copy Area 7.3 Button Sound 7.4 Target Tolerance USB Duplicator 7. Setup 7.5 Asynchronous 7.6 Power Off Time between copy and compare 7.7 Language 7.8 Set to Default www.aleratec.com... -
Page 40: Startup Menu
[ Setup ] 1. Startup Menu Scroll up or down to select the desired function to display first when the USB Duplicator is turned on, for example the “Copy” function. Press OK to confirm your setting. [ Startup Menu ] 1. Copy www.aleratec.com... -
Page 41: Copy Area
When this function is selected, Quick Copy will not be used. The copy process takes longer. [ Copy Area ] Whole Media Press OK to confirm your desired area setting. www.aleratec.com... - Page 42 Button Sound is displayed on the LCD screen. [ Setup ] 3. Button Sound 3. Default setting is ON. Use the UP or DOWN arrows to select either ON or OFF. Press the OK button to change, or ESC to exit. [ Button Sound ] www.aleratec.com...
- Page 43 “Low” tolerance limit. Use the UP or DOWN arrows to make your selection. 0% through 50% [ Set up limit ] No Limit 0% through 50% [ Set low limit ] No Limit Press OK to confirm your desired setting. www.aleratec.com...
- Page 44 [ Setup ] 6. Power off time... 3. Use the UP or Down arrow to scroll through the timing options (in seconds). After making your selection, press the OK button to confirm. [ Power off time ] 0 through 15 seconds www.aleratec.com...
- Page 45 USB Duplicator 7. Setup Use the UP or Down arrow to scroll through the options until Language is displayed on the LCD screen. [ Setup ] 7. Language 3. To select, press the OK button, or ESC to exit. www.aleratec.com...
- Page 46 3. You will be prompted with a warning to confirm you selection. Press OK to continue reset all setting to their original values. Warning: Clear parameter to default? After the process is complete, the following will be displayed. Complete: All parameter was cleared! www.aleratec.com...
-
Page 47: Specifications
Specifications Operating Type • Stand-alone (No PC Required) Number of Targets • 330120 Model: 7 • 330121 Model: 23 • 330122 Model: 31 Supported Media • USB Flash Drives or 2.5” USB Hard Disk Drives/SSD Drives with USB Transfer Speed •... -
Page 48: Technical Support
Technical Support Group can be reached 8:00 AM to 5:00 PM, Pacific Time, Monday through Friday, excluding U.S. holidays. Please try to call from a phone near your Aleratec product. X Access is available 24 hours a day, 365 days a year, via: The World Wide Web at: www.aleratec.com... -
Page 49: Service And Support
www.aleratec.com... - Page 50 www.aleratec.com...
- Page 51 www.aleratec.com...
-
Page 52: Technical Support Fax Back Form
I am experiencing the following problems with my USB Duplicator: _____________________________________________________________ _____________________________________________________________ _____________________________________________________________ _____________________________________________________________ _____________________________________________________________ By answering these questions, your problem will be solved more rapidly. Make copies as necessary. You can reach us electronically at: www.aleratec. com on the internet. www.aleratec.com... - Page 53 Document Number: 330120-330122_ENG_Rev. A Copyright © 2015 Specifications subject to change without notice. Aleratec, Inc. 9851 Owensmouth Avenue Chatsworth, CA 91311 U.S.A. www.aleratec.com...
Need help?
Do you have a question about the 330120 and is the answer not in the manual?
Questions and answers