Table of Contents
Advertisement
Quick Links
Advertisement
Table of Contents

Subscribe to Our Youtube Channel
Related Manuals for Aleratec 280110


Summary of Contents for Aleratec 280110
- Page 1 USER GUIDE Aleratec DVD/CD RoboRacer LS™ Part No. 280110...
- Page 2 www.aleratec.com...
-
Page 3: Table Of Contents
Creating an Image with Nero ..............18 Creating an Image from a Source Disc ..........22 Getting Acquainted with the RoboRacer LS Software ......24 Using RoboRacer LS to Burn an ISO Disc .......... 27 LightScribe Labeling ................29 Technical Support Addresses and Phone Numbers ....33 www.aleratec.com... - Page 4 www.aleratec.com...
-
Page 5: Welcome
RoboRacer LS, considered by industry experts to be one of the finest DVD/CD Duplicators available. The entire Aleratec team is committed to providing you with courteous service. Our knowledgeable staff will strive to make owning and operating your new Aleratec DVD/CD RoboRacer LS a pleasant experience. -
Page 6: Product Features
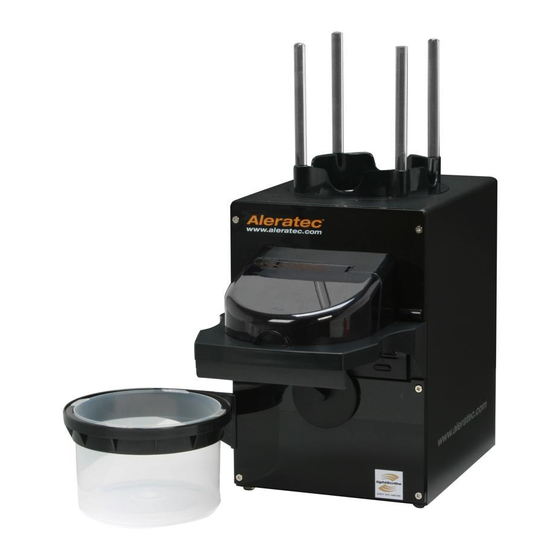
– 100 disc capacity – Duplicate and LightScribe label – Unattended operation Key Items on the DVD/CD RoboRacer LS 1. Clear Plastic Disc Guide Rods A. Power Plug 2. Power and Function Indicator LED B. High Performance Cooling Fan 3. LightScribe DVD Recorder C. USB 2.0 to the PC 4. Disc Tray Control Arm 5. Disc Input Bin 6. Protective Cover 7. Disc Bin Holder 8. Disc Output Bin www.aleratec.com... -
Page 7: Installing The Hardware
Now you can load the rest of the discs. All of the discs need to be level with the sides of the stack straight. Note: Choose a Good Location 1. Allow adequate clearance for moving parts. 2. Do not place near heat sources such as radiators or air ducts, or in a place subject to direct sunlight, excessive dust, mechanical vibration or shock. 3. Good care will help assure maximum product life. Improper operating environment and misuse may void the warranty. www.aleratec.com... -
Page 8: Software Installation
Installing the RoboRacer LS Utility 1. Load the installation CD in the DVD/CD ROM drive in your PC. Double-click on RoboRacer LS Utility from the menu. Click “Next” to begin. 2. Choose where you would like to install the program and click “Next”. www.aleratec.com... - Page 9 3. Choose where you would like the program’s Start menu shortcuts to be installed and click “Next”. 4. Choose what shortcuts you would like to have created by checking the check boxes, and click “Next”. www.aleratec.com...
- Page 10 5. Review the installation procedure to make sure that you are installing what you would like and click “Install”. 6. When installation is complete the setup utility will display the following: De-check the box “Launch RoboRacer LS Utility”. Click “Finish” to complete the software installation. www.aleratec.com...
- Page 11 7. If you did not de-check the box and the 280110 was not plugged into the USB port or the power to the device was turned off then the display box will show: www.aleratec.com...
-
Page 12: Nero Essentials Installation
Nero Essentials Installation Open the Nero installation utility. Click “Install Nero 7 Essentials”. Click “Nero 7 Essentials” again. www.aleratec.com... - Page 13 After a short delay, Windows Installer will start the Nero installation Wizard. When this screen is shown, click “Next”. Agree to the user agreement by checking the checkbox in the lower left corner. Then click “Next”. www.aleratec.com...
- Page 14 Nero Essentials Installation - continued At this screen, fill out the fields you would like. When finished clicked “Next”. Leave the Serial Number that is automatically displayed. Choose the “Custom” option and click “Next”. www.aleratec.com...
- Page 15 Select the languages you want to be supported and click “Next” on this screen. Select only “Nero Express Essentials” and “Nero CoverDesigner”, then click “Next”. www.aleratec.com...
- Page 16 Nero Essentials Installation - continued When the final setup is complete, click “Install” to begin the installation process. 10. During the installation process this screen will be displayed. www.aleratec.com...
- Page 17 Check the boxes of the shortcuts you would like and then click “Next”. 12. When installation is complete this screen will appear. Click “Finish” to exit back to the installer display. www.aleratec.com...
- Page 18 Nero Essentials Installation - continued 13. Once back to this screen, click “Exit”. 14. You can now exit this screen as well by clicking “Exit”. You are ready to use the RoboRacer LS. www.aleratec.com...
-
Page 19: Updating The Lightscribe System Software
1. To install the LightScribe Utility needed to use the LightScribe feature of the 280110 click on the LS installer. 2. Choose the “Run” option on the Windows security warning to allow the installer to begin. 3. The installer will begin by extracting the installer. www.aleratec.com... - Page 20 Updating the LightScribe System Software - continued 4. When extraction is complete The InstallShield Wizard will begin. Click the “Next” button. 5. Agree to the License Agreement by choosing the upper bubble and click the “Next” button. www.aleratec.com...
- Page 21 6. The installation will run and take a minute or so to complete. 7. When the installer is finished this screen will be displayed. Click the “Finish” button to exit the installer. www.aleratec.com...
-
Page 22: Creating An Image With Nero
Creating an Image with Nero 1. Start the Nero Express Essentials program. 2. The screen below will be displayed. For this example choose “Data” and “Data CD”. www.aleratec.com... - Page 23 When finished adding, click the “Next” button. 4. The next display you will see is a label printing screen. Un-check the “Print label” box at the bottom center of the display and click the “Next” button. www.aleratec.com...
- Page 24 6. After the burn button is pressed the “Save Image File” screen will appear. In the lowest dropdown menu called “Save as type:” select “ISO Image Files (.iso)”. Type in the name you would like the image file to be and then click the “Save” button. www.aleratec.com...
- Page 25 7. After clicking the save button the write progress screen will appear. 8. The image process is successful when Nero displays this screen. www.aleratec.com...
-
Page 26: Creating An Image From A Source Disc
“Image Recorder”. This will allow you to save the image to your computer’s hard drive. Leave the number of copies at “1”. When your settings are correct, click the “Copy” button. www.aleratec.com... - Page 27 (.nrg). When you are ready click the “Save” button and Nero will begin copying the source disc. 4. The Nero progress bar will be displayed and when you are finished you will see a final screen displaying your file was successful. www.aleratec.com...
-
Page 28: Getting Acquainted With The Roboracer Ls Software
DVD/CD RoboRacer LS. Check to see that Windows has recognized the new device. To do this, go to “My Computer” and check to see that the Aleratec drive has appeared. If the drive is not displayed in “My Computer” the RoboRacer LS software will not work. - Page 29 LS for “LightScribe Labeling” and begins the “Disc Recording” procedure for automatically burning pre-existing disc images. The “Go!” button can be activated after “Disc Recording” or “LightScribe Labeling” is selected. Note: Click the Aleratec logo to go to the Aleratec website. Click the “Buy Media” button to go to Aleratec’s media webpage for an excellent selection of duplicator grade LightScribe recording media. d. Click “Cancel” to stop current auto loading actions.
- Page 30 4. To Test, click the “Load Disc” button and see if the RoboRacer LS will load one disc. After loading the disc, click the “Eject” button and the disc should be delivered to the output bin. The DVD/CD RoboRacer LS is ready to use. www.aleratec.com...
-
Page 31: Using Roboracer Ls To Burn An Iso Disc
Then choose either CD or DVD media depending on the media you are going to use. Type in how many copies you would like from 1 to 100, and then click the “OK” button to start the automatic disc burning process. www.aleratec.com... - Page 32 Using RoboRacer LS to Burn an ISO Disc - continued 4. The screen will return to this display and the RoboRacer LS will burn the number of discs required. 5. When finished the display will show the job as successful. www.aleratec.com...
-
Page 33: Lightscribe Labeling
LightScribe Labeling The following shows you how to print a batch of LightScribe labels. 1. Start at the RoboRacer LS main screen. 2. Choose the “LightScribe Labeling” Option. www.aleratec.com... - Page 34 Click “Yes” and the “Print LightScribe Label” option will no longer be grayed out. Click the now colored “Print LightScribe Label” and go on to step 6. www.aleratec.com...
- Page 35 5, you do not need to set up any files, simply use the “Next” button until you see this screen. Then, select the “Current recorder” dropdown box and choose the “ALERATEC DVDRW 20A1H” as the drive to be used. Then use the “Back” button to return to the Nero Express Essentials main menu.
- Page 36 7. In this screen choose the print quality that you would like as well as the number of discs to print. Also make sure that the selected drive is listed as “ALERATEC DVDRW 20A1H”. When these settings are complete click the “Print” button. “Auto Labeling” will begin after a short delay.
-
Page 37: Technical Support Addresses And Phone Numbers
Pacific Time, Monday through Friday, excluding U.S. holidays. Please try to call from a phone near your computer system. ► Access is available 24 hours a day, 365 days a year, via: The World Wide Web at: www.aleratec.com FAX at: 1-818-678-0483 www.aleratec.com... - Page 38 Document Number: 9399046_ENG_Rev. E Copyright © 2011 Specifications subject to change without notice. Aleratec, Inc. 9851 Owensmouth Avenue Chatsworth, CA 91311 U.S.A. www.aleratec.com...
Need help?
Do you have a question about the 280110 and is the answer not in the manual?
Questions and answers