
Related Manuals for Aleratec 1:3 DVD/CD Copy Tower Pro HS


Summary of Contents for Aleratec 1:3 DVD/CD Copy Tower Pro HS
- Page 1 USER GUIDE Aleratec 1:3 DVD/CD Copy Tower Pro HS™ 1:7 DVD/CD Copy Tower Pro HS™ Part No. 260152 ..1:3 DVD/CD Copy Tower Pro HS™ Part No. 260153 ..1:7 DVD/CD Copy Tower Pro HS™...
- Page 2 Copyright© 2013 Aleratec, Inc. 9851 Owensmouth Avenue Chatsworth, CA 91311 U.S.A. Aleratec® is a registered trademark, and 1:3 DVD/CD Copy Tower Pro HS™, and 1:7 DVD/CD Copy Tower Pro HS™ are trademarks of Aleratec, Inc Check out Aleratec Online! • Blog.Aleratec.com • Facebook.com/Aleratec...
- Page 3 Operation with non-approved equipment or unshielded cables is likely to result in interference to radio and TV reception. The user is cautioned that changes and/or modifications made to this equipment, without the approval of manufacturer, could void the user’s authority to operate this equipment. www.aleratec.com...
- Page 4 www.aleratec.com...
-
Page 5: Table Of Contents
Overview: Copies from Source DVD/CD ..........12 Overview: Loading Disc Images and Making Copies from the Hard Disk Drive ..................12 Main Menu .................... 13 Specifications .................63 Troubleshooting ................64 Technical Support ................66 Service and Support...............67 Technical Support FAX Back Form ..........70 www.aleratec.com... - Page 6 www.aleratec.com...
-
Page 7: Introduction
• Powerful Control Features with LCD Display and intuitive menu maximizing copy control, flexibility, and output. • 1:3 DVD/CD Copy Tower Pro HS copies three DVDs simultaneously without a computer. • 1:7 DVD/CD Copy Tower Pro HS copies seven DVDs simultaneously without a computer. -
Page 8: Key Items - Dvd/Cd Copy Tower Pro Hs
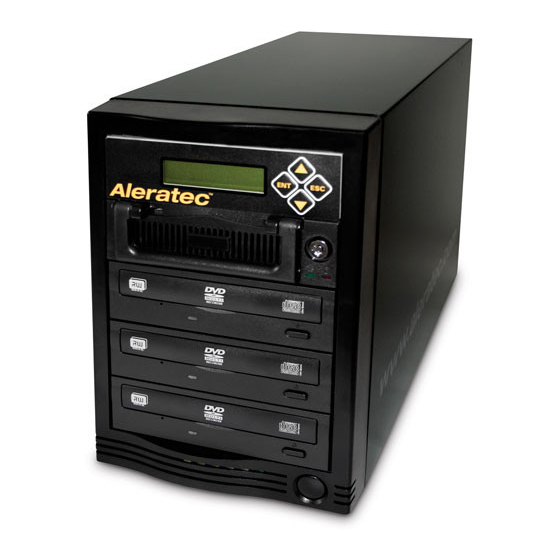
Key Items – DVD/CD Copy Tower Pro HS Display Panel DVD Recorders Removable Hard Drive Power Switch Eject Button 1:3 DVD/CD Copy Tower Pro HS Removable Hard Drive DVD Recorders Display Panel Power Switch Eject Button 1:7 DVD/CD Copy Tower Pro HS Note: Choose a Good Location 1. -
Page 9: Removable Hard Disk Drive
Note: You can use the duplicator to copy directly from DVDs or CDs with or without the HDD. Just place your source disc in any of the DVDRW writers, then load the blank discs and press “Copy” and the duplicator will copy from your source disc. www.aleratec.com... - Page 10 You can remove the key. Note: The HDD will not work unless it is secured in position with the carriage lever and locked with the key. Do not unlock the HDD during operation, as you will destroy any copies you are making. www.aleratec.com...
-
Page 11: Dvd/Cd Copy Tower Pro Hs Display Panel
Introduction DVD/CD Copy Tower Pro HS Display Panel www.aleratec.com Display shows all functions and messages ENT button is used to execute a selected function ESC button is used to cancel a selected function UP arrow is used to scroll up through functions or menus DOWN arrow is used to scroll down through functions or menus www.aleratec.com... -
Page 12: Precautions
Note: The DVD/CD Copy Tower Pro HS must never be cleaned with a lens cleaning kit! Transportation Keep the original packing materials for future moving or shipping of the DVD/CD Copy Tower Pro HS. www.aleratec.com... -
Page 13: Overview
11. Setup 6. Prescan 12. Adv Setup Note: Main Menu item “Image” (number 9) works only when a Hard Disk is connected. Note: Main Menu items “Edit Track” (number 10) is for Audio disc only. www.aleratec.com... -
Page 14: Subfunctions
9.6 Select Src Drive 9.7 Image Format Info 9.8 Edit The main menu “Edit Track” function has 4 subfunctions. These are: 10.1 CD to CD Edit 10.2 (Not supported) 10. Edit Track 10.3 Play Audio Track 10.4 Close Session www.aleratec.com... - Page 15 11.14 Button Sound 11.15 Device Info 11.16 System Info 11.17 Quick Erase Disc 11.18 Full Erase Disc 11.19 Auto Close Tray 11.20 Quick Compare 11.21 Audio Burn Speed 11.22 BD Burn Speed (Not Supported) 11.23 Tray Out (Not Supported) www.aleratec.com...
- Page 16 12.15 Password 12.16 Disc Counter 12.17 Auto Save Image (Not Supported) 12.18 Update Drive Firmware (Not Supported) Note: Subfunction items “12.11 CD&G Format”, “12.13 Switch Link-Host”, “12.15 Password”, “12.17 Auto Save Image”, and “12.18 Update Drive Firmware” are not supported. www.aleratec.com...
-
Page 17: Using The Dvd/Cd Copy Tower Pro Hs
• In case of emergency, insert the straightened end of a large paper clip or similar rigid object into the Emergency Eject Pinhole to open the tray. Then gently pull the tray out. www.aleratec.com... -
Page 18: Power Up Sequence
Press ENT to select HDD (Hard Disk Drive). Press ESC. • Go to menu item 1 (Copy) by pressing arrow buttons. Place blank media into the recorders to be used. After all recorders detect the blank discs, press the ENT button to start copying. www.aleratec.com... -
Page 19: Main Menu
DVD±RW discs inserted as blanks as any DVD±RW discs inserted in the DVD-Recorders to be used as blank media will automatically be erased, and then the content from the source DVD will be recorded on them. www.aleratec.com... - Page 20 Erasing Disc 3. The LCD will display the status of the erasing and testing of the DVD. Testing- DVD 4213.4MB d:20:15 4. When the process is completed, the LCD will display the status. 2. Test OK: 03 www.aleratec.com...
- Page 21 DVD/CD-R/RW disc. When the process is completed, the LCD will display the status. Testing- DVD 4213.4MB d:20:15 Copying- DVD 4213.4MB d:20:15 3. When the process is completed, the LCD will display the status. 3. Test & Copy OK: 03 www.aleratec.com...
- Page 22 1. Press the ENT button to start disc verifying, or press ESC to exit. 4. Verify 2. The LCD will display the status of the verification. Verify- DVD 4213.4MB 2:29:14 3. When the process is completed, the LCD will display the result. 4. Verify OK: 03 www.aleratec.com...
- Page 23 Fail: 0 Diff: 0 3. Press ENT again for the status of each copy. Src: 01 DVD-ROM Total: 4213.4MB 4. If the compare result is identical, the LCD will display the message shown. Src: 02 DVD-RW Identical www.aleratec.com...
- Page 24 OK: 2 Fail: 1 Diff: 0 6. Press the ENT button again for the status of each copy. If the comparison fails, the LCD will display the reason for the failure. Src: 02 DVD-RW TOC not match www.aleratec.com...
- Page 25 3. If a disc can be read correctly, the LCD will display OK. Prescan OK! 4. If it cannot read the source disc correctly, the LCD will display FAIL. A FAIL disc cannot be copied. Prescan Fail! www.aleratec.com...
-
Page 26: Disc Info
Press the ENT button again, and use the arrow keys to display information on the sessions. Session 01 Track 01 - 09 Press the ENT button again, and use the arrow keys to display information on the tracks. Track 01 AUDIO 03:54 www.aleratec.com... -
Page 27: Select Source
ESC to exit. 8. Select Source 2. Use the arrow keys to select HDD or DVD Recorder as source drive. Src: 01 IDEO Master 3. When the source is selected, press the ENT button again. HDD Selected! www.aleratec.com... - Page 28 Using the DVD/CD Copy Tower Pro HS Main Menu Image This function includes 8 subfunctions. These are: 9.1 Load 9.2 Delete Image 9.3 Image Info 9.4 Compare Image 9. Image 9.5 Select Image 9.6 Select Src Drive 9.7 Image Format Info 9.8 Edit www.aleratec.com...
- Page 29 Image Load OK 5. If there is an image file in the current partition, the system will ask you whether to overwrite it or not. Use arrow keys to confirm YES or NO. Image Exists Overwrite? Yes www.aleratec.com...
-
Page 30: Delete Image
The system will ask if you are sure you wish to delete. Use the UP or DOWN arrow to confirm YES or NO. Delete Image in Partition A? Yes After the image file is deleted, the LCD will display the result as shown. Partition A: Image is deleted www.aleratec.com... - Page 31 This function shows the basic information about an image file stored in a particular partition. Select the function by pressing the DOWN arrow. 9-03. Image Image Info Press ENT, and the LCD will display the information about the image file. Disc Type: DVD-ROM Capacity: 4213.4MB www.aleratec.com...
- Page 32 3. When the comparison comes to an end, the LCD will display the results as shown. Compare OK:1 Fail: 0 Diff: 0 4. Press ENT to see the details of source 1 as shown here. Src: 01 DVD-ROM Total: 4213.4MB www.aleratec.com...
- Page 33 6. If the comparison fails, the LCD will show the failure. By pressing ENT twice, the LCD will display the contents of source 1 and those of source 2 do not match as shown. Tgt: 00 TOC not match www.aleratec.com...
- Page 34 Select a partition by pressing the UP and DOWN arrows, and the LCD will display the message as shown. Select Partition A: DVD 4213.4MB After the partition is selected, the LCD will display the results as shown. Set Partition to www.aleratec.com...
- Page 35 Then, use the UP and DOWN arrows to select any of the DVD-Recorders as the source. Select Img Src: 01 IDE1 DVD-ROM After selecting the source, you can press ENT and the LCD will display the message showing the source. Load image from Drive ID-01 www.aleratec.com...
- Page 36 4. Press ENT to confirm YES, and you will see the display shown. At this point you can use the UP or DOWN arrows to select CD or DL. Then press ENT to format the hard drive. HD partition Format Select? DVD www.aleratec.com...
- Page 37 3. Sub1 Title lets you key in a subtitle 1. You can press ENT again to key in a subtitle 2. Edit Sub1 Title 4. When title editing is completed, you will see the display at left. Edit Title www.aleratec.com...
-
Page 38: Edit Track
Go to “Setup” and then “Burning Speed” to change copy speed before selecting tracks. This function includes 4 subfunctions. These are: 10.1 CD to CD Edit 10.2 (Not supported) 10. Edit Track 10.3 Play Audio Track 10.4 Close Session www.aleratec.com... - Page 39 4. Press ENT and scroll to “Select Track” to select the track you want to copy. Press the ENT button to select the track, a “+” will appear by the track selected. Pressing the ENT button again will cancel the selection. Select Track: 1/10 03:25 Select Track: +1/10 03:25 www.aleratec.com...
- Page 40 YES or NO selection. To continue, select YES to select tracks from the next disc. Repeat steps 1 - 7 above. If yes is selected, the source disc will be ejected. Insert another audio disc to be edited. Continue edit next Disc? Yes www.aleratec.com...
- Page 41 Please wait - - - Note: You will NOT be able to use the new audio CD until you close the session. 11. When the session is closed, this message will be displayed. Closing Complete OK:03 Fail:0 www.aleratec.com...
- Page 42 1. Load the CD you want to play in that drive and press the ENT button to play music. Press ESC to index to the next setting. 10-03 Edit Track Play Audio Track Select Track 1/10 04:25 Playing Track-1 00:00 / 03:35 www.aleratec.com...
-
Page 43: Close Session
3. LCD display will show the process of closing the session: “Closing Session Please Wait —”. Close Session Please Wait--- 4. When the session is closed, this message will show the passed and failed discs. Close Complete OK:03 Fail:0 www.aleratec.com... - Page 44 11.14 Button Sound 11.15 Device Info 11.16 System Info 11.17 Quick Erase Disc 11.18 Full Erase Disc 11.19 Auto Close Tray 11.20 Quick Compare 11.21 Audio Burn Speed 11.22 BD Burn Speed (Not Supported) 11.23 Tray Out (Not Supported) www.aleratec.com...
- Page 45 1. Press the ENT button to change the setting, or ESC to exit. 11-02. Setup CD Burn Speed 2. Use the arrow buttons to select the desired speed, then press the ENT button. CD Burn Speed Auto www.aleratec.com...
- Page 46 This function sets the reading speed of the source DVD Recorder. 1. Press the ENT button to change the setting, or ESC to exit. 11-04. Setup Read Speed 2. Use the arrow buttons to select the desired reading speed, then press the ENT button. Read Speed www.aleratec.com...
-
Page 47: Auto Start Drive
The default setting is Copy. 1. Use the arrow buttons to select the desired item (1 - 11), then press the ENT button. 11-06. Setup Startup Menu Startup Menu 1.Copy www.aleratec.com... -
Page 48: Auto Verify
Auto Verify 11.08 Auto Compare This setting controls auto compare of data between source and target discs after copying. Default setting is OFF; press the ENT button to change, or ESC to exit. 11-08. Setup Auto Compare Auto Compare www.aleratec.com... -
Page 49: Auto Prescan
This setting controls auto prescan of the master to verify that it can be read properly, and also tests the reading speed. Default setting is OFF; press the ENT button to change, or ESC to exit. 11-09. Setup Auto Prescan 11-09. Setup Auto Prescan Auto Prescan www.aleratec.com... -
Page 50: Eject Disc
3. If you select “Do Not Eject”, the disc will remain in the DVD Recorders when the job is done and you will have to eject the disc from the DVD Recorders manually. Press the ENT button to change the setting, or ESC to exit. Eject Disc Do Not Eject www.aleratec.com... -
Page 51: Burn Mode
This setting is for CDs only, and controls the writing modes of the disc, including “Disc At Once” (DAO) or “Track At Once” (TAO). 1. Default setting is “DAO”. Press the ENT button to change, or ESC to exit. 11-12. Setup Burn Mode Burn Mode www.aleratec.com... -
Page 52: Display Time
1. Default setting is ON; press the ENT button to change, or ESC to exit. 11-13. Setup Display Time Display Time 11.14 Button Sound This setting controls the button sound. 1. Default setting is ON; press the ENT button to change, or ESC to exit. 11-14. Setup Button Sound Button Sound www.aleratec.com... - Page 53 DOWN arrows to scroll through the devices, or ESC to exit. 11-15. Setup System Info 11.16 System Info This function will show the system information on the display. 1. Press the ENT button to see the system information, or ESC to exit. 11-16. Setup System Info System Info www.aleratec.com...
- Page 54 The more data on the disc, the longer time it takes to erase the disc. Press the ENT button to enter Full Erase Disc, or ESC to exit. Use the arrow keys to select YES or NO and then press the ENT button to execute, ESC to go back. www.aleratec.com...
-
Page 55: Full Erase
Press the ENT button to enter choices selectable with the UP and DOWN arrows. Available time delays are 5, 10, 15, 20, 25, 30, 35, 40, 45, or 50 seconds. 11-19. Setup Auto Close Tray Auto Close Tray www.aleratec.com... -
Page 56: Quick Compare
Press the ENT button to enter the following figure. The default is Auto. Available selectable choices with the UP and DOWN arrows are 48x, 40x, 32x, 24x, 20x, and 16x. Aleratec recommends a burn speed of 16x for highest qualilty audio reproduction. - Page 57 12. Adv Setup 12.10 Load Default 12.11 CD&G Format (Not Supported) 12.12 ISRC & MCN 12.13 Switch Link-Host (Not Supported) 12.14 CD Text 12.15 Password 12.16 Disc Counter 12.17 Auto Save Image (Not Supported) 12.18 Update Drive Firmware (Not Supported) www.aleratec.com...
-
Page 58: Underrun Protect
Audio CD (e.g. 75 minutes of recording time vs. 74 minutes). You can activate the overburn function of the DVD/CD-Recorder through this setting. Default setting is OFF; press the ENT button to change, or ESC to exit. 12-02. Adv Setup Overburn Overburn www.aleratec.com... -
Page 59: Read Error Skip
You can use this function to copy some DVDs with errors. Press the ENT button to change, or ESC to exit. 12-03. Adv Setup Read Error Skip Read Error Skip www.aleratec.com... - Page 60 5GB, in “CD” 1 GB, and in “DL” 10 GB. If you format once more, the old data will be lost. HD Partition FormatSelect? 3. If the controller cannot detect or connect with a hard disk, the display will be as shown here. There is no HDD! www.aleratec.com...
- Page 61 12-05. Adv Setup Verify HDD 2. Use the UP and DOWN arrows to select Disk or Partition. Verify Disk or Partition? Disk 3. Press ENT to verify. After verification, the display will be as shown. Verify Hard Disk www.aleratec.com...
- Page 62 ESC to go back to manual operation. 12-06. Adv Setup Burn-in Burn-in Test Set Burn-in num: Run Continuous 3. Select “Erase&Copy” to test erasing and rewriting to CD-RW or DVD±RW discs only. Burn-in Erase&Copy www.aleratec.com...
-
Page 63: Update Firmware
Searching F/W--- XXX/XXXXX Procedure to make the Firmware disc: Get the latest firmware download from the Aleratec website at www.aleratec.com. Note: Be careful to download the correct firmware; if incorrect firmware is used the duplicator will not function b. Unzip the firmware and write the file “cdxxx.bin” to a blank disc. -
Page 64: Compare Firmware
2. The display will prompt you first for the button test. Follow the instructions on the display to test each button. Enter ESC Hold ESC to Exit 3. After the button function test, the system will self test and then display Test Finished. Test Finished www.aleratec.com... - Page 65 This function supports copying ISRC and MCN formats. Default setting is OFF; press the ENT button to change, or ESC to exit. 12-12. Adv Setup ISRC & MCN Press the DOWN arrow to select ON. ISRC & MCN www.aleratec.com...
- Page 66 Press ESC and the DOWN arrow to enter CD-Text mode. Then press ENT to enter the CD Text selection. 12-14. Adv Setup CD-TEXT The default is OFF. Press the DOWN arrow to select ON. CD-TEXT 12.15 Password (Not supported) www.aleratec.com...
-
Page 67: Disc Counter
Press the DOWN arrow. This display shows the recording in each DVD writer, in this case DVD writer 2. You can press the arrow keys to see the records for other writers. These records can be deleted to clear the counters. 02 OK: 000000001 Fail: 000000000 www.aleratec.com... - Page 68 8. Press ENT to enter the display below. Press ENT to delete the record, or press ESC not to delete. You can use the arrow keys to select another writer. Del 02 Counter Ent: Del Esc: Exit 12.17 Auto Save Image (Not supported) 12.18 Update Drive Firmware (Not supported) www.aleratec.com...
-
Page 69: Specifications
• 90 - 240 VAC, 50/60 Hz, Switchable Dimensions • 1:3 DVD/CD Copy Tower Pro HS: 26.5 x 18.5 x 40 cm (height x width x depth) • 1:7 DVD/CD Copy Tower Pro HS: 43.5 x 18.5 x 45.5 cm Weight •... -
Page 70: Troubleshooting
CD Burn Speed and/or DVD Burn Speed option in the Setup menu. • A firmware update may be available to improve media compatibility; please contact Aleratec Technical Support for assistance. Source Disc Empty (the • Verify that the disc you wish to copy contains the source disc does not appropriate data. -
Page 71: Technical Support
• A CD cannot be copied onto a DVD, or vice versa. Use the Disc Info function to determine the format of the source disc. Copier F/W Fail, Please • Contact your support administrator or Aleratec Update F/W (the firmware Technical Support. has become corrupt and... - Page 72 • Ensure the voltage selection switch is set correctly for your region (115 VAC for use in North America).** • Test the electrical outlet with another appliance. ** applies to P/Ns 260121, 260122, 260135, 260136, 260142, 260143, 260152, 260153 (not to be included in 1:1 products) www.aleratec.com...
-
Page 73: Technical Support
Technical Support After reading this User Guide, if you need additional assistance with this product, please contact Aleratec Technical Support. Our technical staff will be happy to assist you, but they may need your help to better assist you. Calling Aleratec Technical Support without all the necessary information can be both time consuming and frustrating. - Page 74 www.aleratec.com...
- Page 75 www.aleratec.com...
- Page 76 www.aleratec.com...
-
Page 77: Technical Support Fax Back Form
_____________________________________________________________ _____________________________________________________________ By answering these questions, your problem will be solved more rapidly. Make copies as necessary. You can reach us electronically at: www.aleratec.com on the internet. NOTE: Please store and track the included software, registration codes and parts carefully. Requests for replacement software, registration codes, and/or parts may incur a fee. - Page 78 Notes: www.aleratec.com...
- Page 79 Notes: www.aleratec.com...
- Page 80 Document Number: 9399035_ENG_Rev. C Copyright © 2013 Specifications subject to change without notice. Aleratec, Inc. 9851 Owensmouth Avenue Chatsworth, CA 91311 U.S.A. www.aleratec.com...
Need help?
Do you have a question about the 1:3 DVD/CD Copy Tower Pro HS and is the answer not in the manual?
Questions and answers