Table of Contents
Advertisement
Quick Links
Advertisement
Table of Contents

Related Manuals for Aleratec PortaCruiser 350108


Summary of Contents for Aleratec PortaCruiser 350108
- Page 1 USER GUIDE Aleratec ® HDD PortaCruiser™ Part No. 350108...
- Page 2 This manual is copyright with all rights reserved. Under copyright laws, this manual and the software described within may not be copied, except in the normal use of the product(s) described within or to make a backup copy. Copyright© 2009 Aleratec, Inc. 9851 Owensmouth Avenue Chatsworth, CA 91311 U.S.A. www.aleratec.com Aleratec is a registered trademark, and HDD PortaCruiser™...
- Page 3 TV reception. The user is cautioned that changes and/or modifications made to this equipment, without the approval of manufacturer, could void the user’s authority to operate this equipment. www.aleratec.com...
-
Page 4: Safety Regulations
Safety Regulations WARNING To prevent fire or shock hazard, do not expose the unit to rain or moisture. To avoid electrical shock, do not open the housing. Refer servicing to authorized personnel only. www.aleratec.com... -
Page 5: Table Of Contents
Setup Menu: 6-03 Copy Size ..............23 Setup Menu: 6-04 Startup Menu ..............24 Setup Menu: 6-05 Auto Compare ..............25 Setup Menu: 6-06 Copy with Detect ............26 Setup Menu: 6-07 Button Sound..............27 Setup Menu: 6-08 Device Info ..............28 Setup Menu: 6-09 System Info ..............29 www.aleratec.com... - Page 6 Main Menu: Initial RAID0 Option ............47 Dual Disk RAID Controller (USB) Mode – RAID1 Only ........48 Main Menu: Initial RAID1 Option ............48 Specifications .....................49 Troubleshooting ..................49 Technical Support ..................50 Service and Support ...................51 Technical Support FAX Back Form ............54 www.aleratec.com...
-
Page 7: Introduction
JBOD (Spanning mode) – combines two hard disk drives into one virtual drive ▪ Normal Mode – access your dual drives separately NOTE: In either mode, you must reset the unit when attaching/removing hard drives so that the system can re-scan the drives. www.aleratec.com... -
Page 8: Key Items
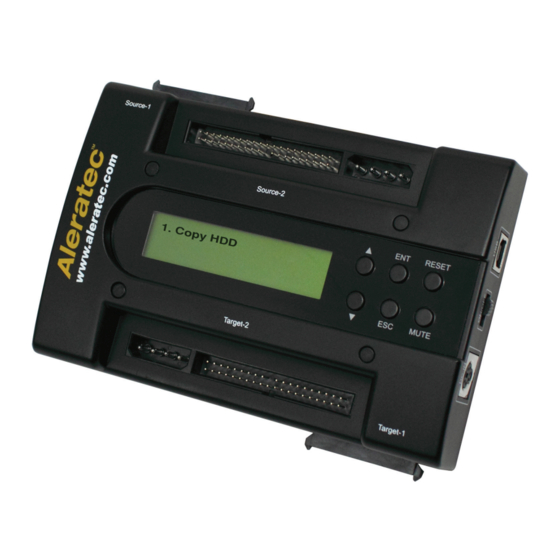
Connector Drive Status Indicator Lights (4) IDE Source Drive Port IDE Source Power Port Controller Buttons USB Connector Power Switch Power Connector IDE Target Power Port Display Panel (see page 3) IDE Target Drive Port SATA Target Drive Connector www.aleratec.com... -
Page 9: Hdd Portacruiser Display Panel And Buttons
RESET button is used to restart the unit MUTE button is used to mute audible alarms www.aleratec.com... -
Page 10: Precautions
HDD PortaCruiser is on, wait at least one hour before turning off the power. Operating the duplicator immediately after a sudden increase in temperature may result in a malfunction. Transportation Keep the original packing materials for future moving or shipping of the HDD PortaCruiser. www.aleratec.com... -
Page 11: Overview
Figure 5 shows the first function. The HDD PortaCruiser will initialize in either Duplicator Mode or Dual Disk RAID (USB) Mode depending on its last state. RESET 1. Copy HDD Duplicator Mode MUTE RESET USB Mode: Normal USB Mode D1: HDD D2: HDD MUTE www.aleratec.com... -
Page 12: Understanding Raid
However, compared with RAID 0, JBOD doesn’t waste any hard drive capacity. Its capacity is the total of all hard drive capacities. For example, set a 100GB hard drive and a 120GB one as JBOD. The total capacity is 220GB. www.aleratec.com... -
Page 13: Duplicator Main Menu
MUTE RESET 8. Adv Setup MUTE Note: The Advanced Setup function is a hidden menu. To access this menu, press ESC for 3 seconds. After you have completed any desired adjustments, press ESC to exit Advanced Setup. www.aleratec.com... -
Page 14: Duplicator Subfunctions
The “Setup” menu has eight (8) subfunctions. These are: 6-01 Language 6-02 DMA Mode 6-03 Copy Size 6-04 Startup Menu RESET 6-05 Auto Compare 6. Setup MUTE 6-06 Copy with Detect 6-07 Button Sound 6-08 Device Info 6-09 System Info www.aleratec.com... - Page 15 The Duplicator “Advanced Setup” menu has eight (8) subfunctions. These are: 8-01 ReScan Bus Delay 8-02 Read Error Skip 8-03 Quick Erase HDD 8-04 H/W Diagnostic RESET 8. Adv Setup MUTE 8-05 Load Default 8-06 Link Option (for USB Mode) 8-07 USB Auto Link 8-08 Copy HPA www.aleratec.com...
-
Page 16: Dual Disk Raid (Usb) Mode Main Menu
MUTE RESET 5. D2 Drive Select MUTE JBOD Mode RESET 1. Duplicator Mode MUTE RESET 2. Information MUTE RESET 3. Change RAID Mode MUTE RESET 4. Initial JBOD MUTE www.aleratec.com... -
Page 17: Raid0 Mode
MUTE RESET 4. Initial RAID0 MUTE RAID1 Mode RESET 1. Duplicator Mode MUTE RESET 2. Information MUTE RESET 3. Change RAID Mode MUTE RESET 4. Initial RAID1 MUTE www.aleratec.com... -
Page 18: Using The Hdd Portacruiser
“Source”, and the hard disk drive you are copying to goes on the side labeled “Target”. Note: When both the IDE and SATA connectors on the Target (or Source) side are connected to hard drives, the HDD PortaCruiser will only recognize the SATA drive. www.aleratec.com... -
Page 19: Removing Hard Drives
Remove the IDE and power cables (for IDE drives) or slide the hard drive away from the HDD PortaCruiser unit (for SATA drives). Note: Do not attempt to remove the hard drive if the drive activity LED is on or the unit is in the middle of a process. www.aleratec.com... -
Page 20: Duplicator Mode
Note: The copying speed, capacity and duration may vary from one source hard drive to another. Once duplication is complete, a job status screen will be displayed. RESET 1. HDD OK:1 Fail: 0 MUTE www.aleratec.com... -
Page 21: Main Menu: Compare Hdd
MUTE During the compare process, the HDD PortaCruiser will display progress information. RESET Comp-23MB/s 236.9.9GB 51:12 MUTE When the comparison is completed, a job status screen will be displayed. RESET Compare OK:1 Fail:0 Diff:0 MUTE www.aleratec.com... -
Page 22: Main Menu: Prescan Source
Please wait... MUTE During the PreScan process, the HDD PortaCruiser will display progress information. RESET Scan-52MB/s 236.4GB 1:15:04 MUTE When the PreScan is complete, a job status screen will be displayed. RESET PreScan OK! MUTE www.aleratec.com... -
Page 23: Main Menu: Rescan Bus
Please wait... MUTE Note: The order of scanning is Source SATA, Source IDE, Target SATA, Target IDE. When the rescan is complete, the following screen will be displayed. RESET Bus re-scan OK! Found 2 Devices MUTE www.aleratec.com... -
Page 24: Main Menu: Source Hdd Size
With the source HDD loaded, use the arrow buttons ( or) to select “Source size”. The following screen will be displayed. RESET 5. Source size MUTE Press ENT to display the capacity of the source hard drive. RESET Total: 232.5GB MUTE www.aleratec.com... -
Page 25: Main Menu: Usb Raid Mode
or) to select “YES” and press ENT to select. Use the arrow buttons ( The following screen will be displayed showing your connected drives. RESET USB Mode: Normal D1: - - - D2: - - - MUTE www.aleratec.com... -
Page 26: Duplicator Mode
Use the arrow buttons ( or) to select “Setup”. The following screen will be displayed. RESET 6. Setup MUTE Note: After changing any of the configuration options, you must press ENT to accept the change. www.aleratec.com... -
Page 27: Setup Menu: 6-01 Language
ENT to display the current language selection (the default language is English). RESET Language English MUTE Use the arrow buttons ( ) to toggle through the available options. Once you change a configuration option, remember to press ENT to save it. www.aleratec.com... -
Page 28: Setup Menu: 6-02 Dma Mode
MUTE Use the arrow buttons ( ) to toggle through the available modes (1-4). Once you change a setting, remember to press ENT to save it. RESET DMA Mode UDMA 1 – UDMA 4 (MB) MUTE www.aleratec.com... -
Page 29: Setup Menu: 6-03 Copy Size
6. Setup MUTE Use the arrow buttons ( ) to toggle through the available copy sizes (1%-100%). Once you change a setting, remember to press ENT to save it. RESET Copy Size 1% - 100% (MB) MUTE www.aleratec.com... -
Page 30: Setup Menu: 6-04 Startup Menu
ENT to display the current configuration setting. The default setting Press is “1. Copy HDD”. RESET Startup Menu 1. Copy HDD MUTE Use the arrow buttons ( ) to toggle through the available options. Once you change a setting, remember to press ENT to save it. www.aleratec.com... -
Page 31: Setup Menu: 6-05 Auto Compare
ENT to display he current configuration setting. The default setting is “Off”. RESET Auto Compare MUTE Use the arrow buttons ( ) to modify the setting. After you change a setting, remember to press ENT to save it. www.aleratec.com... -
Page 32: Setup Menu: 6-06 Copy With Detect
ENT to display he current configuration setting. The default setting is “Off”. RESET 6. Setup MUTE Use the arrow buttons ( ) to modify the setting. After you change a setting, remember to press ENT to save it. www.aleratec.com... -
Page 33: Setup Menu: 6-07 Button Sound
ENT to display the current configuration setting. The default is “On”. RESET Button Sound MUTE Use the arrow buttons ( ) to toggle through the available options. Once you change a default, remember to press ENT to save it. www.aleratec.com... -
Page 34: Setup Menu: 6-08 Device Info
CH: 0 Hitachi 149.1GB MUTE Use the arrow buttons ( or) to show information about any additional hard drive that is connected. The following screen will be displayed. RESET 1 Target CH: 1 Hitachi 149.1GB MUTE www.aleratec.com... -
Page 35: Setup Menu: 6-09 System Info
() to toggle between the subfunctions. Press ENT to select. “System Info”. The following information will be displayed. RESET 6-09. Setup System Info MUTE Press ENT to display system information. RESET HDD Duplicator ver: 092C MUTE www.aleratec.com... -
Page 36: Using The Hdd Portacruiser
Once all changes are complete, press ESC to exit the Adv Setup menu. The following screen will be displayed. RESET Saving Config... Please Wait... MUTE When the configuration changes have been saved, the following screen will be shown. RESET 8. Adv Setup MUTE www.aleratec.com... -
Page 37: Advanced Setup Menu: 8-01 Rescan Bus Delay
Press ENT to display the current configuration setting. Use the arrow buttons (or) to choose different time settings (1-60 seconds). After changing a setting, remember to press ENT to save it. RESET ReScan Bus Delay 20Sec MUTE www.aleratec.com... -
Page 38: Advanced Setup Menu: 8-02 Read Error Skip
ENT to display the current configuration setting. The default setting Press is “Off”. RESET Read Error Skip MUTE Press the arrow buttons ( or) to toggle the option “On” or “Off”. After changing a setting, remember to press ENT to save it. www.aleratec.com... -
Page 39: Advanced Setup Menu: 8-03 Quick Erase Hdd
No MUTE ENT. The Quick Erase will begin. Once complete Select “Yes” and press the following information will be displayed. RESET Erasing Target Please Wait... MUTE RESET The Selected HDD Erase Finished MUTE www.aleratec.com... -
Page 40: Advanced Setup Menu: 8-04 H/W Diagnostic
NOT press the Reset button during this test as it will reset the unit. Press and hold the ESC button to exit this portion of the test. When all tests are complete the following information will be displayed. RESET Test Finished MUTE www.aleratec.com... -
Page 41: Advanced Setup Menu: 8-05 Load Default
RESET Load Default Config? Yes MUTE Press ENT to confirm loading defaults, or press ESC to cancel. When all settings are restored to their original defaults the following information will be displayed. RESET Load Default MUTE www.aleratec.com... -
Page 42: Advanced Setup Menu: 8-06 Link Option
“7.USB RAID Mode” to appear in the main menu. RESET Link Option Menu ON MUTE If set to “OFF”, “7.USB RAID Mode” will not appear in the main menu. After changing a setting, remember to press ENT to save it. www.aleratec.com... -
Page 43: Advanced Setup Menu: 8-07 Usb Auto-Link
) to toggle the option “ON” or “OFF”. If set to “ON” the unit will immediately enter USB mode on startup. After changing a setting, remember to press ENT to save it. RESET USB L.H Mode D1:HDD D2:HDD MUTE www.aleratec.com... -
Page 44: Advanced Setup Menu: 8-08 Copy Hpa
ENT to save it. Note: The HPA is a hidden data region defined in ATA/ATAPI-4. This area is not usually accessible to the operating system or software applications. The HDD PortaCruiser supports the copying of data from this hidden area. www.aleratec.com... -
Page 45: Dual Disk Raid Controller (Usb) Mode
MUTE ) to select “Yes” and press ENT to select. The Use the arrow buttons ( following screen will be displayed. The unit is now back in Duplicator Mode. RESET 1. Copy HDD Copy Size MUTE www.aleratec.com... -
Page 46: Main Menu: Information Option
For System information, USB Mode and firmware version will be displayed. RESET USB Mode: Normal F/W ver: 092C MUTE For Drive information, drive model information and capacity will be displayed. RESET Hitachi HD572168 Capacity: 76.3GB MUTE www.aleratec.com... -
Page 47: Main Menu: Change Raid Mode Option
MUTE or) to select “Yes” and press ENT Use the arrow buttons ( to select. The system will then prompt you to confirm that you understand data may be lost. RESET Data May Be Lost Continue? MUTE www.aleratec.com... - Page 48 MUTE ) to select “Yes” and press ENT to select. Use the arrow buttons ( The new main screen will be shown which displays the new mode and capacity. RESET USB Mode: JBOD RAID Cap: 228.9GB MUTE www.aleratec.com...
- Page 49 MUTE Use the arrow buttons ( ) to select “Yes” and press ENT to select. The system will then prompt you to confirm that you understand data may be lost. RESET Data May Be Lost Continue? MUTE www.aleratec.com...
- Page 50 () to select “Yes” and press ENT to select. The device will copy the source drive’s data to the target drive and a new main screen will be shown which displays the new mode and capacity. RESET USB Mode: RAID1 RAID Cap: 76.3GB MUTE www.aleratec.com...
-
Page 51: Dual Disk Raid Controller (Usb) Mode - Normal Only
MUTE ENT to select. The system will prompt you to choose the desired Press mode. RESET D2 Drive Select MUTE Use the arrow buttons ( ) to select between HDD and Disable and press ENT to select. www.aleratec.com... -
Page 52: Dual Disk Raid Controller (Usb) Mode - Jbod Only
MUTE or) to select “Yes” and press ENT to select. Use the arrow buttons ( The new main screen will be shown which displays the new mode and capacity. RESET USB Mode: JBOD RAID Cap: 228.9GB MUTE www.aleratec.com... -
Page 53: Dual Disk Raid Controller (Usb) Mode - Raid0 Only
MUTE or) to select “Yes” and press ENT to select. Use the arrow buttons ( The new main screen will be shown which displays the new mode and capacity. RESET USB Mode: RAID0 RAID Cap: 152.6GB MUTE www.aleratec.com... -
Page 54: Dual Disk Raid Controller (Usb) Mode - Raid1 Only
MUTE or) to select “Yes” and press ENT to select. Use the arrow buttons ( The new main screen will be shown which displays the new mode and capacity. RESET USB Mode: RAID1 RAID Cap: 228.9GB MUTE www.aleratec.com... -
Page 55: Specifications
If the system idle, power the unit off, wait about ten (10) seconds, and then reapply power. Startup/Shutdown Do not power off the system while it is performing an operation. After a normal shutdown, wait about ten (10) seconds before reapplying power. www.aleratec.com... -
Page 56: Technical Support
Technical Support After reading this User Guide, if you need additional assistance with this product, please contact Aleratec Technical Support. Our technical staff will be happy to assist you, but they may need your help to better assist you. Contacting support without all the necessary information can be both time consuming and frustrating. -
Page 57: Service And Support
If the product fails during normal and proper use within the warranty period, Aleratec, Inc. will, at its option, repair or replace the product at no cost (except shipping and insurance). This limited warranty does not include service to... - Page 58 (even if Aleratec, Inc. has been advised of the possibility of such damages).
- Page 59 Any service outside the scope of this limited warranty shall be at Aleratec, Inc.’s or its Authorized Service Provider’s rates and terms then in effect. This warranty gives you specific legal rights; you may also have other rights which vary from state to state.
-
Page 60: Technical Support Fax Back Form
I am experiencing the following issues with my HDD PortaCruiser: ____________________________________________________________________ ____________________________________________________________________ ____________________________________________________________________ ____________________________________________________________________ ____________________________________________________________________ By answering these questions, your problem will be solved more rapidly. Make copies as necessary. You can reach us electronically at: www.aleratec.com on the internet. www.aleratec.com... - Page 61 Notes: www.aleratec.com...
- Page 62 Document Number: 9399065_ENG_Rev. C Copyright © 2009 Specifications subject to change without notice. Aleratec, Inc. 9851 Owensmouth Avenue Chatsworth, CA 91311 U.S.A. www.aleratec.com...
Need help?
Do you have a question about the PortaCruiser 350108 and is the answer not in the manual?
Questions and answers