Table of Contents
Advertisement
Installation guide
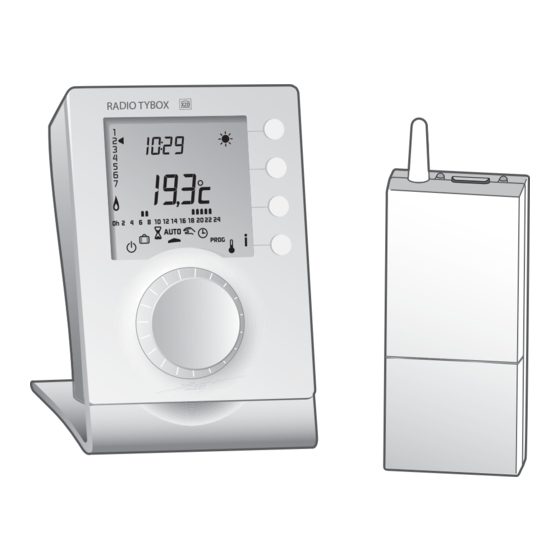
RADIO TYBOX PAC
Wireless programmable thermostat for heat pumps
DELTA DORE - Bonnemain
35270 COMBOURG - FRANCE
E-mail : deltadore@deltadore.com
Device compliant with the requirements of directives:
R&TTE 1999/5/CE
Because of changes in standards and equipment, the characteristics
given in the text and the illustrations in this document are not binding
unless confirmed by Delta Dore.
Advertisement
Table of Contents

Related Manuals for DELTA DORE RADIO TYBOX PAC


Summary of Contents for DELTA DORE RADIO TYBOX PAC
-
Page 1: Installation Guide
35270 COMBOURG - FRANCE E-mail : deltadore@deltadore.com Device compliant with the requirements of directives: R&TTE 1999/5/CE Because of changes in standards and equipment, the characteristics given in the text and the illustrations in this document are not binding unless confirmed by Delta Dore. -
Page 2: Table Of Contents
Warnings Contents Presentation ......5 Carefully read these instructions prior to installation. Location of the receiver ....6 Mounting the receiver . -
Page 3: Presentation
Contents Presentation RADIO TYBOX PAC is composed of a RADIO TYBOX Advanced configurations (menu 2) ..19 PAC transmitter associated with an RF 652 receiver. Modification authorization for the user ..19 Correction of the measured temperature . -
Page 4: Location Of The Receiver
Location of the receiver Mounting the receiver Removing the cover The receiver must be positioned near the heat pump control unit (e.g. Hydraulic module). To remove the cover, push the tab and lift the cover. To avoid interference with the radio transmission, the antenna must be free from any metallic elements (cables, metallic covers, etc.). -
Page 5: Connecting The Receiver
Connecting the receiver Location / Mounting the transmitter For easier use, the RADIO TYBOX can be installed: Connect the control wires, pass the wires - on a wall: at an approximate height of 1.5 m, with through the provided raceway or through screws/plugs, the pierced hole - on a support: Placed on an item of furniture or a... -
Page 6: Fitting To The Base
Fitting to the base Non-reversible heat pump Mode 1 Position the unit on its base and lock it. RF 652 Do not wire Position the thermostat Lock the thermostat the output S1 230 V on its base. 3 4 5 Thermostat input Power supply... - Page 7 Reversible heat pump thermostat Reversible heat pump with + change-over 2 thermostat inputs (cool / heat) Mode 1 Mode 2 For this type of use, the receiver must be set to RF 652 mode 2 before wiring the heat pump’s heat and cool 230 V inputs on the thermostat.
-
Page 8: Starting Up
On the RADIO TYBOX: Starting up - Pres the button the receiver is set to mode 2 When you turn the unit on for the first time, you will - Turn the knob to AUTO to exit the association mode need to set the time. -
Page 9: Configuration
Configuration Basic configurations (menu 1) Press button To access the configuration menus, turn the knob to - press the button to display the temperature - then press the button for 5 seconds. To change the various settings, press the + or - but- 5 sec. -
Page 10: Controlling The Comfort Temperature
For hot water heaters with thermostatic valves, the Advanced configurations (menu 2) Comfort temperature can be provided by adjusting the thermostat of each radiator. In this case, only Economy and Frost Protection tem- peratures are set by the RADIO TYBOX. Comfort temperature set by the TYBOX (by default) Controlling the... -
Page 11: Correction Of The Measured Temperature
With this option, press i to display t - operation with a TYXAL alarm central control unit he set-point temperature. - operation with TYXAL or TYDOM remote controls (Delta Dore), minutes - operation with a home automation transmitter minutes Control time base (e.g. -
Page 12: Associating Radio Products With The Radio Tybox
Press + or - to make your choice. Radio association (menu R) Press OK to confirm and go to the next mode. Associating radio products with the RADIO TYBOX “Consumption indication” feature From the menu rAd. To associate a consumption indicator with the RADIO 1st step: the receiver is delivered already associated TYBOX (e.g. - Page 13 2nd step: Associating the home automation products. Radio association (menu R) On the home automation Product Association product to associate, confirm the association as indicated in Telephone transmitter the table or refer to its user guide. Enter the first 4 numbers of the access code (1234 by default), then press the Each newly associated button for 5 seconds.
- Page 14 Configuration des options (menu 3) The menus 3-12 to 3-18 are only accessible if the Product Association RADIO TYBOX is associated with a RADIO TYWATT. Home automation To access the display of consumption, heating, DHW remote control Press the domain button until and other uses, you must declare the number of CTs until the remote control emits a beep and (current transformers, ref.
-
Page 15: Removing Radio Associations
Configurations 3-13 to 3-18 let you modify costs Removing radio associations according to your subscription. To cancel all radio associations, turn the knob to Subscription Base Double tariff tempo option then hold the button down for 5 seconds. (this Normal action also removes the displayed consumption infor- Base OP blue day... -
Page 16: Return To The Factory Configuration
Return to the factory configuration Radio test A return to the factory configuration is possible for Turn the knob to , then hold the 2nd button (from the menus 1, 2, and 3. top) down for 5 seconds until tESt appears. Turn the knob to , then press and hold the button... - Page 17 Summary table of configurations Choice of heat pump type 1-06 0 = reversible heat pump (by default) 1 = Non-reversible heat pump (heat only) Radio association (menu R) Controlling the Comfort temperature Home automation features r-01 0 = set by the RADIO TYBOX (by default) 1-08 0 = No 1 = Yes...
-
Page 18: Technical Characteristics
Technical characteristics Technical characteristics RADIO TYBOX transmitter RF 652 receiver • Power supplied by two LR03 or AAA-type 1.5 V • 230 V, 50 Hz power supply, +/-10% alkaline batteries (supplied), autonomy of 2 years for • Class II insulation normal use •... -
Page 19: Troubleshooting
Troubleshooting Nothing is displayed on the room unit screen. There is no power supply Check the batteries. The receiver does not accept orders from the transmitter. • Check the transmission by performing a radio test. • Move your transmitter if necessary. •... - Page 20 - 38 - - 39 -...
Need help?
Do you have a question about the RADIO TYBOX PAC and is the answer not in the manual?
Questions and answers