Table of Contents
Advertisement
Quick Links
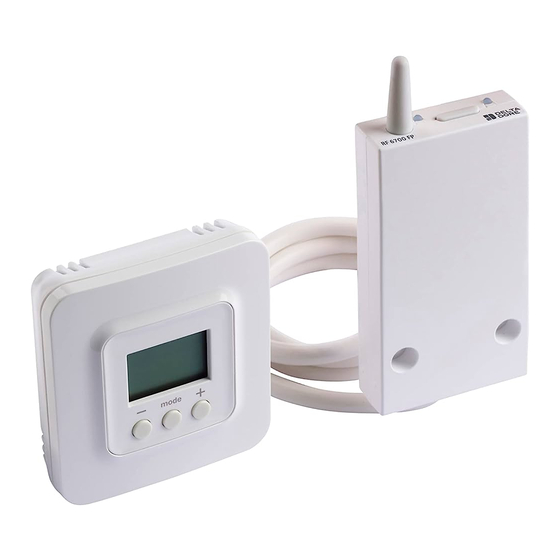
Tybox 5701 FP pilot wire pack
www.deltadore.com
Warning
The Tybox 5701 FP pack consists of a Tybox 5101 transmitter and a 6700 FP RF receiver.
There are two versions of the Tybox 5101 transmitter.
To find out the transmitter version, press the "mode" button for several seconds until the 1st
configuration menu appears: CF00 or CF01.
First
version
1
1
2
Second
version
1
> 5s
> 5s
2
3
mode
> 5s
2
1
2
mode
mode
mode
3
mode
mode
mode
> 5s
3
3
mode
mode
Installation and User
Guide
Access the instructions
mode
> 5s
> 5s
4
4
Access the instructions
mode
mode
> 5s
4
> 5
4
1
Advertisement
Chapters
Table of Contents
Troubleshooting

Related Manuals for DELTA DORE Tybox 5701 FP


Summary of Contents for DELTA DORE Tybox 5701 FP
- Page 1 Warning The Tybox 5701 FP pack consists of a Tybox 5101 transmitter and a 6700 FP RF receiver. There are two versions of the Tybox 5101 transmitter. To find out the transmitter version, press the “mode” button for several seconds until the 1st configuration menu appears: CF00 or CF01.
- Page 2 Toegekende stootspanning: 2500 V Bemessungsstoßspannung: 2500 V Tensione nominale di resistenza alla sovratensione: 2500 V Rated impulse withstand voltage: 2500V Tensión nominal de choque: 2500V Tybox 5701 FP Tybox 5702 FP Tybox 5101 RF 6700 FP Tybox 5101 2 x RF 6700 FP...
- Page 3 3. Association radio / Radioverbinding / Funkkopplung / Associazione radio / Wireless Association / Asociación vía radio >3s mode mode mode ..>3s A la 1ère mise sous tension, le voyant vert du récepteur clignote rapidement, signalant qu’il n’a pas été associé. Alla prima accensione, la spia verde del ricevitore lampeggia rapidamente, indicando che non è...
-
Page 4: Table Of Contents
Installation and User Guide Tybox 5701 FP pilot wire pack www.deltadore.com Contents Installation Installing the transmitter .................... 3 Location ...........................3 1.2 Wall mounting ........................3 1.3 Mounting on a base ......................3 Installing the receiver ....................4 2.1 Location ...........................4 2.2 Mounting / Connection ......................4 Pairing the receiver to the transmitter.............. -
Page 5: Installation
INSTALLATION 1. Installing the transmitter 1.1 Location mode mode mode The thermostat can be mounted on the wall or mode ~1,50 m placed on a piece of furniture in a room whose temperature is representative of the location’s average temperature, with a recommended height of 1.5 m, and it should also be nowhere near any heat sources (fireworks, sunlight, etc.) or >... -
Page 6: Installing The Receiver
2. Installing the receiver 2.1 Location mode mode mode The antenna of the receiver must be clear of any mode ~1,50 m metallic surface. 230V~ 50 Hz 2.2 Mounting / Connection ❶ First of all, switch off the power to your setup. >... -
Page 7: Configuring Your Device
4. Configuring your device mode mode > 5s > 5s The “--” display in a CFxx menu indicates that several receivers associated with the Tybox mode have different values. ❶ Press any button to activate the ❸ Press + or - to adjust the setting, ❹... -
Page 8: Pairing With The Tydom App
5. Pairing with the Tydom App Launch the Tydom app from your smartphone or tablet, then: Settings -> My devices -> Add device -> Heating -> Electrical -> Tybox 5701FP (+ RF6700FP) ... and follow the instructions. For more information, refer to the section § “Operation with the Tydom application”. 6. -
Page 9: Troubleshooting
8. Troubleshooting 8.1 Deleting the pairing of the receiver with the thermostat In the event of a fault, you may have to unpair a product and/or repair a new one. Wireless resetting of the transmitter mode mode mode >3s >3s ❶On the Tybox, briefly press a ❷... -
Page 10: Use
1. Description Temperature display Heat mode Select the mode Battery level indicator Adjustment buttons Request in progress mode 2. Consultation or modification of temperatures IMPORTANT: The radiator must be in automatic mode (AUTO, PROG ...), with its Comfort temperature set to the maximum. -
Page 11: Operation With A Load-Shedder
5. Operation with a load-shedder If a load-shedder is connected to the receiver, the heating will switch to Off during load-shedding requests. When load-shedding is in progress, the green LED on the receiver flashes. 6. LED switch off mode When the function for switching off the LEDs is active: - When powering up (or restoring power), the LEDs are active. -
Page 12: Troubleshooting
7. Troubleshooting 7.1 What the receiver LEDs mean Signal type Diagnosis/Solutions The green light is Power supply is on. constantly on The red light is constantly The receiver is requesting heating (pilot wire output = Comfort) The red LED is slowly The receiver is pending pairing. -
Page 13: Changing Batteries
7.2 Changing batteries • The symbol appears. You have approximately 1 month to replace them (two 1.5 V alkaline batteries, either LR03 or AAA). WARNING: make sure you insert the batteries 2 x 1,5V - AAA LR03 facing the right way and that they are the right type (no lithium batteries). - Page 14 Bemessungsstoßspannung: 2500 V Guía de inicio rápido Tensione nominale di resistenza alla sovratensione: 2500 V Rated impulse withstand voltage: 2500V Tensión nominal de choque: 2500V Tybox 5701 FP Tybox 5702 FP Tybox 5101 RF 6700 FP Tybox 5101 2 x RF 6700 FP...
- Page 15 3. Association radio / Draadloze verbinding / Funkzuordnung / Associazione radio / Radio association / Asociación vía radio >3s mode mode ..>3s EXIT A la 1ère mise sous tension, le voyant vert du récepteur clignote rapidement, signalant qu’il n’a pas été associé. Alla prima accensione, la spia verde del ricevitore lampeggia rapidamente, indicando che non è...
- Page 16 Installation and User Guide Tybox 5701 pilot wire pack www.deltadore.com Contents Installation Installing the thermostat .................... 2 Location ...........................2 1.2 Wall mounting ........................2 1.3 Mounting on a base ......................2 Installing the receiver ....................3 2.1 Location ...........................3 2.2 Mounting / Connection ......................3 Wireless pairing ......................
-
Page 17: Installation
INSTALLATION 1. Installing the thermostat 1.1 Location mode mode mode The thermostat can be mounted on the wall or mode ~1,50 m placed on a piece of furniture in a room whose temperature is representative of the location's average temperature, with a recommended height of 1.5 m, and it should also be nowhere near any heat sources (fireworks, sunlight, etc.) or >... -
Page 18: Installing The Receiver
2. Installing the receiver 2.1 Location The antenna of the receiver must be clear of any metallic surface. 2.2 Mounting / Connection ❶ First of all, switch off the power to your setup. 230V~ ❷ The receiver can be secured by suitably sized 50 Hz screws or by adhesive (supplied). -
Page 19: Configuring Your Device
4. Configuring your device + 5°C - 5°C mode mode mode mode >10s ❶ Press any button to activate the ❷ Press mode for 10 seconds until ❸ Press + or - to adjust the setting, display screen. CF01 is displayed. and on mode to move to the next menu. -
Page 20: Pairing With The Tydom App
5. Pairing with the Tydom app Launch the Tydom app from your smartphone or tablet, then: Settings -> My devices -> Add device -> Heating -> Electrical -> Tybox 5701FP (+ RF6700FP) ... and follow the instructions. For more information, refer to the section § “Operation with the Tydom application". 6. -
Page 21: Troubleshooting
8. Troubleshooting 8.1 Deleting the pairing of the receiver with the thermostat, Tydom or window sensor In the event of a fault, you may have to unpair a product and/or repair a new one. In the first instance, you should delete the receiver from the transmitter (Thermostat, Tydom, etc) as deletion performed on the receiver will not be synchronised with all transmitters. -
Page 22: Use
1. Description Temperature display Select the mode Adjustment buttons mode 2. Consultation or modification of temperatures IMPORTANT: The radiator must be in automatic mode (AUTO, PROG ...), with its Comfort temperature set to the maximum. mode mode mode ❶ Press any button to activate the screen. The current mode is displayed: ON = ready for operation, = Stop. -
Page 23: Operation With A Load-Shedder
4. Operation with a load-shedder If a load-shedder is connected to your receiver: - switch heating off if load-shedding is requested. When load-shedding is in progress, the green LED on the receiver flashes. 5. Operation with the Tydom application Your RF6700 receiver can be paired using the TYDOM application. Features Via the Tydom app Programming... -
Page 24: Troubleshooting
7. Troubleshooting 7.1 What the receiver LEDs mean Signal type Diagnosis/Solutions The green light is constantly Power supply is on. The red light is constantly The receiver is requesting heating (pilot wire output = Comfort) The red LED is slowly The receiver is pending pairing. -
Page 25: Changing Batteries
7.2 Changing batteries • The symbol appears. You have approximately 1 month to replace them (two 1.5 V alkaline batteries, either LR03 or AAA). WARNING: make sure you insert the batteries facing the right way and that they are the right type (no lithium batteries).
Need help?
Do you have a question about the Tybox 5701 FP and is the answer not in the manual?
Questions and answers