Advertisement
Quick Links
TYBOX 1127
FR
Guide de démarrage rapide
NL
Snelstartgids
DE
Schnellstartanleitung
IT
Guida rapida
EN
Quick start guide
TYBOX 1127
230 V~ +/-10%, 50 Hz
2 A max., 230V~ (Type 1.C)
°C
-10°C / +40°C
80 x 104 x 35 mm
IP 30
Température d'essai à la bille : 75°C (Boîtier), 100°C (Bornier)
Verwekingspunt aan kogelmethode: 75°C (Behuizing), 100°C
(Aansluitklem)
Temperatur Kugeldruckprüfung: 75°C (Gehäuse),
100°C (Klemmleiste)
Temperatura di prova della sfera: 75°C (Scatola),
100°C (morsettiera)
Ball test temperature: 75°C (Unit), 100°C (Terminal)
Tension assignée de choc : 2500V / Toegekende
stootspanning: 2500 V / Bemessungsstoßspannung: 2500 V /
Tensione nominale di resistenza alla sovratensione: 2500 V /
Rated impulse withstand voltage: 2500V
www.deltadore.com
2. Description / Omschrijving / Produktbeschreibung / Descrizione / Description
G
H
F
E
D
C
3. Date et heure / Datum en uur / Datum und Uhrzeit /
Data e ora / Date and time
31
12
2
4
2020 ...
1
1
3
5
1
FR
❶ Tournez la molette sur
.
❷->⓫ Réglez la date, puis l'heure par + ou -,
puis validez par OK et passez au réglage suivant.
⓬ Pour sortir du mode, tournez la molette.
NL
❶ Draai het verstelwiel naar
.
❷->⓫ Stel de datum en daarna het uur in
via + of -, bevestig dan met OK en ga naar de
volgende instelling.
⓬ Draai aan het verstelwiel om de modus te
verlaten.
DE
❶ Setzen Sie den Drehknopf auf
.
❷->⓫ Stellen Sie das Datum, dann die Uhrzeit
mit + oder - ein, bestätigen Sie dann mit OK und
gehen Sie zur nächsten Einstellung.
⓬ Um den Modus zu verlassen, drehen Sie den
Drehknopf.
1.
Installation / Installatie / Installation / Installazione / Installation
Power supply
230V
OFF
Programmation 7 jours (
) ou 1 jour (
of 1 dag (
) / 7-Tage () oder 1-Tag (
Programmazione settimanale (
7 day (
) or 1 day (
) programming
ON
Power supply
230V
Molette de réglage / Verstelwiel / Stellrad /
Rotella di regolazione / Selector knob
Profil du programme / Programmaprofiel /
Programm / Profilo del programma / Program
profile
Température / Temperatuur / Temperatur /
Temperatura / Temperature
Jour (1=Lun) / Dag (1=Ma) / Tag (1=Mo) / Giorno
(1=Lun) / Day (1=Mon)
I
Heure / Uur / Uhrzeit / Ora / Time
Consigne en cours / Huidige gewenste
kamertemperatuur / Aktueller Sollwert / Valore di
set-point in corso / Current set-point
Informations / Informatie / Informationen /
Informazioni / Information
23
59
8
10
0
0
6
9
7
11
12
IT
❶ Girare la rotella su
.
❷->⓫ Impostare la data, poi l'ora con + o -, poi
confermare con OK e passare all'impostazione
successiva.
⓬ Per uscire dalla modalità, girare la rotella.
EN
❶ Turn the knob to
.
❷->⓫ Set the date, then the time with + or -,
then confirm with OK and move on to the next
setting.
⓬ To exit the mode, turn the knob.
Ø max. 1,5 mm²
PROG x 7
PROG x 1
) / Programmering 7 dagen (
)
) Programmierung (
)
/
) o giornaliera (
) /
Mode Arrêt / Uit-modus / Ausschalt-Modus /
Modalità Arresto / Shutdown mode
Mode Absence / Afwezigheidsmodus /
Abwesenheitsbetrieb / Modalità Assenza /
Absence mode
Mode Manuel / Manuele modus / Manueller
Modus / Modalità Manuale / Manual mode
AUTO
Suit la programmation / Volgt de
programmering / Folgt der Programmierung /
Segue la programmazione
Réglage date et heure / Instelling datum en
uur / Einstellen Datum und Uhrzeit / Impostazione
data e ora / Date and time settings
4. Réglage des consignes / Instelling van de gewenste
kamertemperaturen / Einstellung der Sollwerte / Regolazione dei
valori di set-point / Set point settings
30°C
5°C
3
1
EXIT
FR
❶ Tournez la molette sur
❷->❼ Réglez la température par + ou -, puis
validez par OK et passez au réglage suivant
(Confort -> Economie -> Hors-gel).
❽ Pour sortir du mode, tournez la molette.
❶ Draai het verstelwiel naar
NL
❷->❼ Stel de temperatuur in via + of -, bevestig
dan met OK en ga naar de volgende instelling
(Comfort -> Energiebesparing -> Vorstvrij).
❽ Draai aan het verstelwiel om de modus te
verlaten.
DE
❶ Setzen Sie den Drehknopf auf .
❷->❼ Stellen Sie die Temperatur mit + oder -
ein, bestätigen Sie dann mit OK und gehen Sie
zur nächsten Einstellung (Komfort -> Economy ->
Frostschutz).
~1,50 m
>
20 cm
Commande du circulateur / Bediening
circulatiepomp / Steuerung der Umwälzpumpe /
Comando del circolatore / Circulator control
L
L
N
1
Commande de l'entrée thermostat / Bediening
thermostaatingang / Steuerung des Thermostateingangs
/ Comando dell'ingresso termostato / Thermostat input
control
L
N
R
1
2
L
N
PROG
Programmation / Programmering /
Programmierung / Programmazione / Programming
Réglage des températures de consigne /
Regeling van de gewenste kamertemperaturen /
Einstellung der Solltemperaturen / Impostazione
delle temperature di set-point / Adjusting
temperature settings
Confort / Comfort / Komfort / Comfort/
Comfort
Economie / Energiebesparing /
Kostenersparnis / Risparmio / Economy
Hors-gel / Vorstvrij / Frostschutz / Antigelo /
Frost Protection
30°C
2
4
5°C
5
❽ Um den Modus zu verlassen, drehen Sie den
.
Drehknopf.
IT
❶ Girare la rotella su
❷->❼ Impostare la temperatura con + o -, poi
confermare con OK e passare all'impostazione
successiva (Comfort -> Risparmio -> Antigelo).
.
❽ Per uscire dalla modalità, girare la rotella.
❶ Turn the knob to
EN
❷->❼ Set the temperature with + or -, then
confirm with OK and move on to the next setting
(Comfort -> Economy -> Frost Protection).
❽ To exit the mode, turn the knob.
N
R
C
T
2
3
4 5
C
T
3
4 5
Th
16°C
6
5°C
7
EXIT
8
.
.
1
Advertisement

Subscribe to Our Youtube Channel
Related Manuals for DELTA DORE TYBOX 1127


Summary of Contents for DELTA DORE TYBOX 1127
- Page 1 Installation / Installatie / Installation / Installazione / Installation Power supply 230V TYBOX 1127 ~1,50 m Ø max. 1,5 mm² > 20 cm Guide de démarrage rapide Commande du circulateur / Bediening Snelstartgids circulatiepomp / Steuerung der Umwälzpumpe / Comando del circolatore / Circulator control...
- Page 2 5. Programmation / Programmering / Programmierung / Programmazione / Programming 5.1 Programmation rapide / Snelle programmering / Schnellprogrammierung / Programmazione rapida / Quick programming EXIT ❶ Tournez la molett e sur PROG. ❶ Setzen Sie den Drehknopf auf PROG. ❶ Turn the knob to PROG. ❷...
- Page 3 Installation and User Guide Tybox 1127 www.deltadore.com Contents Installation Installing the transmitter .................... 3 Location ...........................3 1.2 Mounting/Connection .......................3 Time and date setting ....................4 Configuring your device (Menu 1) ................5 Menu 1-02 Programme duration ....................5 Menu 1-03 Pre-heat activation/deactivation ..............5 Menu 1-08 Controlling the Comfort temperature ............5...
- Page 4 Description ........................9 Automatic mode (AUTO) ..................... 9 Override ......................... 9 4. Information button ...................... 10 Time setting ........................10 Adjusting temperature settings ................10 Programming ......................... 11 7.1 Quick programming ......................11 7.2 Customising a programme ....................12 7.3 Programme verification .....................13 7.4 Return to initial programme .....................13 Manual mode ........................
- Page 5 INSTALLATION 1. Installing the transmitter ~1,50 m 1.1 Location The thermostat can be wall-mounted in a room where the temperature is to be regulated from, at a recommended height of 1.5m and away from Mini 20 cm any heat sources (fireplace, direct sunlight, etc.) or draughts (window, door, etc.).
- Page 6 2. Time and date setting 2021... EXIT ❽-> ❿ Set the hour then the minutes with + or -. ❶ Turn the dial to ⓫ Confirm with OK. ❷-> ❻ Set the day, month, year with + or -. ⓬ To exit the mode, turn the dial. ❼...
- Page 7 3. Configuring your device (Menu 1) >5s EXIT ❸ Press the 1 button. ❻ To exit the mode, turn the dial. ❶ Turn the dial to , then press the To change the various settings, i button for 5 seconds (❷). press the + or - buttons (❹), then press OK to confirm the change and go to the next setting (❺).
- Page 8 4. Configuring your device (Menu 2) >5s EXIT ❸ Press the 2 button. ❻ To exit the mode, turn the dial. ❶ Turn the dial to , then press the To change the various settings, i button for 5 seconds (❷). press the + or - buttons (❹), then press OK to confirm the change and go to the next setting (❺).
- Page 9 Menu 2-07 Days until boiler/heat pump service reminder Must be reset after every service. Default setting: “---” (function off). If you don't want to use this function, leave Adjustable "---" (function off) or from 1 to 365 days the setting on “---”. Menu 2-08 Control time base The control quality depends on parameters like the building’s insulation, the number of radiators or the flooring type.
- Page 10 5. Settings reset The default factory settings may be restored for each of the menus. Reset Init Menu 1 Menu 1 >5s >5s Reset Init Menu 2 Menu 2 EXIT ❸ Press the button on the menu ❹ Then press the OK button to ❶...
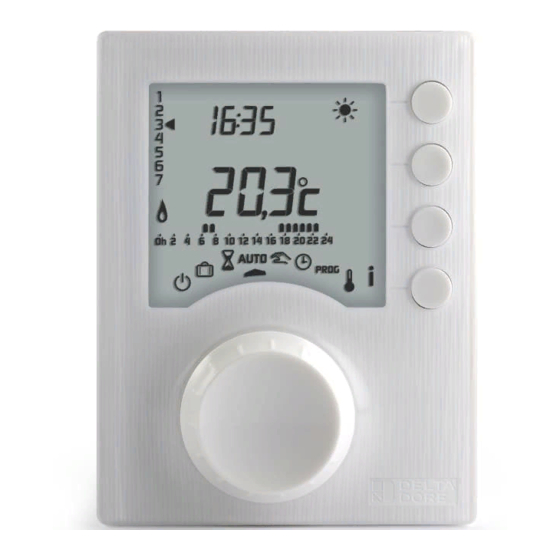
- Page 11 1. Description Selector dial Off mode Absence mode Programme profile Manual mode Room AUTO Follows programming Day (1 = Monday) Date and time settings Time PROG Programming Current setpoint Adjusting Information setpoint temperature settings Comfort Boiler maintenance due Economy (deadline < 30 days) Frost protection 2.
- Page 12 4. Information button In AUTO, manual or off mode, successive presses on the button enable you to: - find out the room temperature or the setpoint temperature (depending on the configuration during installation (menu 2-04), - show the boiler/heat pump operating hours meter, as well as the number of days remaining before maintenance (if this setting is on, menu 2-07), Viewing this screen temporarily cancels the display of the symbol until the maintenance due date.
- Page 13 7. Programming You can opt for weekly (PROGx7) or daily (PROGx1) PROG x 7 programming. PROG x 1 You can select your choice using the switch on the back of the device. You can programme in increments of one hour, 30 minutes or 15 minutes (menu 1-02).
- Page 14 7.2 Customising a programme How to set a daily programme (PROG x1) ❶ Turn the dial to PROG. ❷ Press + or - to choose the programme to change (P1 or P5). EXIT ❸ Confirm with OK. You can check your programme by pressing The programme profile flashes.
- Page 15 7.3 Programme verification EXIT Once your programme has been If it suits you, confirm with OK and To exit the mode, turn the selector changed, you can check it by go to the next day dial. (if PROGx7). successively pressing the button 7.4 Return to initial programme You want to reset to the initial programmes.
- Page 16 8. Manual mode This mode is used to choose a temperature setting (5 to 30°C) that remains 30°C constant. This setting may be restricted (menu 2-01 = 1). 5°C Turn the dial to exit the mode. In this mode, all programming is ignored. 9.
- Page 17 11. Pre-heat function When changing from Economy to Comfort temperature in AUTO mode, your thermostat will anticipate the rise in temperature so that it reaches the right temperature at the scheduled time. Example (see opposite): 6:30 am, Economy period, currently pre-heating to reach the temperature of 20°C at 8:00 am.
Need help?
Do you have a question about the TYBOX 1127 and is the answer not in the manual?
Questions and answers