
Related Manuals for pigtronix Infinity looper

Summary of Contents for pigtronix Infinity looper
- Page 1 Pigtronix Infinity Looper User’s Guide All contents © Absara Audio LLC 2012...
- Page 2 24bits/48kHz. It is a mirror of musical reality... what you put in is what you get out. All loop audio on the Infinity Looper is stored to an on-board memory card and can be accessed via the USB port located on the front of the unit.
- Page 3 Infinity Looper presets a near limitless set of possibilities for the creative musician. The Infinity Looper was many years in the making and required a great deal of time and resources to accomplish the goals that were initially set out for this project.
- Page 4 -- QUICK START GUIDE – Turn on the Infinity, it will load Preset 0 (the blank canvas) upon power up. Set the MASTER VOLUME to 3:00 and both LOOP VOLUME knobs to 12:00 Press Loop 1 footswitch to record (You must record on Loop 1 first) Press Loop 1 footswitch again to close the loop and begin playback...
- Page 5 -- QUICK START GUIDE (continued) – Press Loop 2 footswitch again to open an overdub on Loop 2. Press Loop 2 footswitch again to close the overdub on Loop 2 Now Press Loop 1 footswitch to arm Loop 1. Press Loop 1 footswitch again to open another overdub on Loop 1.
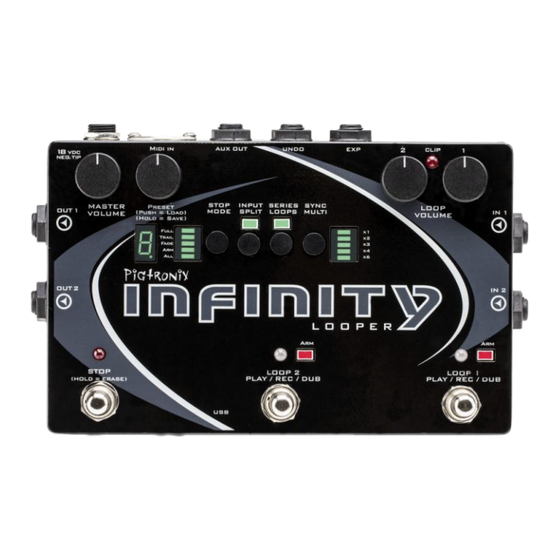
- Page 6 Footswitch Functions: -- FOOTSWITCHES – The three footswitches are the principal means of controlling loop actions. The functionality of the Loop 1 and Loop 2 footswitches is identical. Pressing the Loop 1 footswitch at any time will “ARM” Loop 1, illuminating the corresponding red LED and indicating that Loop 1 is ready to receive Play, Stop, Overdub and Undo commands.
- Page 7 Stop (Hold = Erase) – Pressing the STOP footswitch will cause playback to cease on one or both loops, depending on the ARM or ALL setting (see below). Holding down the STOP footswitch will cause loop audio to be erased from one or both loops, depending on the ARM or ALL setting.
- Page 8 Toggle Switch Functions: -- FULL / TRAIL / FADE -- Holding down the STOP MODE switch will choose the way in which the loops stop when the STOP footswitch is pressed. FULL indicates that audio will stop immediately when you push the STOP footswitch. TRAIL indicates that the audio will stop when it reaches the end of the current loop cycle.
- Page 9 When nothing is plugged into IN 2, then the audio from IN 1 becomes the source for IN 2. In this case, the Input Split function allows you to record separate loops for the left and right output channels. -- SERIES / PARALLEL -- When the SERIES LOOPS is ON, you are in Series mode.
- Page 10 When the SYNC MULTI is ON, the lengths of the two loops are synchronized. The length of Loop 2 will be a multiple of the length of Loop 1, as set by the multiplier factor indicated by the LED bar to the right of the sync multi switch.
- Page 11 Infinity Looper and the number of preset slots you have assigned using the PC or MAC application for the Infinity Looper. See the table on the next page for maximum recording times based on these factors. -- SAVE / LOAD / COPY -- To Load a preset, turn the preset knob to select the desired bank, the digit will flash.
- Page 12 have been made but not saved, the decimal point will flash. If you want to keep your changes, simply follow the save process explained above without changing the selected bank. To Copy a preset from one bank to another simply initiate the save process as explained above on a bank that already contains audio.
- Page 13 Loop 1 Maximum Recording Time (in seconds) with 8GB card Multiplier Value # of preset slots 1662 1108 1107 10 (default) (All above values are in seconds) Loop 2 recording time = Loop 1 length x Multiplier Value 8GB card (included) Total Recording Time = Approx. 2 hours For 16GB card, double all values.
- Page 14 Jacks: DC POWER 18-VOLTS – Use only the 18-Volt, 300mA, negative tip power supply that came with your Pigtronix Infinity Looper. Using the wrong power supply is likely to result in a damaged pedal. IN 1 – Looper input, Plug in your instrument here.
- Page 15 MIDI IN - This provides a connection for MIDI beat clock sync (slave). Infinity Looper will sync to MIDI whenever a MIDI BEAT CLOCK signal is preset. The Infinity Looper can also be configured to obey MIDI START, STOP and Song Select commands.
- Page 16 Footswitches: LOOP 1 (ARM / PLAY / REC / DUB) – This footswitch controls the looping actions for Loop 1 LOOP 2 (ARM / PLAY / REC / DUB) – This footswitch controls the looping actions for Loop 2 STOP (HOLD = ERASE) – Pressing this footswitch causes looped audio to stop playing.
- Page 17 When delayed command been initiated, the relevant footswitch LED will blink to indicate a pending action and will turn solid in color once the action is taken. CLIP LED – This red LED between the Loop Volume knobs will indicate when the input signal is reaching the maximum headroom of the Infinity’s recording engine and begins to trigger the analog limiter stages.
- Page 18 will then disappear to indicate that the preset is now saved as empty. Toggle Switches: STOP MODE – Determines the behavior of the STOP footswitch. Press quickly to choose between the ARM and ALL options. Hold down the STOP MODE switch to toggle through the FULL, TRAIL and FADE options.
- Page 19 Press and Hold the SYNC MULTI switch to toggle between the currently selected SYNC MULTI value and non-SYNC. When none of the SYNC MULTI LEDs are lit, the two loops are NOT SYNCED. Once SYNC MULTI is turned on, press the SYNC MULTI switch quickly to cycle through the different SYNC MULTI values.
- Page 20 LOOP VOLUME 2 - Sets the Loop 1 output volume The Loop 1 and Loop 2 Volume knobs are calibrated so that 12:00 = Unity Gain for Loop audio. Turning either of the Loop Volume knobs above 12:00 will result in Loop Audio that is actually louder than the input signal.
- Page 21 Once loop recording, pressing corresponding footswitch again will close the loop and immediately begin playback. The loop LED will glow green to indicate playback. Pressing the STOP footswitch while a loop is recording will stop the recording and close the loop without immediate playback.
- Page 22 The PLAY function is tied to the STOP MODE selection (ARM or ALL). When ARM is chosen, pressing the Loop footswitch that is armed will begin playback on the currently armed loop only. When ALL is chosen, pressing either Loop footswitch will begin playback of the audio on both loops.
- Page 23 Holding the STOP MODE switch down will select between these options FULL – STOP footswitch will halt loop audio immediately when pressed TRAILS – Pressing the STOP footswitch anytime within the loop cycle will halt loop audio when the end of the armed Loop is reached. FADE –...
- Page 24 currently armed loop. When ALL is chosen, holding down the STOP switch will erase the audio from both loops. Overdub: Overdub lets you add additional material to the original loop. When a loop is playing back, pressing the corresponding loop footswitch will begin...
- Page 25 When an overdub is in the process of being recorded (Loop LED is orange), pressing the UNDO switch will cause the Infinity to permanently erase that overdub at the end of the current loop cycle. Any material from previous overdubs that already been merged...
- Page 26 SYNC Multi: Pressing the SYNC MULTI switch will cycle between the various sync options. With none of the sync lights turned on, Loop 1 and Loop 2 run independently. In “non-sync” mode, the length and start / stop points of Loop 1 and Loop 2 have no impact on one another.
- Page 27 Pressing the Loop 2 footswitch while recording on Loop 2 before it has reached the full SYNC MULTI value will cause Loop 2 to close at the end of the current loop cycle. Holding down the SYNC MULTI switch will toggle the SYNC MULTI function on and off from the current setting without cycling through all of the SYNC MULTI values.
- Page 28 Input Split: The Input Split function is intended for isolating Loop 1 to audio channel 1 and Loop 2 to audio channel 2. This is helpful if you want to loop multiple instruments on isolated, yet synchronized loops. When nothing is plugged into IN 2, then the audio from IN 1 becomes the source for IN 2 and the Input Split function allows you to record separate loops for the left and right output channels.
- Page 29 Looper will synchronize its actions to the MIDI beat clock, acting as a SLAVE device. The MIDI actions of the Infinity Looper are quantized to the measure (assuming 4/4 time) when MIDI is running. Any action that is meant to obey MIDI clock will occur at the beginning of the next measure after the command is initiated.
- Page 30 If MIDI clock signal is present and then the MIDI master is stopped, the looper will obey manual commands in the absence of a MIDI clock pulse. Commands that sync to MIDI clock: Rec / Play – Appropriate action is executed at the start of the next measure after the switch has been pressed.
- Page 31 MIDI Commands that trigger Infinity Looper Actions: In order to enable the Infinity Looper to obey MIDI commands other than MIDI Beat clock, you must hold down the SYNC switch when powering up. MIDI Stop - MIDI Stop command stops all Loop Audio.
- Page 32 To update the Infinity Looper application on your Infinity Looper, download the updated version at the following URL: Pigtronix.com/SPLapplication and replace the appropriate folder on the Infinity Looper with the new version of the application. Firmware Updates: Automatic Firmware Update Using the Looper...
- Page 33 Manual Firmware update: To update your Infinity Looper with the latest firmware, power up the Infinity Looper and plug it into a PC with the supplied USB-A to microUSB cable. The Infinity is not a bus powered device and must be plugged into the wall using the supplied adapter in order to connect via USB.
- Page 34 LOOPERFW directory. Copy the fwupdate.dat file into the LOOPERFW directory, replacing the current file of the same name. Power down the Infinity Looper (eject first on MAC) and then disconnect the USB cable from the Infinity Looper. WHILE HOLDING DOWN the INPUT SPLIT switch, reconnect the power supply to the Infinity Looper, the digit will display an “F”...
- Page 35 Ray Heasman, Ben Artes, Howard “Mick” Davis, Jer Coons, Steve Turnidge and David Koltai designed the Pigtronix Infinity Looper during 2010 – 2012 in Port Jefferson, NY and Seattle, WA. It is inevitable that there will be software updates to the Infinity Looper over time that will expand the pedal’s...
- Page 36 Pigtronix Limited Warranty: Your Pigtronix effect pedal comes with a 1 year limited warranty on parts and workmanship. During the warranty period we will repair or replace, at our option, defective parts or pedals free of charge, and return them to the owner. Warranty service does not...
Need help?
Do you have a question about the Infinity looper and is the answer not in the manual?
Questions and answers