Table of Contents
Advertisement
Quick Links
Advertisement
Table of Contents

Related Manuals for pigtronix Infinity Looper


Summary of Contents for pigtronix Infinity Looper
- Page 1 Infinity Looper User’s Guide All contents c Absara Audio LLC 2014...
-
Page 2: Table Of Contents
Contents Contents 1 Welcome to Infinity 2 Anatomy and Functions Footswitches ..... . . Loop 1 ......Loop 2 . - Page 3 CONTENTS In 1 ......13 In 2 ......13 Out 1 .
- Page 4 CONTENTS 3.14 Click Killer ......27 3.15 Varispeed ......28 3.16 Boot Options .
- Page 5 Automatic Update Using the Looper Application . . . 51 Manual Firmware Update ....52 9 Minimum and Maximum Loop Times 10 Acknowledgements 11 Pigtronix Limited Warranty...
-
Page 6: Welcome To Infinity
Welcome to Infinity Pigtronix designed this pedal to be easy to use, yet vastly powerful and deeply musical. Think of it as a foot-operated, digital version of a multi-track tape recorder. Eschewing the quantization and delayed commands found in other looper pedals, the Pigtronix approach is to make all commands instantaneous. -
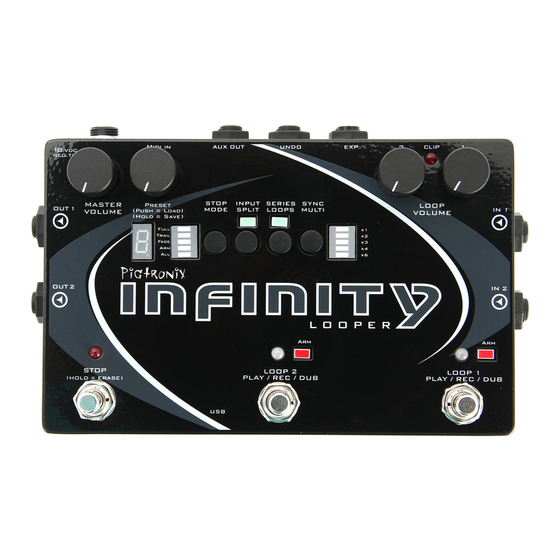
Page 7: Anatomy And Functions
Anatomy and Functions Footswitches Loop 1 This footswitch controls the looping actions for Loop 1. Pressing the Loop 1 footswitch at any time will arm Loop 1, illumi- nating the corresponding red LED and indicating that Loop 1 is ready to receive Play, Stop, Overdub and Undo commands. -
Page 8: Stop
CHAPTER 2. ANATOMY AND FUNCTIONS Stop Quickly pressing the Stop footswitch will stop audio playback on one or both loops, depending on the Arm/All setting (see below). Holding down the Stop footswitch for at least two seconds will cause loop audio to be erased from one or both loops, depending on the Arm/All setting. -
Page 9: Full, Trail, Fade
CHAPTER 2. ANATOMY AND FUNCTIONS twice within 1 second). The Arm functionality also applies to the Play command. When loops are stopped, pressing a loop footswitch will only resume playback of the currently armed loop. Some Remote Switch functions (page 33) also follow the Arm/All setting. -
Page 10: Series Loops
CHAPTER 2. ANATOMY AND FUNCTIONS For more options and details, see the Infinity Rules Input Split section on page 24. Series Loops When Series Loops is on, you are in Series mode. This means that only one of the two loops can play at any given time. This is handy for verse/chorus-type song structures. -
Page 11: Knobs
CHAPTER 2. ANATOMY AND FUNCTIONS You can alter the synchronization at any time while recording, by manually closing Loop 2 with the Loop 2 footswitch. This will cause Loop 2 to close at the end of the current loop cycle. The arm light will blink to indicate that Loop 2 is about to close. -
Page 12: Preset
CHAPTER 2. ANATOMY AND FUNCTIONS Setting it at around 3 o’clock gives you unity gain. Preset This is a rotary push button encoder that is used to select what loop preset is in use, and to store loop audio. The Infinity Looper allows you to store and recall up to 50 presets, which consist of audio that you’ve either recorded on the Infinity, or audio you’ve loaded onto the pedal from your computer using the app. -
Page 13: Jacks
Jacks DC Power Use only the 18-Volt, 300mA, negative-tip power supply that came with your Pigtronix Infinity Looper. Using the wrong power supply is likely to result in a damaged pedal. In 1 Looper input 1. This is normally the input to use, unless you are using both inputs for stereo or two instruments. -
Page 14: Out 2
Connect a dual momentary remote switch here using a TRS (balanced 1/4”) cable (not an instrument or speaker cable!) to enable Overdub, Undo, Redo, Reverse, and Varispeed. We recommend the Infinity Remote: www.pigtronix.com/products/ infinity-remote-switch. For details on how to use the remote switch, please see Remote Switch Functions, page 33. -
Page 15: Midi In
CHAPTER 2. ANATOMY AND FUNCTIONS For details on how to use the Expression Pedal, see Expression Pedal Functions, page 39. MIDI In This provides a connection for MIDI beat clock sync (slave), or a MIDI controller. Infinity Looper will sync to MIDI whenever a MIDI Beat Clock signal is preset. -
Page 16: Leds
CHAPTER 2. ANATOMY AND FUNCTIONS LEDs Loop LEDs The Loop 1 and Loop 2 footswitch LEDs share the same color coding, and light pattern (for colorblind users). Green Orange Playback Recording Overdub Solid Slow Flicker Quick Flicker Both Loop 1 and Loop 2 footswitch LEDs are accompanied by a red square Arm LED that indicates which loop is currently armed. -
Page 17: Multi-Segment Digit
CHAPTER 2. ANATOMY AND FUNCTIONS Multi-Segment Digit This numeric display tells the user which preset is currently selected (within the selected bank) and is also used to confirm firmware update “F”, and to indicate copy in progress “C” and USB active “U” states. In Varispeed mode (see page 35) a “-”... -
Page 18: Infinity Rules
Infinity Rules Arming a loop is achieved by pressing the footswitch that corresponds to the desired loop. The Arm light above the selected loop will glow red indicating its status as armed. A loop must be armed in order to accept further commands. When the Infinity powers up initially, LOOP 1 is armed by default. -
Page 19: Jump Record
CHAPTER 3. INFINITY RULES Jump Record Pressing the Loop 2 footswitch while Loop 1 is recording will close Loop 1 and begin recording on Loop 2. In parallel mode, Loop 1 will immediately begin playback when Loop 2 starts recording. In series mode, Loop 1 will simply close and be ready for playback the next time you hit the Loop 1 footswitch. -
Page 20: Erase
CHAPTER 3. INFINITY RULES Erase To erase a loop, press and hold down the Stop footswitch. If a loop is stopped and armed, pressing the Undo remote switch will erase that loop. When the erase command is triggered, the Stop LED, the current Arm LED and the Multi-Segment Digit will flash once to indicate audio has just been erased. -
Page 21: Sync Multi
CHAPTER 3. INFINITY RULES Sync Multi For basic Sync Multi functionality see the Sync Multi Section (page Holding the Sync Multi switch will toggle Sync Multi on or off. Quickly pressing the Sync Multi switch once Sync Multi is on, cycles through the sync multiplier factor. -
Page 22: Series & Fade Modes
CHAPTER 3. INFINITY RULES footswitch will close Loop 1, and will simultaneously arm and begin recording on Loop 2. Pressing the Loop 1 footswitch next will cause Loop 2 to close and will simultaneously arm and begin playback on Loop 1. 3.10 Series &... -
Page 23: Input Split
CHAPTER 3. INFINITY RULES 3.11 Input Split The Input Split function is intended for isolating Loop 1 to audio channel 1 and Loop 2 to audio channel 2. This is helpful if you want to loop multiple instruments on isolated, yet synchronized loops. When nothing is plugged into Input 2, then the audio from Input 1 becomes the source for Input 2 (as well as Input 1) and the Input Split function allows you to record separate loops for the left and right... -
Page 24: Saving
Settings for Preset 0 can be changed using the Pigtronix Infinity Application. The decimal point will illuminate to indicate that audio is present in a Loop bank. -
Page 25: Erasing
CHAPTER 3. INFINITY RULES In certain instances while saving, the Infinity Looper may need to quickly copy data from one sector of the disk to another. When this happens, the digit will show a flashing “C” while the copy is in process. Erasing To erase saved audio from a preset (for example, erasing one of the loops), the audio must first be erased by pressing and holding the Stop... -
Page 26: Click Killer
CHAPTER 3. INFINITY RULES To enable Expression Pedal control of the feedback value, select ”A” from the Expression Pedal Assignment Menu (page 40). For more information on Expression Pedal Loop Aging control see Expression Pedal Functions, 39. You can enter the Loop Aging menu at any time, even during playback. Loop Aging settings will be saved when you save your preset. -
Page 27: Varispeed
CHAPTER 3. INFINITY RULES 3.15 Varispeed Varispeed allows you to change the pitch (and speed) of your looped audio by altering the recording and playback sample rate. This change can be made in real time using an expression pedal, remote switch, or MIDI. - Page 28 CHAPTER 3. INFINITY RULES standard Undo or Redo functionality however, you can snap to any desired sample rate using the remote switch. In ARM mode, pressing both Remote Switches at the same time will snap the sample-rate to the sample-rate used to record the currently armed Loop. In ALL mode it will always snap to the sample-rate used to record Loop 1.
-
Page 29: Boot Options
CHAPTER 3. INFINITY RULES # of Semi- Interval Up Speed Down Speed tones Minor Second 1.07 Major Second 0.89 1.13 Minor Third 0.83 Major Third 1.25 Perfect Fourth 0.75 1.33 Diminished Fifth 0.70 1.42 Perfect Fifth 0.67 1.50 Minor Sixth 0.63 Major Sixth 0.60... -
Page 30: Mono Mixdown
CHAPTER 3. INFINITY RULES of empty loops is automatically set to 24 kHz. This is essential if you are creating live loops using any type of tap tempo MIDI clock source. The default 24 kHz sample-rate allows for the MIDI source to speed up and slow down without loosing sync. Mono Mixdown Hold Loop 2 during boot to toggle Mono Mixdown. -
Page 31: Reformat
CHAPTER 3. INFINITY RULES Reformat Hold the Series Loops switch during boot to reformat the microSD Card to 50 Presets. Caution: This erase all saved presets and recorded loop audio! -
Page 32: Remote Switch Functions
Reverse is triggered by shorting the ring to the sleeve of the Undo jack. This is accomplished by connecting any two-button, momentary footswitch (such as the Pigtronix Infinity Remote) to the Undo jack with a TRS cable. Pressing the Reverse button triggers reverse playback at the begin- ning of the next loop cycle according to the Arm/All setting (see page 8. -
Page 33: Undo
CHAPTER 4. REMOTE SWITCH FUNCTIONS Undo To undo overdubs, a dual momentary remote switch is required. This should be connected to the Undo jack using a TRS (balanced 1/4”) cable. When an overdub is being recorded (Loop LED is orange), pressing the Undo switch will cause the Infinity to permanently erase that over- dub at the end of the current loop cycle. -
Page 34: Rec Overdub Play
CHAPTER 4. REMOTE SWITCH FUNCTIONS Rec Overdub Play In response to numerous customer requests, we have implemented a feature that allows you to go directly from recording the base layer, straight into overdub mode. This feature is particularly good if you have sounds (delays, reverbs etc) that will trail across the Loop’s boundary;... - Page 35 CHAPTER 4. REMOTE SWITCH FUNCTIONS A short press of Reverse decreases the pitch and increases the length of both loops by the interval selected using the Infinity Ap- plication. A short press of Undo increases the pitch and decreases the length of both loops by the musical interval selected using the Infinity Appli- cation.
- Page 36 CHAPTER 4. REMOTE SWITCH FUNCTIONS The Remote Mapping Menu only sets the Interval while in the Varispeed Remote Control Menu, if you leave the Varispeed Remote Control Menu the Remote Mapping Menu sets the Expression Pedal assign- ment as described on page 39. Caution: Press-and-hold functionality on the Reverse and Undo switches in this menu prevents actions taking place immediately when pressed.
-
Page 37: Expression Pedal Functions
Expression Pedal Functions An industry standard low-impedance TRS expression pedal can be connected to the Infinity using a TRS (tip-ring-sleeve) cable, to control any one of the following (but only one at a time): Loop Volume, Loop Aging, or Varispeed. Moving the expression pedal towards the heel will turn the loop audio down (for both loops) from the level set by the individual loop volume knobs. -
Page 38: Varispeed
CHAPTER 5. EXPRESSION PEDAL FUNCTIONS You can use a simple momentary switch (connected via TRS) in place of an expression pedal to get an instant Loop Replace function out of the “A” mode, since hitting the switch is like going to “0.” Varispeed This is the default function of the Expression pedal while in the Varispeed Remote Control Menu. - Page 39 CHAPTER 5. EXPRESSION PEDAL FUNCTIONS to finalize and exit. The selection from the Remote Mapping Menu applies globally, both in and out of Varispeed Remote Control Menu. The Remote Mapping Menu only sets the Expression Pedal assign- ment when NOT in the Varispeed Remote Control Menu. If the Varispeed Remote Control Menu is entered while in the Remote Map- ping Menu, the Remote Mapping Menu will set the Interval Change of the Varispeed Remote Control Menu as described on page 35.
-
Page 40: Midi
MIDI MIDI Sync MIDI Sync is the normal default MIDI mode of the Infinity it’s always When a MIDI Beat Clock is present, the Infinity Looper will synchro- nize its actions to the MIDI beat clock, acting as a slave device. Once a loop has been recorded with a MIDI Beat Clock, the Infinity will constantly readjust the loop length to stay synchronized. -
Page 41: Time Signature
CHAPTER 6. MIDI Time Signature The Time signature can be changed, on a preset-by-preset basis, using the Infinity Application. For quantization to the beat rather than to the measure, set the measure to a single note (eg. 1/2, 1/4, 1/8, 1/16). -
Page 42: Overdub
CHAPTER 6. MIDI which loop is playing back at the start of the next measure after the switch has been pressed. Overdub Closes a base recording at the start of the next measure after the switch has been pressed then begins recording an Overdub. Commands That Ignore MIDI Sync Erase, Overdub, Global stop (via double tap), and all mode changes via the tactile switches, potentiometers or encoder are not quantized... -
Page 43: Cycle/Toggle
CHAPTER 6. MIDI A Full MIDI Map is provided on page 47. The behavior of individual commands (CC: control change) is broken down into 4 types of control: Cycle/Toggle Any value of these MIDI CC/Note messages toggles or cycles through the available options, changing to the next selection. -
Page 44: Midi Real-Time Messages
CHAPTER 6. MIDI Values of 1 or 2 specifically send a short press and long press respec- tively and act immediately. MIDI Commands That Trigger Infinity Looper Action Feature MIDI CC Comments Varispeed Mapped Global Volume Mapped Loop Aging Mapped Loop 1 Volume Mapped Loop 2 Volume... -
Page 45: Varispeed Midi Note Control
CHAPTER 6. MIDI Sending a MIDI Song Select command will change preset banks, in order to move between different loops during performance. Allow up to 4 seconds for song select changes to take effect. Varispeed MIDI Note Control For precise changes of sample rate for the purposes of a pitch change, the Infinity accepts MIDI Note Control. -
Page 46: Infinity Looper Application
“Run As Administrator” To update the Infinity Looper application on your Infinity Looper, download the updated version at the following URL: www.Pigtronix. com/SPLapplication and replace the appropriate folder on the Infin- ity Looper with the new version of the application. -
Page 47: Firmware Updates
Firmware Updates Automatic Update Using the Looper Application In order to launch the Infinity Looper Application, you must plug the looper into a PC using the supplied USB-A to microUSB cable. The Infinity is not a bus powered device and must be plugged into the wall using the supplied adapter in order to run the Infinity Looper Application. -
Page 48: Manual Firmware Update
USB. Once the Infinity has been connected to a computer, it will appear as a USB mass storage device. Download the latest Firmware update (fwupdate.dat) from the follow- ing URL: www.pigtronix.com/SPLfirmware Open the drive that appears and double click on the LOOPERFW directory. Copy the fwupdate.dat file into the LOOPERFW directory, replacing the current file of the same name. -
Page 49: Minimum And Maximum Loop Times
Minimum and Maximum Loop Times Loop 1 Maximum Recording Time (in Seconds) with an 8GB SD Card Multiplier Value # of Preset Slots 50 (Default) For higher numbers of presets, and other SD card sizes the general formula for maximum loop time is = 0 91 , where , , are Disk size in MB, number of slots, and multiplier value... -
Page 50: Acknowledgements
Looper over time that will expand the pedal’s functionality. Please run the firmware update function on the included application or sim- ply check the Infinity Looper product page on the Pigtronix website for downloadable firmware updates. We hope you enjoy your new Infinity Looper pedal! As always, we welcome your input, and value customer feedback. -
Page 51: Pigtronix Limited Warranty
Pigtronix Limited Warranty Your Pigtronix effect pedal comes with a 1-year limited warranty on parts and workmanship. During the warranty period we will repair or replace, at our option, defective parts or pedals free of charge, and return them to the owner. Warranty service does not include damaged, modified, or misused pedals and such pedals will be subject...
Need help?
Do you have a question about the Infinity Looper and is the answer not in the manual?
Questions and answers