
Related Manuals for Korg SP-300


Summary of Contents for Korg SP-300
- Page 1 Digital Piano Piano Numérique Digital-Piano Pianoforte Digitale User’s manual Mode d’emploi Bedienungseinleitung Manuale d’istruzioni ENGLISH FRANÇAIS DEUTSCH ITALIANO...
- Page 3 English User’s Manual Français Mode d’emploi Deutsch Bedienungseinleitung Italiano Manuale di istruzioni...
- Page 5 Digital Piano User’s Manual...
- Page 6 Connect the equipment into an outlet on a cir- equipment, unplug the AC adapter from the cuit different from that to which the receiver is wall outlet. Then contact your nearest Korg connected. dealer or the store where the equipment was •...
- Page 7 Korg is not responsible for any eventual dif- ferences found between the specifications and the contents of the instruction manual - the specifica-...
-
Page 8: Table Of Contents
Using the SP-300 as a multitimbral tone generator ....... . . -
Page 9: Introduction
MIDI allows two or more devices to control or be controlled by each other, and also allows you to use the SP-300 as a 16-part multitimbral tone generator. Introduction... - Page 10 Powerful integrated amplification. SP-300 includes a powerful, 15 + 15 Watt amplier, with two 10cm speakers in Bass Reflex box. Audio inputs. The audio inputs allows you to directly connect an external mono or stereo audio source, without the need of a mixer.
-
Page 11: Panels
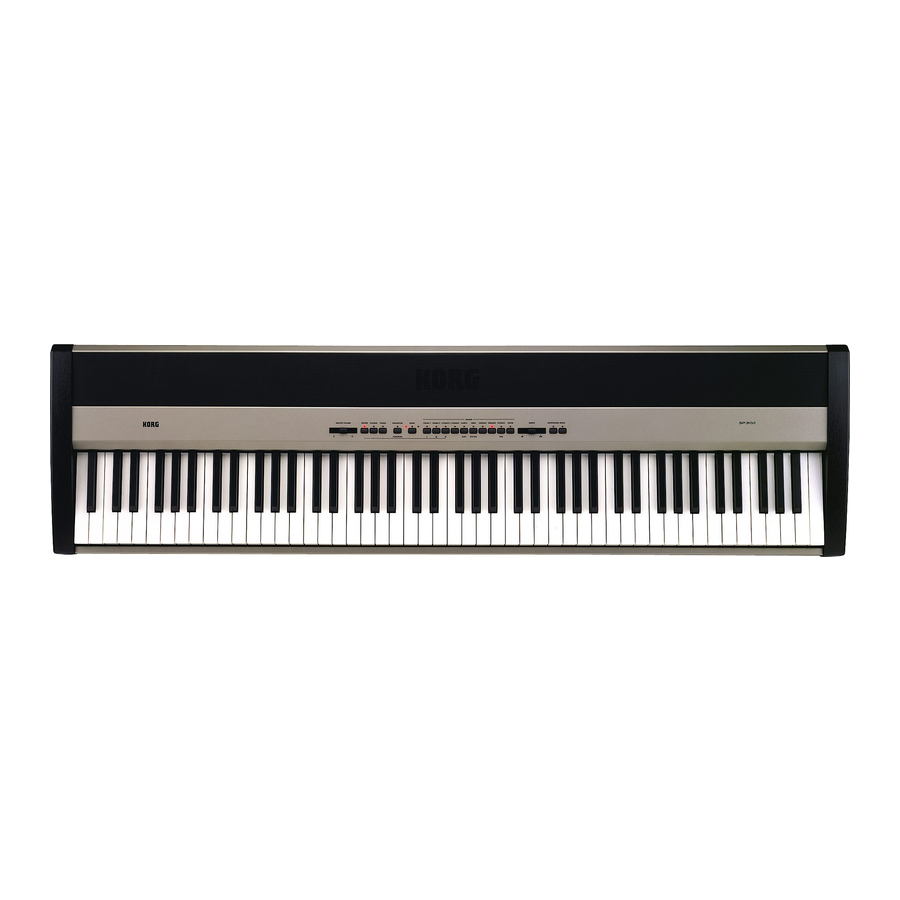
CHAPTER Panels Front panel 7 7 7 7 1 1 1 1 2 2 2 2 3 3 3 3 4 4 4 4 5 5 5 5 6 6 6 6 8 8 8 8 9 9 9 9 0 0 0 0 1 1 1 1 MASTER VOLUME slider: Adjusts the volume for the Output and the Phones connectors. -
Page 12: Rear Panel
the keyboard (Layer mode). 8 8 8 8 TEMPO slider: Adjusts the metronome tempo. 9 9 9 9 METRONOME button: Turns the metronome click on/off. 0 0 0 0 DEMO button: Turns the demo mode on/off, to listen to the demo songs. Select the songs with the sound selection buttons (see number 7 above). - Page 13 (With a hi-fi system use the AUX or TAPE connec- tors, not the PHONO connector). To amplify the SP-300 in mono, connect the sin- gle L/MONO connector. Use the MASTER VOLUME slider to set the output volume.
-
Page 14: Before You Begin
Before you begin Connecting to an external amplification system Use the OUTPUT connectors, if you like to connect your SP-300 to a high-quality mixer, stereo hi-fi, or a couple of active monitors. When using a stereo hi-fi, connect the OUTPUTs to the AUX or TAPE inputs (never use the PHONO inputs). For mono amplification, connect only the L/MONO output. -
Page 15: Connecting External Sources
Warning: Avoid connecting the output of a power amplifier to these inputs!. Turning the instrument on Insert the DC plug of the supplied AC adapter into the DC inlet of the SP-300, and then connect the AC plug to a wall socket; then press the POWER switch. When the instrument is on, the LEDs on the control panel will light up. -
Page 16: Listen To Specified Song
Korg Original (M. Tem- F. Chopin: Fantasie- lune pia): Jumper Impromptu Op.66 E.PIANO 2 Korg Original (M. Tem- Korg Original (M. Tem- J.S. Bach: Prelude in C pia): Lullaby for a Little pia): All the Ones You major (from Das Wohl- Star Don’t Know... -
Page 17: Adjusting Tempo Of Demo Songs
Button Bank 1 (1-10) Bank 2 (11-20) Bank 3 (21-30) VIBES F. Chopin: Etude Op.10, Korg Original (M. Tem- R. Schumann: Trauma- /GUITAR no.3 pia): Jazz in Spain rei, Op.15, no.7 ORGAN 1 W.A. Mozart: A la turque Korg Original (M. Tem- F. -
Page 18: Basic Functions
CHAPTER Basic functions Playing a single sound (Single mode) You can select a sound from the thirty sounds supplied with the instrument. Press one of the sound selection buttons in order to select a sound. The LED on the button you pressed will light. Use the BANK button to select one of the three available banks (1-10, 11-20, 21- 30). -
Page 19: Choosing The Reverb And The Chorus
Data Dump function (see “MIDI Data Dump” on page 30). Choosing the reverb and the chorus The SP-300 has two effects: reverb and chorus. The reverb simulates the sound reverberation in a room, while the chorus simulates a modulating effect that makes the sounds richer. -
Page 20: The Damper Pedal
The supplied pedal can be used as a damper pedal. If you connect to the DAMPER jack a Korg DS1H pedal (optional), you can use the half-pedalling, with a gradual resonance effect depending on the depth of the pedal pressure. - Page 21 Adjusting the metronome volume. While the metronome is playing, keep the METRONOME button pressed and repeatedly press the STRINGS/PAD button (or the B5 key) to lower the volume, or the CHOIR button (or the C6 key) to raise it. To reset the volume, simultaneously press the STRINGS/PAD and CHOIR buttons (or the B5 and C6 keys on the keyboard) while holding the METRONOME button.
- Page 22 Selecting the time signature. You can add an accent to the first beat of a mea- sure. Button Time signature PIANO 1 2 movements (2/4, 2/8...) PIANO 2 3 movements (3/4, 3/8...) E.PIANO 1 4 movements (4/4, 4/8...) E.PIANO 2 6 movements (6/4, 6/8...) While the metronome is working, keep the METRONOME button pressed and press the button that corresponds to the time signature you wish to use (see table...
-
Page 23: Other Functions
CHAPTER Other functions Touch settings The keyboard sensitivity, or touch, can be programmed. Strong ÿ Light Keep the TOUCH button pressed, and press the appropriate button to select one of the available touch settings. Note Standard loudness Heavy Button Touch sensitivity Soft Strong Soft... -
Page 24: Transpose
C7 key. The TRANSPOSE/FUNCTION LED will turn off. Fine tuning In order to adapt the SP-300 pitch to that of another instrument, you can adjust the pitch in steps of 0.5 Hz over a range of A4 = 427.5 ~ 452.5 Hz. The standard tuning is A4 = 440 Hz. -
Page 25: Selecting A Temperament
There are numerous classical compositions that were composed using tempera- ments that differ from the “equal temperament” commonly used today.In order to reproduce the original sound of such compositions, the SP-300 provides Kirnberger and Werckmeister classical temperaments, in addition to the equal temperament, allowing you to select from a total of three temperaments. - Page 26 To check the currently selected temperament, hold down the TOUCH button, and look at which of the above LEDs is turned on. Note: When the power is turned on, the equal temperament will be automatically selected. About stretched tuning. In order to produce the most natural resonance, PIANO 1 and PIANO 2 sounds use a “stretched tuning”...
-
Page 27: Midi
SP-300, and use a sequencer to create complex musical pieces. When you use the SP-300 keyboard or pedal, or select a sound, the notes, pedal acti- vation and change in sound are transmitted to another instrument, or are recorded by a sequencer. -
Page 28: Standard Midi Settings
The standard MIDI has 16 separate channels available for transmission and recep- tion of data. SP-300 always receives on all 16 channels, and transmits on a single channel. To transmit data from the SP-300, you need to choose which of the 16 channels you wish to transmit data on. -
Page 29: Using The Sp-300 As A Multitimbral Tone Generator
You can select a different sound on each of the 16 MIDI channels. Use a MIDI cable to connect the SP-300's MIDI IN to the MIDI OUT of a sequencer etc. Transmit MIDI data from the connected sequencer (or other device). See “Program Change”... -
Page 30: Program Change
Note: When the power is turned on, the Local will be automatically set to On. Program Change The sound of the SP-300 can be selected via MIDI, by sending a Program Change message on the channel where you wish to assign the sound. The table enlists the Program Change numbers (numbering from 0-29;... - Page 31 Button Bank Sound Stage E.Piano E.PIANO 1 Club E.Piano Thin E.Piano Digital E.Piano E.PIANO 2 60’s E.Piano Vintage E.Piano Harpsichord HARPSI/CLAV Clav. Wah Clav. Vibraphone VIBES/GUITAR Marimba Acoustic Guitar Jazz Organ 1 ORGAN1 Jazz Organ 2 Jazz Organ 3 Church Organ 1 ORGAN2 Church Organ 2 Church Organ 3...
-
Page 32: Control Change
Control Change message is sent to a con- nected external MIDI device. At the same time, SP-300 can receive a Control Change message from an external MIDI device connected to its MIDI IN, to control the damper pedal, volume adjustment, and other data. - Page 33 You can load into the SP-300 data you previ- ously saved on a data filer. Use a MIDI cable to connect the MIDI IN of the SP-300 to the MIDI OUT of the data filer. On the SP-300, hold down the TRANSPOSE/FUNCTION button and press the VIBES/GUITAR sound selection button.
- Page 34 SP-300. Please read the data filer owner’s manual for details on data transmission. The SP-300 will receive the data. When the data dump is finished, the SP-300 will return to the same status it was before the data dump. During a data dump operation, the SP-300 will not produce sound, and no other function will work.
-
Page 35: Appendix
ON (or turn the instrument off and then on again). Polyphony The SP-300 contains sampled sounds, which have been recorded, analyzed and pro- cessed from the actual sounds of the original musical instruments. These sounds usually consist of one or more different samples reproduced by pressing a key. Each sample is played back by a single oscillator. -
Page 36: Technical Specifications
DC12V, 500mA, center negative barrel, AC adapter; Damper Pedal; Music stand (all included) Options DS 1H - Damper Pedal with half-pedal control, Piano stand Sounds processed with INFINITY™. Korg reserves the right to change the specifications without notice. Chapter 6... -
Page 37: Control Panel Shortcuts
Control panel shortcuts... - Page 39 Piano numérique Mode d’emploi...
- Page 40 PRECAUTIONS AC de la prise secteur et contacter le reven- deur Korg ou le magasin le plus proche. Position de l’instrument L’instrument ne doit jamais être installé : MARQUE CE POUR L’HARMONISA- TION DES STANDARDS EUROPEENS • Aux rayons directs du soleil •...
- Page 41 Les produits KORG sont fabriqués conformément aux plus rigoureuses spécifications en vigueur dans chaque pays. Ces produits sont garantis par le distributeur KORG dans le pays où ils ont été vendus. Le fabricant/distributeur décline toute responsabilité ou garantie envers tout produit KORG vendu démuni de garantie ou de numéro...
- Page 42 Sélectionner le canal de transmission ..........60 Utiliser le SP-300 en tant que générateur de sons multimbres ......61 Local On/Off .
-
Page 43: Introduction
“Stereo Concert Grand Piano”. La fonction Layer permet de jouer deux timbres ensemble. Effets. Le SP-300 est doté d’effets numériques qui simulent une salle de concert (Reverb) et étoffent le timbre (Chorus). Pédale de résonance Damper. La pédale Damper du SP-300 correspond à la pédale de résonance ou “Forte”... - Page 44 Le protocole MIDI permet à deux dispositifs (ou plus) de piloter ou d’être pilotés l’un l’autre ; le SP-300 peut ainsi fonctionner comme un générateur sonore à 16 parties multitimbres. Amplification de puissance intégrée. Le SP-300 est intégré d’un amplificateur de puissance de 15 + 15 Watts et de deux haut-parleurs de 10 cm en boîte Bass...
-
Page 45: Faces Avant Et Arrière
CHAPITRE Faces avant et arrière Face avant 7 7 7 7 1 1 1 1 2 2 2 2 3 3 3 3 4 4 4 4 5 5 5 5 6 6 6 6 8 8 8 8 9 9 9 9 0 0 0 0 1 1 1 1 Curseur MASTER VOLUME : Règle le volume des bornes Output et Phones. -
Page 46: Face Arrière
deux boutons pour jouer deux timbres (mode Layer). 8 8 8 8 Curseur TEMPO : Règle le tempo du métronome. 9 9 9 9 Bouton METRONOME : Active/coupe le clic du métronome. 0 0 0 0 DEMO: Active/coupe le mode Demo, pour reproduire les morceaux de démonstra- tion. - Page 47 être branché à ces bornes. (Avec un système hi-fi, utilisez les bornes AUX ou TAPE et non pas la borne PHONO). Pour amplifier votre SP-300 en mono, branchez-vous à la borne individuelle L/MONO. Pour réglez le volume de sortie, utilisez le curseur MASTER VOLUME.
-
Page 48: A Lire En Premier
Utilisez les bornes OUTPUT pour brancher une table de mixage de qualité élevée, un hi-fi stéréo ou une paire de retours de scène à votre SP-300. Si vous utilisez un hi-fi stéréo, branchez les bornes OUTPUT de l’appareil aux bornes d’entrée AUX ou TAPE de votre SP-300 (ne jamais utiliser les entrées PHONO). -
Page 49: Branchement De Sources Externes
!. Mettre l’instrument sous tension Introduire la fiche DC de l’adaptateur AC fourni dans la borne DC du SP-300 et ensuite connecter la fiche AC à la prise secteur ; appuyer sur l’interrupteur POWER. Lorsque l’instrument est sous tension, les témoins du tableau de commande s’allu- ment. - Page 50 Korg Original (M. Tem- F. Chopin: Fantasie- lune pia): Jumper Impromptu Op.66 E.PIANO 2 Korg Original (M. Tem- Korg Original (M. Tem- J.S. Bach: Prelude in C pia): Lullaby for a Little pia): All the Ones You major (from Das Wohl- Star Don’t Know...
- Page 51 Bouton Banque1 (1-10) Banque 2 (11-20) Banque 3 (21-30) HARPSI L. van Beethoven: Für J.S. Bach: Italian Con- Korg Original (M. Tem- /CLAV Elise cert pia): Rubber Bob VIBES F. Chopin: Etude Op.10, Korg Original (M. Tem- R. Schumann: Trauma- /GUITAR no.3...
-
Page 52: Fonctions De Base
CHAPITRE Fonctions de base Jouer un timbre (mode Single) Sélectionner l’un des trente timbres à disposition. Appuyez sur l’un des boutons de sélection des timbres. Le témoin du bouton enfoncé s’allume. Appuyez sur le bouton BANK pour sélectionner l’une des trois banques disponibles (1-10, 11-20, 21-30). -
Page 53: Choisir Les Effets De Réverbération Et De Chorus
Dump” on page 65). Choisir les effets de réverbération et de chorus Le SP-300 est doté de deux effets : réverbération et chorus. La réverbération simule la réflexion du son dans une salle, tandis que le chorus simule un effet modulant qui étoffe le son. -
Page 54: La Pédale De Résonance (Damper)
Lorsque la pédale est ainsi affectée au(x) timbre(s) désiré(s), relâchez le bouton TRANSPOSE/FUNCTION. Le métronome Le SP-300 est doté d’un métronome qui vous permet de régler le tempo lorsque vous vous exercez. Chapitre 3... - Page 55 Lancer et arrêter le métronome. Appuyez sur METRONOME pour lancer le métronome ou l’arrêter. Lors de la mise sous tension de l’instrument, le métronome est réglé en fonction de la position du curseur, mais vous pouvez le régler à votre gré...
- Page 56 Par exemple, pour saisir la valeur 168, enfoncez le bouton METRONOME et appuyez sur Do#5 (1), Fa#5 (6), Sol#5 (8). Pour saisir une valeur de 85, enfoncez le bouton METRONOME et appuyez sur Do5 (0), Sol#5 (8), Fa5 (5). Sélectionner la “time signature”. Cette fonction permet d’accentuer le premier battement de la mesure.
-
Page 57: Fonctions Diverses
CHAPITRE Fonctions diverses Réglage du toucher Vous pouvez régler la sensibilité du clavier ou réponse au Strong ÿ Light toucher. Maintenez enfoncé le bouton TOUCH et appuyez sur le bouton correspondant au réglage de dynamique sou- Note Standard loudness haité. Heavy Soft Bouton... -
Page 58: Fonction Transpose
Bouton Toucher Normal. Toucher normal d’un piano. Ré4 Lourd. Les notes graves ne sont reproduites que si l’on joue très fort. Fonction Transpose Parfois, la clé d’écriture d’un morceau est particulièrement difficile (par ex. beau- coup de bémols) ou vous désirez modifier la hauteur pour insérer un autre instru- ment ou voix. -
Page 59: Accordage Fin
Accordage fin Pour adapter la hauteur de votre SP-300 à celle d’un autre instrument, vous pouvez la régler par pas de 0.5 Hz, dans la plage La4 = 427.5 ~ 452.5 Hz. L’accordage stan- dard correspond à La4 = 440 Hz. - Page 60 Bouton Tempérament VIBES/GUITAR Kirnberger. C’est la gamme Kirnberger III inventée par Johann Phillip Kir- è nberger au début du XVIII siècle, pour clavecins. Les deux Tempérament égal. C’est la gamme normalement utilisée de nos jours témoins éteints dans le monde occidental, caractérisée par un intervalle égal entre tous les 12 demi-tons.
-
Page 61: Midi
SP-300, ainsi que d’utiliser un séquenceur pour composer des morceaux musicaux complexes. Lorsque vous jouez sur le clavier de votre SP-300, ou vous appuyez sur la pédale, ou vous sélectionnez un timbre, les notes, l’activation de la pédale et le changement de timbres sont transmis à... -
Page 62: Réglages Midi Standards
IN de l’ordinateur. Connectez la borne MIDI IN de votre SP-300 à la borne MIDI OUT de l’ordinateur. SP-300 rear panel MIDI keyboard MIDI OUT MIDI IN MIDI sound module Réglages MIDI standards Lors de la mise sous tension de l’instrument, les paramètres MIDI de votre SP-300 sont réglés comme suit :... -
Page 63: Utiliser Le Sp-300 En Tant Que Générateur De Sons Multimbres
à 16 parties. Vous pouvez sélectionner un timbre différent sur chacun des 16 canaux MIDI. Utilisez un câble MIDI pour connecter la borne MIDI IN de votre SP-300 à la borne MIDI OUT d’un séquenceur, etc. -
Page 64: Program Change
OUT de votre SP-300 MIDI OUT, pour changer ses timbres. Si vous sélectionnez l’un des sons internes du SP-300 en appuyant sur l’un des boutons de sélection des timbres, un numéro de Program Change MIDI sera transmis, comme indiqué dans le tableau. - Page 65 Uniquement les numéros de Program Change (PC) compris dans la plage 0–29 sont reconnus par le SP-300, tandis que les autres numéros (30-127) sont ignorés. Bouton Banque Timbre Grand Piano 1 PIANO 1 Bright Piano Grand Piano 2 Classic Grand Piano...
-
Page 66: Control Change
Layer, ou que vous effectuez un réglage sur le tableau de commande, un mes- sage de Control Change (Changement de Contrôle) est envoyé au dispositif MIDI externe connecté. De même, votre SP-300 reçoit les messages de Control Change transmis par un dispositif MIDI connecté à sa borne MIDI IN, qui pilote ainsi la pédale Damper, le réglage du volume et des réglages divers. -
Page 67: Midi Data Dump
Pour sauvegarder les données de votre SP-300, procédez comme suit : A l’aide d’un câble MIDI, connectez la borne MIDI OUT de votre SP-300 à la borne MIDI IN du “data filer”. Prédisposez le “data filer” à la réception des données MIDI. - Page 68 Les données précé- demment sauvegardées sur un “data filer” peuvent être rechargées sur votre SP-300. A l’aide d’un câble MIDI, connectez la borne MIDI IN de votre SP-300 à la borne MIDI OUT du “data filer”. Sur le SP-300, maintenez enfoncé le bouton TRANSPOSE/FUNCTION et appuyez sur le bouton de sélection de timbres VIBES/GUITAR.
-
Page 69: Appendice
Si lors de l’utilisation vous détectez les problèmes décrits, examinez l’instrument pour comprendre le problème et essayez de le résoudre en recourant aux conseils proposés. Si l’instrument continue à ne pas fonctionner correctement, adressez-vous à votre revendeur de confiance ou au Centre d’Assistance Agréé Korg le plus pro- che. Problème... - Page 70 excède la limite du son, certaines notes sont “stoppées” et les nouvelles notes ne sont pas reproduites. Par conséquent, en jouant plus de deux notes en mode Layer, la polyphonie maxi- mum dépend du nombre d’oscillateurs utilisés au total. Si en plus vous appliquez un REVERB ou un CHORUS, la polyphonie est ultérieurement réduite, respectivement de 10 et de 3 notes.
-
Page 71: Spécifications Techniques
DC12V, 500mA, pôle négatif au centre, adaptateur AC ; Pédale Damper ; Pupitre (tous fournis) Options DS 1H - Pédale Damper avec mi-pédale de contrôle, Piano stand Sons élaborés avec INFINITY™. Korg se réserve le droit de modifier les spécifications sans préavis. Appendice... - Page 73 Digital-Piano Bedienungsanleitung...
- Page 74 Sollte dies dennoch einmal geschehen, ziehen • In direktem Sonnenlicht Sie sofort den Stecker aus der Steckdose und wenden Sie sich an Ihren Korg Händler, bei • bei hohen Temperaturen oder hoher Luft- dem Sie das Instrument gekauft haben. feuchtigkeit •...
- Page 75 Wenden Sie sich zwecks Kundendienstleistungen bitte an das nächste KORG Kundendienstzen- trum. Ausführliche Informationen über KORG Produkte sowie über Software und Zubehör für Ihr Klavier erhalten Sie bei Ihrem KORG Händ- ler. KORG IM INTERNET Home page Korg Deutschland.: www.korg.de Home page Korg Inc.: www.korg.co.jp...
- Page 76 SP-300 als multitimbraler Tongenerator ........
-
Page 77: Einführung
Stereo-Konzertflügelklang. Sie können die Layer Funktion zum gleichzeiti- gen Spielen von zwei Klängen nutzen. Effekte. Das SP-300 besitzt eingebaute, digitale Effekte, die die Klangeigenschaften einer Konzerthalle (Reverb) nachahmen und den Klang voller machen (Chorus). Damper Pedal-Simulation. Das Damper-Pedal des SP-300 entspricht dem Damper- oder Forte-Pedal eines akustischen Klaviers. - Page 78 Leistungsstarke integrierte Verstärkeranlage. Das SP-300 besitzt einen leis- tungsstarken, 15 + 15 Watt Verstärker mit zwei Bass Reflex Lautsprechern. Audio Ausgänge. Über die Audio-Ausgänge ist ein direkter Anschluss an eine externe Mono- oder Stereo Audioquelle ohne Verwendung eines Mixers möglich.
-
Page 79: Paneele
KAPITEL Paneele Vorderseite 7 7 7 7 1 1 1 1 2 2 2 2 3 3 3 3 4 4 4 4 5 5 5 5 6 6 6 6 8 8 8 8 9 9 9 9 0 0 0 0 1 1 1 1 MASTER VOLUME Schieberegler: Regelt die Lautstärke an den Ausgängen und Kopfhörerbuchsen. -
Page 80: Rückseite
6 6 6 6 BANK Taster: Selektiert eine der 3 verfügbaren Klangbänke. 7 7 7 7 SOUND SELECTION Taster: Drücken Sie einen Taster zur Selektion eines Klangs (Single Modus). Sie können auch zwei Taster gleichzeitig drücken, wenn Sie zwei Klänge zur selben Zeit auf der Tastatur spielen wollen (Layer Modus). 8 8 8 8 TEMPO Schieberegler: Dient zur Regelung des Metronom Tempos. - Page 81 Buchse, sondern die AUX oder TAPE Buchsen zu verwenden). Zur Mono- Verstärkung des SP-300 ist die Einzelbuchse L/MONO zu benutzen. Mit dem MASTER VOLUME Schieberegler wird die Ausgangslautstärke reguliert. 7 7 7 7 PHONES Buchsen: Schließen Sie an diese Buchsen ein oder zwei Paar Kopfhörer 8 8 8 8 DC IN 21V 1A-Buchse: Schließen Sie den mitgelieferten Wechselstrom-Adapter...
-
Page 82: Bevor Sie Beginnen
KAPITEL Bevor Sie beginnen Anschluss an einen externen Verstärker Zur Verstärkung schließen Sie die OUTPUT Ausgänge Ihres SP-300 an einen hoch- wertigen Mixer, eine Stereo-HiFi-Anlage oder aktive Bühnenlautsprecher an. Wenn Sie ein Stereo-HiFi benutzen, schließen Sie die OUTPUT Ausgänge an die AUX oder TAPE Eingänge an (benutzen Sie keinesfalls die PHONO Eingänge). -
Page 83: Anschluss Von Externen Quellen
Instrument einschalten Stecken Sie den Gleichstromstecker des mitgelieferten Ws-Adapters in die Gs- Buchse des SP-300. Schließen Sie dann den Ws-Stecker in die Wandsteckdose ein und drücken Sie den POWER Schalter. Wenn das Instrument eingeschaltet ist, leuchten die LEDs des Bedienfeldes auf. Zum Ausschalten des Instruments drücken Sie erneut den POWER Schalter. - Page 84 Nach Beendigung der Wiedergabe des selektierten Song werden alle übrigen Songs der selektierten Bank zyklisch abgespielt. Taster Bank 1 (1-10) Bank 2 (11-20) Bank 3 (21-30) PIANO 1 F. Mendelssohn-Bar- Korg Original (M. Tem- C.A. Debussy: tholdy: Prelude Op.104a, pia): Reflection Arabesque no.1 no.2 PIANO 2 F. Chopin: Nocturne S.
- Page 85 Taster Bank 1 (1-10) Bank 2 (11-20) Bank 3 (21-30) E.PIANO 2 Korg Original (M. Tem- Korg Original (M. Tem- J.S. Bach: Prelude in C pia): Lullaby for a Little pia): All the Ones You major (from Das Wohl- Star Don’t Know...
-
Page 86: Basisfunktionen
KAPITEL Basisfunktionen Mit nur einem Klang spielen (Single Modus) Sie können einen der dreißig im Instrument enthaltenen Klänge auswählen. Drücken Sie einen der Klangauswahltaster, um einen Klang zu selektieren. Die LED des Tasters schaltet sich ein. Mit dem BANK Taster selektieren Sie eine der drei verfügbaren Bänke (1-10, 11- 20, 21-30). -
Page 87: Hall- Und Chorus-Effekt Wählen
(siehe “MIDI Data Dump” on page 100). Hall- und Chorus-Effekt wählen Das SP-300 besitzt zwei Effekte: Hall und Chorus. Der Halleffekt ahmt die Klange- igenschaften eines Raumes nach, während Chorus einen Modulationseffekt nach- ahmt, der den Klang voller macht. Diese Effekteinstellungen bleiben auch dann erhalten, wenn ein anderer Klang selektiert wird. -
Page 88: Das Damper Pedal
CHORUS Taster. Die LED des Tasters schaltet sich aus. Das Damper Pedal Das mitgelieferte Damper-Pedal kann wie ein Lautstärkepedal benutzt werden. Wenn ein Korg DS1H Pedal (Option) an die DAMPER Buchse anschließen, können Sie das Half-Damper-Effekt nutzen, wobei je nach aufgebrachtem Druck ein gradu- eller Resonanzeffekt erzielt wird. -
Page 89: Das Metronom
Das Metronom Das SP-300 besitzt ein eingebautes Metronom, mit dem das Tempo beim Üben vor- gegeben werden kann. Metronom starten und stoppen. Drücken Sie den METRONOME Taster, um das Metronom zu starten oder zu stoppen. Beim Einschalten ist das Metronom ent- sprechend der Schieberegler-Position eingestellt. - Page 90 Benutzen Sie die Tastatur, um den dreistelligen Tempowert einzugeben (bei zwei- stelligen Werten ist eine “0” voranzustellen). Taste Nummer Taste Nummer Um beispielsweise den Tempowert 168 einzustellen, halten Sie den METRONOME Taster gedrückt und drücken Sie gleichzeitig die Tasten C#5 (1), F#5 (6), G#5 (8). Zur Einstellung des Tempowertes 85 halten Sie den METRONOME Taster gedrückt und drücken gleichzeitig die Tasten C5 (0), G#5 (8), F5 (5).
- Page 91 Halten Sie den METRONOME Taster bei laufendem Metronom gedrückt und drük- ken Sie gleichzeitig den VIBES/GUITAR Klangauswahltaster. Die LED des Tasters leuchtet auf und ein Glockenklang ertönt bei jeder ersten Viertelnote eines Taktes. Um wieder zur normalen Betonung zurückzukehren, halten Sie den METRONOME Taster gedrückt und drücken gleichzeitig den HARPSI/CLAV Klangauswahltaster, so dass sich die LED des HARPSI/CLAV Tasters einschaltet.
-
Page 92: Weitere Funktionen
KAPITEL Weitere Funktionen Einstellung des Anschlags Die Anschlagempfindlichkeit der Tastatur kann unter- Strong ÿ Light schiedlich eingestellt werden. Halten Sie den TOUCH Taster gedrückt und drücken Sie gleichzeitig den entspre- Note Standard loudness chenden Taster zur Einstellung der gewünschten Anschlag- Heavy empfindlichkeit. -
Page 93: Transponierung
Taste Anschlagempfindlichkeit Leicht. Selbst bei leichtem Anschlag können laute Noten gespielt werden. Normal. Normaler Klavieranschlag. Schwer. Nur bei sehr starkem Anschlag werden laute Noten gespielt. Transponierung Bisweilen kommt es vor, dass Stücke in einer schwierig zu spielenden Tonart geschrieben sind (z.B. mit vielen schwarzen Tasten) oder die Tonhöhe zur Abstim- mung auf ein anderes Instrument oder einen Sänger verändert werden muss. -
Page 94: Feinstimmung
TRANSPOSE/FUNCTION Tasters erlischt. Feinstimmung Um die Stimmung des SP-300 der eines anderen Instruments anzupassen, können Sie die Stimmung in Intervallen von 0.5 Hz im Bereich von A4 = 427.5 ~ 452.5 Hz einstellen. Die Standardstimmung ist A4 = 440 Hz. - Page 95 ger und Werckmeister, so dass Sie aus insgesamt drei Stimmungen die jeweils am besten geeignete auswählen können. Zur Einstellung der gewünschten Stimmung halten Sie den TOUCH Taster gedrückt und drücken gleichzeitig den Taster, der der zu selektierenden Stimmung entspricht. Um zur wohltemperierten Stimmung zurückzukehren halten Sie den TOUCH Taster gedrückt und drücken gleichzeitig den Klangauswahltaster, dessen LED eingeschal- tet ist.
-
Page 96: Midi
Instrumente zur Steuerung des SP-300 einsetzen und einen Sequenzer zur Kreation komplexer Musikstücke benutzen. Wenn Sie die Tastatur oder das Pedal des SP-300 benutzen oder einen Klang selek- tieren, werden die Noten, die Pedalaktivierung und die Klangänderungen an ein anderes Instrument übertragen oder von einem Sequenzer aufgenommen. -
Page 97: Standard Midi Einstellungen
MIDI IN Buchse des Computers und die MIDI IN Buchse des SP-300 an die MIDI OUT Buchse des Computers an. SP-300 rear panel MIDI keyboard MIDI OUT MIDI IN MIDI sound module Standard MIDI Einstellungen Beim Einschalten des Instruments sind die MIDI Parameter des SP-300 wie folgt... -
Page 98: Sp-300 Als Multitimbraler Tongenerator
Tongenerator verwendet werden. Sie können auf jedem der 16 MIDI Kanäle einen anderen Klang wählen. Schließen Sie die MIDI In Buchse des SP-300 mit einem MIDI Kabel an die MIDI OUT Buchse eines Sequenzers o.ä. an. Übertragen Sie MIDI Daten vom angeschlossenen Sequenzer (oder einem anderen Gerät). -
Page 99: Program Change
Program Change Befehle übertragen. Sie können einen MIDI Program Change Befehl an ein MIDI Gerät übertragen, das an die MIDI OUT Buchse des SP-300 angeschlossen ist, um dessen Klang zu ändern. Wenn Sie einen der internen Klänge des SP-300 mit den Klangauswahltastern selektieren, wird eine entsprechende MIDI Program Change Nummer übertragen, wie aus der nachstehenden Tabelle zu... - Page 100 Change (PC) Nummern zwischen 0 und 29 werden vom SP-300 berücksich- tigt. Taster Bank Klang Grand Piano 1 PIANO 1 Bright Piano Grand Piano 2 Classic Grand Piano PIANO 2 Honky-Tonky E.Grand Piano Stage E.Piano E.PIANO 1 Club E.Piano Thin E.Piano...
-
Page 101: Control Change
Einstellungen auf dem Bedienfeld vornehmen, wird ein entsprechender Control Change Befehl an ein externes MIDI Gerät gesen- det. In gleicher Weise kann das SP-300 Control Change Befehle von einem externen MIDI Gerät empfangen, das an der MIDI IN Buchse des Instruments angeschlossen ist, um das Lautstärkepedal zu steuern und Lautstärke- oder sonstige Regulierungen... -
Page 102: Midi Data Dump
Daten im Datafiler speichern. So können Sie die Daten Ihres SP-300 speichern. Schließen Sie die MIDI OUT Buchse des SP-300 mit einem MIDI Kabel an die MIDI IN Buchse des Datafiler an. Stellen Sie den Datafiler auf den Empfang von MIDI Daten ein. - Page 103 Die zuvor im Datafiler gespeicherten Daten können wieder ins SP-300 geladen werden. Schließen Sie die MIDI IN Buchse des SP-300 mit einem MIDI Kabel an die MIDI OUT Buchse des Datafiler an. Halten Sie den TRANSPOSE/FUNCTION Taster des SP-300 gedrückt und drücken Sie gleichzeitig den VIBES/GUITAR Klangauswahltaster.
-
Page 104: Anhang
(oder schalten Sie das Instrument aus und anschließend wieder ein). Polyphonie Das SP-300 enthält gesampelte Klänge, die durch Aufnahme, Analyse und Bearbe- itung der Klänge von Original-Musikinstrumenten entstehen. Diese Klänge beste- hen normalerweise aus einem oder mehreren unterschiedlichen Klängen, die durch Anschlagen einer Taste wiedergegeben werden. - Page 105 haben eine begrenztere Polyphonie. Wenn die Anzahl der Noten die Klanggrenze überschreitet, werden manche Noten unterbrochen, damit neue erklingen können. Wenn Sie im Layer Modus mit mehr als zwei Noten spielen, hängt die maximale Polyphonie davon ab, wieviele Oszillatoren insgesamt verwendet werden. Bei Ver- wendung der Funktionen REVERB und CHORUS vermindert sich die Polyphonie zusätzlich um 10 bzw.
-
Page 106: Technische Daten
Zubehör Gs12V, 500mA, Minuspol in der Mitte, Ws-Adapter; Damper Pedal; Notenständer (alles im Lieferumfang enthalten) Sonderaustattung DS 1H - Damper Pedal mit Halbpedalregler, Piano stand Klangerzeugung mittels INFINITY Korg behält sich das Recht auf Änderungen ohne Vorankündigung vor. Kapitel 6... -
Page 107: Bedienfeld-Kurzbefehle
Bedienfeld-Kurzbefehle... - Page 109 Pianoforte Digitale Manuale di istruzioni...
- Page 110 (quali benzene o diluenti), solventi organici o GARANZIA liquidi infiammabili. Conservate questo manuale I prodotti Korg sono costruiti in accordo alle più rigorose normative elettriche e meccaniche in Dopo la lettura, conservate il manuale per ulte- vigore in vari paesi del mondo. Questi prodotti riori consultazioni.
- Page 111 KORG SU INTERNET Home page Korg Inc.: “http://www.korg.co.jp” Home page Korg Italy: “http://www.korg.it” Home page Korg USA: “http://www.korg.com” CONSERVAZIONE DEI DATI Allo spegnimento dello strumento, tutti i parame- tri vengono riportati alla condizione iniziale. © 2002 Korg Italy S.p.A. Stampato in Italia.
- Page 112 Selezionare il canale di trasmissione ..........130 Usare SP-300 come generatore sonoro multitimbrico ....... 131 Local On/Off .
-
Page 113: Caratteristiche Principali
La funzione Layer permette di suonare insieme due suoni. Effetti. SP-300 include due processori di effetti digitali, che permettono di simulare il riverbero naturale di una sala da concerto (Reverb) e aggiungere spessore al suono (Chorus). - Page 114 MIDI. SP-300 è compatibile con il protocollo MIDI, lo standard che permette di col- legare strumenti musicali diversi e computer. Il MIDI permette a due o più disposi- tivi di controllare od essere controllati, e permette di usare l’SP-300 come generatore sonoro multitimbrico a 16 parti.
-
Page 115: Pannello Frontale
CAPITOLO Prospetti Pannello frontale 7 7 7 7 1 1 1 1 2 2 2 2 3 3 3 3 4 4 4 4 5 5 5 5 6 6 6 6 8 8 8 8 9 9 9 9 0 0 0 0 1 1 1 1 Cursore MASTER VOLUME: Regola il volume delle uscite audio (Output) e delle cuffie (Phones). -
Page 116: Pannello Posteriore
7 7 7 7 Tasti di SELEZIONE SUONI: Premete uno di questi tasti per selezionare un suono (modo Single). Potete premere insieme due tasti, per suonare due suoni allo stesso tempo (modo Layer). 8 8 8 8 Cursore TEMPO: Regola il tempo del metronomo. 9 9 9 9 Tasto METRONOME: Attiva/disattiva il metronomo. - Page 117 6 6 6 6 Connettori OUTPUT (L/MONO, R): Uscite audio. Collegate questi connettori ad un sistema di amplificazione. (Nel caso di impianti hi-fi, usate gli ingressi AUX o TAPE, e non l’ingresso PHONO). Per prelevare il segnale audio dell’SP-300 in mono, collegare solo il connettore L/MONO. Usate il cursore MASTER VOLUME per regolare il volume di uscita.
-
Page 118: Prima Di Iniziare
Collegare lo strumento ad un sistema di amplificazione esterno Se desiderate amplificare SP-300 con un sistema di amplificazione esterno, colle- gate le prese OUTPUT agli ingressi di un mixer, di un impianto hi-fi, o di diffusori amplificati di alta qualità. In un impianto hi-fi usate le prese AUX o TAPE (e non la presa PHONO). -
Page 119: Collegare Una Sorgente Audio Esterna
Nota: È sempre meglio accendere lo strumento con un volume basso e poi aumen- tare il volume gradualmente. Ascoltare i brani dimostrativi SP-300 contiene 30 brani dimostrativi preregistrati. Ascoltateli per rendervi conto della ricchezza timbrica e delle potenzialità espressive dello strumento. Ascoltare tutti i brani. - Page 120 Korg Original (M. Tem- F. Chopin: Fantasie- lune pia): Jumper Impromptu Op.66 E.PIANO 2 Korg Original (M. Tem- Korg Original (M. Tem- J.S. Bach: Prelude in C pia): Lullaby for a Little pia): All the Ones You major (from Das Wohl- Star Don’t Know...
- Page 121 Tasto Banco 1 (1-10) Banco (11-20) Banco 3 (21-30) HARPSI L. van Beethoven: Für J.S. Bach: Italian Con- Korg Original (M. Tem- /CLAV Elise cert pia): Rubber Bob VIBES F. Chopin: Etude Op.10, Korg Original (M. Tem- R. Schumann: Trauma- /GUITAR no.3...
-
Page 122: Operazioni Di Base
CAPITOLO Operazioni di base Selezionare un solo suono (modo Single) Potete selezionare uno dei trenta suoni contenuti nello strumento. Premete uno dei tasti di selezione suoni per selezionare uno dei suoni. L’indicatore luminoso del tasto premuto si accende. Usate il tasto BANK per selezionare uno dei tre banchi disponibili (1-10, 11-20, 21- 30). -
Page 123: Scegliere Il Riverbero E Il Chorus
134). Scegliere il riverbero e il chorus SP-300 ha due effetti: riverbero e chorus. Il riverbero simula l’effetto di riverbera- zione del suono in una stanza, mentre il chorus riproduce un effetto di modulazione che rende il suono più ricco. -
Page 124: Il Pedale Di Risonanza
Una volta assegnato il pedale al suono o ai suoni desiderati, rilasciate il tasto TRANSPOSE/FUNCTION. Il metronomo SP-300 incorpora un metronomo, con il quale si può battere il tempo quando si stu- dia un pezzo. Attivare e disattivare il metronomo. - Page 125 diverso con la procedura descritta più avanti. Dopo aver ascoltato i brani dimostra- tivi, il tempo è quello dell’ultimo brano ascoltato. Regolare il volume del metronomo. Mentre il metronomo sta suonando, tenete premuto il tasto METRONOME e premete ripetutamente il tasto STRINGS/PAD (o la nota B5) per ridurre il volume, oppure il tasto CHOIR (o la nota C6) per aumen- tarlo.
- Page 126 tempo di 85, tenete premuto il tasto METRONOME, poi premete C5 (0), G#5 (8), F5 (5). Selezionare una segnatura metrica. Potete sottolineare il primo movimento della battuta con un accento. Tasto Segnatura metrica PIANO 1 2 movimenti (2/4, 2/8...) PIANO 2 3 movimenti (3/4, 3/8...) E.PIANO 1 4 movimenti (4/4, 4/8...)
-
Page 127: Altre Funzioni
CAPITOLO Altre funzioni Regolazione del tocco Potete regolare la risposta della tastiera al tocco. Tenete premuto il tasto TOUCH e premete il tasto corrispondete Forte alla regolazione desiderata. Leggero Volume Normale della nota Tasto Regolazione del tocco Duro PIANO 1/L Leggero. - Page 128 Tasto Regolazione del tocco Normale. Normale curva di dinamica del pianoforte. Duro. È possibile produrre note a volume elevato solo suonando molto forte. Trasposizione Può accadere che il brano da eseguire sia scritto in una tonalità complessa (che usa, cioè, molti tasti neri), o che desideriate cambiarne l’intonazione per renderlo più adatto ad un altro strumento o alla voce del cantante.
-
Page 129: Selezione Di Un Temperamento
Intonazione fine Per adeguare l’intonazione di SP-300 a quella di un altro strumento, potete regolare l’intonazione in passi di 0,5 Hz, nell’ambito di A4 = 427,5 ~ 452,5 Hz. L’intona- zione standard è A4 = 440 Hz. Nota: All’accensione dello strumento, l’intonazione viene riportata automatica- mente all’intonazione standard (A4 = 440 Hz). - Page 130 Tasto Temperamento VIBES/GUITAR Kirnberger. Si tratta della scala Kirnberger III ideata da Johann Phillip Kirnberger all’inizio del XVIII secolo, usata soprattutto per l’accordatura del clavicembalo. Entrambi gli indi- Temperamento equabile. Quasi tutti gli strumenti a tastiera dei nostri catori luminosi giorni seguono questa accordatura, in cui tutti i semitoni sono uguali, ed spenti è...
-
Page 131: Che Cos'è Il Midi
SP-300, usare un sequencer per creare complessi brani musi- cali. Quando si usano la tastiera e il pedale di SP-300, o si seleziona un suono, le note, l’attivazione del pedale e i cambi di suono vengono inviati ad un altro strumento, o vengono registrati da un sequencer. -
Page 132: Impostazioni Standard Del Midi
Lo standard MIDI prevede 16 canali separati per la trasmissione e la ricezione dei dati. SP-300 riceve sempre su tutti e 16 i canali, e trasmette su un solo canale. Per trasmettere dati da SP-300, occorre selezionare uno dei 16 canali su cui trasmettere i dati. -
Page 133: Usare Sp-300 Come Generatore Sonoro Multitimbrico
MIDI. Va scelto anche quando SP-300 è collegato ad un sequen- cer sia attraverso il MIDI IN che il MIDI OUT. Se non si ponesse SP-300 in Local Off, le note già suonate dalla tastiera verrebbero rispedite ad SP-100 dal sequencer, creando un fastidioso effetto di eco. - Page 134 MIDI di Program Change ad un dispositivo MIDI col- legato al MIDI OUT di SP-300. Quando si seleziona uno dei suoni interni di SP-300 mediante i tasti di selezione suoni, viene trasmesso un messaggio MIDI di Program Change, come mostrato nella seguente tabella.
- Page 135 Tasto Banco Suono Digital E.Piano E.PIANO 2 60’s E.Piano Vintage E.Piano Harpsichord HARPSI/CLAV Clav. Wah Clav. Vibraphone VIBES/GUITAR Marimba Acoustic Guitar Jazz Organ 1 ORGAN1 Jazz Organ 2 Jazz Organ 3 Church Organ 1 ORGAN2 Church Organ 2 Church Organ 3 Strings STRINGS/PAD Slow Strings...
- Page 136 Potete salvare le impostazioni personali dei suoni (nei modi Single o Layer) su un dispositivo di memorizzazione MIDI esterno, come un sequencer o un MIDI data filer. In seguito, potrete ricaricare questi dati in SP-300, per recuperare una serie di dati memorizzati.
- Page 137 Salvataggio dei dati nel data filer. Ecco come salvare i dati di SP-300. Usate un cavo MIDI per collegare il MIDI OUT di SP-300 al MIDI IN del data filer. Preparate il data filer per ricevere dati MIDI. In SP-300, tenete premuto il tasto TRANSPOSE/FUNCTION, e premete il tasto di selezione suoni VIBES/GUITAR.
- Page 138 Durante l’operazione di data dump, non è possibile suonare SP-300 o attivare altre funzioni. Al termine del data dump, si ritorna al funzionamento normale. Potete interrompere un’operazione di data dump prima del suo avvio, premendo il tasto TRANSPOSE/FUNCTION o il tasto VIBES/GUITAR.
-
Page 139: Soluzione Dei Problemi
Polifonia SP-300 contiene suoni campionati, cioè registrati dal suono degli strumenti musicali reali, successivamente elaborato. Questi suoni possono essere costituiti uno o più campioni diversi che vengono riprodotti quando si preme un tasto. I suoni costituiti da un solo campione hanno una polifonia massima di 60 voci, mentre i suoni costi- tuiti da due campioni hanno una polifonia limitata ad un massimo di 30 note. -
Page 140: Notazione Inglese E Notazione Italiana
Inoltre, quando si suonano più di due note in modo Layer, la polifonia massima dipende dal numero totale di suoni campionati che costituiscono i suoni utilizzati. L’uso di REVERB e CHORUS riduce ulteriormente la polifonia, rispettivamente, di 10 e 3 note. Notazione inglese e notazione italiana Nel testo vengono usati i nomi inglesi per le note della scala musicale. - Page 141 Alimentatore AC, DC12V, 500mA, polo negativo al centro; Pedale Damper; Leggio (tutti forniti di serie) Opzioni DS 1H - Pedale Damper con controllo del mezzo-pedale; Supporto per piano Suoni elaborati con INFINITY™. Korg si riserva il diritto di cambiare le specifiche senza preavviso. Appendice...
-
Page 143: Midi Implementation Chart
MIDI Implementation Chart KORG SP-300 Digital Piano June 01, 2002 Function Transmitted Recognized Remarks Default Basic Channel Changed 1–16 1-16 Default Mode Messages Altered ****************** 15–113 0–127 Note Number: True Voice ****************** 21–108 Note On O 9n, V=1–127 O 9n, V=1–127... - Page 145 Care Card Garantie...
- Page 154 Address KORG ITALY Spa Via Cagiata, 85 I-60027 Osimo (An) Italy Web servers www.korg.co.jp www.korg.com www.jam-ind.com www.korgfr.net www.korg.de www.korg.it PART NUMBER: MAN0001083 © KORG Italy 2002. All rights reserved...
Need help?
Do you have a question about the SP-300 and is the answer not in the manual?
Questions and answers