Table of Contents
Advertisement
PORTABLE MINIDISC
RECORDER
MODEL
MD-MT290H
OPERATION MANUAL
If you require any advice or assistance regarding
your Sharp product, please visit our web-site
www.sharp.co.uk/customersupport.
Customers without Internet access may telephone
08705 274277 during office hours (or (01) 676 0648
if telephoning from Ireland).
Thank you for purchasing this SHARP product.
For the best performance, read this manual carefully.
It will guide you in operating your SHARP product.
P L
U G
P O
W
IN
E R
0101
TINSE0504AWZZ
E
02M N AO 1
Advertisement
Table of Contents

Related Manuals for Sharp MD-MT290H


Summary of Contents for Sharp MD-MT290H
- Page 1 Thank you for purchasing this SHARP product. PORTABLE MINIDISC For the best performance, read this manual carefully. RECORDER It will guide you in operating your SHARP product. MODEL MD-MT290H OPERATION MANUAL If you require any advice or assistance regarding your Sharp product, please visit our web-site www.sharp.co.uk/customersupport.
-
Page 2: Optional Accessories
Accessories MD-MT290H Remote Control x 1 Earphones x 1 AC Adaptor Rechargeable Nickel-Met- (RADPA8058AWZZ) x 1 al Hydride battery (AD- N70BT) x 1 Battery Carrying Connection Cable Connection Cable Connection Cable Carrying Bag x 1 Case x 1 (for digital record- (for analogue re- (for PC analogue re- ing) x 1... -
Page 3: Table Of Contents
Contents MD-MT290H Page Page " Important Introduction " Useful Features Special Notes ......4 - 5 Advanced Playback . -
Page 4: Special Notes
WILLOW VALE ELECTRONICS LTD. ! SHARP is not liable for damage or loss of your record- 0121 766 5414 ing arising from malfunction of this unit. In the unlikely event of this equipment requiring re-... - Page 5 This model complies ! Recording and playback of any material may require with the law if used with the correct earphones (model consent, which SHARP is unable to give. Please refer number RPHOH0011AWZZ). If the earphones are...
-
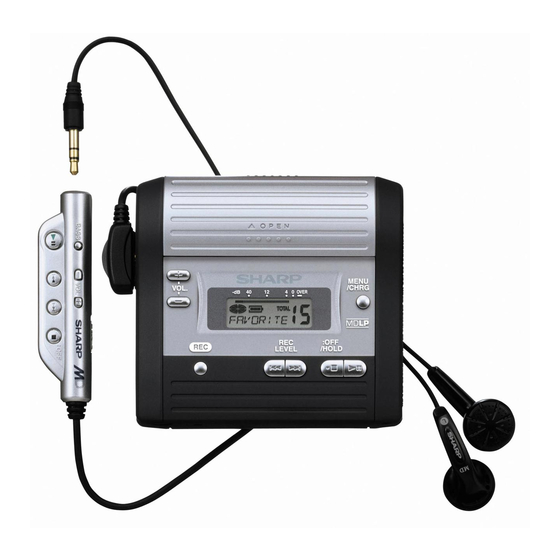
Page 6: Names Of Controls And Indicators
Names of Controls and Indicators MD-MT290H " Main unit Reference page 1. Open Lever ......11 2. - Page 7 MD-MT290H " Display panel 1. Level Meter 2. Random Indicator 1 2 3 3. Repeat Indicator 4. Long-Play/Recording Mode Indicator 5. Monaural Mode Indicator 6. Battery Indicator 7. Play Indicator 8. Pause Indicator 9. Disc Name Indicator 10. Record Indicator 9 10 11 11.
-
Page 8: Precautions
5V DC supplied with this unit, as it may damage it. Using this unit near mobile phones ! SHARP is not responsible for damage due to improper may cause noise pickup. If it oc- use. Refer all servicing to a SHARP authorised serv- curs, move it away from them. -
Page 9: Using With The Rechargeable Battery
Using with the Rechargeable Battery MD-MT290H Charging the rechargeable battery When the rechargeable battery is used for the first time or when you want to use it after a long period of disuse, be sure to charge it fully. Insert the rechargeable battery according to the direction indicated in the battery compartment. -
Page 10: Using With The Ac Adaptor
Using with the AC Adaptor MD-MT290H Plug the AC adaptor into the wall socket, and then insert About charging time the plug on the other end into the DC IN 5V socket. After about 3.5 hours have passed, " " will go out. -
Page 11: Using With The Alkaline Battery
Using with the Alkaline Battery MD-MT290H Use one commercially available alkaline battery (LR6, Insert an alkaline battery according to the "AA" size). direction indicated in the battery compart- Disconnect the AC adaptor. ment. When inserting or removing the battery, push it to- wards the battery terminal. -
Page 12: Connections
Connections MD-MT290H You can record your favourite CDs or tapes to MD. When recording, it is recommended to use the AC adaptor and also install the battery. Should the power failure occur, the power source would be automatically switched to the battery. To connect to a stereo system with "LINE OUT"... -
Page 13: Connections
MD-MT290H To connect to a stereo system with a "DIGITAL OUT" or "OPTICAL OUT" socket (digital connection) When compared with an analogue connection recording, using a digital connection will give higher quality. Some audio systems do not have a DIGITAL OUT socket. Check before connecting. -
Page 14: Hold Function
Hold Function MD-MT290H To prevent accidental operation, the unit can be locked in Remote control unit its present condition using the Hold function. When in Hold, no buttons are active. Main unit Orange mark Hold Move the HOLD switch to the safety position (direc- tion indicated by the arrow). -
Page 15: Before Recording
Before Recording MD-MT290H About the TOC To prevent recorded MiniDiscs from After any recording or editing function, "TOC" (Table Of being erased accidentally Contents) is displayed. To finalise the recording or editing Slide the accidental erase prevention tab, located on the function, turn the power off. -
Page 16: Recording
Recording MD-MT290H Press the REC LEVEL button to adjust the recording level. Analogue recording (connecting with analogue cable) Adjust the recording level so that the maximum sound vol- ume from the source makes the reading swing somewhere be- tween -4 dB and 0 dB. 0 - 30 Digital recording (connecting with digital cable) You can adjust the level in 1 dB... - Page 17 MD-MT290H Notes: ! Complete the operation within 7 seconds whilst selecting Press the MENU/ENTER button. the menus. ! Changing the volume level whilst recording does not affect Press the button repeatedly to se- the recording. ! You cannot adjust the bass level whilst recording. lect "REC MODE".
-
Page 18: Playback
Playback MD-MT290H Press the button. Left Right channel channel Playback starts automatically with a playback only MiniDisc or a MiniDisc which is protected against ac- cidental erasure (Auto-play function). To interrupt playback Press the button. To resume playback, press the button again. - Page 19 MD-MT290H " Bass control During playback, press the MENU/ENTER Each time the BASS button on the remote control is pressed, the bass response will be switched as follows. button. BASS 1 Emphasised slightly. Press the button repeatedly to se- BASS 2 Emphasised more.
-
Page 20: Advanced Playback
Advanced Playback MD-MT290H ! To locate the desired portion ! To locate the beginning of a track To move to the beginning of the next track: Press the button during playback. To restart the track being played: Press the button during playback. To locate the next track: Press the button whilst the unit is stopped. - Page 21 MD-MT290H ! Random play or repeat play Press the button repeatedly to se- lect the desired playback mode. RANDOM : Random play RANDOM REP :Repeat play of tracks in random order ALL REPEAT : Repeat play of all of the tracks 1Tr REPEAT : Repeat play of a single track NORMAL : Normal playback...
-
Page 22: Advanced Recording
Advanced Recording MD-MT290H ! Long-play recording Press the button repeatedly to se- 2 times and 4 times long recording lect the desired recording mode. Double or quadruple time of stereo recording is possible. Stereo recording (SP) 2 times long recording (LP2) Monaural recording In monaural, you can record twice as long as the stereo recording. - Page 23 MD-MT290H ! About the recording mode Notes: " In monaural recording, the sound on the right and left You can select the recording mode from stereo recording, channels is mixed even if the input source is in stereo. 2 times long recording, 4 times long recording, and mon- Although you can hear the stereo sound from the ear- aural recording.
- Page 24 Advanced Recording (continued) MD-MT290H ! Playback sound-actuated recording Press the MENU/ENTER button. Recording automatically starts or pauses by detecting sound from the stereo system (synchronised recording). Select the recording mode (step 4, page 22) and press the MENU/ENTER button. Press the MENU/ENTER button. Press the button repeatedly to se- lect "SYNC ON".
- Page 25 MD-MT290H ! To start recording from the middle of a During playback, press the button at the track point where you want to begin recording. You can erase a portion of a track and make a new Press the REC button. recording.
- Page 26 Advanced Recording (continued) MD-MT290H ! To create your own track numbers ! Recording tracks as a single track You can create your own track numbers at any point. You can record several pieces of music as a single track by disabling the auto marker function. Whilst recording, press the REC button at the point where you want to create track numbers.
-
Page 27: About Track Numbers
MD-MT290H ! About track numbers " When recording, if a programmed playback is per- formed by the source or playback is performed by 1. Track numbers are created automatically during re- selecting tracks manually, the MiniDisc track numbers cording via the analogue connection when a silence of may not be the same as on the source. -
Page 28: Recording From A Microphone
Recording from a Microphone MD-MT290H Press the REC button. Press the REC LEVEL button to adjust the recording level. Adjust the recording level so that the maximum sound vol- ume from the source makes the reading swing somewhere be- tween -4 dB and 0 dB. L: 0 - 20 H: 21 - 30 Select the recording mode (steps 5 - 9,... - Page 29 MD-MT290H ! Sound-actuated recording About pause function The unit automatically pauses when the microphone (Mic Synchronised recording) does not pick up any sound for 3 seconds or more. (Pause function does not work for approximately 10 sec- Press the REC button. onds after a recording starts.) When the microphone picks up sound again, recording starts automatically.
- Page 30 Recording from a Microphone (continued) MD-MT290H ! Track intervals Press the MENU/ENTER button. When recording from the microphone, track numbers will The mode will be set automatically after 7 seconds be created automatically at regular intervals (default set- even if the MENU/ENTER button is not pressed. ting: approximately every 5 minutes).
-
Page 31: Changing Default Settings
Changing Default Settings MD-MT290H ! Beep sound Whilst in the stop mode ... You can eliminate the confirmation sound that beeps With a MiniDisc inserted, press the MENU/ when you press a button. ENTER button for 2 seconds or more. "SET ! Auto play UP"... -
Page 32: Checking Displays
Checking Displays MD-MT290H ! To check the elapsed time and remain- ! To check the remaining recording time ing time of the track and the total playing time During playback, press the MENU/ENTER Whilst in the stop mode, press the MENU/ button. - Page 33 MD-MT290H ! To display the playing time of an indi- ! Checking the remaining amount of bat- tery level vidual track The remaining amount of battery level is shown by the battery indicator ( ) during operation. Whilst in the stop mode, press the button to display the track number and track How to read the battery indicator name.
-
Page 34: Titling A Minidisc
Titling a MiniDisc MD-MT290H ! Creating disc and track names Press the button repeatedly to select the Load a MiniDisc to be named. A playback only or record- type of characters. ing prevented MiniDisc cannot be edited. <Disc name> <Track name> Whilst in the stop Whilst in the pause mode, press the MENU/... - Page 35 MD-MT290H ! To erase a character To enter more letters, repeat steps 6 - 8. Press the VOL + or VOL - button to move the cursor to When the name is completely entered, the character you want to erase, and then press the press and hold down the MENU/ENTER but- BASS button on the remote control.
- Page 36 Titling a MiniDisc (continued) MD-MT290H ! To add characters ! Stamping titles from another MiniDisc Put the unit in the character input mode. Before stamping (Perform steps 1 - 5 on page 34.) When there are 2 MiniDiscs on which the same tracks Press the VOL + or VOL - button to move the are recorded, you can transfer the character information (disc and track names) of the master MiniDisc to another...
- Page 37 MD-MT290H Master MiniDisc operation Operation of the MiniDisc for stamping Insert a master MiniDisc. Load a MiniDisc for stamping. Do not mistake the master MiniDisc for the target one. Whilst in the stop mode, press the MENU/ ENTER button. Press the MENU/ENTER button. Press the button repeatedly to se- lect "EDIT".
-
Page 38: Editing A Recorded Minidisc
Editing a Recorded MiniDisc MD-MT290H ! To erase one track at a time ! To erase all of the tracks at once Start playing the track to be erased, and Whilst in the stop mode, press the MENU/ press the button. - Page 39 MD-MT290H ! To divide a track ! To combine tracks Start playing the track to be divided into two. Start playing the latter of the two tracks to be Press the button at the point where you combined, and press the button.
- Page 40 Editing a Recorded MiniDisc (continued) MD-MT290H ! To move a track When a track has a name before dividing: The two new tracks will have the same name. However, in the "TOC FULL" condition, the second track may not be Play the track to be moved, and press the named.
-
Page 41: Listening Through Another System
Listening through Another System MD-MT290H ! Listening through a stereo system ! Listening through a car stereo To the LINE INPUT sockets White: Separately to the left available Red: cassette to the right adaptor (AD-CT14) Separately available car adaptor (AD-CA20X) To the To the REMOTE... -
Page 42: Other Features And Caution
Other Features and Caution MD-MT290H Resuming auto play Rechargeable battery A rechargeable nickel-metal hydride battery is the only When you stop and then re- kind that can be used. Even if the battery is not used, Stopping start playback without re- you should charge it at least once every three months Stopped track moving the disc, playback... -
Page 43: Minidisc System Limitations
MiniDisc System Limitations MD-MT290H The unit may have the following symptoms whilst recording or editing. The unit is not out of order. SYMPTOM LIMITATIONS More than 255 tracks (maximum) cannot be recorded regardless of "DISC FULL" or "TOC FULL" appears the recording time. -
Page 44: Error Messages
Error Messages MD-MT290H ERROR MEANING ERROR MEANING MESSAGES MESSAGES The battery has run down. Stamp function does not work. BATT EMPTY Can'tSTAMP Nothing is recorded. (Check the number of tracks.) BLANK MD (Replace the disc with a recorded disc.) Cannot save the TOC information Can'tWRITE correctly to a MiniDisc. - Page 45 MD-MT290H ERROR MEANING ERROR MEANING MESSAGES MESSAGES Poor connection of the digital cable. The temperature is too high. NO SIGNAL TEMP OVER No output signal comes out from the (Turn off the power, and wait a while.) connected unit. There is an error in the recording sig- TOC FORM (Use the AC power for the connected nal.
-
Page 46: Troubleshooting
Many potential "problems" can be resolved by the owner without calling a service technician. If something seems to be wrong with this product, check the following before calling your authorised SHARP dealer or service centre. The unit does not turn on. -
Page 47: Maintenance
Maintenance MD-MT290H Cleaning If trouble occurs When this product is subjected to strong external interfer- When the unit becomes dirty Clean it with a soft cloth. When the unit is excessively ence (mechanical shock, excessive static electricity, dirty, use a soft cloth dampened in water (external sur- abnormal supply voltage due to lightning, etc.) or if it is faces only). -
Page 48: Specifications
Specifications MD-MT290H As a part of our policy of continuous improvement, SHARP reserves the right to make design and specification chang- es for product improvement without prior notice. The performance specification figures indicated are nominal values of production units. There may be some deviations from these values in individual units. - Page 49 MD-MT290H Battery life: Stereo 2 times long 4 times long When using the rechargeable Continuous Continuous Continuous Continuous Continuous Continuous battery (fully charged) includ- recording: play: recording: play: recording: play: ed with the unit Approx. 10 Approx. 25 Approx. 13 Approx.
- Page 50 MEMO...
- Page 51 MEMO...
-
Page 52: Terms Of Guarantee
Ltd. (hereinafter called “the Company”) guarantee to pro- caused by accident, misuse, fair wear and tear, neglect, vide for the repair of, or at its option replace this Sharp tampering with the equipment, or any attempt at ad- Equipment, or any component thereof, (other than bat-...
Need help?
Do you have a question about the MD-MT290H and is the answer not in the manual?
Questions and answers