Kyocera KM-1530 Instruction Handbook Manual
Printing system (k) instruction handbook (setup edition)
Hide thumbs
Also See for KM-1530:
- Quick configuration manual (205 pages) ,
- User manual (154 pages) ,
- Instruction handbook manual (86 pages)
Chapters
Table of Contents
Troubleshooting

Related Manuals for Kyocera KM-1530


Summary of Contents for Kyocera KM-1530
- Page 1 INSTRUCTION HANDBOOK <Set-up Edition> ALWAYS read this Instruction Handbook thoroughly before use. After reading, maintain it in good condition and keep it together with the Instruction Handbook for your copier.
-
Page 2: Trademark Information
Trademark Information • Novell and NetWare are registered trademarks of Novell, Inc. • IBM and IBM PC-AT are trademarks of International Business Machines Corporation. • PowerPC is a trademark of International Business Machines Corporation of America and other corporations. • Adobe and Acrobat are trademarks of Adobe Systems Incorporated. •... - Page 3 IBM PROGRAM LICENSE AGREEMENT THE DEVICE YOU HAVE PURCHASED CONTAINS ONE OR MORE SOFTWARE PROGRAMS (“PROGRAMS”) WHICH BELONG TO INTERNATIONAL BUSINESS MACHINES CORPORATION (“IBM”). THIS DOCUMENT DEFINES THE TERMS AND CONDITIONS UNDER WHICH THE SOFTWARE IS BEING LICENSED TO YOU BY IBM. IF YOU DO NOT AGREE WITH THE TERMS AND CONDITIONS OF THIS LICENSE, THEN WITHIN 14 DAYS AFTER YOUR ACQUISITION OF THE DEVICE YOU MAY RETURN THE DEVICE FOR A FULL REFUND.
- Page 4 About this Instruction Handbook This Instruction Handbook <Set-up Edition> is meant to be read when the Printer Board is installed in your copier and the copier is to be used mainly as a local printer. It contains explanations on set-up procedures for using the copier as a printer. As the required set-up and configurations for the printer may differ depending upon the environment in use in the connected computer, please read those sections related to your specific computer environment and perform the appropriate set-up and configuration explained there.
- Page 5 Getting connected When connecting the printer directly to your computer (with a parallel cable) ... 1 Connecting the printer directly to your computer with a parallel Page 5 cable ........Parallel cable 2 Installing the printer driver into your computer ... Refer to the On-Line Manual CD-ROM When connecting the printer to a network (the optional Network Card must be installed)…...
-
Page 6: Table Of Contents
Table of contents 1. Preparations ......................2 1-1 Accessories ..............................2 1-2 Required items ............................2 1-3 Name of parts (main body) ........................2 1-4 Name of parts (operation panel) ........................ 3 2. Set-up ........................5 2-1 Connecting the printer cable ........................5 2-2 Installing the software ..........................5 2-3 Network (TCP/IP) settings .........................6 3. -
Page 7: Preparations
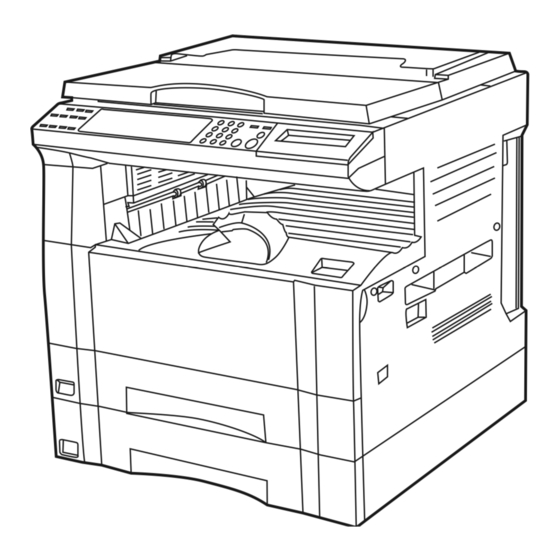
1. Preparations Accessories • 1 CD-ROM • This Instruction Handbook Required items • Parallel cable Name of parts (main body) 1 Parallel interface connector Connect a bi-directional parallel cable here. 2 Memory Card (CompactFlash) slot Insert the optional Memory Card (CompactFlash) here. 3 Main switch Turn this switch ON ( | ) first, prior to using the printer. -
Page 8: Name Of Parts (Operation Panel)
1. Preparations Name of parts (operation panel) 15 ppm copier - Inch specifications 15 ppm copier - Metric specifications 1 Printer key The copy quality/magnification display in the printer mode Press this key when you want to switch to the printer mode. To enter the printer mode, press the Printer key. - Page 9 1. Preparations 20 ppm copier - Inch specifications 20 ppm copier - Metric specifications 1 Printer key 9 Message display Press this key when you want to switch to the printer mode. Indicates the status of the printer as well as other settings. 2 Enter key Press this key when you want to register a setting.
-
Page 10: Set-Up
2. Set-up Connecting the printer cable Installing the software CAUTION: ALWAYS turn the main switch to the printer OFF (O) Perform the following procedure to install into your computer the BEFORE connecting the printer cable. printer driver and other software that is appropriate to the operating system in use in that computer. -
Page 11: Network (Tcp/Ip) Settings
2. Set-up Use the M and N keys to select “2” (Off) and then press the Network (TCP/IP) settings Enter key. The selected setting will flash twice and will then be registered. When the optional Network Card is installed and this machine is to be used as a network printer, it is necessary to set the corresponding IP address for the printer. - Page 12 2. Set-up Use the M and N cursor keys to select “On” and then press <20 ppm copier> the Enter key. * To cancel the setting midway through it, press the Stop/Clear key. Press the Printer key. The machine will switch to the printer mode.
- Page 13 2. Set-up The numeric keys will be used to enter the IP address: Use the M and N cursor keys to select “Gateway” and then First, enter the first 3 digits of the IP address. press the Enter key. * The numbers you enter will be input into the currently highlighted area of the display.
-
Page 14: Troubleshooting
3. Troubleshooting Canceling printing Perform the following procedure when you want to stop printing or you want to clear data. IMPORTANT! • By performing this operation you will be canceling ALL print jobs that are currently waiting in the printer’s memory to be printed. •... -
Page 15: When An Error Code Or Error Messages Appears
3. Troubleshooting When an error code or error messages appears… If an error code or message appears on the operation panel, first check the following tables for cause of the trouble and then perform the corresponding procedure. For more detailed information, refer to the Instruction Handbook for your copier as well as the Instruction Handbook for any optional equipment that is installed in your machine. - Page 16 3. Troubleshooting Error code Display message Procedure (15 ppm copier) (20 ppm copier) — No duplex from bypass Duplex printing is not possible using the Multi-Bypass. Select the drawer for paper feed. 1. If you want to switch to and print from a different drawer, press the Paper Select key until the desired drawer is selected and then press the Enter key.
- Page 17 3. Troubleshooting Error code Display message Procedure (15 ppm copier) (20 ppm copier) RAM disk error Press GO <15 ppm copier> A read- or write-error has occurred on the RAM disk. Press the Start key to erase the error indication. <20 ppm copier>...
- Page 18 3. Troubleshooting Error code Display message Procedure (15 ppm copier) (20 ppm copier) Memory overflow <15 ppm copier> The current print job could not be completed due to insufficient memory in the printer. • If you are using a RAM disk, reduce the size of the RAM disk. If this error occurs often, it is recommended that you install additional memory into the printer.
-
Page 19: Basic Troubleshooting Chart
3. Troubleshooting Basic troubleshooting chart If you experience trouble while you are using this machine as a printer, refer to the table below to perform minor adjustments. If trouble persists, contact your service representative or an authorized service center. * For information in regard to general mechanical trouble with the machine, refer to the Instruction Handbook for your copier. Problem Check point Procedure... -
Page 20: Specifications
4. Specifications CPU ..............PowerPC 405 (200MHz) Printing Speed ........... 15 ppm copier: WITHOUT Memory Board installed - 15 pages/min (A4 [8 1/2" x 11"]) WITH Memory Board installed - 18 pages/min (A4 [8 1/2" x 11"]) 20 ppm copier: 20 pages/min (A4 [8 1/2" x 11"]) Printing Resolution .......... - Page 21 Informations concernant les marques déposées • Novell et NetWare sont des marques déposées de Novell, SA. • IBM et IBM PC-AT sont des marques de fabrique d’International Business Machines Corporation. • PowerPC est une marque de fabrique d’International Business Machines Corporation of America et autres sociétés commerciales.
- Page 22 Les connexions Pour raccorder directement l’imprimante à votre ordinateur (avec un câble parallèle)… 1 Raccorder directement l’imprimante à votre ordinateur avec un Page 5 câble parallèle ....... Câble parallèle 2 Installation du pilote d’imprimante dans votre ordinateur ..Consultez le manuel d’assistance interactif CD-ROM Pour raccorder l’imprimante à...
- Page 23 Table des matières 1. Préparatifs ........................ 2 1-1 Accessoires ..............................2 1-2 Pièces nécessaires ............................ 2 1-3 Nomenclature (corps principal) ........................2 1-4 Nomenclature (panneau de commande) ....................3 2. Installation ........................ 5 2-1 Raccordement du câble d’imprimante ....................... 5 2-2 Installation du logiciel ..........................5 2-3 Réglages de réseau (protocole TCP/IP) ....................
-
Page 24: Préparatifs
1. Préparatifs Accessoires • 1 CD-ROM • Ce manuel d’instructions Pièces nécessaires • Câble parallèle Nomenclature (corps principal) 1 Connecteur d’interface parallèle Raccorder ici un câble parallèle bidirectionnel. 2 Compartiment pour carte de mémoire (CompactFlash) Insérer ici la carte de mémoire (CompactFlash) en option. 3 Interrupteur principal Mettre d’abord cet interrupteur sur marche ( | ), avant d’utiliser l’imprimante. -
Page 25: Nomenclature (Panneau De Commande)
1. Préparatifs Nomenclature (panneau de commande) Copieur 15 ppm - Spécifications en pouces Copieur 20 ppm– Spécifications métriques 1 Touche d’imprimante Affichage de qualité de copie/taux de reproduction en mode Appuyer sur cette touche pour commuter au mode d’imprimante. d’imprimante 2 Touche de démarrage [ACTION] Pour entrer en mode d’imprimante, appuyer sur la touche Appuyer sur cette touche pour redémarrer l’impression ainsi que... - Page 26 1. Préparatifs Copieur 15 ppm - Spécifications en pouces Copieur 20 ppm– Spécifications métriques 1 Touche d’imprimante 9 Affichage de message Appuyer sur cette touche pour commuter au mode d’imprimante. Indique l’état de l’imprimante ainsi que d’autres réglages. 2 Touche de validation Appuyer sur cette touche pour enregistrer un réglage.
-
Page 27: Installation
2. Installation Raccordement du câble Installation du logiciel d’imprimante Effectuez la procédure suivante pour installer, sur votre ordinateur, le pilote d’imprimante et autres logiciels nécessaires pour le système ATTENTION: TOUJOURS mettre l’interrupteur principal de d’exploitation utilisé par cet ordinateur. Pour plus de détails l’imprimante sur arrêt (O) AVANT de raccorder le câble d’imprimante. -
Page 28: Réglages De Réseau (Protocole Tcp/Ip)
2. Installation Sélectionner “2” (Inactif) en utilisant les touches M et N, Réglages de réseau puis appuyer sur la touche de validation. Le réglage sélectionné clignotera deux fois puis sera enregistré. (protocole TCP/IP) Lorsque la carte de réseau en option est installée et que cet appareil doit être utilisé... - Page 29 2. Installation Sélectionner “Actif” en utilisant les touches de curseur M et <Copieur 20 ppm - Spécifications en pouces> N, puis appuyer sur la touche de validation. * Pour annuler la procédure en cours, appuyer sur la touche d’arrêt/ annulation. Appuyer sur la touche d’imprimante.
- Page 30 2. Installation Les touches numériques seront utilisées pour entrer Sélectionner “Gateway” en utilisant les touches de curseur M et N , puis appuyer sur la touche de validation. l’adresse de protocole IP: Entrer tout d’abord les 3 premiers chiffres de l’adresse de protocole IP.
- Page 31 2. Installation Sélectionner “Actif” en utilisant les touches de curseur M et <Copieur 20 ppm - Spécifications métriques> N, puis appuyer sur la touche de validation. * Pour annuler la procédure en cours, appuyer sur la touche d’arrêt/ annulation. Appuyer sur la touche d’imprimante. L’appareil commutera automatiquement au mode d’imprimante.
- Page 32 2. Installation Les touches numériques seront utilisées pour entrer Sélectionner “Gateway” en utilisant les touches de curseur M et N , puis appuyer sur la touche de validation. l’adresse de protocole IP: Entrer tout d’abord les 3 premiers chiffres de l’adresse de protocole IP.
-
Page 33: Dépannage
3. Dépannage Annuler une impression Effectuer la procédure suivante pour arrêter l’impression ou pour annuler des données. IMPORTANT! • En effectuant cette procédure, vous effacerez TOUS les travaux d’impression étant actuellement en attente d’impression dans la mémoire de l’imprimante. • Annulez toujours d’abord l’impression sur votre ordinateur. Si l’impression n’est pas annulée sur votre ordinateur, les données seront envoyées de nouveau dans l’imprimante. -
Page 34: Lorsqu'un Code D'erreur Ou Un Message D'erreur Apparaît
3. Dépannage Lorsqu’un code d’erreur ou un message d’erreur apparaît… Lorsqu’un code ou un message d’erreur apparaît sur le panneau de commande, consultez tout d’abord les tableaux ci-dessous afin de déterminer la cause du problème. Pour plus de détails, consultez le manuel d’instructions de votre copieur ainsi que les manuels d’instructions des accessoires en option étant fixés sur votre appareil. - Page 35 3. Dépannage Code d’erreur Message sur l’affichage Procédure (Copieur 15 ppm) (Copieur 20 ppm) — R/V par bypass impossible L’impression recto-verso ne peut pas être effectuée avec le plateau d’alimentation manuelle. Sélectionner le tiroir pour alimenter le papier. 1. Pour sélectionner un autre tiroir et effectuer l’impression depuis ce tiroir, appuyer sur la touche de sélection de papier jusqu’à...
- Page 36 3. Dépannage Code d’erreur Message sur l’affichage Procédure (Copieur 15 ppm) (Copieur 20 ppm) RAM DISQUE Err App. ACTION <Copieur 15 ppm> Une erreur de lecture ou écriture est survenue dans le disque RAM. Appuyer sur la touche de démarrage pour faire disparaître l’indication d’erreur. <Copieur 20 ppm>...
- Page 37 3. Dépannage Code d’erreur Message sur l’affichage Procédure (Copieur 15 ppm) (Copieur 20 ppm) Débordement de mémoire <Copieur 15 ppm> Le travail d’impression en cours n’a pas pu être terminé car la mémoire de Saturation de la mémoire l’imprimante n’est pas suffisante. •...
-
Page 38: Tableau De Dépannage De Base
3. Dépannage Tableau de dépannage de base En cas de problème survenant lors de l’utilisation de cet appareil comme imprimante, consultez le tableau ci-dessous pour effectuer des réglages mineurs. Si le problème ne disparaît pas, adressez-vous à votre centre de service ou un centre de service agréé. * Pour plus de détails concernant les problèmes mécaniques d’ordre général pouvant survenir dans votre appareil, consultez le manuel d’instructions de votre copieur. -
Page 39: Spécifications
4. Spécifications Processeur central ..........PowerPC 405 (200 MHz) Vitesse d’impression .......... Copieur 15 ppm:Lorsque la carte de mémoire N’est PAS installée - 15 pages/min (A4 [8 1/2" x 11"]) Lorsque la carte de mémoire EST installée - 18 pages/min (A4 [8 1/2" x 11"]) Copieur 20 ppm:20 pages/min (A4 [8 1/2"... - Page 40 Información de marcas • Novell y NetWare son marcas registradas por Novell, Inc. • IBM e IBM PC-AT son marcas comerciales de International Business Machines Corporation. • PowerPC es una marca comercial de International Business Machines Corporation de América y otras empresas. •...
- Page 41 Conexión Cuando conecte la impresora directamente a su computadora (con un cable paralelo)… 1 Conexión de la impresora Computadora directamente a su computadora Página 5 con el cable paralelo ..Cable paralelo 2 Instalación del controlador de Computadora impresora en su computadora ......
- Page 42 Indice 1. Preparación ......................2 1-1 Accesorios ..............................2 1-2 Items requeridos ............................2 1-3 Nombres de las piezas (cuerpo principal) ....................2 1-4 Nombres de las piezas (tablero de controles) ................... 3 2. Instalación ........................ 5 2-1 Conexión del cable de impresora ......................5 2-2 Instalación de los programas ........................
-
Page 43: Preparación
1. Preparación Accesorios • 1 CD-ROM • Este manual de instrucciones Items requeridos • Cable paralelo Nombres de las piezas (cuerpo principal) 1 Conector de interface en paralelo Conecte un cable paralelo bidireccional aquí. 2 Ranura para tarjeta de memoria (CompactFlash) Inserte aquí... -
Page 44: Nombres De Las Piezas (Tablero De Controles)
1. Preparación Nombres de las piezas (tablero de controles) Copiadora de 15 ppm – Especificaciones de pulgadas Copiadora de 15 ppm – Especificaciones métricas 1 Tecla de impresión La indicación de calidad/cambio de tamaño de la copia en el Pulse esta tecla cuando desea cambiar al modo de impresora. modo de impresora 2 Tecla de inicio [GO] Para entrar en el modo de impresora, pulse la tecla de impresión. - Page 45 1. Preparación Copiadora de 20 ppm - Especificaciones de pulgadas Copiadora de 20 ppm - Especificaciones métricas 1 Tecla de impresión 9 Pantalla de mensajes Pulse esta tecla cuando desea cambiar al modo de impresora. Indica el estado de la impresora y los demás ajustes. 2 Tecla de entrada Pulse esta tecla cuando desea registrar un ajuste.
-
Page 46: Instalación
2. Instalación Conexión del cable de Instalación de los programas impresora Realice el siguiente procedimiento para instalar en su computadora el controlador de impresora y otros programas apropiados al sistema PRECAUCION: Desconecte (O) SIEMPRE el interruptor principal de operativo de esa computadora. Para más detalles sobre la la impresora ANTES de conectar el cable de instalación del programa necesario, consulte el manual en línea en impresora. -
Page 47: Ajustes De Red (Tcp/Ip)
2. Instalación Utilice las teclas M y N para seleccionar “2” (No) y pulse la Ajustes de red (TCP/IP) tecla de entrada. El ajuste seleccionado destella dos veces y queda registrado. Cuando se ha instalado la tarjeta de red opcional y se va a utilizar esta máquina como impresora de red, es necesario seleccionar la correspondiente dirección IP para la impresora. - Page 48 2. Instalación Utilice las teclas de cursor M y N para seleccionar “Sí” y <Copiadora de 20 ppm - Especificaciones de pulgadas> pulse la tecla de entrada. * Para cancelar el ajuste en el medio, pulse la tecla de parada/ cancelación.
- Page 49 2. Instalación Se utilizan las teclas numéricas para entrar la dirección IP: Utilice las teclas de cursor M y N para seleccionar Entre primero las primeras 3 cifras de la dirección IP. “Gateway” y pulse la tecla de entrada. * Los números entrados ingresarán en el área que está resaltada en la pantalla.
- Page 50 2. Instalación Utilice las teclas de cursor M y N para seleccionar “Sí” y <Copiadora de 20 ppm - Especificaciones métricas> pulse la tecla de entrada. * Para cancelar el ajuste en el medio, pulse la tecla de parada/ cancelación. Pulse la tecla de impresión.
- Page 51 2. Instalación Se utilizan las teclas numéricas para entrar la dirección IP: Utilice las teclas de cursor M y N para seleccionar Entre primero las primeras 3 cifras de la dirección IP. “Gateway” y pulse la tecla de entrada. * Los números entrados ingresarán en el área que está resaltada en la pantalla.
-
Page 52: Localización De Averías
3. Localización de averías Cancelación de la impresión Realice el mismo procedimiento para parar la impresión o cuando desea cancelar los datos. ¡IMPORTANTE! • Con esta operación se cancelan TODOS los trabajos de impresión en espera para su impresión en la memoria de la impresora. •... -
Page 53: Cuando Aparece Un Código De Error O Un Mensaje De Error
3. Localización de averías Cuando aparece un código de error o un mensaje de error… Si aparece un código o mensaje de error en el panel de controles, confirme primero en los siguientes cuadros la causa del problema y realice el correspondiente procedimiento. - Page 54 3. Localización de averías Código de error Indicación de mensaje Procedimiento (copiadora de 15 ppm) (copiadora de 20 ppm) — No modo duplex desde bypass No es posible la impresión duplex utilizando el alimentador multihojas. Seleccione la alimentación de papel del cajón. 1.
- Page 55 3. Localización de averías Código de error Indicación de mensaje Procedimiento (copiadora de 15 ppm) (copiadora de 20 ppm) Err.Disco RAM Pulse GO <Copiadora de 15 ppm> Se produjo un error de lectura o escritura en el disco RAM. Pulse la tecla de inicio para borrar la indicación de error.
- Page 56 3. Localización de averías Código de error Indicación de mensaje Procedimiento (copiadora de 15 ppm) (copiadora de 20 ppm) Exceso de memoria <Copiadora de 15 ppm> No pudo terminar el trabajo de impresión actual porque no hay suficiente memoria Memoria llena en la impresora.
-
Page 57: Cuadro De Localización De Averías Básicas
3. Localización de averías Cuadro de localización de averías básicas Si tiene problemas durante el uso este aparato como impresora, consulte el siguiente cuadro para realizar ajustes básicos. Si el problema no desaparece, llame a su técnico de servicio o centro de servicio autorizado. * Para información sobre averías generales mecánicas en su aparato, consulte el manual de instrucciones de su copiadora. -
Page 58: Especificaciones
4. Especificaciones CPU ..............PowerPC 405 (200MHz) Velocidad de impresión ........Copiadora de 15 ppm: SIN tarjeta de memoria instalada - 15 hojas/min. (A4 [8 1/2" x 11"]) CON tarjeta de memoria instalada - 18 hojas/min. (A4 [8 1/2" x 11"]) Copiadora de 20 ppm: 20 hojas/min. - Page 59 INSTRUCTION HANDBOOK <Functions Edition> Introduction Chapter 1 Printer-related operation I 1. Printer Settings (15 ppm copier) I 2. Printer Settings (20 ppm copier) I 3. Memory Card / RAM Disk Chapter 2 Software-related operation I 1. Procedure for Installing and Printing with a Printer Driver I 2.
- Page 60 Trademark Information • PRESCRIBE is a registered trademark of Kyocera Corporation. • PRESCRIBE 2e and KPDL2 are trademarks of Kyocera Corporation. • Microsoft, MS-DOS, Windows and WindowsNT are registered trademarks of Microsoft Corporation of America and other countries. • WINDOWS ME is a trademark of Microsoft Corporation.
- Page 61 IBM PROGRAM LICENSE AGREEMENT THE DEVICE YOU HAVE PURCHASED CONTAINS ONE OR MORE SOFTWARE PROGRAMS (“PROGRAMS”) WHICH BELONG TO INTERNATIONAL BUSINESS MACHINES CORPORATION (“IBM”). THIS DOCUMENT DEFINES THE TERMS AND CONDITIONS UNDER WHICH THE SOFTWARE IS BEING LICENSED TO YOU BY IBM. IF YOU DO NOT AGREE WITH THE TERMS AND CONDITIONS OF THIS LICENSE, THEN WITHIN 14 DAYS AFTER YOUR ACQUISITION OF THE DEVICE YOU MAY RETURN THE DEVICE FOR A FULL REFUND.
- Page 62 Typeface Trademark Acknowledgement All resident fonts in this printer are licensed from Agfa Corporation. Helvetica, Palatino and Times are registered trademarks of Linotype-Hell AG. ITC Avant Garde Gothic, ITC Bookman, ITC ZapfChancery and ITC Zapf Dingbats are registered trademarks of International Typeface Corporation.
- Page 63 1. Printer Settings (15 ppm copier) 1. Printer Settings (15 ppm copier) IMPORTANT! All setting items and the selection of their actual settings are accomplished in this machine based on a maximum 3-digit entry system. Refer to “1-2 List of settings” on page 1-3 for information regarding the various items as well as their corresponding menu numbers and available settings.
- Page 64 1. Printer Settings (15 ppm copier) Operation keys <15 ppm copier - Inch version> Printer Key Copy quality/magnification display Enter (Manual) key Numeric keys [Zoom (-)] key [Zoom (+)] key Stop/Clear Start (GO) key (CANCEL) key <15 ppm copier - Metric version> Printer Key Copy quality/magnification display Enter (Manual) key...
- Page 65 1. Printer Settings (15 ppm copier) 1-2 List of settings Menu Item Available settings Remarks number Printer Status Page print out – – – Print out will begin as soon as the Prints out a list of such items as the current printer corresponding menu number is default settings and memory volume, etc.
- Page 66 1. Printer Settings (15 ppm copier) Menu Item Available settings Remarks number KPDL Error Report print out ON/OFF (1) On Sets whether an Error Report will be automatically (2) Off printed out whenever a KPDL error occurs. Auto emulation switching (parallel interface) (1) Line Printer Sets the back-up emulation that, depending upon (2) IBM Proprinter...
- Page 67 1. Printer Settings (15 ppm copier) Menu Item Available settings Remarks number Wide A4 ON/OFF (1) On Increases the printing area on A4 size paper. (2) Off Printing orientation (parallel interface) (1) Portrait (2) Landscape Printing orientation (network interface) (1) Portrait Available only when the Network (2) Landscape Card is installed.
- Page 68 1. Printer Settings (15 ppm copier) Menu Item Available settings Remarks number Receive dump mode (1) OK The data that the printer receives for debugging programs and files is turned into hexadecimal code and printed out. If “OK” (setting: 1) is selected here, this receive dump mode will be activated.
- Page 69 2. Printer Settings (20 ppm copier) 2. Printer Settings (20 ppm copier) 2-1 Procedure for making settings Press the Printer key. The machine will switch to the printer mode. Use the “ ” and “ ” cursor keys to select “MENU” and then press the Enter key. Select the desired setting.
- Page 70 2. Printer Settings (20 ppm copier) Operation keys <20 ppm copier - Inch version> Printer Key Message display Numeric keys < > (Cursor left) (Cursor right) (Cursor) key (Cursor) key Stop/Clear key “GO” command “CANCEL” command “MENU” command <20 ppm copier - Metric version> Printer Key Message display Numeric keys...
- Page 71 2. Printer Settings (20 ppm copier) 2-2 Menu flow chart MENU Printer Status Page print out Interface selection Parallel setting Parallel TX/RX mode Network Card (option) settings NetWare ON/OFF NetWare frame type TCP/IP ON/OFF DHCP ON/OFF IP address Subnet Mask Gateway address EtherTalk ON/OFF Network Card Status Page print out ON/OFF...
- Page 72 2. Printer Settings (20 ppm copier) Font settings Internal Font selection Courier font Letter Gothic font Font List print out Option Font selection Font List print out Printing environment settings Number of copies Printing orientation Page Protect Line Feed (LF) handling Carriage Return (CR) handling Wide A4 ON/OFF Printing resolution settings...
- Page 73 2. Printer Settings (20 ppm copier) RAM disk ON/OFF RAM disk size Reading data Reading program data Writing data Deleting data Deleting font data Deleting program data Deleting macro data Partition List print out Memory Card settings Reading fonts Reading macro data Reading data Reading program data Writing data...
- Page 74 2. Printer Settings (20 ppm copier) Paper handling settings Duplex mode A4 & Letter usage ON/OFF Bypass mode Other settings Form feed time-out Receive dump mode Printer reset Resource protect mode Auto Continue ON/OFF Recovery time for Auto Continue Service Service Rep Status Page print out...
- Page 75 2. Printer Settings (20 ppm copier) 2-3 List of settings Item No. Item Display message Available settings Remarks Printer Status Page print out Print Status Page No, Print Prints out a list of such items as printer default settings and memory volume, etc. Interface selection Interface Parallel, Option...
- Page 76 2. Printer Settings (20 ppm copier) Item No. Item Display message Available settings Remarks Code Set Code Set The code sets Selects the code set that will be used under available for each emulation protocol. (There is no selection will differ selection for the code set under “KPDL”...
- Page 77 2. Printer Settings (20 ppm copier) Item No. Item Display message Available settings Remarks Page Protect Page Protect Auto, On If “AUTO” is selected here, the machine will monitor the data and, if necessary, will automatically turn Page Protect ON. If a “Print overrun”...
- Page 78 2. Printer Settings (20 ppm copier) Item No. Item Display message Available settings Remarks Deleting data Delete Data Select the name of Displayed only when there is Deletes the selected data from the RAM the partition which appropriate data in the RAM disk. disk.
- Page 79 2. Printer Settings (20 ppm copier) Item No. Item Display message Available settings Remarks Deleting font data Delete Font Select the name of Displayed only when there is Deletes the selected font data from the the font from among appropriate font data in the Memory Card.
- Page 80 2. Printer Settings (20 ppm copier) Item No. Item Display message Available settings Remarks Receive dump mode Print HEX-DUMP The data that the printer receives for debugging programs and files is turned into hexadecimal code and printed out. If “OK” is selected here, this receive dump mode will be activated.
- Page 81 3. Memory Card / RAM Disk 3. Memory Card / RAM Disk 3-1 Memory Card This machine comes equipped with a slot for inserting a Memory Card. Use a Memory Card that contains fonts in order to print with fonts other than those already installed in the machine, or use the card to save and then read print data.
- Page 82 3.Memory Card / RAM Disk 3-3 Printer control commands It is possible to issue simple commands to the Memory Card and RAM Disk from the MS-DOS Prompt in Windows. 3-3-1 Using printer control commands A printer control command line includes “!R!” (Command operation start), as well the actual commands and parameters that are to be implemented and that are entered after that.
- Page 83 3. Memory Card / RAM Disk 3-3-2 Formatting the Memory Card Perform the following procedure when you want to initialize the Memory Card from your computer. * In 20 ppm copiers, the Memory Card is initialized from the operation panel on the copier itself. Refer to “2. Printer Settings (20 ppm copier)” on page 2-1 for information on the appropriate procedure.
- Page 84 3.Memory Card / RAM Disk 3-3-4 Writing font data Perform the following procedure when you want to write font data to a Memory Card or RAM Disk from your computer. At the same time as the font data is written to disk, it will be sent to the printer as well. * Verify beforehand that the Memory Card is in a write-enabled state and that the RAM Disk is turned ON.
- Page 85 3. Memory Card / RAM Disk 3-3-5 Reading print data Perform the following procedure when you want to read print data that has been saved on a Memory Card or RAM Disk. * In 20 ppm copiers, reading print data is accomplished from the operation panel on the copier itself. Refer to “2. Printer Settings (20 ppm copier)”...
- Page 86 3.Memory Card / RAM Disk 3-3-7 Printing out the Partition List Perform the following procedure when you want to print out the Partition List in order to verify the print data and font data that has been saved on a Memory Card or RAM Disk. * In 20 ppm copiers, Partition List print out is accomplished from the operation panel on the copier itself.
- Page 87 1. Procedure for Installing and Printing with a Printer Driver 1. Procedure for Installing and Printing with a Printer Driver 1-1 Included printer drivers The following printer drivers are included with this product. * Each type of printer driver has a version appropriate to a specific model of copy machine. Be sure to choose the driver that is appropriate for your copier.
- Page 88 1. Procedure for Installing and Printing with a Printer Driver 1-2 System Conditions GWindows 95 IBM PC / AT or compatible i486SX 25 MHz or more System 8 MB or more requirements 10 MB or more Pentium 90 MHz or more Recomended 16 MB or more requirements...
- Page 89 1. Procedure for Installing and Printing with a Printer Driver 1-3 Screen that Appears when the CD-ROM is Inserted This section explains the screen that appears when the CD-ROM supplied with the Printing System (K) is inserted into the CD-ROM drive. I Install Drivers Click to start installation of the printer driver.
- Page 90 1. Procedure for Installing and Printing with a Printer Driver 1-4 Installing the Printer Driver (Windows) Install the printer driver as follows: * The printer can be connected to the computer by one of the following two methods: local or network. If you want to connect them through network, refer to the operation manual of the operating system (OS).
- Page 91 1. Procedure for Installing and Printing with a Printer Driver Select the driver type. From the list, select the type of driver to be installed, then click Next. * Refer to “1-1 Included printer Drivers” on page 1-1 for information regarding each printer driver.
- Page 92 1. Procedure for Installing and Printing with a Printer Driver Select a printer port. From the list, select the desired port, then click Next. * Normally, set to LPT1. * When installing the printer driver for Windows NT, the Add LPR Port button will appear below the box, so press the button to set the desired LPR printer.
- Page 93 1. Procedure for Installing and Printing with a Printer Driver 1-5 Uninstalling the Printer Driver This section explains how to uninstall the printer driver. Use of the uninstaller supplied with the printer driver allows you not only to uninstall the printer driver, but also uninstall the printer driver related files and Windows registries.
- Page 94 1. Procedure for Installing and Printing with a Printer Driver 1-6 Printing The following is an example procedure for printing using a printer driver under the conditions and environment noted below. • OS : Windows 98 • Printer driver : KX Driver •...
- Page 95 1. Procedure for Installing and Printing with a Printer Driver G Printing from the application Use the application that you want to use to open the document that you want to print. Select [Print] in the [File] menu. The [Print] dialogue box will appear. Select the desired number of copies that you want to make and which pages are to be printed.
- Page 96 2. Windows KX Driver The following section explains the functions of the KX driver. * The following procedure is explained as though it is being carried out in Windows 98. If you are using another operating system, use this procedure simply as reference. * Depending upon version upgrades of the printer driver, the screenshots shown here may differ somewhat from that of the actual printer driver.
-
Page 97: Print Size
2. Windows KX Driver 2-2 Media Tab I Paper Size: Allows you to select a standard size of paper or an envelope size. The following sizes of paper or envelope can be used with this printer. Standard-size paper Letter (8-1/2" x 11"), Legal (8-1/2" x 14"), Ledger (11" x 17"), sheet Statement (5-1/2"... - Page 98 2. Windows KX Driver 2-2-1 Custom Paper Size dialog box I Setting a custom paper size Perform the following procedure in order to register a custom size when you want to print onto a non-standard size of paper. The informa- tion registered here will be displayed under the “Page Size”...
- Page 99 2. Windows KX Driver 2-3 Layout Tab I Pages per Sheet: Allows you to print reduced images of multiple (1, 2, 4, 6, 9, 16 or 25) pages onto a single sheet of paper. This function is called “N-Up” printing (where “N” equals the number of image pages). Reduction of the images is calculated automatically so that all of the selected pages fit onto the single sheet of paper.
- Page 100 2. Windows KX Driver 2-4 Imaging Tab I Print Quality Selects the quality at which printing will be accomplished. [High Quality] ......Enables printing at the highest quality possible for the printer being used. [Draft] ......... Saves on toner use. use this setting when quality printing is not needed such as with test prints. [Custom...] .........
- Page 101 Specifies the printing resolution (number of dots per inch) to be used when printing. Select between “600 dpi” and “300 dpi”. I Kyocera Image Refinement Turning this setting “On” allows the jaggies that appear around the edge of text and graphics to be evened out through the smoothing process.
- Page 102 2. Windows KX Driver 2-5 Output Tab I Output to: Specifies the location of ejection of printed copies. Selection is possible when the optional Job Separator and or Finisher are installed. [Printer Default] ......Copies will be ejected onto the Inner tray. [Inner Tray] .........
- Page 103 2. Windows KX Driver 2-6 Device Settings Tab I Device Options Select and installed options here. Once you have completed the setting for each option, the functions of that option will be available for use. G Optional Paper Feeder Perform this setting according to the installed Option Cassette. G Duplex Unit Perform this setting when the optional Duplex Unit (only available with 20 ppm copiers) is installed.
- Page 104 2. Windows KX Driver 2-6-1 User Settings I Identification Register the desired user and/or department name. I Page Description Language The emulation modes that can be used with this product will be displayed in the dropdown list. If multiple modes are displayed, it is possible to select the desired mode.
- Page 105 2. Windows KX Driver 2-7 Prologue/Epilogue Tab I Disable Feature Make sure there is NO check mark in this checkbox if you want to use the printer’s overlay function. The overlay function will allow you to have selected macro data printed out on top of your documents. I Add Click on this button when you want to add the data of the file that is selected in the displayed list.
- Page 106 This file contains information which is not explained in the manuals. Please read this file before using the printer driver. D: [Welcome.pdf] Kyocera Mita Digital Library screen will appear. Click the available model on screen. The online manual (PDF File) will appear. Installation and operation procedure for printer driver is explained in online manual.
- Page 107 3. Printer Driver for Macintosh Double-Click on the icon for the CD-ROM disk. The content of the CD-ROM will be displayed. The installer by country and by language is supplied in “Driver” folder. Double-Click the available driver installer to start. The installation screen will appear.
- Page 108 3. Printer Driver for Macintosh Access the Apple Menu at the far left of the Menu of Bar and select Chooser. The Chooser will appear. Click once on the LaserWriter 8 icon. Select the name of this printer in the [Select a PostScript Printer] list and then click on the [Create] button.
- Page 109 3. Printer Driver for Macintosh 3-3 General Dialog Box *The actual layout of each dialog box and the available option and settings may differ somewhat depending upon the application and version of LaserWriter that you are using. I Printer: Selects the desktop printer to be used for printing your document. I Copies: Type the desired number of prints to be made (or the number of files to be saved to disk) directly into this field.
- Page 110 3. Printer Driver for Macintosh 3-4 Layout Dialog Box I Pages per sheet: Sets the number of pages to be printed on each sheet of paper. I Layout Direction: A button of either is clicked, and a layout direction is decided. If right button is selected, the pages are laid out from right to left. I Border: Sets the type of line to appear around the page.
-
Page 111: Output Bin
3. Printer Driver for Macintosh 3-5 Printer Specific Options I Resolution: Specifies the printing resolution (number of dots per inch) to be used when printing. Select between “600 dpi” and “300 dpi”. The factory default setting is “600 dpi”. I Management Code: This setting is used when Copy Management is turned ON in the printer. - Page 112 3. Printer Driver for Macintosh I Staple: It is possible to staple your copy sets if the optional Finisher is installed. * Stapling is only available with 20 ppm copiers. * The following settings are required before stapling is possible: (1) Change the “Installable Options”...
- Page 113 3. Printer Driver for Macintosh 3-6 Page Setup dialog Dialog Box Settings for paper size, page layout, magnification ratio and print direction (orientation) are performed in the Page Setup dialog box. To display the Page Setup dialog box, select Page Setup… in the File menu of the corresponding application. * The actual layout of each dialog box and the available options and settings may differ somewhat depending upon the application and the version of LaserWriter that you are using.
- Page 114 3. Printer Driver for Macintosh 3-7 PostScript Dialog Box The actual layout of each dialog box and the available options and settings may differ somewhat depending upon the application and the version of LaserWriter that you are using. I Visual Effects: Visual effects such as horizontal and vertical flip and image inverting can be selected here.
- Page 115 3. Printer Driver for Macintosh 3-8 Custom paper sizes Dialog Box When a paper sizes is selected in “Custom paper sizes” Dialog Box , the paper size can be set as desired. * The actual layout of each dialog box and the available options and settings may differ somewhat depending upon the application and the version of LaserWriter that you are using.
Need help?
Do you have a question about the KM-1530 and is the answer not in the manual?
Questions and answers