
Related Manuals for Kramer VIA Connect2


Summary of Contents for Kramer VIA Connect2
- Page 1 USER MANUAL MODEL: VIA Connect² Presentation & Collaboration Device(Firmware Version 4.0) P/N: 2900-301433 Rev 5 www.kramerav.com...
-
Page 2: Table Of Contents
Using the Gateway Dashboard Listing Default Meeting Spaces in the Mobile App Streaming a Meeting Session Connecting a Video Conferencing Device Camera Switching (VIA 4.1 – For VIA Connect2) Changing VIA Password Technical Specifications VIA App Android Permissions VIA Connect² – Contents... -
Page 3: Introduction
Kramer Electronics Ltd. Introduction Welcome to Kramer Electronics! Since 1981, Kramer Electronics has been providing a world of unique, creative, and affordable solutions to the vast range of problems that confront the video, audio, presentation, and broadcasting professional on a daily basis. In recent years, we... -
Page 4: Recycling Kramer Products
European Advanced Recycling Network (EARN) and will cover any costs of treatment, recycling and recovery of waste Kramer Electronics branded equipment on arrival at the EARN facility. For details of Kramer’s recycling arrangements in your particular country go to our recycling pages at https://www.kramerav.com/social-... - Page 5 Kramer Electronics Ltd. Preview –Moderators can preview presentation content before allowing the presenter to • proceed (in Active Directory Moderator Mode). VIA VERSA – Use VIA Versa to wirelessly connect to a professional grade camera and • AV in the meeting space.
-
Page 6: Typical Applications
Kramer Electronics Ltd. • Easy and Flexible Installation – VIA’s super-compact form factor allows it to be discreetly installed on the back of a display, projector or almost anywhere. Typical Applications VIA Connect² is ideal for the following typical applications: Presentation environments •... - Page 7 Kramer Electronics Ltd. VIA Gateway Dashboard – VIA Connect² device interface opened from the main • display by a keyboard and mouse connected to the VIA Connect² (or by using Collaboration mode). Click the VIA icon in the lower left corner of the Main Display to open this interface.
-
Page 8: Supported Devices
® tablet/smartphone (iPad 2 or later, iOS 12 or later). When using the Airplay service, no Kramer VIA application is needed. However, we recommend using iOS12, Mojave OS X, or higher, for a better experience. Android OS 5. x tablet/smartphone or newer. - Page 9 Kramer Electronics Ltd. VIA 4.1 - Independent VIA-Client Configuration: • VIA Windows/Mac are going to be separated from gateway. It means that new features can be added without having to tweak the gateway settings. This change will make your experience with VIA smoother and more reliable. It is there in all desktop applications in modern SW deployments (For example –...
-
Page 10: Defining Via Connect² Presentation & Collaboration Device
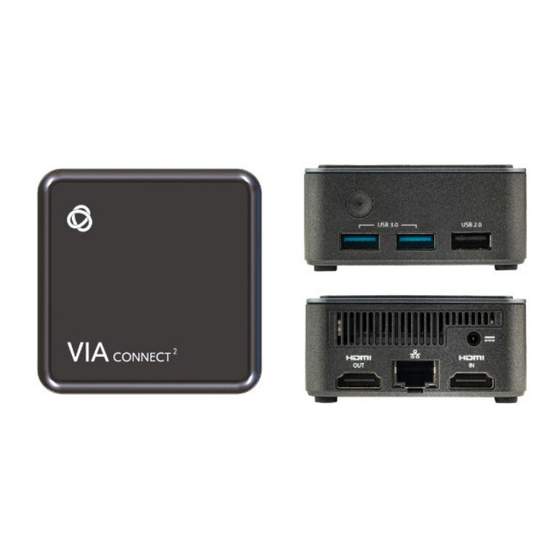
Kramer Electronics Ltd. Defining VIA Connect² Presentation & Collaboration Device This section defines Connect². Figure 4: VIA Connect² Front Panel Feature Function Video Toggle Connector Connect to video toggle cable for toggling between VIA input and HDMI™ input. Micro SD Card Slot Not in use. -
Page 11: For Installer: Mounting Via Connect²
Kramer Electronics Ltd. For Installer: Mounting VIA Connect² Connect². Before installing, verify that the This section provides instructions for mounting environment is within the recommended range: • Operation temperature – 0° to 40°C (32 to 104°F). • Storage temperature – -40° to +70°C (-40 to +158°F). -
Page 12: For Installer: Connecting Via Connect²
Connect², connect its power and then switch on the power to each device. Connecting Device If you wish to use a Kramer active optical pluggable HDMI cable with your Connect², contact your local Kramer office to assist in purchasing the correct cable. -
Page 13: Connecting Main Display
Kramer Electronics Ltd. Connecting Main Display Connect². When VIA Connect² The main display is the screen connected directly to booted up, the VIA gateway screen appears on the main display. All collaboration activity is then displayed here. VIA Connect² enables connecting the following display type: HDMI –... -
Page 14: For Web Administrator: Gateway Management Pages
Kramer Electronics Ltd. For Web Administrator: Gateway Management Pages VIA Connect² administration is divided into two groups of settings: Gateway Dashboard Page (on the website) – Controls general device settings (see • the list below). These high-level controls can only be accessed over LAN or Wi-Fi, with an administrator’s password. -
Page 15: Logging In To Gateway Dashboard Page
Kramer Electronics Ltd. Digital Signage on page 66. • • Reports on page 74. Logging in to Gateway Dashboard Page The Gateway Dashboard Page enables you to configure your VIA Connect² gateway device. It is accessed from any system connected to the same network as your gateway. - Page 16 Kramer Electronics Ltd. To access settings through the Gateway Dashboard Page, you must log in as a Web Administrator (see User Management on page 17). 5. If required, type the Captcha in the text box. To disable the Captcha see Security on page 57.
- Page 17 Kramer Electronics Ltd. Click the tabs in the navigation pane on the left to display the VIA web pages. Click the arrow in the upper right corner to select a different language for web pages. VIA Connect² – For Web Administrator: Gateway Management Pages...
-
Page 18: User Management
Kramer Electronics Ltd. User Management VIA Connect² This section describes how to add user accounts to the database of your device. A user account is required for the Gateway Dashboard Page and if your Connect² is in Database mode (see... -
Page 19: Managing Network Settings
Kramer Electronics Ltd. These options are enabled only when Moderator Mode is enabled(see Moderator Mode on page 52). Moderator – User can moderate and has access to moderator features. Participant – User can join a meeting as a participant but cannot moderate. - Page 20 Kramer Electronics Ltd. If we click DHCP, it will take the IP automatically. Connecting VIA Connect² to a Wi-Fi Network VIA Connect² enables you to wirelessly connect your VIA Connect² device as a client device to your main network. To set up Client Wi-Fi mode: 1.
- Page 21 Kramer Electronics Ltd. 7. Enter the network password and click Apply. Figure 14: Client Mode Setting Page 8. Disconnect the LAN cable (if connected) and reboot the device. Client WiFi Mode is set Wi-Fi with AP Mode VIA Connect² can set up a secure access point for users of your VIA Connect²...
- Page 22 Kramer Electronics Ltd. Setting up secure wireless access point: 1. Click AP Mode (Access Point Mode) and enter an SSID name and password. AP Mode allows guests to join meetings without needing to login to the corporate/institutional network. Under AP mode, there are 2 options: Legacy mode and Wi-fi quick connect.
- Page 23 Kramer Electronics Ltd. Select the channels at which the Wi-Fi SSID will be broadcasted (2 frequencies will be • available – 2.4 GHz and 5GHz), you can select one of them as per the requirement. 2. Select Enable Internet if your VIA Connect²...
- Page 24 Kramer Electronics Ltd. Setting Wi-fi Direct: 1. Ensure the dongle is connected to the gateway. 2. Go to Dashboard > Device Management > Network Settings > Wi-Fi-direct tab will appear. 3. We’ll see 2 options under Wi-Fi direct tab – Standalone and With LAN.
- Page 25 Kramer Electronics Ltd. Figure 19: SSID on VIA Client With Standalone: 1. We can login through the Wi-Fi direct tab only. 2. Enter valid SSID and enter PIN – 4 digits. 3. Select frequency – 2.4GZ or 5 Gz. 4. Click ‘Apply’.
- Page 26 Kramer Electronics Ltd. Figure 20: Standalone option Figure 21: SSID on VIA Client VIA Connect² – For Web Administrator: Gateway Management Pages...
- Page 27 Kramer Electronics Ltd. Connecting VIA Connect² to an 802.1X Network VIA Connect² enables you to wirelessly connect your VIA Connect² device as a client device to an 802.1X network using password authentication or EAP-TLS authentication. EAP-TLS features include: Mutual authentication (server to the client and client to server).
-
Page 28: Via Pad Configuration
Kramer Electronics Ltd. VIA Pad Configuration VIA Pad is an optional touch-pad accessory that enables meeting participants to instantly join VIA Pad VIA Connect² a VIA meeting with their Mac or PC laptop. must be paired with your device before it is used to join meetings. The pairing procedure includes: Configuring VIA Pad Settings on page 27. -
Page 29: Pairing A Via Pad Device
Kramer Electronics Ltd. 3. Select the Auto Connect to Wi-Fi checkbox, to configure VIA Pad to automatically connect to the meeting space Wi-Fi network. Figure 23: VIA Pad Auto Connect Setting Page Figure 24: VIA Pad Auto Connect Setting Page The Auto Connect settings appear. -
Page 30: Site Management
Kramer Electronics Ltd. Site Management VSM (VIA Site Management) is an optional, web-based software application (purchased separately) that enables an administrator to monitor and make changes to all VIA gateways VIA Connect² connected to a network. enables you to activate VSM management for a VIA gateway and define which gateway functions are managed by VSM. -
Page 31: Via Screen Editor
Kramer Electronics Ltd. VIA Screen Editor VIA Connect² enables you to customize the look and feel of the main display home screen: • Creating New Screen Layout on page 30. Formatting Screen Layout Widgets on page 32. • • Editing a Screen Layout on page 42. - Page 32 Kramer Electronics Ltd. 2. Click Add Screen Layout. The wallpaper upload window appears. Figure 27: Wallpaper Editor Page 3. Drag an image file to the window or click Upload a photo from your computer and select an image file from your computer.
- Page 33 Kramer Electronics Ltd. Formatting Screen Layout Widgets provides different formatting options for each layout VIA Connect² widget (screen element), such as: The room code position, format, and refresh time instead of the default room name. Screen Editor Widget formatting: Formatting Text on page •...
- Page 34 Kramer Electronics Ltd. Formatting Text Format the following on the Properties tab: Figure 29: Text Properties Tab Enter the text in the Text1 field. • Select the font size and text alignment. • Under Auto Resize, click ON to automatically resize the box to fit the size of the text.
- Page 35 Kramer Electronics Ltd. Formatting Room Name 1 Room Name 1 is the address used to join a meeting. Format the following on the PROPERTIES tab: Figure 31: Room Name Properties Tab In the Room Name field, you can enter the following: •...
- Page 36 Kramer Electronics Ltd. Formatting Room Code Room Code is the four-digit code that participants need to join the meeting. Format the following on the PROPERTIES tab: Figure 32: Room Code Properties Tab Enable the Always Show On Wallpaper to always show the room code on the main •...
- Page 37 Kramer Electronics Ltd. Formatting Code Popup Code Popup shows the Room Code only when a participant enters the Room Name on Kramer VIA app to join the meeting. This popup appears on top of any content being presented on the main display.
- Page 38 Kramer Electronics Ltd. Formatting Time The Time widget displays the time according to the time zone settings of the VIA device (see Date/Time on page 50). Format the following on the PROPERTIES tab: Figure 35: Time Properties Tab Select 24 hour or AM/PM time format.
- Page 39 Kramer Electronics Ltd. Formatting QR Code The QR Code widget is a QR code that enables a participant to join the meeting by scanning the code with their device. Format the following on the PROPERTIES tab: Figure 37: QR Code Properties Tab Activate the Enable QR code to allow joining the meeting using the QR code.
- Page 40 Kramer Electronics Ltd. Formatting Calendar The Calendar widget displays information about meetings scheduled in the room where the VIA device resides. The VIA Calendar feature must be configured and activated to use this widget (see Integrating Calendar on page 62).
- Page 41 Kramer Electronics Ltd. Under No. of Records to display, select how many upcoming meetings to display. • • Under Font Size, select the font size. Configure Calendar from VIA screen editor see Integrating Calendar on page 62. Format the following on the COLORS tab: Figure 39: Calendar Color Tab •...
- Page 42 Kramer Electronics Ltd. Formatting Timer The Timer widget is a pop-up that displays a notification that counts down the last several minutes before the next meeting is scheduled to start in the room. Format the following on the PROPERTIES tab:...
- Page 43 Kramer Electronics Ltd. Publish – Saves and publishes the template. • Save – Saves the editor. • Exit Editor – Exists from the editor. • Editing a Screen Layout To edit a screen layout: 1. Click Device Management > VIA Screen Editor on the navigation pane.
- Page 44 Kramer Electronics Ltd. 3. Click OK to proceed. A screen layout file (screen) is downloaded to your device. To import a screen layout: 1. Click Device Management > VIA Screen Editor on the navigation. The Screen Editor page appears. 2. Click Import Templates.
-
Page 45: Configuring Via Settings Template
Kramer Electronics Ltd. Configuring VIA Settings Template VIA Connect² enables you to configure settings such as power saver, time & date, audio, and features availability and save them as part of a settings template. This enables you to define and save different settings for different types of meetings. Just load the appropriate template to match your needs. - Page 46 Kramer Electronics Ltd. 5. As you change settings on each page, do one of the following: a. Click Save to save the template. Changes are saved and the template remains open for more edits. A popup appears that confirms the template has been created successfully. Click -OR- b.
- Page 47 Kramer Electronics Ltd. System Configure the following settings in the VIA settings template that affect the overall operation of the system: Figure 45: System Setting Tab If you enter a name in the Custom Room Name, it does not change the IP address, but •...
- Page 48 Use this mode if your controller does not support TLS (default). Language – Select the language for the Gateway Dashboard Page. • Broadcast (default = ON) – When the user launches Kramer VIA app, all broadcasting • VIA gateways appears automatically on the meeting spaces.
- Page 49 Kramer Electronics Ltd. Presentation Configure the following settings in the VIA settings template (see Error! Reference source not found. on page Error! Bookmark not defined.) that affect how participants share content during a meeting: iOS Mirroring – The VIA gateway will act as an Apple® AirPlay receiver. If desired, type •...
- Page 50 Kramer Electronics Ltd. Web admin can select as follows: 1 Presenter – For a single presenter using Wi-Fi Direct. (Default = ON). 2 Presenter – For two presenters using local network. Default Encoding for Presentation – PC & Mac clients connected to the VIA gateway •...
- Page 51 Kramer Electronics Ltd. Auto Disconnection – The VIA device can automatically disconnect participants whose • RSSI (Received Signal Strength Indicator) is weak or cannot be measured, indicating that they are too far from the device to be in the meeting room. (Default = OFF) Deviation –...
- Page 52 Kramer Electronics Ltd. End of Meeting Select what happens to the Whiteboard when all participants have disconnected from a VIA meeting: Figure 59: End of Meeting Setting Tab Clean the Cloud – Deletes all the whiteboard files stored in the VIA cloud (default = •...
-
Page 53: File Sharing
Kramer Electronics Ltd. File Sharing Place limits on the file types that can be shared between participants: Figure 60: File Sharing Setting Tab All Files – Share any type of file between participants. • Selected Files –Click the edit icon to add or remove file types from the allowed list. - Page 54 Kramer Electronics Ltd. Active Directory – Only users defined in the Active Directory can join a meeting and become moderator (see Error! Reference source not found. on page Error! Bookmark not defined.). Basic – Anyone can join a meeting and become moderator. A password can be ...
- Page 55 Kramer Electronics Ltd. Configuring Active Directory Moderator Mode Active Directory users can be imported into VIA Connect² Gateway Management Pages. The Active Directory must be organized into two sets of users: one that has permission to become moderator and one that does not have moderator permission. When using Active Directory, only users who are in the directory can join a VIA meeting.
- Page 56 Kramer Electronics Ltd. 2. Click the Activate Moderator Mode switch and select Active Directory. The Active Directory settings appear. 3. In the Active Directory Domain text box, enter the Active Directory domain name. 4. Select User principal name or Same account name.
- Page 57 Kramer Electronics Ltd. Audio Configure the following audio related settings in the VIA settings template (see Configuring VIA Settings Template on page 44): Figure 64: VIA Gateway Audio Setting Tab VIA Gateway Audio Input – Set the audio input device for the User Gateway.
- Page 58 Kramer Electronics Ltd. Security Configure the following settings in the VIA settings template (see Configuring VIA Settings Template on page 44) that affect login security for the Gateway Dashboard Page and for VIA meetings: Figure 65: VIA Security Setting Tab Web Session Timeout –...
- Page 59 Kramer Electronics Ltd. Certificate VIA Connect² A custom SSL certificate can be uploaded to to better provide for the security needs of your organization. To prevent damage to the system, make sure you upload files that can be used by the system.
-
Page 60: Proxy Server
Kramer Electronics Ltd. Streaming This setting is used for the streaming feature. For more information, see Streaming a Meeting Session on page 122. Proxy Server A proxy server can be used to handle all URLs used during VIA meetings (for example, Youtube URLs used for the Youtube player feature) and for firmware downloads. - Page 61 Kramer Electronics Ltd. VIA Connect²: Features Use these options to reorganize VIA Connect² user menu and hide menu options. The following menus can be changed: Gateway Features – The menu shown on the main display. • Client Features – The menu shown on participants’ laptops and tablets.
-
Page 62: Display Controller
Kramer Electronics Ltd. Display Controller VIA Connect² enables you to control a display screen that is connected to the same network Connect². as your This feature enables you to configure one of the following actions: When the first person joins the meeting, the main display powers ON and when the last •... -
Page 63: Integrating Calendar
Kramer Electronics Ltd. Integrating Calendar VIA Connect² enables you to display scheduled meeting information on the main display home screen. VIA automatically retrieves information about meetings scheduled in the room where the VIA device resides. This feature is available for a room that has been added in Office 365 ®... - Page 64 Kramer Electronics Ltd. Integrating Microsoft Exchange To integrate Microsoft Exchange with VIA Calendar: 1. Click Device Management > Calendar on the navigation panel. The Calendar Account appears. 2. Select MS Exchange from the Calendar Type drop down. The MS Exchange controls appear.
- Page 65 Kramer Electronics Ltd. Integrating Google Calendar To integrate your Google Calendar with VIA Calendar: 1. Click Device Management > Calendar on the navigation panel. The Calendar Account appears. 2. Select Google from the Calendar Type drop down. The Google Calendar controls appear.
-
Page 66: Third Party Apps
Kramer Electronics Ltd. Third Party Apps Adding third party apps. Device Management > Third Party Apps updates, adds or deletes apps that can be opened in the VIA app by meeting participants or by the presenter / moderator on the Main Display. -
Page 67: Digital Signage
For VIA devices sold before June 1 , 2019, Digital Signage is an optional feature available through separate licensing and pricing. Contact your local Kramer office for more details. VIA Connect² Digital Signage displays dynamic content and information on the main display when there is no meeting in progress. - Page 68 Kramer Electronics Ltd. 2. Create and upload media, as required: Creating Scrolling Text on page 67. Adding an RSS Feed on page 68. Adding a Web URL on page 69. Uploading Media Files on page 69. ...
- Page 69 Kramer Electronics Ltd. The following variables can be entered into the text field: • #airplayname# – Displays the airplay name. • #roomname# – Displays the room name/code for joining into the meeting. • #appass# – Displays the Access Point password.
- Page 70 Kramer Electronics Ltd. Adding a Web URL Add the URL of an existing web page or use a third-party solution (for example, Google Slides) to publish a presentation to the web and add the URL of the presentation. To add a web URL for digital signage: 1.
-
Page 71: Template Manager
Kramer Electronics Ltd. Figure 79: Media Setting Tab 3. Click Browse File. A file browser appears. 4. Select an image or video file and click Upload. The file is added and appears in the Existing Media table. Template Manager Templates dictate the layout of the digital signage content. Up to 3 frames of content can be displayed at once. - Page 72 Kramer Electronics Ltd. The Pre-Defined Templates tab explains all the pre-defined templates that are available when you create a campaign 2. Click Custom Templates; The Custom Templates tab appears. 3. Click Add Template; The Add Template pane appears. Figure 81: Add Template Pane 4.
- Page 73 Kramer Electronics Ltd. Campaign Editor A Digital Signage Campaign defines what is displayed in each frame of a digital signage template layout. To configure a digital signage campaign: 1. Click Digital Signage > Campaign Editor on the navigation pane. The Create Campaign page appears.
- Page 74 Kramer Electronics Ltd. Schedule Campaign VIA Connect² enables you to schedule when a digital signage campaign is displayed. To schedule a digital signage campaign: 1. Click Digital Signage > Schedule Campaign on the navigation pane. The Schedule Campaign page appears.
-
Page 75: Reports
Kramer Electronics Ltd. Font Management VIA Connect² enables you to add new Fonts for digital signage. To add new fonts to Digital Signage: 1. Click Digital Signage > Font Management on the navigation pane. The Font Management page appears. Figure 86: Font Management Page 2. -
Page 76: Updating Firmware
Kramer Electronics Ltd. Webadmin Activity Log – Shows activity of the Gateway and Gateway Settings • embedded web pages. To view and search the system activity logs: 1. Click Reports > Webadmin Activity Log / Gateway Activity Log on the navigation pane;... - Page 77 Kramer Electronics Ltd. To update your VIA Connect² firmware: 1. Click Utility > Update Firmware on the navigation panel. The Update Firmware page appears. Figure 88: Update Firmware Page 2. When using an updated file saved on your computer: a. Click Browse File; A file browser appears.
- Page 78 Kramer Electronics Ltd. To verify the update, view the current firmware version on the Check for Update button on Gateway Dashboard Page. Figure 89: Update and Download Confirmation Message Activating VIA Gateway License VIA Connect² enables you to upload and activate your VIA Connect²...
-
Page 79: Resetting Default Settings
Kramer Electronics Ltd. To Activate your VIA Connect² license: If a Digital License is already installed on your device, the name of the license appears on the bottom of the page. 1. Select UTILITY > VIA License on the navigation panel. - Page 80 Kramer Electronics Ltd. To reset Logs: 1. Click Utility > Maintenance on the navigation pane. 2. Select Logs check box. 3. Click Apply. Logs reset after reboot. To download Logs: 1. Enable System logs in VIA Settings Template. 2. Go to Utility> Maintenance> Download logs> Click download logs button.
- Page 81 Kramer Electronics Ltd. To upload BIOS feature: • Go to Maintenance> upload bios option at bottom right. Process takes few mins and the gateway will reboot after it is done. Figure 93: Uploading BIOS Process VIA Connect² – For Web Administrator: Gateway Management Pages...
-
Page 82: For Web Administrator: Gateway Dashboard
Kramer Electronics Ltd. For Web Administrator: Gateway Dashboard VIA Connect² Administrators control an individual device from two menus: Gateway Dashboard Page – These are a web UI, loaded from inside the device, which • control general device settings. The Management Pages are high-level controls which can be accessed over LAN and Wi-fi, and require an administrator’s password (see... - Page 83 Kramer Electronics Ltd. Figure 94: Gateway Dashboard Features Page Disconnect user - We can disconnect a user by clicking on this. Make Moderator – Only the person using the gateway dashboard can turn a participant into a moderator by choosing the "Make Moderator" option.
-
Page 84: Settings - Logging Into The Settings Tab
Kramer Electronics Ltd. Settings – Logging into the Settings tab To log in to the Gateway Dashboard Settings: 1. Click the VIA icon in the lower left of the main display or use CTRL-Tab to view an open screen. The Gateway Dashboard appears. -
Page 85: Lan Settings
Kramer Electronics Ltd. LAN Settings Use the Gateway Dashboard to change the VIA Connect² IP address. By default, the IP address of your unit is automatically assigned by a DHCP server. The following explains how to set a static IP address. - Page 86 Kramer Electronics Ltd. Wi-Fi Settings VIA Connect² can be setup to use Wi-Fi in two modes: AP or Client. AP (access point) mode – Use this option if your device is connected to a LAN. Your VIA Connect² can setup its own Wi-Fi network which can be used by guests to connect to meetings without giving access to the wider network or requiring them to have a network login.
- Page 87 Kramer Electronics Ltd. Wi-Fi with AP Mode VIA Connect² VIA Connect² can set up a secure access point for users of your network. This setup is ideal for guest users who you may not want to connect directly to your network.
- Page 88 Kramer Electronics Ltd. Wi-fi Quick Connect: Enabling this will show the VIA_ SSID & Password UI. It has the two fields, first for SSID with a prefix ‘VIA_’ and second for Password. It will have the SSID limit set to 10 characters and password length of max 8 Characters.
- Page 89 Kramer Electronics Ltd. Wi-Fi with Client Mode VIA Connect² VIA Connect² enables you to wirelessly connect your device as a client device to your main network. Use this option if you have no LAN connection available. To set up Client Wi-Fi mode: 1.
- Page 90 Kramer Electronics Ltd. Wifi IP Info It will show the IP details of the Wi-fi. The fields are non-editable. • Figure 105: Wi-fi IP Info Connecting VIA Connect² to an 802.1X Network VIA Connect² VIA Connect² enables you to wirelessly connect your device as a client device to an 802.1X network using password authentication or EAP-TLS authentication.
-
Page 91: Accessing System Controls
The log folder is only available if system logging is activated in the Gateway Management Pages (see Viewing and Searching System Activity Logs on page 74). VIA Connect² unit is pre-activated by Kramer. If your license has been revoked, you can activate it here. VIA Connect² – For Web Administrator: Gateway Dashboard... - Page 92 Kramer Electronics Ltd. To access system controls: 1. Login to Gateway Dashboard settings and select System Controls. The System Controls tab appears. The System Controls tab appears. Figure 106: Setting Control Tab 2. Available Options: Audio – Select audio output option.
- Page 93 Kramer Electronics Ltd. System Health – Check connection statuses (click the Check Status button). Figure 109: System Health Activate Unit – View or enter the VIA Connect² license details. Figure 110: Activate Unit Enabling Audio for VIA Versa Video Conferencing VIA Connect²...
-
Page 94: Camera Switching (Via 4.1)
Kramer Electronics Ltd. Figure 111: Audio Setting Tab from Gateway Dashboard 5. From the Audio Output Devices drop-down, select USB. 6. From the Audio Input Devices drop-down, select the name of the external video conferencing device. 7. Click Apply. Audio is enabled for VIA Versa web-conferencing after resetting the session. - Page 95 Kramer Electronics Ltd. Figure 112: Toggle switch when more than 1 camera is connected VIA Connect² – For Web Administrator: Gateway Dashboard...
-
Page 96: For User: Connecting Via Via Connect²
Kramer Electronics Ltd. For User: Connecting via VIA Connect² VIA Connect² enables multiple participants to connect for flexible local and remote on-screen meeting, presenting and collaborating. You can connect to it from a distance over LAN, locally over WiFi or using an HDMI cable. -
Page 97: Installing Or Running The Via App
Select one of the following: o Run VIA - Downloads a temporary Kramer VIA app which you can run without installing to join the meeting. o Install the VIA app – Install the VIA APP and use it to join meetings and moderate. - Page 98 Kramer Electronics Ltd. On Android or iOS: 1. Download and install the free Kramer VIA app from Apple App Store or Google Play or scan the QR code (if shown). Figure 114: Android Toolbar 2. Continue with Joining a Room with the VIA app on page 98.
-
Page 99: Joining A Room With The Via App
Kramer Electronics Ltd. Joining a Room with the VIA app 1. Make sure you are connected to the same network as the VIA Connect² device. 2. Open your installed VIA app. If you are using a VIA Pad, see Presenting from a VIA Pad on page 101. -
Page 100: Presenting From The Via User Dashboard
Kramer Electronics Ltd. Presenting from the VIA User Dashboard Invite additional users to the meeting (generates an email with a link). Leave the meeting. 1. Select what you want to share: Screen – Share your screen on the Main Display. Click the down arrow “Extend”... - Page 101 Kramer Electronics Ltd. Changing the Default Encoding Format (Via Client > Settings icon on top left) VIA Connect² enables you to change the default encoding format for your device. This is the encoding format used for presenting and streaming video from your device to VIA Connect²...
-
Page 102: Presenting From A Via Pad
Kramer Electronics Ltd. Presenting from a VIA Pad Your VIA Pad needs to have been paired with the VIA Connect² unit before it is used (see Configuring VIA Pad Settings on page 27). The following instructions are for Windows and Mac OS users. - Page 103 Kramer Electronics Ltd. Presenting from an HDMI Source VIA Connect² enables you to show content on the main display from an external device connected to the HDMI IN connector. When a device is connected to the HDMI input, it overrides other VIA Connect²...
- Page 104 Kramer Electronics Ltd. To mirror your screen using AirPlay Services: 1. Connect your Apple device to the network that VIA Connect² is connected to. 2. For iPhone or iPad/Mini iPad: Swipe from the upper right corner to reveal the Control Center and click Screen Mirroring.
- Page 105 PC to enable the feature. Mac users can use AirPlay to simulate the same behavior. To mirror with the Extended Desktop feature: On the Kramer VIA User Dashboard, click the Screen-1 icon and select Extended. • Figure 119: Media Player Window An extension of your device desktop appears on the VIA main display.
-
Page 106: Sharing Media From The User Dashboard
Kramer Electronics Ltd. Sharing Media from the User Dashboard Use the Media sharing option on the VIA app to stream video to the main display without sharing your screen. You can also simply share your screen while playing a video. -
Page 107: Rtsp Streaming Through Vlc
Kramer Electronics Ltd. Video files shared from your device to the main display by a native media player such as QuickTime and/or Windows Media Player may experience lower frame rates, inconsistent playback, and increased latency, depending on your laptop system’s performance. - Page 108 Kramer Electronics Ltd. 2. Click Media > Stream. The Open Media window appears. Figure 122: Media Window 3. Click Add and select a file to stream and click Stream. The Stream Output/Source window appears. Figure 123: Stream Output Window VIA Connect² – For User: Connecting via VIA Connect²...
- Page 109 Kramer Electronics Ltd. 4. Click Next. The Stream Output/Destination Setup window appears. Figure 124: Destination Setup Window 5. Select RTSP from the New Destination drop down and click Add. The RTSP tab appears. 6. Type a short name to be used as a Path and click Next.
- Page 110 Kramer Electronics Ltd. 7. Clear the Activate Transcoding checkbox and click Next. The Stream Output/Option Setup window appears. Figure 126: Options Setup Window 8. Select Stream all elementary streams and click Stream. 9. On the VIA User Dashboard, Select Multimedia.
-
Page 111: Moderating - Controlling The Meeting
Kramer Electronics Ltd. RTP Streaming Through VLC The Real-time Transport Protocol (RTP) is a network protocol for delivering audio and video over IP networks. RTP is used extensively in communication and entertainment systems that involve streaming media, such as telephony, video teleconference applications, television services and Web-based push-to-talk features. - Page 112 Kramer Electronics Ltd. If you can become the moderator, the Moderator icon is shown on your User Dashboard: 1. Click the Moderator icon on your User Dashboard to become the moderator. If sessions cannot start without a moderator, the session will start when you click the ...
-
Page 113: Collaborating On The Main Display
Kramer Electronics Ltd. Figure 130: Presentation Request Window 7. The moderator can also end a presentation by clicking on the Display icon in the Participants tab. If another user is a moderator, the meeting will not start until that moderator joins, and the... -
Page 114: Using The Whiteboard
Kramer Electronics Ltd. 4. Move your cursor up past the top of your device screen and it will appear at the bottom of the main display with your nickname next to it. Figure 133: Collaboration Cursors on the Main Display 5. - Page 115 Kramer Electronics Ltd. Whiteboard Tools Icon Action Draw on the whiteboard. Highlighter Highlight text or objects on the whiteboard in yellow. Eraser Erase annotations. Click icon corner to select eraser thickness and to erase the entire whiteboard. Capture Select an area and paste in onto the current whiteboard page or a new page.
-
Page 116: Chatting And File Sharing
Kramer Electronics Ltd. Show Desktop Show Desktop allows you to hide the whiteboard and to navigate freely on the VIA desktop. A toolbar is available for making annotations on the VIA desktop and capturing an object. For example, capture an area of the screen and add it as an object in the current Whiteboard page. - Page 117 Kramer Electronics Ltd. Figure 135: The Participants tab 4. Chatting from the Chat tab: Click the Chat tab (if you are not in it). Select the participant you want, (or select “everyone” from the dropdown) and enter the text.
-
Page 118: For User: Advanced Features
Kramer Electronics Ltd. For User: Advanced Features Using the Gateway Dashboard The Gateway Dashboard provides advanced meeting functions that are usually performed by the VIA administrator or a participant with moderator status. The dashboard is a web UI that is loaded from inside the device and controls features of the device’s meeting interface. -
Page 119: The Features Menu
Kramer Electronics Ltd. Participants Menu VIA Connect² enables the administrator to view the participants. The Participants menu shows the participants along with DND, Display Control, Display Status, Chat Selection and File Sharing options. Figure 138: Participants Menu Mirroring List only appears when a user is mirroring their screen. - Page 120 Kramer Electronics Ltd. Figure 139: Options on the Features tab Screen Share - Shows the main display on all participant devices. A check mark • appears on the Screen Share icon and a new window with a live representation of the main display and a toolbar opens on all the participant’s devices.
-
Page 121: Settings Menu
Kramer Electronics Ltd. Settings Menu Refer to Settings – Logging into the Settings tab on page 83, Wi-Fi Settings on page Accessing System Controls on page 90. Figure 140: Settings Menu VIA Connect² – For User: Advanced Features... -
Page 122: The Power Menu
Kramer Electronics Ltd. The Power Menu You will see these options: Reset session, reboot, and shutdown. Figure 141: Power Menu Listing Default Meeting Spaces in the Mobile App When you start Kramer VIA mobile app, the Spaces screen appears, showing all meeting spaces that you have favorited. -
Page 123: Streaming A Meeting Session
Kramer Electronics Ltd. Streaming a Meeting Session VIA Connect² enables you to stream all activity on the main display during a meeting to other VIA gateway units or computers. VIA Connect² enables two types of streaming options: Unicast Streaming on page 122. - Page 124 Kramer Electronics Ltd. Streaming from one VIA Unit to Another VIA Unit To stream from one VIA gateway unit (such as Connect²) to another VIA unit, you need: Two VIA gateway units, one for a receiver and one for a sender.
- Page 125 Kramer Electronics Ltd. 7. Launch VLC. 8. Click Media > Open Network Stream. 9. Type the streaming URL as udp://@:<port number> Streaming begins and is displayed on the receiver computer. Multicast Streaming VIA gateway units (such as Connect²) can stream their screens as a multicast so that multiple devices can view the gateway’s display.
- Page 126 Kramer Electronics Ltd. 6. Select the added URL and click Play. Streaming begins from one VIA’s display to another VIA Gateway. Repeat steps 1–6 to stream to another VIA unit. Receiving Multicast Streams on Multiple Windows/Mac Computers 1. Launch VLC on the client computer.
-
Page 127: Connecting A Video Conferencing Device
The video and audio for the video conference switches to the external video conferencing device and you are ready to start a video. Camera Switching (VIA 4.1 – For VIA Connect2) 1. If more than 1 camera is connected to the VIA gateway, VIA room device is activated and hybrid session is initiated, the new camera toggle button will appear on the VIA app. -
Page 128: Changing Via Password
Kramer Electronics Ltd. Figure 142: Toggle switch when more than 1 camera is connected Recording icon will only appear if both the steps are followed: 1. Enable Recording in the settings template on the web. 2. Log in VIA client, navigate to the participant list, and access the recording option. - Page 129 Kramer Electronics Ltd. 4. The “change password” will redirect to User Management page. Figure 144: Redirected to User Management Page 5. Change your password (if minimum character length is enabled under Password Policies, it will show the notification of minimum length of password).
-
Page 130: Technical Specifications
Kramer Electronics Ltd. Technical Specifications PORTS 1 Ethernet On an RJ-45 connector 2 USB 3.0 On a female USB type-A connector 1 USB 2.0 On a female USB type-A connector 2 Pin connector Video Switching control VIDEO Max Resolution Up to 4K@30 for both Input & Output... -
Page 131: Via App Android Permissions
Kramer Electronics Ltd. VIA App Android Permissions Permission Category Description How Used Camera Take pictures and videos. Logging in through QRCode reader. Contacts Find accounts on the device. Logging in to cloud storage apps like Google Drive, OneDrive, and Dropbox. - Page 132 This limited warranty gives you specific legal rights, and you may have other rights which vary from country to country or state to state. This limited warranty is void if (i) the label bearing the serial number of this product has been removed or defaced, (ii) the product is not distributed by Kramer Electronics or (iii) this product is not purchased from an authorized Kramer Electronics reseller.
- Page 133 SAFETY WARNING Disconnect the unit from the power supply before opening and servicing For the latest information on our products and a list of Kramer distributors, visit our website where updates to this user manual may be found. We welcome your questions, comments, and feedback.
Need help?
Do you have a question about the VIA Connect2 and is the answer not in the manual?
Questions and answers