
Related Manuals for Kramer VIA Campus


Summary of Contents for Kramer VIA Campus
- Page 1 USER MANUAL MODEL: VIA Campus Collaboration Device for Education and Training Environments P/N: 2900-300558 Rev 1 www.kramerAV.com...
-
Page 2: Table Of Contents
Connecting VIA Campus to a Display Downloading and Running VIA Campus Software Using an .msi File Logging In to VIA Campus Logging to the VIA Campus using a VIA Pad Using iOS /Android Mirroring to Share your Screen VIA Campus Functions Defined Using VIA Campus VIA Campus User’s Main Menu... - Page 3 Figures Figure 1: VIA Campus Collaboration Device Figure 2: Connecting the VIA Campus Collaboration Device Figure 3: VIA Campus Admin Features Figure 4: VIA Campus Main User Screen Figure 5: The Participant List Figure 6: Enable Control Figure 7: Chat Window...
-
Page 4: Introduction
Introduction Welcome to Kramer Electronics! Since 1981, Kramer Electronics has been providing a world of unique, creative, and affordable solutions to the vast range of problems that confront video, audio, presentation, and broadcasting professionals on a daily basis. In recent years, we have redesigned and upgraded most of our... -
Page 5: Getting Started
Avoid interference from neighbouring electrical appliances that may adversely influence signal quality Position your VIA Campus away from moisture, excessive sunlight and dust This equipment is to be used only inside a building. It may only be connected to other equipment that is installed inside a building. -
Page 6: Recycling Kramer Products
Kramer Electronics has made arrangements with the European Advanced Recycling Network (EARN) and covers any costs of treatment, recycling and recovery of waste Kramer Electronics branded equipment on arrival at the EARN facility. For details of Kramer’s recycling arrangements in your particular country go to our recycling pages at http://www.kramerelectronics.com/support/recycling/. -
Page 7: Overview
VIA Campus also lets teachers use e-polling and e- exams to easily and instantly measure how much students are actually learning. -
Page 8: Applications & Features
JPEG images (all operating systems) and play MP4 videos from any platform. You can also display and share PDFs from any logged-in device. VIA Campus features a 10Mbps maximum video bitrate for 30fps or 60fps videos and handles video files of up to 8GB. -
Page 9: Defining The Via Campus Collaboration Device
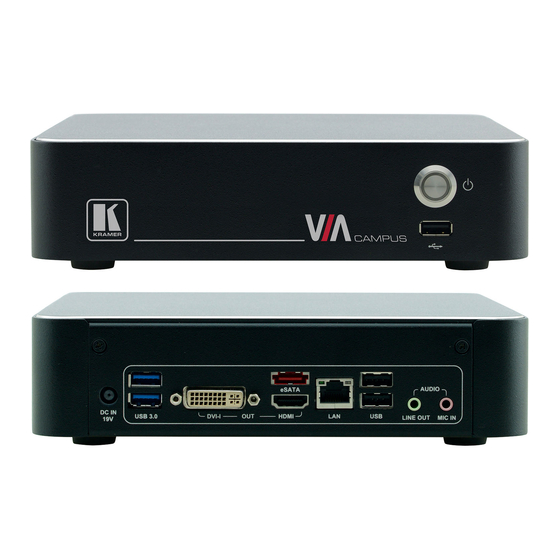
Airplay service of your device. Android user? Use the VIA App to start mirroring your device and its content! Defining the VIA Campus Collaboration Device This section defines VIA Campus. Figure 1: VIA Campus Collaboration Device... -
Page 10: Setting Up Via Campus
Always switch off the power to each device before connecting it to your VIA Campus. After connecting VIA Campus, connect its power and then switch on the power to each device. To connect the VIA Campus as illustrated in the example in Figure 2 you need: A VIA Campus Wireless Collaboration Hub A display (projector, monitor, or screen). -
Page 11: Connecting Via Campus To A Display
Unlike the HDMI port, the DVI-I jack does not carry embedded audio and requires a separate audio connection The VIA Campus internal video card reads the Extended Display Identification Data (EDID) for any connected display and sets the optimum display resolution and image refresh rate automatically through the HDMI connector. -
Page 12: Downloading And Running Via Campus Software
For full functionality, VIA Campus must be connected to a local area network (LAN). You may assign a fix IP address to the VIA Campus. However, your VIA Campus is set on DHCP mode by default. NOTE: To allow participation in a collaborative session (send and receive content), connect the VIA Campus hub and all participant devices (PCs/ MACs/ smartphones/tablets) to the same network (LAN - wired/wireless). - Page 13 For tablets and smartphones, find the Kramer VIA app in the App Store (iOS) and Google Play (Android). Alternatively, open your Web browser on your mobile device and enter the IP address for your VIA Campus unit. Choose from the following two options: Download the app to your tablet/phone and install.
-
Page 14: Using An .Msi File
This accesses VIA Campus. iOS and Android 1. First, enter the IP address for the VIA Campus (found on the main display screen in the lower left). 2. Next, choose a username (nickname) for your device (it can be any mix of letters and numbers) then enter it on the login screen of your device. -
Page 15: Logging To The Via Campus Using A Via Pad
All participants in a meeting using an Apple device can mirror their screen by using the Airplay service. No application is required to activate this mode. However, the VIA Campus unit must run firmware version 1.8 or later and iOS mirroring feature must be enabled (see the “settings” section for more details). - Page 16 XXXX is a random combination of letters and numbers. Note: If the room code is enabled on the VIA Campus, you are prompted to enter the same 4-digit security code when attempting to mirror you iOS device. This code appears on the main screen of the VIA Campus.
- Page 17 4.6.2 MacBooks and Apple Computers 1. Connect your Apple device to the network where the VIA Campus resides. 2. Click the AirPlay menu on the Apple Menu Bar, located in the top-right corner of the screen near the clock. 3. Choose the AirPlay device name of the VIA Campus.
- Page 18 Note: If the Room Code is enabled on the VIA Campus, you are prompted to enter the same 4-digit security code when attempting to mirror you iOS device. This code appears on the main screen of the VIA Campus. 4.6.3 Android Device Mirroring 1.
-
Page 19: Via Campus Functions Defined
VIA Campus Functions Defined VIA Campus presents two types of screens depending upon whether it is being used by the Admin or by a User. The following screen shots illustrate both types. The illustration below shows the VIA Campus main Admin screen and its functions:... - Page 20 Display Layout Allows selecting the layout when several participants are stepped-in (thumbnail view or dynamic view) The illustration below shows the VIA Campus main User screen and its functions: VIA Campus - VIA Campus Functions Defined...
-
Page 21: Figure 4: Via Campus Main User Screen
Shows a mirror of the VIA Campus collaboration display on Display the user’s devices (laptop, iPAD, MacBook, Android tablet). The user can see all the activities of the VIA Campus collaboration display on his system (this feature is called "Screen Share" in the Admin menu) - Page 22 Gives participants control over the presenters Mac or PC laptop File Transfer Shares files between the available participants during the session Party Apps Open the third-party applications installed and integrated with VIA Campus VIA Campus - VIA Campus Functions Defined...
-
Page 23: Using Via Campus
Using VIA Campus VIA Campus is a powerful and versatile collaboration hub that gives participants a wide selection of presentation tools. This section describes each of the tools and how they work. VIA Campus User’s Main Menu This section refers to the user's experience. Once you have logged in to VIA, the Parent Dashboard displays on your home-screen. -
Page 24: Figure 5: The Participant List
Start a presentation at a display The user is currently presenting Chat Status Start a chat session with any available participants The participant is currently chatting with you. Click to open the chat session VIA Campus - Using VIA Campus... -
Page 25: Enabling Control
Start Collaboration icon and drag his laptop mouse to the top and off their local screen. That cursor now moves to the VIA Campus unit and appears on the main display of Jim. Buttons are shown in the picture below:... -
Page 26: Chatting With Participants
The admin or user can start a chat session to exchange text messages between users. To initiate a chat session: Go to the participant list and click the chat icon for the desired participant. The chat window opens and you can chat with selected participant: VIA Campus - Using VIA Campus... -
Page 27: File Transfer
The user can check for active chat sessions by going to Features > Chat. File Transfer VIA Campus can transfer files between PC/Mac/Mobile Devices logged in users. To share a file: Go to the participant list and click on the file share icon for the desired participant with whom you wish to share a file In the cloud directory, select the desired file on your device. -
Page 28: Figure 8: Admin File Sharing
Once completed, the file is saved on that participant’s system Figure 9: User File Sharing When completed, the file is saved at receiver’s system. You can check or cancel currently sharing file from Features > File Transfer VIA Campus - Using VIA Campus... -
Page 29: Multimedia
Player. However, if you choose this method and do not use VIA for video playback, your video will be only mirrored to the display. Using this method, you may experience lower frame rates, inconsistent playback and increased latency. VIA Campus - Using VIA Campus... - Page 30 Clients of media servers issue commands like play and pause, to facilitate real-time control of playback of media files from the server. VIA Campus supports RTSP. A media being played locally on a computer can be streamed on a VIA Campus unit, provided the computer and the VIA Campus unit are on connected networks.
- Page 31 4. Click Next on the next screen. 5. Choose RTSP from the New Destination drop down and click Add. 6. Enter a short name to be used as Path, uncheck Activate Transcoding and click Next. VIA Campus - Using VIA Campus...
- Page 32 8. Open VIA Collage client and click Features > Multimedia > Streaming Player. 9. Type a name as the URL name. 10. The URL path takes the form: rtsp://<local computer IP address>:8554/<name mentioned in step 6> VIA Campus - Using VIA Campus...
- Page 33 Web-based push-to-talk features. VIA Campus supports RTP. A media can stream on a VIA Campus unit, provided the computer and the VIA Campus unit are on connected networks. For RTP Streaming using VLC:...
-
Page 34: View Main Display
5. Choose RTP/MPEG Transport Stream from the New Destination drop down and click Add. 6. Enter VIA Campus unit’s IP address and click Stream. 7. Open VIA Campus client and click Features > Multimedia > Streaming Player. 8. Type a name as the URL name. -
Page 35: Start Collaboration
Note: Saved image captures are available under the Multimedia section of the Parent Dashboard under “Documents.” Start Collaboration VIA Campus offers state-of-the-art collaboration functionality. VIA allows up to 255 meeting participants to collaborate. The Start Collaboration function allows a user to use their mouse and keyboard on VIA gateway. - Page 36 Note: To disable this functionality once the collaborative session has ended, select the same Enable Control icon and the red button disappears. Once deselected, no other participants have access to that computer. User #2, who can now see User #1’s content, selects the Start Collaboration button VIA Campus - Using VIA Campus...
- Page 37 Sharing” capabilities of VIA to share the edited document with all participants. The person who is sharing their content now clicks the same Disable Control icon, disabling the ability for any other participant to control/modify their content VIA Campus - Using VIA Campus...
-
Page 38: Cloud
On VIA Campus, the user is given two options when they select a file to share: Share the file just to VIA – to open it locally on the VIA Campus to view and edit (for example - share an Excel spreadsheet to the Campus to open and... -
Page 39: Whiteboard Collaboration
Whiteboard Collaboration The whiteboard function creates a canvas on the VIA Campus hub. With the whiteboard, you can: Access a wide range of drawing and annotating tools Comment on any content shown on screen Insert any kind of images Annotate on an extended desktop... - Page 40 1 to screen 2 and retrieve pages from screen 2 to screen 1. When a participant sends any page to screen 2 and then annotates it on the main VIA Campus screen, those annotations show simultaneously on screen 2.
-
Page 41: Figure 12: Wide Desktop
Show Desktop allows you to hide the whiteboard and to navigate freely on your desktop. A toolbar is available for making annotations on your desktop and capturing an object. For example, capture an area of the screen and add it as an object in your current page. VIA Campus - Using VIA Campus... -
Page 42: Calling With Skype
Exits the whiteboard 6.11 Calling with Skype VIA Campus lets you call using Skype to any other Skype user in the world. To activate Skype: Click on Features and click on This launches Skype and you can login and call/chat with any available contact. -
Page 43: Using Gotomeeting
Using GoToMeeting GoToMeeting is integrated with VIA Campus, providing you with a simple and powerful way to hold unlimited online meetings. A VIA Campus admin can start a meeting and share his screen with any available user, anywhere in the world. -
Page 44: Accessing A Web Page
6.15 Accessing a Web Page VIA Campus can directly launch a Web browser. You do not need to exit VIA Campus to open a Web site, or launch a Web-based presentation. To open the Web browser: Click on Features and click on the Web Browsing icon This opens the default browser (Internet Explorer) through VIA Campus and you can navigate to any Web site or online video/presentation file. -
Page 45: Figure 14: Settings Screen
To open the settings page use keyboard and mouse connected to VIA Campus unit: 1. Click on Features to expand. 2. Click on Settings. 3. It requests the password for the VIA Super User. 4. Enter the password “supass”. The user name is “su” by default. -
Page 46: Figure 15: Lan Settings Screen
5. Click OK at the confirmation message. 6. Click on Reboot to restart the system with the new settings. 6.16.2 Room Name/Code Settings To activate/deactivate Room Code, Date & Time: In Settings, click on Room Name/Code The following screen appears: VIA Campus - Using VIA Campus... -
Page 47: Figure 16: Room/Name Code Screen
Room Name, enter the new address or DNS name, then click on Apply and reboot VIA Campus. To login any device to the VIA Campus client, you must enter the same Room Name in the location field on your device Activate Room Code: The Room Code is a security overlay feature that generates and updates a four digit code. -
Page 48: Figure 17: Configurations Screen
Show Room Name / Code on second Display also: Supported only if there is a second display connected to the VIA Campus unit. This feature allows you to show the Room Name on the wallpaper of the second display connected... -
Page 49: Figure 18: System Control Screen
System controls access the control panel, audio settings, display settings, task manager, system health and log files of the VIA Campus unit. The log folder is only available if system logging is activated from the configurations tab of settings. You can also select the language for the VIA application here. -
Page 50: Figure 19: Wallpaper Screen
VIA Campus is pre-activated by Kramer. If your unit needs to be re-activated, contact Kramer Technical Support. 6.16.5 Wallpaper Settings This feature allows any corporation or institution to change the default screen to match their branding and in-room equipment usage instructions. -
Page 51: Figure 20: Third Party Apps Screen
Third Party App Settings The Third Party App feature allows the user to add a shortcut to any third party applications already installed on VIA Campus. The user can then launch these applications without exiting VIA Campus. The administrator can also install any other third party application that is not available on the system that a user wants to run. -
Page 52: Figure 21: Setting Application Name
6. Close this page and the settings page as well. 7. Reboot the VIA Campus hub. To Install a Third Party Application: 1. Click on Install Applications. 2. When asked to logout as a VIA Campus user, click Yes. VIA Campus - Using VIA Campus... - Page 53 Step-In function on VIA Campus. To enable Presentation Mode: 1. Click on Authentication. 2. Select Activate Moderator Mode. 3. Select which mode you want to use and reboot VIA Campus gateway. VIA Campus - Using VIA Campus...
-
Page 54: Figure 22: Authentication Screen
Database Based This mode requires building a database of users that can access the system. The users receive credentials (username and password). There are two default users available to login into VIA Campus client in Moderator mode. Moderator: Default user name: su... -
Page 55: Figure 23: Moderator Mode
To create users: 1. Open the VIA Campus Web site by entering the VIA Campus IP address in any Web browser (or open a browser from any client PC connected to same network and enter VIA Campus IP address). 2. At the top, login with default moderator username (supass). The moderator... -
Page 56: Figure 24: Login Screen When Moderator Mode Is Active
Figure 24: Login Screen When Moderator Mode is Active To start a presentation: Click on “Step-In” and VIA Campus sends a request to the moderator for display permission The moderator clicks on “Allow” to start the participant’s presentation on the... - Page 57 Active Directory groups or organizational units: Moderator: A user with meeting moderator rights, that is, this user can directly display his screen on a VIA Campus Gateway and can allow a participant requesting for presentation on the main display Participant: A participant of a presentation session who can join the meeting room but cannot project their desktop without the moderator’s permission...
- Page 58 5. Based on the above selection, type the name of Moderator and Participant Group/OU in their respective boxes. Note: VIA Campus does not discover and connect to the Active Directory; rather it relies on you to correctly enter the details. If there is a typographical error in any of fields, the users (Moderators and Participants) cannot log in.
- Page 59 To login into the VIA Campus client when basic moderator mode is activated: 1. Open the VIA Campus client and enter the location (IP address of the VIA Campus gateway). 2. Enter the nickname. The Room Code field appears. 3. Enter the room code (if Room Code is activated).
-
Page 60: Managing Settings From The Via Web Management Interface
Interface To manage settings using the Web browser: 1. Open the Web browser and enter the IP address for your VIA Campus unit 2. Enter user name “su” and password “supass”. 3. Click on VIA Management tab to access the Settings menu. -
Page 61: Figure 25: Via Management - Network Settings
Campus. Apply Settings after finishing. Information about the Disk Space in use can be found here, as well as the MAC address of the VIA Campus device. Figure 25: VIA Management - Network Settings VIA Campus - Using VIA Campus... - Page 62 6.17.2 VIAPad Configuration For entities using VIA Pad, the first required step is to configure the VIA Campus unit in order to allow it to pair the VIA Pad devices. VIAPad Configuration Guest mode: Enable this mode in case you want the VIA Pad to act as a simple “Step-In / Step-Out”...
- Page 63 VIA Site Management Server (VSM Server) is an optional software application (subject to a separate pricing) that allows an administrator to monitor and make changes to all connected VIA Campus or Connect gateways. It is a Web-based interface that allows the administrator to: Add or modify an existing VIA Gateway (VIA Campus/VIA Connect PRO) Push various settings like configuration, gateway features, client features, etc.
- Page 64 2. Type a Gateway ID (a gateway ID can be a random number, as long as it is unique. It helps identify the VIA Campus or Connect unit in question.) 3. Click Validate and Save for changes to take effect.
-
Page 65: Figure 26: Via Site Management
3. All previously uploaded wallpapers are saved and shown as below. To select one of them, click on “Set”. 4. Then click on Reboot The background image on VIA Campus changes after rebooting. VIA Campus - Using VIA Campus... - Page 66 Configuration settings are: Activate System Log – Activates the logging of all system activity either by the client or the gateway to aid diagnosing a problem with VIA Campus Activate Media Mode – If multiple displays are connected to VIA Campus, the first display is reserved as the media screen.
- Page 67 View Main Display & Participants’ List. The View Main Display icon replaces the Step In button and Features are grayed out: The user that enabled DND must disable DND to allow other participants to regain full functionality. DND De-Activated VIA Campus - Using VIA Campus...
- Page 68 The color of the text of the room name, the room code, the date and time to show on the background of the VIA Campus wallpaper can also be changed in this Settings menu. Click on the square to select your preferred color.
- Page 69 Additionally, it defaults to allow 4 iOS devices to be mirrored to the VIA Campus simultaneously. This setting can also be changed. Once these setting changes have been made, click Apply. Reboot the VIA Campus to allows the settings to take effect.
- Page 70 Figure 30: VIA Management – Configuration VIA Campus - Using VIA Campus...
-
Page 71: Figure 27: Via Management - Authentication
The space allocated to this specific icon is left blank so you can reorganize manually the order of the icons by simply dragging them to your preferred scheduling. Make sure you click on “Apply” and Reboot your unit to apply these changes. VIA Campus - Using VIA Campus... -
Page 72: Figure 28: Via Management - Gateway Features
The space allocated to this specific icon is left blank so you can reorganize manually the order of the icons by simply dragging them to your preferred scheduling. Make sure you click on “Apply” and Reboot your unit to apply these changes. VIA Campus - Using VIA Campus... -
Page 73: Figure 29: Via Management - Client Features (Mac/Windows)
Figure 29: VIA Management – Client Features (MAC/Windows) Figure 30: VIA Management – Client Features (Mobile) VIA Campus - Using VIA Campus... - Page 74 6.17.8 Gateway/Webadmin Activity Logs Figure 33: Utilities – Gateway Activity Log Figure 34: Utilities – Webadmin Activity Log VIA Campus - Using VIA Campus...
- Page 75 6.17.9 Update Firmware To update your VIA Campus unit through this interface, ONLY use the .zip file (as a compressed file – do not try to uncompress it) available for download from our technical support Web page: http://www.kramerelectronics.com/support/downloads.asp Figure 35: Utilities - Update Firmware 6.17.10 Maintenance...
-
Page 76: User Experience
2016. 6.18 User Experience VIA Campus enables a high level of collaboration in meetings. Participants can share files, chat, edit a common document, or stream full HD (1080p/60) video content. Following is a summary of VIA Campus functions: Collaboration capabilities have been enhanced with the addition of the popular... - Page 77 Alternatively, enjoy the ability to select one file saved in your VIA Multimedia feature (photo, document or video) and choose to upload it to your cloud service account, for later usage. Note: Different devices enable different features depending on the device capabilities. See the following illustrations. VIA Campus - Using VIA Campus...
-
Page 78: Figure 31: Samsung Galaxy
Figure 31: Samsung Galaxy VIA Campus - Using VIA Campus... -
Page 79: Figure 32: Iphone/Ipad
Figure 32: iPhone/iPad VIA Campus - Using VIA Campus... -
Page 80: Figure 33: Pc
Figure 33: PC VIA Campus - Using VIA Campus... -
Page 81: Technical Specifications
21.2cm x 19.6cm x 5.6cm (8.4” x 7.7” x 2.2”) W, D, H. NET WEIGHT: 1.28kg (2.8lbs). INCLUDED ACCESSORIES: 3 power cords (US, EU, UK), DVI (M) to VGA (F) Kramer adapter OPTIONAL: 2U rack adapter Specifications are subject to change without notice at http://www.kramerelectronics.com... -
Page 82: Via Campus Upgrade Procedure
2. Make sure that your unit is connected to a display, powered and booted up in the Campus mode. 3. Connect the USB drive to a USB port on the VIA Campus unit. The Cloud window opens automatically and the Campus-1.8.1215.644.exe file appears. -
Page 83: Updating Your Computer Client Applications (Windows And Mac)
Once the user has installed the new client App, the version appearing on the top right side of Participants shows the correct version This single client application now runs for VIA Collage, VIA Campus and VIA Connect PRO units Updating the Mobile Applications It is essential that all users download the new client application from the VIA unit. - Page 85 SAFETY WARNING Disconnect the unit from the power supply before opening and servicing For the latest information on our products and a list of Kramer distributors, visit our Web site to find updates to this user manual. We welcome your questions, comments, and feedback.
- Page 86 VIAPad Getting Started...
- Page 87 Connect VIA Pad to your VIA device. Touch VIA Pad to begin pairing. When pairing is complete, VIA Pad will light up green. Pair your VIAPad of any VIA device Make sure your VIA unit has been programmed for VIA Pad before Once connected, VIA Pad will light up blue.
- Page 88 Connect your VIA Pad to your laptop. Open the VIA Pad folder and double Touch to present! click on “VIA Pad”. If necessary, type in your room code and click “Login”. Connect your VIAPad Room Name 173.168.1.42 Nick Name johndoe Code Login Once connected, VIA Pad will light up white.
- Page 89 For more information, visit us at: www.True-Collaboration.com VIAPad Quick Start...
Need help?
Do you have a question about the VIA Campus and is the answer not in the manual?
Questions and answers