Kramer VIA collage User Manual
4k wireless presentation & collaboration solution
Hide thumbs
Also See for VIA collage:
- Quick start manual (61 pages) ,
- User manual (57 pages) ,
- Quick start manual (4 pages)

Related Manuals for Kramer VIA collage


Summary of Contents for Kramer VIA collage
- Page 1 USER MANUAL MODEL: VIA Collage 4K Wireless Presentation & Collaboration Solution (For Firmware Version 2.2) P/N: 2900-300475 Rev 8 www.kramerAV.com...
-
Page 7: Table Of Contents
Introduction Getting Started Overview Defining VIA Collage Connecting VIA Collage Connecting VIA Collage to a Display Setting Up VIA Collage Running the Kramer VIA App Logging in to VIA Collage Mirroring Using iOS/OS X Airplay Service Mirroring Android Devices Using Kramer VIA... - Page 8 Figures Figure 1: VIA Collage 4K Wireless Presentation & Collaboration Solution Figure 2: Connecting the VIA Collage 4K Wireless Presentation & Collaboration Solution Figure 3: VIA Embedded Web pages Welcome Screen Figure 4: Kramer VIA Login Window Figure 5: VIA Home Screen...
- Page 9 Figure 101: Digital Signage > Schedule Playlist WHAT to Play Tab Figure 102: WHAT to Play Tab Figure 103: Set Running Time for Web page Figure 104: Scheduled Campaign displayed in the Schedule Playlist Tab Figure 105: Utilities – Webadmin Activity Log VIA Collage – Contents...
- Page 10 Figure 106: Utilities - Update Firmware Figure 107: Utilities – Maintenance VIA Collage – Contents...
-
Page 11: Introduction
Introduction Welcome to Kramer Electronics! Since 1981, Kramer Electronics has been providing a world of unique, creative, and affordable solutions to the vast range of problems that confront video, audio, presentation, and broadcasting professionals on a daily basis. In recent years, we have redesigned and upgraded most of our... - Page 12 Avoid interference from neighbouring electrical appliances that may adversely influence signal quality Position your VIA Collage away from moisture, excessive sunlight and dust This equipment is to be used only inside a building. It may only be connected to other equipment that is installed inside a building.
-
Page 13: Overview
The VIA Collage integrates seamlessly with any organization’s current IT infrastructure, converting any projector or screen into a networked device that users can share and view on their current devices. Every local connection to VIA Collage is wireless, free of dongles, cables, and other compatibility peripherals. - Page 14 Here are a few of the things you can do with VIA Collage: Up to six different participant screens can be shown at the same time. VIA Collage automatically sizes each screen to the maximum available resolution, displaying tiles for two or more screens. Finished sharing? Tap Stop presenting to disconnect.
- Page 15 Chromebook iPad/iPhone® tablet/smartphone (iPad 2 or later, iOS 9 or later) Note: When using the Airplay service, no Kramer VIA application is needed. However, we recommend using iOS10 or Sierra OS X for a better experience. Android® OS 5.x tablet/smartphone Note: For using the Android mirroring feature, a device equipped with Android 5.1...
-
Page 16: Defining Via Collage
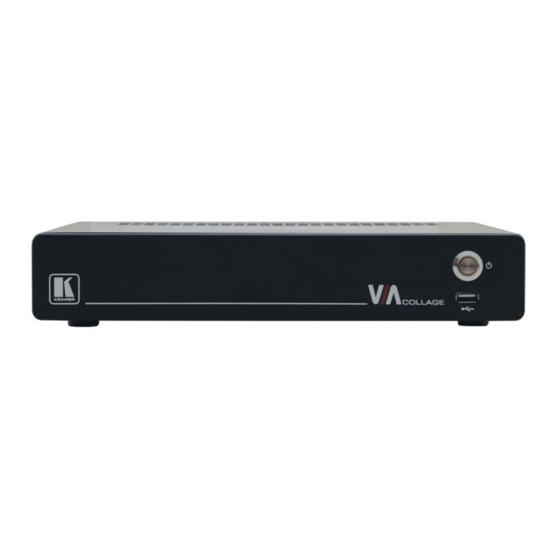
Defining VIA Collage This section defines VIA Collage. Figure 1: VIA Collage 4K Wireless Presentation & Collaboration Solution Feature Function Power Button For turning the machine on and off. Button lights when the unit is turned on. USB Connector Connect to a computer for upgrading firmware or connect to a USB device. -
Page 17: Connecting Via Collage
Connecting VIA Collage Always switch off the power to each device before connecting it to your VIA Collage. After connecting VIA Collage, connect its power and then switch on the power to each device. To connect the VIA Collage as illustrated in the example in... -
Page 18: Connecting Via Collage To A Display
Figure 2: Connecting the VIA Collage 4K Wireless Presentation & Collaboration Solution Connecting VIA Collage to a Display VIA Collage is equipped with dual display output connections. The HDMI connection can be used with any compatible projection or direct- view display, such as an LCD monitor. - Page 19 For full functionality, VIA Collage must be connected to a local area network (LAN). You must assign an IP address to the VIA Collage. NOTE: To allow participation in a collaborative session (send and receive content), connect the VIA Collage hub and all participant devices (PCs/ MACs/ smartphones/tablets) to the same network (LAN - wired/wireless).
-
Page 20: Setting Up Via Collage
Setting Up VIA Collage Running the Kramer VIA App Your device should run the Kramer VIA app to enable you to present on the display using VIA Collage. 4.1.1 Running the Kramer VIA App for PC and Mac To run Kramer VIA, for PC and Mac computers: 1. - Page 21 To run Kramer VIA for Chromebooks or the Chrome Browser: 1. Open your Chrome browser and enter the name of your VIA Collage device as displayed on main display. The VIA embedded web page Welcome screen appears (Figure 2.
- Page 22 The app is added to your Chrome browser and a confirmation message appears. 4.1.3 Running the Kramer VIA App Using an Installation File IT managers can use the VIA .msi file (Windows) or .dmg file (Apple) for easy deployment and installation of the VIA application on the user’s clients.
-
Page 23: Logging In To Via Collage
4.2.1 Logging In to VIA Collage Manually To log in to VIA Collage manually: 1. Connect your device to the same network that VIA Collage is connected to. 2. Run the Kramer VIA app. The Kramer VIA login window appears. -
Page 24: Figure 5: Via Home Screen
3. Type the Room Name as it appears in the lower left corner of the VIA Home screen on the main display (this is the VIA Collage IP address). Figure 5: VIA Home Screen 4. Type a Nick Name (username) for your device (it can be any combination of letters and numbers). -
Page 25: Figure 6: Via Home Screen With Qr Code Icon
The following instructions are for iOS, Android & Windows Phone users. To log in to VIA Collage using the QR Code: 1. Connect your device to the same network as the VIA Collage and run the Kramer VIA app on your device. - Page 26 4.2.3 Logging In to VIA Collage Using a VIA Pad Make sure that your VIA Pad has been paired with your VIA Collage unit before using it (see section .2.5). The following instructions are for Windows and Mac OS users.
- Page 27 4. When prompted, touch the Android device to the writable tag. A message appears, confirming that the tag was successfully written. 4.2.4.2 Logging in Using the NFC Tag The Kramer VIA app must be installed on your device to log in using the 4 NFC tag (see section .1).
-
Page 28: Figure 7: Room List Manager Window
Figure 7: Room List Manager Window To populate the room list from the VSM server: Type the VSM server address in the field at the top of the Room List Manager window and click Get List. VIA Collage - Setting Up VIA Collage... -
Page 29: Figure 8: Plain Text Room List File
A text box appears. Figure 9: Rename Room Text Box 2. Type a new name for the room and click OK. The room IP address appears in the list under the new name. VIA Collage - Setting Up VIA Collage... -
Page 30: Mirroring Using Ios/Os X Airplay Service
All participants in a meeting using an Apple device can mirror their screen on the main display using the Apple AirPlay service. No app is required to activate this mode. However, you must enable the iOS mirroring feature in the VIA Collage 7 embedded web pages (see section .2.8.2). -
Page 31: Figure 10: Iphone Control Center
To mirror your screen using AirPlay Services: 1. Connect your Apple device to the network that VIA Collage is connected to. 2. For iPhone or iPad/Mini iPad: Swipe up from the bottom to reveal the Control Center and click AirPlay. -
Page 32: Mirroring Android Devices Using Kramer Via
Your device must support Android version 5.1 as a minimum. The latest Android OS version is recommended. To mirror your Android device screen using Kramer VIA: 1. Connect your Android device to the network that VIA Collage is connected 4 2. Log in to Kramer VIA (see section .2). -
Page 33: Figure 12: Presenting (Mirroring) Confirmation Message
4. Click START NOW to confirm. Mirroring starts and your screen appears on the main display. 5. Minimize the Kramer VIA app by clicking the Home button of your device and open any content on your device to share it on the main display. -
Page 34: Via Collage Functions
VIA Collage Functions The VIA Collage dashboard enables using functions and configuring settings. VIA Collage provides two types of dashboards: Gateway Dashboard – section 5 .1 User Dashboard – section 5 .2 In addition, many VIA Collage functions are accessed from the: ... -
Page 35: Gateway Dashboard
Gateway Dashboard The Gateway Dashboard is available when accessing the VIA Collage user interface directly through the VIA Collage device. Figure 13: VIA Collage Gateway Dashboard Features Icon Action Features Allows user to see and access all available features of VIA... -
Page 36: User Dashboard
Reboot Shuts down the VIA Collage system Shut Down User Dashboard The User Dashboard is available when accessing the VIA Collage user interface 1 from an external device (see section .2.2). For more information about User Dashboard functions, see section ... - Page 37 Multiple users can interact and control the main display at the same time View Main Shows a mirror of the VIA Collage collaboration display on the user’s devices (laptop, iPAD, MacBook, Android tablet). The Display user can see all the activities of the VIA Collage collaboration display on his system (this feature is called "Screen Share"...
-
Page 38: Figure 15: Example Of Mobile Drawer Features Layout
Figure 15: Example of Mobile Drawer Features Layout VIA Collage - VIA Collage Functions... -
Page 39: Taskbar Menu
Taskbar Menu Figure 16: Kramer VIA Taskbar Menu After a successful login to VIA Collage through Kramer VIA app, a VIA icon appears in the taskbar of your Windows or Mac computer. Click this icon to access menu of the Kramer VIA functions. Some of the options on the taskbar menu are also found in the dashboard. -
Page 40: Using Via Collage
Using VIA Collage VIA Collage is a powerful and versatile collaboration hub that gives participants a wide selection of presentation tools. In this section, we will look at each of those tools and discuss briefly how it works. VIA Collage User Dashboard Once you have logged in to VIA, the Dashboard is displayed on your device screen. -
Page 41: Collaborating
Admin has the control of that user Collaborating VIA Collage offers state-of-the-art collaboration functionality. VIA allows up to 254 meeting participants to collaborate – utilizing a compatible external wireless network. The collaboration features enable a participant to interact with the main display as if it were a part of their own device screen, using their own mouse, keyboard and touch screen. -
Page 42: Figure 18: Stop Collaboration In The Dashboard Features
A floating Stop Collaboration icon also appears in the upper right corner of your screen. Figure 19: Floating Stop Collaboration Icon 2. Click and drag the floating Stop Collaboration icon to another location on your screen, if necessary. VIA Collage - Using VIA Collage... -
Page 43: Figure 20: Collaboration Cursor On The Main Display
5. To use your cursor to control your own device, move your cursor past the bottom of the main display until it appears on your device screen. VIA Collage - Using VIA Collage... -
Page 44: Figure 21: Virtual Touchpad
To stop collaborating: For a laptop: Click Stop Collaboration in the dashboard Features or the floating icon. Collaboration stops and your cursor disappears from the main display or the VIA Collage - Using VIA Collage... -
Page 45: Figure 22: Enable Control
Figure 22: Enable Control Icon with Check Note: To disable this functionality once the collaborative session has ended, select the same Enable Control icon and the red button disappears. Once deselected, no other participants have access to that computer. VIA Collage - Using VIA Collage... - Page 46 If desired, User #1 can use the dashboard File Transfer feature to share the edited document with all participants. 8. User #1 now clicks the Enable Control icon, disabling the ability for any other participant to control or modify their content or device. VIA Collage - Using VIA Collage...
-
Page 47: Enabling Control
Start Collaboration icon and drag his laptop mouse to the top and off their local screen. That cursor now moves to the VIA Collage unit and appears on the main display of Dave. Buttons are shown in the picture below:... -
Page 48: Chatting With Participants
In the chat window, the participant’s name is at the left side of the window and your chat messages are on the right side. The user can check for active chat sessions by going to Features > Chat VIA Collage - Using VIA Collage... -
Page 49: Transferring Files
Transferring Files VIA Collage can transfer files between PC/Mac logged in users. To share a file: Go to the participant list and click the file share icon for the desired participant with whom you wish to share a file. -
Page 50: Handling Multimedia
Note: Without using the VIA software, media files can be played from your device using native media players you have installed such as QuickTime and/or Windows Media Player. However, if you choose this method and do not use VIA for video playback, your VIA Collage - Using VIA Collage... -
Page 51: Figure 26: Vlc Media Menu
VIA GO supports RTSP. A media played locally on a computer can be streamed on VIA GO, provided the computer and VIA GO are on connected networks. For RTSP Streaming using VLC: 1. Open VLC. Figure 27: VLC Media Menu VIA Collage - Using VIA Collage... -
Page 52: Figure 27: Open Media Window
2. Click Media > Stream. The Open Media window appears. Figure 28: Open Media Window 3. Click Add and select a file to stream and click Stream. The Stream Output/Source window appears. Figure 29: Stream Output/Source Window VIA Collage - Using VIA Collage... -
Page 53: Figure 29: Stream Output/Destination Setup Window
The Stream Output/Destination Setup window appears. Figure 30: Stream Output/Destination Setup Window 5. Select RTSP from the New Destination drop down and click Add. The RTSP tab appears. Figure 31: Stream Output/Destination Setup RTSP Tab VIA Collage - Using VIA Collage... -
Page 54: Figure 31: Stream Output/ Transcoding Options Window
6. Type a short name to be used as a Path and click Next. The Stream Output/Transcoding Options window appears. Figure 32: Stream Output/ Transcoding Options Window Clear the Activate Transcoding checkbox and click Next. The Stream Output/Option Setup window appears. Figure 33: Stream Output/Option Setup Window VIA Collage - Using VIA Collage... - Page 55 The RTP (Real-time Transport Protocol) is a network protocol for delivering audio and video over IP networks. RTP is used extensively in communication and entertainment systems that involve streaming media, such as telephony, video teleconference applications, television services and Web-based push-to-talk features. VIA Collage - Using VIA Collage...
-
Page 56: View Main Display
VIA Collage supports RTP. A media can stream on a VIA Collage unit, provided the computer and the VIA Collage unit are on connected networks. For RTP Streaming using VLC: 1. Open VLC. 2. Click Media > Stream. 3. Click Add, select a file to stream and click Stream. -
Page 57: Figure 33: View Main Display Window On A Laptop
3. Use the tool bar to perform the following basic whiteboarding activities: Draw, erase, add notes and save the file. Select color options. Create annotations that allow the user to take notes locally on their device without appearing on the presentation. VIA Collage - Using VIA Collage... -
Page 58: Managing Cloud Files
On VIA Collage, the user is given two options when they select a file to share: Share the file just to VIA – to open it locally on the VIA Collage to view and edit (for example - share an Excel spreadsheet to the VIA Collage to open and edit as a group) ... -
Page 59: Using The Whiteboard Feature
To delete all files from the cloud directory, click Clean Directory. A warning note appears that this is a permanent deletion Using the Whiteboard Feature The whiteboard feature creates a canvas on the VIA Collage hub. With whiteboard, you can: ... -
Page 60: Figure 35: Whiteboard Toolbar
Saves all your activities either as PDF or as JPEG format Show Desktop Displays your desktop with all running applications. The user can also annotate at the running application using the desktop stylus Close Closes Whiteboard screen. VIA Collage - Using VIA Collage... -
Page 61: Figure 36: Wide Desktop
Note: Whiteboard toolbar can be moved to bottom (and back to top) of the display by clicking on the small arrows visible at right side of the toolbar Figure 37: Wide Desktop Figure 38: Multiple Screens VIA Collage - Using VIA Collage... - Page 62 Virtual Inserts text on the whiteboard Keyboard Save Saves your activity in either.jpg or .pdf format Press this icon to immediately switch to your full Whiteboard screen whiteboard page Exit Exits the whiteboard VIA Collage - Using VIA Collage...
-
Page 63: Screen Share
Pause at any slide to annotate it and reload at any time to resume with the current slide being preseted. To view the main collaboration display on the user’s system, the user needs to stop both his display and media. VIA Collage - Using VIA Collage... -
Page 64: Showing Content From A Third Party Device
Apple TV, Roku, video cameras with composite video or HDMI outputs, and Samsung’s AllShare Play wireless hub, along with your display. You can connect an extra device to VIA Collage using the HDMI input, or add an external HDMI switcher to select from multiple third-party devices. -
Page 65: Figure 40: Record In Features Tab
Figure 41: Record in Features Tab 3. Select Record. The Record screen appears. Figure 42: Record Screen 4. Click the large Record button to start recording the meeting. 5. Click the Pause button to pause or resume. VIA Collage - Using VIA Collage... -
Page 66: Figure 42: Recording Screen
10. Click Save. The recording is saved on the system or on the USB drive connected to the VIA Collage, depending on the settings selected by the administrator. To 7 access saved recordings from the system, see section .2.19. -
Page 67: Streaming A Meeting Session
6.13 Streaming a Meeting Session VIA Collage enables you to stream all activity on the main display during the course a meeting to other VIA gateway units are computers. VIA Collage enables two types of streaming options: (section ... -
Page 68: Figure 43: Via Settings > Recording & Streaming Tab
6.13.1.2 Feeding the Receiver Information to VIA Collage The receiver information must be fed to VIA Collage before streaming can begin. To feed receiver information to VIA Collage: 1. In the VIA Management > VIA Settings tab, click the Recording &... - Page 69 6.13.1.3 Streaming from one VIA Unit to Another VIA Unit To stream from one VIA gateway unit ( such as VIA Collage) to another VIA unit, you need: Two VIA gateway units, one for a receiver and one for a sender ...
- Page 70 6.13.1.4 Streaming from a VIA Unit to a Windows/Mac Computer To stream from one VIA gateway unit (such as VIA Collage) to a Windows/Mac computer, you need: One VIA gateway unit, for a sender One Windows or Mac computer with the latest VIA client application...
- Page 71 6.13.2 Multicast Streaming VIA gateway units (such as VIA Collage) can stream their screens as a multicast so that multiple devices can view the gateway’s display. 6.13.2.1 Creating a Multicast URL To create a Multicast IP URL: 1. Select an IP address in the following range: 224.0.0.0 to 239.255.255.255...
- Page 72 2. Click Media > Open Network Stream. 3. Type the streaming URL as udp://@<IPAddress>:<port number> Streaming starts from the VIA unit to the receiver computer. 4. Repeat steps 1 – 3 to stream to another computer. VIA Collage - Using VIA Collage...
-
Page 73: Conducting A Poll
6.14 Conducting a Poll VIA Collage enables you to select questions for a poll or exam, send the questions to participants, and view and collect results. To create and manage poll questions 7 using the embedded web pages, see section .2.20). -
Page 74: Figure 45: Poll List Screen
5. Select the Poll Start Date and Poll End Date 6. Type a keyword in the Category/Question box and click Search. The search results appear below the Search button. 7. Select the required questions to include in the poll. VIA Collage - Using VIA Collage... -
Page 75: Figure 46: Epolling Publish Results Window On Participant's Screen
Figure 47: ePolling Publish Results Window on Participant’s Screen Show live results – displays a graph for each question on the main display with live response results. Figure 48: ePolling Show Live Results on Main Display VIA Collage - Using VIA Collage... -
Page 76: Figure 48: Poll Start Participant Message
VIA. Figure 49: Poll Start Participant Message 10. To stop a poll, select the relevant questions on the Poll List screen (Figure 46) and click Stop Poll at the bottom of the screen. VIA Collage - Using VIA Collage... -
Page 77: Figure 49: Poll Icon In The Dashboard Features Tab
Figure 50: Poll icon in the Dashboard Features Tab A window appears on your device with the first question. Figure 51: Poll Question Window 2. Select your answer and click Submit. The next question in the poll appears. VIA Collage - Using VIA Collage... -
Page 78: Picture-In-Picture
6.16 Calling with Skype / Skype for Meeting (if installed) VIA Collage lets you call using Skype to any other Skype user in the world. To activate Skype: Click Features > Third Party Apps and click This launches Skype / Skype for Business and user can login and start calling/messaging or video conferencing with any available contact. -
Page 79: Using Webex (If Installed)
6.19 Using the Web Browser VIA Collage can directly launch a Web browser. You do not need to exit VIA Collage to open a Web site, or launch a Web-based presentation. To open the Web browser: ... - Page 80 Share - Share the selected file using your preferred mailing service Alternatively, enjoy the ability to select one file saved in your VIA Multimedia feature (photo, document or video) and choose to upload it to your cloud service account, for later usage. VIA Collage - Using VIA Collage...
-
Page 81: Configuring Via Collage
Configuring VIA Collage Configure basic settings directly from the Settings window of the Kramer VIA app 7 (see section .1). Configure advanced settings from the VIA embedded web pages (see section .2). Configuring Settings from the Kramer VIA App... - Page 82 3. Click Login. The VIA Settings window appears. Figure 53: VIA Settings Window – LAN Settings Tab 4. After changing settings, click Reboot to restart VIA Collage and apply all new settings. 7.1.1 Configuring Network Settings Network settings can also be configured from the embedded web pages section ...
- Page 83 It is also possible to setup your VIA Collage in Dual network mode by selecting the Enable Dual Network check box. For more details about how to properly configure this feature, go to: www.kramerav.com/product/VIA%20Collage#Tab_Resources). If you do not require connecting your VIA devices to 2 different networks, make sure to disable the VIA dual network feature and deactivate or unplug the unneeded RJ-45 cable to avoid unwanted communication from this socket.
- Page 84 VIA Collage. A user can then launch these applications without exiting VIA Collage. The VIA Collage administrator can also install any other third party application that is not available on the system that a user wants to run.
- Page 85 3. Change the application name from “Application Name” field. 4. Close this page and the settings page as well. 5. Reboot the VIA Collage hub If you want to add a shortcut of any of these apps to your main display, check the “add to Shortcut”...
- Page 86 To control the ‘Quick access app’ bar position: Open “settings” from the bar and change the bar location To Install a Third Party Application: 1. Click Install Applications 2. When asked to logout as a VIA Collage user, click Yes VIA Collage - Configuring VIA Collage...
- Page 87 Two encoding formats are available: H.264 – Default format if your OS supports H.264 encoding. The format reducing bandwidth requirements when Presenting. JPEG – If the OS does not support H.264 encoding, enable this format. VIA Collage - Configuring VIA Collage...
- Page 88 .2) when using a laptop with a touchscreen, 1. Click Settings in the VIA taskbar menu (Figure 16). The Client Preferences screen appears (Figure 57). 2. Select the Use touch screen for collaboration checkbox. VIA Collage - Configuring VIA Collage...
-
Page 89: Configuring Settings Using The Embedded Web Pages
6 1. Open the VIA web browser (see .19) or a web browser on a device connected to the VIA network.and go to the IP address for your VIA Collage unit. The embedded web pages Welcome page appears (Figure 2. - Page 90 The VIA embedded web pages enable creating new users and defining what system activities each user has access to. There are two default users available to log in to VIA Collage: Moderator Level User: VIA Collage - Configuring VIA Collage...
- Page 91 .2.21) The user must have Moderator status to have ePolling enabled. 4. Select one of the following participation levels: Moderator – user is able to become a moderator and has access to features VIA Collage - Configuring VIA Collage...
- Page 92 Participant – user participates in a meeting, but cannot access moderator features. 5. Click Save. A new user is added and the User List tab appears with the new user added to the list. VIA Collage - Configuring VIA Collage...
- Page 93 Collage. Apply Settings after finishing and Reboot your device. MAC address of the VIA Collage device is provided here. It is also possible to setup your VIA Collage in Dual network mode by selecting the Enable Dual Network check box. For more details about how to properly configure this feature, go to: www.kramerav.com/product/VIA%20Collage#Tab_Resources).
- Page 94 Figure 62: VIA Web pages – Change Password Tab 2. Type the Old Password, New Password and Confirm Password. 3. Click Update. The password is changed and you are logged out of the web pages. VIA Collage - Configuring VIA Collage...
- Page 95 2. Click the icon in the Edit column. The Edit User tab appears. Figure 64: VIA Web pages – Edit User Tab 3. Type and confirm a new password in the Password and Confirm boxes. VIA Collage - Configuring VIA Collage...
- Page 96 Settings for the user are updated and the User List tab appears. 7.2.5 Configuring VIAPad For entities using VIA Pad, the first required step is to configure the VIA Collage unit in order to allow it to pair the VIA Pad devices. VIAPad Configuration ...
- Page 97 VSM (VIA Site Management) is an optional, web-based software application (subject to a separate pricing) that enables an administrator to monitor and make changes to all connected VIA Collage units or other connected gateways. VSM enables and administrator to: ...
- Page 98 Firmware upgrade scheduling Analytics reports VSM can automatically provide individual configuration to added gateways or you can configure settings locally through the gateway. Contact your regional sales representative for more details about this solution. VIA Collage - Configuring VIA Collage...
- Page 99 Click Save for changes to be saved with no validation from VSM. Since validation is not made immediately, any error entered at this stage – like duplication of ID must be corrected manually at a later stage. VIA Collage - Configuring VIA Collage...
- Page 100 1. Click VIA Management > Wallpaper on the left tabs of the VIA web pages. The Wallpaper tab appears. Figure 66: VIA Management > Wallpaper Tab 2. Click Click Here to Upload. 3. Select Wallpaper (must be an image file – jpeg, png, bmp) from your system VIA Collage - Configuring VIA Collage...
- Page 101 4. All previously uploaded wallpapers are saved and shown as below. To select one of them, click “Set”. To delete one of them, click “Delete”. 5. Then click Reboot. The background image on VIA Collage changes after rebooting 7.2.8 Using the VIA Settings Subtab To use the VIA Settings subtab: 1.
- Page 102 Activate PIP Mode – Shows the output of the third party device (DIP30, Apple TV, Media Player, etc.) as a PIP on VIA Collage. Otherwise, the output of a third party device is shown as a full screen image ...
- Page 103 Additionally, it defaults to allow 4 iOS devices to be mirrored to the VIA Collage simultaneously. This setting can also be changed. Once these setting changes have been made, click Apply. Reboot the VIA Collage to allows the settings to take effect.
- Page 104 You can select “Print QR Code” if you need to get a hard copy of it for displaying it in the room. Relocate & Resize the QR Code: VIA Collage - Configuring VIA Collage...
- Page 105 To relocate the QR code on the VIA main display, click and drag it with the mouse and drop it anywhere on the screen. To resize QR code, click and drag it from the code frame to any desired size. VIA Collage - Configuring VIA Collage...
- Page 106 Language: Select the preferred language for your VIA interface. 7.2.9 Customizing the VIA Home Screen The VIA Collage embedded web pages enable you to change the position and color of elements of the VIA Home screen (Figure 5) and to display a customized DNS (Domain Name System) name if local DNS services are supported by the network.
- Page 107 The Display settings screen appears (Figure 68). 3. Click Customize Gateway Screen in the Wallpaper, Room Code, Room Name Settings section. The Customize Gateway screen appears Figure 69: VIA Web pages – Customize Gateway Screen VIA Collage - Configuring VIA Collage...
- Page 108 Click ON in the Room Name Overlay section to display the Room Name persistently during presentation and select a value in the Auto Hide field to set the amount of time the Room Name is displayed. 7. Click Apply to save changes and reboot VIA Collage for changes to take effect. 7.2.10...
- Page 109 2. In the Auto Power Off Timing section, click ON. 3. Select the Hours (24 hour format) and Minutes for the time of day for the VIA Collage to automatically shut off every day. 4. In the Auto Reboot Timing section, click ON.
- Page 110 2. In the Date and Time Format for embedded web pages section, select the Date and Time Format from the option box. 3. In the VIA Gateway Timezone Configuration section, select the required time zone from the Set Time Zone option box. VIA Collage - Configuring VIA Collage...
- Page 111 3. In the VIA Gateway Audio Output section, select the required type of audio output. 4. In the File Sharing Settings section, define the type of files that are enabled for sharing during a meeting: All Files – enables all file types for sharing. VIA Collage - Configuring VIA Collage...
- Page 112 7.2.14 Activating the Recording Feature VIA Collage enables you to record all activity on the main display during the course a meeting. Before using the recording feature, it must be activated in the embedded web pages. To start streaming a meeting, see ...
- Page 113 7.2.15 Configuring Moderator Access VIA Collage enables a participant in a meeting to become a moderator in order to control certain features. To enable a Moderator in a meeting, Moderator Mode must be activated and configured in the embedded web pages, To activate Moderator Mode: 1.
- Page 114 To create users, see section .2.2. To log in into the VIA Collage client when Database Based moderator mode is activated: Open the VIA Collage client and enter the location (IP address of the VIA Collage gateway) ...
- Page 115 Click Login. To start a presentation: Click Present. VIA Collage sends a presentation request to the moderator. A preview of the participant’s screen is displayed (for MAC/Windows users) to help the moderator accept or deny the request: The moderator clicks Allow full screen or Allow (Auto Position).
- Page 116 Groups grant access to resources. Organizational units (OUs) control objects and delegate group policy settings. VIA Collage seamlessly integrates with Active directories (ADs) to avoid the hassle of creating users from VIA Collage’s Web UI. VIA Collage Gateway contains the following groups that must be mapped with Active Directory groups or organizational units: ...
- Page 117 5. Based on the above selection, type the name of Moderator and Participant Group/OU in their respective boxes. Note: VIA Collage does not discover and connect to the Active Directory; rather it relies on you to correctly enter the details. If there is a typographical error in any of fields, the users (Moderators and Participants) cannot log in.
- Page 118 Once a password is entered, click Apply and reboot the VIA device. To login into the VIA Collage client when basic moderator mode is activated: 1. Open the VIA Collage client and enter the location (IP address of the VIA Collage gateway).
- Page 119 1. In the Moderator Mode tab (Figure 74), select Moderator can enable/disable Chat feature during a session. 2. Click Reboot. A Chat checkbox appears in the upper right corner of the dashboard of the moderator. VIA Collage - Configuring VIA Collage...
- Page 120 Display Status icon of the participant in the Participant tab of the dashboard. In the Moderator Mode tab of the embedded web pages, you can add a message that enables the participant to either approve or deny permission to present their screen. VIA Collage - Configuring VIA Collage...
- Page 121 When the moderator clicks a participant Display Status icon, a message appears on the participant’s screen. Participant can click Approve to start presenting or Deny to deny the request to present. Figure 78: Participant’s Screen with Presentation Request Confirmation Message VIA Collage - Configuring VIA Collage...
- Page 122 The space allocated to this specific icon is left blank so you can reorganize manually the order of the icons by simply dragging them to your prefferred scheduling. Click “Apply” and Reboot your unit to apply these changes. Figure 79: VIA Management – Gateway Features VIA Collage - Configuring VIA Collage...
- Page 123 Make sure you click “Apply” and Reboot your unit to apply these changes. Figure 80: VIA Management – Client Features VIA Collage - Configuring VIA Collage...
- Page 124 7.2.18 Managing Mobile Features Figure 81: VIA Management – Client Features (Mobile) Manage the features available on the VIA Mobile (iOS/Android/Windows) applications. VIA Collage - Configuring VIA Collage...
- Page 125 3. Click the icon in the Download column to download the relevant recording. 4. Click the icon in the Edit column. The Edit Recording screen for the relevant recording appears. Figure 83: Edit Recording Screen VIA Collage - Configuring VIA Collage...
- Page 126 See section 7.2.15. The VIA ePolling feature enables the moderator to conduct polls with the participants of a collaborative session. Using the VIA Collage embedded web pages, you can create multiple choice or true/false questions, organize the questions into categories and sub categories, and export questions to a spreadsheet.
- Page 127 3. Select a Parent Category. Note: Once you have entered a category, you can now use it as a Parent Category. 4. Click Save. 5. Add more Categories and assign Parent Categories as needed. VIA Collage - Configuring VIA Collage...
- Page 128 3. Select the No. of Choices and type the full text for each choice OR select the true/false checkbox. 4. Select categories and subcategories for the question. 5. Click Save. 6. Add more questions as needed. VIA Collage - Configuring VIA Collage...
- Page 129 5. Select the required CSV file and click Open. 6. In the Upload CSV file box, click Import. The questions from the file are imported to VIA and appear in the list on the Poll List tab. VIA Collage - Configuring VIA Collage...
- Page 130 To assign questions to a category: 1. On the left side of the embedded web pages, select ePolling > Category List. The Category List tab appears. Figure 89: ePolling > Category List Tab VIA Collage - Configuring VIA Collage...
- Page 131 3. Select the questions to assign to the selected category and click Apply. The questions are added to the category. 4. Click the number in the No. of Polls column on the Category list tab to view all questions for that category. VIA Collage - Configuring VIA Collage...
- Page 132 OR click Export Results. A CSV file is created with the number of people who selected each answer for the selected questions. 4. The files are available to open at the bottom of the main display screen. VIA Collage - Configuring VIA Collage...
- Page 133 Digital Signage is an optional feature available through separate licensing and pricing. Contact your local Kramer office for more details. The Digital Signage feature enables you to use VIA Collage to display dynamic content and information on the main display when there is no meeting in progress.
- Page 134 Figure 93: Digital Signage Create URL Window 3. Type the URL address and File Name (name that will appear on the Existing Media list) and click Save. The new URL is added to the Existing Media list. VIA Collage - Configuring VIA Collage...
- Page 135 Font/Background Color to pick the text and background color. 8. Click Preview. A preview of the scroller appears at the top of the window. 9. Click Save. The new Scroller is added to the Existing Media list. VIA Collage - Configuring VIA Collage...
- Page 136 92), click Upload Media. A file browser window appears. Figure 95: Digital Signage Upload Media File Browser 11. Select an image or video file and click Open. The file is added to the Existing Media list. VIA Collage - Configuring VIA Collage...
- Page 137 To add and manage digital signage templates: 1. On the left side of the embedded web pages, select Digital Signage > Template Manager. The Template Manager tab appears. Figure 96: Digital Signage > Template Manager Subtab VIA Collage - Configuring VIA Collage...
- Page 138 2. Click the name of a template. A window opens, showing a preview of the selected template. Figure 97: Digital Signage Template Preview Window 3. Click Add Template. The template builder screen appears. Figure 98: Digital Signage Template Builder Screen VIA Collage - Configuring VIA Collage...
- Page 139 11. Click Save. The new template appears in the Template Manager list (Figure 96). 12. Click Edit to open the template builder screen and edit the selected template. 13. Click Delete to delete the selected template. VIA Collage - Configuring VIA Collage...
- Page 140 To define a digital signage campaign: 1. On the left side of the embedded web pages, select Digital Signage > Schedule Playlist. The Schedule Playlist tab appears. Figure 100: Digital Signage > Schedule Playlist Tab VIA Collage - Configuring VIA Collage...
- Page 141 5. Select a Start Date on the first calendar and an End Date on the second calendar. 6. Select the checkbox next to Start (hh:mm) to define a start time for the first day of the campaign and an end time for the last day of the campaign. VIA Collage - Configuring VIA Collage...
- Page 142 7. Click the WHAT to Play tab. The Schedule Playlist WHAT to Play tab appears. Figure 102: Digital Signage > Schedule Playlist WHAT to Play Tab VIA Collage - Configuring VIA Collage...
- Page 143 Add to Playlist. All selected media for the selected frame appears in the Schedule Details area. 10. Click the Advanced button to set the running time for a web page (url). VIA Collage - Configuring VIA Collage...
- Page 144 Figure 104: Set Running Time for Web page 11. Click Save. The new campaign is saved and it appears on the Schedule Playlist tab. Figure 105: Scheduled Campaign displayed in the Schedule Playlist Tab VIA Collage - Configuring VIA Collage...
- Page 145 7.2.23 Updating Firmware To update your VIA Collage unit through this interface , save the downloaded file to your computer and extract all files (the extracted file contains: VIA Collage release notes document, VIA Collage Upgrade procedure document, VIA Collage update zip file).
- Page 146 Click Utilities on the left menu and then select Maintenance. You can select one by one the default configurations you would like to reset or simply click “select all” to reset to complete default factory settings. Figure 108: Utilities – Maintenance VIA Collage - Configuring VIA Collage...
-
Page 147: Technical Specifications
10% to 90%, RHL non-condensing 11.7” x 2.2” x 8.3” W, D, H DIMENSIONS: WEIGHT: 2.3kg (5.0lbs) INCLUDED ACCESSORIES: 3 power cords (US, EU, UK) OPTIONAL: 2U rack adapter Specifications are subject to change without notice at www.kramerav.com VIA Collage - Technical Specifications... -
Page 148: Via Collage Upgrade Procedure
Refer to “VIA Collage upgrade procedure” included in the downloaded folder. Verifying a Correct Installation From your VIA Collage unit, click the Participants icon and check that the correct software version appears on the right side of the screen. Check on Kramer Web site for the latest Firmware version... -
Page 149: Updating The Mobile Applications
It is important to update your mobile units as soon as the mobile apps are available in accordance with the firmware upgrade of the VIA, otherwise your mobile devices cannot work with the VIA. VIA Collage - VIA Collage Upgrade Procedure... -
Page 151: Safety Warning
SAFETY WARNING Disconnect the unit from the power supply before opening and servicing For the latest information on our products and a list of Kramer distributors, visit our Web site to find updates to this user manual. We welcome your questions, comments, and feedback.
Need help?
Do you have a question about the VIA collage and is the answer not in the manual?
Questions and answers