Advertisement
Quick Links
Scan to view this
document online
Step 1: Check what's in the box
VIA GO3 Collaboration Device
1 Power cords for US and EU
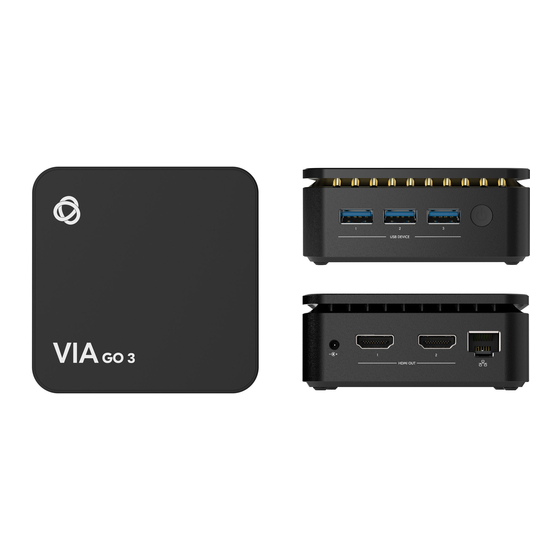
Step 2: Get to know your VIA GO3
#
Feature
1
3 x USB DEVICE 3.0 Connector Connect to a USB device, for example, a USB speaker.
2
Power Button with LED
3
Power Connector
4
1 x HDMI OUT Connector
5
RJ-45 Connector
The following ports are unavailable and covered by rubber covers:
1. HDMI OUT 2.
2. USB-C.
3. Analog audio.
VIA GO3 Quick Start
VIA GO3 Quick Start Guide
For Installer
This guide helps you install and use your VIA GO3 for the first
time.
Go to
https://www.kramerav.com/product/VIA GO3
download the latest user manual and check if firmware
upgrades are available.
1 VESA mounting bracket
1 VESA screw set
Function
Press to power ON or turn OFF the device.
Connect to the 12V DC power supply.
Connect to an HDMI sink.
Connect to a LAN (default mode).
to
P/N: 2 9 0 0 - 3 0 1 7 9 7 QS
Scan to view the
user manual online
1 Quick start guide
Rev: 2
Advertisement

Related Manuals for Kramer VIA GO3


Summary of Contents for Kramer VIA GO3
- Page 1 VIA GO3 Quick Start Guide For Installer This guide helps you install and use your VIA GO3 for the first time. Go to https://www.kramerav.com/product/VIA GO3 Scan to view the Scan to view this download the latest user manual and check if firmware upgrades are available.
- Page 2 Step 3: Mount VIA GO3 VIA GO3 can be installed on a flat surface / wall, rear of a monitor or rack mount using the included VESA mounting bracket and screw set: Mount VIA GO3 to the Mounting Bracket Attach the mounting bracket to the VIA GO3 with 2 screws.
-
Page 3: Step 5: Connect Power
Step 5: Connect power Connect the 12V DC power adapter to VIA GO3 and plug it into the mains electricity. Caution: There are no operator serviceable parts inside the unit. Caution: The device is intended to be installed at a height of 2 meters or less. - Page 4 Configure VIA Network Change Hostname or Change network DHCP / Fixed IP Click “Change Host name” in the Dashboard’s Quick Links, or click Network Settings in the navigation pane on the left to open the Network Settings > LAN Settings screen. 2.
- Page 5 Common VIA Settings Adjustments Change Room name 1. Click “Edit Room name” in the Dashboard’s Quick Links OR open the VIA Settings screen and click the Edit icon on the “Active” template to open the default VIA Settings > System tab. 2.
- Page 6 VIA Screen Editor To create a personalized VIA Screen template, use the Screen Editor. 1. Click VIA Screen Editor in the navigation panel on the left to open the Screen Editor’s layout list. 2. Click Add Screen Layout (top right) to start a new screen layout in the Screen Editor. 3.
- Page 7 Step 1: Connect your personal device to the proper network Connect your personal device to the same Wi-Fi or LAN network as the VIA GO3 in your meeting room. Step 2: Run or Download the Kramer VIA app For Mac or PC: 1.
- Page 8 Integrated YouTube Player Do Not Disturb (DND) SIMPLIFIED EU DECLARATION OF CONFORMITY Hereby, Kramer Electronics declares that the radio equipment type VIA GO³ is in compliance with Directive 2014/53/EU. The full text of the EU declaration of conformity is available via the Resources tab on the product page at the following internet address: https://www.kramerav.com/product/VIA GO3...
Need help?
Do you have a question about the VIA GO3 and is the answer not in the manual?
Questions and answers