Table of Contents
Advertisement
Quick Links
VIA Connect² Quick Start Guide
For Installer
This guide helps you install and configure your
Scan for full
manual
Go to
manual and check if firmware upgrades are available.
Step 1: Check what's in the box
VIA
Connect² Collaboration Device
1 Power supply (12V DC) with adapters for US, UK, and EU
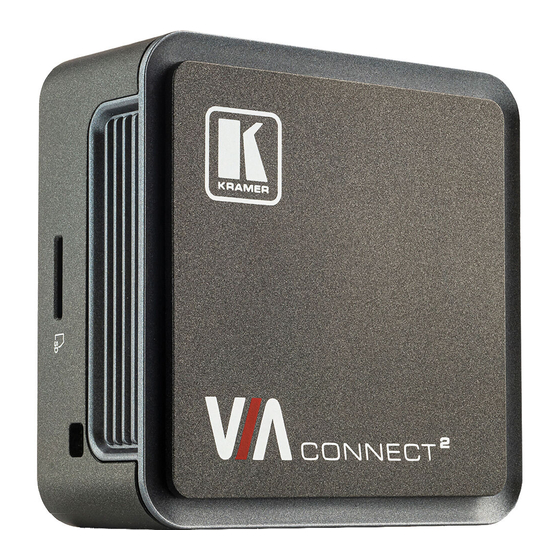
Step 2: Get to know your VIA Connect²
#
Feature
1
Video Toggle Connector
2
Micro SD Card Slot
3
Power Button with LED
4
USB 3.0 Connectors (x2)
5
USB 2.0 Connector
6
Lock Opening
7
HDMI™ OUT Connector
8
RJ-45 Connector
9
HDMI™ IN Connector
10
Power Connector
Step 3: Install VIA Connect²
Place
VIA
Connect² on a flat surface, or mount on a wall or the back of a display using the included VESA mounting bracket:
1. Attach the VESA mounting bracket to
the back of the display with 4 screws.
When mounting the device on a display, the installer MUST secure the display to prevent instability.
VIA Connect²
Quick Start
www.kramerav.com/downloads/VIA Connect²
Function
Connect to video toggle cable for toggling between VIA input and HDMI™ input.
Not in use.
Press to power ON or turn OFF the device.
Connect to USB devices, for example, a keyboard and a mouse.
Connect to a USB device, for example, a keyboard or mouse.
Connect to a security locking cable.
Connect to an HDMI sink.
Connect to a LAN (default mode).
Connect to an HDMI source.
Connect to the 12V DC power supply.
2. Fasten two screws to the bottom of
VIA
Connect².
VIA
Connect² for the first time.
to download the latest user
1 VESA mounting bracket
1 VESA screw set
3. Insert the screws on the bottom of
VIA
mounting bracket.
2 9 0 0 - 3 0 1 4 3 3 QS
P/N:
1 Video toggle cable
1 Quick start guide
Connect² into the slots on the
Rev: 3
Advertisement
Table of Contents

Related Manuals for Kramer VIA Connect2


Summary of Contents for Kramer VIA Connect2
- Page 1 VIA Connect² Quick Start Guide For Installer This guide helps you install and configure your Connect² for the first time. Scan for full manual Go to www.kramerav.com/downloads/VIA Connect² to download the latest user manual and check if firmware upgrades are available. Step 1: Check what’s in the box Connect²...
- Page 2 The device is intended to be installed at a height of 2 meters or less. Warning: Use only the Kramer Electronics power adapter that is provided with the unit. Warning: Disconnect the power and unplug the unit from the wall before installing.
- Page 3 The Welcome page of Connect² appears. Click Run VIA to execute the Kramer VIA app without downloading it. (Intended for guests who are using VIA only temporarily.) Click Install VIA to download the Kramer VIA app onto your computer. (Intended for regular users of VIA.) Click Join Through Browser to use an online version of Kramer VIA.
- Page 4 Step 10: Using the VIA dashboard menu • Tap the green button to present your screen to the meeting participants on the main display. • Tap Show Options > Features to access Connect² features. • Tap Show Options > Participants to see who else is connected. Step 11: VIA Connect²...
Need help?
Do you have a question about the VIA Connect2 and is the answer not in the manual?
Questions and answers