Kramer VIA Connect PRO User Manual
Wireless presentation and collaboration
solution
Hide thumbs
Also See for VIA Connect PRO:
- User manual (131 pages) ,
- Quick start manual (4 pages) ,
- User manual (63 pages)

Related Manuals for Kramer VIA Connect PRO


Summary of Contents for Kramer VIA Connect PRO
- Page 1 USER MANUAL MODEL: VIA Connect PRO Wireless Presentation and Collaboration Solution (For Firmware Version 2.4) P/N: 2900-300419 Rev 8 www.kramerAV.com...
-
Page 2: Table Of Contents
For User: Running Kramer VIA App Running the Kramer VIA App for PC and Mac Running the Kramer VIA App for Tablets & Smartphones and for Chromebooks/Chrome Web Browser Running the Kramer VIA App Using an Installation File For User: Participating in a VIA Meeting... -
Page 3: Introduction
Kramer Electronics Ltd. Introduction Welcome to Kramer Electronics! Since 1981, Kramer Electronics has been providing a world of unique, creative, and affordable solutions to the vast range of problems that confront the video, audio, presentation, and broadcasting professional on a daily basis. In recent years, we... -
Page 4: Overview
European Advanced Recycling Network (EARN) and will cover any costs of treatment, recycling and recovery of waste Kramer Electronics branded equipment on arrival at the EARN facility. For details of Kramer’s recycling arrangements in your particular country go to our recycling pages at www.kramerav.com/support/recycling. - Page 5 Chromebook • iPad/iPhone® tablet/smartphone (iPad 2 or later, iOS 9 or later) When using the Airplay service, no Kramer VIA application is needed. However, we recommend using iOS11 or Sierra OS X for a better experience. • Android® OS 5. x tablet/smartphone...
-
Page 6: Defining Via Connect Pro Wireless Presentation And Collaboration Solution
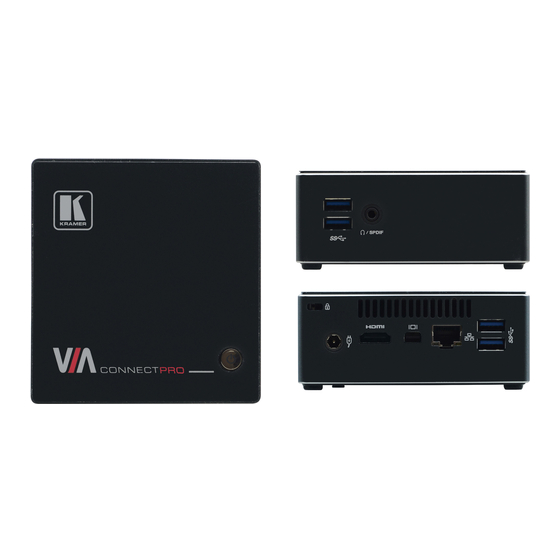
Connect to a Mini DisplayPort acceptor. LAN RJ-45 Connector Connect to a LAN network or to a wireless router. USB 3.0 Connectors Connect to up to two USB devices. VIA Connect PRO – Defining VIA Connect PRO Wireless Presentation and Collaboration Solution... -
Page 7: For Installer: Installing In A Rack
Start guide for installation instructions, available at: www.kramerav.com/downloads/VIA Connect PRO You can also install VIA Connect PRO using one of the following methods: • Install the mounting plate on a wall with the 4 screws, insert the 2 hand-tightened screws into the bottom of the device, and mount the device on the mounting plate using the 2 screws. -
Page 8: For Installer: Connecting Via Connect Pro
(LAN). The default IP setting is DHCP that assigns an automatic IP address to your unit. This enables easy Plug and Play setup when connecting your VIA Connect PRO to the network. To assign a static IP address, (see Changing LAN Settings on page 62). VIA Connect PRO – For Installer: Connecting VIA Connect PRO... -
Page 9: Connecting Main Display
PRO’s internal video card reads the EDID (Extended Display Identification VIA Connect Data) for any connected display and sets the optimum display resolution and image refresh rate automatically through the HDMI and DisplayPort jacks. VIA Connect PRO – For Installer: Connecting VIA Connect PRO... -
Page 10: For Web Administrator: Configuring Settings - Embedded Web Pages
30. • Customizing Main Display Look and Feel on page 39. • Maintaining Your VIA Unit on page 46. • Configuring Digital Signage on page 51. VIA Connect PRO – For Web Administrator: Configuring Settings – Embedded Web Pages... -
Page 11: Logging In To Embedded Web Pages
4. Type the two Captcha Text “words” with a space between them in the text box. You can change the Captcha Text by clicking the refresh button to the right of the text box. VIA Connect PRO – For Web Administrator: Configuring Settings – Embedded Web Pages... -
Page 12: Configuring Via Gateway Settings
® uptime, disk space, iOS Mirroring status, Chrome status, Miracast enabled status, VSM connectivity, and LAN parameters. VIA Connect PRO – For Web Administrator: Configuring Settings – Embedded Web Pages... - Page 13 1. Click VIA Management > VIA Settings on the navigation pane (Figure The VIA Settings page appears. Figure 6: VIA Management > VIA Settings > System & iOS Tab 2. Click Display. VIA Connect PRO – For Web Administrator: Configuring Settings – Embedded Web Pages...
- Page 14 To change the date format for the embedded web pages: 1. Click VIA Management > VIA Settings on the navigation pane (Figure The VIA Settings page appears (Figure 2. Click Date & Time. VIA Connect PRO – For Web Administrator: Configuring Settings – Embedded Web Pages...
- Page 15 2. Click Date & Time. The Date & Time tab appears (Figure 3. In the VIA Gateway Timezone Configuration section, select the required time zone from the Set Time Zone drop-down. VIA Connect PRO – For Web Administrator: Configuring Settings – Embedded Web Pages...
- Page 16 The new NTP server is saved and appears in the NTP Server table. To edit an NTP server name, click the icon in the Edit column. To delete an NTP server name, click the icon in the Delete column. VIA Connect PRO – For Web Administrator: Configuring Settings – Embedded Web Pages...
- Page 17 4. Select the Hours (24 hour format) and Minutes for the time of day for the VIA Connect to automatically reboot every day. 5. Click Reset VIA Session for settings to take effect. VIA Connect PRO – For Web Administrator: Configuring Settings – Embedded Web Pages...
- Page 18 Contact your regional sales representative for more details about this solution. If VIA discovery is enabled and configured at VSM side, your VIA device will be automatically added under VSM supervision. VIA Connect PRO – For Web Administrator: Configuring Settings – Embedded Web Pages...
- Page 19 Kramer Electronics Ltd. To configure VIA Connect PRO to be managed by VSM when VIA Discovery is not activated: 1. Click VIA Management > VIA Site Management on the navigation pane (Figure The VIA Site Management page appears. Figure 11: VIA Management > VIA Site Management Page 2.
- Page 20 To define end of meeting actions: 1. Click VIA Management > VIA Settings on the navigation pane (Figure The VIA Settings page appears (Figure 2. Click Advanced. VIA Connect PRO – For Web Administrator: Configuring Settings – Embedded Web Pages...
- Page 21 Close Whiteboard and Discard – Close the Whiteboard on the main display and discard the current page. ▪ Do not Close the Whiteboard – leave the Whiteboard open on the main display. VIA Connect PRO – For Web Administrator: Configuring Settings – Embedded Web Pages...
- Page 22 Non-Secure – API commands can be sent to the VIA gateway on a non-secure, plain text port. Select this option if your controller does not support TLS. VIA Connect PRO – For Web Administrator: Configuring Settings – Embedded Web Pages...
-
Page 23: Managing Network Settings
Figure 13: VIA Management > Network Settings Page 2. Under IP Configuration, select Static. 3. In the Network Information table, change the IP settings. 4. Click Apply Settings. VIA Connect PRO – For Web Administrator: Configuring Settings – Embedded Web Pages... - Page 24 A file browser appears. 7. Open the relevant key file. 8. Click Upload. Do not upload the key file until the certificate file is finished uploading. 9. Restart your device. VIA Connect PRO – For Web Administrator: Configuring Settings – Embedded Web Pages...
-
Page 25: Managing User Access
2. Type the new Username, Password and Confirm Password. 3. Under User Role, select from the following administrative levels: ▪ Web Administrator – access to change all system settings, including Digital Signage. VIA Connect PRO – For Web Administrator: Configuring Settings – Embedded Web Pages... - Page 26 1. Click User Management > User List on the navigation pane (Figure The User List page appears (Figure 16). 2. Click the icon in the Edit column for the relevant user. VIA Connect PRO – For Web Administrator: Configuring Settings – Embedded Web Pages...
- Page 27 3. Type your Old Password, New Password, and Confirm Password. 4. Click Update. The changes are applied and you are logged out of the embedded web pages. VIA Connect PRO – For Web Administrator: Configuring Settings – Embedded Web Pages...
- Page 28 Allow Participants to confirm start of Presentation – see Showing Participant Screen on Main Display on page 6. If you selected Active Directory, see Configuring Active Directory Moderator Mode on page 27. VIA Connect PRO – For Web Administrator: Configuring Settings – Embedded Web Pages...
- Page 29 1. Click Activate Moderator Mode. 2. Click Active Directory under Moderator Mode. The Active Directory options appear. Figure 20: VIA Management > Moderator Mode Page with Active Directory Options VIA Connect PRO – For Web Administrator: Configuring Settings – Embedded Web Pages...
- Page 30 If there is a typographical error in any of fields, the users (Moderators and Participants) cannot log in. For further details, refer to Kramer’s white paper “VIA Integration into DNS and Microsoft Active Directory”.
- Page 31 The Global Settings page appears with the NTP tab open (Figure 2. Click Session Settings. The Sessions Settings tab opens (Figure 22). 3. Under Captcha, click OFF. VIA Connect PRO – For Web Administrator: Configuring Settings – Embedded Web Pages...
-
Page 32: Managing Via Features
1. Click VIA Management > Gateway /Client /Mobile Features on the navigation pane (Figure The selected Features page appears. Figure 23: VIA Management > Client Features Page VIA Connect PRO – For Web Administrator: Configuring Settings – Embedded Web Pages... - Page 33 Figure 24: VIA Management > Client Features Page with Hidden Feature To show a feature that was hidden, click + in the upper right corner of a hidden feature frame. VIA Connect PRO – For Web Administrator: Configuring Settings – Embedded Web Pages...
- Page 34 VIA Pad overrides Room Code – Participant can log in to a meeting without entering ▪ the room code. Room Name is automatically populated; it reflects the name of your VIA Connect PRO unit. VIA Connect PRO – For Web Administrator: Configuring Settings – Embedded Web Pages...
- Page 35 3. If desired, type a new Mirror Name. This is the name that appears when you look for AirPlay devices on your iOS device. 4. Select the maximum number of mirrored iOS devices that can be used simultaneously. VIA Connect PRO – For Web Administrator: Configuring Settings – Embedded Web Pages...
- Page 36 The VIA Settings page appears with the System & IOS tab open (Figure 2. Select the Do Not Disturb checkbox. Do Not Disturb is enabled after the next reboot. VIA Connect PRO – For Web Administrator: Configuring Settings – Embedded Web Pages...
- Page 37 1. Connect the display to be controlled to the same network as your VIA Connect PRO. 2. Click VIA Management > Display Controller on the navigation pane (Figure VIA Connect PRO – For Web Administrator: Configuring Settings – Embedded Web Pages...
- Page 38 Office 365 Admin Center or Google Admin console for G Suite. See Configuring Third Party Apps for VIA Calendar Integration available for download at: www.kramerav.com/downloads/VIA Connect PRO. VIA Connect PRO – For Web Administrator: Configuring Settings – Embedded Web Pages...
- Page 39 The Calendar page appears (Figure 28). 2. Select the Show Calendar on VIA checkbox. 3. Under Account, select Google from the Calendar Type drop down. The Google Calendar controls appear. VIA Connect PRO – For Web Administrator: Configuring Settings – Embedded Web Pages...
- Page 40 7. Copy the integration code from the Google sign in page and paste it into the Step 2 field on the VIA Calendar page. 8. Click Get Calendar. 9. Under Step 3, select the calendar associated with the room. VIA Connect PRO – For Web Administrator: Configuring Settings – Embedded Web Pages...
-
Page 41: Customizing Main Display Look And Feel
If the wallpaper image resolution does not match VIA's output resolution, the image may not display accurately. For best results, use a wallpaper image that matches the output resolution of VIA. VIA Connect PRO – For Web Administrator: Configuring Settings – Embedded Web Pages... - Page 42 The VIA Settings page appears (Figure 2. Click Display. The Display tab appears (Figure 3. Click Customize Gateway Screen in the Wallpaper, Room Code, Room Name Settings section. VIA Connect PRO – For Web Administrator: Configuring Settings – Embedded Web Pages...
- Page 43 6. Change any of the properties of the selected text, as required. 7. Click Apply. The changes are saved and shown after resetting the session. Each type of text enables different types of customization, as follows: VIA Connect PRO – For Web Administrator: Configuring Settings – Embedded Web Pages...
- Page 44 Date Time Color – Click to select a new text color ▪ ▪ 24 hours format – Select/clear the checkbox to show time in 24/12 hour format Customizing Room Name Display Figure 34: Room Name Display Properties VIA Connect PRO – For Web Administrator: Configuring Settings – Embedded Web Pages...
- Page 45 Room Code Color – Click to select a new text color. ▪ Room Code Refresh Time –Define how often the room code is changed to a different number. VIA Connect PRO – For Web Administrator: Configuring Settings – Embedded Web Pages...
- Page 46 Click Print QR Code to get a hard copy of the QR code to post in the room. VIA Connect PRO – For Web Administrator: Configuring Settings – Embedded Web Pages...
- Page 47 The Display tab appears (Figure 3. In the VIA Gateway User Interface Scaling section, select Large from the User Interface Scaling option box. 4. Click Reset VIA Session. VIA Connect PRO – For Web Administrator: Configuring Settings – Embedded Web Pages...
-
Page 48: Maintaining Your Via Unit
The VIA Settings page appears with the System & IOS tab open (Figure 2. Select the Activate System Log check box. The gateway activity log is activated. VIA Connect PRO – For Web Administrator: Configuring Settings – Embedded Web Pages... - Page 49 The filtered search results appear in the table at the bottom of the page. Click Export to PDF or Export to CSV to save a file of the log table on your computer. VIA Connect PRO – For Web Administrator: Configuring Settings – Embedded Web Pages...
- Page 50 If an update is available, confirm the download. The new firmware is downloaded to your computer. c. Click Browse File. A file browser appears. d. Select the relevant firmware update file. VIA Connect PRO – For Web Administrator: Configuring Settings – Embedded Web Pages...
- Page 51 Kramer Electronics Ltd. e. Click Upload. The new firmware is uploaded to the unit and the FW is updated. 3. Upon completion of the update process, reboot the unit. VIA Connect PRO – For Web Administrator: Configuring Settings – Embedded Web Pages...
- Page 52 Resetting Calendar Settings removes the calendar settings from the unit and credentials will be required to renew synchronization to your calendar. To reset default settings: 1. Click Utilities > Maintenance on the navigation pane (Figure The Maintenance page appears. VIA Connect PRO – For Web Administrator: Configuring Settings – Embedded Web Pages...
-
Page 53: Configuring Digital Signage
Image – static image (allowed file extensions: jpg, jpeg, bmp, gif, png) • Video (allowed file extensions: avi, mpeg, wmv, mpg, mov, vob, mkv, mp4, m4v) • RSS feed – Live RSS feed VIA Connect PRO – For Web Administrator: Configuring Settings – Embedded Web Pages... - Page 54 To create a web url for digitanamel signage: 1. On the Upload Media File page (Figure 40), click Create Web URL. The Create URL window appears. Figure 41: Digital Signage Create URL Window VIA Connect PRO – For Web Administrator: Configuring Settings – Embedded Web Pages...
- Page 55 5. Click Preview. A preview of the scroller appears at the top of the window. 6. Click Save. The new Scroller is added to the Existing Media list. VIA Connect PRO – For Web Administrator: Configuring Settings – Embedded Web Pages...
- Page 56 The Select a tag drop-down list appears. 4. Select the required tag from the drop-down list. 5. Under File Name, enter the name that will appear on the Existing Media list. VIA Connect PRO – For Web Administrator: Configuring Settings – Embedded Web Pages...
- Page 57 To add and manage digital signage templates: 1. Select Digital Signage > Template Manager on the navigation pane (Figure The Template Manager page appears. Figure 45: Digital Signage > Template Manager Page VIA Connect PRO – For Web Administrator: Configuring Settings – Embedded Web Pages...
- Page 58 4. Type a name for the new template in the Template Name text box. 5. Click Add Frame. A new frame appears in the black preview box. Figure 48: Digital Signage Template Builder Screen – New Frame VIA Connect PRO – For Web Administrator: Configuring Settings – Embedded Web Pages...
- Page 59 1. On the left side of the embedded web pages, select Digital Signage > Schedule Playlist. The Schedule Playlist page appears. Figure 49: Digital Signage > Schedule Playlist Page VIA Connect PRO – For Web Administrator: Configuring Settings – Embedded Web Pages...
- Page 60 6. Select the checkbox next to Start (hh:mm) to define a start time for the first day of the campaign and an end time for the last day of the campaign. VIA Connect PRO – For Web Administrator: Configuring Settings – Embedded Web Pages...
- Page 61 8. In the Template View section on the right side, select a template. A preview of the selected template appears in the Template View section. Figure 52: WHAT to Play Tab VIA Connect PRO – For Web Administrator: Configuring Settings – Embedded Web Pages...
- Page 62 The new campaign is saved, and it appears on the Schedule Playlist page. Figure 54: Scheduled Campaign displayed in the Schedule Playlist Page To delete a campaign, select the relevant campaign and click Delete Schedule. VIA Connect PRO – For Web Administrator: Configuring Settings – Embedded Web Pages...
-
Page 63: For Web Administrator: Configuring Settings - Gateway Dashboard
2. Click Features > Settings. The login window appears. Figure 56: Settings Login Window 3. Type an administrator user name and password (default user name = su, default password = supass). VIA Connect PRO – For Web Administrator: Configuring Settings – Gateway Dashboard... -
Page 64: Changing Lan Settings
2. Enter, as required, the Host Name, IP Address, Subnet Mask, Default Gateway, DNS Server. 3. Click Apply Settings. 4. Click OK in the Confirmation Message. The system reboots with the new settings. VIA Connect PRO – For Web Administrator: Configuring Settings – Gateway Dashboard... -
Page 65: Accessing System Controls
To access system controls: 1. On the Gateway Dashboard Settings Screen (Figure 57), click System Controls. The System Controls tab appears. Figure 58: System Control Screen 2. Click the required icon. VIA Connect PRO – For Web Administrator: Configuring Settings – Gateway Dashboard... -
Page 66: For User: Running Kramer Via App
• Running the Kramer VIA App for PC and Mac on page 64. • Running the Kramer VIA App for Tablets & Smartphones and for Chromebooks/Chrome Web Browser on page 65. • Running the Kramer VIA App Using an Installation File on page 65. -
Page 67: Running The Kramer Via App For Tablets & Smartphones And For Chromebooks/Chrome Web Browser
Running the Kramer VIA App Using an Installation File For easy deployment and installation of Kramer VIA app on participant devices, IT managers can use the msi file (Windows) or dmg file (Apple) available at: https://www.kramerav.com/product/VIA%20Connect%20PRO#Tab_Resources VIA Connect PRO – For User: Running Kramer VIA App... -
Page 68: For User: Participating In A Via Meeting
Logging In to a VIA Meeting Using a VIA Pad on page 70. • Logging In to a VIA Meeting Using a VIA NFC Tag for Android on page 70. • Managing Room Names on page 99. VIA Connect PRO – For User: Participating in a VIA Meeting... - Page 69 You may be required to type a user name and password if Databased Moderator mode is activated (see Configuring Moderator Mode on page 26). For more information, ask your meeting Web Administrator. VIA Connect PRO – For User: Participating in a VIA Meeting...
- Page 70 Present / Stop Presenting – Mirror or mirroring your screen on the main display. • Participants – Display a list of all participants in the session. • Volume Control – Control the volume of speakers connected to VIA Connect PRO. VIA Connect PRO – For User: Participating in a VIA Meeting...
- Page 71 3. Scan the QR code that appears in lower right corner of the VIA main display (Figure 36). You are automatically logged in to the VIA meeting. The VIA Dashboard and taskbar appear on your device screen (Figure 61). VIA Connect PRO – For User: Participating in a VIA Meeting...
- Page 72 Configuring VIA Pad Settings on page 32). The following instructions are for Windows and Mac OS users. To log in to VIA Connect PRO using a VIA Pad: 1. Connect your VIA Pad to a USB connector on your laptop.
-
Page 73: Mirroring Your Device Screen
Your mobile device must support Android version 5. 1 as a minimum. The latest Android OS version is recommended. Android mirroring does not support audio. Audio is heard from your device and not from the output of the VIA device. VIA Connect PRO – For User: Participating in a VIA Meeting... - Page 74 – Minimum version iOS 10 (iOS 12 is recommended). • Mac Books and Apple Computers – Minimum version OS X 10. 11 (Mojave is recommended). VIA Connect PRO – For User: Participating in a VIA Meeting...
- Page 75 For Mac Books and Apple Computers: Click the AirPlay menu on the Apple Menu Bar, located in the top right corner of the screen, near the clock. Figure 66: Mac Books/Apple AirPlay Menu VIA Connect PRO – For User: Participating in a VIA Meeting...
- Page 76 To properly disconnect iPhone or iPad/Mini iPad and stop mirroring: 1. Swipe up from the upper right corner to reveal the Control Center. Figure 68: Apple AirPlay Toggle 2. Click Stop Mirroring. Mirroring stops. 3. Click iPhone/iPad. VIA Connect PRO – For User: Participating in a VIA Meeting...
- Page 77 2. On the VIA dashboard, click Present. You are presenting. Figure 69: User Dashboard with Do Not Disturb Deactivated 3. Click the gray icon to the right of the Stop Presenting icon. VIA Connect PRO – For User: Participating in a VIA Meeting...
- Page 78 You have full access to all features. The other participants see a modified user dashboard that only allows access to the Participants list. Other icons are disabled. 4. Click the yellow icon. Do Not Disturb is deactivated and the other participants return to full functionality. VIA Connect PRO – For User: Participating in a VIA Meeting...
-
Page 79: Collaborating On Main Display
A floating Stop Collaboration icon also appears in the upper right corner of your screen. Figure 73: Floating Stop Collaboration Icon Click and drag the floating Stop Collaboration icon to another location on your screen, if necessary. VIA Connect PRO – For User: Participating in a VIA Meeting... - Page 80 4. Tap the yellow Lock button to lock the left-click in pressed position and move the cursor using the top section of the touchpad for dragging or selecting. The left-click button turns red and remains locked until you remove your finger from the touchpad. VIA Connect PRO – For User: Participating in a VIA Meeting...
- Page 81 Draw a line, rectangle, or circle. Click the lower right corner to select the shape, color and line thickness. Highlighter Highlight text or objects on the whiteboard in yellow. VIA Connect PRO – For User: Participating in a VIA Meeting...
- Page 82 Close the Whiteboard. The whiteboard toolbar can be moved to the bottom (and back to top) of the display by clicking the small arrows on the right side of the toolbar VIA Connect PRO – For User: Participating in a VIA Meeting...
- Page 83 Any other participant who wants to take control or collaborate with Dave's system can click the Start Collaboration icon and drag his laptop mouse to the top and off their local screen. VIA Connect PRO – For User: Participating in a VIA Meeting...
- Page 84 Collaborating on Main Display on page 77). To enable laptop touch screen collaboration: 1. Click the VIA icon in your computer taskbar. The taskbar menu appears. Figure 78: Kramer VIA Taskbar Menu VIA Connect PRO – For User: Participating in a VIA Meeting...
- Page 85 3. Once Enable Control is selected, a red check mark appears on the upper-right of the icon. Figure 80: Enable Control Icon with Check At any time, User #1 can click Enable Control again to stop other users from controlling their computer. VIA Connect PRO – For User: Participating in a VIA Meeting...
-
Page 86: Streaming Video
1080p/60fps rate. The video is obtained from the client device without being transferred to VIA Connect PRO. VIA Connect PRO features a 10Mbps maximum video bitrate for 30fps or 60fps videos and handles video files of up to 8GB. VIA Connect PRO – For User: Participating in a VIA Meeting... - Page 87 1. Click YouTube in the features menu of your VIA dashboard (Figure 61). The YouTube player window appears. Figure 82: YouTube Player Window 2. In the URL Name field, enter a name for the video. VIA Connect PRO – For User: Participating in a VIA Meeting...
- Page 88 PRO, provided the computer and VIA Connect PRO are on connected networks. To Configure RTSP Streaming using VLC Media Player: 1. Open VLC Media Player. Figure 83: VLC Media Menu VIA Connect PRO – For User: Participating in a VIA Meeting...
- Page 89 The Open Media window appears. Figure 84: Open Media Window 3. Click Add and select a file to stream and click Stream. The Stream Output/Source window appears. Figure 85: Stream Output/Source Window VIA Connect PRO – For User: Participating in a VIA Meeting...
- Page 90 Figure 86: Stream Output/Destination Setup Window 5. Select RTSP from the New Destination drop down and click Add. The RTSP tab appears. Figure 87: Stream Output/Destination Setup RTSP Tab VIA Connect PRO – For User: Participating in a VIA Meeting...
- Page 91 7. Clear the Activate Transcoding checkbox and click Next. The Stream Output/Option Setup window appears. Figure 89: Stream Output/Option Setup Window 8. Select Stream all elementary streams and click Stream. VIA Connect PRO – For User: Participating in a VIA Meeting...
- Page 92 RTP. Media can stream on a VIA Connect PRO unit, provided the computer and VIA Connect PRO are on connected networks. To stream RTP using VLC: 1. Open VLC. 2. Click Media > Stream. VIA Connect PRO – For User: Participating in a VIA Meeting...
-
Page 93: Communicating With Participants
If there is a meeting moderator with enable/disable chat access (see Configuring Moderator Mode on page 26), verify that Chat is selected in the upper right corner of the Participants list. VIA Connect PRO – For User: Participating in a VIA Meeting... - Page 94 1. On the VIA Dashboard, click Participants or click the File Transfer feature icon. The Participants list opens. 2. Click the file transfer icon for the desired participant with whom you wish to share a file. A file browser appears. VIA Connect PRO – For User: Participating in a VIA Meeting...
- Page 95 VIA meeting. This directory is referred to as the VIA Cloud and is located in the VIA Connect PRO internal memory. VIA Connect PRO – For User: Participating in a VIA Meeting...
- Page 96 Moderator Mode must be activated to enable becoming a Moderator during a meeting (see Configuring Moderator Mode on page 26). To become the meeting moderator: 1. Click Participants on the Dashboard. VIA Connect PRO – For User: Participating in a VIA Meeting...
- Page 97 Becoming Meeting Moderator on page 94). Figure 97: Kramer VIA app Dashboard participant’s list 2. Clear the Chat checkbox at the top of the Participants list. Chat is disabled. VIA Connect PRO – For User: Participating in a VIA Meeting...
- Page 98 (for MAC/Windows users) to help the moderator accept or deny the request: 2. The moderator clicks Allow full screen or Allow (Auto Position). The participant’s presentation appears on the main display. VIA Connect PRO – For User: Participating in a VIA Meeting...
-
Page 99: Mirroring Main Display On Your Device
On PCs & Macs: Click the +/- magnification icons in the upper right corner of your View Main Display window. 3. Use the tool bar to perform the following basic whiteboarding activities: VIA Connect PRO – For User: Participating in a VIA Meeting... - Page 100 VIA saves your current screen and all annotations that you make appear only on your screen. To exit View Main Display: • Click the View Main Display icon on the Features menu of the VIA Dashboard close the View Main Display window. VIA Connect PRO – For User: Participating in a VIA Meeting...
-
Page 101: Managing Room Names
• In the Room List Manager window, start type the Room Name you want to connect to. All room names on the VSM server appear on the room list. VIA Connect PRO – For User: Participating in a VIA Meeting... - Page 102 To create a room shortcut: 1. Select the checkbox next to the relevant room name in the Room List Manager list and click Create Shortcut. A file browser window appears. VIA Connect PRO – For User: Participating in a VIA Meeting...
-
Page 103: Advanced Meeting Functions
To use the gateway dashboard: 1. Click the VIA logo in the upper right corner of the main display (Figure 36). The administrator dashboard appears (Figure 55). 2. Click Features. VIA Connect PRO – For User: Participating in a VIA Meeting... - Page 104 The administrator can only share the main display with participants that are not presenting and/or streaming video. VIA Connect PRO – For User: Participating in a VIA Meeting...
- Page 105 3. Select the scaling option. The dashboard is scaled. This feature only appears in the taskbar menu when you are using a device with 4K resolution to connect to the meeting. VIA Connect PRO – For User: Participating in a VIA Meeting...
- Page 106 To feed receiver information to VIA Connect PRO: 1. Click VIA Management > VIA Settings on the navigation pane (Figure The VIA Settings page appears (Figure 2. Click Streaming. VIA Connect PRO – For User: Participating in a VIA Meeting...
- Page 107 5. Click the VIA icon in the computer taskbar and select Start Streaming. 6. On the computer, log out and log in to the receiver VIA unit. 7. In the Dashboard, click Features > Multimedia. VIA Connect PRO – For User: Participating in a VIA Meeting...
- Page 108 2. Select any allowed port number from 1 – 65536. 3. For an IP address of 224. 0. 0. 5 and an allowed port of 2222, define the UDP URL as: udp://224. 0. 0. 5:2222/ VIA Connect PRO – For User: Participating in a VIA Meeting...
- Page 109 3. Type the streaming URL as udp://@<IPAddress>:<port number> Streaming starts from the VIA unit to the receiver computer. 4. Repeat steps 1 – 3 to stream to another computer. VIA Connect PRO – For User: Participating in a VIA Meeting...
-
Page 110: Technical Specifications
11. 8cm x 11. 5cm x 4. 0cm (4. 6” x 4. 5” x 1. 6”) W, D, H. DIMENSIONS: NET WEIGHT: 0. 475kg (1. 0lbs) INCLUDED ACCESSORIES: 3 power cords (US, EU, UK), Kramer mini DP to VGA adapter, VESA mounting bracket Specifications are subject to change without notice at www.kramerav.com VIA Connect PRO – Technical Specifications... - Page 111 Electronics products, this product must be insured during shipment, with the insurance and shipping charges prepaid by you. If this product is returned uninsured, you assume all risks of loss or damage during shipment. Kramer Electronics will not be responsible for any costs related to the removal or re- installation of this product from or into any installation.
- Page 112 SAFETY WARNING Disconnect the unit from the power supply before opening and servicing For the latest information on our products and a list of Kramer distributors, visit our Web site where updates to this user manual may be found. We welcome your questions, comments, and feedback.
Need help?
Do you have a question about the VIA Connect PRO and is the answer not in the manual?
Questions and answers