Rimage Professional Endeavor User Manual
Rimage professional endeavor: user guide
Hide thumbs
Also See for Professional Endeavor:
- Quick start instructions (5 pages) ,
- Specifications (1 page) ,
- Replacement procedure (8 pages)
Table of Contents
Advertisement
Quick Links
Download this manual
See also:
Reference Manual
Advertisement
Table of Contents

Related Manuals for Rimage Professional Endeavor


Summary of Contents for Rimage Professional Endeavor
-
Page 1: User Guide
User Guide 110747-000, Rev. C Use this manual to help you • Operate the Endeavor • Troubleshoot the Rimage Endeavor autoloader ™... - Page 2 Notice for USA Federal Communications Commissions (FCC) Statement This device complies with Part 15 of the FCC Rules. Operation is subject to the following two conditions: (1) This device may not cause harmful interference, and (2) this device must accept any interference received, including interference that may cause undesired operation.
- Page 3 Rimage assumes no liability resulting from errors or omissions in this document, or from the use of the information it contains. Rimage is not responsible for inactive or changed website links, nor is it responsible for the content of any third party websites.
-
Page 4: Limited 1 Year Warranty
Rimage must receive written notice of any claimed defect or failure to perform within five (5) days after such failure or defect is first observed. For warranty service, call Rimage at (952) 946-0004. The Limited Warranty set forth above is Rimage's only Warranty in connection with the Rimage Endeavor and Everest products. -
Page 5: Table Of Contents
Operator Panel Error Messages... 28 Everest Printer Errors ... 29 Appendix A - Specifications ... 31 Endeavor Specifications ... 31 Endeavor with Everest II Printer ... 31 For More Information ... 32 Appendix B - Safety Precautions... 33 Precautions ... 33 Mesures de sécurité. -
Page 6: Precautions
Precautions Any equipment that has AC line voltage, or low DC voltages, such as switches, power supplies, fuses, fans, non-stepper motors, must be replaced with Rimage–approved components to maintain the safety approval issued by UL. The laser beam used by this CD-R recorder can be harmful to the eyes. Do not attempt to open the recorder. -
Page 7: Chapter 1 - Overview
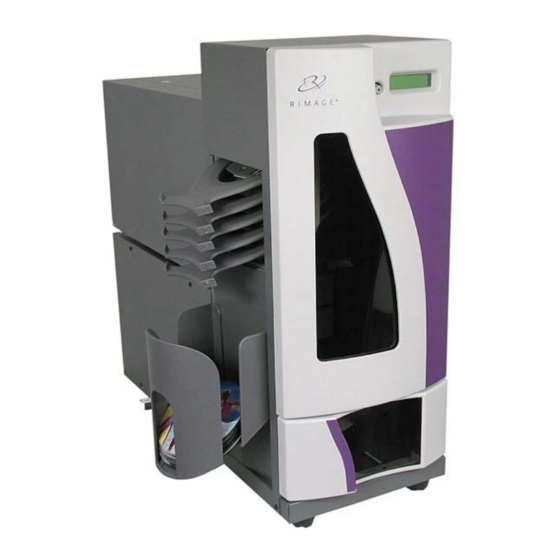
Chapter 1 - Overview Introduction This chapter introduces you to the Rimage Endeavor components, front panel operations and other user operations. For specifications, go to Description The Endeavor is a robotic-controlled CD-R or DVD-R autoloader ("transporter"). It has two recorders, a high quality thermal printer, a lift arm to move discs, and output trays to store completed discs. -
Page 8: Endeavor Parts
Endeavor Parts The figure below shows the basic Endeavor parts. Everest II Printer Operator Button Operator Panel Front Cover Operator Panel The Operator Panel provides a two-Line LCD Display and an Operator Button. The LCD Display provides status reporting during normal operation, or any condition that requires the user to resolve. -
Page 9: Operator Button
Operator Button The operator button is a push button that opens and closes the printer drawer and runs diagnostics. The LED inside the operator button is on during transporter operation. The LED also flashes during initialization, but is off when there are no transporter operations. -
Page 10: Output Trays
Output Trays There are five output trays on the outside of the Endeavor. When a disc is recorded and printed, the lift arm moves to a tray position and releases the disc. The disc slides down and out to the end of the tray. There are sensors located on each output tray to detect if a disc is in the tray. -
Page 11: Disc Output Configuration
Disc Output Configuration The Endeavor autoloader has five output trays numbered 1 through 5. Production Server software handles these trays in various ways depending on the settings. The Transporter Configuration tab in the Parameters dialog has a Mailbox combo-box with three options for the Endeavor outputs: “Output”, “Res. Output”, and “Don’t Use”. -
Page 12: System Switches
Endeavor, which then supplies power to the Everest Printer. Voltage Selector Switch The voltage selector switch on the Everest printer must be set to match the AC voltage from the outlet. Selections are 110 VAC or 220 VAC. Mode Switch The Mode Switch is to set the operational mode of the Everest printer. -
Page 13: Cable Connections
Cable Connections Endeavor has cable connections coming out the back of the transporter frame and the Everest Printer that require connections. These connections are listed here, but the directions for connecting a PC are in the “QuickStart Instructions”. AC Power... -
Page 14: Chapter 2 - User Operations
Loading Discs You can load up to 50 discs in the supply bin. Use thermal printable discs compatible with the Everest II Printer. 1. Open the autoloader door. 2. Hold the discs by the outer edge so you do not put fingerprints on either the top or the bottom surface and place them in the supply bin. -
Page 15: Installing Ribbons
Note: If this is the first time powering the system up, make sure the printer’s shipping screw was moved to the storage position. See the Everest Unpacking and Setup directions. -
Page 16: Remove Discs From Output Tray
5. EVEREST PRINTER WARMING UP – The Everest printer takes about 5 minutes to warm up when it is first powered up. The LED is no longer flashing. 6. EVEREST ENDEAVOR READY If any error messages occur during the power up sequence, refer to the possible error messages on page 28. -
Page 17: Removing And Installing The Front Panel
Removing and Installing the Front Panel Grasp the sides of the Front Panel sideways which may damage the operator button. The Front Panel has four pins that are held in with retaining clips. Install the front panel by aligning the pins to the retaining clips and press it in until it snaps in securely. -
Page 18: Chapter 3 - Maintenance
It is best to place the Endeavor in a dust-free environment. Printer Alignment After installing the printer, it may need an alignment to the gripper arm. The alignment was initially done at the factory, but shipment may have shifted the original alignment. - Page 19 5. Press the operator button one more time to move the disc closer to the print pad. 6. Insert a Disc up into the Lift Arm as shown below. The gripper fingers (not shown) will hold the disc. Lift Arm 7.
- Page 20 9. To perform the side-to-side alignment procedure, loosen the two Torx side-to-side screws. Slide the printer, NOT the drawer, in small increments until the side edges of the disc and print pad are aligned. Then tighten the two Torx side-to-side screws.
- Page 21 Disc Retainer 11. Once the printer is aligned, rotate the leadscrew to raise the lift arm. 12. Pull the disc down from the gripper fingers. 13. Press and hold the operator button to exit diagnostic test 4.
-
Page 22: Gemini Utilities
Gemini Utilities The Rimage Gemini Utilities program is used to update the controlling autoloader’s firmware and to check the number of discs printed. It can also be used to change the serial number of the autoloader and the name of the Endeavor. -
Page 23: Chapter 4 - Diagnostics And Error Messages
Chapter 4 - Diagnostics and Error Messages Introduction This chapter provides Endeavor diagnostic testing and error message information. The Button Diagnostics allows you troubleshoot the Endeavor autoloader and components. The Button Diagnostics include: Diagnostic Test 01 – Cycle Outputs Diagnostic 02 –... -
Page 24: Diagnostic Tests
Opens the print drawer and closes it to see if there is a disc in the printer. The lift arm moves down to the supply bin and retrieves the disc. The print drawer opens and the lift arm places the disc on the print drawer. The drawer closes and reopens, and the lift arm retrieves the disc. - Page 25 The Endeavor opens the print drawer and closes it to see if there is a disc in the printer. It moves the lift arm down to retrieve a disc from the supply bin.
- Page 26 04 – Jog Lift Diagnostic Use this test to help align the printer and recorders. PRESS/REL to JOG HOLD to EXIT. After pressing the operator button, the motor energy is released so the Leadscrew can be rotated by hand to move the lift arm for finer movements. A disc can be placed in the gripper fingers to check alignments.
- Page 27 sensor. When the lift arm is at the top, the sensor is blocked. Move the lift arm down to unblock the sensor. Press the operator button to exit the test. Below is the bottom view of the lift arm. Lift Home Sensor Media Plunger/Disc Present Sensor 07 –...
-
Page 28: Operator Panel Error Messages
This is not a test, but it is used to exit the diagnostic mode and returns to the normal operation mode. Operator Panel Error Messages CLAMP FAILURE – the Everest Printer tried to clamp a disc but it failed. Check the alignment of the printer to the gripper fingers. ENDEAVOR PAUSED CHECK DOOR/BIN – Endeavor stopped all movements because the door is open. -
Page 29: Everest Printer Errors
EVEREST PRINTER NO MEDIA – The lift arm could not pick a disc off the printer. There was not a disc on the print pad or the printer is not aligned to the gripper fingers. The gripper solenoid may not be working or it needs adjustment. - Page 30 Send the Everest Printer to the factory for service. EVEREST PRINTER SET SWITCH TO 1 – Endeavor detected the mode switch on the Everest Printer is not set to position 1. Change the switch to position 1 and recycle the power on the Endeavor.
-
Page 31: Appendix A - Specifications
FCC Class A, EN 55022 Susceptibility EN 50024 Safety UL 1950, CAN C22.2 No. 950, EN 60950 Two disc recorders; a Rimage Endeavor autoloader, an Everest II Printer, and complete software suite. CD or DVD. • Easy to read LCD display. -
Page 32: For More Information
Rimage manuals (product Installation and User Guide manuals) are provided on the Producer Software Suite disc under the Rimage menus and on the Rimage web site at www.rimage.com/Technical/Producer/index.html under Procedures and Manuals Rimage general information is at www.rimage.com/. -
Page 33: Appendix B - Safety Precautions
Precautions Any equipment that has AC line voltage, or low DC voltages, such as switches, power supplies, fuses, fans, non-stepper motors, must be replaced with Rimage–approved components to maintain the safety approval issued by UL. The laser beam used by this CD-R recorder can be harmful to the eyes. Do not attempt to open the recorder. -
Page 34: Mesures De Sécurité
Mesures de sécurité. Ce manuel d'instruction et les indications sur le produit permettent l'exploitation sûre appropriée et par l'utilisateur. Les marques suivantes d'indication aident à protéger vous et d'autres personnes contre des dommages, et équipement des dommages. Veuillez lire les précautions et familiarisez-vous avec leur signification avant d'employer l'équipement pour assurer la sûreté. -
Page 35: Sicherheitsanweisungen
Sicherheitsanweisungen Anweisungen im Handbuch und Markierungen auf dem Produkt erlauben korrekten und sicheren Betrieb des Druckers. Die folgenden Markierungen helfen vor Verletzung zu schützen und das Gerät vor Beschädigung zu bewahren. Um Schäden an Mensch und Gerät zu vermeiden, lesen Sie bitte alle Hinweise und Warnungen genau durch, bevor Sie das Gerät einschalten und machen Sie sich mit deren Bedeutung vertraut Warnung! Wird dieses Symbol ignoriert und das Gerät falsch bedient, kann dies... - Page 36 PN 110747-000, Revision C Rimage Corporation * 7725 Washington Avenue South * Minneapolis, MN 55439 USA Rimage Europe, GmbH * Hans-Böckler-Straße 7 * 63128 Dietzenbach, Germany...
Need help?
Do you have a question about the Professional Endeavor and is the answer not in the manual?
Questions and answers