
Related Manuals for Promise Technology VTrak J5960 Series


Summary of Contents for Promise Technology VTrak J5960 Series
- Page 1 VTrak J5960 Series High-Density Storage System Product Manual Version 1.0 © 2021 PROMISE Technology, Inc. All Rights Reserved.
-
Page 2: Table Of Contents
VTrak J5960 Series Product Manual Contents �������������������������������������������������������������������������������������������������������������������������������������������� afety precautionS ������������������������������������������������������������������������������������������������������������������������������������������������������ 1 ntroduction ������������������������������������������������������������������������������������������������������������������������������������������������������������ 1 eatureS ���������������������������������������������������������������������������������������������������������������������������������������������������� 2 pecificationS ����������������������������������������������������������������������������������������������������������������������������������������������������������� 5 ardware �������������������������������������������������������������������������������������������������������������������������������������� 5 ront anel ardware �������������������������������������������������������������������������������������������������������������������������������� 6 ront anel ��������������������������������������������������������������������������������������������������������������������������������������� 7 anel ardware ���������������������������������������������������������������������������������������������������������������������������������� 8 anel ������������������������������������������������������������������������������������������������������������������������������ 9 rive arrier �����������������������������������������������������������������������������������������������������������������������... - Page 3 Promise Technology Product Manual ������������������������������������������������������������������������������������������������������������������ 86 ontacting ecHnical upport ��������������������������������������������������������������������������������������������������������������������������������������������� 90 imited arranty ����������������������������������������������������������������������������������������������������������� 91 iSclaiMer of otHer warrantieS �������������������������������������������������������������������������������������������������������������������������� 92 eSponSiBilitieS ����������������������������������������������������������������������������������������������������� 92 eturning tHe roduct epair...
- Page 4 Promise Technology About This Manual This manual includes are four levels of notices: Warning A Warning notifies you of probable equipment damage or loss of data, or the possibility of physical injury, and how to avoid them. Caution A Caution informs you of possible equipment damage or loss of data and how to avoid them.
- Page 5 When requesting compliance information for this product, always refer to this regulatory model number. The regulatory model number is not the marketing name or model number of the product. Consult PROMISE Technology, Inc. authorized service provider. https://www.promise.com Manufacturing Dates of Products: https://www.promise.com/Promotion/Manufacturing-Dates...
- Page 6 (2) this device must accept any interference received, including interference that may cause undesired operation. For questions regarding this FCC SDoC, contact us by mail or telephone: • PROMISE TECHNOLOGY USA • 3241 Keller St., Santa Clara CA 95054 • Email: sales@promise.com Industry Canada Regulatory Compliance Notices Avis de conformité...
-
Page 7: Safety Precautions
The installation and maintenance of products must be carried out by qualified personnel. If the product sustains damage requiring service, disconnect the product from all power sources and refer servicing to a PROMISE TECHNOLOGY INC. authorized service provider. Examples of damage requiring service include: •... - Page 8 • Use an approved power cord. If you have questions about the type of power cord to use, contact your PROMISE TECHNOLOGY INC. authorized service provider. • If you have not been provided with a power cord for your product or for any AC-powered option intended for your product, purchase a power cord that is approved for use in your country.
- Page 9 Promise Technology VTrak J5960 Series Product Manual Precautions for maintaining and servicing products To reduce the risk of electric shock or damage to the equipment when installing, maintaining, or servicing products, observe the following precautions: • Some products contain power supplies that are capable of producing hazardous energy levels. Refer to the documentation included with your product to determine whether it contains these power supplies.
- Page 10 Promise Technology About This Manual Warning Hazardous moving parts. Keep away from moving fan blades. To reduce the risk of injury from a hot component, allow the surface to cool before touching. Power supplies Hot-plug power supplies are not designed to be removed or installed with AC power connected to the power supply.
-
Page 11: Eatures
Introduction ntroductIon This chapter provides an introduction to the VTrak J5960. You can also check out the PROMISE Technology YouTube channel for a video introduction to this and many other PROMISE products, as well as instructional videos useful for setting up and managing the VTrak J5960. -
Page 12: Specifications
Promise Technology VTrak J5960 Series Product Manual Specifications Form factor 4U60 Bays JBOD storage chassis Drives 60 HDD (3.5” or 2.5”) Dual IO Module : 12 Gb SAS HDD and SSD drives Single IO Module : 6 Gb SATA HDD and SSD drives... - Page 13 Promise Technology Introduction General Description 80 PLUS Platinum 1200W Redundant Power Supply Power Supply Voltage 100-127Vac, 200-240Vac Current <15A@100-127Vac @full load <10A@200-240Vac/160-340Vdc @full load (Maximum) Load 10% Eff˛ 86% , Load 20% Eff˛ 91% , Load 50% Eff˛ 94% , Load 100% Power Conversion Efficiency Eff˛ 91% Eff˛ for 230Vac Rear LED • Fan status LED per FAN FRU (4 Fan sets per FRU, total two FAN FRU) • Ethernet pairs Link/Activity Led on Each IOM...
- Page 14 Promise Technology VTrak J5960 Series Product Manual Safety & Environment Description EMI / RFI Statements EMC Class A: CE, FCC Safety: CB Environmental Standards RoHS, WEEE Temperature Range Operational: 5° to 35°C (41° to 95°F) Non-Operational: -40° to 60°C (-40° to 140°F)
-
Page 15: Hardware
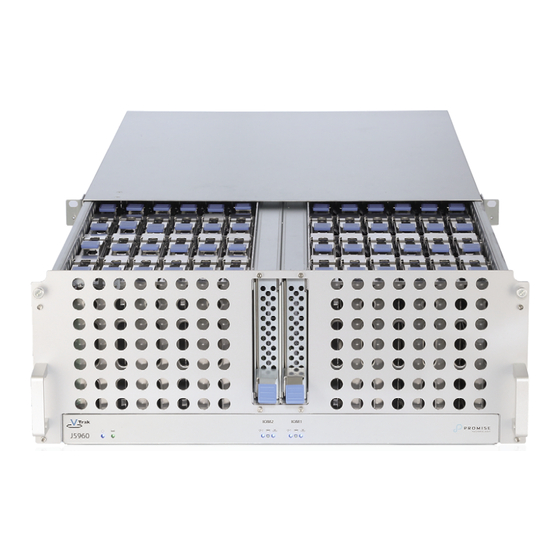
Promise Technology Introduction Hardware This section provides a summary of the external hardware features of the VTrak J5960 Series enclosures. Front Panel Hardware Front view of VTrak J5960 Front Panel Description I/O Modules System LEDs I/O Module LEDs... -
Page 16: Front Panel Leds
Promise Technology VTrak J5960 Series Product Manual Front Panel LEDs IOM1 Heartbeat Global Enclosure Status IOM1 Status IOM1 Activity Power IOM2 Heartbeat IOM2 Status IOM2 Activity Front Panel LEDs LED name Status Description Power System Power Off Blue System Power On... -
Page 17: Back Panel Hardware
Promise Technology Introduction Back Panel Hardware Back view of VTrak J5960 PSU Status LED Status Back Panel Description System Fan Module (Dual Fan, 2 Modules) Power Supply Unit (2 PSU) SFF-8644 Ports (6 per I/O Module) 1G Network Port for in-band management (1 per I/O Module) -
Page 18: Back Panel Leds
Promise Technology VTrak J5960 Series Product Manual Close up view of ports on back of VTrak J5960 Back Panel LEDs LEDs Status Description SFF-8644 SAS Link down Expansion Port Link On (Steady Green) Link up status LED Blinking Green Activity... - Page 19 Promise Technology Introduction Drive Carrier LEDs Drive Status Power / Activity Drive Carrier LEDs LED name Status Description Disk Status Drive not configured Steady Green Drive is configured Blinking Green Locator feature Amber Drive is rebuilding Drive error or failure Power / Activity No Drive...
-
Page 20: Access To Internal Components
Promise Technology VTrak J5960 Series Product Manual Access to Internal Components Complete access to the hard disk drive bays is provided from the top of the enclosure. After mounting the securing the device with the sliding rail rack system in an equipment rack, you can open the sliding top and populate the enclosure with hard disk drive carrier assemblies. - Page 21 Optional onsite parts replacement program Promise Technology, Inc. (“Promise”) warrants that for three (3) years from the time of the delivery of the product to the original end user except for one (1) year warranty on the battery backup unit: a) the product will conform to Promise’s specifications;...
-
Page 22: H Ardware I Nstallation
Promise Technology VTrak J5960 Series ardware nstallatIon The VTrak J5960 is a 4U form factor, high availability, high density, rack-mounted storage enclosure capable of hosting up to 60 SAS or SATA drives. For a full list of compatible drives and total storage capacities, see the List of Compatible Drives for this model at the PROMISE website. - Page 23 Promise Technology Hardware Setup Unpacking The VTrak J5960 is shipped in protective outer packaging that consists of cardboard caps on the top and bottom and an outer sleeve surrounding the sides. Edge protectors reinforce the top cap, while plastic banding surrounds the packaging and secures it all to the shipping pallet.
-
Page 24: Safety Warnings And Cautions
Promise Technology VTrak J5960 Series Safety Warnings and Cautions To avoid personal injury or property damage, before you begin installing the product, read, observe, and adhere to all of the following safety instructions and information. CAUTION Electrostatic discharge can harm delicate components inside PROMISE prod- ucts. - Page 25 Promise Technology Hardware Setup CAUTION Reliable Grounding: Maintain reliable grounding of rackmounted equip- ment. Give particular attention to supply connections other than direct connections to the branch circuit (for example, use of power strips). CAUTION Equipment Loading: Always load equipment into a rack from the bottom up so that the rack does not become top-heavy and tip over.
-
Page 26: Restricted Access Location
Promise Technology VTrak J5960 Series Restricted Access Location The VTrak J5960 is intended for installation in a server room or computer room where at least one of the following conditions apply: • access can only be gained by service persons or by users who have been instructed about the restrictions applied to the location and about any precautions that shall be taken and/or •... -
Page 27: Installation Procedure For Rack Mounting
Promise Technology Hardware Setup Installation Procedure for Rack Mounting Follow the instructions below to install the chassis in a 19” equipment rack. Step 1 : Remove the inner rail that is nested inside the rack rails. There are Right and Left rails and they must be installed as a set. - Page 28 Promise Technology VTrak J5960 Series Step 2 : Install the inner rail onto the chassis making sure they are installed on the correct side. Each inner rail will read “R” for the right or “L” for the left embossed on the side that faces away from the chassis. Right and Left are with reference to looking at the front of the enclosure.
- Page 29 Promise Technology Hardware Setup Step 3 : Set the vertical rack rail depth to between 32” and 36”. Ensure that all of the vertical rails are set to the same depth using a tape measure. Step 4: Install the outer rails into the rack. Pay special attention to which side is being installed. The embossed R is for the right side and L is for the left side.
- Page 30 Promise Technology VTrak J5960 Series f. Align the front of the rail with the holes on the rack posts that will receive the rails and pull the rail toward the holes until the latching mechanism engages the rack. If necessary, unscrew the rack post fasteners to enable the latching mechanism to engage.
- Page 31 Promise Technology Hardware Setup Step 5 : Extend the mid-rails out of the rack so that they are protruding from the front of the rack and the safety latches engage. Extend Mid-Rails Step 6 : Install the chassis into the rails.
- Page 32 Promise Technology VTrak J5960 Series CAUTION This step in the installation requires a minimum of 3 individuals to install safely, two to lift and one to guide the others who may have difficulty seeing because the enclosure is in the way. Ensure that the appropriate measures are taken to safely support the enclosure during installation.
- Page 33 Promise Technology Hardware Setup b. In preparation to perform a team lift, position one individual on each side of the enclosure (to lift) and a third individual standing at the protruding rack rails (to guide the chassis to mate with rack rails).
- Page 34 Promise Technology VTrak J5960 Series Before installation, check the Cable Management Arm (CMA) direction and switch the CMA connector. 1. Press PUSH button. 2. Spin 180 degrees to change direction. A = CMA connector B = CMA connector base on inner member...
-
Page 35: Cable Management Arm Installation
Promise Technology Hardware Setup Cable Management Arm Installation 1. Install the inner member A onto B 2. Install the outer member C onto D. 3. Install outer member E ont F. -
Page 36: Cable Management Arm Release
Promise Technology VTrak J5960 Series Cable Management Arm Release 1. Release the outer member. Press PUSH button on the CMA plug-in part to draw it out. 2. Release the outer member. a. Turn CMA 90 degrees to the right hand side to maintain the chassis or resume the re- moval. - Page 37 Promise Technology Hardware Setup Step 8: Cable the CMA(s). a. Unlatch the elbow side of the arm(s) by pressing the blue button labeled “push,” and then swing the arm(s) open. b. Gather the SAS, power, and Ethernet cables for installation. Before cabling, note the following rout-...
-
Page 38: Disk Carrier Assembly
Promise Technology VTrak J5960 Series Disk Carrier Assembly The hard disk drives (HDD) must first be a secured to the disk drive carriers before inserting the assembled drive carriers into the drive slots. The Drive carriers are shipped in place in the enclosure. It is necessary to slide the top cover to expose the drive carriers, then remove them for assembly. - Page 39 Promise Technology Hardware Setup To remove the disk drive carriers: 1. Slide the top cover back to expose the empty carriers. 2. Pull the lever handle up to release the catch, use two hands to pull the drive carrier out grabbing the corners.
- Page 40 Promise Technology VTrak J5960 Series For each 3/5” HDD to assemble: 1. Carefully remove the HDD from the protective packaging. 2. Place the HDD in the drive carrier so the mounting screws can align with the screw holes, and the contacts are exposed at the open end of the drive carrier.
-
Page 41: Installing Hard Disk Drives
Promise Technology Hardware Setup Installing Hard Disk Drives Step 12 : Install the 3.5in HDD Assembly. a. Ensure that the enclosure has been pulled out of the rack until the rail latches engage. b. Find the LED indicators on the top of the drive carrier. Orient the drive carrier so the LEDs are on the front of the enclosure. - Page 42 Promise Technology VTrak J5960 Series Step 14: Now that the drives are installed into the chassis, test the installation by sliding the enclosure in and out of the rack a minimum of three times. If the enclosure binds, catches, or displays any incorrect motion or behavior retry the installation of the drives and chassis.
-
Page 43: Maintenance
Promise Technology Hardware Setup Maintenance VTrak J5960 uses a modular design with placement of the various modules intended to make hardware module replacement easy to accomplish with the enclosure remaining in the rack. With the exception of the carrier disks, hardware module replacement can be accomplished without even sliding the device out from the rack. - Page 44 Promise Technology VTrak J5960 Series Lift lever on front of IO Module Pull module straight out To replace the IO Module, simply perform the task in the reverse order. Align the module in the empty bay, slide in until it makes contact, press down on the lever to seat the unit. Check the LEDs for the new...
-
Page 45: Replacing A Fan Module
Promise Technology Hardware Setup Replacing a Fan Module Fan modules are hot swappable. To remove a Fan Module, loosen the screws on each side, grasp the handle and pull the unit straight out. Fan Module replacement To replace the fan module, perform the task in reverse. Align the Fan module in the empty bay, push in until it is flush with the back of the enclosure, tighten the screws to secure it in place. -
Page 46: Replacing A Psu Module
Promise Technology VTrak J5960 Series Replacing a PSU Module PSU modules are hot swappable. To remove a PSU module, first disconnect and remove the power cable. Then press down on the release lever and pull on the handle, sliding the unit straight back. -
Page 47: Sff-8644 Connection
Promise Technology Hardware Setup SFF-8644 Connection The setup description below references the illustration on the next page. In this example, a VTrak D5000 is used as the RAID head. Other compatible systems will be similarly connected using SFF-8644 Mini-SAS ports and cabling. - Page 48 Promise Technology VTrak J5960 Series VTrak J5960 SFF-8644 connection to a VTrak RAID head...
-
Page 49: M Anaging The Vt Rak J5960
Promise Technology System Management J5960 anagIng tHe The VTrak J5960 provides following two methods for management: a. SCSI Enclosure Services (SES) management via in-band SAS b. Command Line Interface (CLI) via out-of-band Serial console (RJ11), or out-of-band 1G network (RJ45) by SSH or Telnet. -
Page 50: Network Settings
Promise Technology VTrak J5960 Series Network Settings To modify network settings using CLI via out-band serial console: Follow the steps listed below to change VTrak J5960 IOM network management port settings: 1. Connect an RS-232 cable between the VTrak J5960 IOM serial port and the host ULTRA port, then launch a serial console utility and set baud rate parameters to 115200,8,N,1 for a successful serial port connection. - Page 51 Promise Technology System Management 3. Use “help” (-h) after the net command to view the command options: 4. Example, to enable DHCP for network settings on the IOM network management port: 5. Example, to set a static IP settings for the IOM network management port:...
-
Page 52: To Modify Network Settings Using Ses Commands Via In-Band Sas
Promise Technology VTrak J5960 Series 6. The default password “password” used for login can be changed with the net command net -m -pw -s 7. To restore the factory default password with the net command net -m -pw -c To modify network settings using SES commands via in-band SAS: VTrak J5960 supports 0xAF SES page for network configuration. - Page 53 Promise Technology System Management The picture below is an example of the listed details about current network configurations. II. To change IOM management port network configuration using the 0xAF SES page: The table below lists the format of 0xAF SES page.
- Page 54 Promise Technology VTrak J5960 Series The following is an example to enable DHCP: The following is an example to configure a static IP address for the IOM management port: 1. IP: 10.92.54.99 2. Subnet: 255.255.255.0 Gateway: 10.92.54.254 The following is another example (without setting Gateway IP) to set a static IP address for the IOM management port: •...
- Page 55 Promise Technology System Management b. The following is an example to enable DHCP: Execute sg_senddiag sg3 utility to issue SEND DIAGNOSTIC (0x1C) SCSI commands to set 0xAF SES page to J5960 IOM. The following is sequence of hex bytes to form diag page to send...
-
Page 56: Sas Zones
Promise Technology VTrak J5960 Series SAS Zones The concept of SAS zones for grouping disks drives has been developed and implemented in the SAS 3 standard. In VTrak J5960, SAS Zone Configuration enables users to configure data hosts to access a specified group of hard disk drives via SAS (Serial Attached SCSI). - Page 57 Promise Technology System Management Zoning Configuration 0: No Zoning As the name itself implies, in “No Zoning” configuration each Hard Disk Drive can be accessed from any uplink connector. There is no restriction or access control from the Expander. As depicted in diagram below: Zoning Configuration 1 In Zoning Configuration 1, the Hard Disk Drive pool is divided evenly into two groups.
- Page 58 Promise Technology VTrak J5960 Series Disk Groups Disk Drive Slots Disk Group 1 7, 8, 9, 10, 11, 12, 19, 20, 21, 22, 23, 24, 31, 32, 33, 34, 35, 36, 43, 44, 45, 46, 47, 48, 55, 56, 57, 58, 59, 60...
- Page 59 Promise Technology System Management Zoning Configuration 2 In Zoning Configuration 2, the Hard Disk Drive pool is divided evenly into two groups of 30 drives. Access is divided between uplinks on both IOMs. Disk Groups Disk Drive Slots Disk Group 1...
- Page 60 Promise Technology VTrak J5960 Series Zoning Configuration 3 In Zoning Configuration 3, the Hard Disk Drive pool is divided evenly into two groups of 30 drives. Access is divided between uplinks on both IOMs. Disk Groups Disk Drive Slots Disk Group 1...
- Page 61 Promise Technology System Management Zoning Configuration 4 In Zoning Configuration 4, the Hard Disk Drive pool is divided evenly into three groups of 20 drives. Access is divided between uplinks on both IOMs. Disk Groups Disk Drive Slots Disk Group 1...
- Page 62 Promise Technology VTrak J5960 Series Zoning Configuration 5 In Zoning Configuration 5, the Disk Drive pool is divided evenly into two groups. The disk group 1 includes 50 hard disks, the disk group 2 includes 10 SSDs for high bandwidth or high IOPS applications. Access is divided between uplinks on both IOMs.
- Page 63 Promise Technology System Management I. To set SAS zone configuration using CLI command via out-of-band serial console, SSH or Telnet: Follow the procedure below for CLI operations by serial console: 1. Connect an RS-232 cable between the VTrak J5960 IOM serial port and the host ULTRA port, then launch a serial console utilityand set baud rate related parameters (115200,8,N,1) to connect the VTrak J5960 IOM serial port before begin CLI opetaions.
- Page 64 Promise Technology VTrak J5960 Series On-line help for the enclosure command:...
- Page 65 Promise Technology System Management Set SAS zone configuration (an example to set SAS zone configuration 2): Power cycle VTrak J5960 or execute CLI enclosure command (enclosure -m -r 2) to restart the VTrak J5960. After the boot procedure is completed, check the current SAS zone configuration with the enclosure command.
- Page 66 Promise Technology VTrak J5960 Series II. To set SAS zone configuration SES command via in-band SAS: VTrak J5960 supports 0xAD SES page to query and set SAS Zone configuration. The page 0xAD is a vendor specific SES page for SAS zoning application.
- Page 67 Promise Technology System Management The following is detailed definitions for SES page 0xAD. 1. Configure Type Valid value: 0, 1 Set Configure Type to 1 when set any Zone Type by 0xAD SES control page. When query SAS Zone configuration and check Configure Type from returned 0xAD SES status page, 0 means no Zone, 1 means any Zone configuration be set.
- Page 68 Promise Technology VTrak J5960 Series The following are detailed definitions for SES page 0xA1. 1. (1). The RQST RST DUAL IOM bit set to 1 specifies the enclosure services to reset both IOMs, which can be used after IOM firmware download.
- Page 69 Promise Technology System Management The following is an example to query and set the SAS Zone configuration via SAS in-band by sg3 utility in a Linux Host. 1. Execute lsscsi to list sg devices and then locate Promise enclosure device.
- Page 70 Promise Technology VTrak J5960 Series Check current SAS Zone configuration from SES page 0xAD. Execute sg_ses sg3 utility to issue RECEIVE DIAGNOSTIC (0x1D) SCSI command to get 0xAD SES page for J5960 IOM’s SAS Zone configuration. Use this command to query current SAS Zone settings from the VTrak J5960 IOM.
- Page 71 Promise Technology System Management 4. Restart VTrak J5960 to activate the new SAS Zone configuration. User can power cycle the VTrak J5960, or send 0xA1 SES page to the VTrak J5960 IOM to request a restart. Below is an example to restart a VTrak J5960 dual IOM using in-band SAS interface, user could send 0xA1 SES page by SEND DIAGNOSTIC (0x1C) SCSI command via sg_senddiag sg3 utility.
- Page 72 Promise Technology VTrak J5960 Series 6. The following is the command sequence to change SAS Zone Configuration from Zone 3 to no Zone. sg_senddiag --pf -vv --raw=ad,00,00,0C,01,00,00,00,00,00,00,00,00,00,00,00 /dev/sg1 sg_senddiag --pf -vv --raw=a1,00,00,04,02,00,00,00 /dev/sg1 rescan-scsi-bus.sh -r multipath -ll lsscsi -g sg_ses -p 0xAD /dev/sg1 -H...
-
Page 73: Firmware Upgrade Via Serial Cable
Promise Technology System Management Firmware Upgrade via Serial Cable Follow the procedure below to upgrade VTrak J5960 firmware: 1. Connect serial console from a Windows Host to the VTrak J5960 IOM1. 2. Use Tera Term in Windows (serial port setting: 115200,8,n,1,n). - Page 74 Promise Technology VTrak J5960 Series...
- Page 75 Promise Technology System Management The following example is the command execution and logs for ptiflash: cli> ptiflash -x Please Use XModem Protocol for File Transmission. Use Q Or q to quit Download before starting XModem. Received 1095936Bytes Buffer Download Complete Please reboot the system for the change to take effect.
- Page 76 Promise Technology VTrak J5960 Series 5. When the IOM1 firmware upgrade is Successful, connect the serial console to IOM2 and then repeat step 4 to upgrade Expander FW to IOM2. 6. Execute the following command to restart a dual IOM system when you have completed the IOM2 firmware upgrade.
- Page 77 Promise Technology System Management 7. Reset to the factory default settings and restart a dual IOM again. factorydefaults enclosure -m -r 2 The following example is a message after restarting a dual IOM: cli> factorydefaults Please reboot the system for the change to take effect.
- Page 78 Promise Technology VTrak J5960 Series Firmware Upgrade via Serial Cable Use the procedure below to upgrade VTrak J5960 firmware with Linux sg utility. 1. Power on VTrak J5960 and connect any IOM1 SAS port and any IOM2 SAS port to the Linux Host. Since there are two SAS connections from VTrak J5960 IOM1 and IOM2 to the Host’s SAS HBA, Linux Host will...
- Page 79 Promise Technology System Management will write 1010480 bytes Write buffer cmd: 3b 02 00 00 00 00 0f 6b 30 00 [root@localhost J5960_FW]# 4. Power cycle the Vtrak J5960, then execute lsscsi to find the Promise enclosure, and check reversion again.
- Page 80 Promise Technology VTrak J5960 Series [0:0:2:0] disk HGST HUH721212AL5200 A3D0 /dev/sdd [0:0:3:0] disk HGST HUH721212AL5200 A3D0 /dev/sde [0:0:4:0] disk HGST HUH721010AL5200 A384 /dev/sdf [0:0:5:0] disk HGST HUH721212AL5200 A3D0 /dev/sdg [0:0:6:0] disk HGST HUH721212AL5200 A3D0 /dev/sdh [0:0:7:0] disk HGST HUH721010AL5200 A384...
- Page 81 Promise Technology System Management sdan [0:0:40:0] disk HGST HUH721212AL5200 A3D0 /dev/ sdao [0:0:41:0] disk HGST HUH721212AL5200 A3D0 /dev/ sdap [0:0:42:0] disk HGST HUH721010AL5200 A384 /dev/ sdaq [0:0:43:0] disk HGST HUH721212AL5200 A3D0 /dev/ sdar [0:0:44:0] disk HGST HUH721212AL5200 A3D0 /dev/ sdas...
- Page 82 Promise Technology VTrak J5960 Series [0:0:65:0] disk HGST HUH721010AL5200 A384 /dev/ sdbn [0:0:66:0] disk HGST HUH721010AL5200 A384 /dev/ sdbo [0:0:67:0] disk HGST HUH721010AL5200 A384 /dev/ sdbp [0:0:68:0] disk HGST HUH721010AL5200 A384 /dev/ sdbq [0:0:69:0] disk HGST HUH721212AL5200 A3D0 /dev/ sdbr...
- Page 83 Promise Technology System Management sdcm [0:0:91:0] disk HGST HUH721212AL5200 A3D0 /dev/ sdcn [0:0:92:0] disk HGST HUH721212AL5200 A3D0 /dev/ sdco [0:0:93:0] disk HGST HUH721212AL5200 A3D0 /dev/ sdcp [0:0:94:0] disk HGST HUH721212AL5200 A3D0 /dev/ sdcq [0:0:95:0] disk HGST HUH721010AL5200 A384 /dev/ sdcr...
- Page 84 Promise Technology VTrak J5960 Series [0:0:116:0] disk HGST HUH721212AL5200 A3D0 /dev/ sddm [0:0:117:0] disk HGST HUH721212AL5200 A3D0 /dev/ sddn [0:0:118:0] disk HGST HUH721010AL5200 A384 /dev/ sddo [0:0:119:0] disk HGST HUH721010AL5200 A384 /dev/ sddp [0:0:120:0] disk HGST HUH721212AL5200 A3D0 /dev/ sddq...
- Page 85 Promise Technology System Management /dev/sg18 [0:0:18:0] disk HGST HUH721212AL5200 A3D0 /dev/sdt /dev/sg19 [0:0:19:0] disk HGST HUH721212AL5200 A3D0 /dev/sdu /dev/sg20 [0:0:20:0] disk HGST HUH721010AL5200 A384 /dev/sdv /dev/sg21 [0:0:21:0] disk HGST HUH721010AL5200 A384 /dev/sdw /dev/sg22 [0:0:22:0] disk HGST HUH721010AL5200 A384 /dev/sdx /dev/sg23...
- Page 86 Promise Technology VTrak J5960 Series [0:0:43:0] disk HGST HUH721212AL5200 A3D0 /dev/ sdar /dev/sg44 [0:0:44:0] disk HGST HUH721212AL5200 A3D0 /dev/ sdas /dev/sg45 [0:0:45:0] disk HGST HUH721212AL5200 A3D0 /dev/ sdat /dev/sg46 [0:0:46:0] disk HGST HUH721212AL5200 A3D0 /dev/ sdau /dev/sg47 [0:0:47:0] disk HGST...
- Page 87 Promise Technology System Management sdbq /dev/sg69 [0:0:69:0] disk HGST HUH721212AL5200 A3D0 /dev/ sdbr /dev/sg70 [0:0:70:0] disk HGST HUH721212AL5200 A3D0 /dev/ sdbs /dev/sg71 [0:0:71:0] disk HGST HUH721212AL5200 A3D0 /dev/ sdbt /dev/sg72 [0:0:72:0] disk HGST HUH721010AL5200 A384 /dev/ sdbu /dev/sg73 [0:0:73:0] disk...
- Page 88 Promise Technology VTrak J5960 Series [0:0:94:0] disk HGST HUH721212AL5200 A3D0 /dev/ sdcq /dev/sg95 [0:0:95:0] disk HGST HUH721010AL5200 A384 /dev/ sdcr /dev/sg96 [0:0:96:0] disk HGST HUH721212AL5200 A3D0 /dev/ sdcs /dev/sg97 [0:0:97:0] disk HGST HUH721212AL5200 A3D0 /dev/ sdct /dev/sg98 [0:0:98:0] disk HGST...
- Page 89 Promise Technology System Management sddp /dev/sg120 [0:0:120:0] disk HGST HUH721212AL5200 A3D0 /dev/ sddq /dev/sg121 [0:0:121:0] enclosu Promise 4U-SAS-60-D BP 1012 /dev/sg122 [3:0:0:0] disk OWC Mercury EXTR BBF0 /dev/sda /dev/sg0 [root@localhost ~]# [root@localhost ~]# [root@localhost ~]# sginfo /dev/sg31 INQUIRY response (cmd: 0x12)
- Page 90 Promise Technology VTrak J5960 Series Power cycle J5960 [root@localhost J5960_FW]# [root@localhost J5960_FW]# [root@localhost J5960_FW]# lsscsi -g [0:0:122:0] disk HGST HUH721010AL5200 A384 /dev/sdb /dev/sg1 [0:0:123:0] disk HGST HUH721010AL5200 A384 /dev/sdc /dev/sg2 [0:0:124:0] disk HGST HUH721010AL5200 A384 /dev/sdd /dev/sg3 [0:0:125:0] disk HGST...
- Page 91 Promise Technology System Management /dev/sg23 [0:0:145:0] disk HGST HUH721010AL5200 A384 /dev/sdy /dev/sg24 [0:0:146:0] disk HGST HUH721212AL5200 A3D0 /dev/sdz /dev/sg25 [0:0:147:0] disk HGST HUH721212AL5200 A3D0 /dev/ sdaa /dev/sg26 [0:0:148:0] disk HGST HUH721010AL5200 A384 /dev/ sdab /dev/sg27 [0:0:149:0] disk HGST HUH721010AL5200 A384...
- Page 92 Promise Technology VTrak J5960 Series [0:0:170:0] disk HGST HUH721010AL5200 A384 /dev/ sdax /dev/sg49 [0:0:171:0] disk HGST HUH721010AL5200 A384 /dev/ sday /dev/sg50 [0:0:172:0] disk HGST HUH721212AL5200 A3D0 /dev/ sdaz /dev/sg51 [0:0:173:0] disk HGST HUH721212AL5200 A3D0 /dev/ sdba /dev/sg52 [0:0:174:0] disk HGST...
- Page 93 Promise Technology System Management sdbv /dev/sg74 [0:0:196:0] disk HGST HUH721010AL5200 A384 /dev/ sdbw /dev/sg75 [0:0:197:0] disk HGST HUH721212AL5200 A3D0 /dev/ sdbx /dev/sg76 [0:0:198:0] disk HGST HUH721212AL5200 A3D0 /dev/ sdby /dev/sg77 [0:0:199:0] disk HGST HUH721212AL5200 A3D0 /dev/ sdbz /dev/sg78 [0:0:200:0] disk...
- Page 94 Promise Technology VTrak J5960 Series [0:0:221:0] disk HGST HUH721010AL5200 A384 /dev/ sdcu /dev/sg100 [0:0:222:0] disk HGST HUH721212AL5200 A3D0 /dev/ sdcv /dev/sg101 [0:0:223:0] disk HGST HUH721212AL5200 A3D0 /dev/ sdcw /dev/sg102 [0:0:224:0] disk HGST HUH721212AL5200 A3D0 /dev/ sdcx /dev/sg103 [0:0:225:0] disk HGST...
- Page 95 Promise Technology System Management INQUIRY response (cmd: 0x12) ---------------------------- Device Type Vendor: Promise Product: 4U-SAS-60-D BP Revision level: 1013 [root@localhost J5960_FW]# [root@localhost J5960_FW]# sginfo /dev/sg92 INQUIRY response (cmd: 0x12) ---------------------------- Device Type Vendor: Promise Product: 4U-SAS-60-D BP Revision level: 1013...
- Page 96 Promise Technology VTrak J5960 Series Product Manual ontactIng ecHnIcal upport PROMISE Technical Support provides several support options for PROMISE users to access information and updates. We encourage you to use one of our electronic services, which provide product information updates for the most efficient service and support.
- Page 97 Promise Technology Contacting Technical Support United States 3241 Keller St. Santa Clara CA 95054, USA Technical Support (E-Support): https://support.promise.com Web site: http://www.promise.com// Australia Technical Support (E-Support): https://support.promise.com Web site: http://www.promise.com// EMEA Netherlands Science Park Eindhoven 5228 5692 EG Son, The Netherlands Technical Support (E-Support): https://support.promise.com...
- Page 98 Promise Technology VTrak J5960 Series Product Manual Sweden Technical Support (E-Support): https://support.promise.com Web site: http://www.promise.com// Switzerland ITF Technical Support (E-Support): https://support.promise.com Web site: http://www.promise.com// Norway ITF Technical Support (E-Support): https://support.promise.com Web site: http://www.promise.com// Belgium Technical Support (E-Support): https://support.promise.com Web site: http://www.promise.com// Luxembourg Technical Support (E-Support): https://support.promise.com...
- Page 99 Promise Technology Contacting Technical Support Korea Technical Support (E-Support): https://support.promise.com Web site: http://www.promise.com// Hong Kong Technical Support (E-Support): https://support.promise.com Web site: http://www.promise.com// Singapore Technical Support (E-Support): https://support.promise.com Web site: http://www.promise.com// Japan 3F, Mura Matsu Bldg, 3-8-5, Hongo Bunkyo-ku Tokyo 113-0033, Japan Technical Support (E-Support): https://support.promise.com...
- Page 100 VTrak J5960 Series Product Manual Limited Warranty PROMISE Technology, Inc. (“PROMISE”) warrants that this product, from the time of the delivery of the product to the original end user: a) all components, except the cache backup battery, for a period of three (3) years;...
- Page 101 Promise Technology Contacting Technical Support Disclaimer of other warranties This warranty covers only parts and labor, and excludes coverage on software items as expressly set above. Except as expressly set forth above, PROMISE disclaims any warranties, expressed or implied, by statute or otherwise, regarding the product, including, without limitation, any warranties for fitness for any purpose, quality, merchantability, non-infringement, or otherwise.
- Page 102 Promise Technology VTrak J5960 Series Product Manual Your Responsibilities You are responsible for determining whether the product is appropriate for your use and will interface with your equipment without malfunction or damage. You are also responsible for backing up your data before installing any product and for regularly backing up your data after installing the product.
- Page 103 Promise Technology Contacting Technical Support • Use the original shipping carton and packaging • Include a summary of the product’s problem(s) • Write an attention line on the box with the RMA number • Include a copy of your proof of purchase You are responsible for the cost of insurance and shipment of the product to PROMISE.
- Page 104 Promise Technology VTrak J5960 Series Product Manual...
Need help?
Do you have a question about the VTrak J5960 Series and is the answer not in the manual?
Questions and answers