
Subscribe to Our Youtube Channel
Related Manuals for Promise Technology Vess R3600 Series


Summary of Contents for Promise Technology Vess R3600 Series
- Page 1 Vess R3600 Series / Vess J3600 Product Manual Version 1.0 © 2019 PROMISE Technology, Inc. All Rights Reserved.
- Page 2 The terms “Vess R3600” or “subsystem” are used in examples or descriptions throughout this manual to refer to any of the available Vess R3600 Series models. The terms “unit” or “device” can refer to any Vess R3600 Series or Vess J3600 Series model.
- Page 3 Manual Overview The manual is organized into chapters as follows: • Introduction, this chapter provides a general overview of the available devices in the Vess R3600 Series. • Hardware Installation describes the steps necessary for installing subsystem hardware including installing hard disks and placing the device into a rack system.
- Page 4 Promise Technology About This Manual This manual includes are four levels of notices: Warning A Warning notifies you of probable equipment damage or loss of data, or the possibility of physical injury, and how to avoid them. Caution A Caution informs you of possible equipment damage or loss of data and how to avoid them. Important An Important message calls attention to an essential step or point required to complete a task, including things often missed.
- Page 5 Promise Technology Vess R3600 / Vess J3600 Product Manual Regulatory compliance notices Regulatory compliance identification numbers For the purpose of regulatory compliance certifications and identification, this product has been assigned a unique regulatory model number. The regulatory model number can be found on the product nameplate label, along with all required approval markings and information.
- Page 6 About This Manual If the product sustains damage requiring service, disconnect the product from all power sources and refer servicing to a PROMISE TECHNOLOGY INC. authorized service provider. Examples of damage requiring service include: • The power cord, extension cord, or plug has been damaged.
- Page 7 Promise Technology Vess R3600 / Vess J3600 Product Manual Si le produit a subit des dommages nécessitant une réparation, débranchez-le de la source d'alimentation électrique et contactez un fournisseur de service autorisé de TECHNOLOGIE PROMISE INC. pour effectuer les réparations. Exemples de dommages nécessitant une réparation : •...
- Page 8 Promise Technology About This Manual • Some products contain power supplies that are capable of producing hazardous energy levels. Refer to the documentation included with your product to determine whether it contains these power supplies. The installation of internal options and routine maintenance and service of this product should be performed by individuals who are knowledgeable about the procedures, precautions, and hazards associated with equipment containing hazardous energy levels.
- Page 9 • Use an approved power cord. If you have questions about the type of power cord to use, contact your PROMISE TECHNOLOGY INC. authorized service provider. • If you have not been provided with a power cord for your product or for any AC-powered option intended for your product, purchase a power cord that is approved for use in your country.
- Page 10 • Do not disassemble, crush, puncture, short external contacts, or dispose of the battery in fire or water. • Replace only with the PROMISE TECHNOLOGY INC. spare battery designated for this product. Dispose of used batteries according to the manufacturer's instructions and local disposal requirements.
- Page 11 Batteries AVERTISSEMENT ! Certains produits de PROMISE TECHNOLOGY INC. peuvent contenir des piles internes remplaçables ou des batteries. Il y a un risque d'incendie, de brûlures ou d'explosion si la batterie n'est pas manipulée correctement. Pour réduire le risque de blessures corporelles :...
- Page 12 • Ne pas démonter, écraser, perforer, court-circuiter les contacts externes ou jeter la batterie dans un feu ou de l'eau. • Remplacez seulement avec la pile de rechange de PROMISE TECHNOLOGY INC. conçue pour ce produit. Jetez les piles usagées conformément aux instructions du fabricant et aux exigences locales en matière d'élimination.
- Page 13 Promise Technology Vess R3600 / Vess J3600 Product Manual Canada (Avis Canadian) Class A equipment This Class A digital apparatus meets all requirements of the Canadian Interference-Causing Equipment Regulations. CAN ICES-3(A)/NMB-3(A) Cet appareil numérique de la class A respecte toutes les exigences du Règlement sur le matériel brouilleur du Canada.CAN ICES-3(A)/NMB-3(A)
-
Page 14: Table Of Contents
Promise Technology Contents ��������������������������������������������������������������������������������������������������������������������������������������������� bout AnuAl ����������������������������������������������������������������������������������������������������������������������������������� anual verview ������������������������������������������������������������������������������������������������������������������������������������������������������ 1 ntroduction ������������������������������������������������������������������������������������������������������������������������������������������������������������ 1 eAtures r3600 s J3600 M ������������������������������������������������������������������������������������������������������ 2 eries And odels ���������������������������������������������������������������������������������������������������������������������������������������������������� 3 pecificatiOnS ����������������������������������������������������������������������������������������������������������������������������������������������������������� 6 ardware ��������������������������������������������������������������������������������������������������������������������������������������������������������� 6 ront r3600 ������������������������������������������������������������������������������������������������������������������������������������������ 7 Ack oF J3600 ���������������������������������������������������������������������������������������������������������������������������������������� 10 Ack oF ���������������������������������������������������������������������������������������������������������������������������������... - Page 15 Promise Technology Vess R3600 / Vess J3600 Product Manual led b ���������������������������������������������������������������������������������������������������������������������������������������� 35 ront ehAVior r3600 p ��������������������������������������������������������������������������������������������� 39 Ower upply OMpOnentS �������������������������������������������������������������������������������������������������������������������������������������������� 40 ontroller led b ������������������������������������������������������������������������������������������������������������������ 41 OntrOller eHaviOr 10g p led b r3600 r3600 eHaviOr On xi and ���������������������������������������������������������������������������������������������������������������...
- Page 16 Promise Technology Contents nAs A ��������������������������������������������������������������������������������������������������������������������������������� 76 AnAging ccounts nAs u ���������������������������������������������������������������������������������������������������������������������������������� 76 sing the ser list naS u ����������������������������������������������������������������������������������������������������������� 77 Ser infOrMatiOn naS u ���������������������������������������������������������������������������������������������������������� 77 O cHange Ser paSSwOrd naS u ����������������������������������������������������������������������������������������������������������������������� 77 O reMOve a nAs u �����������������������������������������������������������������������������������������������������������������������������������������������...
- Page 17 Promise Technology Vess R3600 / Vess J3600 Product Manual ������������������������������������������������������������������������������������������������������������������������� 100 iewing ower upplY tAtus ����������������������������������������������������������������������������������������������������������������������������������� 101 ocAting An nclosure �������������������������������������������������������������������������������������������������������������������������� 102 Aking ontroller ettings ��������������������������������������������������������������������������������������������������������������������� 103 iewing ontroller nForMAtion ��������������������������������������������������������������������������������������������������������������������������������������������� 105 uzzer ettings �������������������������������������������������������������������������������������������������������������������������������������� 105 ilencing the uzzer ������������������������������������������������������������������������������������������������������������������������������ 106...
- Page 18 Promise Technology Contents ���������������������������������������������������������������������������������������������� 127 iewing ibre Hannel tatiSticS ����������������������������������������������������������������������������������������� 127 iewing ibre Hannel Ogged eviceS ��������������������������������������������������������������������������������� 128 iewing ibre Hannel nitiatOrS On tHe abric ������������������������������������������������������������������������������������������������������������� 128 iewing ibre Hannel ScSi c ������������������������������������������������������������������������������������������������������������������� 129 anaging i OnnectiOnS ScSi t ����������������������������������������������������������������������������������������������������� 129...
- Page 19 Promise Technology Vess R3600 / Vess J3600 Product Manual ��������������������������������������������������������������������������������������������������������������������������� 144 ebServer ervice ������������������������������������������������������������������������������������������������������������ 144 tOpping ebServer ervice ��������������������������������������������������������������������������������������������������������� 145 eStarting ebServer ervice �������������������������������������������������������������������������������������������������������������� 145 aking ebServer ettingS SSH S ������������������������������������������������������������������������������������������������������������������������������������� 146 ervice SSH S ���������������������������������������������������������������������������������������������������������������������� 146 tOpping ervice SSH S �������������������������������������������������������������������������������������������������������������������...
- Page 20 Promise Technology Contents ������������������������������������������������������������������������������������������������������������������������������������� 168 roduct egistrAtion ���������������������������������������������������������������������������������������������������������������������������� 168 utOMatic eStart ������������������������������������������������������������������������������������������������������������������������������� 169 AnAging with the ��������������������������������������������������������������������������������������������������������������������������� 170 Aking A eriAl onnection cli �������������������������������������������������������������������������������������������������������������������������������������� 170 ogging nto the ������������������������������������������������������������������������������������������������������������� 171 OMMand able Of OntentS ����������������������������������������������������������������������������������������������������������������� 173 able Of uppOrted OMMandS ������������������������������������������������������������������������������������������������������������������������������...
-
Page 21: Features
Introduction ntroductIon The Vess R3600 Series consolidates both block and file protocols onto a single hardware platform, simplified storage administration in one unified storage appliance that achieves performance and scalability goals. High availability design with active-active configuration, Vess R3600 Series storage solutions are ideal for use in data- intensive environments such as virtualized, cloud data centers or mid-size to large scale surveillance installations that utilize the Vess A Series Storage Appliance for Video Surveillance. - Page 22 Promise Technology Vess R3600 / Vess J3600 Product Manual Vess R3600 Series and Vess J3600 Models All models listed below are equipped with dual controllers and two power supplies. Model Interface / Controller Controllers Drives Power Supplies 4 x 1000BASE-T...
- Page 23 Promise Technology Introduction Specifications Vess R3600 Series models Form factor 3U 19” rack mount Drives supported • Up to 16 3.5” drives • 6/12 Gb SAS, 6 Gb SATA HDD and SSD • Supports any mix of SAS and SATA drives simultaneously in the same...
- Page 24 Promise Technology Vess R3600 / Vess J3600 Product Manual Safety & Environment Description EMI / RFI Statements EMC Class A: CE, FCC, VCCI, BSMI, RCM Safety: IEEE CB, NTRL Environmental Standards RoHS, WEEE Temperature Range Operational: 5° to 35°C, Non-Operational: -40° to 60°C...
- Page 25 Promise Technology Introduction Vess J3600 JBOD models Form factor 3U 19” rack mount Drives supported • Up to 16 3.5” drives • 6/12 Gb SAS, 6 Gb SATA HDD and SSD • Supports any mix of SAS and SATA drives simultaneously in the same...
-
Page 26: Hardware
Promise Technology Vess R3600 / Vess J3600 Product Manual Hardware The following section provides a summary of the front and back panel hardware features of the Vess R3600 Series and Vess J3600 enclosures. Front View Vess R3600 and Vess J3600 enclosures feature handles on each side used to secure the enclosure to an equipment rack. -
Page 27: R3600
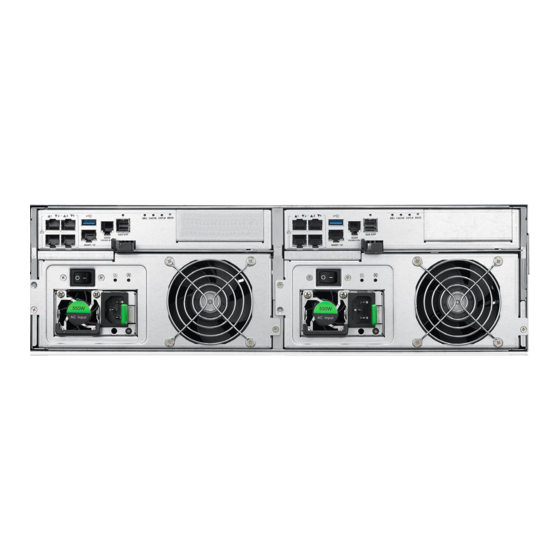
Introduction Back of Vess R3600 The rear of the Vess R3600 Series enclosure provides access to the power supply units, which include the cooling fans, and the system controller(s). Each controller has an RJ-45 Gigabit Ethernet port used for management, an RS-232 serial management port using an RJ-11 connector, four 1 Gb/s iSCSI ports, one SAS Expansion port for additional drive enclosures, one USB 3.0 port and various LED indicators which are described below. - Page 28 Promise Technology Vess R3600 / Vess J3600 Product Manual Back view of Vess R3600i Controller 1 Controller 2 PSU 1 Power Socket PSU 2 Power Socket ON/Off ON/Off switch switch Back view of Vess R3600ti 10G BASE-T (2 ports) Controller 1...
- Page 29 Promise Technology Introduction Back view of Vess R3600xi Controller 1 10G SFP+ (2 ports) Controller 2 10G SFP+ (2 ports) PSU 1 Power Socket PSU 2 Power Socket ON/Off ON/Off switch switch Back view of Vess R3604fi 16Gb Fibre 16Gb Fibre...
-
Page 30: J3600
Promise Technology Vess R3600 / Vess J3600 Product Manual Back of Vess J3600 The rear of the Vess J3600 Series enclosure provides access to the power supply units, which include the cooling fans, and the IO modules. Each IO module has two SAS Expansion ports, including status LEDs for the SAS ports and the IO module. - Page 31 Optional onsite parts replacement program Promise Technology, Inc. (“Promise”) warrants that for three (3) years from the time of the delivery of the product to the original end user except for one (1) year warranty on the battery backup unit: a) the product will conform to Promise’s specifications;...
-
Page 32: Ardware I Nstallation
• Power on Depending on the details of your order, the Vess R3600 Series or Vess J3600 enclosure might be shipped with hard drives installed, or it might require that you install hard drives. The section “Installing Physical Drives” on... -
Page 33: Packing List
Promise Technology Hardware Setup Unpacking Packing List The Vess R3600 Series box contains the following items: • Vess R3600 Unit • One Quick Start Guide printed • Two 1.5m (4.9 ft) Power cord • Sliding rail assembly for rack mounting • DB9-to-RJ11 serial data cable... -
Page 34: Mounting The Vess Enclosure In A Rack
Mounting the Vess enclosure in a rack This section provides instructions for installing the Vess R3600 Series or Vess J3600 JBOD enclosure into a rack. Note that for simplicity, all Vess models enclosures are referred to as Vess or Vess unit. - Page 35 Promise Technology Hardware Setup To install the Vess into a rack with the supplied mounting rails: 1. Check the fit of the mounting rails in your rack system. Installing the rails onto the rack Front left label Front right label Support flange on the front end of each rail Guide pins on rails align with holes in the rack post 2.
- Page 36 Promise Technology Vess R3600 / Vess J3600 Product Manual Rail ends attach to the outside of each post Rail ends attach on the out- side of the front and rear rack posts 3. Place the Vess onto the rails. • At least two persons are required to safely lift the system.
- Page 37 Promise Technology Hardware Setup 4. Secure the enclosure to the rack. • Use screws and nuts to lock the unit in to place in the rack. Secure to rack Screws and cage nuts attach the Vess to the rack posts...
-
Page 38: Installing Physical Drives
Promise Technology Vess R3600 / Vess J3600 Product Manual Installing Physical Drives The Vess R3600 Series and Vess J3600 JBOD subsystems support: • SAS hard disks • SATA hard disks (SATA drives require use of an adapter) For a list of supported physical drives, download the latest compatibility list from the PROMISE http://www.promise.com/support/. -
Page 39: Drive Slot Numbering
Promise Technology Hardware Setup Drive Slot Numbering You can install any suitable disk drive into any slot in the enclosure. The diagrams below shows how drive slots are numbered on the Vess R3600 Series and Vess J3600 models. Slot numbering is reflected in the WebPAM PROe and CLI user interfaces. Be sure to install all of the drive carriers into the Vess R3600 and Vess J3600 enclosure to ensure proper airflow, even if you do not populate all the carriers with physical drives. -
Page 40: Installing Your Drives
Promise Technology Vess R3600 / Vess J3600 Product Manual Installing Your Drives The drive carrier accommodates 3.5-inch drives. The Vess R3600 and Vess J3600 do support use of SATA drives (SATA drives require use of an adapter), but SAS drives are recommended. - Page 41 Promise Technology Hardware Setup 1. Press the drive carrier release button. 2. Grasp the front and gently pull the empty drive carrier out of the enclosure. Drive carrier front view Disk carrier release button 3. If you are installing SATA drives, attach a SAS-to-SATA adapter onto the power and IO connectors of each drive.
-
Page 42: Making Management Connections
MGMT/IO port on both controllers for system management. The Vess R3600 Series also features a Serial management port for system management using a terminal emulation program and the Vess R3600 Command Line Interface (CLI). The hardware connections for both methods are described in this section. -
Page 43: Serial Management Connection
2. Attach the DB9 end of the serial data cable to a serial port on the host PC or server. Network management connection Each Vess R3600 Series controller has a 1000BASE-T Ethernet port labeled MGMT/IO used for management via network connection. - Page 44 Vess R3600i management path connections Note The RJ-45 network management ports on a Vess R3600 Series subsystem share the same Virtual IP address. The default Virtual IP address, 10.0.0.1, applies to the RJ-45 network port (MGMT/IO) on both controllers. If you change the Virtual...
-
Page 45: Making Data Connections
Making Data Connections Follow the instructions below for the type of controller used on your Vess R3600 subsystem. iSCSI Options The Vess R3600 Series includes various options for iSCSI networks. All Vess R3600 controllers, including the Vess R3604fi, include four 1000BASE-T ports. The iSCSI data options for each of the available controllers are as follows: •... - Page 46 Promise Technology Vess R3600 / Vess J3600 Product Manual 10G BASE-T iSCSI SAN connections For the 10G BASE-T iSCSI storage network: Connect suitable network cables (Cat-6 or Cat-7 Ethernet cable) between the one or both 10G ports on one or both controllers to the 10G network switch used for the iSCSI SAN.
-
Page 47: Ptic I Scsi
Promise Technology Hardware Setup SFP+ Fiber Optic iSCSI The Fiber Optic data network for the Vess R3600xi controller requires the following items: • An SFP+ connection in each host PC or server • An SFP+ transceiver for every SFP+ port in the connection (subsystem, switch, HBA) •... -
Page 48: Sfp+ Fiber Optic Connections
Promise Technology Vess R3600 / Vess J3600 Product Manual Important For a list of supported HBAs, switches, and SFP transceivers, download the latest compatibility list from PROMISE support: http://www.promise.com/support SFP+ Fiber Optic connections For the Fiber Optic storage network: 1. Connect Fibre Optic cables between the Fibre Optic ports on the server and the Fibre Optic ports on the SFP+ switch. -
Page 49: Fibre Channel San Data Path
Promise Technology Hardware Setup Fibre Channel SAN data path The Vess R3604fi features 16Gb Fibre Channel. The Fibre Channel data network requires the following items: • A Fibre Channel connection in each host PC or server An SFP transceiver for every SFP (Fibre Channel) port in the connection (subsystem, switch, HBA), 16Gb • SFP transceivers are recommended for best performance. -
Page 50: Fibre Channel Das Connections
Promise Technology Vess R3600 / Vess J3600 Product Manual Fibre Channel DAS connections For 16Gb Fibre Channel direct attached storage (DAS): 1. For each attached server or host PC, connect Fiber Optic cable to the Fibre Channel port on the host PC or server;... -
Page 51: Ess R3600 With Jbod E Xpansion
Promise Technology Hardware Setup Vess R3600 with JBOD Expansion JBOD expansion requires one SFF-8644 to SFF-8644 external SAS cable for each JBOD unit. The single controller Vess J3600sS is intended for use with the single controller Vess R3600 models, as well as the Vess A6000 Series and Vess A7000 Series models. -
Page 52: D Uel C Ontroller E Xpansion With V Ess
Promise Technology Vess R3600 / Vess J3600 Product Manual Duel Controller Expansion with Vess R3600 To setup a redundant JBOD cascading connection: 1. Use the SFF-8644 external SAS cable supplied with the Vess J3600sSD to connect the SAS port in left controller of the Vess R3600sD to a SAS port 1 of left controller on the uppermost Vess J3600sSD in the rack. -
Page 53: S Ingle C Ontroller E Xpansion With V Ess
Promise Technology Hardware Setup Single Controller Expansion with Vess R3600 1. Connect the SFF-8644 SAS port in the host Vess R3600 system to SAS Port 1 on the uppermost Vess J3600sS unit in the rack. 2. Connect SAS Port 2 on the same Vess J3600sS to the SAS Port 1 on the next Vess J3600sS in the stack. -
Page 54: Onnecting The P Ower
Promise Technology Vess R3600 / Vess J3600 Product Manual Connecting the Power Vess R3600 and Vess J3600 enclosures are equipped with two power supply units (PSU) for each enclosure; each PSU has its own ON/OFF switch. Connect both power supplies to a suitable power source. -
Page 55: Front Led Behavior
Promise Technology Hardware Setup Front LED Behavior When boot-up is finished and the Vess R3600 subsystem is functioning normally: • Power, FRU and Logical Drive LEDs display Green continuously • Controller Activity LED flashes Green when there is controller activity. • System Heartbeat LED blinks Green once per second for five seconds, then goes dark for ten secondes, then repeats the same pattern. Also on the front panel, there are two LEDs on each drive carrier. These report the presence of power and a physical drive, and the current condition of the drive. - Page 56 Promise Technology Vess R3600 / Vess J3600 Product Manual Vess R3600 front right LED Behavior After Boot Up Status Description System power off Power Blue System power on System power off Green OK, healthy Global Enclosure Status Amber Malfunction Critical/Failure (Check the PSU and controller LEDs on the back of the Vess enclosure).
- Page 57 Promise Technology Hardware Setup LED indicators on front right of Vess J3600 enclosure LED name Status Description System Power Off Power Blue System Power On System Power Off Global Green OK/Healthy Enclosure Amber Malfunction Status Critical Reserved No I/O No I/O and SAS expansion...
- Page 58 Promise Technology Vess R3600 / Vess J3600 Product Manual Disk Carrier LEDs Drive Status Power / Activity The Vess spins up hard disk drives sequentially to minimize power draw during start-up. After a few moments: • The Power/Activity LED displays blue when a physical drive is present.
-
Page 59: Omponents
Promise Technology Hardware Setup Vess R3600 Power Supply Components The LEDs on the rear panel of the Vess R3600 include a single status LED on each power supply. These PSU status LED will light green to indicate normal operation. A red LED indicates a problem or unit failure. See the table below for more detailed PSU LED information. -
Page 60: Controller Leds
Promise Technology Vess R3600 / Vess J3600 Product Manual Controller LEDs When boot-up is finished and the Vess R3600 subsystem is functioning normally: • Controller status LEDs display green continuously. • Ethernet LEDs display green or flash depending on your network connection. • The SAS Expansion LEDs display green or flash during port activity. Vess R3600 Controller LEDs 4 5 6 Please refer to table on next page for LED description. -
Page 61: Ontroller Led B Ehavior
Promise Technology Hardware Setup Controller LED Behavior The table below describes behavior of the LED indicators on the Vess R3600 Series controller. Table below refers to Controller LED illustration on previous page Item # LED Description Port Speed (1G I/O and Flashing amber indicates 100 Mb/s, flashing green indicates 1 Gb/s. - Page 62 Promise Technology Vess R3600 / Vess J3600 Product Manual LED indicators for Fibre Channel ports on Vess R3604fi 16G 8G 4G 16G 8G 4G 16G 8G 4G 16G 8G 4G Fiber Channel Port LED behavior Power on Power on 4 Gbps...
- Page 63 Promise Technology Hardware Setup Vess J3600 Controller LEDs SFF-8644 SAS Expansion Port Link Status LED x 2 IOM Status LED The table below describes behavior of the LED indicators on the Vess J3600 controller. LED name Status Description Green Ready...
-
Page 64: D Efault P Assword
Promise Technology Vess R3600 / Vess J3600 Product Manual Resetting the Default Password This feature resets the Administrator’s password to the default factory setting, password. Use this feature when you have forgotten Administrator’s password or a new Administrator has been appointed. - Page 65 Promise Technology Management with WebPAM PROe PaM Pro ysteM onfIguratIon This chapter describes system configuration using WebPAM PROe. The information is presented in approximately the same order the links for the menus appear in the WebPAM PROe user interface. The menus, submenus and other configuration information includes the following: •...
-
Page 66: Ogging Into
Promise Technology Vess R3600 / Vess J3600 Product Manual PaM Pro oggIng Into 1. Launch your browser. 2. In the browser address field, type in the virtual management port IP address of the Vess R3600 subsystem. Use the IP address you set in the CLI. -
Page 67: Choosing The Display Language
Promise Technology Management with WebPAM PROe Choosing the Display Language WebPAM PROe displays in multiple languages. You choose the display language when you log in. If you are already logged in and you want to change the display language: 1. Click Logout at the top right corner of the screen. -
Page 68: Perusing The Interface
Promise Technology Vess R3600 / Vess J3600 Product Manual Perusing the Interface The WebPAM PROe interface consists of a header and four tabs, each with specific functions. • Header Top right corner of the window: • Event Notification • Save Service Report – Saves a detailed report to your Host PC •... - Page 69 Promise Technology Management with WebPAM PROe • NAS Share tab • Create New NAS Share • NAS Share List • Protocol • Periodic Snapshot • NAS Account tab • NAS User (Create, delete, modify users) • NAS Group • Domain •...
-
Page 70: Logging Out Of Webpam Proe
Promise Technology Vess R3600 / Vess J3600 Product Manual Web PAM PROe Main menu/Dashboard Logging out of WebPAM PROe There are two ways to log out of WebPAM PROe: • Close your browser window • Click the Logout icon in the upper right corner of the GUI Clicking Logout brings you back to the Login Screen. -
Page 71: Icense
Promise Technology Management with WebPAM PROe License Some advanced features such as the PerfectCloud (R3000 SR1.0, D5000 SR1.3), PerfectLock (R3000 SR1.0, D5000 SR1.3) and PerfectData features require a license to use. Please contact Promise Sales, channel partner, distributor to purchase perpetual license or acquire a trial license (free of charge for 60 days) for further evaluation. -
Page 72: Iewing The S Torage N Etwork
Promise Technology Vess R3600 / Vess J3600 Product Manual IewIng tHe torage etwork To view the other subsystems on your Storage Network, click the Discovery button at the left bottom edge of the WebPAM PROe window. Discovery menu in Main menu Logging onto a Subsystem To log onto a subsystem in the list, click on the IP address of that subsystem. -
Page 73: Ashboard
Promise Technology Management with WebPAM PROe asHboard The Dashboard presents a quick system status overview, including graphs for storage capacity utilization, I/O performance and network bandwidth used. Capacity Utilization A graph and numerical list of total available storage capacity, used capacity, size of existing volumes, storage used for snapshots, and free capacity. -
Page 74: Generating A Service Report
Promise Technology Vess R3600 / Vess J3600 Product Manual Click here to view Click here to Dashboard with new events Events notices generate a service report Generating a Service Report A Service Report is a detailed report covering the configuration and status of all components in your RAID system. -
Page 75: C Reating A S Hared S Torage P Ool
NAS sharing (see “Creating a NAS Share” on page 68) or create volumes for a SAN setup (see “Creating a Volume” on page 60). Note that the Vess R3600 Series supports using NAS and SAN simultaneously. You can even allocate a portion of a disk pool for NAS Share, and another portion for SAN volumes. - Page 76 Promise Technology Vess R3600 / Vess J3600 Product Manual In the Create New Pool menu, click to select the available hard disks you want to be in the pool, the selected disks become darker in color to indicate selection. Type a name used for the pool, then choose the remaining parameters: • Type (default = Advanced)
-
Page 77: Ist
Promise Technology Management with WebPAM PROe Pool List Storage pools are listed in the Pool List after creation. Use this menu to delete or extend a pool. To view more detail, click on the gear icon for the pool and select the Detail option. Note that, except of the pool name and preferred controller, pool parameters cannot be edited once it has been created. -
Page 78: Creating Spare Drive
Promise Technology Vess R3600 / Vess J3600 Product Manual Creating Spare Drive Spare drives can be created at anytime, as long as there are unassigned drives available. The spare drive should be the same type (SSD or HDD) as the drives in the pool. Note that in this example, there is only one pool created, so the Type is irrelevant. - Page 79 Promise Technology Management with WebPAM PROe Spare Drive List Spare drives are listed in the Spare Drive list. Use this menu to delete a spare drive or to view more details about a spare drive. Click the gear icon and select Detail to view information about a spare drive.
-
Page 80: C Reating A V Olume
Promise Technology Vess R3600 / Vess J3600 Product Manual reatIng a oluMe Now that we have a storage pool, we can create volumes in the pool. The main decision for volumes is whether to use thin or full provisioning. Thin provisioning allows for creation of volumes which have a total cumulative capacity that is greater than the physical capacity available for the pool. - Page 81 Promise Technology Management with WebPAM PROe Volume List Use the Volume List menu to Un-export, Export, or Delete existing volumes. Also, this is where you can link to LUN Mapping and Masking to enable it. To view more detailed information for a volume, you can either click the gear icon for the volume and select the Detail option, or click on the volume name in the left panel under Overview.
-
Page 82: Snapshots
Promise Technology Vess R3600 / Vess J3600 Product Manual Snapshots A volume snapshot is used to capture a read-only copy of the volume status at the time the snapshot is created. The snapshot is saved in case it is necessary to revert back to the volume status at the time of the snapshot for disaster recovery. -
Page 83: Lones
Promise Technology Management with WebPAM PROe Clones A clone is created from a snapshot as a means of backing up the snapshot. If you intend to delete a snapshot that has a clone, you must first delete the clone. To create a snapshot clone, first create the snapshot, select it in the Snapshot & Clone list, click on the Create Clone button. -
Page 84: Snapshots
Promise Technology Vess R3600 / Vess J3600 Product Manual Snapshots To rollback using a snapshot, select the snapshot, click on the gear icon, and choose the Rollback Snapshot option. You are required to confirm that you want to rollback using the snapshot in a pop-up menu. Type “confirm”... -
Page 85: Lun Mapping And Masking
Promise Technology Management with WebPAM PROe LUN Mapping and Masking This feature applies to Fibre Channel SAN and iSCSI subsystems and controls user access to storage resources. • LUN Mapping – Maps a LUN to an initiator; a LUN can be mapped to multiple initiators. -
Page 86: Editing A Lun Map
Promise Technology Vess R3600 / Vess J3600 Product Manual LUN Mapping Editing a LUN Map Editing a LUN map is the action of assigning a logical drive or LUN to an initiator. By changing the assignment, you change the initiator’s access. -
Page 87: Deleting A Lun Map
Promise Technology Management with WebPAM PROe LUN Mapping & Masking Deleting a LUN Map Deleting a LUN map prevents the initiator from accessing the LUN while LUN masking is enabled. To delete a LUN map: 1. Click the Volume tab. -
Page 88: Reating A Nas S Hare
Promise Technology Vess R3600 / Vess J3600 Product Manual nas s reatIng a Hare The procedure for creating a NAS Share includes first creating a storage pool (see “Creating a Shared Storage Pool” on page 55), then creating the NAS Share. You can set up protocols when creating the NAS Share, or change them after it is created. - Page 89 Promise Technology Management with WebPAM PROe 5. Set the Capacity for the NAS Share. If you are not using Thin Provisioning, you have the option to use the Maximum capacity if you click the Max capacity available box. If you use Maximum capacity, this will use the entire capacity of the disk pool for the NAS share, therefore you cannot create another NAS share or a SAN volume on the disk pool used.
-
Page 90: Iewing Nas S Hare I Nformation
Promise Technology Vess R3600 / Vess J3600 Product Manual Viewing NAS Share Information To view information on a NAS Share, select the NAS Share, click ont the gear icon and choose the View option. Information displayed includes: • NAS Share ID •... -
Page 91: Nas Share Protocols
Promise Technology Management with WebPAM PROe NAS Share Protocols FTP, NFS, SMB, and HTTP can be disabled or enabled when you set up the NAS share. After creating the NAS share, you can use the Modify NAS Share menu to enable or disable protocols, or enable/disable them and configure other settings using the menu specific to each protocol. -
Page 92: Hanging Smb S Ettings
Promise Technology Vess R3600 / Vess J3600 Product Manual Changing SMB Settings To change the settings for SMB network protocol (Samba server) including enabling ACL authentication, on the selected NAS share, access the SMB Settings menu and configure the following: Enable/Disable: Click the Enable box to checkmark the box if you want to enable the SMB networking •... -
Page 93: Hanging Ftp S Ettings
Promise Technology Management with WebPAM PROe Changing FTP Settings To change the settings for FTP on the selected NAS share, access the FTP Settings menu and configure the following: Enable/Disable: Click the Enable box to checkmark the box if you want to enable the FTP protocol. Click •... -
Page 94: Hanging Nfs S Ettings
Promise Technology Vess R3600 / Vess J3600 Product Manual Changing NFS Settings To change the settings for NFS on the selected NAS share, access the NFS Settings menu and configure the following: Enable/Disable: Click the Enable box to checkmark the box if you want to enable the NFS service. Click •... -
Page 95: Hanging Http S Ettings
Promise Technology Management with WebPAM PROe Changing HTTP Settings To change the HTTP settings on the selected NAS share, access the HTTP Settings menu and configure the following: Enable/Disable: Click the Enable box to checkmark the box if you want to enable the HTTP service. Click •... -
Page 96: Managing Nas Accounts
Promise Technology Vess R3600 / Vess J3600 Product Manual Managing NAS Accounts Management of NAS local and domain users and user groups, user permission settings and the Domain setting are done in the menus under the NAS Account tab. NAS users can be local or domain users. A user can be in multiple user groups. -
Page 97: O V Iew Nas U Ser Information
Promise Technology Management with WebPAM PROe To View NAS User information Click on the View button to display basic user information. To change NAS User password 1. Click Change Password button 2. Type the new password in the Password and again in the Retype Password entry fields. -
Page 98: O Add A Single User For The Nas
Promise Technology Vess R3600 / Vess J3600 Product Manual To add a single user for the NAS 1. Click NAS Account tab > NAS User. 2. Click the Add New User button. In the Add New User menu, enter the required settings: •... -
Page 99: O Remove M Ultiple U Sers From The Nas U Sers List
Promise Technology Management with WebPAM PROe 3. Enter the required settings: • Start Index • Quantity • User Name (the prefix of the user name that is followed by the index value) • Password • Retype Password 4. Click the Next button. -
Page 100: Nas Group Settings
Promise Technology Vess R3600 / Vess J3600 Product Manual NAS Group settings Use the NAS Group menus for setting both Local and Domain User groups. Query User Groups In the NAS Account tab, click the NAS Group button and use the search function to query information on user groups. -
Page 101: Add User Group And Choose Members
Promise Technology Management with WebPAM PROe Add User Group and choose members 1. Use the Type pull-down menu toggles the menu between User Group. 2. Click the New Group Create button. 3. Enter a Group Name and click the boxes to select member local users from the list. -
Page 102: Domain Configuration
Promise Technology Vess R3600 / Vess J3600 Product Manual Domain Configuration Use the Domain menu to create a Domain Workgroup or to join a Domain on the network using Windows Active Directory, LDAP or Open Directory. Domain Settings Important Make sure network settings support joining the AD Domain. Also, time settings need to... -
Page 103: Omain S Ettings
Promise Technology Management with WebPAM PROe Domain Settings 1. In NAS configuration: Account > Domain. 2. Check the Enable box to enable the Domain settings. 3. Choose the Domain Type and configure settings accordingly. • Active Directory Enter the Active Directory domain and domain DNS server (server IP), the NetBIOS name is set automatically. -
Page 104: Acl Setting
Promise Technology Vess R3600 / Vess J3600 Product Manual ACL Setting The Access Control List (ACL) rule-based access permission protocol is applied to a Share Disk when ACL is enabled. To configure the rules for ACL, go to the NAS Share List menu, select the NAS Share you want to configure, click on the Gear icon for that NAS Share, and select the ACL option. - Page 105 Promise Technology Management with WebPAM PROe ACL rules are applied by Type: use the Type pull-down menu to select Everyone, User or Group, then check a box for the appropriate rule to Deny-Access, Read-Only or Read-Write. ACL Settings for NAS Account Users...
-
Page 106: Indows Acl
Promise Technology Vess R3600 / Vess J3600 Product Manual Using Windows ACL To use Windows ACL, it must first be enabled in SMB Settings. 1. Access the SMB Settings menu: NAS Share > Protocol, select SMB in the Protocol list and click on the Settings button 2. - Page 107 Promise Technology Management with WebPAM PROe 2. Right-click on the node you want to configure for ACL, scroll down to select Properties. 3. In the Properties menu under the Group or user names list, click on the Edit button.
- Page 108 Promise Technology Vess R3600 / Vess J3600 Product Manual 4. Click on the Add button. 5. In the Select Users or Groups menu, enter the user name to add to the ACL users list, and click on Check Names button.
- Page 109 Promise Technology Management with WebPAM PROe 6. The new user appears in the list (syntax: IP address/user name). Click the OK button to return to the Properties menu. 7. The newly created user appears in the Group or user names list. Click OK to exit the menu.
-
Page 110: M Anagement U Ser
Promise Technology Vess R3600 / Vess J3600 Product Manual anageMent Management users can view the Vess R3600 user interface or make configuration changes according to the privilege level configured for the user. Only Super user level management users can add, remove or modify users. -
Page 111: Adding A New User
Promise Technology Management with WebPAM PROe Adding a New User This action requires Administrator or Super User privileges. To create a user: 1. Click the Administration tab. 2. Click the Management User tab 3. In the Management User menu, click the Add New User button. -
Page 112: Changing User Settings
Promise Technology Vess R3600 / Vess J3600 Product Manual Changing User Settings This action requires Administrator or a Super User privileges. To change user settings: 1. Click the Administration tab. 2. Click the Management User tab 3. In the Management User menu, choose the user and click the Modify button. -
Page 113: Deleting A User
Promise Technology Management with WebPAM PROe Deleting a User This action requires Administrator or Super User privileges To delete a user: 1. Click the User tab. 2. In the Management User menu, choose the user and click the Delete button. -
Page 114: Nformation
Promise Technology Vess R3600 / Vess J3600 Product Manual eVIce Use the Device menus to monitor subsystem status and make settings changes to subsystem components, drives, network settings, etc. Device Overview Viewing Subsystem Information To view subsystem information, click the Device menu tab. -
Page 115: Restarting The Subsystem
Promise Technology Management with WebPAM PROe Restarting the Subsystem This function shuts down the subsystem and then restarts it. To restart the subsystem: 1. Click the Device tab. 2. Click the Overview icon. 3. Click the Shutdown/Restart Subsystem button. 4. Choose the Apply to option, Subsystem, Controller 1 or Controller 2. -
Page 116: Shutting Down The Subsystem
Promise Technology Vess R3600 / Vess J3600 Product Manual Shutting Down the Subsystem This function shuts down the RAID subsystem without restarting it. To shutdown the subsystem: 1. Click the Device tab. 2. Click the Overview icon. 3. Click the Shutdown/Restart Subsystem button. -
Page 117: Device View
Promise Technology Management with WebPAM PROe Device View The Device View menus display a real time virtual representation of the device used to check status of the subsystem and its components. Choose the Front View, Back View, and Internal View (click button in Back View menu). - Page 118 Promise Technology Vess R3600 / Vess J3600 Product Manual Device Back View Click this to see Hover the cursor over a internal view component to see a status summary Device Internal View...
-
Page 119: Iewing E Nclosure T Opology
Promise Technology Management with WebPAM PROe Viewing Enclosure Topology This feature displays the connection topology of the Vess R3600 subsystem. Topology refers to the manner in which the data paths among the enclosures are connected. There are three methods: •... -
Page 120: Iewing E Nclosure I Nformation
Promise Technology Vess R3600 / Vess J3600 Product Manual Viewing Enclosure Information To view enclosure information: 1. Click the Device tab. 2. Click the Component List icon. 3. Click the Enclosure and select View in the gear icon to view detailed information in a new menu. - Page 121 Promise Technology Management with WebPAM PROe Locating an Enclosure To locate an enclosure: 1. Click the Device tab. 2. Click the Component List icon. 3. Click the Enclosure you want, then click the Locate button. The enclosure LEDs blink for one minute.
- Page 122 Promise Technology Vess R3600 / Vess J3600 Product Manual Making Controller Settings In a dual-controller RAID subsystem, settings made to one controller are applied to both controllers. To make controller settings: 1. Click the Device tab. 2. Click the Component List icon.
- Page 123 Promise Technology Management with WebPAM PROe Viewing Controller Information To view controller information: 1. Click the Device tab. 2. Click the Component List icon. 3. Click the controller you want, then click the View button. Basic controller information includes: •...
- Page 124 Promise Technology Vess R3600 / Vess J3600 Product Manual Advanced controller information includes: • Slot 1 Memory Type • Slot 1 Memory Size • Slot 2 Memory Type • Slot 2 Memory Size • M.2 Device Present 1 • M.2 Device Size 1 •...
- Page 125 Promise Technology Management with WebPAM PROe Buzzer Settings To make buzzer settings: 1. Click the Device tab. 2. Click the Component List icon. 3. Choose the Enable Buzzer / Disable Buzzer option to enable or disable the buzzer. 4. Choose the Turn on Buzzer / Turn off Buzzer option to turn the buzzer on or off. Note that while the buzzer is on, the status reads Sounding;...
- Page 126 Promise Technology Vess R3600 / Vess J3600 Product Manual Managing Physical Drives Viewing Physical Drive Information To view physical drive information: 1. Click the Device tab. 2. Click the Physical Drive icon. Information for each drive is listed in the menu.
- Page 127 Promise Technology Management with WebPAM PROe Making Global Physical Drive Settings To make global physical drive settings: 1. Click the Device tab. 2. Click the Physical Drive icon. 3. Click the Global Physical Drive Settings button. 4. Check the boxes to enable, uncheck to disable.
- Page 128 Promise Technology Vess R3600 / Vess J3600 Product Manual Managing UPS Units Viewing UPS Information To view information about a specific UPS unit: 1. Click the Device tab. 2. Click the UPS icon. UPS information includes: • UPS ID •...
- Page 129 Promise Technology Management with WebPAM PROe Making UPS Settings These settings control how the Vess R3600 subsystem detects the UPS unit and responds to data reported by the UPS unit. To make UPS settings: 1. Click the Device tab. 2. Click the UPS icon.
- Page 130 Promise Technology Vess R3600 / Vess J3600 Product Manual anagIng nItIators Adding a Fibre Channel or iSCSI Initiator You must add an initiator to the Vess R3600’s initiator list in order to map your LUN or logical drive to the initiator.
- Page 131 Promise Technology Management with WebPAM PROe Viewing Initiators The Vess R3600’s initiator list displays initiators available for mapping to a LUN or logical drive. You must add initiators to the Vess R3600’s initiator list to make them available for mapping to a LUN.
- Page 132 Promise Technology Vess R3600 / Vess J3600 Product Manual anageIng argets Adding a Fibre Channel or iSCSI Target You must add an target to the Vess R3600’s target list in order to map your LUN or logical drive to the target.
- Page 133 Promise Technology Management with WebPAM PROe Viewing Target The Vess R3600’s target list displays targets available for mapping to a LUN or logical drive. You must add targets to the Vess R3600’s target list to make them available for mapping to a LUN.
- Page 134 Promise Technology Vess R3600 / Vess J3600 Product Manual etwork anageMent Network settings includes IP settings, physical port settings, management and IO port settings, including the option to allow IO on management ports. By default, Subsystem Management is enabled Management Portal list...
- Page 135 Promise Technology Management with WebPAM PROe Making Management IP Settings Use the Management Portal menu to view, change, enable or disable IP settings for the Subsystem and Controller management. To change management IP settings: 1. Click the Device tab. 2. Click the Network Management tab, expand Portal and click on Management Portal.
- Page 136 Promise Technology Vess R3600 / Vess J3600 Product Manual Viewing Management IP Settings Use the Management Portal menu to view, change, enable or disable IP settings for the Subsystem and Controller management. To view management IP settings: 1. Click the Device tab.
- Page 137 Promise Technology Management with WebPAM PROe Making IO Portal Settings Use the IO Portal menu to view, change, enable or disable IP settings for the IO Ports. To change IO port IP settings: 1. Click the Device tab. 2. Click the Network Management tab, expand Portal and click on IO Portal.
- Page 138 Promise Technology Vess R3600 / Vess J3600 Product Manual Viewing IO Portal Settings Use the IO Portal menu to view, change, enable or disable IP settings for the IO Ports. To view IO port IP settings: 1. Click the Device tab.
- Page 139 Promise Technology Management with WebPAM PROe Making Global IP Settings Use the Global Settings menu to select the default route used for system management; this menu also includes the option to enable IO on management ports. 1. Click the Device tab.
- Page 140 Promise Technology Vess R3600 / Vess J3600 Product Manual Making Trunk Settings Two or more IO ports can be used to create a Trunk Port (link aggregation) in order to increase throughput capacity. In order to do this, it is necessary to delete at least two IO portals in the IO Portal menu. Then the physical ports can be aggregated to form a single portal.
- Page 141 Promise Technology Management with WebPAM PROe Create IO Trunk Two or more IO ports can be used to create a Trunk Port (link aggregation) in order to increase throughput capacity. In order to do this, it is necessary to delete at least two IO portals in the IO Portal menu. Then the physical ports can be aggregated to form a single portal.
- Page 142 Promise Technology Vess R3600 / Vess J3600 Product Manual Viewing Port Information To view physical port information for IO or Management ports: 1. Click the Device tab. 2. Click the Network Management tab, expand Port and click on Management Port or IO Port.
- Page 143 Promise Technology Management with WebPAM PROe Making Maintenance Mode Settings Each controller has its own IP addresses for access when the controller goes into maintenance mode. To make maintenance mode settings: 1. Click the Device tab. 2. Click the Network Management tab.
- Page 144 Promise Technology Vess R3600 / Vess J3600 Product Manual Managing Fibre Channel Connections Viewing Fibre Channel Node Information To view Fibre Channel node information: 1. Click the Device tab. 2. Click the FC Management tab. 3. Click the Node tab.
- Page 145 Promise Technology Management with WebPAM PROe Viewing Fibre Channel Port Information To view Fibre Channel port information: 1. Click the Device tab. 2. Click the FC Management tab. 3. Click the Port tab. 4. Click the gear icon in the list of FC ports and select the View option.
- Page 146 Promise Technology Vess R3600 / Vess J3600 Product Manual Fibre Channel Node Information Port Setting Information The examples below show the type of attached topology you achieve based on your connection type and the configured topology you select. Example 1: If you connect the Vess R3600 to a Fibre Channel switch and choose NL-Port topology, you create a Public Loop attached topology.
- Page 147 Promise Technology Management with WebPAM PROe Viewing Fibre Channel Port Statistics To view Fibre Channel port statistics: 1. Click the Device tab. 2. Click the FC Management tab. 3. Click the Statistics tab. 4. Click the gear icon in the list of FC ports and select the View option.
-
Page 148: Iewing F Ibre C Hannel Sfp
Promise Technology Vess R3600 / Vess J3600 Product Manual Viewing Fibre Channel Initiators on the Fabric To view a list Fibre Channel initiators on the fabric: 1. Click the Device tab. 2. Click the FC Management tab. 3. Click the Device on Fabric tab. -
Page 149: M Anaging I Scsi C Onnections
Promise Technology Management with WebPAM PROe scsI c anagIng I onnectIons Viewing iSCSI Target Information To view information about the iSCSI target: 1. Click the Device tab. 2. Click the iSCSI Management icon. 3. Click the Target tab. (Note that you need to click Expand Detail Information to view the entire list) Target information includes: • ID –... -
Page 150: Making Iscsi Target Settings
Promise Technology Vess R3600 / Vess J3600 Product Manual Making iSCSI Target Settings To make target settings: 1. Click the Device tab. 2. Click the iSCSI Management icon. 3. Click the Target tab. 4. Click the target you want, then click the Modify button. -
Page 151: Deleting An Iscsi Session
Promise Technology Management with WebPAM PROe Viewing iSCSI Session Information To view a list of iSCSI sessions: 1. Click the Device tab. 2. Click the iSCSI Management icon. 3. Click the Session tab. 4. Click the View button. Deleting an iSCSI Session To delete an iSCSI session: 1. -
Page 152: Making Iscsi Isns Settings
Promise Technology Vess R3600 / Vess J3600 Product Manual Making iSCSI iSNS Settings To make iSNS settings: 1. Click the Device tab. 2. Click the iSCSI Management icon. 3. Click the iSNS tab. 4. Click on a portal to select it. -
Page 153: Adding Iscsi Chaps
Promise Technology Management with WebPAM PROe Adding iSCSI CHAPs To add an iSCSI CHAP: 1. Click the Device tab. 2. Click the iSCSI Management icon. 3. Click the CHAP tab. 4. Click the Create CHAP button. 5. Make your choices and inputs as required: Enter a name in the Name field. -
Page 154: Making Iscsi Chap Settings
Promise Technology Vess R3600 / Vess J3600 Product Manual Making iSCSI CHAP Settings When you change CHAP settings, you must change the secret. You cannot change the type (peer or local). To make iSCSI CHAP settings: 1. Click the Device tab. -
Page 155: Sing The V Iewing E Vents
Promise Technology Management with WebPAM PROe sIng tHe Vent Iewer The Event Viewer displays log of subsystem events. Events are classified as: • Runtime Events – A list of and information of up to about 300,000 of the most recent runtime events recorded since the subsystem was started. -
Page 156: Saving Events
Promise Technology Vess R3600 / Vess J3600 Product Manual Viewing Events To display Events: 1. Click the Administration tab. 2. Click the Events icon. The log of Events appears. Events are added to the top of the list. Each item includes: • Index number –... -
Page 157: M Anaging U Sers
Promise Technology Management with WebPAM PROe anagIng sers Viewing User Information To view user information: 1. Click the Administration tab. 2. Click the Management User tab. The list of users displays. User information includes: • User name • Display Name •... -
Page 158: Making User Settings
Promise Technology Vess R3600 / Vess J3600 Product Manual User Privileges Level Meaning View Allows the user to See all status and settings but not to make any changes Allows the user to perform maintenance tasks including Rebuilding, PDM, Maintenance... -
Page 159: Changing User Passwords
Promise Technology Management with WebPAM PROe Changing User Passwords This action requires Administrator or Super User privileges. To change a user’s password: 1. Click the Administration tab. 2. Click the User Management icon. 3. In the User list, click the user you want, then click Change Password. -
Page 160: Setting User Event Subscriptions
Promise Technology Vess R3600 / Vess J3600 Product Manual Setting User Event Subscriptions By default, all users have event notification: • Enabled • Set to the Major (severity) level for all events Subscribing users receive notification of events at the chosen severity level and all higher levels. -
Page 161: Ervices
Promise Technology Management with WebPAM PROe Viewing Services This feature displays all software services running on the RAID subsystem. To view the list of software services: 1. Click the Administration tab. 2. Click the Service icon. The Services list displays the Status and Start Type of the services available. These services are described in the sections that follow. -
Page 162: Restarting Email Service
Promise Technology Vess R3600 / Vess J3600 Product Manual Restarting Email Service To restart the Email service: 1. Click the Administration tab. 2. Click the Service icon. 3. Click the gear icon for Email service and select the Restart option. -
Page 163: Slp Service
Promise Technology Management with WebPAM PROe SLP Service Service Location Protocol (SLP) discovers services over the Internet. SLP applies to IPv4 protocol only. Stopping SLP Service To stop the SLP service: 1. Click the Administration tab. 2. Click the Service icon. -
Page 164: Making Slp Settings
Promise Technology Vess R3600 / Vess J3600 Product Manual Making SLP Settings To change SLP service settings: 1. Click the Administration tab. 2. Click the Service icon. 3. Click the gear icon for SLP service and select the Settings option. - Page 165 Promise Technology Management with WebPAM PROe Restarting Webserver Service 1. Click the Administration tab. 2. Click the Service icon. 3. Click the gear icon for SLP service and select the Restart option. 4. Type “CONFIRM” in the popup menu and click the Confirm button.
- Page 166 Promise Technology Vess R3600 / Vess J3600 Product Manual SSH Service Secure Shell (SSH) service enables you to access the subsystem’s Command Line Interface (CLI) through a network connection. Stopping SSH Service To stop SSH service: 1. Click the Administration tab.
- Page 167 Promise Technology Management with WebPAM PROe Making SSH Settings To change SSH service settings: 1. Click the Administration tab. 2. Click the Service icon. 3. Click the gear icon for SSH service and select the Settings option. 4. In the SSH Settings tab, make settings changes as required: •...
- Page 168 Promise Technology Vess R3600 / Vess J3600 Product Manual SNMP Service Simple Network Management Protocol (SNMP) is the long used protocol for getting information or modifying about managed devices on IP networks. Stopping SNMP Service To stop SNMP service: 1. Click the Administration tab.
- Page 169 Promise Technology Management with WebPAM PROe SNMP Settings To change SNMP settings: 1. Click the Administration tab. 2. Click the Service icon. 3. Click the gear icon for SNMP service and select the Settings option. 4. Required settings include: • Security User Name •...
- Page 170 Promise Technology Vess R3600 / Vess J3600 Product Manual Performance Monitoring The Vess R3600 includes menu displays for monitoring of numerous functions and parameters. However, many administrators might give priority to particular functions for monitoring. For this reason, a feature is included to allow the administrator to create a favorites list of menus for monitoring.
- Page 171 Promise Technology Management with WebPAM PROe Favorite Performance Monitoring menus display To remove a chart from the Favorite menus, click on Remove this chart.
- Page 172 Promise Technology Vess R3600 / Vess J3600 Product Manual anagIng ackground ctIVItIes Background activities perform a variety of preventive and remedial functions on your physical drives, disk arrays, logical drives, and other components. You can run a background activity immediately or schedule it to run at a later time. Scheduling options are described below.
- Page 173 Promise Technology Management with WebPAM PROe Add a Scheduled Background Activity To add a new scheduled background activity: 1. Click the Administration tab. 2. Click the Background Activities tab. The list of background appears. 3. Click the Background Activity Scheduler button.
- Page 174 Promise Technology Vess R3600 / Vess J3600 Product Manual 11. For Redundancy Check, choose, • Auto Fix option – Attempts to repair the problem when it finds an error. Check to enable • Pause on Error option – The process stops when it finds a non-repairable error.
- Page 175 Promise Technology Management with WebPAM PROe Enable/Disable Scheduled Background Activity Background activity schedules are enabled by default when you create the schedule. If you want to stop a background activity now but plan to use it again in the future, disable the scheduled activity rather than deleting it.
- Page 176 Promise Technology Vess R3600 / Vess J3600 Product Manual Media Patrol Media Patrol is a routine maintenance procedure that checks the magnetic media on each disk drive. Media Patrol checks are enabled by default on all disk arrays and spare drives. Media Patrol is concerned with the media itself, not the data recorded on the media.
- Page 177 Promise Technology Management with WebPAM PROe Redundancy Check Redundancy Check is a routine maintenance procedure for fault-tolerant disk arrays (those with redundancy) that ensures all the data matches exactly. Redundancy Check can also correct inconsistencies. Starting, Stopping, Pausing and Resuming Redundancy Check To make Redundancy Check settings: 1.
- Page 178 Promise Technology Vess R3600 / Vess J3600 Product Manual Rebuild When you rebuild a disk array, you are actually rebuilding the data on one physical drive. • When a physical drive in a disk array fails and a spare drive of adequate capacity is available, the disk array begins to rebuild automatically using the spare drive.
- Page 179 Promise Technology Management with WebPAM PROe Background Synchronization Synchronization is automatically applied to redundant logical drives when they are created. Synchronization recalculates the redundancy data to ensure that the working data on the physical drives is properly in sync. Background Synchronization Rate 1.
- Page 180 Promise Technology Vess R3600 / Vess J3600 Product Manual Predictive Data Migration (PDM) is the migration of data from the suspect physical drive to a spare drive, similar to rebuilding a logical drive. But unlike Rebuilding, PDM constantly monitors your physical drives and automatically copies your data to a spare drive before the physical drive fails and your logical drive goes Critical.
- Page 181 Promise Technology Management with WebPAM PROe Restore Factory Default Settings This feature restores settings to their default values. Caution Use this feature only when required and only on the settings that you must reset to default in order to set them correctly.
- Page 182 Promise Technology Vess R3600 / Vess J3600 Product Manual Factory Default Settings (by type) Firmware Settings Software Settings • Background Activities Settings • BGA Scheduler Settings • Controller Settings • Service Settings • Enclosure Settings • Web Server Settings •...
- Page 183 Promise Technology Management with WebPAM PROe Export User Database You can save the user information and settings from one Vess R3600 RAID subsystem, export it, and then import it to automatically configure your other Vess R3600 RAID subsystems. To export a user database: 1.
- Page 184 Promise Technology Vess R3600 / Vess J3600 Product Manual Export Configuration Script, NAS Configuration, NAS Account You can save a system report from a Vess R3600 RAID subsystem. To export a user database: 1. Click the Administration tab. 2. Click the Import/Export tab. 3. Click the Export option.
- Page 185 Promise Technology Management with WebPAM PROe Import User Database You can save the user information and settings from one Vess E5000 RAID subsystem, export it, and then import it to automatically configure your other Vess E5000 RAID subsystems. Caution Importing a user database overwrites the current users and user settings on your Vess E5000 subsystem.
- Page 186 Promise Technology Vess R3600 / Vess J3600 Product Manual Import Configuration Script, NAS Configuration, NAS Account You can save a settings script for system configuration, NAS configuration or NAS account settings and use it to automatically configure your Vess E5000 subsystem. The script must be a plain, non-encrypted text file. From there, you can import the script from the Host PC and perform the configuration automatically.
- Page 187 Promise Technology Management with WebPAM PROe Update Firmware Use this function to flash (update) the firmware on the Vess R3600. Download the latest firmware image file from PROMISE support: http://www.promise.com/support/ and save it to your Host PC or TFTP server.
-
Page 188: Product Registration
Promise Technology Vess R3600 / Vess J3600 Product Manual When the update is completed a message tells you to reboot the subsystem, 7. Click the OK button. • If you chose the Disruptive Flash Method, the RAID subsystem and JBOD expansion units automatically restart. -
Page 189: M Anaging With The Cli
Promise Technology Managing with CLI anagIng wItH tHe This chapter provides information on how to use the command line interface (CLI) for administration of the Vess R3600 with a description of the syntax and function of each command and its parameters. CLI management can be done remotely using an SSH based terminal simulation program, or connect directly to the device using the serial port. -
Page 190: Making A Serial Connection
Promise Technology Vess R3600 / Vess J3600 Product Manual Making a Serial Connection Before you begin, be sure the RJ11-to-DB9 serial data cable is connected between the Host PC and the Vess R3600 enclosure, and that both machines are booted and running. - Page 191 Promise Technology Managing with CLI Command Table of Contents export ..... about ..... factorydefaults ........acltmpl ..... folder ..... allowip ..... group ..... battery ..... import ......initiator ......iscsi ..... bgasched ..... isns ..... buzz .....
- Page 192 Promise Technology Vess R3600 / Vess J3600 Product Manual pair ..... snapshot ..... password ..... spare ..... pcie ..... stats ......subscription ..... periodsnap ..... subsys ..... phydrv ..... swmgt ..... ping ..... sync ..... pool ..... target .....
-
Page 193: Able Of Ontents
The table below and on the following pages provides a brief description of the CLI commands available on the Vess R3600 Series. Command Action about View utility information. acl List, set, clear, cancel or refresh the ACL settings on the NAS Share acltmpl List, add or delete the Windows ACL common settings. - Page 194 Promise Technology Vess R3600 / Vess J3600 Product Manual Table of Supported Commands (Continued) Command Action encldiag View enclosure element information. View or edit enclosure and SEP information and settings. Locate an enclosure via enclosure LEDs. event View or clear events logs.
- Page 195 Promise Technology Managing with CLI Table of Supported Commands (Continued) Command Action pcie View PCIe slots information in controller. View PDM status and progress. Start, stop, pause or resume a PDM process. periodsnap List, add, modify or delete periodic snapshot task.
- Page 196 Promise Technology Vess R3600 / Vess J3600 Product Manual Table of Supported Commands (Continued) Command Action snapshot Create snapshots or modify snapshot settings. spare Create or modify hot spare drives. stats View or reset statistics. subscription View, modify, enable or disable event notification.
-
Page 197: Otes And
Promise Technology Managing with CLI otes and onVentIons Commands and options are NOT case sensitive. Not all extended keys are supported. However, you can use the backspace and the left and right arrow keys for command line editing. In addition, the up and down arrow keys allow scrolling through the command history buffer. - Page 198 Promise Technology Vess R3600 / Vess J3600 Product Manual Usage acl -a <action> [-f <full path>] [-s <settings>] [-v] acl -a clear -f <full path> acl -a set -f <full path> -s <settings> acl -a cancel -f <full path> acl -a refresh -f <full path>...
- Page 199 Promise Technology Managing with CLI role= acl role type. everyone user group name= user name or group name. Only valid for user or group acl role type acl= acl settings unset deny windows Following settings are valid for windows acl setting.
- Page 200 Promise Technology Vess R3600 / Vess J3600 Product Manual r_ext_attr= Read extended attributes ACL allow deny create= Create files/ write data ACL allow deny create_f= Create folders/ append data ACL allow deny w_attr= Write attributes ACL allow deny w_ext_attr= Write extended attributes ACL...
- Page 201 Promise Technology Managing with CLI r_perm= Read permission ACL allow deny chg_perm= Change permission ACL allow deny take_own= Take owner ACL allow deny Verbose mode. Used with -a list. Examples: acl -a list -f /FS/ns acl -a list -f /FS/ns/a.txt acl -a clear -f /FS/ns acl -a set -f /FS/ns -s “role=user, name=testa, acl=ro”...
- Page 202 Promise Technology Vess R3600 / Vess J3600 Product Manual acltmpl Usage acltmpl -a <action> [-n <template name>] [-s <settings>] [-v] acltmpl -a list -n <template name> acltmpl -a add -n <template name> -s <settings> acltmpl -a mod -n <template name> -s <settings>...
- Page 203 Promise Technology Managing with CLI list= List folder/ read data ACL allow deny (Default) r_attr= Read attributes ACL allow deny (Default) r_ext_attr Read extended attributes ACL allow deny (Default) create Create files/ write data ACL allow deny (Default) create_f Create folders/ append data ACL...
- Page 204 Promise Technology Vess R3600 / Vess J3600 Product Manual delete Delete ACL allow deny (Default) r_perm Read permission ACL allow deny (Default) chg_perm Change permission ACL allow deny (Default) take_own Take owner ACL allow deny (Default) Verbose mode. Used with -a list.
- Page 205 Promise Technology Managing with CLI allowip Usage allowip [-a <action>] -t <type> -d <ID> [-i <index>] [-s <settings>] Summary This command allows the user to add, modify or delete NFS allow share IP settings. Options -a <action> Which action to perform.
- Page 206 Promise Technology Vess R3600 / Vess J3600 Product Manual squash= all_squash root root_squash noroot no_root_squash Verbose mode. Used with -a list. Examples allowip -a list -t nasshare -d 2 allowip -a add -t nasshare -d 2 -s “ip=10.0.0.1, permission=ro, squash=root”...
- Page 207 Promise Technology Managing with CLI battery Usage battery [-a <action>] [-b <batId>] battery -a recondition -b <batId> Summary Battery is used to display the current status of a battery indicating the percentage of charge left. This command is also used to recondition a battery. Reconditioning of a battery attempts to fully discharge, and then recharge it.
- Page 208 Promise Technology Vess R3600 / Vess J3600 Product Manual Usage bbm [-a <action>] [-p <PdId>] bbm -a clear -p <PdId> Summary The bbm command displays or clears the Bad Block Map (BBM) defect list for all configured physical drives. Options -a <action>...
- Page 209 Promise Technology Managing with CLI Usage bga [-a <action>] bga -a mod -s “<list of settings>” Summary The bga command displays all current background activities and makes settings for each background activity. Options -a <action> Specifies the action to perform.
- Page 210 Promise Technology Vess R3600 / Vess J3600 Product Manual rebuildrate= Rebuild rate determines the rate at which rebuild will run. (low=25, medium=50, high=75) medium high rcrate= Redundancy check rate determines the rate at which redundancy check will run. (low=25, medium=50, high=75)
- Page 211 Promise Technology Managing with CLI bgasched Usage bgasched -a <action> -t <type> -s <list of settings> bgasched -a add -t <type> -s <list of settings> bgasched -a mod -t rc -i <RC scheduler id> -s <list of settings> bgasched -a mod -t <type> -s <list of settings>...
- Page 212 Promise Technology Vess R3600 / Vess J3600 Product Manual Battery Reconditioning Schedule. Spare Drive Check Schedule. -i <RC scheduler id> Specifies the RC scheduler ID. It’s used for list/modify/delete RC scheduler. If the option is not specified, assumed to all.
- Page 213 Promise Technology Managing with CLI day of week, it will be used. For Weekly, the range is [Sun|Mon|Tues|Wed|Thur|Fri|Sat]. For multiple value, divided by space. The default is ‘Fri’ for MP, ‘Wed’ for RC, ‘Tues’ for SC, ‘Sun Mon Tues Wed Thur Fri Sat’ for others.
- Page 214 Promise Technology Vess R3600 / Vess J3600 Product Manual (Default) No end time. An integer N indicates after N times. yyyy-mm-dd End date, month’s range is 1-12 and day’s range is 1-31. autofix= Fix inconsistent data. enable The default is enable.
- Page 215 Promise Technology Managing with CLI Examples bgasched bgasched -a mod -t rc -i 1 -s “status=disable,poolid=1 3~5 7” bgasched -a add -t mp -s “recurtype=monthly,daypattern=dow,wom=2nd,dow=Sun, month= 1 3~6, endon=10” bgasched -a add -t sc -s “recurtype=weekly,dow= Mon Wed Fri,starttime=12:00, endon=2020-01-01”...
- Page 216 Promise Technology Vess R3600 / Vess J3600 Product Manual buzz Usage buzz [-a <action>] buzz -a list buzz -a enable buzz -a disable buzz -a on buzz -a off Summary The buzz command displays the status of the buzzer, and enables, disables, turns on or turns off the buzzer.
- Page 217 Promise Technology Managing with CLI cache Usage: cache [-a <action>] -t <type> [-m <media type>] [-p <phydrv id list>] [-i <pool id list>] Summary: The cache command allows the user to list cache info. To add or del read/write cache using SSD physical drive.
- Page 218 Promise Technology Vess R3600 / Vess J3600 Product Manual -p <phydrv id list> To specify physical drive IDs. Only valid for -a add/mod action. -i <pool id list> To specify assigned pool IDs. If not specified for adding cache, it means no pool assigned.
- Page 219 Promise Technology Managing with CLI chap Usage chap [-a <action>] [-i <ChapId>] chap -a add [-s “<list of settings>”] chap -a mod -i <ChapId> [-s “<list of settings>”] chap -a del -i <ChapId> Summary The chap command is used to create, modify or delete a CHAP record. CHAP authentication is used between the subsystem and an initiator for the iSCSI host interface.
- Page 220 Promise Technology Vess R3600 / Vess J3600 Product Manual Examples chap chap -a del -i2 chap -a mod -i1 -s “name=chap1” chap -a add -s “name=chap1, type=local” > Chap Secret: **************** clone Usage clone [-a <action>] [-i <clone id>] [-d <snapshot id>] [-n <clone name>] [-v] clone -a list clone -a add -d <snapshot id>...
- Page 221 Promise Technology Managing with CLI Options -a <action> Which action to perform. list (Default) Displays the current active Clone(s) and their status(es). Add a clone based on snapshot. Modify clone setting. Delete a clone. export Export a clone.For volume type only.
- Page 222 Promise Technology Vess R3600 / Vess J3600 Product Manual ctrl Usage ctrl [-a <action>] [-i <ctrlId>] [-c <ctrl count>] [-v] ctrl -a mod [-i <ctrlId>] -s “<list of settings>” ctrl -a clear [-i <ctrlId>] [-t <condition type>] Summary The ctrl command displays controller information and changes controller settings.
- Page 223 Promise Technology Managing with CLI Following setting is shared if there are dual controllers: coercion= To enable or disable disk coercion functionality. Disk coercion will truncate the size of the physical disks but will make different sized drives appear as though they are similarly sized. For example, a 90.1 GB drive would appear as the same size as an 89.8 GB drive.
- Page 224 Promise Technology Vess R3600 / Vess J3600 Product Manual smartpollinginterval= (1 - 1440) Sets the time interval in number of minutes to poll the drive SMART status. cacheflushinterval= (1-12) Sets the time interval in seconds to flush the controller writeback cache.
- Page 225 Promise Technology Managing with CLI powersavingidletime= After an HDD has been idle for the set period of time, parks the read/write heads. Set the time interval in number of minutes. Valid values are 0(never), 15, 30, 60(= 1 hour)..1440(=24 hours).
- Page 226 Promise Technology Vess R3600 / Vess J3600 Product Manual Examples ctrl ctrl -v ctrl -l ctrl -a mod -i 1 -s “alias=ctrl1, coercion=enable” ctrl -a mod -s “powersavingstoppedtime=180” date Usage date date -a mod [-d <date>] [-t <time>] [-z <timezone>] Summary The date command allows the user to view and modify the system time.
- Page 227 Promise Technology Managing with CLI domain Usage domain -a <action> [-t <type>] [-s <settings>] Summary This command allows the user to list, enable or disable domain settings, check KDC for Windows AD or domain name for LDAP, as well as to rejoin into domain sever by existing domain settings.
- Page 228 Promise Technology Vess R3600 / Vess J3600 Product Manual none (Default) -s “<option>=<value>” Used to specify domain settings. Only valid for -a enable action. domain= (AD/LDAP)Domain name kdc= (AD) Key Distribution Center netbios= (AD) NetBIOS Name server= (LDAP/OD) Domain server host...
- Page 229 Promise Technology Managing with CLI Examples domain -a list domain -a enable -t ad -s “domain=2008ad.com, kdc=WIN-CC18N6QMNLL.2008AD.com, netbios=2008ad, username=administrator, password=password” domain -a enable -t ldap -s “domain=test.com, server=10.84.2.46, security=none, basedn=’dc=test,dc=com’, username=admin, password=password, usersuffix=’ou=People’, grpsuffix=’ou=Group’” domain -a check -t ad -l “domain=2008ad.com”...
- Page 230 Promise Technology Vess R3600 / Vess J3600 Product Manual encldiag Usage encldiag -a <action> -e <EnclosureId> -t <element type> Summary The enclosure diagnostic command is used to get enclosure element information, such as PSU usage, PSU power on time. Options -a <action>...
- Page 231 Promise Technology Managing with CLI enclosure Usage enclosure [-a <action>] -v enclosure -a mod -s <list of settings> enclosure -a locate [-t <FRU type> -f <FRU id>] Summary The enclosure command provides status and information about the various components of the enclosure unit. It is also used to set thresholds for temperature and polling.
- Page 232 Promise Technology Vess R3600 / Vess J3600 Product Manual ctrltempwarning= Controller temperature, displayed in Celsius, that the controller will consider as a warning threshold. (61-65) For IOM sensor 1,4. (66-70) For IOM sensor 2,5. (71-78) For IOM sensor 3,6. ctrltempcritical= Controller temperature, displayed in Celsius, that the controller will consider as a critical threshold.
- Page 233 Promise Technology Managing with CLI event Usage event [-a <action>] [-i <SeqNo>] [-c <event count>] [-v] event -a clear Summary The event command displays and clears the RAM and NVRAM event logs. Options -a <action> Specified the action to perform.
- Page 234 Promise Technology Vess R3600 / Vess J3600 Product Manual export Usage export -t <fileType> [-s <tftpServer>] [-p <port>] [-x <fileExt>] -f <fileName> Summary The export command exports certain types of configuration files to a TFTP server. Options -t <file type>...
- Page 235 Promise Technology Managing with CLI factorydefaults Usage factorydefaults -a <action> -t <type> Summary The factorydefaults command restores specified settings to the factory default values. Options -a <action> Specifies the action to perform. restore Restore the factory default settings. erase Erase iSCSI configurations(used along with <-t iscsi>).
- Page 236 Promise Technology Vess R3600 / Vess J3600 Product Manual network network settings including management port and portal, iSCSI port, portal, trunk and iSNS. phydrv Physical drive settings. subsys Subsystem settings. The following are individual Software settings: bgasched bga scheduler settings.
- Page 237 Promise Technology Managing with CLI Usage fc [-a <action>] [-t <Type>] [-i <CtrlId>] [-p <PortId>] [-v] fc -a mod -t <Type> -i <CtrlId> -p <PortId> -s “<list of settings>” fc -a reset -i <CtrlId> -p <PortId> Summary The fc command is used to view and modify Fibre Channel information and settings. Fibre Channel host interface product only.
- Page 238 Promise Technology Vess R3600 / Vess J3600 Product Manual -p <port id> Port Id. Default to be all ports for listing if -p is not specified. Default to be port 1 for modifying if -p is not specified. -s “<option>=<value>”...
- Page 239 Promise Technology Managing with CLI folder Usage: folder [-a <action>] [-p <path>] [-t <type>] [-c <count>] [-s <settings>] Summary: The folder command is used to list, create, delete or refresh the folder as well as modify or change owner of file or folder.
- Page 240 Promise Technology Vess R3600 / Vess J3600 Product Manual -s “<option>=<value>” Used to specify what options to change. Only valid for add or mod action. owner= Specify the folder or file owner. recursive= Recursive enable or disable. Valid for folder type.
- Page 241 Promise Technology Managing with CLI group Usage: group [-a <action>] [-n <group name>] group -a add -g <group name> [-u “user=<user name list>”] group -a mod -g <group name> -s “desc=<>” group -a del -g <group name> group -a adduser -g <group name> [-u “user=<user name list>”] group -a deluser -g <group name>...
- Page 242 Promise Technology Vess R3600 / Vess J3600 Product Manual Examples group group -a add -g gname group -a mod -g gname -s “desc=<>” group -a del -g gname group -a adduser -g gname -u a group -a refresh...
- Page 243 Promise Technology Managing with CLI import Usage import -t <fileType> -s <tftpServer> -f <fileName> [-p <port>] [-i] [-l] Summary The import command is used to import files from a remote host. Options -t <file type> Specifies what type file to import.
- Page 244 Promise Technology Vess R3600 / Vess J3600 Product Manual initiator Usage initiator [-a <action>] [-i <Index>] [-c <Count>] initiator -a add [-i <Index>] -n <Name> initiator -a del -i <Index> Summary Use this to display information about the current initiator list as well as to add or delete an initiator.
- Page 245 Promise Technology Managing with CLI -c <Count> Used to specify the number of initiators to be listed. Only used with -a list option. -t <type> When used with the -a add option, this option specifies which kind of initiator to add.
- Page 246 Promise Technology Vess R3600 / Vess J3600 Product Manual iscsi Usage iscsi [-a <action>] [-t <Type>] [-i <componentId>] [-r <CtrlId> -p <PortId>] [-c <Count>] [-m <PortalInterfaceType>] [-v] iscsi -a mod [-t <Type>] [-i <TargetId|SessionId|PortalId|DeviceId>] [-r <CtrlId> -p <PortId>] -s “<list of settings>”...
- Page 247 Promise Technology Managing with CLI -i <component id> <target id> Target id for iSCSI target type. <session id> Session id for iSCSI session type or stats type. <portal id> Portal id for iSCSI portal type. <device id> Device id for iSCSI device type..
- Page 248 Promise Technology Vess R3600 / Vess J3600 Product Manual datadigest 32bit CRC for iSCSI data. Enabling a data digest may decrease performance. enable disable unichapauth Unidirectional CHAP authorization. Requires the initiator to have a CHAP secret to log into the subsystem. Can be configured only when modify a target.
- Page 249 Promise Technology Managing with CLI The following settings apply to portals. Requires -t portal and -g <portal id> options. Adding a portal also requires -m <portal interface type> optioin. vlantag = The VLAN tag of a portal in LAN-mode. Range is 1 to 4094.
- Page 250 Promise Technology Vess R3600 / Vess J3600 Product Manual Examples iscsi iscsi -t port -r 1 -p 2 iscsi -a del -t session -i 2 -r 1 iscsi -a mod -s “keepalive=enable” iscsi -a mod -t target -i 1 -s “alias=vendorNode”...
- Page 251 Promise Technology Managing with CLI Options -a <action> Which action to perform. list (Default) Displays a summary of iSNS settings. Allows the user to change iSNS settings -t <port type> The type of port to iSNS through. If -t is not specified, the default value is Mgmt port.
- Page 252 Promise Technology Vess R3600 / Vess J3600 Product Manual license Usage license [-a <action>] Summary It can be used to view the imported license information. Use command “import” to import or update license file. Options -a <action> Specify which action to perform.
- Page 253 Promise Technology Managing with CLI logout Usage logout Summary The logout command is used to logout the current user from the session. Examples logout lunmap Usage lunmap [-a <action>] [-i <InitiatorId>] [-t <type>] [-c <Count>] lunmap -a addlun -i <InitiatorId> [-p <SourceType>] [-l <SourceIdList>] [-m <LunMapList>] lunmap -a dellun -i <InitiatorId>...
- Page 254 Promise Technology Vess R3600 / Vess J3600 Product Manual Options -a <action> Which action to perform. list (Default) Displays the current LMM table. enable Enables LMM. disable Disables LMM. Adds an LMM entry and its LUN maps to the table.
- Page 255 Promise Technology Managing with CLI -p <source type> Specifies the source type. volume snapshot clone -l <Source ID list> (0-1023) Specifies the source IDs. -m <LUN map list> (0-1023) Specifies the LUN mapping values. Please check the maximum number of LUNs supported by host OS.
- Page 256 Promise Technology Vess R3600 / Vess J3600 Product Manual maintenance Usage maintenance [-a <action>] -i <CtrlId> maintenance -a enter -i <CtrlId> Summary The maintenance command instructs the selected RAID controller to enter maintenance mode. Note: To bring the RAID controller out of maintenance mode, enter the command “shutdown -a restart”.
- Page 257 Promise Technology Managing with CLI migrate Usage migrate [-a <action>] [-i <ID>] [-t <location>] [-p <pool ID>] [-s <settings>] Summary The migrate command allows the user to migrate volume into another pool which located in same subsystem (Local) or other subsystem (Remote).
- Page 258 Promise Technology Vess R3600 / Vess J3600 Product Manual syncmode= sync mode method. async semi-sync sync (Default) srcwwn= source subsystem wwn.It’s optional when start remote migrate. dstwwn= destination subsystem wwn.It’s optional when start remote migrate. Verbose mode. Used with -a list.
- Page 259 Promise Technology Managing with CLI Usage mp -a <action> Summary Media patrol (MP) is a feature that will actively search the disks for media errors. When an error is found, MP will attempt to repair the error. If MP fails to correct the error, MP will attempt to reassign the sector.
- Page 260 Promise Technology Vess R3600 / Vess J3600 Product Manual nasconfig Usage nasconfig -a <action> [-f <file name>] Summary This command allows the user to list, reset or restore NAS configuration Options -a <action> Which action to perform. list (Default) List NAS settings...
- Page 261 Promise Technology Managing with CLI nasshare Usage nasshare [-a action] [-i <nasshare id>] [-v] nasshare -a list [-i <nasshare id>] [-v] nasshare -a add -p <pool id> -s “<list of nasshare params>” nasshare -a mod -i <nasshare id> -s “<list of nasshare params>”...
- Page 262 Promise Technology Vess R3600 / Vess J3600 Product Manual -s “<option>=<value>” Used to specify what options to change. Only valid for add or mod action. name The name of the NAS Share. capacity Used to specify the capacity of NAS Share.
- Page 263 Promise Technology Managing with CLI Examples nasshare -a list -v nasshare -a add -p 1 -s “name=sd, capacity=10gb” nasshare -a mod -i 1 -s “name=sd2, capacity=20gb” nasshare -a del -i 1 nasshare -a mount -i 1 nasshare -a unmount -i 1 Usage net [-a <action>] [-t <type>] [-f <protocol family>] [-c <ctrl ID>] [-p <portid>] [-s “<list of settings>”] [-m] [-v]...
- Page 264 Promise Technology Vess R3600 / Vess J3600 Product Manual Options -a <action> Which action to perform. list (Default) Displays a list of IP configurations. To modify current network settings. enable To enable IPv4/IPv6 for portal type. To enable IO support for port type.
- Page 265 Promise Technology Managing with CLI The following settings apply to portal. Requires -t portal or -t portal -m and -c <controllerr id> options. Specify the primary IP address. ipmask= Specify the primary subnet mask. gateway= Specify the gateway. dhcp= Enable or disable DHCP support.
- Page 266 Promise Technology Vess R3600 / Vess J3600 Product Manual wol= Enable or disable Wake On LAN support. enable disable The following settings apply to port. Requires -t port, -c <controllerr id> and -p <port id> options. jumboframe = Enable or Disable the jumbo frame of the port.
- Page 267 Promise Technology Managing with CLI Usage ntp [-a <action>] ntp -a list ntp -a mod -s “<list of settings>” ntp -a test -t <time server> ntp -a sync Summary The ntp command enables a user to view NTP status, add an NTP server, modify NTP settings, test the NTP server connection, and synchronize subsystem time with the NTP server.
- Page 268 Promise Technology Vess R3600 / Vess J3600 Product Manual Examples ntp -a list ntp -a mod -s “server1=ABC.123.XYZ” (adds a NTP server) ntp -a mod -s “ntp=enable, server1=ABC.123.XYZ” ntp -a test -t ABC.123.XYZ ntp -a sync pair Usage pair -a <action> [-r <remote ip>] [-w <wwn>] Summary This command allows the user to list, add, modify or delete pair.
- Page 269 Promise Technology Managing with CLI password Usage password [-u <username>] [-t<type>] [-p<protocol>] Summary Allows a user to change their password. A normal (non super user) user will never use the -u option, as they are allowed only to change their password. For any user who wants to change its own password, it will be first prompted for their old password before inputting their new password.
- Page 270 Promise Technology Vess R3600 / Vess J3600 Product Manual Examples password old password:****** new password:****** Retry password:****** password -u snmpuser -t snmp -p auth Input auth password:****** Retype auth password:****** password -u nasuser -t nas new password:****** Retry password:****** pcie...
- Page 271 Promise Technology Managing with CLI Usage pdm [-a <action>] [-l <PoolId>] [-s <SeqNo>] pdm -a start -l <PoolId> -s <SeqNo> -p <PdId> pdm -a stop -l <PoolId> -s <SeqNo> pdm -a pause -l <PoolId> -s <SeqNo> pdm -a resume -l <PoolId> -s <SeqNo>...
- Page 272 Promise Technology Vess R3600 / Vess J3600 Product Manual Examples pdm -a start -l 0 -s 2 -p 10 pdm -a stop -l 0 -s 2 periodsnap Usage periodsnap -a <action> [-t <type>] [-d <source id>] -s <list of settings>...
- Page 273 Promise Technology Managing with CLI -t <source type> Specify source storage type for list or add periodic snapshot task. nasshare volume (Default for add.) -d <source ids> Source storage IDs. Nasshare IDs or volume IDs. Valid for add/modify action. For multiple value, divided by ‘,’ or ‘~’. Note that all the nasshares or volumes must in the same pool.
- Page 274 Promise Technology Vess R3600 / Vess J3600 Product Manual starthour= Used to specify start hour of task. The range is 0-23. endhour= Used to specify end hour of task. This option is valid for Daily recurrence type. The range is 0-23.
- Page 275 Promise Technology Managing with CLI phydrv Usage phydrv [-a <action>] [-p <PdId>] [-c <Pd count>] [-v] phydrv -a mod -p <PdId> -s “<list of settings>” phydrv -a locate -p <PdId> phydrv -a online -p <PdId> phydrv -a offline -p <PdId>...
- Page 276 Promise Technology Vess R3600 / Vess J3600 Product Manual -c <count> Used when more than one physical drive is to be specified and their ID numbers are sequential. Used with -a list option to display external drive information. -t <condition type>...
- Page 277 Promise Technology Managing with CLI The following settings are global to same type of physical drives: writecache= Enables or disables write cache on the physical drive(s). enable disable rlacache= Enables or disables read look ahead cache on the physical drive(s).
- Page 278 Promise Technology Vess R3600 / Vess J3600 Product Manual The following settings are only for SATA drives: dmamode= For SATA drive only. Attempt to negotiate at the specified DMA transfer mode. If a DMA transfer mode cannot be negotiate, the next slower mode will be attempted until a mode can be negotiated (udma6, udma5..udma0, mdma 2..mdma0).
- Page 279 Promise Technology Managing with CLI Examples phydrv phydrv -v phydrv -l -v phydrv -a locate -p 9 phydrv -a mod -s “writecache=enable,rlacache=enable” phydrv -a offline -p 8 phydrv -a online -p 8 phydrv -a clear -p 8 ping Usage ping -t <PortType> [-l <CtrlId>] [-p <PortId>] -i <ipAddr | DestinationId> [-d <DestinationType>]...
- Page 280 Promise Technology Vess R3600 / Vess J3600 Product Manual Options -t <port type> The type of port to ping through. If -t is not specified, the default value is mgmt port. iscsi iSCSI port. iSCSI host interface product only. mgmt Management port.
- Page 281 Promise Technology Managing with CLI pool Usage pool [-a <action>] [-i <pool id>] [-v] pool -a add [-s “<list of pool params>”] -p <pd id list> pool -a del -i <pool id list> pool -a mod -i <pool id> -s “<list of pool params>”...
- Page 282 Promise Technology Vess R3600 / Vess J3600 Product Manual -t <Drive type> Specify the type of drive. Physicsl drive External drive -p <PD ID list> Used to specify which drives are to be used in a pool. Used in conjunction with -a add or -a expand.
- Page 283 Promise Technology Managing with CLI raid= Used to specify the RAID level of the pool Only valid for add action with physical drive type. Striping. Mirroring on two drives. Parity, requiring 3 or more drives. Mirroring on even number of drives.
- Page 284 Promise Technology Vess R3600 / Vess J3600 Product Manual ctrlid= Used to specify which controller the pool is preferred for LUN affinity. Valid value is 1 or 2. If value is not specified, LUN affinity will be auto balanced. Valid for add or mod action.
- Page 285 Promise Technology Managing with CLI protocol Usag: protocol [-a <action>] [-d <ID>] [-t <type>] [-n <name>] [-s <settings>] Summary This command allows the user to list, modify, reset, enable or disable global protocol service, as well as to list, modify, enable or disable sharing protocol on the share disk, snapshot or clone.
- Page 286 Promise Technology Vess R3600 / Vess J3600 Product Manual Only used with -d specified http -s “<option>=<value>” Used to specify global protocol service settings followings are valid for FTP type encrypt= standard explicit implicit sftp port = connection port (1 ~ 65535). Default as 21.
- Page 287 Promise Technology Managing with CLI ntacl= Windows NT ACL support. smbadmin= SMB manager account. Only can modified for LDAP/OD type domain mode. followings are valid for HTTP type httpport= HTTP connection port. Default is 8088. httpsport= HTTPS connection port. Default is 8089.
- Page 288 Promise Technology Vess R3600 / Vess J3600 Product Manual ptiflash Usage ptiflash [-a <action>] [-t] [-s <ServerIP>] -f <FileName> [-p <PortNum>] [-e <encl id>] [-i <ctrl id>] [-n] [-d <pd id>] [-l] [-y] [-v] Summary This is the flash utility for the controller and physical drives. It is used to flash images such as firmware or software for controllers and drive firmware image for physical drives.
- Page 289 Promise Technology Managing with CLI -e <encl id> Specifies the Enclosure ID. Only used with -a versioninfo option. If not specified, default value is all enclosures. -i <ctrl id> Specifies the Controller ID. Only used with -a versioninfo option. Enclosure id is required when controller id is specified.
- Page 290 Promise Technology Vess R3600 / Vess J3600 Product Manual quota Usage quota [-a <action>] [-d <storage id>] [-t <type>] [-s <setting>] [-v] quota -a set -d <storage id> -t <type> -s “<list of settings>” quota -a refresh -d <storage id> -t <type>...
- Page 291 Promise Technology Managing with CLI Examples quota -a list -d 1 -t nasshare quota -a set -d 1 -t nasshare -s “role=user, name=a, limit=1Gb” quota -a set -d 1 -t nasshare -s “role=user, name=a, limit=0” quota -a refresh -d 1 -t nasshare...
- Page 292 Promise Technology Vess R3600 / Vess J3600 Product Manual -i <ID> Source or destination volume ID for stop action. Source volume ID for other actions. When used with -a stop action. For local location, it means source volume ID. For remote location, if role is source, it means source volume ID;...
- Page 293 Promise Technology Managing with CLI srcip= source portal ip.Only valid for remote replication. dstip= destination portal ip.Only valid for remote replication. srcwwn= source subsys wwn.Only valid for remote replication. It’s optional when start remote replication. dstwwn= destination subsys wwn.Only valid for remote replication.
- Page 294 Promise Technology Vess R3600 / Vess J3600 Product Manual Usage rb [-a <action>] [-l <PoolId>] [-s <SeqNo>] rb -a start -l <PoolId> -s <SeqNo> -p <PdId> rb -a stop -l <PoolId> -s <SeqNo> rb -a pause -l <PoolId> -s <SeqNo>...
- Page 295 Promise Technology Managing with CLI Usage rc [-a <action>] [-l <LdId>] rc -a start -l <LdId> [-n] [-p] rc -a stop -l <LdId> rc -a pause -l <LdId> rc -a resume -l <LdId> Summary The rc command is used to start and stop a Redundancy Check and monitor the progress of a running Redundancy Check.
- Page 296 Promise Technology Vess R3600 / Vess J3600 Product Manual Examples rc -a start -l 3 -n -p rc -a start -l 3 rc -a stop -l 2 sasdiag Usage sasdiag -a <action> -e <EnclosureId> -i <expanderId> [-p <PHYId>] Summary Diagnostic command for getting SMP discovery info, getting PHY error log, or clear the error log. For products that support multiple enclosures only.
- Page 297 Promise Technology Managing with CLI Examples sasdiag -a discover -l expander -e 1 -i 1 sasdiag -a errorlog -l expander -e 1 -i 1 sasdiag -a clearerrlog -l expander -e 1 -i 1 -p 1 sasdiag -a errorlog -l c2cport Usage sc [-a <action>] [-i <SpareId>]...
- Page 298 Promise Technology Vess R3600 / Vess J3600 Product Manual session Usage session session -h (this command) Summary This command lists the current active sessions. Examples session...
- Page 299 Promise Technology Managing with CLI shutdown Usage shutdown -a <action> [-i <ctrlId> shutdown -a shutdown shutdown -a restart shutdown -a restart -i 2 shutdown -a shutdown -i 1 Summary Shutdown is the command used to shutdown or restart a controller or subsystem.
- Page 300 Promise Technology Vess R3600 / Vess J3600 Product Manual smart Usage smart [-a <action>] [-p <PdId>] Options -a <action> Which action to perform. list (Default) Displays the status of S.M.A.R.T. diagnostic for phydrv drive(s). enable Enable S.M.A.R.T. disable Disable S.M.A.R.T.
- Page 301 Promise Technology Managing with CLI snapshot Usage snapshot [-a <action>] -i <snapshot ID> -t <type> -d <id> [-n <name>] Summary This command allows the user to list, add, modify, delete, export, unexport, or rollback a snapshot. Export or unexport only valid for volume type.
- Page 302 Promise Technology Vess R3600 / Vess J3600 Product Manual -s “<option>=<value>” Used to specify what options to change. Only valid for add or mod action. name= snapshot name. Force delete the snapshot or rollback to older one. Verbose mode. Used with -a list.
- Page 303 Promise Technology Managing with CLI spare Usage spare [-a <action>] spare -a list [-i <SpareId>] [-d <PoolId>] [-v] spare -a add [-i <SpareId>] -p <PdId> [-t g|d] [-r y|n] [-d <PoolId list>] [-s “<list of settings>”] spare -a del -i <SpareId>...
- Page 304 Promise Technology Vess R3600 / Vess J3600 Product Manual -t <type> Type of hot spare to manipulate. A global hot spare will replace any drive from a redundant pool of same size or smaller. A dedicated hot spare will only replace drives from pools in which the spare is associated with.
- Page 305 Promise Technology Managing with CLI stats Usage stats [-t <type>] [-i <devId>] [-c <Count>] stats -a clear Summary The stats command displays statistics of subsytem, controller, enclosure, physical drives, and logical drives; and resets the statistics count to zero. Options -a <action>...
- Page 306 Promise Technology Vess R3600 / Vess J3600 Product Manual subscription Usage subscription -a <action> [-u <username>] -t <type> -s “<list of settings>” subscription -a list subscription -a list -v -t <type> subscription -a enable subscription -a disable subscription -a mod [-u <username>] -s “<list of settings>”...
- Page 307 Promise Technology Managing with CLI shortcut event subscription by shortcut. If the param have no value, it means that the severity level of underling items are different. enclosure event subscription by enclosure. raid event subscription by RAID core. host event subscription by host interface.
- Page 308 Promise Technology Vess R3600 / Vess J3600 Product Manual Followings for raid type event subscription: ctrl = Controller event subscription of enclosure. da = Disk Array event subscription of enclosure. init = Initialization blower event subscription of enclosure. ld = Logical Drive cooling unit event subscription of enclosure.
- Page 309 Promise Technology Managing with CLI Followings for other type event subscription: ups = UPS event subscription of other. app = Application event subscription of other. The range is (info | warning | minor | major | critical | fatal | none).
- Page 310 Promise Technology Vess R3600 / Vess J3600 Product Manual subsys Usage subsys [-a <action>] [-v] subsys -a mod -s “<list of settings>” subsys -a lock [-r] [-t <number of minutes>] subsys -a unlock [-f] subsys -a chklock Summary The subsys command is used to display and make changes to subsystem settings. This is also used to lock the subsystem so that only the current administrator can make modifications.
- Page 311 Promise Technology Managing with CLI cachemirroring= Enable and disable cache mirroring. Cache mirroring will only be available when redundancy type is active-active. The default value is enable if not specified. enable disable -t <number of mins> Used with -a lock. Number of minutes to lock the subsystem.
- Page 312 Promise Technology Vess R3600 / Vess J3600 Product Manual swmgt Usage swmgt [-a <action>] swmgt -a mod -n <component name> [-t <startup type>] [-s “<list of settings>] swmgt -a start -n <component name> swmgt -a stop -n <component name> swmgt -a restart -n <component name>...
- Page 313 Promise Technology Managing with CLI SSH. snmp SNMP. -t <startup type> Specifies the startup type. automatic Component is automatically started when system boots. manual Component has to be manually started by issuing command. -s “<option>=<value>” Used to specify settings for this component. This is used when modifying (mod).
- Page 314 Promise Technology Vess R3600 / Vess J3600 Product Manual snmp settings port= IPv4 Port number. port6= IPv6 Port number. sysname= System name string. syslocation= System location string. syscontact= System contact information string. readcommunity= IPv4 Read community name. readcommunity6= IPv6 Read community name.
- Page 315 Promise Technology Managing with CLI Examples swmgt swmgt -n webserver swmgt -a start -n snmp swmgt -a stop -n snmp swmgt -a mod -n snmp -t automatic swmgt -a add -n ssh -p “filename=key.pub, server=192.168.1.1, comment=root@server” swmgt -a del -n ssh -i 1 For adding multiple trapsinkserver (SNMP): swmgt -a add -n snmp -p “trapsinkserver=192.168.1.1,trapfilter=info”...
- Page 316 Promise Technology Vess R3600 / Vess J3600 Product Manual target Usage target [-a <action>] [-i <Index>] [-n <Name>] target -a add [-i <Index>] -n <Name> target -a del -i <Index> Summary Target will display information about the current target list as well as the ability to add or delete a target.
- Page 317 Promise Technology Managing with CLI topology Usage topology [-a <action>] [-v] Summary View enclosures topology, the physical connections and devices. For products that support multiple enclosures only. Options -a <action> Which action to perform. list (Default) Displays topology information. View complete information about topology.
- Page 318 Promise Technology Vess R3600 / Vess J3600 Product Manual transit Usage transit [-a <action>] [-l <PoolId>] [-s <SeqNo>] transit -a start -l <PoolId> -s <SeqNo> -p <PdId> transit -a stop -l <PoolId> -s <SeqNo> transit -a pause -l <PoolId> -s <SeqNo>...
- Page 319 Promise Technology Managing with CLI Examples transit transit -a start -l 0 -s 2 -p 10 transit -a stop -l 0 -s 2 trunk Usage trunk [-a <action>] [-i <trunk id>] trunk -a add -s “<list of settings>” Summary The trunk command is used to display and modify port trunk settings for the iSCSI host interface.
- Page 320 Promise Technology Vess R3600 / Vess J3600 Product Manual trunktype= trunk type balance_xor Transmits based on XOR formula. (Source MAC address is XOR’d with destination MAC address) modula slave count. This selects the same slave for each destination MAC address and provides load balancing and fault tolerance.
- Page 321 Promise Technology Managing with CLI Usage tz [-a list] [-d] [-h] tz -a mod -s “<list of settings>” Summary TZ is used to display or modify the time zone for the controllers Options -a <action> Which action to perform. list (Default) Displays current or all the time zone info.
- Page 322 Promise Technology Vess R3600 / Vess J3600 Product Manual volume Usage volume [-a <action>] [-i <volume ID>] [-p <pool ID>] [-s <settings>] Summary This command allows the user to list, add, modify, delete, export and unexport volume. Options -a <action>...
- Page 323 Promise Technology Managing with CLI name= Volume name. capacity= Volume capacity. For add action. If not specified for not thin-provision supported volume, it means to use the max available capacity of the pool. For mod action, it means to extend capacity of the volume. It must be larger than original capacity.
- Page 324 Promise Technology Vess R3600 / Vess J3600 Product Manual Verbose mode. Used with -a list. Enable non-interactive mode. Examples volume -a list volume -a list -i 1 volume -a list -p 2 volume -a add -p 2 -s “name=test, capacity=20GB, block=8KB, sector=512B”...
- Page 325 Promise Technology Managing with CLI Usage ups [-a <action>] ups -a list [-v] ups -a mod -s “<list of settings>” Summary The ups command allows a user to view and modify ups status and settings. Network UPS is supported for IPv4 protocol only.
- Page 326 Promise Technology Vess R3600 / Vess J3600 Product Manual user Usage user [-a <action>] [-u <username>] user -a add -u <username> -p <privilege> [-s “<list of settings>”] user -a mod -u <username> [-p <privilege>] [-s “<list of settings>”] user -a del -u <username> [-t <type>] Summary The user command allows a user to view and modify an existing user account.
- Page 327 Promise Technology Managing with CLI -t <usertype> Specifies the type of user. mgmt (Default) Management user. snmp SNMP user, who can only view subsystem settings through SNMP. Nas user. -u <username> Specifies the username to display, edit or delete. Maximum username length is 25 characters, no spaces.
- Page 328 Promise Technology Vess R3600 / Vess J3600 Product Manual auth= Specifies the authentication protocol. Using MD5 authentication protocol. Using SHA authentication protocol. priv= Specifies the privacy protocol. Only when authentication is set, can this be set. Using CBC-DES privacy protocol.
- Page 329 Promise Technology Contacting Technical Support ontactIng ecHnIcal uPPort PROMISE Technical Support provides several support options for PROMISE users to access information and updates. We encourage you to use one of our electronic services, which provide product information updates for the most efficient service and support.
- Page 330 Promise Technology Vess R3600 / Vess J3600 Product Manual United States 580 Cottonwood Drive Milpitas, Ca 95035, USA Technical Support (E-Support): https://support.promise.com Web site: http://www.promise.com// Australia Technical Support (E-Support): https://support.promise.com Web site: http://www.promise.com// EMEA Netherlands Science Park Eindhoven 5228 5692 EG Son, The Netherlands Technical Support (E-Support): https://support.promise.com...
- Page 331 Promise Technology Contacting Technical Support Sweden Technical Support (E-Support): https://support.promise.com Web site: http://www.promise.com// Switzerland ITF Technical Support (E-Support): https://support.promise.com Web site: http://www.promise.com// Norway ITF Technical Support (E-Support): https://support.promise.com Web site: http://www.promise.com// Belgium Technical Support (E-Support): https://support.promise.com Web site: http://www.promise.com// Luxembourg Technical Support (E-Support): https://support.promise.com...
- Page 332 Promise Technology Vess R3600 / Vess J3600 Product Manual Korea Technical Support (E-Support): https://support.promise.com Web site: http://www.promise.com// Hong Kong Technical Support (E-Support): https://support.promise.com Web site: http://www.promise.com// Singapore Technical Support (E-Support): https://support.promise.com Web site: http://www.promise.com// Japan 3F, Mura Matsu Bldg, 3-8-5, Hongo Bunkyo-ku Tokyo 113-0033, Japan Technical Support (E-Support): https://support.promise.com...
- Page 333 Contacting Technical Support Limited Warranty PROMISE Technology, Inc. (“PROMISE”) warrants that this product, from the time of the delivery of the product to the original end user: a) all components, except the cache backup battery, for a period of three (3) years;...
- Page 334 Promise Technology Vess R3600 / Vess J3600 Product Manual Disclaimer of other warranties This warranty covers only parts and labor, and excludes coverage on software items as expressly set above. Except as expressly set forth above, PROMISE disclaims any warranties, expressed or implied, by statute or otherwise, regarding the product, including, without limitation, any warranties for fitness for any purpose, quality, merchantability, non-infringement, or otherwise.
- Page 335 RMA number on the label. The RMA number is essential for tracking your product and providing the proper service. Return ONLY the specific product covered by the warranty. Do not ship cables, manuals, CDs, etc. USA and PROMISE Technology, Inc. Canada: Customer Service Dept. Attn.: RMA # ______...
- Page 336 Promise Technology Vess R3600 / Vess J3600 Product Manual • Use the original shipping carton and packaging • Include a summary of the product’s problem(s) • Write an attention line on the box with the RMA number • Include a copy of your proof of purchase You are responsible for the cost of insurance and shipment of the product to PROMISE.
- Page 337 Promise Technology Contacting Technical Support...
Need help?
Do you have a question about the Vess R3600 Series and is the answer not in the manual?
Questions and answers