Advertisement
Available languages
Available languages
Quick Links
GUÍA RÁPIDA
INYECCIÓN CERO Y MONITORIZACIÓN 24H (OPCIONAL) INVERSORES SOLARES
COMPATIBLE CON LOS EQUIPOS
EQX2-4002-T, EQX2-5002-T,
EQX2-6002-T, EQX2-8002-T,
EQX2-10002-T, EQX2-12002-T
EQX2-15002-T, EQX2-17002-T
EQX2-20002-T, EQX2-25002-T
EQX2-33004-T, EQX2-40004-T
EQX2-50004-T, EQX2-60004-T
EQX2-100010-T
Advertisement

Related Manuals for Salicru EQUINOX EQX2-4002-T


Summary of Contents for Salicru EQUINOX EQX2-4002-T
- Page 1 GUÍA RÁPIDA INYECCIÓN CERO Y MONITORIZACIÓN 24H (OPCIONAL) INVERSORES SOLARES COMPATIBLE CON LOS EQUIPOS EQX2-4002-T, EQX2-5002-T, EQX2-6002-T, EQX2-8002-T, EQX2-10002-T, EQX2-12002-T EQX2-15002-T, EQX2-17002-T EQX2-20002-T, EQX2-25002-T EQX2-33004-T, EQX2-40004-T EQX2-50004-T, EQX2-60004-T EQX2-100010-T...
- Page 2 SALICRU...
- Page 3 Índice general 1. CONTENIDO. 2. CONSIDERACIONES. 3. INSTALACIÓN MECÁNICA. 4. INSTALACIÓN ELÉCTRICA. 4.1. DIAGRAMA DE CONEXIONADO GENERAL. 4.2. ALIMENTACIÓN DE LOS DISPOSITIVOS. 4.3. COMUNICACIÓN ENTRE LOS DISPOSITIVOS. 4.4. ESQUEMA ELÉCTRICO GENERAL DE LA INSTALACIÓN. 5. SECUENCIA DE ENCENDIDO. 6. OPERACIÓN DEL SISTEMA. 6.1.
- Page 4 0,3 m – o la longitud equivalente a la distancia existente analizador de red ESM3T 90D24 EQX2 / ESM3T 300D50 EQX2. entre los elementos de protección del cuadro eléctrico entre los cuales se intercalen los dispositivos. SALICRU...
- Page 5 2. CONSIDERACIONES. Esta guía rápida ha sido elaborada para proporcionar el soporte necesario durante todo el proceso de instalación de los equipos opcionales tanto a instaladores profesionales como a usuarios menos familiarizados en este sector, por lo que se indican todos los pasos que hay que seguir en todo momento detalladamente.
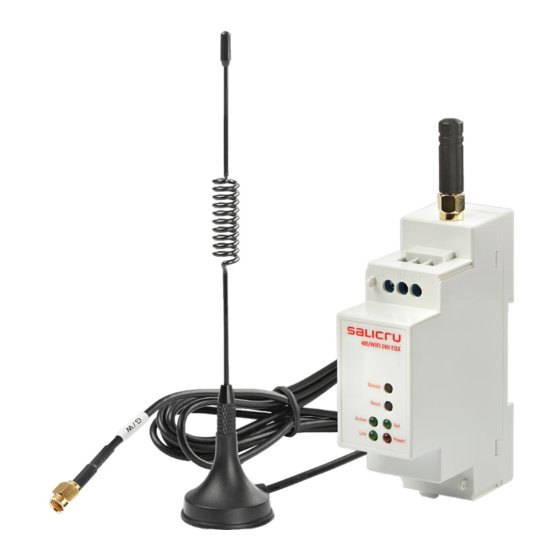
- Page 6 485/WIFI 24H EQX2-T: PIAs Módulo de comunicación 485/WIFI 24H EQX2-T Analizador de red ESM3T 90D24 EQX2 / ESM3T 300D50 EQX2 Asegurar que ambos dispositivos tienen las pestañas de sujeción del carril DIN insertadas correctamente en la parte inferior. SALICRU...
- Page 7 4. INSTALACIÓN ELÉCTRICA. 4.1. DIAGRAMA DE CONEXIONADO GENERAL. Este diagrama muestra la estructura y composición del cableado de la monitorización 24h. para el inversor trifásico de la serie EQX2-T, en relación con el proyecto real. La instalación y el cableado deben cumplir con los estándares locales. Módulo de comunicación Analizador de red 485/WIFI 24H EQX2-T...
- Page 8 Cable N 0,1 Nm. alimentación no suministrados: 0,30 m de cable de red (L1, L2, L3, N) de 1,5mm sección. PIAs Módulo de comunicación 485/WIFI 24H EQX2-T Analizador de red ESM3T 90D24 EQX2 / ESM3T 300D50 EQX2 SALICRU...
- Page 9 Conectar los transformadores de intensidad CT. La lectura de la tensión se realiza de forma directa, mientras que la intensidad se mide a través de los transformadores de corriente externos. Los transformadores de corriente ya están cableados. Se deben instalar en los cables de las fases L1, L2 y L3, justo después del IGA, haciendo coindicir la flecha con el sentido que sigue la corriente en la instalación cuando se vierte energía a la red: desde las cargas hacia la acometida.
- Page 10 Cable RS485+ Cable RS485- RS485+ 33 ÷ 50 kW RS485- RS485+ RS485- 2 pines 5 pines Cable RS485+ RS485- 100 kW RS485+ RS485- 6 pines Tabla 1. Conectores a instalar en las mangueras 2 y 3 vs potencia inversor. SALICRU...
- Page 11 Conectar el módulo de comunicación 485/WIFI 24H EQX2-T con el analizador de red ESM3T 90D24 EQX2 / ESM3T 300D50 EQX2 y el inversor solar EQUINOX2: Conectar las mangueras indicadas en el apartado anterior de la siguiente forma: El extremo de la Manguera 1 con conector RJ45 al puerto RS485-2...
- Page 12 33 ÷ 60 kW: Inversor EQX2-T 33÷60 kW COM 2 COM 3 hacia puerto hacia puerto comunicaciones comunicaciones RS485 medidor ESM3T 90D24 EQX2 / ESM3T 300D50 EQX2 Antes de conectar los cables, pasarlos por el prensa-estopas. 485/WIFI 24H EQX2-T SALICRU...
- Page 13 Potencia ˆ 100 kW: Inversor EQX2-T 100 kW RS485-1 RS485-2 6 5 4 3 2 1 6 5 4 3 2 1 hacia puerto comunicaciones hacia puerto medidor comunicaciones RS485 Antes de conectar los cables, pasarlos por el prensa-estopas. ESM3T 90D24 EQX2 / ESM3T 300D50 EQX2 485/WIFI 24H EQX2-T Conectar la antena a su base.
- Page 14 Conectores Resistencia 4 ÷ 25 kW 3 pines Resistencia 33 ÷ 50 kW Resistencia incluida como accesorio del equipo. 5 pines Inversor EQX2-T 100 kW Switch Posición 100 kW Medidor Pines Resistencia ESM3T 90D24 EQX2 / ESM3T 300D50 EQX2 SALICRU...
- Page 15 4.4. ESQUEMA ELÉCTRICO GENERAL DE LA INSTALACIÓN. Potencias ˆ 4 ÷ 25 kW: (*) Solamente para instalaciones con el opcional Módulo de comunicación 485/WiFi 24H EQX2-T. Las instalaciones con únicamente el analizador de red ESM3T 90D24 EQX2/ESM3T 300D50 EQX2, prescindir de las conexiones que se dirigen al Módulo de comunicación citado.
- Page 16 33 ÷ 50 kW: (*) Solamente para instalaciones con el opcional Módulo de comunicación 485/WiFi 24H EQX2-T. Las instalaciones con únicamente el analizador de red ESM3T 90D24 EQX2/ESM3T 300D50 EQX2, prescindir de las conexiones que se dirigen al Módulo de comunicación citado. SALICRU...
- Page 17 Potencia ˆ 100 kW: (*) Solamente para instalaciones con el opcional Módulo de comunicación 485/WiFi 24H EQX2-T. Las instalaciones con únicamente el analizador de red ESM3T 90D24 EQX2/ESM3T 300D50 EQX2, prescindir de las conexiones que se dirigen al Módulo de comunicación citado.
- Page 18 La puesta en marcha continua en el siguiente apartado. No desconectar ningún dispositivo de la instalación. Para más información, en el Anexo II se encuentra una tabla con todos los estados posibles de los LEDs del módulo de comunicación 485/ WIFI 24H EQX2-T con las respectivas descripciones para diagnosticar posibles errores. SALICRU...
- Page 19 6. OPERACIÓN DEL SISTEMA. Configurar el equipo según se indica a continuación dependiendo de las funciones requeridas: Monitorización de datos de generación y consumo con o sin inyección cero 12H (*) 24H (**) 6.1. SIN INYECCIÓN CERO. Para poder visualizar los datos de consumo proporcionados por el analizador de red ESM3T 90D24 EQX2/ESM3T 300D50 EQX2 en la APP, configurar el siguiente parámetro del inversor:...
- Page 20 Introducir el correo electrónico con el que se dio de alta la planta. En esa dirección de correo electrónico se enviará un mensaje con el remitente “postmaster@kumo.salicru.com” y asunto “EQUINOX2 – Reset password”. En el contenido del mensaje se encuentra un código “Token”...
- Page 21 8. CONFIGURACIÓN DE LA INSTALACIÓN (PLANTA) EN LA APLICACIÓN EQX-sun. Cuando se entran las credenciales y se accede a la cuenta, aparece el panel principal titulado como “Mis plantas”. En este panel irán apareciendo las plantas que se vayan creando. Para crear una planta, pulsar el botón “añadir”...
- Page 22 485/WIFI 24H EQX2-T, por lo que únicamente será necesario vincular este último. Añadir un dispositivo a la planta que se ha creado: pulsar el botón de “propiedades” [ ], a la derecha del título de la planta. SALICRU...
- Page 23 A continuación, seleccionar el dispositivo 485/WIFI 24H EQX2-T para iniciar el proceso de vinculación. En el menú desplegable, pulsar el botón “Dispositivos”. Aparecerá el panel de “Dispositivos”. En este panel irán apareciendo los dispositivos que se vayan asignando a la planta. Para añadir el dispositivo (módulo de comunicación 485/WIFI 24H EQX2-T a la planta, pulsar el botón “añadir”...
- Page 24 La primera vez que el módulo de comunicación 485/WIFI 24H EQX2-T tenga alimentación, los LEDs aparecerán de la siguiente manera: De lo contrario, será necesario ejecutar el paso número 3. Pulsar el botón “Siguiente” para seguir con el siguiente paso. SALICRU...
- Page 25 Comprobar estado LED “Active”. En un hipotético caso en el que los LEDs no estuviesen como se ha indicado en el apartado anterior, o que el dispositivo hubiese sido configurado anteriormente, será necesario resetear la configuración: Mantener presionado el botón “RELOAD” durante 5 segundos.
- Page 26 En la siguiente captura de pantalla se muestra un ejemplo de las redes que se detectan, siendo la cuarta de la lista la red que proporciona el router de la instalación: SALICRU...
- Page 27 SSID_red_vecino_1 SSID_red_tienda_1 SSID_red_vecino_2 SSID_router_instalacion SSID_red_vecino_3 SSID_red_tienda_2 Solo en el caso de que la red a configurar no aparezca en la lista anterior. El nombre de la red (SSID) aparece escrito en la etiqueta que, normalmente, se encuentra debajo del router. Después de seleccionar la red, pulsar el botón “Next”.
- Page 28 Pulsar el botón “Next”. l. La configuración ha terminado. Pulsar OK para validarla. El dispositivo se reiniciará automáticamente y se aplicará la configuración. m. Cerrar el navegador de internet. Configuración finalizada. Omitir el paso número 5 “Conexión del dispositivo”. SALICRU...
- Page 29 Conexión del dispositivo. No realizar este paso si se ha configurado una red de 5HGz. Ya ha quedado configurado en el paso anterior. Atención: para el proceso de conexión, el smartphone o tablet tiene que estar conectado a la misma red WiFi a la que se quiera conectar el dispositivo.
- Page 30 El período de actualización es Cuota autárquica: define de 1 minuto. independencia de la instalación de la red eléctrica, dividiendo la energía Ubicación de la planta. autoconsumida y la energía total demanda por el consumidor. Mayor cuota autárquica = mayor SALICRU...
- Page 31 10.2. PANTALLA INDIVIDUAL DE PLANTA. Cada planta tiene tres pestañas en la parte superior: “Tiempo real”, “Histórico” e “Info”. Información que proporciona la pestaña “Tiempo real”: Esta pestaña se divide, en 4 secciones: sinóptico, generación, consumo y ahorro diario por generación. El diagrama sinóptico ofrece una idea muy visual del estado actual de la planta: el movimiento de las líneas indican la dirección del flujo de la energía, y su color si procede de la red...
- Page 32 “propiedades” [ ], a la derecha del título de la planta y después, en el menú desplegable, pulsando el botón “Editar”. Cuando la compañía comercializadora realice cambios en sus tarifas eléctricas, será necesario editar el precio de los kWh, por ejemplo. SALICRU...
- Page 33 11. ANEXO I: INSTALACIÓN CON SISTEMA DE INYECCIÓN CERO EXTERNO. Todos los inversores serie EQX2-T son compatibles con el sistema de vertido cero del fabricante RENESYS. A continuación se detalla un esquema tipo para una instalación de 2 equipos de 100 kW en paralelo con inyección cero certificada. Comunicaciones Fig.
- Page 34 Asegurar que la dirección Modbus se ha introducido correctamente en el inversor. Véase el apartado 5, Comunicación con paso 2. Link el inversor solar EQUINOX22 Estableciendo comunicación con el inversor solar EQUINOX22. Comunicación con el inversor solar EQUINOX22 establecida. Tab. 2. Indicadores LED. SALICRU...
- Page 35 : ................................................................................................................................................................................................................................................................................................................................................................................................................................................................................................................................................................................................................................................................................................................................................................................................................................................................................................................................................................................................................................................................................................................................................................................................................... GUÍA RÁPIDA EQUINOX - INVERSORES FOTOVOLTAICOS -...
- Page 36 REF. EL251B00 REV. B CODE 401* Avda. de la Serra 100 08460 Palautordera BARCELONA Tel. +34 93 848 24 00 sst@salicru.com SALICRU.COM La red de servicio y soporte técnico (S.S.T.), la red comercial y la información sobre la garantía está disponible en nuestro sitio web: www.salicru.com...
- Page 37 QUICK GUIDE ZERO FEED-IN AND 24H MONITORING (OPTIONAL) SOLAR INVERTERS COMPATIBLE WITH EQX2-4002-T, EQX2-5002-T, EQX2-6002-T, EQX2-8002-T, EQX2-10002-T, EQX2-12002-T EQX2-15002-T, EQX2-17002-T EQX2-20002-T, EQX2-25002-T EQX2-33004-T, EQX2-40004-T EQX2-50004-T, EQX2-60004-T EQX2-100010-T...
- Page 38 SALICRU...
- Page 39 General index 1. CONTENTS. 2. CONSIDERATIONS. 3. MECHANICAL INSTALLATION. 4. ELECTRICAL INSTALLATION. 4.1. GENERAL CONNECTION DIAGRAM. 4.2. POWER SUPPLY TO THE DEVICES. 4.3. COMMUNICATION BETWEEN THE DEVICES. 4.4. INSTALLATION WIRING OVERVIEW DIAGRAM. 5. START UP SEQUENCE. 6. SYSTEM OPERATION. 6.1. WITHOUT ZERO FEED-IN.
- Page 40 Network cable (L1, L2, L3, N) with a 1.5 mm cross-section to supply the 0.3 m - or the length equivalent to the distance between the ESM3T 90D24 EQX2 / ESM3T 300D50 EQX2 network analyser. protection components on the switchboard between which the devices are inserted. SALICRU...
- Page 41 2. CONSIDERATIONS. This quick guide is intended to assist both professional installers and users less familiar with the sector when installing the optional devices. As such, the steps to be followed at each stage of the installation process are described in detail. However, if additional support is required after following the guidelines in this quick guide, our technical service can be contacted by any of the means listed on its back cover.
- Page 42 Starting from the direction of the power supply to the system, first fit the ESM3T 90D24 EQX2 / ESM3T 300D50 EQX2 network analyser and then the 485/WIFI 24H EQX2-T communication module: PIAs Communication module 485/WIFI 24H EQX2-T Network analyser ESM3T 90D24 EQX2 / ESM3T 300D50 EQX2 Ensure the lower DIN rail connector tabs have correctly clicked into place on both devices. SALICRU...
- Page 43 4. ELECTRICAL INSTALLATION. 4.1. GENERAL CONNECTION DIAGRAM. This diagram shows the structure and layout of the 24h monitoring wiring for the EQX2-T three-phase inverter series in a real project set-up. The installation and wiring must comply with local standards. Communication module Network analyser 485/WIFI 24H EQX2-T ESM3T 90D24 EQX2 /...
- Page 44 Cable L2 connector, Cable L3 maximum torque Power cables Cable N supplied: 0.1 Nm. 0.30 m of network cable (L1, L2, L3, N) with 1.5 mm cross-section. PIAs Communication module 485/WIFI 24H EQX2-T Network analyser ESM3T 90D24 EQX2 / ESM3T 300D50 EQX2 SALICRU...
- Page 45 Connect the current transformers. The voltage is read directly, while the intensity is measured by the external current transformers. The current transformers are hard-wired. They must be fitted to the L1, L2 and L3 phase cables, just after the IGA, with the arrow pointing in the direction in which the current flows through the installation when power is fed into the grid: from the loads to the supply.
- Page 46 4 ÷ 25 kW RS485- 3 pins Cable RS485+ Cable RS485- RS485+ 33 ÷ 50 kW RS485- RS485+ RS485- 2 pins 5 pins Cable RS485+ RS485- 100 kW RS485+ RS485- 6 pins Table 1. Connectors to be installed on cables 2 and 3 vs inverter power. SALICRU...
- Page 47 Connect the 485/WIFI 24H EQX2-T communication module to the ESM3T 90D24 EQX2 / ESM3T 300D50 EQX2 network analyser and the EQUINOX2 solar inverter: Connect the cables listed in the previous section as follows: Connect the end of Cable 1 with the RJ45 connector to the RS485-2 port on the ESM3T 90D24 EQX2 / ESM3T 300D50 EQX2 network ˆ...
- Page 48 33 ÷ 60 kW: Inverter EQX2-T 33÷60 kW COM 2 COM 3 to the meter to the RS485 communications communications port port ESM3T 90D24 EQX2 / ESM3T 300D50 EQX2 Before connecting the cables, pass them through the cable gland. 485/WIFI 24H EQX2-T SALICRU...
- Page 49 Power ˆ 100 kW: EQX2-T 100 kW Inverter RS485-1 RS485-2 6 5 4 3 2 1 6 5 4 3 2 1 to the meter communications to the RS485 port communications port Before connecting the cables, pass them through the cable gland. ESM3T 90D24 EQX2 / ESM3T 300D50 EQX2 485/WIFI 24H EQX2-T Connect the antenna to its base.
- Page 50 120 Ω. Connect according to the following table: Inverter power Connectors Resistor 4 ÷ 25 kW 3 pins Resistor 33 ÷ 50 kW Resistor included as an accessory to the device. 5 pins EQX2-T 100 kW Inverter Switch Position 100 kW Meter Pins Resistor ESM3T 90D24 EQX2 / ESM3T 300D50 EQX2 SALICRU...
- Page 51 4.4. INSTALLATION WIRING OVERVIEW DIAGRAM. Powers ˆ 4 ÷ 25 kW: Distribution network Supply / Meter CGMP 24H monitoring Inverter installation (General control and protection board) Example existing installation Loads AC protections (*) Only for installations with the optional 485/WIFI 24H EQX2-T communication module.
- Page 52 Example existing installation Loads AC protections (*) Only for installations with the optional 485/WIFI 24H EQX2-T communication module. Installations using only the ESM3T 90D24 EQX2/ESM3T 300D50 EQX2 network analyser do not need the connections to the above-mentioned communication module. SALICRU...
- Page 53 Power ˆ 100 kW: Distribution network Supply / Meter CGMP 24H monitoring Inverter installation (General control and protection board) Example existing installation Loads AC protections (*) Only for installations with the optional 485/WIFI 24H EQX2-T communication module. Installations using only the ESM3T 90D24 EQX2/ESM3T 300D50 EQX2 network analyser do not need the connections to the above-mentioned communication module.
- Page 54 Startup continues in the next section. Do not disconnect any device from the installation. For further information, Annex II includes a table listing all the possible LED statuses of the 485/WIFI 24H EQX2-T communication module with their respective descriptions for troubleshooting possible errors. SALICRU...
- Page 55 6. SYSTEM OPERATION. Depending on the required functions, configure the equipment as follows: Monitoring of generation and consumption data with or without zero feed-in 12H (*) 24H (**) 6.1. WITHOUT ZERO FEED-IN. To view the consumption data provided by the ESM3T 90D24 EQX2/ESM3T 300D50 EQX2 network analyser in the APP, configure the fol- lowing inverter parameter:...
- Page 56 If you have forgotten the password, tap “Recover password?” to open the following screen: Enter the e-mail address used to register the system. A message from "postmaster@kumo.salicru.com" will be sent to this e-mail address with the subject "EQUINOX2 - Reset password".
- Page 57 8. CONFIGURING AN INSTALLATION IN THE EQX-sun APPLICATION. When the credentials are entered and the account is accessed, the main panel entitled "My installations" appears. All the created installations will appear in this panel. To create an installation, tap the "add" button ( + ) to the right of "My installations".
- Page 58 The ESM3T EQX2 network analyser is already physically connected to the 485/WIFI 24H EQX2-T communication module, so only the latter needs to be paired. Add a device to the created installation: tap the "properties" button [ ] to the right of the installation name. SALICRU...
- Page 59 Next, select the 485/WIFI 24H EQX2-T device to start the pairing process. In the drop-down menu, tap the "Devices" button. The "Devices" panel will appear. This panel will display the devices that are assigned to the installation. To add the device (485/WIFI 24H EQX2-T communication module) to the installation, tap the "add"...
- Page 60 The first time the 485/WIFI 24H EQX2-T communication module is powered, its LEDs should appear as follows: Failing this, you will need to carry out step number 3. Tap the "Next" button to proceed to the next step. SALICRU...
- Page 61 Check the status of the "Active" LED. In the hypothetical scenario that the LEDs are not displaying as indicated in the previous section or that the device has been previously configured, you will need to reset the configuration: Press and hold the "RELOAD" button for 5 seconds. Use a pointed (not sharp) tool to press the button correctly.
- Page 62 The list is sorted by signal strength (RSSI), so it could be that the network you are looking for appears further down, and you'll need to scroll down to the bottom. The following example screenshot shows the networks that have been detected, with the fourth in the list being the network provided by the installation's router: SALICRU...
- Page 63 SSID_network_neighbour_1 94:83:C4:03:1:A4 SSID_network_shop_1 B3:F2:67:A5:21:A1 SSID_network_neighbour_2 C6:B4:C6:8:44:6 SSID_router_installation A6:BD:36:F8:C4:3 SSID_network_neighbour_3 D3:FC:21:F8:35:1 SSID_network_shop_2 43:87:05:C2:4:18 Only if the network to be configured does not appear in the previous list. The network's name (SSID) is written on the label, which is usually found under the router. After selecting the network, tap “Next”.
- Page 64 Tap the “Next” button. l. The setup has been completed. Tap OK to confirm. The device will restart automatically and the settings will take effect. m. Close the Internet browser. Setup complete. Omit step number 5 “Connecting the device”. SALICRU...
- Page 65 Connecting the device. Do not perform this step if you have configured a 5HGz network. It has already been configured in the previous step. Caution: for the connection process, the smartphone or tablet must be connected to the same Wi-Fi network as the one to which the device is to be connected.
- Page 66 Location of the installation. generated energy consumed by the total energy demanded by the consumer. Higher self-sufficiency quota = greater independence from the electricity grid. 10.2. INDIVIDUAL INSTALLATION HOME SALICRU...
- Page 67 SCREEN. Each installation has three tabs at the top: "Real-time", "Historical", and "Info". Information provided by the "Real-time" tab: This tab is divided into 4 sections: overview, generation, consumption and daily savings through generation. The overview diagram offers a highly visual snapshot of the current status of the installation: the movement of the lines indicates the direction of the energy flow, and their colour tells you if it's coming from the network (red), from the panels...
- Page 68 This tab shows the information entered when the installation was created. The fields can be modified by tapping on the "properties" button [ ] to the right of the installation name and then pressing the "Edit" button in the drop-down menu. For example, if the utility company changes its electricity tariffs, you will need to edit the kWh price. SALICRU...
- Page 69 11. ANNEX I: INSTALLATION WITH AN EXTERNAL ZERO FEED-IN SYSTEM. All the EQX2-T series inverters are compatible with the RENESYS zero feed-in system. The following diagram shows a typical installation with 2 x 100 kW units in parallel with certified zero feed-in. Communications Fig.
- Page 70 Ensure that the Modbus address has been entered correctly in the Communication inverter. See section 5, step 2. with the Link EQUINOX22 solar Establishing communication with the EQUINOX22 solar inverter. inverter Communication with the EQUINOX22 solar inverter established. Tab. 2. LED indicators. SALICRU...
- Page 71 : ................................................................................................................................................................................................................................................................................................................................................................................................................................................................................................................................................................................................................................................................................................................................................................................................................................................................................................................................................................................................................................................................................................................................................................................................................... QUICK GUIDE EQUINOX - PHOTOVOLTAIC INVERTERS -...
- Page 72 REF. EL251B01 REV. B CODE 401* Avda. de la Serra 100 08460 Palautordera BARCELONA Tel. +34 93 848 24 00 sst@salicru.com SALICRU.COM Information about our technical service and support network (T.S.S.), sales network and warranty is available on our website: www.salicru.com...
- Page 73 GUIDE RAPIDE INJECTION ZÉRO ET CONTRÔLE 24 H/24 (EN OPTION) ONDULEURS SOLAIRES COMPATIBLE AVEC LES ÉQUIPEMENTS EQX2-4002-T, EQX2-5002-T, EQX2-6002-T, EQX2-8002-T, EQX2-10002-T, EQX2-12002-T EQX2-15002-T, EQX2-17002-T EQX2-20002-T, EQX2-25002-T EQX2-33004-T, EQX2-40004-T EQX2-50004-T, EQX2-60004-T EQX2-100010-T...
- Page 74 SALICRU...
- Page 75 Indice général 1. CONTENU. 2. CONSIDÉRATIONS. 3. INSTALLATION MÉCANIQUE. 4. INSTALLATION ÉLECTRIQUE. 4.1. SCHÉMA DE CÂBLAGE GÉNÉRAL. 4.2. ALIMENTATION DES APPAREILS. 4.3. COMMUNICATION ENTRE LES APPAREILS. 4.4. SCHÉMA ÉLECTRIQUE GÉNÉRAL DE L'INSTALLATION. 5. SÉQUENCE DE MISE SOUS TENSION. 6. FONCTIONNEMENT DU SYSTÈME. 6.1.
- Page 76 Câble réseau (L1, L2, L3, N) d’une section de 1,5 mm pour alimenter 0,3 mm – ou longueur égale à la distance entre les éléments l’analyseur de réseaux ESM3T 90D24 EQX2 / ESM3T 300D50 EQX2. de protection du tableau électrique entre lesquels les appareils sont intercalés. SALICRU...
- Page 77 2. CONSIDÉRATIONS. Le présent guide rapide a été élaboré dans le but de fournir le support technique nécessaire tout au long du processus d’installation des équi- pements en option aux installateurs professionnels et aux utilisateurs moins expérimentés en la matière en décrivant en détail chacune des étapes à...
- Page 78 EQX2, puis le module de communication 485/WIFI 24H EQX2-T : PIAs Module de communication 485/WIFI 24H EQX2-T Analyseur de réseaux ESM3T 90D24 EQX2 / ESM3T 300D50 EQX2 Assurez-vous que les pattes de fixation inférieures du rail DIN des deux appareils sont bien emboîtées. SALICRU...
- Page 79 4. INSTALLATION ÉLECTRIQUE. 4.1. SCHÉMA DE CÂBLAGE GÉNÉRAL. Ce schéma montre la structure et la composition du câblage de contrôle 24 h/24 pour un onduleur triphasé de la série EQX2-T, par rapport au projet réel. L’installation et le câblage doivent satisfaire aux réglementations et normes locales. Module de communication Analyseur de réseaux 485/WIFI 24H EQX2-T...
- Page 80 Câble Câble N d’alimentation maxi 0,1 Nm. non fournis : Câble réseau de 0,30 m (L1, L2, L3, N), d’une section de 1,5 mm PIAs Module de communication 485/WIFI 24H EQX2-T Analyseur de réseaux ESM3T 90D24 EQX2 / ESM3T 300D50 EQX2 SALICRU...
- Page 81 Branchez les transformateurs d’intensité CT. La lecture de la tension s’effectue directement, tandis que l’intensité est mesurée par les transformateurs de courant externes. Les transformateurs de courant sont déjà câblés. Vous devez les installer sur les câbles des phases L1, L2 et L3, juste après l’IGA, en faisant coïncider la flèche avec le sens du courant de l’installation lorsque de l’énergie est injectée au réseau : des charges vers l’alimentation.
- Page 82 – 3 broches Broche Câble RS485+ Broche Câble RS485- RS485+ 33 ÷ 50 kW RS485- RS485+ RS485- 2 broches 5 broches Broche Câble RS485+ RS485- 100 kW RS485+ RS485- 6 broches Tableau 1. Connecteurs à installer sur les faisceaux 2 et 3 vs puissance onduleur. SALICRU...
- Page 83 Connectez le module de communication 485/WIFI 24H EQX2-T à l’analyseur de réseaux ESM3T 90D24 EQX2 / ESM3T 300D50 EQX2 et à l’onduleur solaire EQUINOX2 : Connectez les faisceaux décrits à la section précédente comme suit : L’extrémité du Faisceau 1 avec le connecteur RJ45 au port RS485-2 de l’analyseur de réseaux ESM3T 90D24 EQX2 / ESM3T 300D50 ˆ...
- Page 84 33 ÷ 60 kW : Onduleur EQX2-T 33÷60 kW COM 2 COM 3 vers le port de vers le port de communication communication RS485 du compteur ESM3T 90D24 EQX2 / ESM3T 300D50 EQX2 Avant de brancher les câbles, faites-les passer par le presse-étoupe. 485/WIFI 24H EQX2-T SALICRU...
- Page 85 Puissance ˆ 100 kW : Onduleur EQX2-T 100 kW RS485-1 RS485-2 6 5 4 3 2 1 6 5 4 3 2 1 vers le port de communication vers le port de du compteur communication RS485 Avant de brancher les câbles, faites-les passer par le presse-étoupe. ESM3T 90D24 EQX2 / ESM3T 300D50 EQX2 485/WIFI 24H EQX2-T Connectez l’antenne à...
- Page 86 Puissance onduleur Connecteurs Broche Résistance 4 ÷ 25 kW – 3 broches Broche Résistance 33 ÷ 50 kW Résistance incluse en tant qu’accessoire de l’équipement. 5 broches Onduleur EQX2-T 100 kW Switch Position 100 kW Compteur Broches Broche Résistance ESM3T 90D24 EQX2 / ESM3T 300D50 EQX2 SALICRU...
- Page 87 4.4. SCHÉMA ÉLECTRIQUE GÉNÉRAL DE L'INSTALLATION. Puissance ˆ 4 ÷ 25 kW : Réseau de distribution Prise / Compteur CGMP Installation onduleur Surveillance 24 H (Tableau général de commande et de protection) Exemple d’installation existante Charges Protections CA (*) Seulement pour les installations pourvues du module de communication 485/WIFI 24H EQX2-T en option.
- Page 88 (*) Seulement pour les installations pourvues du module de communication 485/WIFI 24H EQX2-T en option. Pour les installations pourvues uniquement de l’analyseur de réseaux ESM3T 90D24 EQX2/ESM3T 300D50 EQX2, omettre les connexions qui vont vers le module de communication mentionné. SALICRU...
- Page 89 Puissance ˆ 100 kW : Réseau de distribution Prise / Compteur CGMP Installation onduleur Surveillance 24 H (Tableau général de commande et de protection) Exemple d’installation existante Charges Protections CA (*) Seulement pour les installations pourvues du module de communication 485/WIFI 24H EQX2-T en option.
- Page 90 La procédure de mise en marche continue à la section suivante. Veuillez ne déconnecter aucun appareil de l’installation. Pour plus d’informations quant au diagnostic des éventuelles erreurs, reportez-vous au tableau de l’Annexe II qui indique tous les états possibles des LED du module de communication 485/WIFI 24H EQX2-T avec les descriptions correspondantes. SALICRU...
- Page 91 6. FONCTIONNEMENT DU SYSTÈME. Configurez l’équipement comme suit selon les fonctions souhaitées : Contrôle des données de production et de consommation, avec ou sans injection zéro. 12 h (*) 24 h (**) 6.1. SANS INJECTION ZÉRO. Pour pouvoir visualiser toutes les données de consommation fournies par l’analyseur de réseaux ESM3T 90D24 EQX2/ESM3T 300D50 EQX2 au moyen de l’APPLI, veuillez configurer le paramètre suivant de l’onduleur : Configuration générale →...
- Page 92 Un message sera envoyé à cette adresse de courrier électronique avec comme expéditeur « postmaster@ kumo.salicru.com » et objet « EQUINOX2 – Reset password ». Le message envoyé contient le code « Token » composé de 6 chiffres. Saisissez ce code dans l’écran de vérification du code, puis pressez « Envoyer ».
- Page 93 8. CONFIGURATION DE L’INSTALLATION (CHAMP) AU MOYEN DE L’APPLI EQX-sun. Après avoir saisi les renseignements d’identification et accédé au compte, l’écran principal « Mes champs » s’affiche. Tous les champs créés sont affichés dans cet écran. Pour créer un champ, pressez le signe « + » (Ajouter) situé à droite de « Mes champs ».
- Page 94 L’analyseur de réseaux ESM3T EQX2 est déjà connecté physiquement au module de communication 485/WIFI 24H EQX2-T, vous ne devez donc qu’associer ce dernier. Ajouter un appareil au champ créé : pressez « » (Propriétés) à droite du nom du champ. SALICRU...
- Page 95 Sélectionnez l’appareil 485/WIFI 24H EQX2-T pour commencer le processus de liaison. Dans le menu déroulant, pressez « Appareils ». L’écran « Appareils » s’affiche. Tous les appareils ajoutés au champ sont affichés dans cet écran. Pour ajouter l’appareil (module de communication 485/WIFI 24H EQX2-T) au champ, pressez le signe « + » (Ajouter) situé à droite de « Appareils ».
- Page 96 La première fois que le module de communication 485/WIFI 24H EQX2-T est mis sous tension, les LED apparaissent comme suit : Si ce n’est pas le cas, passez à l’étape 3. Pressez « Suivant » pour passer à l’étape suivante. SALICRU...
- Page 97 Vérifier l’état de la LED « Active ». Si les LED n’apparaissent pas comme il est indiqué à la section précédente ou si l’appareil a été préconfiguré, vous devez réinitialiser la configuration : Maintenez pressé « RELOAD » pendant 5 secondes. Utilisez un outil pointu (pas tranchant) pour bien appuyer sur le bouton.
- Page 98 à vous déplacer vers le bas de la liste pour le trouver. La capture d’écran suivante montre les réseaux détectés au sein d’une installation, le quatrième étant le réseau fourni par le routeur de l’installation : SALICRU...
- Page 99 SSID_réseau_voisin_1 94:83:C4:03:1:A4 SSID_réseau_magasin_1 B3:F2:67:A5:21:A1 SSID_réseau_voisin_2 C6:B4:C6:8:44:6 SSID_router_installation A6:BD:36:F8:C4:3 SSID_réseau_voisin_3 D3:FC:21:F8:35:1 SSID_réseau_magasin_2 43:87:05:C2:4:18 Seulement si le réseau à configurer n’apparaît pas dans la liste précédente. Le nom du réseau (SSID) est indiqué sur l’étiquette qui se trouve généralement le routeur. Une fois le réseau souhaité sélectionné, pressez « Next ». h.
- Page 100 Pressez « Next ». l. La configuration est maintenant terminée. Pressez « OK » pour confirmer. L’appareil se remettra automatiquement en marche et la configuration sera appliquée : m. Fermez votre navigateur web. La configuration est terminée. L’étape 5 « Connexion de l’appareil » n’est pas nécessaire. SALICRU...
- Page 101 Connexion de l’appareil. Omettez cette étape si vous avez configuré un réseau 5 GHz. Vous l’avez déjà configuré à l’étape précédente. Attention : pour la connexion, votre smartphone ou tablette doit être connecté au réseau WIFI auquel vous souhaitez connecter l’appareil. Vous ne pouvez procéder à la connexion en utilisant un réseau de connexion GPRS/3G/4G/5G. Saisissez le nom du réseau WIFI auquel vous souhaitez connecter votre appareil.
- Page 102 électrique Lieu du champ. et égal au rapport entre l’énergie autoconsommée et l’énergie totale demandée par le consommateur. Plus le taux d’autosuffisance est élevé = plus l’autonomie par rapport au réseau est importante. SALICRU...
- Page 103 10.2. ÉCRAN D’UN CHAMP. Chaque champ dispose de trois onglets en haut de l’écran : « Temps réel », « Historique » et « Infos ». Informations contenues dans l’onglet « Temps réel » : Cet onglet se divise en 4 sections : synoptique, production, consommation et économies quotidiennes de production. Le synoptique offre un aperçu très visuel de l’état actuel du champ : le mouvement des lignes indique le sens de circulation de l’énergie, et les couleurs indiquent si elle provient du réseau (rouge), des panneaux (vert) ou d’une combinaison des deux...
- Page 104 Dans cet onglet vous pouvez voir les informations utilisées pour créer le champ en question. Vous pouvez, si vous le souhaitez, modifier les champs en pressant « » (propriétés) à droite du titre de l’écran, puis en pressant « Éditer » dans le menu déroulant. Par exemple, si vous devez modifier le prix du kWh, car votre fournisseur d’électricité a modifié ses tarifs. SALICRU...
- Page 105 11. ANNEXE I : INSTALLATION AVEC SYSTÈME D’INJECTION ZÉRO EXTERNE. Tous les onduleurs de la série EQX2-T sont compatibles avec le système d’injection zéro de la marque RENESYS. Vous trouverez ci-après un schéma type d’une installation de 2 équipements de 100 kW en parallèle avec injection zéro certifiée. Communications Fig.
- Page 106 Assurez-vous que l’adresse Modbus établie sur l’onduleur est Communication correcte. Reportez-vous à l’étape 2 de la section 5. avec l’onduleur Link solaire Communication avec l’onduleur solaire EQUINOX2 en cours EQUINOX2. d’établissement. Communication avec l’onduleur solaire EQUINOX2 établie. Tab. 2. Indicateurs LED. SALICRU...
- Page 107 : ................................................................................................................................................................................................................................................................................................................................................................................................................................................................................................................................................................................................................................................................................................................................................................................................................................................................................................................................................................................................................................................................................................................................................................................................................... GUIDE RAPIDE EQUINOX - INVERSEURS PHOTOVOLTAÏQUES -...
- Page 108 REF. EL251B03 REV. B CODE 401* Avda. de la Serra 100 08460 Palautordera BARCELONA Tel. +34 93 848 24 00 sst@salicru.com SALICRU.COM Le réseau de service et de support tech- nique (S.S.T.), le réseau commercial et les informations de garantie sont disponibles sur notre site Internet : www.salicru.com...
Need help?
Do you have a question about the EQUINOX EQX2-4002-T and is the answer not in the manual?
Questions and answers