Quantum CHECK POINT MAESTRO ORCHESTRATOR 1U Getting Started Manual
Hide thumbs
Also See for CHECK POINT MAESTRO ORCHESTRATOR 1U:
- Install manual (1 page) ,
- Installation manual (12 pages) ,
- Quick start manual (36 pages)
Table of Contents
Advertisement
Quick Links
Advertisement
Table of Contents

Related Manuals for Quantum CHECK POINT MAESTRO ORCHESTRATOR 1U


Summary of Contents for Quantum CHECK POINT MAESTRO ORCHESTRATOR 1U
- Page 1 24 April 2023 QUANTUM MAESTRO Getting Started Guide...
-
Page 2: Table Of Contents
Part 4 - Monitoring the Security Group Members Hardware Components MHO-140 Front Panel MHO-140 Rear Panel Ports Mounting the Quantum Maestro Orchestrator MHO-140 and MHO-170 in a Rack Connecting Cables to Quantum Maestro Orchestrators Splitting the Ports with Breakout Cables Breakout Cables MHO-175 Splitting Options... - Page 3 Table of Contents Connecting to the Downlink Ports with DAC or Fiber Cables Quantum Maestro Orchestrator Ports and Gaia OS Interfaces Quantum Maestro Getting Started Guide | 3...
-
Page 4: Introduction
The ports allow a variety of blocking ratios that suit all application requirements. Quantum Maestro Orchestrator 1U systems enable the use of 1, 10, 40 and 100 GbE port speeds in a large scale without the need to change power infrastructure facilities. -
Page 5: Shipping Carton Contents
Notes: DB9 connectors are also known as DE9 connectors. Before installing your new Quantum Maestro Orchestrator, unpack it and check the parts list to make sure that all the parts are in the package. Check the parts for visible damage that may have occurred during shipping. -
Page 6: Features
MHO-175 - 42 MB MHO-170 - 16 MB MHO-140 - 16 MB Lowest power, under 5 W per 100 GbE port Enhanced scalability 1+1 hot-swappable power supplies 4 N+1 hot-swap fans Color coded PSUs and fans Quantum Maestro Getting Started Guide | 6... -
Page 7: Speed And Throughput
48 SFP+ 8 QSFP28 (use QSFP to SFP breakout cables) Quantum Maestro Orchestrator supports different interfaces and speed rates when you use QSFP to SFP adapters, or hybrid cables. For more information, see "Splitting the Ports with Breakout Cables" on page 41... -
Page 8: Getting Started With Mho-140 - Single Site With Two Orchestrators
Part 1 - Installing the Hardware and Connecting Cables 1. Mount the two Quantum Maestro Orchestrators MHO-140 in the racks on the site. "Mounting the Quantum Maestro Orchestrator MHO-140 and MHO-170 in a Rack" on page 29 2. Install the Security Appliances for your Security Groups. - Page 9 - Compatibility of transceivers for Check Point appliances. See: "Port Mapping for the Quantum Maestro Orchestrator MHO-140" on page 20 "Connecting Two Quantum Maestro Orchestrators for Redundancy" on page 48 Diagrams: Connecting cables between Downlink ports on each Orchestrator and 2 ports on the...
- Page 10 Quad Port Card to a Downlink port on the first Orchestrator (A). b. Connect a cable from Port 2 on the Quad Port Card to a Downlink port on the second Orchestrator (B). Quantum Maestro Getting Started Guide | 10...
- Page 11 A DAC cable connected to the dedicated Synchronization ports on the Orchestrators. Cables that connect odd ports on the Quad Port Card to the first Orchestrator. Cables that connect even ports on the Quad Port Card to the second Orchestrator. Quantum Maestro Getting Started Guide | 11...
-
Page 12: Part 2 - Initial Configuration On Each Orchestrator
- Compatibility of transceivers for Check Point appliances. See: "Port Mapping for the Quantum Maestro Orchestrator MHO-140" on page 20 "Connecting to the Uplink Ports with DAC or Fiber Cables" on page 61 "Connecting to the Uplink Ports with Breakout Cables" on page 63... - Page 13 5. Activate the Orchestrator #1 - enter "y" when it asks you. More information This Orchestrator activation enables the Downlink ports and the Uplink ports. For more information, see sk171784 - Activation of a Quantum Maestro Orchestrator. Quantum Maestro Getting Started Guide | 13...
- Page 14 There is no Gaia First Time Configuration Wizard on Orchestrators. You do not need to install a license on Orchestrators. 9. Repeat Steps 1 - 8 for the Orchestrator #2. You must configure a different IPv4 address than that of the Orchestrator #1. Quantum Maestro Getting Started Guide | 14...
-
Page 15: Part 3 - Configuration Of Security Groups
Getting Started with MHO-140 - Single Site with Two Orchestrators Part 3 - Configuration of Security Groups Follow the Getting Started Guide section in the Maestro Administration Guide for your version: R81.20 Quantum Maestro Administration Guide R81.10 Quantum Maestro Administration Guide R81 Quantum Maestro Administration Guide R80.30SP Quantum Maestro Administration Guide... -
Page 16: Part 2 - Configuring Gaia Settings On The New Security Group
Getting Started with MHO-140 - Single Site with Two Orchestrators More information See: "Port Mapping for the Quantum Maestro Orchestrator MHO-140" on page 20 "MHO-140 ports on the front panel and their default names in Gaia" on page 76 8. From the right pane... -
Page 17: Part 3 - Configuring A Security Gateway Object In Smartconsole
1. Connect to the command line on the Security Group with an SSH client to: <IPv4 Address of Security Group> 2. Run this command: asg monitor 3. Wait for each Security Group Members to show its state as "ACTIVE". This can take 6-7 minutes. Quantum Maestro Getting Started Guide | 17... -
Page 18: Hardware Components
Hardware Components Hardware Components This section provides a description of hardware components of Quantum Maestro Orchestrators. Port Mapping for the Quantum Maestro Orchestrator MHO-175 Legend Item Description Item Description Port 1 is the Management port for Management port (Mgmt1) for the... - Page 19 Description Item Description System Health LEDs Port LEDs that show the status of all ports (including the split ports) Port Mapping for the Quantum Maestro Orchestrator MHO-170 Legend Item Description Item Description Ports 1 - 2 are the Management port for...
- Page 20 Hardware Components Port Mapping for the Quantum Maestro Orchestrator MHO-140 Legend Item Description Item Description Ports 1 - 4 are the Management Port 48 is the Synchronization port port for Security Groups on the same Site (lead to the Check Point...
- Page 21 Ports 5 and higher only as uplink, downlink, site_sync, or ssm_sync (for intra-site sync redundancy) You cannot change the type of the dedicated Internal Synchronization port: MHO-175 - Port 32 MHO-170 - Port 32 MHO-140 - Port 48 5. Save the configuration: save config Quantum Maestro Getting Started Guide | 21...
- Page 22 Hardware Components 6. Examine the port configuration: show maestro port <Port ID> qsfp-mode show maestro port <Port ID> type Quantum Maestro Getting Started Guide | 22...
-
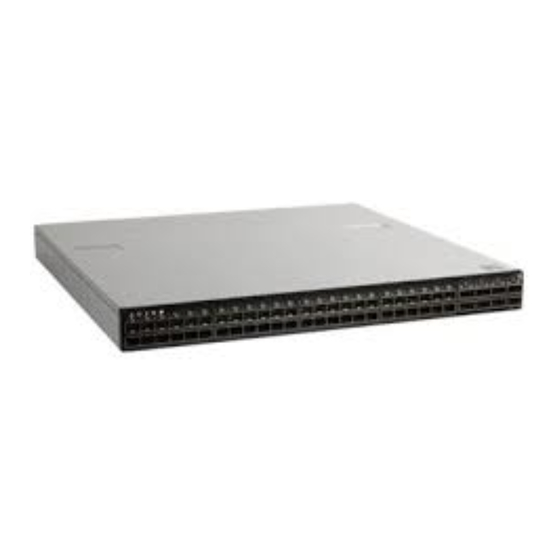
Page 23: Mho-140 Front Panel
LEDs that show the state of the split interfaces when you connect with Breakout cables to the 40 / 100 GbE Uplink ports (5). Synchronization port 48 (colored purple). You connect a DAC cable between ports 48 on two Quantum Maestro Orchestrators MHO-140 for redundancy on the same site. Notes: It is possible to connect DAC or Fiber cable (with transceivers) to each port (from 1 to 56). -
Page 24: Mho-140 Rear Panel
Replacing Power Supply Units Second Power Supply Unit. See RJ45 port labeled 0, through which you configure the Gaia Operating System on the Quantum Maestro Orchestrator (Gaia Portal and Gaia Clish). RJ45 port labeled 1, through which it is also possible to configure the Gaia Operating System on the Quantum Maestro Orchestrator (Gaia Portal and Gaia Clish). -
Page 25: Ports
IP address. To change the default IP address: 1. Connect to the Quantum Maestro Orchestrator over the RJ45 console port. 2. Log in to Gaia Clish. 3. Configure the applicable IPv4 settings on the interface Mgmt1. - Page 26 Ports Location of the MGMT Port Orchestrator Model On the front panel On the rear panel MHO-175 N / A MHO-170 N / A MHO-140 N / A Quantum Maestro Getting Started Guide | 26...
- Page 27 Do not use excessive force, when inserting or removing the USB storage device to and from the connector. Location of the USB Port Orchestrator Model On the front panel On the rear panel MHO-175 N / A MHO-170 N / A MHO-140 N / A Quantum Maestro Getting Started Guide | 27...
- Page 28 Ports Console Port The port with the label CONSOLE is an RJ45 console port that provides access to the Gaia OS on the Quantum Maestro Orchestrator. Location of the RS232 (Console) Port Orchestrator Model On the front panel On the rear panel...
-
Page 29: Mounting The Quantum Maestro Orchestrator Mho-140 And Mho-170 In A Rack
Mounting the Quantum Maestro Orchestrator MHO-140 and MHO- 170 in a Rack This section provides the information necessary to mount the Quantum Maestro Orchestrator MHO-140 or MHO-170 in a rack. Installation and Initialization Installation and initialization of the Quantum Maestro Orchestrator requires attention to the normal mechanical, power, and thermal precautions for rack-mounted equipment. - Page 30 Mounting the Quantum Maestro Orchestrator MHO-140 and MHO-170 in a Rack Airflow in MHO-170 and MHO-140 The fan units in the Quantum Maestro Orchestrator generate the airflow from the front panel (intake) to the rear panel: Important: All systems in the same rack should be planned with the same airflow direction.
- Page 31 Mounting the Quantum Maestro Orchestrator MHO-140 and MHO-170 in a Rack Parts in the static rail kit: Legend Item Description 2 x Rack mount rails 2 x Rack mount blades that slide into the rack mount rails (A) 8 x M6 standard cage nuts, and 8 x M6 standard Phillips pan-head screws...
- Page 32 Mounting the Quantum Maestro Orchestrator MHO-140 and MHO-170 in a Rack Notes: You use the Phillips flat head screws (D) to secure the rack mount rails (A) to the Quantum Maestro Orchestrator. You must use at least two of these screws on each side.
- Page 33 Mounting the Quantum Maestro Orchestrator MHO-140 and MHO-170 in a Rack Before you mount the Quantum Maestro Orchestrator to the rack, plan the way you wish to place it: Pay attention to the airflow within the rack cooling, connector, and cabling options.
- Page 34 Install eight cage nuts (C) in the desired 1U slots of the rack. Notes: The red frame on the image denotes the Quantum Maestro Orchestrator inside the rack. Install four cage nuts on each side of the Quantum Maestro Orchestrator.
- Page 35 Step Instructions Attach the left and right rack mount rails (A) to the left and right sides of the Quantum Maestro Orchestrator. Use the Phillips flat-head screws (D) to secure each rack mount rail (A) to each side of the Quantum Maestro Orchestrator.
- Page 36 Mounting the Quantum Maestro Orchestrator MHO-140 and MHO-170 in a Rack Step 3: Attaching the Rack Mount Rails to the Rack While your installation partner is supporting the Quantum Maestro Orchestrator, perform these steps: Step Instructions Mount the Quantum Maestro Orchestrator into the rack enclosure.
- Page 37 Do not tighten the screws yet. Example: Step 5: Tightening the Screws While your installation partner is supporting the Quantum Maestro Orchestrator, tighten the eight Phillips pan-head screws (C) you inserted in the previous steps. To tighten the screws, use a torque of 4.5±0.5 Nm.
- Page 38 Mounting the Quantum Maestro Orchestrator MHO-140 and MHO-170 in a Rack Step 6: Cable Installation It is possible to insert or remove all network cables while the Quantum Maestro Orchestrator is powered To insert a cable, press the connector into the port receptacle until the connector is firmly seated. The LED indicator, corresponding to each data port, light up when the physical connection is established.
- Page 39 Mounting the Quantum Maestro Orchestrator MHO-140 and MHO-170 in a Rack MHO-140 Cable Orientation Quantum Maestro Getting Started Guide | 39...
- Page 40 System Status LED to turn green (see System Status LED It can take up to five minutes to power on the Quantum Maestro Orchestrator. If after five minutes the System Status LED is lit in red color, unplug the power cords and...
-
Page 41: Connecting Cables To Quantum Maestro Orchestrators
Connecting Cables to Quantum Maestro Orchestrators Connecting Cables to Quantum Maestro Orchestrators This section describes how to connect cables to Quantum Maestro Orchestrators. It is possible to deploy Quantum Maestro Orchestrators in these ways: On a single site (see "Single Site" on page 48... - Page 42 Connecting Cables to Quantum Maestro Orchestrators Quantum Maestro Getting Started Guide | 42...
-
Page 43: Mho-175 Splitting Options
Connecting Cables to Quantum Maestro Orchestrators MHO-175 Splitting Options Explanations It is possible to split each of the QSFP28 ports 1 to 32 (colored green) into four SFP28 ports. In MHO-175, all port LEDs are located on the right side. - Page 44 Port 1/8/1 eth1-30 Port 1/8/2 eth1-31 Port 1/8/3 eth1-32 Port 1/8/4 Note - For more information about the ports and interface names in Gaia, see "Quantum Maestro Orchestrator Ports and Gaia OS Interfaces" on page 69 Quantum Maestro Getting Started Guide | 44...
- Page 45 Connecting Cables to Quantum Maestro Orchestrators To see the state of split ports, it is necessary to use the control button to select the LED indication mode. The control button (item 1) selects one of the five available LED indication modes in a cycle.
-
Page 46: Mho-170 Splitting Options
Port 1/15/1 eth1-30 Port 1/15/2 eth1-31 Port 1/15/3 eth1-32 Port 1/15/4 Note - For more information about the ports and interface names in Gaia, see "Quantum Maestro Orchestrator Ports and Gaia OS Interfaces" on page 69 Quantum Maestro Getting Started Guide | 46... -
Page 47: Mho-140 Splitting Options
Port 1/49/1 eth1-50 Port 1/49/2 eth1-51 Port 1/49/3 eth1-52 Port 1/49/4 Note - For more information about the ports and interface names in Gaia, see "Quantum Maestro Orchestrator Ports and Gaia OS Interfaces" on page 69 Quantum Maestro Getting Started Guide | 47... -
Page 48: Single Site
Single Site Single Site This section describes how to connect cables to Quantum Maestro Orchestrators on the same site. Connecting Two Quantum Maestro Orchestrators for Redundancy In This Section: This section describes the connection of two Quantum Maestro Orchestrators for Redundancy on the same site. - Page 49 Network 2 connected to ports on the Networking Device (3). Networking Device (router or switch) that connects your Network 1 and Network 2 to the Quantum Maestro Orchestrators and 16) with Bond interfaces (Link Aggregation). Quantum Maestro Getting Started Guide | 49...
- Page 50 A DAC cable, Fiber cable (with transceivers), or Breakout cable that connects a first slave of the first Bond (4) on the Networking Device (3) to the first Quantum Maestro Orchestrator (15). A DAC cable, Fiber cable (with transceivers), or Breakout cable that connects a second slave of the first Bond (4) on the Networking Device (3) to the second Quantum Maestro Orchestrator (16).
- Page 51 A DAC cable, Fiber cable (with transceivers), or Breakout cable that connects a Downlink port on the first Quantum Maestro Orchestrator (15) to the Security Appliance (30). A DAC cable, Fiber cable (with transceivers), or Breakout cable that connects a Downlink port on the second Quantum Maestro Orchestrator (16) to the Security Appliance (30).
- Page 52 Otherwise, the Quantum Maestro Orchestrators are not able to distribute the traffic equally between the Security Appliances in the same Security Group. It is possible to connect a maximum of two Downlink ports from each Quantum Maestro Orchestrator to each Security Appliance.
- Page 53 Dual Port Card to a Downlink port on the second Orchestrator (B). Connecting cables between Downlink ports on each Quantum Maestro Orchestrator and 1 out of 4 ports on the Quad Port Card on each Security Appliance Illustration...
- Page 54 Single Site Connecting cables between Downlink ports on each Quantum Maestro Orchestrator and 2 out of 4 ports on the Quad Port Card on each Security Appliance Illustration Instructions Important - In R80.20SP, this connection method is supported only with the R80.20SP Jumbo...
-
Page 55: Workflow
Networking 1. Configure a first Bond interface (4) on two slave ports. Device (3) This Bond interface connects Network 1 to the Quantum Maestro Orchestrators. Configure the applicable settings, so that the traffic from and to Network 1 passes only on this Bond interface. - Page 56 Security Appliance" on page 53 On both Connect a DAC cable (17) between the dedicated synchronization port (in Quantum our example, Port 32) on the first Quantum Maestro Orchestrator (15) and Maestro the dedicated synchronization port (in our example, Port 32) on the Orchestrators second Quantum Maestro Orchestrator (16).
- Page 57 Connecting to the Management Ports with DAC or Fiber Cables Connecting to the Management Ports with Breakout Cables For more information that applies to MHO-140, see: "Connecting to the Management Ports with DAC or Fiber Cables" on page 59 Quantum Maestro Getting Started Guide | 57...
- Page 58 Table: Workflow (continued) Step Device Instructions One of the two Perform these steps: Quantum 1. Connect to the Gaia Operating System on the Quantum Maestro Maestro Orchestrator. Orchestrators You connect through a dedicated port: or 16) In MHO-175 and MHO-170 - the...
-
Page 59: Connecting Cables To Mho-140
The different diagrams below show connections to different ports on the Quantum Maestro Orchestrators. It is possible to connect to the Quantum Maestro Orchestrator ports with a DAC cable, Fiber cable (with transceivers), or Breakout cable. The sections below provide a high-level description. - Page 60 Note - You assign this Management port to the applicable Security Groups. Shared Management feature allows to assign the same Management port (interface ethX-MgmtY) on a Quantum Maestro Orchestrator to different Security Groups. The assigned Management port has a different IP address and a different MAC address in each Security Group, to which this port is assigned.
-
Page 61: Connecting To The Uplink Ports With Dac Or Fiber Cables
Connecting Cables to MHO-140 Connecting to the Uplink Ports with DAC or Fiber Cables Example of a connection to default Uplink ports 5 to 26: Example of a connection to default Uplink ports 49 to 56: Quantum Maestro Getting Started Guide | 61... - Page 62 Description Production network 1 that communicates with production network 2 (5) through a Security Group configured on the Quantum Maestro Orchestrator. Layer 2 switch. A DAC or Fiber cable (with transceivers) connected to an Uplink port (in our example, Ports 7 and 49).
-
Page 63: Connecting To The Uplink Ports With Breakout Cables
Important - It is possible to connect breakout cables only to the top ports 49, 51, 53, and 55. When the specific top ports are in a split mode, the corresponding bottom ports are disabled. Example: Quantum Maestro Getting Started Guide | 63... - Page 64 This connection disables the bottom Uplink port (in our example, Port 56). First Quantum Maestro Orchestrator. A 10 GbE DAC cable connected to the dedicated Synchronization ports 48 on the Quantum Maestro Orchestrators. Important - This connection is only used to synchronize the configuration of Security Groups between the Quantum Maestro Orchestrators.
- Page 65 Connecting Cables to MHO-140 Notes: Cables colored green (solid lines) show connections to the first Quantum Maestro Orchestrator (10). Cables colored blue (dash lines) show connections to the second Quantum Maestro Orchestrator (12). It is possible to configure some of the Downlink ports as additional Uplink ports.
- Page 66 Connecting Cables to MHO-140 Connecting to the Downlink Ports with DAC or Fiber Cables Example of a connection to default Downlink ports 27 to 47: Quantum Maestro Getting Started Guide | 66...
- Page 67 A DAC cable or Fiber cable (with transceivers) connected to a Downlink port (in our example, Port 30) on the first Quantum Maestro Orchestrator (1) and to the applicable port on the Expansion Line Card on the Security Appliance 16.
- Page 68 Configuring Security Groups > Section Configuration Procedure > Section Configuring Security Groups in Gaia Clish > Section Configuring the Port Settings . The Quantum Maestro Orchestrators create Link Aggregation for the applicable Downlink ports automatically. See these sections: "Connecting cables between Downlink ports on each Quantum Maestro Orchestrator and 2 ports on the Dual Port Card on each Security Appliance"...
- Page 69 Quantum Maestro Orchestrator Ports and Gaia OS Interfaces The tables below show how the Gaia Operating System on the Quantum Maestro Orchestrator assigns the interface names to the ports on the Quantum Maestro Orchestrator's front panel (the default configuration). Important - The Gaia Operating System on the Quantum Maestro Orchestrator does not let you configure the network settings for the Uplink or Downlink ports.
- Page 70 Quantum Maestro Orchestrator Ports and Gaia OS Interfaces MHO-175 ports on the front panel and their default names in Gaia First MHO-175 Quantum Maestro Orchestrator Table: First MHO-175 ports and interfaces Port Port Number Interface Port Number Interface Port on the...
- Page 71 Quantum Maestro Orchestrator Ports and Gaia OS Interfaces Second MHO-175 Quantum Maestro Orchestrator Table: Second MHO-175 ports and interfaces Port Port Number Interface Port Number Interface Port on the Name Name on the Name Name Front in Gaia OS in Gaia OS...
- Page 72 Quantum Maestro Orchestrator Ports and Gaia OS Interfaces Notes When you connect two Quantum Maestro Orchestrators MHO-175 for redundancy, Gaia OS shows: eth1-XX and Port 1/X/X for the first Quantum Maestro Orchestrator. eth2-XX and Port 2/X/X for the second Quantum Maestro Orchestrator.
- Page 73 Quantum Maestro Orchestrator Ports and Gaia OS Interfaces MHO-170 ports on the front panel and their default names in Gaia First MHO-170 Quantum Maestro Orchestrator Table: First MHO-170 ports and interfaces Port Port Number Interface Port Number Interface Port on the...
- Page 74 Quantum Maestro Orchestrator Ports and Gaia OS Interfaces Second MHO-170 Quantum Maestro Orchestrator Table: Second MHO-170 ports and interfaces Port Port Number Interface Port Number Interface Port on the Name Name on the Name Name Front in Gaia OS in Gaia OS...
- Page 75 Quantum Maestro Orchestrator Ports and Gaia OS Interfaces Notes When you connect two Quantum Maestro Orchestrators MHO-170 for redundancy, Gaia OS shows: eth1-XX and Port 1/X/X for the first Quantum Maestro Orchestrator. eth2-XX and Port 2/X/X for the second Quantum Maestro Orchestrator.
- Page 76 Quantum Maestro Orchestrator Ports and Gaia OS Interfaces MHO-140 ports on the front panel and their default names in Gaia First MHO-140 Quantum Maestro Orchestrator Table: First MHO-140 ports and interfaces Port Port Number Interface Port Number Interface Port on the...
- Page 77 Quantum Maestro Orchestrator Ports and Gaia OS Interfaces Table: First MHO-140 ports and interfaces (continued) Port Port Number Interface Port Number Interface Port on the Name Name on the Name Name Front in Gaia OS in Gaia OS Front in Gaia OS...
- Page 78 Quantum Maestro Orchestrator Ports and Gaia OS Interfaces Second MHO-140 Quantum Maestro Orchestrator Table: Second MHO-140 ports and interfaces Port Port Number Interface Port Number Interface Port on the Name Name on the Name Name Front in Gaia OS in Gaia OS...
- Page 79 Port 2/28/1 eth2-63 Port 2/63/1 Notes When you connect two Quantum Maestro Orchestrators MHO-140 for redundancy, Gaia OS shows: eth1-XX and Port 1/X/X for the first Quantum Maestro Orchestrator. eth2-XX and Port 2/X/X for the second Quantum Maestro Orchestrator. The tables above show the default configuration before you connect breakout cables.
Need help?
Do you have a question about the CHECK POINT MAESTRO ORCHESTRATOR 1U and is the answer not in the manual?
Questions and answers