
Related Manuals for Seawind 1600


Summary of Contents for Seawind 1600
- Page 1 OWNERS 1600 MANUAL For the safe operation, handling and maintenance of the Seawind 1600 2021 Edition...
-
Page 2: Introduction
INTRODUCTION Dear Seawind Owner, You have just received delivery of your new Seawind 1600. We would like to thank you for showing confidence in our product by choosing to cruise with Seawind. We are sure you will enjoy your boat for many years to come. - Page 3 If a maintenance manual is provided, use it for the craft's maintenance. You will find a box filled with warranty cards and manuals for the equipment installed aboard your 1600. Be sure to review the warranty information provided and register for any extended warranty available.
-
Page 4: Table Of Contents
P a g e Contents INTRODUCTION ............................1 Contents ..............................3 SECTION 1 – QUICK START GUIDE ......................6 HOUSE POWER ........................6 ENGINES ..........................7 SECTION 2 – GENERAL DETAILS ........................ 8 DESIGN CATEGORY ......................... 8 STABILITY ..........................8 SPECIFICATION AND OPTIONS INSTALLED ................ - Page 5 P a g e MANOERVERS ........................33 SECTION 5 – ONBOARD SYSTEMS OPERTION ..................34 NAV STATION ........................34 NAVIGATION ........................34 SANITATION ......................... 37 GALLEY AND COOKING ......................38 GAS SYSTEMS ........................38 COCKPIT AND DECKS ......................39 AIRCONDITINOING ....................... 40 BILGE ............................
- Page 6 P a g e 6.17 LIFTING AND SETTING ON HARD ..................64 6.18 BEACHING ..........................66 6.19 WINTERISING ........................66 SECTION 7 – SAFETY ..........................68 GENERAL SAFETY ........................68 EXTREME WEATHER ......................68 LIGHTNING ........................... 68 FIRE ............................69 LIFERAFT ..........................
-
Page 7: Section 1 - Quick Start Guide
P a g e SECTION 1 – QUICK START GUIDE 1.1 HOUSE POWER 12V DC 1. Turn the HOUSE switch ON 2. Ensure the INSTRUMENTS and ACCESSORIES breakers are ON (these allow the navigation equipment to be operated) 3. Power on each of the navigation devices at the power button on the unit 240/110V AC •... -
Page 8: Engines
P a g e 4. Disconnect the shore power lead • To re connect to shore power repeat the above steps in reverse order. • To connect to the generator refer to section 5.8 in this owners manual. 1.2 ENGINES 1. -
Page 9: Section 2 - General Details
For intact stability the vessel fulfils the requirements of ISO standard ISO/FDIS 12217-2:2001 (E) design category A-option 2, as shown in the vessel stability booklet. 2.3 SPECIFICATION AND OPTIONS INSTALLED MODEL Seawind 1600 Max. Rec. No of people 16.1 meters. 52’8”... - Page 10 P a g e POWER AC: INVERTER /CHARGER MASTERVOLT 2500 OUTPUT AC 2150W OUTPUT CHARGE 100A Download Inverter Manual >> GENERATOR FISCHER PANDA 10000i OUTPUT AC Download Generator Manual >> POWER DC: LITHIUM HOUSE BATTERY 12 VOLT Li-On 2 x 5000w Download Lithium Battery Manual >>...
-
Page 11: General Layout
P a g e | 10 2.4 GENERAL LAYOUT... -
Page 12: General Arrangement (3 Cabin)
P a g e | 11 2.5 GENERAL ARRANGEMENT (3 CABIN) -
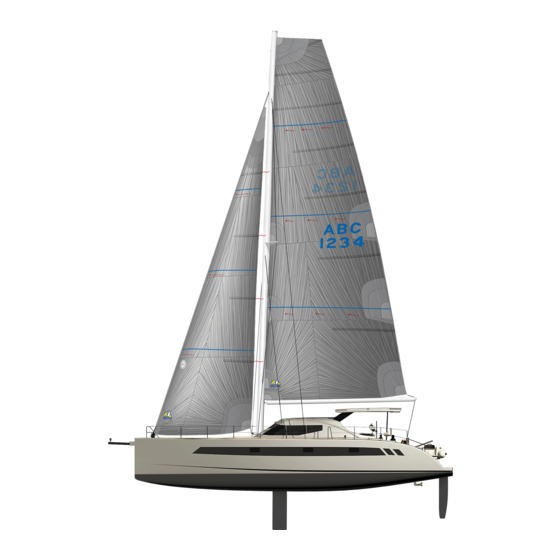
Page 13: Profile Layout
P a g e | 12 2.6 PROFILE LAYOUT... -
Page 14: Section 3 - Sailing And Control Of Your Vessel
3.2 LOADING Multi-hulls should be treated like aircraft when it comes to loading. The 1600 is designed as a light, responsive craft. Overloading can affect performance and handling, while excessive overloading can also affect safety margins and additional wear on equipment. Always be conscious of weight and take care not to carry unnecessary items. -
Page 15: Mooring
P a g e | 14 • Fuel – Valves closed • Gas – Valves closed • Thru hulls – Valves closed. • Gear – stowed and secure. • Sails and covers – Dry and protected • Exterior Hardware – Clean and lubricated. •... - Page 16 P a g e | 15...
- Page 17 P a g e | 16...
-
Page 18: Anchoring
• Raise your foils to protect them against changing tide levels. 3.6 ANCHORING Your 1600 is equipped with a windlass controllable either at the helm by an up/down switch or at the windlass itself. The primary Anchor is self launching and permanently rigged. An electric up foot control can be operated from the front deck and down with manual clutch. -
Page 19: Anchor Bridle
3.7 ANCHOR BRIDLE The 1600 has been designed to be moored using a bridle attachment. Each bow is fitted with a substantial mooring cleat engineered for the loads encountered when on a mooring. The inside... -
Page 20: Helm Stations - Instruments
P a g e | 19 To hook up to a mooring: • Prepare the bridle by fitting the eye splice of one mooring line to each bow cleat. • Slowly approach the mooring until it is directly under the forebeam •... -
Page 21: Rudders
P a g e | 20 TROUBLESHOOTING The B&G Navigation instrumentation is highly robust and sophisticated. B&G instruments are daisy chained together with digital plug connected cabling. With the first instance of malfunction check the digital cable connections. Some instruments can operate unattended e.g. - Page 22 P a g e | 21 a spotter on either the opposite helm or the pulpit seat. Always be aware behind you particularly in shipping channels. NOTE: When anchored or moored lock the steering by rotating the steering lock located at the center of each steering wheel.
-
Page 23: Daggerboards
Dagger boards partially or fully retracted when not needed decrease drag and increase boat speed. In high performance craft asymmetric dagger settings are sometimes practiced between windward and leeward hulls. Seawind recommends the dagger boards be symmetrically maneuvered on this cruising catamaran to spread the strain on the ships structure. -
Page 24: Engines
| 23 3.11 ENGINES Two 80hp diesel motors power the Seawind 1600. They are fitted with Yanmar SD60 saildrive legs. The installed upgraded 3 blade folding propellers deliver more thrust than the standard 2 blades. These combinations have proven to provide reliable, quiet propulsion. - Page 25 This information however aims to provide a novice 1600 user a base of understanding which can then be replaced by actual on water experience and learned knowledge. After using your 1600 for some time as you...
- Page 26 P a g e | 25 SYSTEM DRAWING...
-
Page 27: Gori Propellers
P a g e | 26 TROUBLESHOOTING Refer to the Yanmar manual for service and troubleshooting guide. Diesel engines have a reputation for being very reliable provided they are serviced regularly and best quality diesel engine oil, fuel filters and water impellors are used. There is an old adage for diesel engines that give them clean fuel, the best oil and good cooling water flow that they will go forever. -
Page 28: Winches
P a g e | 27 3.19 SWITCHING FROM OVERDRIVE TO NORMAL 3.20 When in “Overdrive”, and moving forward thru the water, you switch to “Neutral”, and due to the boat moving forward thru the water, the propeller will/should fold. Go back to “Forward”, and the propeller will open in “Normal”... -
Page 29: Section 4 - Sail Controls - Setting Sails
P a g e | 28 SECTION 4 – SAIL CONTROLS – SETTING SAILS A boat of this weight with sail areas of this size can generate significant forces. Because your boat is so stiff, stable and is set up for single handed operation you will not have as much feedback as a smaller vessel does when it becomes overpowered. - Page 30 The inner forestay must be attached in apparent windspeeds over 31kts. The inner forestay on your 1600 is made of a synthetic Dyneema line and is easy to roll and store. The mast has a 2:1 halyard pre fitted to enable easy fitting of the inner forestay. When not in use this can be shackled to a horn cleat at the base of the mast.
- Page 31 P a g e | 30 halyard whilst the other two ends are each fitted to a pad eye on the bows. The pad eye is located to the aft of the bow seats on each hull. Once the stay has been attached to all 3 points the halyard should be raised and tension applied using the winch.
-
Page 32: Sail Controls - Main
P a g e | 31 4.2 SAIL CONTROLS - MAIN A. Topping lift is operated from the central winch/clutches. B. The Outhaul is controlled at the mast. C. Main Halyard is operated from the central winch/clutches. D. Reefing is operated from the central winch/clutches. E. -
Page 33: Sail Controls - Jib
P a g e | 32 4.3 SAIL CONTROLS - JIB Your jib is self-tacking and pre rigged on a single line furler. A. Furling is controlled by the clutch block at the port toerail exit. B. Sheeting is controlled from the central winch/clutches C. -
Page 34: Manoervers
Some are even difficult to tack without motoring. Your 1600 catamaran is exceptional in this regard and can even tack on its own under the autopilot. When manually tacking or gybing you must maintain boat speed, by bearing slightly into the power zone before turning and gradually steering to lock. -
Page 35: Section 5 - Onboard Systems Opertion
Under nav station equipment 5.2 NAVIGATION Your Seawind 1600 has been complemented with a comprehensive navigation package from B&G. This manual aims to give you a basic understanding of the installation of your navigation however for operating instructions and troubleshooting advice please refer to the onboard B&G equipment manuals. - Page 36 P a g e | 35 B&G SYSTEM DRAWING...
- Page 37 P a g e | 36 7.5m...
-
Page 38: Sanitation
P a g e | 37 5.3 SANITATION The electric toilets are plumbed to fresh water, both with holding tanks to be used according to port regulations and consideration to other water users in surrounding anchorages. At the bottom of each tank there is a 3 way valve to switch between, sea, hold and deck pump out. There is also a seacock valve at each thru hull. -
Page 39: Galley And Cooking
The units can be set to fridge or freeze according to your requirements. An LPG stove has been fitted to the 1600 and an LPG or optional electric oven installed in the outboard bench space. The manufacturers manuals should be referred to for both appliances. -
Page 40: Cockpit And Decks
P a g e | 39 5.6 COCKPIT AND DECKS There is plenty of stowage areas so keep your decks clean and organized. The decks can be washed by the deck wash hose which pushes into the outlet socket located under the anchor locker hatch. -
Page 41: Airconditinoing
The three compressor units all run off one water pump mounted in the bilge of the port hull. Before starting the aircon units on your 1600 it is important to follow the correct start and pre start procedure. - Page 42 P a g e | 41 should remain completely dry. If you constantly see fluid determine what it is. ie sewage, fresh water, fuel, or sea water and refer to systems drawings to help troubleshoot. There are numerous other access points through the interior to reach your equipment. The primary and engine bay manual pickups can be switched via a ball valve located inside each engine bay.
-
Page 43: Electrical - Power Sources And Distribution
5.9 ELECTRICAL – POWER SOURCES AND DISTRIBUTION Batteries under your settee are the primary source of power with a master remote switch located in the same compartment and controlled from the nav station. They are sealed AGM type or optional Lithium and do not require checking. There are some higher load appliances for example air-conditioning that will not run on batteries and require the generator to be running or shore power connected. - Page 44 P a g e | 43 To activate the AC system after the generator has been started, make sure all AC circuit breakers are in the OFF position. Slide the breaker bar up from the generator breaker and over the shore power breaker. You can now turn on the generator breaker. NOTE: The generator has a circuit breaker located beside the generators inverter control unit within the inboard locker in the port fwd cabin.
-
Page 45: Electrical - 220V Ac
P a g e | 44 SOLAR POWER Solar panels on the bimini are wired to recharge the main house batteries. No action is necessary to operate. These panels are regulated via solar regulators located behind the saloon seating backrest. ALTERNATORS The main engines are equipped with 120A alternators. - Page 46 P a g e | 45 220V AC SYSTEM DRAWING...
- Page 47 MANUAL OVERRIDE – depress the HOUSE control knob and turn clockwise towards the “Man On” (GREEN) position or counter clockwise towards the “Man Off” (RED) position. NOTE: the HOUSE control switch is located on the main bulkhead and is accessible by removing the saloon settee backrest.
- Page 48 P a g e | 47 MONITORING The monitoring page on the C-Zone display can be accessed from the main menu by selecting “Favorites Page” The C-Zone system provides monitoring for: • Water tanks • Fuel tanks • House battery bank •...
- Page 49 C-ZONE WIRING DIAGRAM...
- Page 50 P a g e | 49 C-ZONE SYSTEM LAYOUT CZone Wireless Mass Combi 12v/35ah AGM START COI #1, #2, CZone 10 Screen Interface 12/2200- USB CAN BATT. CHARGER 100A/230V 80-911-0090-00 80-911-0119-00 80-911-0100-00 44010350 80-911-0044-00 SCM60 MPPT-MB 80-911-0095-00 COI #3, #4 B&G BRIDGE MLI battery 80-911-0057-00...
- Page 51 P a g e | 50 HIGH LOAD 12V SYSTEM LAYOUT...
-
Page 52: Entertainment System
HDMI input of the tv source. 5.12 FRESH WATER There are dual watertanks and pumps on your Seawind 1600. One pump is located forward of the starboard water tank. The other under the port saloon settee base. Two valves next to the port pump can be rotated so you can draw water from both tanks or isolate one of the tanks should it become contaminated. - Page 53 P a g e | 52...
-
Page 54: Hot Water System
P a g e | 53 WATERMAKER The watermaker and operation valves are located in the port engine bay and is plumbed directly to the port and stbd water tank. To operate refer to the manufacturer’s guidebook. Should you be at sea and the watermaker fails, there is a huge volume of rainwater catchment potential on your deck and Mainsail. -
Page 55: Section 6 - Care, Servicing And Maintenance
10 minutes. 6.3 BOTTOM HULLS Prior to its first launching, your Seawind 1600 was prepared for antifouling as follows: a. Gelcoat was sanded to remove all traces of mould release wax and to provide a good key for the next coating. -
Page 56: Exterior Hardware
P a g e | 55 therefore diminish its resistance to osmosis. 20 Litres of Altex No5 is be sufficient coverage for two coats. WARNING: If optional Shore Power, Lightning Protection or HF Radio is installed an external Earth Plate will be located underwater on the port hull. This Earth Plate must NOT be painted over. -
Page 57: Interior
Do not use a harsh sponge or cloth. FABRICS The fabrics in your Seawind 1600 vary from boat to boat. When cleaning these materials, general household fabric cleaners should be used. It is advisable to first try any new cleaner on a small patch of material that will not be noticed should the cleaner mark the fabric. -
Page 58: Sails
P a g e | 57 Water incursion: Identify source by lightly running water over suspect areas. Reseal problem area with silastic. Timber stains: Lightly sand back. Carefully bleach black stains out. Touch up very small areas with clear matt can spray. Larger areas use clear two-pack polyurethane 60% sheen Mould –... -
Page 59: Rigging
Apply some pressure and clutch off as a safety backup. The rig on your Seawind 1600 is designed to be efficient and can be easily handled by two persons. It features a self tacking, roller furled headsail and single line slab reef mainsail with lazy jacks and boom catcher. - Page 60 P a g e | 59 The spreader diamonds control the mast pre-bend and ensure that it cannot bend sideways. The mast is initially set up with approximately 150mm of pre-bend, that is, the mast has a gentle bend along its length so that at the midpoint it is approximately 150mm from an imaginary straight line between each end of the mast.
-
Page 61: Sheets & Halyards
P a g e | 60 Excessive Halyard or sheet wear. Check for clear run for all running rigging. Avoid slack lines and running over sharp edges. Remove sharp edges with very fine small half round file. Sheet or halyard slipping on winch. Ensure minimum four turns around winch, increase friction with more turns if necessary. -
Page 62: Gas
P a g e | 61 Boom Breaking Designation Dia (mm) Cut (m) Material point (kg) Preventer Vectran 7,512 Reef n°1 Vectran 7,512 Reef n°2 Vectran 7,512 Reef n°3 Vectran 7,512 Outhall Spectra 5,086 Deck Breaking Designation Dia (mm) Cut (m) Material point (kg) Jib furler... - Page 63 P a g e | 62 very slightly worn, their price is nothing compared to that of the risk of corrosion to the rest of the equipment. WARNING: Due to the technical nature of servicing and maintaining engines, our policy is to direct owners/ operators to the Manufacturer Handbook instructions.
- Page 64 P a g e | 63 VC10 YANMAR ENGINE CONTROL SYSTEM...
-
Page 65: Sanitation
P a g e | 64 6.14 SANITATION The boat is equipped with high quality and advanced toilets which are easy to use. Periodically you should turn each manual valve open and close a few times to kept the ball valve in good operating order. - Page 66 P a g e | 65 When the boat is set down on the hard as opposed to a soft beach it must be supported under the main and engine bay bulkheads.
-
Page 67: Beaching
6.18 BEACHING The centerline of your 1600 is solid glass with no core 300mm either side of the boats centerline. This solid reinforcement allows the boat to be beached, reducing the risk of through hull penetration. - Page 68 P a g e | 67 • Put the transducers and sensors inside, cover all of the openings, leave all of the inside doors open, and place a humidity extractor in each hull, grease all hinges and locks and thoroughly clean the ship. EXTERIOR Rinse the whole boat down, the deck, the hulls, the front beam, the bottom of the mast, the cockpit, etc..Grease all of the mechanical and moving parts with Vaseline (hinges, locks and so...
-
Page 69: Section 7 - Safety
Your Seawind dealer is happy to assist with appropriate methods for dealing with each scenario. As not every scenario is easily predicted one of the best ways to gather experience is to talk to your cruising peers about their experiences. -
Page 70: Fire
P a g e | 69 • Ensure your flares and EPIRB other signal devices are in commission against loss of communications. • Winches and sailing controls are mechanically operable. • The winch on the mast combined with a halyard can be rigged to give the anchor windlass redundancy. - Page 71 P a g e | 70...
-
Page 72: Liferaft
P a g e | 71 7.5 LIFERAFT Your boat can be equipped with an optional 8 person life-raft in canister or valaise. Please refer to the manual supplied by its manufacturer for its proper use. If installed in canister the life raft is secured inside the port aft section of the bridge-deck. To release from the cockpit: 1. -
Page 73: Survival, Evacuation And Distress
P a g e | 72 This boat may capsize and remain inverted if excessive sail is carried. It is designed not to sink if this occurs. The working sail plan should be reduced if the average wind exceeds Force 5 on the Beaufort scale. -
Page 74: Personal Responsibility
Seawind catamaran. Obviously it is impossible to completely eliminate every risk and the onus of care extends beyond Seawind or the owner/captain but to the personal attention of each crew member. -
Page 75: Section 8 - Conclusion
SECTION 8 – CONCLUSION 8.1 OWNERS CLUB If you are just taking possession of this Seawind 1600 the Seawind owners club is a great place to meet new friends, ask for advice and assistance as you learn the ropes and a great opportunity to share cruising stories and plan group activities. -
Page 76: Section 9 - Warranty Policy
SEAWIND warrants to the first-use Purchaser and any subsequent owner during the warranty period, that any part manufactured by SEAWIND will be free of defects in material and workmanship for a period of twelve (12) months from the date of delivery to the first use Purchaser under normal use and service. -
Page 77: Limitations Of Liability
SEAWIND to Purchaser whether for loss of use of the Vessel, loss of time, inconvenience, commercial loss, or direct, special or consequential damages or otherwise arising out of the use of the Vessel. -
Page 78: Pre-Approval Of Warranty Repairs
SEAWIND, at SEAWIND’s plant, or as an alternative, a repair facility approved by SEAWIND. Transportation costs to and from the place of repair shall be paid by the owner. Prior to any warranty repairs or replacements being undertaker, the Purchaser must obtain written approval from SEAWIND for repairs or replacements to be undertaken. - Page 79 | 78 Warranty Notification Form Email to: customerservice@seawindcats.com NOTE: before any warranty work is to be performed – Seawind Catamarans must first approve it. Date of Notification: …. / …. /. Name of Owner: …………………………Name of Agent ………………………….. Phone …………………..
-
Page 80: Section 10 - Maintenance Log
P a g e | 79 SECTION 10 – MAINTENANCE LOG DATE ITEM REMARKS... - Page 81 P a g e | 80 DATE ITEM REMARKS...
- Page 82 P a g e | 81 DATE ITEM REMARKS...
- Page 83 P a g e | 82 Notes:________________________________________________________________________ _____________________________________________________________________________ _____________________________________________________________________________ _____________________________________________________________________________ _____________________________________________________________________________ _____________________________________________________________________________ _____________________________________________________________________________ _____________________________________________________________________________ _____________________________________________________________________________ _____________________________________________________________________________ _____________________________________________________________________________ _____________________________________________________________________________ _____________________________________________________________________________ _____________________________________________________________________________ _____________________________________________________________________________ _____________________________________________________________________________ _____________________________________________________________________________ _____________________________________________________________________________ _____________________________________________________________________________ _____________________________________________________________________________ _____________________________________________________________________________ _____________________________________________________________________________ _____________________________________________________________________________ _____________________________________________________________________________ _____________________________________________________________________________ _____________________________________________________________________________ _____________________________________________________________________________ _____________________________________________________________________________ _____________________________________________________________________________ _____________________________________________________________________________ _____________________________________________________________________________ _____________________________________________________________________________ _____________________________________________________________________________ _____________________________________________________________________________ _____________________________________________________________________________ _____________________________________________________________________________ _____________________________________________________________________________...
Need help?
Do you have a question about the 1600 and is the answer not in the manual?
Questions and answers