Table of Contents
Advertisement
Quick Links
Advertisement
Table of Contents
Troubleshooting

Related Manuals for Seawind 1160 Deluxe


Summary of Contents for Seawind 1160 Deluxe
- Page 1 Owner’s Manual February 2016...
- Page 2 Seawind. We are sure you will enjoy your boat for many years to come. The Seawind family is made to last. For your boat to perform reliably, it is of utmost importance that a careful maintenance program is followed. This will benefit you in the form of safety, as well as protecting your investment and other waterway users.
- Page 3 Owners Handbook This manual has been compiled to help you to operate your craft with safety and pleasure. It contains details of the craft; the equipment supplied or fitted, its systems and information on their operation. Please read it carefully, and familiarize yourself with the craft before using it.
-
Page 4: Table Of Contents
Owners Handbook Table of Contents INTRODUCTION ....................II GENERAL INFORMATION ..................8 SAFETY EQUIPMENT .................... 12 Portable Fire Fighting Equipment ..............13 Fixed Fire Fighting Equipment ................13 EXTERIOR MAINTENANCE ..................15 Gelcoat ......................15 Stainless Steel ....................15 Solar Panels ....................15 Windows ...................... - Page 5 Owners Handbook LP Gas Piping Diagram ..................31 Troubleshooting ..................... 32 ANTIFOULING BOTTOM PAINT ................32 Maintenance ....................33 Troubleshooting ..................... 33 DECK HARDWARE ....................33 Maintenance ....................34 Steering ....................... 34 Winches ....................... 34 Troubleshooting ..................... 35 FUEL TANKS ...................... 36 Fuel Piping Diagram ..................
- Page 6 Owners Handbook Generator ..................... 43 Charging Layout ..................... 44 Shore Power ....................44 Electrical Diagram ..................45 Calibration of BEP D.C Electrical Panel ............... 46 Troubleshooting ..................... 46 REFRIGERATION ....................48 Fridge Operation ................... 48 Freezer Operation ..................48 Cleaning Outside .................... 49 Cleaning Inside ....................
- Page 7 Owners Handbook WARRANTY POLICY ..................... 59 Warranty Notification Form ................61 S e a w i n d C a t a m a r a n s...
-
Page 8: General Information
Builders Plate The hull identification number (HIN) is displayed on the Builders Plate onboard the vessel. For Seawind an example HIN is VN-CSR0403FJ213 The Builders Plate is located on the Port helm. The HIN Number is also printed on the Stbd transom. - Page 9 Owners Handbook RCD Design Category This vessel carries the CE marking (shown here) to indicate that it complies with the EU Recreational Craft Directive. It has been assigned the Design Category explained below: Category A, Ocean This boat is given a CE design category A. This craft is designed to operate in winds that may exceed wind force 8 (Beaufort Scale) and in significant wave heights of 4m and above, and is largely self-sufficient.
- Page 10 Owners Handbook Stability For intact stability the vessel fulfils the requirements of ISO standard ISO/FDIS 12217-2:2001 (E) design category A-option 2. S e a w i n d C a t a m a r a n s...
- Page 11 Owners Handbook General Layout S e a w i n d C a t a m a r a n s...
- Page 12 Owners Handbook Specifications Type Sailing Catamaran Duty Pleasure Craft Vessel Crew Guest Accommodation (max) A - Ocean RCD Design Category Maximum Load 1400 Kg Maximum Persons WARNING: Do not exceed the maximum recommended number of persons. Regardless of the number of persons on board, the total weight of persons and equipment must never exceed the maximum recommended load.
-
Page 13: Safety Equipment
Owners Handbook SAFETY EQUIPMENT Life Jackets - Owner Supplied - Coastal Lifejackets Portable Fire Fighting Equipment Portable fire extinguishers to be located in the following locations: Accommodation (STBD) – Aft Cabin Accommodation (STBD) - FWD cabin Midship (PORT) - Companionway WARNING: Do not store large items near the extinguishers so as to obstruct the quick removal and use. - Page 14 Owners Handbook Fire Fighting Equipment and Escape Route – 3 Cabin S e a w i n d C a t a m a r a n s...
-
Page 15: Exterior Maintenance
Owners Handbook EXTERIOR MAINTENANCE Gelcoat Your Seawind 1160 gelcoat is a polyester known as “Isothalic NPG Gelcoat”. It has been chosen for its very high performing properties of water resistance, UV resistance and colour fastness. Maintenance: Like all finishes, your Seawinds’s gelcoat will suffer over time from the harsh properties of the sun and its UV rays. -
Page 16: Windows
Owners Handbook Windows The windows on the Seawind 1160 are made from 10mm and 6 mm toughened tinted glass (10mm on the front windows and 6mm on the side windows). To clean windows use a good quality glass cleaner. Opening Hatches All opening deck hatches have been tested to the relevant ISO standard. -
Page 17: Cockpit Weather Board Details
INTERIOR MAINTENANCE The interior of your Seawind 1160 is a blend of timber with modern lightweight materials and fabrics. General household cleaners and detergents can be used throughout. -
Page 18: Troubleshooting
MAST, BOOM AND RIGGING The rig on your Seawind 1160 is designed to be efficient and can be easily handled by two persons. It features a self tacking, roller furled headsail and single line slab reef mainsail with lazy jacks and boom catcher. -
Page 19: Rig Tension
Owners Handbook the third by snatch blocks. Each reef takes in around 20% of the sail area. The third reefing point meets AYF Cat1 ½ luff storm sail requirements. The standing rigging consists of forestay and side stays of 10mm 316-grade 1x19 dieform wire. -
Page 20: Troubleshooting
Owners Handbook Now go sailing. The correct rig tension can be best checked at sea. In a reasonable sail to windward (say, in 15 knots or more), the lee stay will normally go slack but not flop around. This is acceptable. If it does “flop” around take up the slack with a few turns (count the number of turns). -
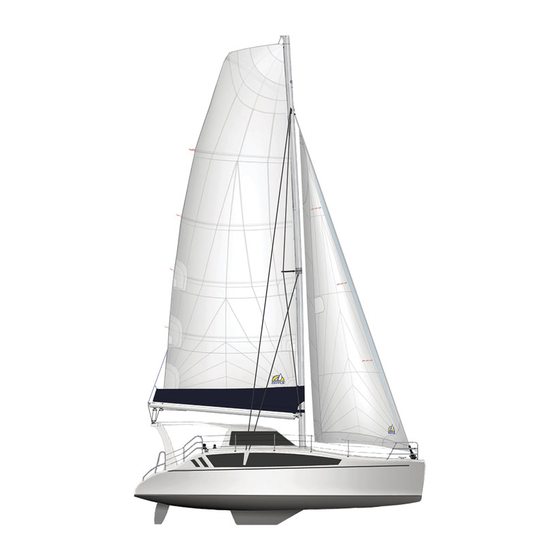
Page 21: Sail Plan
Owners Handbook Sail Plan Main sail area 57 m2 Jib area 21.8 m2 SEAWI ND1160 1 1 6 0 Ge n e r a l Ar r a n g e m e n t s - Sa i l Pl a n S e a w i n d C a t a m a r a n s... -
Page 22: Plumbing
Fresh Water System The diagram included with this section will allow you to identify the main areas and components of the Seawind 1160 fresh water system. The 13L/M 40psi freshwater pump is located under the forward starboard bench settee forward starboard in the saloon. - Page 23 Owners Handbook out via a shower sump pump located under the floor in each head. This pump operates when the pull switch is out. Regular checks should be carried out to ensure that there are no blockages from hair etc. Hot water is provided to the galley, toilets and (optional) transom shower from a 40L/8.8G storage tank heated by exchange from the port engine or from optional shore power when connected.
-
Page 24: Fresh Water Piping Diagram - 3 Cabin
Owners Handbook Fresh Water Piping Diagram – 3 Cabin S e a w i n d C a t a m a r a n s... -
Page 25: Heads
Owners Handbook Heads The toilets installed are of a high marine standard and should be trouble free if used according to manufacturers’ instructions. WARNING: To avoid toilet blockage objects that do not break down immediately must not be put in the toilet. The toilet is flushed using salt-water supplied by a 3/4”... -
Page 26: Bilge Pumps
Owners Handbook - It is good seamanship to keep wooden bungs of the right size (shaped like cones) at hand so that they can be used to plug the inlet or outlet in the event of a valve failure. - Over time the waste discharge hose will build up growth and become blocked. It is good practice to set a maintenance plan of cleaning this hose every 6-12 months. -
Page 27: Waste Piping Diagram
Owners Handbook Bilge Piping Diagram Waste Piping Diagram S e a w i n d C a t a m a r a n s... -
Page 28: Troubleshooting
Owners Handbook Troubleshooting Pressure Plumbing. Pressure plumbing leaking will be evident by the pressure pump continually running intermittently. The fresh water pump is located under the Saloon stb fwd settee, the optional salt water pump in the aft stb engine bay. -
Page 29: Lp Gas
Automatic position at all times. LP GAS The LP (Liquid Propane) Gas system in your Seawind 1160 has been installed by a licensed Gas fitter and a compliance certificate issued. A metal compliance plate is riveted onto the lid of the gas bottle locker as a permanent certificate. - Page 30 Owners Handbook Your SW 1160 is fitted with a remote gas solenoid facility that will shut the gas off when not in use from the Galley. A shut-off valve is also located next to the LPG bottle. Before the Galley Stove or BBQ may be operated the LPG Gas Circuit Breaker Switch and LPG Gas Solenoid Switch must be on.
-
Page 31: Lp Gas Piping Diagram
Owners Handbook LP Gas Piping Diagram S e a w i n d C a t a m a r a n s... -
Page 32: Troubleshooting
ANTIFOULING BOTTOM PAINT Prior to its first launching, your Seawind 1160 was prepared for antifouling as follows: Gelcoat was sanded to remove all traces of mould release wax and to provide a good key for the next coating. -
Page 33: Maintenance
Troubleshooting Seawind use Altex No5 because it is rated the best value antifouling available. Antifouling effectiveness depends on many factors including prevailing tides, sun light and abrasion. Two different colour coats are applied initially so the rate of use in your area can be determined over the first year. -
Page 34: Maintenance
Grease available in spray can form. Winches The primary winches on the Seawind 1160 are two Lewmar 45ST and two Lewmar 40ST self tailing winches. All sheets and halyards are brought back to the cockpit and held with dedicated clutch or jammers and the winches are used for multi purposes. -
Page 35: Troubleshooting
Owners Handbook Troubleshooting All deck hardware should be regularly washed down with fresh water to minimise seizing, rust and salt build up. Deck equipment that is stiff or has not been used for some time is best lubricated with a silicon based lubricant to provide a protective coating and avoid jamming. -
Page 36: Fuel Tanks
Owners Handbook FUEL TANKS There are separate fuel tanks in each hull, with a total capacity of 360 Litres (95 Gals). The tanks are constructed from HDPE thermoplastic and pressure tested prior to installation to meet CE requirements. The fuel tanks are located under the cabin sole and are accessed through the lift out floor hatches in the galley on the starboard side and at the fwd end of the centre bathroom on the port side. -
Page 37: Motors
A diesel fuel additive to dissipate algae and water should be used all the time. MOTORS Two 29 hp diesel motors power the Seawind 1160. They are usually Yanmar 3YM30C’s with Saildrive legs. Two blade fixed propellers are standard. Optional 3 blade folding propellers deliver more thrust. These combinations have proven to provide reliable, quiet propulsion. -
Page 38: Service Spare Part Numbers
Owners Handbook and conditions. A suitably qualified and experienced diesel mechanic should undertake any work performed in the engine bays. There are many hazards and potential dangers if work or adjustments are made without appropriate understanding of the implications. For this reason, only have qualified trades people and technicians perform any work in the engine rooms. -
Page 39: Recommended Spare Part From Yanmar
Owners Handbook Recommended Spare Part from Yanmar Part Number Quantity 8mm Fuel/Oil Copper Washers 22190-080002 12mm Copper Washers 22190-020002 Water Pump Impellor 128990-4220 Water Pump Cover O-Ring X02173476 Water Pump Cover Screws 128990-42520 Water Pump Belt 104511-78780 Alternator Belt 119831-42290 Troubleshooting Refer to the Yanmar manual for service and troubleshooting guide. -
Page 40: How To Operate The 3 Blade Gori Folding Propeller
Owners Handbook How to operate the 3 blade Gori folding propeller. The 3 blade Gori propeller, has 2 pitches. “Normal” and “Overdrive”. “Normal” mode is used when motoring in rough waters or against the current, where you need the full horse power, and full rpm. “Overdrive” mode is used when motoring in calm waters, or when motor sailing (lower rpm.) DO NOT go full rpm. -
Page 41: Airconditioning
ELECTRICAL The Seawind 1160 has both a 12V DC and optional 110/240V AC electrical systems. The 12V DC system consists of 400A/hr House Battery Bank located under the saloon settee port side and 700 CCA Motor Starting Battery also located under the saloon settee. -
Page 42: Switch Panels
Owners Handbook Generally while at a marina the optional shore power should be set to charge the house batteries continually. While living on the boat it will generally be necessary to run one motor for at least one hour every day to recharge the house batteries. -
Page 43: Emergency Starting
Owners Handbook running to efficiently use the alternator capacity. Optional two 120W Solar Panels are connected directly through their own circuit breaker to the House Battery Bank through an independent solar panel voltage regulator. The House Battery Switch does not need to be on for the Solar Panels to be recharging. -
Page 44: Charging Layout
Charging Layout Shore Power Your Seawind 1160 can be fitted with an optional 240V 15A or 110V 30A AC Shore Power with inlet located the port helm position. Double General Purpose Outlets are located in the navigation, galley and optional other areas for small appliance operation. -
Page 45: Electrical Diagram
Owners Handbook Electrical Diagram S e a w i n d C a t a m a r a n s... -
Page 46: Calibration Of Bep D.c Electrical Panel
Owners Handbook Calibration of BEP D.C Electrical Panel There are only 4 settings to change. After entering the setup page of the unit by holding down the top and bottom buttons the ,V and C, scroll through with the 'C' button to the following prompts and change to the new settings as below: 1. - Page 47 Owners Handbook cooling. Stop the engine and follow the engine manufacturers recommendation for checking the fan belt tension and reset or replace if necessary. Spare fan belts should be carried at all times. Electrical Switch Panels. All switched circuit breakers required for normal operation such as lights and refrigeration are located on DC Switch Panel in the Navigation Area.
-
Page 48: Refrigeration
Connection is mostly soldered with some plug connectors. Electrical problems mainly occur at point of connection. REFRIGERATION The Seawind 1160 is fitted with a Vitrifrigo 130 litre front opening fridge and a two compartment ICEER 60L electric ICEER freezer Fridge Operation To turn the fridge on, use the circuit breaker located in the port passageway electrical panel. -
Page 49: Cleaning Outside
Solar Panels may keep either refrigerator or freezer on continually while unattended indefinitely but not both. SLIPPING The diagrams below should be used as a reference when slipping the Seawind 1160. The weight of the boat should be supported on its keels. In addition props must be positioned near the bow and stern to ensure the boat does not rock fore and aft. -
Page 50: Slipping Diagram
ANCHORING Your Seawind 1160 carries a 45lb Delta anchor as standard with 55m of 8mm short link galvanized chain. An optional second 35Lb anchor with 10m of chain and 50m of rope may also be included. - Page 51 Owners Handbook Troubleshooting The 100A Electrical Winch Circuit Breaker is located on the aft side of the Electrical Switch Box in the port forward saloon area. It is accessible under the settee cushion next to the coffee table. If both sheet and anchor electrical winches are installed they share the same circuit breaker.
-
Page 52: Life Raft, Mooring & Towing Position Diagram
Owners Handbook Life Raft, Mooring & Towing Position Diagram: S e a w i n d C a t a m a r a n s... -
Page 53: Instrumentation
Owners Handbook INSTRUMENTATION Log/Speed Indicators The Log/Speed instrument uses a mechanical impellor usually installed through the starboard forward hull. This transducer is prone to blockage with weed and barnacles in as short a time as one week. The Log/Speed transducer can be removed, cleaned and replaced with a dummy plug provided to reduce exposure when not in use. -
Page 54: Notes On Sailing
Owners Handbook NOTES ON SAILING S e a w i n d C a t a m a r a n s... -
Page 55: Trifold Door Operation
Owners Handbook Your Seawind 1160 is set-up to be easily sailed by a small crew. You should have many years of trouble free sailing. There are, however, a few points to consider that are unique to catamaran sailing and are outlined below. -
Page 56: Reaching And Running
WARNING: The Mainsail must be kept off the Side Stays to prevent premature wear of the sail. The Seawind 1160 should not be run directly down wind as it increases risk of damage from an uncontrolled gybe. Better downwind performance can be achieved by tacking and using the optional Screecher or Multi Purpose Spinnaker. -
Page 57: Troubleshooting
Owners Handbook falling off to around 60 degrees, moving forward under sail to be turned up under rudder to around 20 degrees. The net effect is to zigzag down wind at around one knot. It is also prudent to triangulate the main boom with the topping lift, main sheet and preventer to the aft mooring cleat. -
Page 58: Conclusion
Owners Handbook CONCLUSION At Seawind Catamarans, we are always trying to improve our boats and as such welcome any input from our customers. Should you have any thoughts regarding improvements to the boat please contact us on the details below. - Page 59 Owners Handbook MANUFACTURER’S WARRANTY PROVIDED BY SEAWIND GROUP HOLDINGS PTY LTD 1. LIMITED ONE YEAR WARRANTY THE BUILDERS warrants to the first-use Purchaser and any subsequent owner during the warranty period, that any part manufactured by THE BUILDERS will be free of defects in material and workmanship for a period of twelve (12) months from the date of delivery to the first use Purchaser under normal use and service.
- Page 60 Limited One Year Warranty above. 7) Purchaser shall be responsible for returning the CATAMARAN, or any defective part, to a SEAWIND approved yard, for any warranty repairs, with all transportation charges paid by Purchaser. Purchaser agrees to promptly notify THE DEALER of any condition or part which Purchaser believes to be defective within thirty (30) days of discovering the defect.
- Page 61 Owners Handbook Warranty Notification Form Email to: info@seawindcats.com NOTE: before any warranty work is to be performed – Seawind Catamarans must first approve it. Date of Notification: …. / …. /. Name of Owner: …………………………Name of Agent ………………………….. Phone …………………..
- Page 62 Owners Handbook MAINTENANCE LOG Date Engine Hrs Engine Hrs Details Price S e a w i n d C a t a m a r a n s...
- Page 63 Owners Handbook Date Engine Hrs Engine Hrs Details Price S e a w i n d C a t a m a r a n s...
- Page 64 Owners Handbook Date Engine Hrs Engine Hrs Details Price S e a w i n d C a t a m a r a n s...
- Page 65 Owners Handbook Date Engine Hrs Engine Hrs Details Price S e a w i n d C a t a m a r a n s...
Need help?
Do you have a question about the 1160 Deluxe and is the answer not in the manual?
Questions and answers