Nortel Meridian SL-100 Reference Manual
Meridian modular telephones
Hide thumbs
Also See for Meridian SL-100:
- Product manual (208 pages) ,
- Reference manual (142 pages) ,
- Fundamentals (256 pages)

Related Manuals for Nortel Meridian SL-100


Summary of Contents for Nortel Meridian SL-100
- Page 1 555-4001-114 Meridian SuperNode Meridian SL-100 Meridian Modular Telephones Reference Manual MSL11 Standard 10.02 November 1999...
- Page 3 The information contained herein is the property of Nortel Networks and is strictly confidential. Except as expressly authorized in writing by Nortel Networks, the holder shall keep all information contained herein confidential, shall disclose the information only to its employees with a need to know, and shall protect the information, in whole or in part, from disclosure and dissemination to third parties with the same degree of care it uses to protect its own confidential information, but with no less than reasonable care.
- Page 5 Publication history November 1999 Version 10.02, Standard release for MSL11. This version makes minor updates to technical information to the Music On Transfer (MOT) feature. July 1999 Version 10.01, Preliminary release for MSL11. This version adds Automatic Answer Back (AAB) Enhancement, Music On Transfer (MOT), and Enhanced IPE Controller feature information.
- Page 6 iv Publication history Don’t Answer (CFB/CFD) Per Key Destination, and replaces the 10-language display option information with the 3-language version information. November 1996 Version 06.02, Standard release for MSL06. This version adds 56k/64k data rate information. September 1996 Version 06.01, Preliminary release for MSL06. This version adds information on the Multiple Station Message Waiting Indication feature.
- Page 7 Publication history v August 1993 Version 02.01, BCS35. This version adds the Multiple Appearance Directory Number (MADN) Ring Forward feature as a station feature available to Meridian Modular Telephones. The version also adds the following information since the previous issue of this publication: NT8X49AC controller card Intelligent peripheral equipment NT keyboard dialing...
-
Page 9: Table Of Contents
Unpacking or packing a modular telephone 2-1 Meridian modular telephone installation 2-1 Data terminal installation 2-3 Installing the Meridian Modular 2616 (M2616CT) cordless telephone 2-5 Meridian SL-100 (MSL-100) system administrator 2-6 Troubleshooting 2-6 Power failure 2-6 Vibrator signal alerter (optional) 2-7... - Page 10 viii Contents Troubleshooting 2-39 Troubleshooting MCA 2-41 Cross-connections 2-46 General description Voice 3-1 Data 3-1 Physical characteristics 3-2 M2006 3-4 M2008 3-5 M2008HF 3-6 M2016S 3-8 M2016S modular telephone keys and indicators 3-9 M2616 3-9 M2216ACD 3-11 M2216-2 3-11 MCA 3-13 Diagnostics 3-13 Download requests 3-13 Escape sequence 3-14...
- Page 11 ACD headset interface 5-17 Supervisor and agent positions 5-18 Supervisor position 5-18 Agent position 5-23 ACD set login/logout 5-27 Meridian SL-100 features General 6-1 Authorization Code 6-3 Automatic Answer Back (AAB) 6-4 Automatic Answer Back (AAB) Enhancement 6-4 Provisioning 6-4...
- Page 12 x Contents Automatic Line 6-7 Call Forward 6-8 Call Park 6-9 Call Pickup 6-10 Call Transfer/3-Way Calling 6-12 Call Waiting 6-13 Conference 6-14 Executive Busy Override 6-15 Group Intercom 6-16 Last Number Redial 6-17 Make Set Busy 6-17 Malicious Call Hold 6-18 Message Waiting 6-19 Multiple Appearance Directory Number Ring Forward 6-20 Multiple Station Message Waiting Indication 6-21...
- Page 13 Nortel KBD menus 8-7 Main menu 8-7 Modify menu 8-7 User input characteristics 8-8 Message prompt characteristics 8-8 Nortel KBD dialing procedures 8-9 Manual dialing 8-9 Data speed call activation 8-10 Autodial call activation 8-11 Data call disconnection 8-12 Calling sequence 8-13...
- Page 14 xii Contents Speed call number 8-16 Manual answer 8-17 Remote loopback 8-18 Script file 8-19 Incoming calls 8-28 Manual answer 8-28 Auto answer 8-30 Hayes keyboard dialing Initialization 9-1 Autobaud and autoparity 9-2 Implementing the P66 command 9-3 S registers 9-5 Register S0—ring to answer ON 9-6 Register S1—ring count 9-6 Register S2—escape sequence character 9-6...
- Page 15 Contents xiii Service order commands 11-2 Adding a Meridian modular telephone set 11-2 Establishing a directory number hunt group 11-4 Establishing a multiline hunt group 11-6 Adding a member to a hunt group 11-8 Assigning the Multiple Station Message Waiting Indication feature to an existing set 11-9 Adding the Handsfree feature to an M2008HF telephone set 11-10 Adding the Trunk Member Display (TRKDISP) feature 11-11...
- Page 16 xiv Contents Local plug-in +5V transformer configuration 4-7 Feature or line indicators 5-3 Example of supervisor telephone set 5-19 Display queue status format 5-22 Example of agent telephone set 5-24 LMOH feature assignment 6-29 CUSTSTN datafills 6-29 AUDIO datafills 6-30 MCA flashing LED 8-3 Main menu 8-7 Modify menu 8-8...
- Page 17 Contents xv Adding the NAME option allowing 15 characters 11-12 Adding the NAME24 option allowing 24 characters 11-13 Sample service order commands for removing a feature 11-14 Sample service order commands for CFB with the control field of “K” being added to a M2616 set 11-15 Meridian modular telephones 12-1 Meridian modular telephone accessories 12-2...
-
Page 19: About This Document
xvii About this document When to use this document This publication provides information on the Meridian modular telephones and associated options. The Meridian modular telephone series contains the following telephone sets: M2006, M2008, M2008HF, M2016S, M2216, M2616, and the M2616CT. These telephone sets and their options are introduced to the Meridian SuperNode (MSL-100) central control (CC) in the areas of table control, call processing, call progress indication, and facilities maintenance. -
Page 20: What Precautionary Messages Mean
xviii About this document The following documents are referred to in this document: 297-1001-594, Lines Maintenance Guide 297-1001-822, Commands Reference Manual Service Order Reference Manual Commercial Systems Customer Data Schema What precautionary messages mean The types of precautionary messages used in NT documents include attention boxes and danger, warning, and caution messages. -
Page 21: How Commands, Parameters, And Responses Are Represented
About this document xix WARNING Possibility of equipment damage WARNING Damage to the backplane connector pins Align the card before seating it, to avoid bending the backplane connector pins. Use light thumb pressure to align the card with the connectors. Next, use the levers on the card to seat the card into the connectors. -
Page 22: Responses
xx About this document Responses Responses correspond to the MAP display and are shown in a different type: FP 3 Busy CTRL 0: Command request has been submitted. FP 3 Busy CTRL 0: Command passed. The following excerpt from a procedure shows the command syntax used in this document: Manually busy the CTRL on the inactive plane by typing >BSY CTRL ctrl_no... -
Page 23: Introduction
Introduction The Meridian modular telephone (MMT) line of Nortel Networks products encompasses seven telephone sets, an integrated data module (the Meridian Communication Adapter (MCA)), a 22 key add-on option, a display module option, and three different types of external power options. - Page 24 1-2 Introduction M2616—a high performance multiline telephone with 15 programmable feature keys and a PDN key and an integrated handsfree unit M2616CT—a multiline 900Mhz cordless telephone with 14 programmable feature keys on the base and six keys on the handset which map to the six bottom programmable keys on the base.
-
Page 25: Installation Procedures
Installation procedures Unpacking or packing a modular telephone Use proper care while unpacking Meridian modular telephones. Check for damaged containers so that appropriate claims can be made to the transport company for items damaged in transit. If a telephone must be returned to the factory, ensure that the telephone is packed in the appropriate container to avoid damage during transit. -
Page 26: View Of Jacks And Tabs At Base Of Telephone
2-2 Installation procedures Figure 2-1xx View of jacks and tabs at base of telephone Restraining tabs for line cord Line cord connector Handset connector Restraining tab for handset you are installing the the M2006, an Steps 6 through 9 and Steps 15 older model M2008, M2008HF or through 23 newer model M2008 with display, or... -
Page 27: Data Terminal Installation
Installation procedures 2-3 Ensure that this latch-tab is firmly snapped into place. If you are installing an older model M2008 with display, Steps 11 through 23 M2616, M2016S, or M2216ACD, any set with Meridian Communications Adapter (MCA) or external power Connect the 2-conductor line cord to the telephone base. -
Page 28: Data Terminal And Mca Power Supply Connections
2-4 Installation procedures Procedure 2-2 Installing the data terminal Connect the RS-232-C interface connector from the data terminal to the matching header connector in the back of the Meridian modular telephone. (See Figure 2-2.) Insert the two captive screws in the connector body into the threaded holes in the header connector, and secure tightly to prevent accidental disconnection during data terminal operation. -
Page 29: Installing The Meridian Modular 2616 (M2616Ct) Cordless Telephone
Installation procedures 2-5 Installing the Meridian Modular 2616 (M2616CT) cordless telephone The following procedures describe the Meridian Modular M2616 cordless telephone installation procedures. WARNING Risk of personal danger The M2616CT should not be installed in an outside plant environment. The M2616CT has exposed contacts at the base of the set which allow foreign voltage and/or lightning to travel to the telephone line cord. -
Page 30: Meridian Sl-100 (Msl-100) System Administrator
The light is either yellow or off. Yellow indicates a spare battery is in the charge port. Meridian SL-100 (MSL-100) system administrator A new line class code (LCC) called M2616CT is available in software release MSL08. Follow the table to datafill the set:... -
Page 31: Vibrator Signal Alerter (Optional)
Vibrator signal alerter (optional) You must purchase a special vibrating battery in order to use this feature. Contact your local Nortel distributor for part number. Telephone field installation The M2616CT range limit is approximately 150 feet. This depends on the building structure and environment in the area in which you are located. -
Page 32: Preparing And Installing The Mca
2-8 Installation procedures Preparing and installing the MCA Procedure 2-3 details the instructions required to install or replace the MCA in the Meridian modular telephone sets. The MCA allows synchronous and asynchronous ASCII terminals and personal computers to connect to the Meridian modular telephone, using an RS-232C or V.35 interface on a DB-25 connector. -
Page 33: Mca Hardware
Installation procedures 2-9 MCA hardware Additional hardware is required to install the MCA. The hardware requirements are based on the Meridian modular telephone model number and date code. Refer to table 2-1 to determine the required MCA hardware. Table 2-1xxx Required MCA hardware Required NT2K... - Page 34 2-10 Installation procedures Skip to the MCA installation instructions. If you have the NT2K telephone (date code of April 24, 1998 or later) or NTZK telephone: Remove the two screws from the footstand and separate it from the telephone base. To remove the footstand from the base, press in the back edge of the footstand as you lift it from the telephone base.
-
Page 35: Installing The Analog Terminal Adapter (Ata)
Installation procedures 2-11 For NT2K sets, install the jumper board with the black connector (P1) onto the 2x7 pin connector (the jumper is keyed for orientation). MCA installation Install the MCA in the footstand: Tilt the MCA PC board so that the DB-25 connector fits into the break-out section. -
Page 36: Identifying The Model Number And Date Code
2-12 Installation procedures M2616, and M2216ACD). The ATA allows an analog device (FAX, modem or 500/2500 telephone) to work simultaneously with your Meridian modular telephone. The ATA board mounts inside the footstand of your Meridian modular telephone. The ATA is compatible with MSL08 and later. CAUTION When handling internal telephone components, static electricity must be discharged by touching any grounded... -
Page 37: Ata Hardware
Installation procedures 2-13 Figure 2-4xxx Identifying the model number and date code Begins with NT2K or NT9K, model order code (model, vintage and color code) NT2K08GH36 M2008HF H/F DATA/DISPLAY ASH XXXXXXXXXXXX NT2K08XE35 Listed MADE IN MEXICO internal code 05/06/98 A0665408 always NT2K Warranty start date CPC code... -
Page 38: Remove The Power Supply Board (If Installed)
2-14 Installation procedures Preparing the telephone for ATA installation Disconnect and remove all cords (including the handset cord) from the telephone. Place the telephone, face-down, on a padded level surface. If you have the NT2K (with a date code of April 24, 1998 or later) or NT9K telephone: Remove the two screws from the footstand and separate it from the telephone base. -
Page 39: Jumper Board Installation
Installation procedures 2-15 Jumper board installation If a power supply board was not installed on the NT2K or NTZK, remove the 2 jumper plugs on the 2x7 pin connector. Locate the appropriate jumper board to install in the telephone base. For NTZK sets, install the jumper board with the brown connector (P1) board onto the 2x7 pin connector with the screw post facing toward the bottom of the set and away from the power supply screw post. -
Page 40: Msl-100 System Administration
2-16 Installation procedures Install the footstand into the telephone base by inserting the two footstand tabs into the notches on the base of the telephone. Screw the footstand into position using the two screws provided and a Phillips screwdriver. Plug the output of the external power module into the circular mini DIN connector located on the back wall of the footstand. -
Page 41: Self-Test And Diagnostics
Installation procedures 2-17 Table 2-3xxx Example of adding the ATA line class code for system configuration in SERVORD (continued) Prompt Response Description Ringtype, Group, Follow normal the prompts require datafill Subgroup, NCOS, administration specified by your customer SNPA Key, Ringing procedures for an site M2006 class... -
Page 42: Installing Or Replacing The Power Supply
2-18 Installation procedures Installing or replacing the power supply Procedures 2-4 through 2-6 explain how to install and remove the power supply on various types of Meridian modular telephones. Procedure 2-4 Installing or replacing the power supply on M2616, or M2216ACD NTZK sets Complete wiring and cross-connections before connecting the telephone to the connecting block. - Page 43 Installation procedures 2-19 The power supply is located on the left side of the set. Remove two small screws from the power supply board near the top. Set them aside. If you are not replacing the power supply board, place the jumpers (A0288529) connecting the bottom two sets of the pins on the P1 connector.
- Page 44 2-20 Installation procedures Remove the handset, and place the telephone upside down on top of a level, solid surface covered with soft material or paper to prevent damage to movable keys and the telephone face. Disconnect all cords from the telephone. Loosen and remove the two screws from the stand assembly of the telephone, and unsnap stand assembly by grasping the plastic extension and pulling upwards.
- Page 45 Installation procedures 2-21 Reassemble the telephone bottom and top cover assemblies to the stand assembly. If the telephone is equipped with an MCA, reconnect the data cable to the appropriate jack. Tighten all screws. Reconnect new line cords supplied with the power supply option, then replace the telephone in the normal operating position.
- Page 46 2-22 Installation procedures If the telephone is equipped with an MCA, unplug the data cable from the appropriate jack. Remove the four screws securing the bottom cover of the telephone set to the top cover. Leaving screws in place, remove the bottom cover by lifting it upward. Set the bottom cover aside.
-
Page 47: Installing And Replacing The Display Option
Installation procedures 2-23 Replace the base and insert. Tighten all screws. If the telephone is equipped with an MCA, plug the MCA cable into the jack on the telephone base. Install the stand and secure it with two screws. Reconnect the line cord and handset. Place the label supplied with the power supply option on the bottom cover of the set for tracking purposes. - Page 48 2-24 Installation procedures Loosen and remove the two screws from the stand assembly of the telephone. Unsnap the stand assembly by pressing inward at the back of the stand where it meets the base pulling it upward. Set the stand assembly aside, taking care not to lose the mounting hardware.
-
Page 49: Placement Of Display Cable On Nt2K Displays And Ntzk Phones
Installation procedures 2-25 Note: If the set is an M2216ACD equipped with the power supply option, remove the power supply as described in Procedure 2-4. Removing the existing display Remove the two or three screws from the display module. Remove the display module from the telephone. - Page 50 2-26 Installation procedures Note: The power supply is not required on the M2616 models unless the set is equipped with other hardware options. Install the Phillips-head, self-tapping screw supplied with the power supply option into the mounting hole. Tighten the screw firmly with a #1 Phillips screwdriver.
- Page 51 Installation procedures 2-27 Leaving the screws in place, remove the bottom cover by lifting it upward. Set the cover aside. CAUTION Possible equipment damage Before handling internal telephone components, you must discharge static electricity from your hands and tools by touching any grounded metal surface or conductor.
-
Page 52: Display Cable Routing For Nt2K28Xx Displays
2-28 Installation procedures Make sure the red line on the ribbon cable lines up with the white dot beside the J3 or P4 connector pins. Carefully work the ribbon cable connector onto the connector pins on the mother board until firmly seated. Route the cable flat beside the power supply board, gathering excess cable under the display. - Page 53 Installation procedures 2-29 To install or replace an older model display (NT2K24WA or NT2K25YL) in the NT2K series phone that does not use the daughter board, follow the steps in Procedure 2-9. Note that if you are installing the older model display on an NT2K series M2008 or M2008HF phone, you will need cable P0738600.
- Page 54 2-30 Installation procedures the telephone is not already Step 13 equipped with a display option you are replacing an existing display Step 11 option Removing the existing display Remove the two or three screws from the display module. Remove the display module from the telephone.
-
Page 55: Installing An Nt2K In An Nt2K M2008 Or M2008Hf Set
Installation procedures 2-31 Figure 2-7xxx Installing an NT2K in an NT2K M2008 or M2008HF set Ribbon cable Display module Speaker housing Mother board Placement of display board Connectors Display board To reinstall the power supply option (if the unit is so equipped), configure the board with the set. -
Page 56: Installing And Replacing The External Alerter
2-32 Installation procedures Fold the ribbon cable near the connector and carefully work the ribbon cable connector onto the P4 pins of the mother board until it is firmly seated. Route the cable flat beside the power supply board, gathering excess cable under the display. - Page 57 Installation procedures 2-33 Leaving the screws in place, remove the bottom cover by lifting it upward. Set it aside. the telephone is not equipped with Step 8 an external alerter option you need to replace an existing Step 10 external alerter option Removing the external alerter The external alerter option card is located off-center (right) of the set.
-
Page 58: Installing Or Replacing The Key Expansion Modules
2-34 Installation procedures Figure 2-8xx Local plug-in transformer configuration to IDF Adapter jack 6-conductor line cord from telephone Adapter plug Adaptor plug Wall transformer Jack adapter 110V or 220V Installing or replacing the key expansion modules Procedure 2-11 describes how to install and replace the key expansion modules. - Page 59 Installation procedures 2-35 Procedure 2-11 Installing or replacing the key expansion module Use this procedure to add one or two key expansion modules to the M2616, and M2216ACD telephones. Note: The key expansion module requires a power supply board and an additional power source on NTZK (Aries I) sets.
- Page 60 2-36 Installation procedures the telephone is not already Step 15 equipped with the key expansion module the telephone is equipped with a Step 12 key expansion module that you are replacing Removing the key expansion module Remove the screw from the stand assembly. Unsnap the stand assembly from the key expansion module and telephone by pressing inward at the back of the stand where it meets the base and pulling upwards.
-
Page 61: Wall Mount Instructions
Installation procedures 2-37 Insert the self-tapping Phillips-head screws (three if you have one module, four if you have two) supplied with the key expansion module into the mounting holes in the bottom of the footstand. Tighten firmly with a #1 Phillips screwdriver. - Page 62 2-38 Installation procedures Procedure 2-13 Performing the Meridian modular telephone self-test Unplug the line cord from the telephone. Begin the test by plugging in the line cord while holding down the RLS or Goodbye key. Response: Speaker beeps once and all LCDs flash. The Message Waiting lamps light steadily.
-
Page 63: Troubleshooting
Installation procedures 2-39 Result: Headset beeps. Unplug the headset. Press the right side of the volume control key. Result: Speaker beeps. Display is filled with dark squares. Press the right side of the volume control key. Result: Speaker beeps. Display is blank. Press the right side of the volume control key. -
Page 64: Meridian Modular Telephone Connections
2-40 Installation procedures If the telephone uses external power Step 3 does not use external power Step 4 Make sure the transformer or closet power supply is properly connected and that the power supply board is properly installed. Refer to Procedures 2-4 through 2-6. -
Page 65: Troubleshooting Mca
Installation procedures 2-41 Procedure 2-16 Correcting a telephone that wobbles Ensure that all cords are properly routed through channels underneath the restraining tabs on the footstand. Refer to Figure 2-9. Check that the footstand is firmly seated on the telephone. Ensure that all feet are firmly seated in the footstand. - Page 66 2-42 Installation procedures Be sure the MCA is receiving signals from your terminal by watching the display while entering carriage returns on the keyboard. If the indicator flashes, the connection is correct. If not, check the cable to make sure it is the standard RS-232 cable and is properly connected.
-
Page 67: Mca Troubleshooting Flowchart
Installation procedures 2-43 Figure 2-10xxx MCA troubleshooting flowchart Power up LED lit steady Distinctive flash LED lit Attach RS-232 MCA bad LED check cable to DTE Telephone bad (A44-A64 interface check) No AT <cr> No menu <cr> echo Enter number P66 KBD No menu or H for help... -
Page 68: Miscellaneous Troubleshooting Tips
2-44 Installation procedures Procedure 2-21 Troubleshooting problems with the key expansion module Unplug the line cord and plug it in again. Ensure that the transformer is plugged in. Ensure that the power supply board is installed properly. Make sure that the ribbon cable connecting the telephone and the key expansion modules routed properly and is not pinched. - Page 69 Installation procedures 2-45 Table 2-4xxx Miscellaneous troubleshooting tips (continued) Symptom Solution Garbled prompts are sent to your Enter a period (.) followed by carriage terminal when you press carriage return to perform an autoparity. return. The CALLING prompt is displayed Hold down the break key(s) for two when you try to make a data call from seconds and press carriage return.
-
Page 70: Cross-Connections
2-46 Installation procedures Cross-connections Figure 2-11 is a cross-connect diagram for Meridian modular telephones. Figure 2-11xxx Meridian modular telephone cross-connections Pack connector PE shelf Cross connect block Line pack W–BL line cord to Unit 0 BL–W telephone for power supply leads W–G to telephone G–W... -
Page 71: General Description
General description The Meridian modular telephones are designed to provide cost-effective integrated voice and data communications capability. These telephone sets communicate with the MSL-100 Integrated Services Network, using digital transmission over standard twisted-pair wiring. The telephones interface with the MSL-100 system using the enhanced digital port card (EDPC), which has 16 ports that support 16 digital telephones and data units. -
Page 72: Physical Characteristics
3-2 General description The firmware performs the following functions: scans for user keyboard input decodes and converts user inputs to appropriate key-press codes to send to the line group controller (LGC) interprets call sequencing commands from the LGC generates appropriate messages prompts, based upon call setup progress The MSL-100 MCA keyboard dialing (KBD) provides user interaction with the MCA. -
Page 73: Lcd Indicator States
General description 3-3 Note 1: When equipped with a display module or MCA, Key 8 (Key 6 on M2006) is automatically assigned as the Program key and cannot be changed. Note 2: There is only one DN for the M2006 telephone set. If more than one DN is assigned, it disables itself, and all LCDs light steadily. -
Page 74: M2006
3-4 General description Table 3-2xxx Meridian modular telephone programmable and fixed keys (continued) Version Programmable keys Fixed keys M2216ACD-1 Hold M2216ACD-2 Release Volume control M2616 Hold Release Volume control —end— M2006 The M2006 modular telephone (Figure 3-1) is a single-line telephone with five programmable function keys having the following characteristics: There are five assignable key/LCD indicator pairs in addition to the PDN key (Key 1). -
Page 75: M2008
General description 3-5 Figure 3-1xxx M2006 modular telephone Switchhook Speaker Message-waiting lamp Rls key Hold key Program key Function keys and LCDs Volume DN key control Dimensions for the M2006: length—8.42 in (216 mm) width—8.42 in (216 mm) height—3.61 in (92.6 mm) weight—2.65 lbs (1.1 kg) M2008 The M2008 modular telephone (Figure 3-2) is a multiline set with seven... -
Page 76: M2008Hf
3-6 General description It offers the display option. Figure 3-2xxx M2008 modular telephone Filler plate Switchhook Speaker Message-waiting lamp Rls key Program key Hold key Function keys and LCDs Volume PDN key control Dimensions for the M2008: length—8.42 in (216 mm) width—8.45 in (216 mm) height—3.61 in (92.6 mm) weight—2.65 lbs (1.1 kg) -
Page 77: M2008Hf Modular Telephone
General description 3-7 If neither the data option nor the display option is installed, key 8 operates as a normal system programmable key, sending key press and release messages to the PBX and receiving indicator status messages from the PBX. If Group Listening is enabled at the set (hardware plug), key 7 becomes the Group Listening key. -
Page 78: M2016S
3-8 General description Dimensions for the M2008HF: length—8.4 in (212 mm) width—8.5 in (216 mm) height—3.7 in (92.6 mm) weight—2.4 lbs (1100 grams) M2016S The M2016S modular telephone is a telephone security group (TSG) Class 2 type accepted digital telephone designed to provide on-hook security that is required for certain government contractor applications. -
Page 79: M2016S Modular Telephone Keys And Indicators
General description 3-9 Figure 3-4xxx M2016S modular telephone keys and indicators Filler plate Speaker Switchhook Message- waiting lamp Rls key Program key Hold key 16 function keys and 8 LCDs Microphone Volume control PDN key Dimensions of the M2016S phone: length—9.75 in (251 mm) width—9.45 in (237 mm) height—3.64 in (92.6 mm) -
Page 80: M2616 Modular Telephone
3-10 General description A loudspeaker is provided for alerting tone and for voice reproduction during handsfree operation. A microphone is included. If equipped with the MCA, it requires an external power supply option. If equipped with the MCA, the set’s top right feature key (Key 8) becomes dedicated as the local program mode key. -
Page 81: M2216Acd
General description 3-11 weight—2.65 lbs (1.10 kg) M2216ACD The M2216 is a multiline set for ACD operations with 15 programmable function keys. See Figure 3-6. Note: The M2216 replaces the M2216-1, which has been manufacture discontinued. The M2216 has the following characteristics: There are 15 assignable key/LCD indicator pairs in addition to the PDN key/LCD indicator (Key 1). - Page 82 3-12 General description Factory-installed power allows the use of a carbon set in the PJ-327 jack. When local power is present, the carbon headset is functional, and an electret headset may be used with the RJ-32 jack in a listen-only mode. When local power is not present, the PJ-327 jack is not functional, and an electret headset in the RJ-32 jack can be used.
-
Page 83: Mca
General description 3-13 The MCA is an integrated data module consisting of a single PCP that is mounted within the telephone and allows synchronous (64 kbit/s) and asynchronous (110 to 19,200 byte/s) ASCII terminals, personal computers, and printers to be connected to the set through an RS-232-C interface. The MCA is a part of data communications equipment (DCE). -
Page 84: Escape Sequence
3-14 General description whenever the MCA is returned to service (RTS) or when the digital line module (DLM) or intelligent peripheral equipment (IPE) is returned to service. Escape sequence When the MCA is configured for Hayes-compatible keyboard dialing, the MCA has two operational states: command and online. In the keyboard dialing command state, the user inputs are interpreted as call setup information. -
Page 85: Echo
General description 3-15 Echo During call set-up, all user inputs are echoed by the MCA to the terminal. To turn the echo off (command state), enter the command E0 (zero). Keyboard dialing With keyboard dialing (KBD), the user can originate data calls to local and remote hosts or DTE by using the terminal keyboard. -
Page 86: Peripheral Equipment
3-16 General description Examples of menus associated with this feature are illustrated in Appendix E, “Script file menus”. Peripheral equipment Digital line module The telephone interfaces with the EDPC in the digital line module (DLM) of the MSL-100 system using time compressed multiplexed (TCM) transmission. -
Page 87: External Alerter Interface
General description 3-17 The digital line card (DLC) interfaces with the IVD digital terminals and supports the M2000 and M3000 series sets and their respective data options. The DLC inserts into any line card slot on the IPE shelf and can interface with a maximum of 16 digital sets for each DLC card, for a total of 32 ports. -
Page 88: Display Module
3-18 General description Table 3-3xxx Features and options matrix (continued) Feature or M2006 M2008 M2008HF M2016-S M2216ACD M2616 M2616CT option Optional hardware availability: display Standard Standard key expansion module external alerter Headset Electret X (on handset only) power supply Required Required Standard with MCA... - Page 89 General description 3-19 Quebec French Spanish Sets equipped with this display option have added local features over the basic set: display of call timers predial (only available after the display is physically attached to the set) independently setting volume levels for the following items: —...
-
Page 90: Name Display Character Extension
3-20 General description Name Display Character Extension This feature provides the option to use up to 24 characters exclusively for the name field on the phone sets capable of handling the increase. The sets compatible with this feature are: M2006 M2008 M2016S M2216A... -
Page 91: 15 Character Name Display For A Basic Call
General description 3-21 Figure 3-8xxx 15 character name display for a basic call Originator: K.SCHEUERMANN (15 Char) 52222 00:00 Terminator: A.APPLEBAUMM (15 Char) 51111 00:00 Meridian SuperNode MSL-100 Meridian Modular Telephones Reference Manual MSL11... -
Page 92: Key Expansion Module
3-22 General description Figure 3-9xxx 24 character name display for a basic call Originator: KATHLEEN_SCHEUERMANN 52222 00:00 Terminator: AARON_APPLEBAUMM 00:00 51111 The 24 character name is displayed internally only. This is accomplished by adding the feature in SERVORD. Note: Both the existing 15 character name feature and the 24 character name feature are compatible. -
Page 93: Brandline Insert
Brandline inserts snap easily into and out of the filler plate. Note: Telephone sets sent to Nortel (Northern Telecom) for repair are returned with the standard Meridian logo in the insert. Remove any customized brandline inserts before returning sets for repair. -
Page 94: Call Processing
3-24 General description The power supply options allow the terminal and all installed Meridian modular telephone options to use local power. They are used with the Meridian modular telephones whenever the installation requires an external alerter, an MCA, a boosted alerting volume, or carbon headsets. Some set configurations and options need more than basic loop power to operate. -
Page 95: Facilities Maintenance
General description 3-25 if the user makes a call from the MCA and the far end is busy, the MCA asks if the user wants to invoke the Ring Again feature, assuming it is assigned to the MCA. Facilities maintenance The line test position (LTP) level of the MAP terminal is, among other things, used for posting a line, busying that line, and returning it to service. - Page 96 3-26 General description Meridian IVD port cards contain 32 lines for use, 16 voice and 16 data lines. These lines may not be physically detached from a port card as a line card may be removed from a drawer. If one of these lines becomes disabled, it can not simply be pulled out and replaced.
-
Page 97: Performance Specifications
Performance specifications Environmental and safety considerations All Meridian modular telephones and their associated options meet the requirements of Electronics Industries Association (EIA) specification PN-1361. Temperature and humidity Table 4-1 lists temperature and humidity specifications for Meridian modular telephones. Table 4-1xxx Temperature and humidity specifications Temperature range Relative humidity... -
Page 98: Alerting Tone Characteristics
4-2 Performance specifications length limit (longer lengths are possible, depending on the wire’s gauge and insulation). The Meridian modular telephones equipped with MCA use a 6-conductor line cord. Those without the MCA use a 2-conductor line cord. CAUTION Do not use other vendor line cords Use only the line cord provided with the Meridian modular telephone. -
Page 99: M2006 And M2008 Tone Frequency Combinations
Performance specifications 4-3 tone-ON and tone-OFF messages to the telephone. The alerting tone cadences cannot be changed from the telephone, but can be altered for individual Meridian modular telephones by datafill. One application can be a separate ringing tone for each of a series of Meridian modular telephones in the same office area to facilitate identification. -
Page 100: Power Requirements
4-4 Performance specifications Table 4-3xxx M2016S, M2216, and M2616 tone frequency combinations (continued) Tone Frequencies Warble rate 333 Hz, 250 Hz 10.4 Hz 333 Hz, 250 Hz 2.6 Hz Note: A 500-Hz buzz signal is provided for incoming call notification while the receiver is off-hook. -
Page 101: Data
64k MCA +5V power boards The 64k MCA has new circuitry to accept a +5V wall transformer available soon from Nortel. The power board is replaced by a jumper and relay on the Meridian digital terminal. All Meridian digital terminals with data ordered have the jumper and relay already inside. -
Page 102: Local Plug-In Transformer Configuration
4-6 Performance specifications adapter can provide the additional power needed to operate the telephone and its options. (See Figure 4-2.) Figure 4-2xxx Local plug-in transformer configuration Adapter plug Wall transformer 110V or 220V Jack adapter CAUTION Possible equipment damage Do not plug any equipment (computer, modem, LAN card) other than the Meridian modular telephone into the RJ-11 transformer adapter, as damage to equipment may result. -
Page 103: Closet Power Supply
Performance specifications 4-7 Rated load current—700 mA Note: The set cannot be wall-mounted over the wall jack when using a transformer because of the size of the RJ-11 adapter. Instead, mount the set above or to the side of the jack, and run the set and power cords to it. The +5V transformer (A0655850 or equivalent) must meet the following specifications: input voltage—120Vac/60Hz 19.0 W... -
Page 104: Mca Data Characteristics
4-8 Performance specifications Note 1: All terminals must be isolated from the input winding, and each terminal must be isolated from all other terminal windings. A separate winding is required for each terminal, and grounds should not be connected. Note 2: The QUT1 closet power supply source is not compatible with Meridian modular telephones. - Page 105 Performance specifications 4-9 For more detailed information, see the Meridian Communications Adapter (MCA) Reference Manual, 555-4001-123. The MCA is equipped with the Hayes dialing feature. This feature enables the user to originate data calls to local and remote DTE directly from a data terminal keyboard or personal computer if connected to the MCA.
-
Page 107: Basic Set Operation
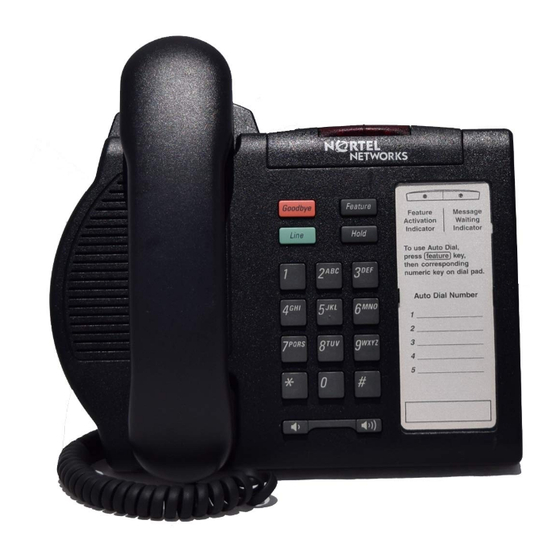
Basic set operation Meridian modular telephone sets are designed to be practical and functional with large feature and line keys and with adjustable volume control and distinctive visual indicators. In addition, the Meridian modular telephone offers a wide range of business telephone features. The features described in this publication that are best suited for your specific telecommunications needs can be assigned to your telephone. -
Page 108: Hardware Options
5-2 Basic set operation M2616CT—a multiline 900Mhz cordless telephone with 14 programmable feature keys on the base and six keys on the handset which map to the six bottom programmable keys on the base. A primary directory number (PDN) key, program key and handsfree key are standard on the set. -
Page 109: Meridian Communications Adapter
Basic set operation 5-3 A maximum of two modules can be added to a telephone set. Depending on whether one or two modules are attached to the telephone set, the total number of programmable feature keys increases to either 37 or 59, respectively. -
Page 110: Fixed Keys
5-4 Basic set operation Fixed keys The following fixed keys are provided: Primary directory number (PDN) Volume control Hold Release (Rls) Handsfree/Mute (if activated for the M2616 set only) Primary directory number This fixed key is Key 1 on all Meridian modular telephones. M2006 sets only have one line, therefore, Key 1 on M2006 sets is simply called a directory number. -
Page 111: Hold Key
Basic set operation 5-5 ringing When the telephone is disconnected, has maintenance performed on the loop, or a restart occurs, both speaker and alerting tone levels return to their default values upon reconnecting. When the set is operating on loop power alone, the highest (eighth) step in volume cannot be reached (as seen when using Display in Program mode). - Page 112 5-6 Basic set operation is muted. Pressing the handsfree/mute key again reactivates the microphone, and the handsfree LCD remains lit. Handsfree operates as if an off-hook operation had been performed. For example, when the telephone is idle, pressing the handsfree/mute key turns on the handsfree unit and selects the PDN, allowing the user to make a call.
-
Page 113: Program Key
Basic set operation 5-7 Key 7 can have other features assigned to it as long as handsfree is not set to Y in SERVORD. Table 5-1 describes all new prompts implemented by the handsfree feature. Table 5-1xxx Handsfree feature prompts Valid Areas affected Prompt text... -
Page 114: 00 Volume Control
5-8 Basic set operation 09—Key Click Telephone calls can be received while the phone is in the Program mode. The display is devoted to program features while the phone is in Program mode and continues to display program features until the Program key is pressed a second time to exit. -
Page 115: 01 Predial Recall
Basic set operation 5-9 The telephone returns to the idle screen. Exit, or repeat Steps 2 and 3 to adjust another volume level. Note: For hearing-impaired applications where an amplifier is appropriate, the NT TONE (NT 8UX06–03) is available. You have completed this procedure. 01 Predial Recall This feature is useful when users are predialing a number and are interrupted by an incoming call, when misdialing a number and wanting to amend it... -
Page 116: 03 Call Timer Enable
5-10 Basic set operation Response: The contrast increases or decreases depending on the direction in which the user presses the rocker switch. Press the Program key to save and exit. Response: The telephone returns to the idle screen. You have completed this procedure. 03 Call Timer Enable When the Call Timer enables, all calls are automatically timed, and the timer displays for 10 seconds after each call is disconnected. -
Page 117: 05 Language Select
Basic set operation 5-11 04 MAY 2:05 P 04 5 2:05 P Use Procedure 5-5 to set the Idle Screen Format. Procedure 5-5 Setting the Idle Screen Format Press the Program key, and dial 04. Response: The display shows first Idle Screen Format. Press the volume control rocker switch to scroll through the idle screen formats. -
Page 118: 07 Display Diagnostics
5-12 Basic set operation Each language is displayed in its own language, such as English, Francais, and Espanol. Press the Program key to save and exit. Response: The telephone returns to the idle screen. You have completed this procedure. 07 Display Diagnostics The Display Diagnostics feature provides a self diagnostic test for the display. -
Page 119: On-Hook Dialing
Basic set operation 5-13 Response: This action turns the Key Click option either on or off. Press the Program key to save and exit. Response: The telephone returns to the idle screen. You have completed this procedure. Telephone calls can be received while the telephone is in the Program mode. However, the display remains in Program mode until the user presses the Program key a second time. -
Page 120: Microphone Muting (M2616, M2616Ct And M2008Hf)
5-14 Basic set operation You have completed this procedure. Microphone muting (M2616, M2616CT and M2008HF) When a user activates the Handsfree feature by pressing the Handsfree/mute key during a telephone conversation, the microphone is turned off. However, the speaker remains on and prevents the other party from overhearing local conversation. - Page 121 Again, the KBD routine may vary with the data equipment being used, and reference to the user’s data terminal manual may be necessary. For a MSL-100 MCA keyboard dialing routine, refer to Chapter 8, “Nortel keyboard dialing”. The AT Dialing feature (Hayes) provides DTE users with a means to use personal computer software packages requiring a Hayes-type keyboard dialing command protocol.
-
Page 122: Automatic Call Distribution (M2216)
5-16 Basic set operation Automatic Call Distribution (M2216) The M2216, M2216-1, and M2216-2 modular telephones are designed for the Automatic Call Distribution (ACD) system. The M2216 telephone set is not limited to ACD applications only. For detailed information on ACD features and operations, refer to the Automatic Call Distribution Product Guide, 297-2041-010. -
Page 123: Acd Headset Interface
Basic set operation 5-17 ACD agent positions are telephone sets assigned ACD features. ACD supervisors are telephone sets that may be assigned the same ACD features, but are assigned with additional feature keys. These additional supervisor functions include monitoring the work load of agents within their ACD group, observing ACD calls, and assisting agents requesting information. -
Page 124: Supervisor And Agent Positions
GN Netcom —model 105-3160 (lightweight monaural headset with over-the-ear hook, quick disconnect, and a coil cord) Nortel Liberation M2216-2 You cannot adjust the headset interface for the M2216-2. Because a standard exists for carbon headset design, and the M2216-2 supports carbon headsets, there is no need for an adjustable headset interface. -
Page 125: Example Of Supervisor Telephone Set
Basic set operation 5-19 Figure 5-2xxx Example of supervisor telephone set Program Night Service Call Agent DASK Answer Agent AEMK Secondary DN Supervisor jack Agent jack LEGEND: Supervisor/PDN key AEMK Answer Emergency Key Agent Status Lamp controlled interflow DASK Display Agents Summary Key directory number display queue status display queue threshold... - Page 126 5-20 Basic set operation The SUPR option must be assigned to a supervisor set before assigning Agent Status lamps and Answer Agent, Call Agent, Forced Agent Availability, Night Service, Display Queue Status, Display Queue Threshold, Answer Emergency, Display Agents Summary, or Controlled Interflow keys.
- Page 127 Basic set operation 5-21 extended observe, allowing the key to access any ACD group. These capabilities are established in SERVORD. Use Procedure 5-11 to observe an agent. Procedure 5-11 Observing an agent Press the OBS key. Press the ASL key for the desired agent. Response: The supervisor can monitor an active INCALLS call on the agent station.
-
Page 128: Display Queue Status Format
5-22 Basic set operation Display Queue Status key A supervisor can query the current load status statistics for an ACD group by pressing the Display Queue Status (DQS) key for that ACD group. The information displayed resembles the format in Figure 5-3. CALLS—shows the number of calls waiting in the ACD incoming call queue. -
Page 129: Agent Position
Basic set operation 5-23 Procedure 5-13 Using the AEM key The agent presses the AEM key. Response: The supervisor lamp flashes and rings for a maximum of 30 seconds (or buzzes if the supervisor is on another call). The agent’s DN appears on the supervisor’s display. -
Page 130: Example Of Agent Telephone Set
5-24 Basic set operation Figure 5-4xxx Example of agent telephone set Program CLSUP ACDNR Make Set Busy Secondary DN (INCALLS) LEGEND: ACDNR Automatic Call Distribution Not Ready CLSUP call supervisor directory number Emergency Key line of business code INCALLS key The INCALLS key is always Key 1 (the bottom feature key) on the M2216, M2216-1 and M2216-2. - Page 131 Basic set operation 5-25 Make Set Busy key The Make Set Busy (MSB) key provides a method for logging an agent out of the ACD queue. Make Set Busy overrides the Not Ready Queue. If the agent activates the Make Set Busy feature, the agent is logged out. If an agent presses the Make Set Busy key while active on an ACD call, the agent is ineligible to receive new ACD or non-ACD calls, but the current active call is unaffected.
- Page 132 5-26 Basic set operation The CLSUP-Different INCALL feature allows the agent call to be directed to a specific supervisor regardless of the ACD group on which the agent is associated. Emergency key If an agent receives a threatening or abusive call on the INCALLS key, the Emergency key (EMK) conferences in the supervisor or records the conversation while the call is still connected.
-
Page 133: Acd Set Login/Logout
Basic set operation 5-27 Response: The associated lamp extinguishes. You have completed this procedure. ACD set login/logout ACD agents are required to log in to an ACD agent position. The ACD set login feature prevents ACD sets from receiving ACD calls until the agent completes the login procedure. - Page 134 5-28 Basic set operation Enter the 4-digit agent login identification number. The INCALLS lamp and MSB lamp extinguish. The MSB key deactivates. The ACDNR key activates. The agent is placed in the ACDNR queue. The supervisor position winks. Go to Step 4. Then You receive reorder You entered an invalid...
- Page 135 Basic set operation 5-29 Logout An agent can log out in one of two ways: If an agent is not active on an ACD call and presses the MSB key to activate the Make Set Busy feature, the agent is logged out. If agent is active on an ACD call and has the Make Set Busy feature activated, the agent is logged out if the Rls key is pressed to release the call.
-
Page 137: Meridian Sl-100 Features
Meridian SL-100 features General Meridian modular telephones are equipped with keys that can be assigned various features. With the help of the System Administrator, the telephone set can be configured for any specific needs. All of the feature option keys use clear, removable plastic caps. - Page 138 6-2 Meridian SL-100 features Table 6-1xxx Meridian modular telephone station features (continued) Feature Feature Call Waiting Ring Again Conference Trunk Member Display (TRKDISP) Executive Busy Override Speed Call Note: 1. The M2006 Modular Telephone cannot use the Group Intercom feature.
-
Page 139: Authorization Code
Meridian SL-100 features 6-3 In addition to the Supervisor capabilities, the M2216 Modular Telephones provide the following Automatic Call Distribution (ACD) agent capabilities: Feature Feature ACD Not Ready Line of Business Code Call Supervisor Make Set Busy Emergency Meridian modular telephones support the features of the electronic telephone sets and are datafilled in the same way. -
Page 140: Automatic Answer Back (Aab)
6-4 Meridian SL-100 features Response: The Transfer or Conference indicator comes on. Dial * or #, followed by the account code. Enter the authorization code number. Response: The caller receives dial tone. Dial the phone number. Press the Transfer or Conference key. -
Page 141: Feature Activation And Deactivation
Meridian SL-100 features 6-5 The DEO command is used to delete the option AAB entirely from the set. Feature activation and deactivation AAB is assigned on a dedicated key. The following are procedures for activation and deactivation of the feature. The set must be idle when you try to activate/deactivate the feature. -
Page 142: Automatic Dial
6-6 Meridian SL-100 features Automatic Dial Automatic Dial provides a convenient, time-saving feature that allows the caller to dial a number automatically by pressing the Auto Dial key. This feature is especially useful for a frequently dialed number. Use the following procedures to activate specific Automatic Dial capabilities: programming the Auto Dial key—Procedure 6-5... -
Page 143: Automatic Line
Meridian SL-100 features 6-7 Press the AUD key. Response: The AUD indicator goes off. Note: The telephone can not be on an active conversation. You must either place the active call on hold or release the call to delete an Automatic Dial number. -
Page 144: Call Forward
6-8 Meridian SL-100 features You have completed this procedure. Procedure 6-10 Answering an Automatic Line call Lift the handset, and speak. Response: The DN indicator associated with the automatic line comes on. You have completed this procedure. Call Forward This feature allows the user to forward calls to another telephone. For example, if the user is working in another area, they can forward their calls to that location. -
Page 145: Call Park
Meridian SL-100 features 6-9 Procedure 6-12 Reinstating Call Forward to the same number Press the Forward key twice. The telephone forwards calls to the same number programmed previously. Response: The Call Forward indicator flashes after pressing the Forward key once. The Call Forward feature is set when the Forward key is pressed the second time. -
Page 146: Call Pickup
6-10 Meridian SL-100 features Enter the Call Park Retrieve feature access code. Dial the number that the call is parked against. Response: Two-way conversation between the caller and the parked call begins. The system unparks the call. You have completed this procedure. - Page 147 Meridian SL-100 features 6-11 Press an idle DN key. Response: The associated DN indicator comes on, and the user receives dial tone. Enter the Call Pickup feature access code. Response: Two-way conversation begins between the user and the incoming caller.
-
Page 148: Call Transfer/3-Way Calling
6-12 Meridian SL-100 features Procedure 6-20 Answering a call on a specific extension in another Call Pickup group using Directed Call Pickup Lift the handset. Press an idle DN key. Response: The associated DN indicator comes on, and the user receives dial tone. -
Page 149: Call Waiting
Meridian SL-100 features 6-13 Response: The system completes the transfer. You have completed this procedure. Procedure 6-22 Stopping the transfer and returning to the first party Press the DN key. Press the Rls key, and then press the DN key. -
Page 150: Conference
6-14 Meridian SL-100 features To place the second call on hold and return to the first call: Press the Hold key Press the Call Waiting key. Response: The call on Call Waiting is put on hold. Press the DN key. -
Page 151: Executive Busy Override
Meridian SL-100 features 6-15 The Conference indicator comes on. The active call is put on hold. The caller receives dial tone. Enter the next conferee’s DN. Response: The caller receives ringback until the conferee answers. Talk privately with this person before completing the conference or multi-party connection. -
Page 152: Group Intercom
6-16 Meridian SL-100 features Group Intercom The Group Intercom feature provides a grouping of telephones within an organization or department. This arrangement provides users within that intercom group to call each other by dialing a code assigned by the System Administrator. -
Page 153: Last Number Redial
Meridian SL-100 features 6-17 The current call is put on hold. Hang up. Response: The current call is disconnected. Press the Group Intercom key. Response: The Group Intercom indicator comes on. The call is established. You have completed this procedure. -
Page 154: Malicious Call Hold
6-18 Meridian SL-100 features Procedure 6-29 Activating the Make Set Busy feature Press the Make Busy key. Response: The Make Busy indicator comes on. No calls ring to the DN. Incoming callers receive a busy signal. You have completed this procedure. -
Page 155: Message Waiting
Meridian SL-100 features 6-19 Enter the Malicious Call Hold feature access code. Response: The system generates records with information on the caller. Contact System Administration. Note 1: After the Malicious Call Hold feature has been activated, the caller must be manually taken off hold. Hang up, or continue talking to the caller. -
Page 156: Multiple Appearance Directory Number Ring Forward
6-20 Meridian SL-100 features Hang up. Press the Release (Rls) key. Response: The DN indicator goes off. Message Waiting indicator goes off. If Message Waiting indicator is still on, more messages are waiting. Repeat Steps 2 and 3. You have completed this procedure. -
Page 157: Multiple Station Message Waiting Indication
Meridian SL-100 features 6-21 Procedure 6-34 Activating MADN ring forward Press the MRFM key. Response: The DN indicators are unaffected by feature activation. The DN indicators flash at all appearances of the MADN. Any MADN appearance can answer the call;... -
Page 158: Valid Terminals For Msmwi Feature
6-22 Meridian SL-100 features Table 6-2xxx Valid terminals for MSMWI feature Terminal description Terminal type Proprietary business sets PSET PSET w/display M2000 digital telephones (digital IVD sets) M2009 M2018 M2112 M2317 Meridian modular telephones (digital) M2006 M2008 M2008HF M2016S M2216... -
Page 159: Msmwi Feature Applications
Meridian SL-100 features 6-23 In order to use the MSMWI feature, a primary terminal must have one of the following features assigned to it: Message Waiting (MWT) Executive Message Waiting (EMW) All attempts to remove MWT or EMW from the primary terminal will be blocked until all MSMWI assignments associated with that primary terminal are removed from the corresponding secondary terminals. -
Page 160: Ring Again
6-24 Meridian SL-100 features Procedure 6-35 Allowing another person to join your conversation while on a call Press the Privacy Release key. Response: The DN indicator flashes on all phones that are in the same MADN group. When the second MADN group member joins the call, the DN indicator stops flashing. -
Page 161: Speed Call
Meridian SL-100 features 6-25 Procedure 6-37 Deactivating the Ring Again feature Press the Ring Again key a second time before notification that the busy line is free. Response: The Ring Again indicator turns off. You have completed this procedure. Speed Call This feature allows the user to dial a preprogrammed number using a 1- or 2-digit code. - Page 162 6-26 Meridian SL-100 features Response: The system dials the phone number automatically. You have completed this procedure. Procedure 6-39 Storing a Speed Call number Press the Speed Call key. Response: The Speed Call indicator flashes. Dial the 1- or 2-digit code to be associated with the number being stored.
-
Page 163: Trunk Member Display
Meridian SL-100 features 6-27 Response: The Speed Call indicator flashes. Press the Release (Rls) key. Response: The Speed Call indicator goes off. You have completed this procedure. Trunk Member Display The Trunk Member Display TRKDISP feature is used with the Meridian business set (MBS)/integrated voice and data (IVD) display sets. -
Page 164: Operation With The Complete Lmoh Functionality
6-28 Meridian SL-100 features MBS and ISDN lines. For MBS and ISDN sets, the feature is asigned and applied on a per set basis and is only assignable to key 1. The user can assign LMOH through service order (SERVORD). SERVORD commands NEW or ADO are used to assign the option to a line, CHF to change the option and DEO to delete the option from a line. -
Page 165: Example Of Feature Assignment And Operation
Meridian SL-100 features 6-29 Example of feature assignment and operation Figure 6-1 shows how a customer group CUST_GRP uses AUDIO1 as its central music source and has the following configuration for features CHD, KSMOH, PHOLD and MBSCAMPO in table AUDIO. -
Page 166: Music On Transfer (Mot)
6-30 Meridian SL-100 features Figure 6-3xxx Table AUDIO datafills AUDIOKEY AUDIOKEY ( MUSIC MUSICCLLI 0) $ AUDIO1 KSMOH AUDIO1 PHOLD ( MUSIC MUSICCLLI 1) $ AUDIO1 ( MUSIC MUSICCLLI 2) $ ( MUSIC MUSICCLLI 3) $ AUDIO1 MBSCAMP ( MUSIC MUSICCLLI 4) $... -
Page 167: Provisioning
Meridian SL-100 features 6-31 Provisioning The MOT feature is provisioned on the set using SERVORD and is controlled using the datafill of tables CUSTSTN and AUDIO. Table CUSTSTN The MOT feature adds a new CUSTSTN option known as MOT for the associated customer group. -
Page 168: Feature Setup/Feature Eligibility
6-32 Meridian SL-100 features the call. Set B can also go on-hook to transfer. In any of these scenarios the audio source from set A is automatically stopped. Feature setup/feature eligibility Before a specific line is set up to initiate the MOT feature, the following sets... - Page 169 Meridian SL-100 features 6-33 feature, the holding party first flashes and then dials the activation code for that feature. As a result the held party, due to this flash, has audio provided by the MOT feature during the time the holding party has completed the dialing of the activation code for that feature.
-
Page 170: Data Schema
6-34 Meridian SL-100 features Key Set Music On Hold (KSMOH) If KSMOH is assigned on a line along with MOT, then KSMOH does not provide the audio for 3WC/CXR held calls, as it is already provided by MOT. Data schema Tables IBNLINES, KSETFEAT, CUSTSTN, and AUDIO have been modified with the MOT feature. -
Page 171: Keypad Dialing
Keypad dialing With the Meridian communication adapter (MCA), key pad dialing (KPD) may be used to originate data calls to local and remote hosts, data terminal equipment (DTE), or both from the Meridian modular telephone keypad. The display prompts and information on the telephone set display screen are controlled through the keypad. -
Page 172: Idle State
7-2 Keypad dialing Idle state The valid input characters in this screen format are the left and right arrows (volume control toggle key) indicated in the upper left of the display. The selection portion of this screen consists of one selection at a time. ( <... -
Page 173: Setting The Contrast
Keypad dialing 7-3 Each field in the time and date may be changed independently of the other fields. To select a field, press the volume control toggle key to the left or right, and scroll to the desired field. When a field is selected, it flashes. The valid input characters are displayed in the upper left. -
Page 174: Programming From The Keypad
7-4 Keypad dialing This screen allows the user to adjust the attributes on the set. The volume setting screen uses icons to denote the six different volumes that may be adjusted. The icons replace the “$” shown in the sample screen and represent the following information: bell—ringer volume box containing a cross—buzzer volume... - Page 175 Keypad dialing 7-5 Procedure 7-1 Dialing from the keypad Press P. Response: The local program mode is activated. Press P again. Response: The set returns to an idle state. (Time and date are shown if the set is equipped with the display module option.) Press P followed by #, *, or two digits greater than 20.
- Page 176 7-6 Keypad dialing Press P followed by one of the following values: 1200 2400 4800 9600 19200 555-4001-114 Standard 10.02 November 1999...
- Page 177 Keypad dialing 7-7 Response: The display shows the following in response to the entered values as shown in the “Action” column: Manual Data Call Release Data Call Language Selection Asynchronous Mode Synchronous Mode Enter baud rate 110-bps 150-bps 300-bps 600-bps 1200-bps 2400-bps 4800-bps...
-
Page 178: Manual Data Call (P#)
7-8 Keypad dialing Cancel Data Ring Again Full Duplex Half Duplex Modem Mode Network Mode Internal Clock External Clock PSDS Mode Off PSDS Mode On Enable Echo Canceller Disable Echo Canceller SL-1 Mode SL-1/DMS–100 Mode V.25 bis mode Off V.25 bis mode On Bisync On HDLC On Assert RTS Off... -
Page 179: Release Data Call (P*)
Keypad dialing 7-9 Release Data Call (P*) Procedure 7-3 describes how to release a call in asynchronous and synchronous mode. Note: The P in the following procedure represents the Program key. Procedure 7-3 Releasing a data call while in asynchronous and synchronous mode To release a call while in asynchronous mode, use any of the following methods: ––Press P*. -
Page 180: Asynchronous/Synchronous (P20, 21)
7-10 Keypad dialing Asynchronous/Synchronous (P20, 21) Procedure 7-5 describes how to choose between the asynchronous and synchronous modes. Note: The P in the following procedure represents the Program key. Procedure 7-5 Choosing between asynchronous and synchronous modes Press P20 for asynchronous mode. Press P21 for synchronous mode. -
Page 181: Parity Assignment (P23, P24, P25, P26)
Keypad dialing 7-11 The set exits the programming mode. You have completed this procedure. Parity assignment (P23, P24, P25, P26) Procedure 7-7 describes how to specify the self-checking method of minimizing transmission errors in received data signals. An extra binary signal is added to each character signal to make the total number of 1s or 0s even or odd for each character. -
Page 182: Hotline Activation And Deactivation (P30, P29)
7-12 Keypad dialing The set exits the programming mode. Press P27 to instruct the switch to stop sending prompts to the terminal. Press P to save and exit the command. Response: The set exits the programming mode. You have completed this procedure. Hotline activation and deactivation (P30, P29) A hotline allows the user to have keyboard dialing initiate calls to an Autodial number. -
Page 183: Forced Data Terminal Ready Activation And Deactivation (P34, P33)
Keypad dialing 7-13 Note 1: If a power failure occurs while a Virtual Leased Line is on, the MCA automatically calls back the Auto Dial number when power returns. At the same time, default parameters such as baud rate, parity, or forced DTR are set to those programmed by the keypad dialing functions. -
Page 184: Dynamic Carrier Detect Activation And Deactivation (P36, P35)
7-14 Keypad dialing Response: The set exits the programming mode. You have completed this procedure. Dynamic Carrier Detect activation and deactivation (P36, P35) Procedure 7-12 describes the commands required to turn a Dynamic Carrier Detect (DCD) on or off. This feature is useful for communication software packages that require a transition of carrier detect from low (0) to high (1) to activate answer mode. -
Page 185: Ring Again Feature Cancellation (P39)
Keypad dialing 7-15 Response: Remote loopback is activated for the next data call only. Press P to save and exit the command. Response: The set exits the programming mode. Press P37 to turn remote loopback off. Press P to save and exit the command. Response: The set exits the programming mode. -
Page 186: Modem Mode (P42)
7-16 Keypad dialing Press P41 for half duplex. Modem mode (P42) Procedure 7-16 describes the steps required to dial a modem pool. Note: The P in the following procedure represents the Program key. Procedure 7-16 Modem pooling When you dial a modem pool the MCA prompts: ENTER REMOTE NUMBER Enter number of external modem to access and <CR>. -
Page 187: Psds On/Off (Synchronous) (P46, P47)
Keypad dialing 7-17 PSDS on/off (synchronous) (P46, P47) Procedure 7-19 describes the commands required to turn Public Switch Data Services (PSDS) on or off. Having PSDS on allows you to use the PSDS feature. Note: The P in the following procedure represents the Program key. Procedure 7-19 Turning PSDS On or Off To turn PSDS on or off:... -
Page 188: Bis Mode (P54, P55, P56, P57)
7-18 Keypad dialing Note: The P in the following procedure represents the Program key. Procedure 7-22 Activating SL-1/DMS-100 mode Press P50 to choose SL-1 mode. Press P51 to choose DMS-100 mode. V.25 bis mode (P54, P55, P56, P57) Procedure 7-23 describes the steps required to activate the V.25 bis mode options. -
Page 189: Autodial Programming Activation (P60, P61)
Keypad dialing 7-19 Press P59 to turn RTS on (no flow control). Autodial programming activation (P60, P61) Procedure 7-25 describes the steps required to activate automatic dial (autodial) programming. Note: The P in the following procedure represents the Program key. Procedure 7-25 Activating autodial programming Press P60 to activate automatic dial programming. -
Page 190: Data Parameter Display (P62 Continued)
7-20 Keypad dialing <<< >>> Scroll P to exit. You have completed this procedure. Data parameter display (P62 continued) The volume control key (<<< >>>) is used as a scroll key in Program mode. Table 7-1 shows examples of scrolling through the data parameter settings. Note: The P in the following table represents the Program key. -
Page 191: Status Display (P63)
Keypad dialing 7-21 Example 4: SPEED RESTRICTION OFF SMARTMODEM 9600 Note: To scroll, press <<< >>>. To exit, press P. Status display (P63) Procedure 7-27 shows the layout of the RS-232-C leads information on the display. Use the volume control key (<<< >>>) to scroll through the Program mode selections. -
Page 192: Incoming Data Call
7-22 Keypad dialing Incoming data call The data call is answered automatically, and an audible tone occurs. A data call cannot be manually answered using KPD. The Automatic Answer feature can be disabled through keyboard dialing in asynchronous mode. No prompts are displayed unless the display is in the data call monitor mode. -
Page 193: Locking Data Parameters (P67)
Press P to save the emulation setting and exit the command. Response: The set exits the programming mode. You have completed this procedure. For detailed information on the P66 command, refer to Chapter 8, “Nortel keyboard dialing”, and Chapter 9, “Hayes keyboard dialing”, in this document. Locking data parameters (P67) Procedure 7-30 describes the steps required to lock data parameters. -
Page 194: Voice Directory Number Assignment (P68)
7-24 Keypad dialing Press P to save and exit the command. Response: The set exits the programming mode. You have completed this procedure. Voice Directory Number assignment (P68) Voice Directory Number (VDN) key assignment allows the user to instruct the MCA on which VDN key to make voice call originations. Procedure 7-31 describes the steps required to make a VDN key assignment. -
Page 195: Nortel Keyboard Dialing
Nortel keyboard dialing Database considerations Before configuring the Meridian modular telephone set for keyboard dialing, the following considerations are required to ensure proper operation of the keyboard dialing feature: The data directory number (DN) and secondary DN must have single appearances. -
Page 196: Operational Guidelines
Call Forward key Optional Operational guidelines Nortel (Northern Telecom) keyboard dialing (KBD) allows data calls to be originated to local or remote hosts or data terminal equipment (DTE) using a terminal keyboard. Nortel KBD is supported only for ASCII, asynchronous, character mode, interactive terminals equipped with Electronic Industry Association (EIA) RS-232-C interface. -
Page 197: Initialization
Implementing the P66 command The P66 key allows the user the flexibility of issuing Hayes commands while in Nortel KBD or exiting Nortel KBD and entering Hayes keyboard dialing. The P66 command contains the initial screen and four scrolling screens that enables the user to select which type of modem the MCA can emulate. -
Page 198: Emulation Selections
8-4 Nortel keyboard dialing Table 8-2xxx Emulation selections Action Initial screen Emulation selection (Scroll <<< >>>) Screen 1 Smartmodem 9600 Press P to select emulation and exit. Screen 2 Smartmodem 2400 Press P to select emulation and exit. Screen 3... -
Page 199: Mca Operational Modes
KBD is disabled. The user still has access to Nortel KBD menus; however, when the user exits from the menus, the user is locked out of Nortel KBD. To return to Nortel KBD, the P66 command must be entered, and Nortel KBD must be reselected. -
Page 200: Terminal Parameters
8-6 Nortel keyboard dialing Terminal parameters Terminal parameters, such as baud rate, can be printed on the user’s terminal. Procedure 8-1 describes the steps necessary to display the user’s terminal parameters. Note: indicates a carriage return. (CR) Procedure 8-1 Displaying terminal parameters Press carriage return. -
Page 201: Nortel Kbd Menus
Main menu The Main menu is displayed when the terminal is properly set up for operation and no Nortel KBD call is in progress. This menu contains feature operation selections and instructions. Functions can be selected by entering the letter representing the function required. Figure 8-2 shows an example of the Main menu. -
Page 202: User Input Characteristics
8-8 Nortel keyboard dialing Figure 8-3xxx Modify menu MODIFY MENU A – AUTO NUMBER M – MANUAL ANSWER S – SPEED NUMBER F – SCRIPT FILE R – REMOTE LOOPBACK Q – QUIT MODIFY SELECT : User input characteristics User keyboard dialing input must conform to the following characteristics: All input is echoed to the terminal screen. -
Page 203: Nortel Kbd Dialing Procedures
Other prompts end with a carriage return and a line feed. Nortel KBD dialing procedures Manual dialing The following procedures present dialing instructions for Nortel KBD operation. Procedure 8-2 provides step-by-step instructions for manual dialing used for both local and remote data calls. -
Page 204: Data Speed Call Activation
8-10 Nortel keyboard dialing Response: The following message is displayed: CALLING nnnn The MCA sends the digits to the switch to place the call. The host sends the dialed digits to the MCA. Note: The Digit Display feature supplies both the number called and the number that answers the call. -
Page 205: Autodial Call Activation
Nortel keyboard dialing 8-11 Response: The following prompt appears on the screen. ENTER ACCESS CODE Select the speed call feature using the following format: nn (CR) Response: The following prompt appears on the screen. CALLING nn The MCA sends the speed call and the digit key pressed to the switch to place the call. -
Page 206: Data Call Disconnection
8-12 Nortel keyboard dialing Note: The only valid characters are those on the screen. Illegal characters result in the following prompt: INVALID COMMAND / ENTRY, REENTER: Type H (CR). Response: Terminal displays the Main menu. Type A (CR). Response: The following prompt appears on the screen. -
Page 207: Calling Sequence
Nortel keyboard dialing 8-13 Calling sequence Calls may be either local or remote. Remote calls can be placed using either digital trunks or automated modem pooling. After the call has been initiated, the call progression depends on which type of call has been placed. -
Page 208: Automated Modem Pool Calls
8-14 Nortel keyboard dialing Automated modem pool calls With this feature, the switch automatically determines if the called party must be reached by way of a modem. If so, then the modem is automatically accessed for the user. If the call cannot be connected, then the user is given a message prompt stating the compatibility. -
Page 209: Modify
Nortel keyboard dialing 8-15 The MCA uses the Ring Again feature, or the MCA cancels the previous Ring Again. When the called number becomes free, the MCA sends a BELL character to the terminal. The screen displays the following prompt: DATA STATION NOW AVAILABLE. -
Page 210: Speed Call Number
8-16 Nortel keyboard dialing Enter a menu selection. Type A (CR). Response: AUTODIAL NO. Type nnnnnnn (CR). Response: The telephone set modifies the autodial number. Note: If you release the call at this step, the switch retains the original Autodial number. -
Page 211: Manual Answer
Nortel keyboard dialing 8-17 Response: The following prompt appears: ENTER ACCESS CODE: Type nn (CR). Response: The following prompt appears: SPEED NUMBER: Type nnnnnnn (CR). You can either modify a speed call number or enter a new number. You can keep the number the same by entering a (CR) only. -
Page 212: Remote Loopback
8-18 Nortel keyboard dialing If you want to change the manual answer Step 5 do not want to change the manual Step 7 answer Type Y (CR). Go to Step 8. Type N (CR) or just press the carriage return (CR). -
Page 213: Script File
Nortel keyboard dialing 8-19 Type R (CR). Response: The following prompt appears on the screen: REMOTE LOOPBACK (Y/N): If you want to change the manual answer Step 6 do not want to change the manual Step 8 answer Type Y (CR). - Page 214 8-20 Nortel keyboard dialing After the learn set-up procedure, the user must initiate an Autodial or Speed Call for which the Learn Script mode has been set. If a call using the same feature specified in the Learn Script Menu is not made, the Learn Script mode is canceled;...
- Page 215 Nortel keyboard dialing 8-21 LEARN AUTODIAL SCRIPT LEARN SPEED DIAL SCRIPT SCRIPT FILE DIRECTORY QUIT SELECT: Type D (CR). The following display appears on the screen: DELETE AUTODIAL SCRIPT DELETE SPEED DIAL SCRIPT SCRIPT FILE DIRECTORY QUIT SELECT: Type E (CR).
- Page 216 8-22 Nortel keyboard dialing Type M (CR) to enter a menu selection. Type F (CR). Response: The following display appears on the screen: LEARN SCRIPT DELETE SCRIPT ESCAPE SCRIPT QUIT SELECT: Type L (CR). Response: The Learn Script menu appears on the screen:...
- Page 217 Nortel keyboard dialing 8-23 Refer to Procedure 9-13 for instructions on deleting the script. Type A (CR) or S (CR). Response: The following display appears on the screen: xx BYTES (xx.x%) AVAILABLE FOR NEW SCRIPT. ACTIVATE LEARN MODE (Y/N)? Type Y (CR).
- Page 218 8-24 Nortel keyboard dialing The following screen appears: SCRIPT FILE DIRECTORY ACCESS SCRIPT LENGTH CODE NAME (bytes) ------------------------------- COCOS HP3000 X.25 291 BYTES (14.7%) AVAILABLE FOR A NEW SCRIPT. Type Q (CR). Response: The terminal displays the Main Script menu.
- Page 219 Nortel keyboard dialing 8-25 The Modify menu is displayed: A - AUTO NUMBER M - MANUAL ANSWER S - SPEED NUMBER F - SCRIPT FILE R - REMOTE LOOPBACK Q - QUIT MODIFY SELECT: Type F (CR) to display the Script File Directory choice.
- Page 220 8-26 Nortel keyboard dialing Type N (CR). a script exists Step 13 a script does not exist Step 12 Type A (CR). Response: The following display appears on the screen: SCRIPT DOES NOT EXIST You are returned to the Delete Script menu.
-
Page 221: Example Script File
Nortel keyboard dialing 8-27 The following screen appears: SCRIPT NOT DELETED The user returns to Delete Script menu. Go to Step 17. Type D (CR). SCRIPT FILE DIRECTORY ACCESS SCRIPT LENGTH CODE NAME (bytes) --------------------------- COCOS HP3000 X.25 291 BYTES (14.7%) AVAILABLE FOR A NEW SCRIPT. -
Page 222: Incoming Calls
8-28 Nortel keyboard dialing Table 8-3xxx Example script file (continued) Prompt User input DTE RESPONSE: User ID HOST PROMPT: SLLEA01 DTE RESPONSE: Password HOST PROMPT: PRIVACY MODE END SCRIPT —end— Escape sequences The escape code can be modified at either the Main Script menu or just before activating the learn mode in the Learn Script menu. - Page 223 Nortel keyboard dialing 8-29 displayed. If the Digit Display feature is not assigned to the MCA, the calling number is not displayed at Step 1. Procedure 8-14 Manual answer Type nnnn (CR) Y. Response: The following prompt is displayed: INCOMING CALL.
-
Page 224: Auto Answer
8-30 Nortel keyboard dialing Auto answer This procedure is used when the user’s answer mode is set for Automatic Answer and an incoming data call occurs. If the user changes the speed of the terminal without re-autobauding, the data displayed on the screen at Step 1 is meaningless. -
Page 225: Hayes Keyboard Dialing
Hayes keyboard dialing Hayes keyboard dialing allows you the option of using commands compatible with the Hayes V-series Smartmodem 9600 to originate and answer data calls. This allows the Meridian communication adapter (MCA) to be used with the following software packages that also support the Hayes protocol: Smartcom II V2.0 Smartcom II V2.1... -
Page 226: Autobaud And Autoparity
AT commands does not. Parameter S66 register (nonzero) If the S66 register contains a nonzero value (Nortel KBD), the autobauding operates as follows: If a carriage return (0DH) is entered followed by a period (2EH) and another carriage return (0DH), the Nortel KBD becomes active. -
Page 227: Implementing The P66 Command
Hayes keyboard dialing 9-3 If only a carriage return (0DH) is entered, the Nortel KBD becomes active with only an autobaud performed. For more information about Nortel KBD, refer to Chapter 8, “Nortel keyboard dialing”. If AT, at, A/, or a/ is entered, Hayes keyboard dialing becomes active with an autobaud and autoparity performed. - Page 228 To select the desired emulation, press P66. Scroll through the choices. When you have found the desired screen, press P. For information on Nortel KBD and P66 implementation, refer to Chapter 8, “Nortel keyboard dialing”, in the section titled “Implementing the P66 command”.
-
Page 229: S Registers
Hayes keyboard dialing 9-5 SPEED RESTRICTION xxx HAYES COMPATIBLE MODEM SPEED RESTRICTION xxx NT KBD DIALING prompt appears when the S66 register is HAYES COMPATIBLE MODEM zero (modem emulation), but the values in registers S52, S53, and S54 do not match one of the standard Hayes product codes previously mentioned. To emulate a modem with a product code not mentioned above, select any one of the emulation screens from the P66 menu. -
Page 230: Register S0-Ring To Answer On
9-6 Hayes keyboard dialing where r equals 1 to 69. For the S registers and their associated values used by the MCA, refer to Appendix B, “AT dialing parameter registers”. Some registers defined in the Hayes keyboard dialing implementation are not applicable to the MCA and are ignored. -
Page 231: Register S36-Baud Rate Adapting
Hayes keyboard dialing 9-7 three characters must be of shorter duration than that specified for the guard time. Register S36—baud rate adapting When an attempt to make a connection fails due to incompatible baud rates, the MCA reads this register to determine whether to terminate the connection, or to adapt to the far end baud rate. -
Page 232: User Input Characteristics
9-8 Hayes keyboard dialing 40-character command line buffer. A space (ASCII 20H) can also be used, but does not take up space in the buffer. User input characteristics When you enter data for AT dialing, it must conform to the following characteristics: Each command line must begin with the letters AT or at and end with a carriage return. - Page 233 Hayes keyboard dialing 9-9 when the escape sequence +++ is entered while the MCA is on-line when a call is dropped using a valid break sequence Procedure 9-1 Hayes keyboard dialing escape code sequence Wait at least one second after previous entry. Type +++.
-
Page 234: Hayes At Commands
9-10 Hayes keyboard dialing S12 and S2. A typical example of the escape sequence is described in Procedure 9-1. After returning to command state, you may, for example, release the call using the H command. Or you may re-enter the online state using the O command. -
Page 235: Keyboard Feature Operation
Hayes keyboard dialing 9-11 Table 9-2xxx Result codes (continued) Digit code Word code Meaning CONNECT 4800 Data connection established at 4800 baud CONNECT 9600 Data connection established at 9600 baud CONNECT 19200 Data connection established at 19,200 baud —end— Keyboard feature operation Table 9-3 and Procedures 9-2 through 9-5 illustrate the dialing procedures for AT keyboard dialing. -
Page 236: Establishing A Hayes Keyboard Call
9-12 Hayes keyboard dialing Table 9-3xxx Dial modifiers (continued) Dial modifier Description This character returns the MCA to the command state after dialing (ATD9974500;). These characters can be used in the dialing string, but have no effect on the dialing sequence. P R T W These characters can be used in the dialing string, but have no effect on the dialing sequence. -
Page 237: Auto Answer
Hayes keyboard dialing 9-13 Procedure 9-3 Incomplete Hayes keyboard call Type ATDnnnn (CR). The MCA sends digits when (CR) is received and the network connection is established. The data connection fails. Response: The following prompt is displayed: NO CARRIER The call is released. You have completed this procedure. -
Page 238: Incoming Calls
9-14 Hayes keyboard dialing Procedure 9-5 Manually answering a Hayes data call When the MCA detects an incoming call, the following message displays on the screen: RING Response: The MCA counts rings. Type ATA (CR). Response: The MCA answers. The following message appears on the screen: CONNECT The data connection is established. -
Page 239: Testing And Maintenance
10-1 Testing and maintenance Meridian modular telephone testing consists basically of acceptance test procedures. Impulse noise, background noise, and crosstalk compatibility problems are unlikely. Examine loop length, connect the telephone, and check performance by establishing a communication path to another telephone (or data terminal) and going through the different call routines (enabled features) while observing and verifying the responses at the telephone and data terminal. - Page 240 10-2 Testing and maintenance Each time a Meridian modular telephone is unplugged and a new one plugged in (for example, when replacing a defective telephone), a waiting period of at least 6 seconds is required before the new telephone can be tested.
- Page 241 Testing and maintenance 10-3 Press dial pad key 4. Response: LCD 4 comes on. Press dial pad key 5. Response: LCD 5 comes on. Press dial pad key 6. Response: LCD 6 comes on. Press dial pad key 7. Response: LCD 7 comes on.
- Page 242 10-4 Testing and maintenance Press Function key 2. Response: LCD 2 comes on. Press Function key 3. Response: LCD 3 comes on. Press Function key 4. Response: LCD 4 comes on. Press Function key 5. Response: LCD 5 comes on. Press Function key 6.
- Page 243 Testing and maintenance 10-5 Press Function key 12. Response: LCD 12 comes on. Press Function key 13. Response: LCD 13 comes on. Press Function key 14. Response: LCD 14 comes on. Press Function key 15. Response: LCD 15 comes on. Press Function key 16.
-
Page 244: Volume Adjustment Tests
10-6 Testing and maintenance Press HOLD key. Response: LCDs 6 through 9 come on, and the system provides buzzer tone. Press HOLD key. Response: This step ends the test. Press HOLD key. Response: The telephone set rings. Note: The LCD response does not include the Handsfree LCD on the M2616. The Handsfree LCD remains OFF during these tests. - Page 245 Testing and maintenance 10-7 Repeat Steps 2 and 3 for the alerting tone. Response: The volume of the alerting tone increases and decreases in the same manner as the dial tone. You have completed this procedure. Procedure 10-3 Testing volume adjustment for a handsfree M2616 set Press a loop key (DN).
-
Page 246: Mca Self Test
10-8 Testing and maintenance MCA self test The MCA self test enables a user to test the MCA circuit board, even if there is no data terminal equipment (DTE) present. This test can be run in response to problems with keyboard functions. While the MCA self test is running, the data line and associated voice line are call processing busy (CPB), causing a simultaneous test at the MAP workstation to fail. - Page 247 Testing and maintenance 10-9 Enter the MCA self test access code (usually two or three digits as defined in table IBNXLA). Response: The DN LCD flashes. MCA IS UNDER TEST appears on the DTE screen. If the LCD does not flash, MCA IS UNDER TEST does not appear on the DTE screen, and reorder tone is received continuously, the MCA self test could not be set up.
-
Page 248: Xlaname
10-10 Testing and maintenance Table 10-1xxx Table XLANAME datafill Field Subfield Explanation and action XLANAME Translator name Enter the one- to eight-character alphanumeric name assigned to the customer, feature, or preliminary translator. DEFAULT Default data This field consists of the following subfields: TRSEL, ACR, SMDR, and FEATURE. -
Page 249: Trouble Locating Procedures
Testing and maintenance 10-11 Table 10-2xxx Table IBNXLA datafill Field Subfield Explanation and action This field consists of the following subfields: XLANAME and DGLIDX. Translator name XLANAME Enter the one- to eight-character alphanumeric name assigned to the customer, feature, or preliminary translator. - Page 250 10-12 Testing and maintenance In addition to diagnostic tests performed at the Meridian modular telephones, facility maintenance actions are invoked manually through the following levels on the MAP workstation: line test position (LTP) line test position manual (LTPMAN) line test position line test access (LTPLTA) Periodic maintenance actions are invoked on Meridian modular telephones through the automatic line test (ALT) level of the MAP workstation.
- Page 251 Testing and maintenance 10-13 Replace faulty components. Try to establish a call. Response: If the call attempt is unsuccessful, go to Procedure 10-1. You have completed this procedure. Procedure 10-7 Telephone (voice or dialing) failure trouble locating procedure Check the line cord and handset cord to determine if all TELADAPT connectors are firmly in place, and resecure if loose.
-
Page 252: Automatic Set Relocation
10-14 Testing and maintenance Automatic set relocation Automatic set relocation (ASR) allows a telephone user to move integrated voice data (IVD) telephone sets from one location to another without the intervention of a service person. The ASR process involves two steps. The first step is called the ASR Out process. -
Page 253: Asr Process
Testing and maintenance 10-15 — One DN must be set aside for ASR In use only. One DN must be set aside for each set that is to be relocated at the same time as other sets are being relocated. Up to 1023 DNs can be relocated at the same time. - Page 254 10-16 Testing and maintenance Neither the ASR Out or the ASR In process is available during an image. If the user attempts to perform the ASR process, treatment is given. If a user performs the ASR Out process and afterwards realizes that it was a mistake, only the user can return the LEN to service.
- Page 255 Testing and maintenance 10-17 Procedure 10-9 ASR In process Plug the set into any properly equipped jack. WARNING Telephone set damage If the set is plugged into a wrong jack, several things could happen. If the jack belongs to a non-IVD line card, and an IVD set is plugged into this jack, damage to the digital set or line card, or both, can result.
-
Page 256: Asr Audit
10-18 Testing and maintenance ASR audit If a user performs the ASR Out process and takes the telephone set to an empty LEN and plugs the set in, the ASR process creates the temporary datafill. If the user does not perform the ASR In process, the temporary datafill is deleted by an ASR audit, which is run once a day. -
Page 257: Service Orders
11-1 Service orders Service orders are used for adding, changing, or deleting features. Service orders go through the table editor to fill the customer tables as if entries were made directly into the tables. To open a service order, log on to the MAP workstation and access the SERVORD (service order) system. -
Page 258: Available Ring Types
11-2 Service orders Display-based Expansion Module (DBA)—for digital sets Analog Terminal Adapter (ATA)—for modular and digital sets Available ring types The following ring types are available to the system: FH—fast high FL—fast low SH—slow high SL—slow low Service order commands This chapter provides service order data for the following tasks specific to Meridian modular telephones: adding a Meridian modular telephone set... - Page 259 Service orders 11-3 Table 11-1xxx Example service order commands to add an IVD station (continued) Prompt Response > SONUMBER: NOW 85 04 19 PM > (press RETURN) > 7221000 LCC: > M2216A RINGTYPE: > GROUP: > GROUP1 SUBGRP: > NCOS: >...
-
Page 260: Establishing A Directory Number Hunt Group
11-4 Service orders Table 11-1xxx Example service order commands to add an IVD station (continued) Prompt Response > OPTKEY: > —end— Establishing a directory number hunt group The following service order commands provide an example of establishing a directory number hunt (DNH) group. Table 11-2xxx Example service order commands for establishing a DNH group... - Page 261 Service orders 11-5 Table 11-2xxx Example service order commands for establishing a DNH group (continued) Prompt Response > NCOS: > SNPA: > KEY: > RINGING: > PILOT_LEN > 2 0 0 3 DN_LEN: > 7224000 LEN: > 2 0 0 4 KEY: >...
-
Page 262: Establishing A Multiline Hunt Group
11-6 Service orders Table 11-2xxx Example service order commands for establishing a DNH group (continued) Prompt Response GROUPSIZE: > —end— Establishing a multiline hunt group The following service order commands provide an example of establishing a multiline hunt (MLH) group. Table 11-3 Example service order commands for establishing a multiline hunt group Prompt... - Page 263 Service orders 11-7 Table 11-3 Example service order commands for establishing a multiline hunt group (continued) Prompt Response SUBGRP: > NCOS: > SNPA: > KEY: > RINGING: > PILOT_LEN: > 2 0 0 6 MEM_LEN: > 7224000 KEY: > LINE_CLASS: >...
-
Page 264: Adding A Member To A Hunt Group
11-8 Service orders Adding a member to a hunt group The following service order commands provide an example of adding an M2616 member to a hunt group. Table 11-4xxx Adding a member to a hunt group Prompt Response > SERVORD >... -
Page 265: Assigning The Multiple Station Message Waiting Indication Feature To An Existing Set
Service orders 11-9 Assigning the Multiple Station Message Waiting Indication feature to an existing set The Multiple Station Message Waiting Indication (MSMWI) feature can be assigned to a set through the use of the ADO command. The following table represents an instance of the MSMWI feature on an existing set. Table 11-5xxx Assigning MSMWI to an existing set... -
Page 266: Adding The Handsfree Feature To An M2008Hf Telephone Set
11-10 Service orders Adding the Handsfree feature to an M2008HF telephone set The following service order commands provide an example of what the prompting will look like for the activation of handsfree on a M2008. The handsfree prompt is not new, but is now valid for M2008HF set types. The OPTKEY 1 in the following table indicates that a feature is being added to the DN, not that key 1 will be assigned the handsfree feature. -
Page 267: Adding The Trunk Member Display (Trkdisp) Feature
Service orders 11-11 Adding the Trunk Member Display (TRKDISP) feature Table 11-7 shows an example of adding the TRKDISP feature. Table 11-7xxx Adding the Trunk Member Display feature Prompt Response SONUMBER: NOW 97 3 11 AM > (press RETURN) DN_OR_LEN: >... -
Page 268: Adding The Name Option For Name Display Character Extension
11-12 Service orders Adding the NAME option for Name Display Character Extension For Name Display Character Extension, both the existing 15 character name feature and the 24 character name feature is compatible. The user can have 24 characters displayed internally and still have 15 characters displayed externally. - Page 269 Service orders 11-13 Table 11-9xxx Adding the NAME24 option allowing 24 characters Prompt Response SONUMBER: NOW 98 6 23 AM > (press RETURN) DN_OR_LEN: > 9975111 OPTKEY: > OPTION: > NAME24 DISPLAYNAME: > KATHLEEN_SCHEUERMANN COMMAND AS ENTERED: ADO NOW 98 6 23 AM 9975111 ( NAME24(KATHLEEN_SCHEUERMANN)$) ENTER Y TO CONFIRM, N TO REJECT OR E TO EDIT >y Meridian SuperNode MSL-100 Meridian Modular Telephones Reference Manual MSL11...
-
Page 270: Removing A Feature From A Telephone Set
11-14 Service orders Removing a feature from a telephone set The following service order commands provide an example of removing a feature from a Meridian modular telephone set. Table 11-10xxx Sample service order commands for removing a feature Prompt Response >... - Page 271 Service orders 11-15 user to assign different forwarding DNs to the keys specified in the KEYLIST of the CFB/CFD feature. This was done with the creation of the control type of “K” for Per Key. To implement the CFB/CFD Per Key feature, the user selects “K” for the CFB/CFD Per Key control field and specifies the desired DN keys on which the feature is allowed in the KEYLIST.
- Page 272 11-16 Service orders Table 11-11 Sample service order commands for CFB with the control field of “K” being added to a M2616 set (continued) Prompt Response ADO NOW 97 2 26 AM 8664035 ( 1 CFB K $ ) $ ENTER Y TO CONFIRM, N TO REJECT OR E TO EDIT >y MACHINES ARE OUT OF SYNC, SERVICE ORDERS NOT ALLOWED...
-
Page 273: Ordering Information
12-1 Ordering information The Meridian modular telephones can be ordered through your distributor. Table 12-1 lists the available Meridian modular telephones. Table 12-1xxx Meridian modular telephones Merdian modular telehphones M2006 Single Line set M2008 Multiline Business set M2008 Multiline Business set with Display M2008HF Multiline Business set with Handsfree M2008HF Multiline Business set with Display and Handsfree M2616 Multiline Business set with Handsfree... - Page 274 12-2 Ordering information Table 12-2 lists the accessories for the Meridian modular telephones. Table 12-2xxx Meridian modular telephone accessories Accessories Communicator PC interface card Meridian External Alerter Interface Meridian Communications Adapter (MCA) Analog Terminal Adapter (ATA) MCA/ATA Wall Transformer MCA/ATA Footstand MCA/ATA Jumper/relay kit MCA User Guide ATA User Guide...
- Page 275 Ordering information 12-3 Table 12-3xxx M2616CT accessories Accessories Blank Brandline insert Corded Legacy Handset 7, 14, or 25 foot 6 conductor line cord —end— Table 12-4 lists the supported accessories for manufacture discontinued products. Table 12-4xxx Supported accessories for manufacture discontinued products Accessories Order code...
- Page 276 12-4 Ordering information The Meridian modular telephones can be ordered alone or with the Meridian communication adapter (MCA), display module (where available), and power supply board factory-installed. Any factory-installed hardware option that requires additional power automatically comes with the power supply board.
- Page 277 Ordering information 12-5 Table 12-5xxx Meridian modular telephone stocklist (continued) Description Ordering code Chameleon Ash NT2K08XF-35 Dolphin Grey NT2K08XF-93 M2008 modular telephone (with MCA and display) Black NT2K08GG-03 (with power board) Chameleon Ash NT2K08GG-35 (with power board) Dolphin Grey NT2K08GG-93 (with power board) M2008 HF (basic) Black NT2K08ZC-03...
- Page 278 12-6 Ordering information Table 12-5xxx Meridian modular telephone stocklist (continued) Description Ordering code Dolphin Grey NT2K18XF-93 M2216 (with MCA) Black NT2K18GG-03 (with power board) Chameleon Ash NT2K18GG-35 (with power board) Dolphin Grey NT2K18GG-93 (with power board) M2616 modular telephone (basic) Black NT2K16GD-03 Chameleon Ash...
- Page 279 Ordering information 12-7 Table 12-6 lists the hardware options that can be purchased separately. Table 12-6xxx Meridian modular telephone accessories and miscellaneous optional hardware stocklist Description Ordering Code Additional requirements Meridian communications NT2K65XR Power supply board adapter 3 language display option Power supply board with Aries I NTZK telephone sets...
- Page 280 12-8 Ordering information Table 12-6xxx Meridian modular telephone accessories and miscellaneous optional hardware stocklist (continued) Description Ordering Code Additional requirements 48V power supply board and NT2K10WD Transformer or closet interconnect cable power 110V transformer AO367335 Power supply board 220V transformer AO367314 Power supply board Cable, power supply board...
- Page 281 Ordering information 12-9 Table 12-6xxx Meridian modular telephone accessories and miscellaneous optional hardware stocklist (continued) Description Ordering Code Additional requirements Black P07845-03 Chameleon Ash P07845-35 Dolphin Grey P07845-93 M2006/M2008 key cap NT2K81AB package Wall mount clip P0670793 Lens directory identification P0652720 Meridian Telephone Quick NT5F53AB...
-
Page 283: Appendix A Hayes Standard At Commands
13-1 Appendix A Hayes standard AT commands Table 13-1 describes the standard Hayes AT commands. Each command must be preceded by AT or at when entered on a separate line. If the AT command is concatenated, then the AT is only used at the beginning of the command with a maximum of 40 characters. - Page 284 13-2 Appendix A Table 13-1xxx Standard Hayes keyboard dialing commands (continued) Command Description Returns a 2s compliment checksum of MCA read-only memory (ROM) Displays a037800c004420 b100000000 (same value as Smartmodem V-series 9600 returns) Go into the on-line state. Go into the on-line state. MCA returns result codes.
- Page 285 Hayes standard AT commands 13-3 Table 13-1xxx Standard Hayes keyboard dialing commands (continued) Command Description &D3 Hang up and reset to default settings (for example, MCA profile configuration). &Q0* Disable baud rate ADAPTING. MCA attempts to connect at the speed of last autobaud command. This command is the default if ADAPTING is disabled in the MCA profile.
- Page 286 13-4 Appendix A Table 13-1xxx Standard Hayes keyboard dialing commands (continued) Command Description &F Reset MCA to default settings. &Y0 Reset MCA to default settings. &Y1 Reset MCA to default settings. —end— The following is a list of other commands that are supported. These commands are not executed, and no error messages are returned.
- Page 287 Hayes standard AT commands 13-5 &G0 &G1 &G2 &J0 &J1 &K0 &K1 &K2 &K3 &K4 &K5 &L0 &L1 &M0 &P0 &P1 &T0 &W0 &W1 Meridian SuperNode MSL-100 Meridian Modular Telephones Reference Manual MSL11...
-
Page 289: Appendix B At Dialing Parameter Registers
14-1 Appendix B AT dialing parameter registers The software reset command Z may be used to reset all the registers to their default values. Table 14-1 describes the Hayes keyboard dialing parameter registers. Note 1: All values are in decimal form. Note 2: The firmware does not perform a range check on the value assigned to an S register. - Page 290 14-2 Appendix B Table 14-1xxx Hayes keyboard dialing parameter registers (continued) Register Range Default Description 20–255 x (0.02) sec escape sequence guard time RESERVED RESERVED 0, 1 0 = no adapting 1 = adapting S37–S50 0–255 NOT USED 0–255 x (0.25) sec delay until modem pool activation Any valid ASCII code most significant product code character...
-
Page 291: Appendix C Basic At Command Sets
15-1 Appendix C Basic AT command sets Basic AT command sets for data calls Table 15-1 describes the AT command sets for data calls. Table 15-1xxx AT command sets for data calls Command Parameter Result answer calls manually n = 0 or 1 0 = carrier defect asserted 1 = carrier detect not asserted Dnnnn... -
Page 292: Basic At Command Sets For Voice Calls
15-2 Appendix C Basic AT command sets for voice calls Table 15-2 describes the AT command sets for voice calls. Table 15-2xxx AT command sets for voice calls Command Parameter Result AT attention key for switching between data or voice transmission mode to AT command mode manual answer for handsfree and on-hook dialing DPnnnn n = 0–99... - Page 293 16-1 Appendix D MCA digit and word code responses Table 16-1 describes the digit and word code responses returned by the Meridian communications adapter (MCA). Table 16-1xxx Digit- and word-code responses Digit code Word code Meaning command line processed without error CONNECT data connection established RING...
-
Page 295: Appendix E Script File Menus
17-1 Appendix E Script file menus The following figures show access to the various script file menus: Figure 17-1 Main menu Figure 17-2 Modify menu Figure 17-3 Script File menu Figure 17-4 Learn Script menu Procedure 17-1 shows an example procedure of how to access and learn the autodial script after moving through the menus as shown in Figure 17-1 through Figure 17-4. - Page 296 17-2 Appendix E Figure 17-2xxx Modify menu MODIFY MENU A – AUTO NUMBER M – MANUAL ANSWER S – SPEED NUMBER F – SCRIPT FILE R – REMOTE LOOPBACK Q – QUIT MODIFY SELECT : F (CR) Enter F(CR) to select the Script File menu.
- Page 297 Script file menus 17-3 Figure 17-4xxx Learn script menu LEARN SCRIPT MENU A – LEARN AUTODIAL SCRIPT D – SCRIPT FILE DIRECTORY S – LEARN SPEED SCRIPT Q – QUIT LEARN MENU SELECT : A (CR) Enter A(CR) to learn the autodial script.
- Page 298 17-4 Appendix E Note: xxxx represents the script name entered by the user. Type N (CR). Response: The following screen displays: PASSWD: XXXXXXXX m (CR) AUTO SCRIPT YES starts with autodial call. NO starts with access code XX speed call. Ends with escape code sequence.
- Page 299 18-1 List of terms See Automatic Answer Back. See answer agent key. See alternating current. See Automatic Call Back See automatic call distribution. ACDNR See automatic call distribution not ready. See automatic digit display. AEMK See answer emergency key. agent status lamp (ASL) The agent status lamp allows the supervisor to monitor an agent’s status continuously.
-
Page 300: 18-2 List Of Terms
18-2 List of terms American National Standards Institute (ANSI) ANSI is an organization supported by U.S. industry to establish uniformity of standards. American Standard Code for Information Interchange (ASCII) ASCII is a code with seven information signals plus one parity check signal, designed for interworking between computers. - Page 301 List of terms 18-3 See agent status lamp. See automatic set relocation. See analog terminal adapter. AT dialing AT dialing refers to Hayes keyboard dialing, which is a method used to make data calls through the MSL-100 system by entering a command starting with the letters AT, followed by a few characters to distinguish the command, and then a carriage return.
- Page 302 18-4 List of terms Batch Change Supplement (BCS) Prior to BCS36, a DMS-100 Family release. See Batch Change Supplement. See Call Agent key. Call Agent key (CAG) The Call Agent key allows the supervisor to establish direct communication with agents. This key is used in conjunction with observe agent and agent status lamp.
- Page 303 List of terms 18-5 carriage return (0DH) same as pressing the RETURN key See central control. central control (CC) The central control comprises the data processing functions with associated data store and program store. See Controlled Interflow key. CLSUP See Call Supervisor. CLSUP-DIFF See Call Supervisor-different.
- Page 304 18-6 List of terms data communications equipment (DCE) Data communications equipment provides for the movement of encoded information by means of electric transmission systems by way of one or more data links according to a protocol. data directory number (DDN) A data directory number is the number that designates a subscriber data station within a numbering plan area.
- Page 305 List of terms 18-7 digital line module (DLM) The digital line module is a 23-position peripheral module developed to allow the MSL-100 system to interface with the M2000 series of telephone sets. digital set interface processor (DSIP) The digital set interface processor performs the messaging and control functions to support the parallel space time switch in the digital line module.
- Page 306 18-8 List of terms See digital line module. See directory number. See Directory Number Hunt. See Display Queue Status key. See Display Queue Threshold key. DSIP See digital set interface processor. See data terminal equipment. See data terminal ready. EDPC See enhanced digital port card.
- Page 307 List of terms 18-9 See Emergency key. enhanced digital port card (EDPC) The Meridian modular telephones interface with the MSL-100 system through the enhanced digital port card, which houses 16 ports that support 16 digital telephones and data units. external alerter The external alerter board provides an interface to standard remote ringing devices, such as a ringing unit installed in a location separate from the telephone.
- Page 308 See integrated voice and data. See keyboard dialing. keyboard dialing (KBD) Nortel keyboard dialing allows data calls to be originated to local or remote hosts or data terminal equipment using a terminal keyboard. Nortel keyboard dialing is supported only for ASCII, asynchronous, character mode, interactive terminals equipped with Electronic Industries Association RS-232-C interface.
- Page 309 List of terms 18-11 keypad dialing (KPD) With the Meridian programmable data adapter, keypad dialing can be used to originate data calls to local and remote hosts, data terminal equipment, or both from the Meridian modular telephone keypad using the Program (P) key.
-
Page 310: M2006 Modular Telephone
18-12 List of terms line group controller (LGC) A line group controller is a peripheral module that connects DS30 links from the network to line concentrating modules. line test position (LTP) The LTP is a MAP workstation position that has been specifically equipped for performing line tests. -
Page 311: M2616 Modular Telephone
List of terms 18-13 M2216-1 modular telephone (manufacture discontinued) See M2216 modular telephone. M2216-2 modular telephone (manufacture discontinued) The M2216-2 modular telephone is a multiline ACD IVD digital set with 15 feature keys and a factory-installed M0200 display module. The M2216-2 set is similar to the M2216 set, but with one RJ-11 jack for an electret supervisor headset and one PJ-327 jack for a carbon headset. - Page 312 RS-232-C interface. Meridian modular telephone (MMT) The Meridian modular telephone line of Nortel products encompasses five telephone sets, an integrated data module (the Meridian Programmable Data Adapter), a 22-key/lamp add-on option, a display module option, and three different types of external power options.
- Page 313 See Northern Telecom. Nortel Networks See Northern Telecom. Northern Telecom (Nortel) A part of the tricorporate structure, which consists of Nortel Technology, Bell Canada, and Northern Telecom. Northern Telecom publication (NTP) An NTP is a document that contains descriptive information about Nortel hardware or software modules and performance-oriented practices for installing, testing, and maintaining the system.
- Page 314 18-16 List of terms See Program key. See private branch exchange. See personal computer. See pulse code modulation. See primary directory number. See product engineering code. period (2EH) Same as pressing the period “.” key peripheral module (PM) All hardware or modules of the system that provide interfaces between the network module and external line, trunk, or service facilities.
- Page 315 (PEC) A PEC is an eight-character code that provides a unique identification for each marketable product manufactured by Nortel. Program key The Program key (P key) controls access to the display or Meridian programmable data adapter for parameter selection. The Program Mode is activated by pressing P.
- Page 316 18-18 List of terms Return To Service (RTS) The RTS command is a MAP command that restores communications among or between the components of the remote, communications between the remote and the host, or subscriber service. Ring Again (RAG) Ring Again is one of the message prompts that is given if the user cannot be connected.
- Page 317 List of terms 18-19 TADO See touch asynchronous data option. touch asynchronous data option (TADO) The touch asynchronous data option provides data capabilities to the M3000 Touchphone with an interface to ASCII terminals and personal computers at data speeds from 110 bytes/s to 19.2 Kbyte/s. telephone security group Trunk Member Display (TRKDISP) The TRKDISP feature is used with the Meridian business set...
- Page 320 Except as expressly authorized in writing by Nortel Networks, the holder is granted no rights to use the information contained herein.
Need help?
Do you have a question about the Meridian SL-100 and is the answer not in the manual?
Questions and answers