PRESONUS StudioLive III Series Owner's Manual
Digital mix console / recorder with motorizedfaders
Hide thumbs
Also See for StudioLive III Series:
- Owner's manual (157 pages) ,
- Quick start manual (20 pages) ,
- Networking manual (17 pages)

Related Manuals for PRESONUS StudioLive III Series


Summary of Contents for PRESONUS StudioLive III Series
- Page 1 StudioLive Series III Digital Mix Console / Recorder with Motorized Faders 电动推子数字混音控制台/录音机 Owner’s Manual 用户手册 ® 3n6lish www. presonus. com...
-
Page 2: Table Of Contents
3.4 TypicalBand Setup Diagrams 经典的乐队设置图 — 20 T ableofContents目录 3.5 TypicalChurch SetupDiagrams 经典的教堂设置图 — 21 Overview 概览— 1 BasicMixFunctionsOverview 基本混合功能概览— 22 Introduction 介绍 — 1 4.1 Channel Strip Basics 通道条基础知识 — 22 1.2 About this Manual 关于本手册 — 1 FaderLayers andBanks 推子层和库 — 23 1.3 CompanionPreSonusProducts 配套产品-—... - Page 3 6.11.2 Main/Subgroup Assignment 6 The Fat Channel — 43 Main/Subgroup分配 (所有32-Channel StudioLive 6.1 Overview 概况— 43 型号) — 72 6.1.1 A/B Comparison for EQ and Dynamics Settings EQ和Dynamics设置的A/B比较— 44 7 Tape Controls 录音带控制 — 73 6.1.2 Copy/Paste & Preset Load/Save 复制/粘贴 7.1 Pairing a Bluetooth Device 蓝牙设备组—...
- Page 4 10 Monitoring Controls 监听控制— 13 Resources 信号源— 121 13.1 NetworkingOverview网络概况— 121 10.1 Solo Controls 独奏控制 — 98 13.1.1 Wired Ethernet Control Setup 有限网络控制设 10.1.1 Solo Modes 独奏模式— 99 置 — 121 10.1.2 Using the Solo Bus for Monitoring 使用独奏总线 进行监听— 100 13.2 StereoMicrophonePlacement 立体声麦克风摆放—...
- Page 5 14.2.1 Input Source 输入信号源 — 143 14.2.2 Analog Sends 模拟发送 — 145 14.2.3 AVB Sends AVB 发送— 146 14.2.4 USB Sends USB发送 — 147 14.2.5 SD Card SD卡— 149 14.3 Block Diagrams PreSonus 块状示意图— 150 14.4 Troubleshooting Information 故障排除信息 — 150...
-
Page 6: Overview 概览
Owner’s Manual Overview 概览 Introduction 介绍 Thank you for purchasing your PreSonus® StudioLive™ Series III Digital Mixer. PreSonus Audio Electronics has built your StudioLive mixer with high-grade components to ensure optimum performance for many years to come. StudioLive Series III breaks new boundaries for music performance and production. - Page 7 • StudioLive 16 Throughout this manual, you will find Power User Tips, providing mixing tricks and explanations of various useful audio terms. Near the end of this manual, you’ll find a selection of audio tutorials, covering everything from microphone placement to recommended equalizer and compression settings.
-
Page 8: Companionpresonusproducts 配套产品
就是你)的最佳方式,是确保你从信号链的起点到终点都能获得最佳体验。 为了实现这一目标,我们从第一天起,把无缝集成放在这些产品的每个设计 阶段。其成果是,系统按照预期的方式相互传输,开箱即用,没有过多的配 置麻烦。 For more information on how our PreSonus AVB networking devices play so well with one another, please review the PreSonus AVB Networking Guide. 关于 PreSonus AVB 网络设备,如何相互配合的更多信息,请查阅 PreSonus AVB 网络指南。 For more information on individual products, please visit www.presonus.com. -
Page 9: What's In The Box
StudioLive III系列 快速入门指南 • IEC power cord IEC电源线 Power User Tip: All companion software and drivers for yourPreSonus StudioLive Series III mixer are available for download from your My PreSonus user account. Please visit http://my.presonus.com and register your StudioLive Series III mixer to receive downloads and licenses. -
Page 10: Additional Resources 其它资源
StudioLive Series III mixers. • StudioLive Series III Fat Channel Plug-ins Addendum. Additional Fat Channel plug-in models can be purchased from PreSonus.com. This guide covers the installation and authorization process as well as the features of each plug-in model. - Page 11 Studio One and Studio One Artist. -StudioLive Series III AVB网络指南。本手册涵盖了StudioLive Series III调音台 高级AVB音频网络配置。 -StudioLive Series III Fat Channel Plug-ins Addendum。可以从PreSonus.com 买附加的Fat Channel插件型号。本指南涵盖了安装和授权过程,以及每个 件模型的功能。 -StudioLive Series III HUI for ProTools DAW Control Addendum。StudioLive III 系列调音台可以使用HUI模拟控制Avid ProTools®。...
-
Page 12: Getting Started 入门
Getting Started StudioLive™ Series III Level Setting Procedure Owner’s Manual Getting Started 入门 Before you begin, here are a few rules to get you started: 在你开始之前,这里有几条规则可以让你入门: • Always turn down the Main fader and both the Monitor and Phones knobs in the Monitor section before making connections. -
Page 13: Levelsetting Procedure 水平设置程序
Getting Started StudioLive™ Series III Level Setting Procedure Owner’s Manual Plug your StudioLive into a power outlet and turn it on. 将 StudioLive 插入电源插座,并打开。 Move all of the faders on your StudioLive down to the lowest setting. 将 StudioLive上的所有推子移到最低设置。 Mute Mute Mute Mute... - Page 14 Getting Started StudioLive™ Series III Level Setting Procedure Owner’s Manual Press the Input button in the Fat Channel. 按 Fat Channel 的 Input 输入按钮。 Ch. 6 Ch. 7 Ch. 8 Ch. 9 Ch. 1 0 Ch. 1 1 Ch. 1 2 Ch.
- Page 15 Getting Started StudioLive™ Series III Level Setting Procedure Owner’s Manual 13. Raise the Channel 1 fader to its “U”setting (unity gain). 将 Channel 1的推子提高到 "U "设置(统一增益)。 14. Press the “Main” button in the Fat Channel to assign Channel 1 to the Main output bus.
-
Page 16: Useful Concepts 实用概念
Getting Started StudioLive™ Series III Useful Concepts Owner’s Manual Useful Concepts 实用概念 This section covers some basic workflow concepts to help you to more quickly get acquainted with your StudioLive. 本节包括一些工作流程的基本概念,以帮助你快速地熟悉你的 StudioLive。 2.2.1 Select Buttons and the Fat Channel 选择 Buttons & Fat Channel All around the StudioLive, you will see Select buttons. -
Page 17: Channel
The Compressor and EQ in the Fat Channel are equipped with multiple plug-in models that can be loaded on each input and output to alter the sound and provide your mix with more character. Additional Fat Channel plug-ins can be purchased from the PreSonus Shop. Fat Channel中的压缩器和均衡器,配备了多个插件,可以加载到每个输入和输 出上,以改变声音,为你的混音提供更多的特色。Additional Fat Channel 插件,... -
Page 18: Faderlayers
Matrix 矩阵混音提供辅助混音,在任意总线输出以及每个输入通道创建。 What’s more, FlexMixes can be stereo linked or used as mono, providing maximum flexibility. 还有,FlexMixes可以立体声连接或作为单声道使用,提供跟多灵 活性。 Power User Tip: Compact StudioLive Series III mixers, like the StudioLive 32SC, are equipped with more FlexMix buses than physical analog FlexMix outputs. These additional buses can be routed over the AVB network to NSB-series stageboxes, EarMix personal monitor systems, and other mixers on the network. -
Page 19: Dcagroups Dca 组合
Getting Started StudioLive™ Series III Useful Concepts Owner’s Manual DCA Groups DCA组 2.2.5 Filter DCA Groups are a way to control the overall volume of a group of related channels (such as all drum channels). While you can accomplish a similar result by routing channels to a subgroup and controlling their volume with the subgroup master, DCA Filter Groups require no such re-routing and offer some additional utility. -
Page 20: Projects,Scenes,Andpresets项目,场景和预置
StudioLive III系列调音台,接受将任何输入路由到任何通道,将任何混音路由到 任何输出。这样你能够为你的调音台,创建一个定制的配置。你可以把任何模 拟输入或数字返回(AVB、USB或SD)拼接到你喜欢的任意通道,以及把任何 FlexMix 路由到任意模拟输出、AVB网络,或作为USB音频接口和SD多轨录音机 的信号源。 The Digital Patching screen provides a detailed overview of what type of source is feeding each channel, which input or return is patched to each channel, and where each bus is routed. Digital Patching 显示了一个详细的概述,即输入或返回配置的每个通道提供信 号源是什么类型的,以及每个总线被路由到哪里。... -
Page 21: User Profiles 用户配置文件
StudioLive™SeriesIII Getting Started Useful Concepts Owner’s Manual Scenes that share the same Global System settings should be stored within the same Project. Many Scenes can be stored within each Project. A Scene saves all the settings you need to recall your mix like Channel Strip parameters, Fat Channel models and settings, and Channel Identifiers like name, color, and type. -
Page 22: Hookup 联机
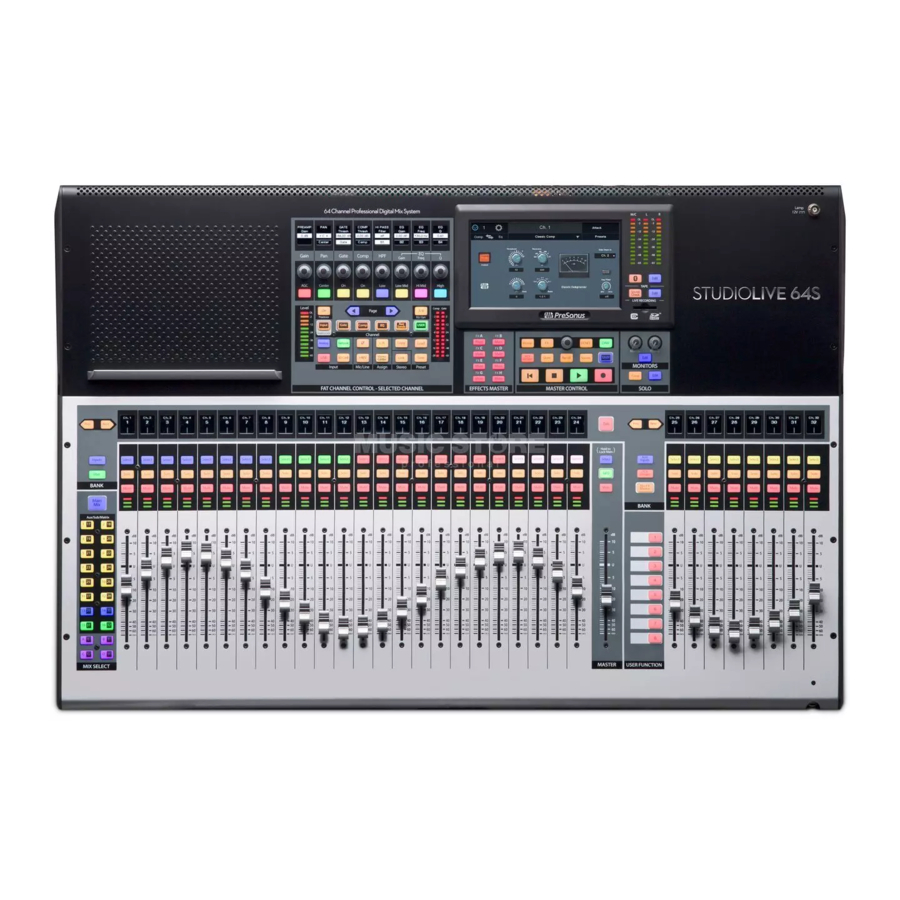
Hookup StudioLive™ Series III Rear Panel Configurations Owner’s Manual Hookup 联机 Rear Panel Configurations 后面板的配置 StudioLive 64S 3.1.1 AnalogInputs模拟输入 Mic / Line Mic Only Aux Inputs Tape Inputs Talkback In 4 1/4” TRS 1 XLR (F) 2 RCA 32 Combo AnalogOutputs模拟输出... -
Page 23: Studiolive 32Sx
Hookup StudioLive™ Series III Rear Panel Configurations Owner’s Manual 3.1.3 StudioLive 32SX AnalogInputs模拟输入 Mic / Line Mic Only Aux Inputs Tape Inputs Talkback In 4 1/4” TRS 1 XLR (F) 16 XLR 2 RCA 16 Combo AnalogOutputs模拟输出 Subgroup Mono Sum Tape Out Flex Mix Main Out... - Page 24 Hookup StudioLive™ Series III Rear Panel Configurations Owner’s Manual StudioLive 32 (Blue Model) 型号 3.1.5 AnalogInputs 模拟输入 Mic / Line Mic Only Aux Inputs Tape Inputs Talkback In 4 1/4” TRS 16 XLR 2 RCA 1 XLR (F) 16 Combo AnalogOutputs 模拟输出...
- Page 25 Analog Inputs 模拟输入 Mic/Line Inputs. Each microphone input on the StudioLive Series III mixers is supplied with a remote PreSonus XMAX microphone preamplifier, for use with all types of microphones. The XMAX preamp features a Class A input buffer circuit, followed by a dual-servo gain stage.
- Page 26 power to mics that don’t require power can damage them (especially ribbon mics). Switch phantom power offfor all channels where it is not required. 警示 : 电容式麦克风和其他一些包含有源前置电路的特殊麦克风,需要幻象电源 。然而,对不需要电源的麦克风应用幻象电源会损坏它们(特别是带状麦克风) 。对所有不需要幻象电源的通道关闭幻象电源。 XLR connector wiring for phantom power: 幻象电源的XLR连接器接线: Pin 1 = GND Pin 2 = +48V Pin 3 = +48V Note: As with many audio devices, plugging a microphone or line-level device, or...
- Page 27 StudioLive™SeriesIII Hookup Owner’s Manual Rear Panel Connections 3.2.2 Analog Outputs 模拟输出 Sub Outputs (StudioLive 32 S, StudioLive 32 SX, and StudioLive 32 only). These are balanced mono outputs, one for each subgroup. 这些都是平衡的单声道输出,每个子组都有。 Power User Tip: While other StudioLive Series III models do not provide dedicated subgroups outputs, every 32-channel StudioLive Series III is equipped with four dedicated subgroups in addition to the FlexMixes.
- Page 28 StudioLive 64S 的 Mono Output 输出配备了自己的单声道总线。这条总线可 以配置为单声道混音或中心通道,并为独立于主混音总线的所有输入,提供 电平控制。当配置为中心通道时,每个通道都有一个独特的中心发散控制。 关于 StudioLive 64S 单声道总线的更多信息,请参见第5.6节。 • All other models. For all other StudioLive Series III models, the Mono output is an analog sum of the Main stereo mix. All other models. 对于所有其他 StudioLive 系列III型号,单声道输出是主立体 声混音的模拟和。...
-
Page 29: Digitalandnetworking 数字与网络
Hookup StudioLive™ Series III Rear Panel Connections Owner’s Manual 3.2.3 Digital and Networking 数字与网络化 AES Output. By default, the AES/EBU digital output receives the same signal as the stereo Main outputs. However, you can route any of the mix buses, Tape input, or the Solo bus to this output. -
Page 30: Power 电源
Hookup StudioLive™ Series III Top Panel Connections Owner’s Manual 3.2.4 Power 电源 Power Input. Connect the provided IEC power cable to this input. 将提供的IEC电源线连接到这个输入口。 Power Switch. Push the top part of this switch to power your StudioLive on, and the bottom to switch power off. -
Page 31: Typicalband Setup Diagrams 经典的乐队设置图
Hookup StudioLive™ Series III Typical Band Setup Diagrams Owner’s Manual Typical Band Setup Diagrams 有代表性的波段设置图 backup acoustic guitar/DI bass/DI vocal mic lead vocal electric guitar amp drum kit backup vocal mics keyboard/DI wireless in-ear (keys) wireless router subwoofer front of house drum monitor sidefill speakers... -
Page 32: Typicalchurch Setupdiagrams 经典的教堂设置图
Hookup StudioLive™ Series III Typical Church Setup Diagrams Owner’s Manual Typical Church Setup Diagrams 有代表性的 Church设置图 acoustic guitar/DI bass/DI electric guitar electric guitar drum kit amp (rhythm) amp (lead) piano iPads running Mobile devices running QMix-UC UC Surface wireless router keyboard/DI laptop running Capture... -
Page 33: Channel Strip Basics 通道条基础知识
Basic Mix Functions Overview StudioLive™ Series III Channel Strip Basics Owner’s Manual 4 Basic Mix Functions Overview 基本 Mix 混音功能概述 StudioLive Series III mixers offer many powerful and flexible mixing tools that allow you to quickly set up and monitor multiple mixes at once and have been designed to make managing multiple layers of input channels, mix masters, and fader mixes, as well as navigating even the most complicated systems simple. - Page 34 • Pan Position. Shows the current pan position for the channel currently being controlled by the channel strip. 显示当前被通道条控制的通道的当前的pan声音位置。 Select Button 按钮 Press this button to select a channel or bus to bring its Fat Channel settings into focus. Select buttons can also be used to add and remove channels from Subgroups, DCA Filters, and Mute Groups.
-
Page 35: Faderlayers Andbanks 推子层和库
Basic Mix Functions Overview StudioLive™ Series III Fader Layers and Banks Owner’s Manual Fader Layers and Banks 推子层与波段 With so many available analog and digital inputs, mixes, buses, and DCAs, your StudioLive has more internal mix elements than it does channel strips to control them. -
Page 36: Userfaderlayer 用户推子层
Basic Mix Functions Overview StudioLive™ Series III Fader Layers and Banks Owner’s Manual Mix/FX Masters. When enabled, the master level for Subgroups, FlexMixes, and FX buses are available from your StudioLive control surface as follows: 启用后,Subgroups、FlexMixes 和 FX 总线的主控电平可以从你的 StudioLive 控 制界面获得,如下所示:... - Page 37 Select the channel of your choice on the Touch Display to assign it to the channel strip of your choice. 在Touch Display屏上,选择你所选择的通道,将其分配到你所选择的 通道条上。 Repeat steps 2-4 as necessary to populate the User layer with your most needed channels. 根据需要重复步骤 2-4,用你最需要的通道填充 User layer 用户层。 Press Done when finished.
-
Page 38: Filterdca Groups 滤波器Dca组
Basic Mix Functions Overview StudioLive™ Series III Filter DCA Groups Owner’s Manual Filter DCA Groups 滤波器DCA数字控制音频组 Professional mixing consoles have addressed the problem of managing complex mixes with population groups that reduce the channels you’re viewing at one time and DCAs that control the overall level of a group of channels. 专业调音台解决了复杂混音处理的问题。群体组可以减少你在同一时间查看... - Page 39 Basic Mix Functions Overview StudioLive™ Series III Filter DCA Groups Owner’s Manual 3. Select the DCA Group you’d like to use. 选择你想要的DCA Group Main Volume -84.00 dB Edit Auto Groups Traditional DCA Edit 4. Press the“Edit” button on the Master Control Touch Display. Groups Drums Guitars...
-
Page 40: Editing Or Deleting 编辑或删除 Afilterdcagroup一个滤波器Dca组
4.3.2 Editing or Deleting a Filter DCA Group 编辑或删除滤波器DCA组 1. To edit or delete a Filter DCA Group, first touch its name to select it. 2. Touch the Edit button to enter the Filter DCA Group Edit screen. 3. To add or remove a channel from the group, touch the name of the channel in the provided list to select or deselect them. -
Page 41: Main Meters 主测量
默认情况下,DCA组中每个通道的独立电平,会随着该组的主推子进行调整, 并维持它们的相对混合。启用 Traditional DCA 模式,将调整该组的输出电平, 不会改变该组内各通道的推子位置。 Main Meters 主输出电平 These meters show signal level for the Main bus. An additional meter is provided to the left of the Main L/R meters on the StudioLive 64S to monitor the signal level on the Mono/Center bus. -
Page 42: Talkbackeditscreen 对讲编辑图像
Basic Mix Functions Overview StudioLive™ Series III Talkback System Owner’s Manual 4.5.1 Talkback Edit Screen 对讲编辑图像 Press the Talkback Channel’s Select button to open the Talkback Edit screen, giving you access to additional options. 按下Talkback Channel 的 "Select" 按钮,打开 Talkback Edit 屏幕,授权 你访问更多的选项。... -
Page 43: Buses And Routing 总线与回路
Buses and Routing StudioLive™ Series III FlexMixes Owner’s Manual Buses and Routing 总线和路由 StudioLive Series III mixers were designed to be highly adaptive to your mix environment. At the core of this design philosophy are the FlexMixes, however, dedicated Internal FX buses, four fixed subgroups (32-channel models), and a main mono bus (StudioLive 64S) round out the complement of routable outputs on your StudioLive mixer. - Page 44 StudioLive 64s Users: To access the second mix layer for any Mix button, press the button a second time. For instance, if you press the Mix 1| 17 button once, you will be viewing Mix 1. A second press of this button will show Mix 17. The button will toggle between the two mixes with each consecutive press until another Mix button is selected.
-
Page 45: Flexmixes
Buses and Routing StudioLive™ Series III Aux Mixes Owner’s Manual 3. Mix Name. Tap to customize name. 4. Stereo Link Options. You can choose to link the four functions when creating a stereo bus, or leave them independently controllable: Fader Level, Compressor/ Limiter, Names, and Bus Panning (Stereo Matrix Mixing only). -
Page 46: Pre/Postchannelsends前/后通道的发送
Buses and Routing StudioLive™ Series III Aux Mixes Owner’s Manual Press the Settings button on the Master Control Touch Display. 按Master Control Touch Display屏上的 Settings 按钮。 Press the Aux button under FlexMix Mode. 按下FlexMix模式下的Aux按钮。 5.2.1 Pre/Post Channel Sends 前置/后置通道发送 You can select the send positions for the channels routed to each Aux mix. By default, all aux buses are set to Pre 1. - Page 47 As an example, let’s create a mono monitor mix on FlexMix 1. 作为一个例子,让我们在 FlexMix 1上创建一个单声道监听混音。 Press the Mix 1 button in the Mix Select section to access settings for Aux Mix 1. The faders move to show send levels to Aux 1 for each channel in your mix. 按...
-
Page 48: Working With External Effects Processors
Buses and Routing StudioLive™ Series III Aux Mixes Owner’s Manual Move the Master fader to adjust the overall level of the monitor mix. BANK 移动 Master 推子, 来调整监听混音的整体水平。 5. You can listen to the monitor mix you’re creating in your headphones or control room monitors by pressing the Edit button in the Monitors control section. - Page 49 Buses and Routing StudioLive™ Series III Subgroups Owner’s Manual Press the Next button to bring the Aux Input channel layer. 按 "Next"按钮,使 Aux Input 输入通道层。 Press the Select button that corresponds to Aux Input 1 (the input pair you’re using as an effects return), to access its settings in the Fat Channel. 按与...
-
Page 50: Subgroups 子群
Subgroups 子群 A subgroup allows you to combine multiple channels into a single bus so that the overall level for the entire group is controlled by a single fader and can be processed using the Fat Channel’s noise gate, limiter, compression, and EQ, in addition to the processing available for each channel. -
Page 51: Fixed Subgroups (32-Channelmodelsonly) 固定子
Buses and Routing StudioLive™ Series III Subgroups Owner’s Manual Creating a Subgroup 创建 Subgroup 5.3.1 Press the Select button for the FlexMix Master you’d like to make a Subgroup. Talk 按 " Select" 按 钮 , 为 F l e x M i x M a s t e r 选 择 你 想 创 建 Subgroup 。... - Page 52 To view the fixed Subgroups’ master faders, press the Mix/FX Masters button. This will bring up the master output control for every output bus. 要查看固定子群的主推子,请按Mix/FX Masters按钮。这将调出每个输出总线的主输出控制。 Use the Next button to bank to the end of the FlexMixes. Next 使用 " "...
- Page 53 StudioLive™SeriesIII Buses and Routing 5. 3 Subgroups Owner’s Manual To add a channel to a fixed Subgroup: 添 加 频 道 到 一 个 固 定 的 Subgroup: Select the channel and press the Subgroup button in the Assign section of Level Page the Fat Channel.
- Page 54 StudioLive™SeriesIII Buses and Routing 5. 3 Subgroups Owner’s Manual Enable all four Stereo Link Options. 启用所有四个Stereo Link Options 选项。 In the Fat Channel, press the Stereo Link button. 在Fat Channel中,按 Stereo Link按钮。 Ch. 10 Ch. 11 Ch. 12 Ch. 13 Ch.
-
Page 55: Matrix Mixes 矩阵混音
Buses and Routing StudioLive™ Series III Matrix Mixes Owner’s Manual Press the FlexMix fader’s Select button to use the Fat Channel section to add dynamics processing and EQ to the stereo drum group. Talk 1.按住 FlexMix 键,接着按每个鼓通道的 "Select "键,把它们分配到 Inputs subgroup中。... -
Page 56: Creatinga Frontfillmix 创建 Frontfillmix
Buses and Routing StudioLive™ Series III FX Buses Owner’s Manual Pre/ Post Channel Sends 前置/后置通道发送 You can select the send positions for the channels routed to each Matrix mix. By default, all Matrix mixes are set to Pre 1. This places the send of every input channel to each aux bus before the fader, limiter, EQ, and compressor, but after the Polarity Invert switch, high-pass filter, and gate. - Page 57 Pre/ Post Channel Sends 前置/后置通道发送 Like Aux mixes, you can select the send position for each channel that is routed to an FX Mix. By default, all FX buses are set to Post. This places the send of every input channel to each FX bus after the fader, limiter, EQ, and compressor, Polarity Invert switch, high-pass filter, and gate.
-
Page 58: Main Mono/Center Bus 主单声道/中心总线 (Studiolive64Sonly) (仅适用Studiolive64S )
Main Mono/Center Bus (StudioLive 64S only) 主单声道/中心总线(仅限 StudioLive 64S ) Unlike the other StudioLive Series III mixer models which are equipped with with a Mono Sum output that shares the Main bus with the Main stereo outputs, the StudioLive 64S’s Mono output is provided with its own mix bus. This bus can either be configured as a mono bus for the stereo main mix or as the center channel in an LCR configuration. - Page 59 Buses and Routing StudioLive™ Series III Main Mono/Center Bus (StudioLive 64S only) Owner’s Manual 5.6.1 Mono Bus Mode Mono 总线模式 Sample Rate: When Stereo Pan mode is active, the send level for each channel to the Mono bus is set to 0.0 dB and the send position is set to post-fader by default. In this Show Peak Hold:...
- Page 60 使用 subgroup workflow 的好处是,简化了向重低音扬声器添加通道的工作: 你只需要按下 assign按钮,该通道以你在Main mix混音中设置的相同电平,通 过重低音扬声器输出。这就是Mono bus的默认反应。 But what if you want more kick in your subwoofer? Or less keys? 但是,你想让低音炮有更多的冲击力?或更少调试? This is where the Mono send comes into play, allowing you to customize your low- frequency mix to better enhance your system. If you need even more control, you can set the send position to pre-fader for a truly independent subwoofer mix.
-
Page 61: Lcr Mode 模式
Buses and Routing StudioLive™ Series III Main Mono/Center Bus (StudioLive 64S only) Owner’s Manual 5.6.2 LCR Mode 模式 LCR Pan mode allows you to pan each channel across three positions, from left to center to right and back again, through any position in between. This is accomplished using the Center Divergence control. - Page 62 When the Center Divergence is set to 50% and the channel is panned to the center (<C>), the signal will be sent to the both sides of the Stereo bus and the Center bus at the same level. 当 Center Divergence设置为50%时,通道Pan到中央(<C>),信号将以 相同的电平,发送到立体声总线和中央总线的两侧。...
-
Page 63: The Fat Channel
The Fat Channel StudioLive™ Series III Overview Owner’s Manual The Fat Channel Overview 概述 The Fat Channel gives you powerful signal processing, mixing, and configuration tools for each channel and bus on your StudioLive. To begin working on a channel or mix with the Fat Channel, simply press its Select button. - Page 64 The Fat Channel StudioLive™ Series III Overview Owner’s Manual InputChannels FX Returns Main Mix Aux & Tape Inputs FlexMixes Preamp Gain √ HiPassFilter √ √ √ Gate √ Compressor √ √ √ √ √ 4-Band 4-Band 4-Band 6-Band 6-Band √ √...
- Page 65 6.1.2 Copy/Paste & Preset Load/Save 复制/粘贴和预设加载/保存 Press Copy to copy Fat Channel settings from the currently selected channel to one or more other channels. Once Copy is pressed, the Select buttons for all other channels start blinking. Press the Select button on any channels to which you want to copy Fat Channel settings from the currently selected channel.
- Page 66 The Fat Channel StudioLive™ Series III Overview Owner’s Manual To save a preset: 要保存一个预置。 1. Press Save. The Fat Channel Presets view is shown on the Touch Display. 按 Save。Fat Channel Presets 预设视图,会显示在 Touch Display 触摸显示 屏上。 Press the Store button in the Master Control area to bring up the onscreen keyboard.
- Page 67 The Fat Channel StudioLive™ Series III Fat Channel Navigation Owner’s Manual Select a preset and load it by pressing the Recall button in the Master Control area. 按 Master 主控区的 Recall 键,选择一个预设与加载 它。 Talk You can also momentarily audition the effects of a preset by selecting a preset and pressing the Audition button on the Touch Display, or rename it by pressing Rename and entering a new name with the onscreen keyboard.
- Page 68 Dynamic Fat Channel The eight Scribble Strip displays, encoders, and buttons at the top of the Fat Channel change dynamically to provide access to a variety of features and mixing tools. What is controlled here is determined by both the type of channel or bus that is selected and by the Fat Channel mode buttons.
- Page 70 StudioLive™SeriesIII The Fat Channel Input Mode Owner’s Manual 1. Processor On/Off. Enables/Disables the currently active processor. 启用/停用当前活动的处理器。 2. Input. For all StudioLive models, this opens the Channel Overview screen on the Touch Display. For models equipped with a Dynamic Fat Channel, this button will spill the Input layer controls onto the Fat Channel displays, encoders, and buttons.
-
Page 71: Input Mode 输入模式
Input Mode 输入模式 Pressing the Input button in the Fat Channel gives you access to important controls and informative displays for the currently selected channel or mix. Note: These controls are fixed on the StudioLive 32SX and 32SC. For all other models, pressing holding the Input button will lock or unlock these functions to the Dynamic Fat Channel controls. - Page 72 StudioLive™SeriesIII The Fat Channel Input Mode Owner’s Manual 5. High-Pass Filter. Use the encoder to set the High-Pass Filter Frequency Threshold for the Selected Channel or Output Bus. The filter’s threshold can be set from 24 Hz to 1 kHz. When the threshold is set to its lowest point, the filter is off.
- Page 73 编码器根据系统菜单中,设置的Pan Mode set 设置Mono Send level电平或 Center Divergence percentage 百分比。该按钮在Pre- &Post-fader推子前和推 子后,发送至Mono Bus之间进行切换。关于单声道总线的更多信息, 见第 5.6 节。 3. Delay. Sets the alignment delay for the currently selected input or bus. More information about input and output delays and be found in Section 13.6 and 13.7.
-
Page 74: Gate Mode (Dynamic Fat Channel)
Power User Tip: Inpractice, expanders and noise gates are used almost identically. The main difference is that an expander is smoother and more gradual, so that it is easier to set the attack and release times correctly. More information about Gates and Expanders can be found at: www.presonus.com/learn/technical-articles/How-To-Use-Dynamics- Processing-Getting-Started-With-Compressors-Gates-and-More Inpractice,扩展器和噪声门的使用几乎相同。主要的区别是,扩展器更平滑、 更渐进,更容易正确设置attack和release的时间。关于门和扩展器的更多信息的... - Page 75 3. Attack. Sets the time it takes for the gate to“open”when a signal passes the threshold. 设置当信号通过阈值时,门 "open" 所需的时间。 Power User Tip: A fast attack rate is crucial for percussive instruments. Slow-rising signals such as vocals and bass guitar require a slower attack; with these signals, a faster attack can cause an audible click.
-
Page 76: Compressor Mode (Dynamic Fat Channel)
The Fat Channel StudioLive™ Series III Compressor Mode (Dynamic Fat Channel) Owner’s Manual 6.5 Compressor Mode (Dynamic Fat Channel) 压缩器模式 (动态Fat Channel) Pressing the Comp button in the Fat Channel gives you access to the Compressor parameters for the selected channel or mix. A compressor is a dynamics processor that reduces the dynamic range of a signal by attenuating it by a set ratio when it exceeds a defined threshold. - Page 77 4. Release. Sets the time it takes for the compressor to stop attenuating a signal once it falls below the threshold. 设定当信号低于阈值时,压缩器停止衰减。 Power User Tip: Very short compressor release times can produce a choppy or “jittery” sound, especially when compressing instruments that have a lot oflow-frequency components, such as bass guitar.
-
Page 78: Tube Leveling Amplifier 电子管均衡放大器
The Fat Channel StudioLive™ Series III Compressor Mode (Dynamic Fat Channel) Owner’s Manual 6.5.2 Tube Leveling Amplifier 电子管平衡放大器 Dynamic Fat Channel Controls 动态 Fat Channel Controls 控制 When the Tube Leveling Amplifier is selected, the following controls are available in the Fat Channel: 当选择了电子管均衡放大器时,在Fat Channel中可以使用以下控制:... -
Page 79: Class-A Fet Compressor A类Fet压缩器
The Fat Channel StudioLive™ Series III Compressor Mode (Dynamic Fat Channel) Owner’s Manual Class-A FET Compressor A类 FET 压缩机 6.5.3 Dynamic Fat Channel Controls When the Class-A FET Compressor is selected, the following controls are available in the Fat Channel: 当选择了A类FET压缩器时,Fat Channel中可用控制:... -
Page 80: Eq Mode (Dynamic Fat Channel)
The Fat Channel StudioLive™ Series III EQ Mode (Dynamic Fat Channel) Owner’s Manual EQ Mode (Dynamic Fat Channel) 模式 Pressing the EQ button in the Fat Channel gives you access to equalization settings for the currently selected channel or mix. An EQ (or equalizer) is a tone control that lets you make changes in the tonal balance of a signal. - Page 81 5. Band 3 / High-Mid Gain. Sets the amount by which the selected frequency will be boosted or cut. Press the button below to turn the band on or off. 设定所选频提升或削减的量。按下面的按钮,可以打开或关闭该频段。 6. Band 3 / High-Mid Frequency/Q. The encoder can control either frequency or Q for this band of EQ.
-
Page 82: Eq模式 (动态Fat Channel )
The Fat Channel StudioLive™ Series III EQ Mode (Dynamic Fat Channel) Owner’s Manual 6.6.2 Passive Program EQ 均衡器 Dynamic Fat Channel Controls When the Passive EQ is selected, the following controls are available in the Fat Channel: 选择 Passive EQ 时,以下控制可在Fat Channel: HIGH HIGH HIGH... - Page 83 L-MID H- MID L- MID H- MID HIGH Gain Freq Freq Gain Gain Freq Gain 0.00 dB 60 Hz 0.00 dB 700 Hz 0.00 dB 4.8 kHz 0.00 Low Gain. Sets the amount of boost or cut to apply the low-frequency band of this EQ.
-
Page 84: Aux Sends Mode (Dynamic Fat Channel)
The Fat Channel StudioLive™ Series III Aux Sends Mode (Dynamic Fat Channel) Owner’s Manual Aux Sends Mode (Dynamic Fat Channel) 模式 Dynamic Fat Channel Controls When the Fat Channel is in Aux Sends mode, the Scribble Strips will display different parameters depending on how you have your FlexMixes configured: 当Fat Channel 处于... -
Page 85: Channel Overview 通道概况
The Fat Channel StudioLive™ Series III Fat Channel Screens Owner’s Manual Fat Channel Screens 图像 6.8.1 Channel Overview 概况 While an Input channel is selected and Input mode is active, the Channel Overview is shown on the Touch Display: 所选 Input channel 并激活Input mode模式时,图像会显示Channel Overview 通 道概况:... - Page 86 11. Gate. Displays the Noise Gate overview. Touch to open the Noise Gate Screen. See Section 6.8.3 for more information. 显示 "Noise Gate" 概况。触控以打开"Noise Gate" 图像。更多信息 见第 6.8.3 节。 12. Delay. Sets the amount of alignment delay applied to the input channel or bus. Touch to enable manipulation by the Master Control encoder.
-
Page 87: Channel Settings Screen 通道设置图像
The Fat Channel StudioLive™ Series III Fat Channel Screens Owner’s Manual Channel Settings Screen 图像 6.8.2 When the overview screen for a channel or bus is open, can access the Channel Settings screen by tapping on the Settings button (Call-out #3). 当打开通道或总线概况图像时,通过点击Settings按钮(Call-out #3)进入... - Page 88 - Comp./Limiter. Enable this option to link the compression and limiting detection behavior for linked channels or buses. With this option on, signals occurring either linked channel cause identical gain reduction behavior in both. Disable this option to let the compressor/limiter act independently on each linked channel.
-
Page 89: Gate Overview Screen 门控概况图像
The Fat Channel StudioLive™ Series III Fat Channel Screens Owner’s Manual 6.8.3 Gate Overview Screen 图像 While Gate is active in the Fat Channel, the Touch Display displays the Gate Overview screen, displaying every Gate parameter available, along with useful metering and a graphical representation of the effect of current settings. - Page 90 Note: Because the StudioLive 64S employs the quad-core FLEX DSP engine, any of the first 32 channels can be used a Key Source for channels 1-32 while any of the second 32 channels can be used as a Key Source for channels 33-64. StudioLive 64S 采用四核...
-
Page 91: Compressor Overview Screens 压缩器概况 图像
强烈、有力的音调特点。 In addition to the three plug-in models that come with your StudioLive mixer, the following additional compressor models are available for purchase from shop.presonus.com: 除了StudioLive调音台附带的三种插件型号外,还有以下额外的压缩器型 shop.presonus.com 号供购买,还有网站 • Brit Comp. Capturing the unique sound of a twin VCA gain-reduction amplifier design, the Brit Comp is ideal for taming piano dynamics or adding punch to drums and percussion. - Page 92 这款具有标志性1950年代的压缩器/限幅器的模型,在任何信号上,都 能赋予一种明确无误的顺滑宽厚感。包括Classic Studio Bundle。 • RC-500 Compressor. FET-based compressors such as the one in the PreSonus RC 500 use transistors to emulate a triode tube’s operation and sound. Modeled after PreSonus’ RC500 signature FET compressor, this plug-in provides an ultra-fast attack time and repeatable performance.
- Page 93 The Fat Channel StudioLive™ Series III Fat Channel Screens Owner’s Manual Power User Tip: Use the Shift or Tap buttons to “null” button any parameter by pressing and holding the Shift or Tap button while adjusting the control of your choice to return that control to its default setting.
- Page 94 parameter. Touching a drop-down selector (such as Key Source) lets you select from a list of relevant choices. Use the Master Control encoder to scroll through choices. Touching onscreen buttons toggles the related parameter on or off. 当Fat Channel 处于Standard Compressor 模式时,Touch Display 会显示一个概览 图像的相关参数,以及实用测量和当前设置的效果图形显示。触屏上的任意...
- Page 95 The Fat Channel StudioLive™ Series III Fat Channel Screens Owner’s Manual Note: Because the StudioLive 64S employs the quad-core FLEX DSP engine, any of the first 32 channels can be used a Key Source for channels 1-32 while any of the second 32 channels can be used as a Key Source for channels 33-64.
-
Page 96: Eq Overview Screens Eq概况图像
The Fat Channel StudioLive™ Series III Fat Channel Screens Owner’s Manual 6.8.4.3 Class-A FET Compressor Overview Screen When the Fat Channel is in Class A FET Compressor mode, the Touch Display shows an overview screen that displays the relevant parameters. Touching any onscreen knob allows you to use the Master Control encoder to set the selected parameter. - Page 97 RC-500 EQ. It’s rare to find a truly outstanding solid-state channel strip that can deliver a vintage vibe reminiscent of classic high-end products, yet employs a thoroughly modern design. The PreSonus RC 500 was one of these rare gems. The RC 500 EQ plug-in is modeled after the channel strip’s 3-band semi- parametric EQ and combines isolated filters and optimized, per-band Q to provide subtle signal- shaping without harsh artifacts.
- Page 98 为经典。包括在免费的 PreSonus Bundle 中。 More information on installing and using plug-in models can be found in the PreSonus StudioLive Fat Channel Add-on Addendum. Once a plug-in has been installed on your StudioLive, it will be available from the drop-down list on the Touch Display.
- Page 99 The Fat Channel StudioLive™ Series III Fat Channel Screens Owner’s Manual 1. Signal Source. Displays whether this channel is receiving signal from an analog or digital source. Press to open the Digital Patching screen. For more information, see Section 12.3.1. 显示该通道是否正在接收模拟或数字信号。按下打开数字配线屏幕。...
- Page 100 1. Gain. Controls the amount of boost or cut applied to the frequency of the currently of the currently selected band (Call-out #5, 7, 9, or 11). 控制应用于当前所选频段(Call-out #5、7、9或11)频率的提升或衰 减量。 2. Frequency. Sets the center frequency for the currently selected band (Call-out #5, 7, 9, or 11).
- Page 101 The Fat Channel StudioLive™ Series III Fat Channel Screens Owner’s Manual 14. High Shelf On/Off. Enables/disables the high shelf EQ. When the Shelf button is not engaged, the High band is a parametric EQ. Enabling the Shelf button turns the High band into a high shelving EQ that alters, by a fixed amount, a band of high frequencies at and above a user-selected shelving frequency.
- Page 102 The Fat Channel StudioLive™ Series III Fat Channel Screens Owner’s Manual 1. EQ On/Off. Enables/disables the EQ globally. Touch to toggle on or off 启用/禁用均衡器。触控来切换开启或关闭。 2. Low Boost. Boosts the Low Band. 提升了低频段。 3. Low Frequency. Sets the center frequency for the Low Band. 设置低频段的center frequency中心频率。...
- Page 103 5. Low-Mid Gain. Sets the Gain for the Low-Mid Band. 6. High-Mid Frequency. Sets the center frequency for the High-Mid Band. 7. High-Mid Gain. Sets the Gain for the High-Mid Band. 8. High Gain. Sets the Gain for the High Band. 1.
-
Page 104: User Mode 用户模式
The Fat Channel StudioLive™ Series III User Mode Owner’s Manual 6.8.6 Aux Sends Overview Screen Aux 发送概况图像 While Aux Sends Mode is engaged, the Touch Display displays the Aux Sends Overview screen. This screen displays the send level of the Selected channel in every FlexMix: 当... - Page 105 • Analog. Signal is routed from the corresponding analog input. 信号从相应的模拟输入端路由。 • Network. Signal is routed from the corresponding channel from the AVB network input (if applicable). 信号从AVB网络输入的相应通道路由(如果适用)。 • USB. Signal is routed from the corresponding USB audio channel, for playback from a computer.
-
Page 106: Input Meters 输入计量器
StudioLive™SeriesIII The Fat Channel 6 .1 0 Input Controls Owner’s Manual 6.10.2 Input Meters 输入测量 On the left side of the Fat Channel control section, you’ll see the “Level” meter. This meter gives you a visual indication of input signal level for the selected channel or mix. - Page 107 StudioLive™SeriesIII The Fat Channel 6 .1 0 Input Controls Owner’s Manual Network Input Source 网络输入信号源 Press the Network Input Source icon to select the Network Input that will be active on the currently selected channel or bus when the source is set to Network in the Fat channel.
- Page 108 Press the SD Input Source icon to select the SD Track that will be active on the currently selected channel or bus when the source is set to SD in the Fat channel. Tap on any SD playback stream to patch it to the current channel. 按...
-
Page 109: Polarity And Phantom Power 极性和幻 象电源
The Fat Channel StudioLive™ Series III 6.10 Input Controls Owner’s Manual Polarity and Phantom Power 极性与幻象电源 6.10.4 When an analog input channel is selected, these buttons let you toggle channel polarity flipping (Ø) and phantom power (+48V) on or off. Power User Tip: When recording with more than one open microphone, use the polarity invert to combat phase cancellation between microphones. - Page 110 • Channel/bus names 通道名称/连接名 For more information on selecting linking options, seeSection 6.8.2. 关于选择连接选项的更多信息, 见第 6.8.2 节 。...
-
Page 111: Output Assignment Buttons 输出分配按钮
The Fat Channel StudioLive™ Series III 6.11 Output Assignment Buttons Owner’s Manual Output Assignment Buttons 输出分配键 6.11 6.11.1 Main/Mono Bus Assignment (StudioLive 64S only) 主/单声道总线分配(仅限 StudioLive 64S) When an input channel is selected, you can use these buttons to assign it to the Main and Mono/Center buses. -
Page 112: Tape Controls 录音带控制
Tape Controls StudioLive™ Series III Pairing a Bluetooth Device Owner’s Manual Tape Controls 磁带控制装置 By default, the Tape channel is sourced from the analog Tape In jacks on the rear of the mixer and the currently paired Bluetooth audio device simultaneously. The two signals are mixed together and summed on the Tape In channel. - Page 113 这个按钮可以将 USB 连接的计算机的音频,路由到磁带输入通道。一旦选择, USB streams 37和38将作为磁带源可用。关于USB音频路由的更多信息, 请见 6.10.3 节。 • SD Card. Touch this button to route audio residing on an inserted SD card to the Tape input channel. 此按钮,将驻留在插入的SD卡上的音频,路由到 Tape input channel 通道。 The Tape to Main knob mirrors the setting of the Tape input channel fader. Touch the knob to adjust this setting with the Master Control encoder.
-
Page 114: Sd Recording Sd录制
包装之前你的卡已经被格式化。有几个工具可以让你格式化你的SD/SDHC卡。 Please note: The StudioLive Series III mixers support both SD and SDHC cards up to 32 GB. Tested and approved models and brands can be found at www.PreSonus.com. 请注意: StudioLive III 系列调音台同时支持 SD 和 SDHC 卡,最大容量为 32GB 。经过 测试和认证过的型号和品牌,可在 www.PreSonus.com 找到。... - Page 115 Creating a New Session for Recording 创建一个New Session会话 When the Live Recording screen is displayed on the Touch Display, you can create a new live recording Session by touching New Session on the Touch Display. This brings up the New Session screen. 当实时录音显示在...
-
Page 116: Loading A Session For Playback 加载一个用于播放的片
StudioLive Series III mixers, allowing you to track directly to an SD card using the same high-quality audio engine as PreSonus’ ground breaking Studio One DAW. Session files recorded on the SD Card can be opened directly in Studio One and Capture –... - Page 117 SD Recording StudioLive™ Series III Capture Screen Owner’s Manual 在计算机上使用USB音频接口,用Capture 3.0录制的会话可以加载到SD卡上, 以便以后播放。欲了解更多信息, 请查阅《 Capture ™ 3 软件参考手册》 。 1. Record Duration. Shows the total recorded length of the current Session. 2. Current Position. Shows the current position of the recording and playback. 显示录音和回放的当前位置。...
-
Page 118: Recording Status Messages 录制状态信息
9. Rec. Errors. This field indicates the number of errors and the potential for errors to occur. See Section 8.3.1 for more information. 这个字段表示错误的数量和发生错误的可能性。更多信息 见第 8.3.1 节 。 10. Status. Displays the current recording status. See Section 8.3.1 for details. 显示当前的录音状态。... -
Page 119: Transport Controls 传输控制
StudioLive™SeriesIII SD Recording 8 .3 Capture Screen Owner’s Manual Rec Errors: 录音错误: • Green. The recording session currently has no recording errors and there isn’t a chance that an error will occur. The green box will display 0 inside, showing that there are currently no record errors. -
Page 120: Virtual Sound Check 虚拟声音核查
SD Recording StudioLive™ Series III Virtual Sound Check Owner’s Manual Virtual Sound Check 虚拟声音检测 We’ve all been there. The drummer is stuck in traffic. The guitarist is stuck at work. And you’re stuck at front-of-house (FOH) with a hyped up lead singer and bass player and no way to dial in a front-of-house mix, let alone set up the singer’s in-ear mix. -
Page 121: Master Control 主控制
Master Control StudioLive™ Series III StudioLive Series III FLEX DSP Rack Effects Owner’s Manual Master Control 主控 The Master Control area contains an array of controls that give you access to vital functions of the mixer including the StudioLive Series III FX rack, UCNET communication, DAW control, and the scene library. - Page 122 32-Channel StudioLive models are also provided with a dedicated Tap Tempo button in this same section. This button controls the tempo for any delay. To synchronize a delay effect to music as you hear it, tap this button in rhythm with the music (in 1/4-note, or one-beat intervals), until the delay effect is synced to your liking.
-
Page 123: The Effects Editor 效果编辑器
Master Control StudioLive™ Series III StudioLive Series III FLEX DSP Rack Effects Owner’s Manual 9.1.1 The Effects Editor As previously mentioned, tapping on any of the slots in the Effects Rack will launch the Effects Editor. At the top of this screen, you will find the Effects Type drop-down menu. - Page 124 • Reflection. This control allows you to set the level (in decibels) of the early reflections. The louder the early reflections, the smaller the room will seem. 这个控制,可以设置早期反射的水平(分贝)。早期反射越大,房间 越小。 • Size. Sets the width of the stereo image. 设定立体声图像的宽度。 • LPF Frequency. Use this control to attenuate low frequencies that can muddy a reverb.
- Page 125 Master Control StudioLive™ Series III StudioLive Series III FLEX DSP Rack Effects Owner’s Manual 9.1.2.2 335 Digital Reverb 数字混响 This reverb mimics the controls and sound of classic 1970s digital reverb and provides the following controls: 这个混响器模仿1970年代经典数字混响器的控制和声音,提供以下控制: • Predelay. Sets the length of short delay before the onset of reverberation, lending a sense of space to the reflections.
- Page 126 • Diffusion. Sets the amount of diffusion to apply to the reverb tail. 设定应用于混响尾音的扩散量。 • Reflection (Time). This control allows you to set the level (in decibels) of the early reflections. The louder the early reflections, the smaller the room will seem. 这个控制,可以设置早期反射的水平(分贝)。早期反射越大,房间越小。...
- Page 127 Master Control StudioLive™ Series III StudioLive Series III FLEX DSP Rack Effects Owner’s Manual 9.1.2.4 Vintage Plate Reverb(模拟板式)混响 This reverb effect is inspired by a classic mechanical plate reverb unit and provides the following parameters: 这个混响效果的灵感,来自于经典的机械板式混响装置,并提供以下参数: • Predelay. Sets the length of short delay before the onset of reverberation, lending a sense of space to the reflections.
- Page 128 设置延迟信号反馈到效果器的输入的量。较高的设置会导致较长的延迟尾 音(最终导致彻底的混乱)。 • LP Filter. Sets the cutoff frequency for a low-pass filter, applied to the delayed signal. 设置低通滤波器的截止频率,应用于延迟信号。 • HP Filter. Sets the cutoff frequency for a high-pass filter, applied to the delayed signal. 设置高通滤波器的截止频率,应用于延迟信号。 • Feedback LPF. Sets the cutoff frequency for the low-pass filter applied to the feedback signal.
- Page 129 Master Control StudioLive™ Series III StudioLive Series III FLEX DSP Rack Effects Owner’s Manual 9.1.2.6 Stereo Delay 立体声延迟 This delay effect is inspired by a classic 80’s-era dual-delay unit and provides the following controls: 这个延时效果的灵感,来自于80年代的经典双延时装置,提供以下控制: • Delay Time A and B. Sets the length of their respective delay line. 设置各自的延迟线的长度。...
- Page 130 • Tap Assign L and R. Assigns the respective Tap Tempo function to the TAP button. 为TAP按钮指定相应的点播节奏功能。 • Time Left and Right. Sets the delay time for the left and right side, respectively. 左和右分别设置延迟时间。 • Width. Sets the width of the stereo image. 设置立体声图像的宽度。...
- Page 131 Master Control StudioLive™ Series III StudioLive Series III FLEX DSP Rack Effects Owner’s Manual 9.1.2.8 Chorus (效果器) A chorus effect is created by mixing the source signal with one or more pitch-shifted copies of it and then modulating the copies using an LFO. 合唱效果是通过将源信号与一个或多个音高偏移的副本混合,然后用LFO对...
- Page 132 • Width. Shifts the phase of the LFO. 转移LFO的相位。 • Offset. Sets the time (in milliseconds) between the source signal and the modulated signal. 设置源信号和被调制信号之间的时间(以毫秒计)。 • Feedback. Variable feedback, or regeneration, produces multiple decaying repeats. Increasing the feedback value increases the number of echoes, as well as the resonance that is created as one echo disappears into another.
-
Page 133: Effects Presets 效果预置
Master Control StudioLive™ Series III StudioLive Series III FLEX DSP Rack Effects Owner’s Manual 9.1.3 Effects Presets 效果预设 From the Effects Presets screen, you can load factory and custom presets for each Effect Type as well as store your own custom presets. 在... - Page 134 You can also momentarily audition the effects of a preset by selecting a preset and pressing the Audition button on the Touch Display, or rename it by pressing Rename and entering a new name with the onscreen keyboard. 你也可以通过选择预设,按下Touch Display上的Audition按钮,瞬间试听预设 的效果,或者通过按下...
-
Page 135: Ucnet
UCNET Owner’s Manual UCNET UCNET is a special networking protocol that PreSonus created to enable advanced remote control and audio transmission features between various PreSonus hardware and software products. This includes devices running Studio One, Capture, UC Surface, and QMix-UC software. - Page 136 When setting permissions for a device running QMix-UC software, the Mix selector gives you the following modes of control permission to choose from: 当为运行QMix-UC软件的设备设置权限时,Mix 选择器给你以下控制权限模式 的选择: • None. Select this to disable remote control on the selected device. 选择这个选项,可以禁用所选设备的远程控制。 • All Mixes. Control of every Aux Mix Send level and pan setting. 控制每个Aux Mix Send发送电平和...
- Page 137 StudioLive™SeriesIII Master Control UCNET Owner’s Manual UC Surface Device Permissions UC Surface设备权限 When setting permissions for UC Surface, you can choose to filter out certain functions. When the button is the off state, the function will not be available for the selected device.
-
Page 138: Software Control 软件控制
Software Control 软件控制 9.4.3 Your StudioLive Series III mixer can control Studio One in addition to function as a Mackie Control Emulation device for Logic and a HUI emulation device for ProTools. StudioLive III系列调音台除了可以控制Studio One以外,还可以作为Logic的 Mackie控制和ProTools HUI的仿真设备。 For more information on using your StudioLive mixer as a controller for your DAW application please review the following addendums: 关于使用StudioLive调音台作为DAW应用的控制器的更多信息,请查看以下... -
Page 139: Control Network Ip Address
Master Control StudioLive™ Series III UCNET Owner’s Manual Control Network IP Address Settings 控制网络IP地址设置 9.4.4 In the Control Network area of the UCNET screen, you’ll see the current IP address of your StudioLive. This IP address can be assigned in one of three ways. Select the necessary IP assignment mode by touching one of the following buttons: UCNET图像上的Control Network区域,可以看到你的StudioLive的当前IP地址... - Page 140 当StudioLive系列III调音台,正在控制DAW时,你可以选择让Transport部分在 DAW模式被禁用时,控制SD录音机,或者继续在DAW中控制Transport,无论 DAW模式是否激活。 For more information on using your StudioLive mixer as a controller for your DAW application please review the following addendums: 关于使用StudioLive调音台作为DAW应用的控制器的更多信息,请查看以下 附录: • StudioLive Series III Studio One DAW Control Addendum • StudioLive Series III MCU for Logic DAW Control Addendum •...
-
Page 141: Daw Button Daw按钮
Master Control StudioLive™ Series III DAW Button Owner’s Manual DAW Button 按钮 Your StudioLive can act as a control surface for the mixer functions of a computer running our Studio One, Logic or ProTools software. Press the DAW button to switch between normal mixing functions and DAW control. - Page 142 • User Function Buttons. The assignments for all User Function buttons. 所有User Function按钮的分配。 • GEQ Settings. All bus assignments and curves. 所有总线分配和曲线。 • FlexMix Modes. Aux, Subgroup, Matrix. 辅助,子组,矩阵。 • Pre/Post Modes. FlexMix and FX Mix. FlexMix and FX Mix 混响效果 •...
- Page 143 Master Control StudioLive™ Series III Scenes and Projects Owner’s Manual Saving a Project 1. To save a project, press the Scenes button. 要保存一个项目,请按 "Scenes"按钮。 Talk Prev 2. Tap the desired location for your new Project. You can select an Empty Main Location or a previously used location.
-
Page 144: Creating And Recalling Scenes 创建与调用场景
9.6.2 Creating and Recalling Scenes 创建和召回场景 Creating a scene requires simply dialing in a mix that you would like to use at a later date and saving it. This has obvious benefits for both studio and live sound. For example, in the studio, saving and recalling a scene allows you to move to another song and come back to the current mix later. - Page 145 StudioLive™SeriesIII Master Control 9 . 6 Scenes and Projects Owner’s Manual Saving a Scene 保存一个场景 1. To save a scene, press the Scenes button. 要保存一个场景,请按 "Scenes"按钮 2. This will open the Scenes library menu on the Touch Display. The Store and Recall buttons will begin to flash.
-
Page 146: Filters 滤波器
Master Control StudioLive™ Series III Scenes and Projects Owner’s Manual 9.6.3 Filters 滤波器 At the top of the Project and Scenes library screen, you will find the Filters button. Tapping this will open the Filters screen. From here you can select the parameters you want to be affected when you recall a Project or a Scene. - Page 147 • GEQ. GEQ bus assignments and curve settings. GEQ总线分配和曲线设置。 • Flex Mix Pre/Post Modes. Pre 1, Pre 2, or Post Settings for all FlexMixes. 所有FlexMixes的Pre 1、Pre 2或Post后设置。 • Solo Bus User Settings. Solo Mode (Radio, Latch, or Control Room), Solo in Place, Solo Selects, Solo PFL, Solo Level.
- Page 148 Master Control StudioLive™ Series III Scenes and Projects Owner’s Manual Scene Filters 场景滤波器 FilterName IncludedParameters 滤波器名称 包括参数 Name Color ChannelInfo Type 通道信息 FatChannelSettingsforallInputs: HighPassFilter GateSettingsandKeySource Input Fat Channel Compressor Settings and Key Source 输入Fat Channel EQ Settings FatChannelOrder(EQ<>Comp) LimiterSetting On/Off state for all Mutes Mutes 静音...
-
Page 149: List Editor 列表编辑器
Master Control StudioLive™ Series III Scenes and Projects Owner’s Manual 9.6.4 List Editor 列表编辑器 The List Editor allows you to change Project and Scene names, delete them, lock the ability to make changes to them, as well as reorder your Scene library as necessary. Tapping on the List Editor tab opens the editor. - Page 150 Tap the Delete Scene button to remove it from the Project. 点击Delete Scene按钮,将其从项目中移除。 You can also tap on the ‘X’ next to a Scene in the Edit List to remove it from the Project. Power User Tip: Your StudioLive mixer will always ask you to confirm your selection before it deletes a Project or a Scene.
-
Page 151: Scene Safe 场景安全
Master Control StudioLive™ Series III Scenes and Projects Owner’s Manual 9.6.5 Scene Safe 安全 In some cases, you may want to protect a channel or bus from being affected when scenes are recalled. To do this, touch the Scene Safe button. This opens the Scene Safe screen on the Touch Display. -
Page 152: Reset 重置
Master Control StudioLive™ Series III Scenes and Projects Owner’s Manual 9.6.6 Reset 重置 For both Projects and Scenes, you’ll find a Reset button. This button resets the currently loaded Project or Scene to the default state. Because you will potentially lose any changes to your current mix, you will be prompted to confirm this choice. -
Page 153: Nulling Parameters 归零参数
Master Control StudioLive™ Series III Scenes and Projects Owner’s Manual Their parameters will be set as follows: 它们的参数被设置为: FatChannelParameters Fat Channel 参数 CHANNEL HIPASS NOISE GATE LIMIT COMPRESSOR HIGH L.MID H.MID GAIN STATE STATE THRESH STATE <C> RANGE PEAK PEAK Analog Source 20ms... -
Page 154: Monitoring Controls 监听控制
Monitoring Controls StudioLive™ Series III 10.1 Solo Controls Owner’s Manual Monitoring Controls 监听控制 In addition to the main outputs, your StudioLive mixer features a set of monitor outputs and a headphone jack, each with its own distinct signal path. While you can use these outputs to listen to the main mix, you can also assign other signals to them, such as Aux mixes, the solo bus, or the tape input. - Page 155 Delay 延迟控制,可以调整应用到耳机和控制室输出信号的延迟量。触控 Delay旋钮,转动Master Control编码器,增加任何一个输出的延时。这非常 有用,对调整前厅监听信号,与来自前厅PA系统的信号的时间。在你听到 它之前,PA的声音必须穿过从扬声器到你的混音位置的距离,所以会有一 定的延迟,在使用监听输出时,这可能会掩盖你的混音的更多细节。调整 这个控制,直到相位/发声效果达到最小。 10.1 Solo Controls 控制 The StudioLive features an independent Solo bus. This feature is extremely useful in setting levels for monitor mixes, dialing in dynamics processing on each channel, and fixing issues during a live show without interrupting the main mix. StudioLive有一个独立的Solo bus独奏总线。这个功能很有用,对于设置监听混...
-
Page 156: Solo Modes 独奏模式
Monitoring Controls StudioLive™ Series III 10.1 Solo Controls Owner’s Manual 10.1.1 Solo Modes 独奏模式 To access the Solo bus controls, press the Edit button in the Solo control section. This will make the following controls available in the Touch Display. 要访问独奏总线控制,按Solo control部分的Edit 按钮。以下控制在Touch Display 上可用。... - Page 157 4. PFL/AFL Toggle Button. Enables Pre-Fader Listen (PFL) Soloing. The default setting for the Solo bus is After-Fader Listen (AFL); by pressing PFL, Pre-Fader Listening is enabled. In either mode, pressing Solo on any channel or bus routes that channel to the Solo bus and has no effect on the main or subgroup mixes. 启用“推子前”聆听(PFL)独奏。独奏总线的默认设置,是“推子后”...
- Page 158 Monitoring Controls StudioLive™ Series III 10.1 Solo Controls Owner’s Manual Using the Solo Bus for Monitoring 使用 Solo Bus 进行监听 10.1.2 When mixing live, or when recording multiple musicians at once, it is often necessary to quickly listen to just one instrument or group. The Solo and Monitor buses can be used together for this purpose.
- Page 159 10.1.3 Using Solo in Place to Set Up a Mix 使用 "Solo in Place"来设置混音 We started this manual with a quick and easy way to set up the input levels for your StudioLive, ensuring that you have the highest possible input level without clipping your analog-to-digital converters.
- Page 160 8. Once you’re satisfied, press the Solo button on the next channel and repeat step 6. In this way, continue with each channel in your mix.一旦你满意了, 在下一个通道上按下Solo按钮,重复步骤6。以这种方式,继续在你的 混音中的每一个通道。 9. When you’ve finished, press the Edit button in the Solo section and touch Solo in Place on the Touch Display to disable it and set up your fader mixer.
- Page 161 Graphic EQ StudioLive™ Series III 10.1 Solo Controls Owner’s Manual Graphic EQ 图形均衡器 Your StudioLive comes packed with 31-band graphic EQ processors that can be freely assigned to the Main mix, or your choice of FlexMixes. These can be used for system tuning, subtle tweaks, or wherever you find them useful.
- Page 162 。500赫兹和2千赫之间的范围,中音乐器(吉他、小鼓、萨克斯风等)变得 " 很糙",而1千赫兹和2千赫之间,太多的提升会使你的混音听起来很薄或 "尖"。 High Mids (2 kHz to 4 kHz). The attack portion of percussive and rhythm instruments occurs in this range. High mids are also responsible for the projection of midrange instruments. 在这个范围内,会有打击乐和节奏性乐器的Attack部分。高中音也负责中音乐 器的投射。 Presence (4 kHz to 6 kHz). This frequency range is partly responsible for the clarity of a mix and provides a measure of control over the perception of distance.
-
Page 163: Assigning Geqs 分配Geqs
Graphic EQ StudioLive™ Series III 11.1 Assigning GEQs Owner’s Manual Assigning GEQs 分配GEQs 11.1 To assign a Graphic EQ to one of the mixes, select the desired mix and press the GEQ button. This will open the GEQ screen. Touching a mix will insert a Graphic EQ on it post-fader. - Page 164 4. Reset. Press this button to flatten the GEQ. 按这个按钮可以使GEQ平缓。 5. To Faders. Enable this button to control your GEQ from your StudioLive faders. 启用这个按钮,从StudioLive推子上控制 GEQ。 6. RTA. Enables the RTA. See Section 11.4. 启用RTA。 见第 11.4 节 。 StudioLive 32SX and 32SC Users Power User Tip: For StudioLive 32SXand 32SC users, the RTA can be enabled and disabled from the control surface by pressing the RTA button.
-
Page 165: Geq Presets 设置Geq
Graphic EQ StudioLive™ Series III 11.3 GEQ Presets Owner’s Manual 11.3 GEQ Presets 预设 To store or load a GEQ preset for the currently selected instance, touch the Presets button while the GEQ screen is active. This loads the GEQ Presets screen. In this screen, to load a preset, scroll through the list of existing presets, and touch the preset of your choice to select it. - Page 166 1. With the mic input gain at an appropriate level, bring the aux- send level up on the mic channel you wish to ring. 在麦克风输入增益处于适当水平的情况下,会希望麦克风通道的辅助发 送电平提高。 Power User Tip: If you are using one console for stage monitors and another console for front-of-house, set the mic input gain on the front-of-house console.
- Page 167 Graphic EQ StudioLive™ Series III 11.4 Using the RTA to Ring Out Monitors Owner’s Manual You can apply this process to the main system, as well. This is especially useful with applications requiring lavaliere or podium mics. These types of microphones are typically omnidirectional condensers and are very prone to feedback.
-
Page 168: Home
Home StudioLive™ Series III 11.4 Using the RTA to Ring Out Monitors Owner’s Manual Home When you press the Home button, the Home screen opens on the Touch Display. This screen gives you access to settings and functions related to system configuration and troubleshooting. - Page 169 9. Talkback Edit. Opens the Talkback Edit page. For more information, see Section 4.5.1. 打开 "Talkback Edit"页面。更多信息 见 4.5.1 节 。 10. Selected Channel. Displays currently selected channel or bus. 显示当前选中的通道或总线。 11. Current Parameter. Displays current parameter. 显示当前参数。...
-
Page 170: System Screen 系统图像
Home StudioLive™ Series III 12.1 System Screen Owner’s Manual System Screen 系统图像 12.1 The System screen gives you access to many useful settings and functions that let you choose how your StudioLive looks and operates. The following functions are available: 在... - Page 171 9. Fat Channel Load/Paste Filters. Lets you choose which parameters are included when you load a Fat Channel preset or copy/paste Fat Channel settings between channels. For more information, seeSection 12.1.3. 加载 Fat Channel 预设或通道之间的复制/粘贴Fat Channel 设置时,你可以选择 参数。更多信息, 见第 12.1.3 节 。 10.
-
Page 172: Permissions 权限
Home StudioLive™ Series III 12.1 System Screen Owner’s Manual 12.1.1 Permissions 权限 Controlling your StudioLive remotely with UC Surface or QMix-UC for mobile devices allows you to move about the venue freely. However, it can also put the full power of the your mixer in multiple hands—... - Page 173 Press the Edit button that corresponds to the User Button you want to edit, and you’ll see a function assignment screen. User Button Edit按钮 的 按钮所对应的 ,你会看到一个分配功能图像。 按你想编辑...
- Page 174 Home StudioLive™ Series III 12.1 System Screen Owner’s Manual In this screen, you can choose the function to assign to the chosen button, in the following categories: 你可以在这个图像上,选择要分配给所选按钮的功能。在以下类别中: • Mute Groups. Lets you create stored sets of mute settings that correspond with the current state of the mixer, recallable at the press of the chosen User Button.
- Page 175 Touch Copy/Paste to set copy/paste filter settings. 触控Copy/Paste可设置复制/粘贴滤波器的设置。 The following categories of settings are available to toggle on or off: 以下类别的设置,可供开启或关闭切换: • Preamp. (Filtered by default) • +48V. (Filtered by default) • Polarity. (Filtered by default) • Pan. • Channel Type. •...
-
Page 176: Firmwareupdate 固件升级
SD card or UC Surface. To update using an SD Card, log into your My PreSonus account and download the new firmware version. Save the firmware file to an SD card and insert the card into your StudioLive mixer. Touch Update to complete the firmware update, or press Cancel to cancel the update. -
Page 177: User Profiles 用户配置文件
选择这个模式时,每个辅助混音和主混音的通道静音是连接在一起的。在任何 一个混音中静音一个通道,都会在每个混音中给它静音。 12.2 User Profiles 用户配置文件 User Profiles allow you to create custom settings limiting access to certain functions. Specific scenes can also be assigned to each Profile so that when the user logs into the mixer, they will have the option to load their preferred Scene. 你可以创建自定义设置,限制对某些功能的访问。特定的场景也可以分配给每... -
Page 178: Defaultadministrator 默认管理员
Home StudioLive™ Series III 12.2 User Profiles Owner’s Manual 12.2.1 Default Administrator 默认管理员 User Profiles must be activated on your mixer. By default, your mixer is logged into the Default Adminitrator profile. This profile has access to every setting and parameter on your mixer. - Page 179 Tap password 保护Default Administrator 的配置文件。如果注销了这个配置文件, 会提示你输入密码重新登录。要删除Default Administrator password密码,请在 开机时,按住Master Mute按钮。一旦图像上出现进度条,密码就会被删除。 5. Reset Profile. Resets profile to default state. 将配置文件重置为默认状态。...
- Page 180 。名称保持不变,可按 " " 键。 完成后,按 Select an Avatar 选择一个Avatar By default, the PreSonus logo is the avatar for every user. This can be changed by tapping the default avatar on the profile settings page. 默认情况下,PreSonus的标志为每个用户的默认头像。通过点选个人资料 设置页面上的默认头像来改变。 Profile Type You can create two different Profile Types: Admin and User. Admin profiles are given access to every function and parameter.
- Page 181 Home StudioLive™ Series III 12.2 User Profiles Owner’s Manual Default Project and Scene Just like for the Default Administrator profile, you can select a Project to be loaded when someone logs into their User Profile. This is especially useful for less experienced users.
- Page 182 Reset Profile 重置配置文件 To reset a profile to factory default, select Reset Profile. You will be prompted to confirm this choice. Reset Profile 要将一个配置文件重置为出厂默认值,选择 。会提示你确 认这一选择。...
- Page 183 Home StudioLive™ Series III 12.2 User Profiles Owner’s Manual 12.2.3 Edit User Permissions 编辑用户许可 When a User Profile is set to “User,” permissions can be granted for certain functions and denied for others. 当User Profile被设置为 "User"时,对某些功能可以授予权限,而对其他功能则 予以拒绝。 The following features are only accessible from Administrator Profiles and always locked out in every User Profile: 以下功能只能从...
- Page 184 • Changing FX Types. This locks the ability to change the effects types loaded into the StudioLive Series III Effects Rack. 锁定改变加载到StudioLive系列III的Effects Rack的效果类型的能力。 • Save Scenes. This locks the ability to save or create new scenes. 锁定保存或创建新的场景。 • Changing / Adding DCA Filter Groups. This locks the ability to create or alter DCA Filter Groups.
- Page 185 12.3 Pressing the Audio Routing button in the Home screen will give you access to audio routing options for networked audio devices, USB sources, SD card recordings, and special settings for networked PreSonus devices. 按下Home图像中的Audio Routing按钮,可以访问联网音频设备、USB信号源、 SD卡录音的音频路由选项,以及PreSonus设备联网的特殊设置。 • AVB Input Streams. Touch to route available network sources to your StudioLive mixer’s AVB Inputs.
- Page 186 Digital patching allows you to route any analog or digital input to any channel and any mix to any output. This can save you hours of frustration having to rewire and repatch your physical inputs and outputs, especially in a fixed installation. Digital patching also allows you freely route audio to your AVB network and record anything you’d like via USB.
- Page 187 Home StudioLive™ Series III 12.3 Audio Routing and the Digital Patching Screen Owner’s Manual Digital Patching: Input Source 数字配接:输入源 12.3.1 Selecting the Input Source menu will allow you to patch any source to any channel. From the Assigned Source menu, select the type of source you would like routed to a channel: 选择Input Source菜单,你可以将任何源配接到任意通道。从...
- Page 188 Selecting the Analog Sends menu will allow you to patch any mix to any FlexMix output. Select the output to which you’d like to route your mix first. Then select the mix from the Available Source list to the right. 选择...
-
Page 189: Digitalpatching:avbsends 数字配线:Avb发送
Home StudioLive™ Series III 12.3 Audio Routing and the Digital Patching Screen Owner’s Manual Digital Patching: AVB Sends 数字配线:AVB 发送 12.3.3 Selecting the AVB Sends menu will allow you to patch any channel send or mix to any AVB send. Select the send to which you’d like to route your audio first. Then select the channel or mix from the Available Source list to the right. - Page 190 Home StudioLive™ Series III 12.3 Audio Routing and the Digital Patching Screen Owner’s Manual 12.3.4 Digital Patching: USB Sends 数字配接: USB发送 Selecting the USB Sends menu will allow you to patch any channel send or mix to any USB driver send. Select the USB driver send to which you’d like to route your audio first.
- Page 191 Home StudioLive™ Series III 12.3 Audio Routing and the Digital Patching Screen Owner’s Manual 12.3.5 Digital Patching: SD Card 数字配接:SD 卡 StudioLive 64S users. Selecting the SD Card menu will allow you to patch any input or mix to any of the 34 SD Card recording inputs. Select the SD Card recording input to which you’d like to route your audio first.
-
Page 192: Utilities 应用程序
Home StudioLive™ Series III 12.4 Utilities Owner’s Manual 12.4 Utilities 应用程序 Your StudioLive is equipped with a variety of utilities that allow you to test the functionality of your mixer. Pressing the Utility button from the Home screen will open this menu. 你的StudioLive配备了各种实用工具,可以测试你调音台的功能。按下... -
Page 193: Resources 信号源
Resources StudioLive™ Series III 13.1 Networking Overview Owner’s Manual Resources 信号源 13.1 Networking Overview 网络概况 Networking your StudioLive Series III mixer involves both hardware and software components. The entire installation and configuration procedure is given in this manual, but before beginning, you must download and install UC Surface touch- control software onto a macOS or Windows computer or an iPad, as described in the StudioLive Software Library Reference Manual. - Page 194 Wired Ethernet Control Setup 互联网控制设置 13.1.1 1. Connect standard CAT5e or CAT6 Ethernet cables from your computer’s Ethernet port to an Ethernet router, and from the router to the Control port on the StudioLive’s rear panel. 将标准的CAT5e或CAT6互联网连接线,从电脑的端口连接到路由器,再从路 由器连接到StudioLive后面板的控制端口。 2. Launch Universal Control on the computer (macOS or Windows) that is connected to the router.
- Page 195 输入密码。 4. Click Connect. 点击 "连接"。 macOS 10.8 and later 1. On the Menu bar click on the Wireless Status icon. 在Menu 栏上,点击Wireless Status图标。 2. Select the name of the wireless network you set for your wireless router. 选择你的无线路由器设置的无线网络的名称。 3. Enter the password. 输入密码。...
-
Page 196: Grand Piano 大钢琴
Resources StudioLive™ Series III 13.2 Stereo Microphone Placement Owner’s Manual Stereo Microphone Placement 立体声传声器的摆放 13.2 The following are a few recording applications to help you get started with your StudioLive. These are by no means the only ways to record these instruments. Microphone selection and placement is an art. -
Page 197: Acousticguitar 原声吉他
Resources StudioLive™ Series III 13.2 Stereo Microphone Placement Owner’s Manual 13.2.3 Acoustic Guitar 原声吉他 Point a small-diaphragm condenser microphone at the 12th fret, approximately 8 inches away. Point a large-diaphragm condenser microphone at the bridge of the guitar, approximately 12 inches from the guitar. Experiment with distances and microphone placement. - Page 198 Resources StudioLive™ Series III 13.2 Stereo Microphone Placement Owner’s Manual Drum Overheads (XY example) 鼓上方(XY示例) 13.2.5 Place two small-diaphragm condenser microphones on an XY stereo-microphone holder (bar). Position the microphones so that each one is at a 45-degree angle, pointed down at the drum kit, approximately 7 or 8 feet above the floor or drum riser.
-
Page 199: Percussion 打击乐
Compression Setting Suggestions Owner’s Manual Compression Setting Suggestions 压缩设置的建议 13.3 The following are the compression presets that were used in the PreSonus BlueMax. We have included them as a jumping-off point for setting up compression on the StudioLive. 以下是在PreSonus BlueMax中使用的压缩预置。把它们作为在StudioLive 上设置压缩的一个跳板。... -
Page 200: Keyboards 键盘
13.3.3 Fretted Instruments 指挥乐器 Electric Bass. The fast attack and slow release in this setting will tighten up the electric bass and give you control for a more consistent level. Electric Bass. 在这个设置中的fast attack 和slow release,会收紧电 吉他,让你的控制力更加稳定。 THRESHOLD RATIO ATTACK RELEASE -4.4 dB 2.6:1... - Page 201 正如其名那样,这是hard limiter硬限幅器,或是”brickwall” (限制效果器)设 置——是控制双轨混音台或立体声输出电平的理想选择。 THRESHOLD RATIO ATTACK RELEASE 5.5dB 7.1:1 0.001ms 98ms Contour. This setting fattens up the main mix. 这个设置使主混音更加饱满。 THRESHOLD RATIO ATTACK RELEASE -13.4dB 1.2:1 0.002ms 182ms 13.3.6 Effects 效果 Squeeze. This is dynamic compression for solo work, especially electric guitar.
- Page 202 Resources StudioLive™ Series III 13.4 EQ Frequency Guides Owner’s Manual 13.4 EQ Frequency Guides EQ频率指导 13.4.1 What Frequencies to Cut and Boost 频率削减与提升 Instrument WhattoCut WhytoCut WhytoBoost What toBoost 乐器 削减 削减 提升 提升 7kHz 8kHz HumanVoice Sibilance 咝咝声 Bigsound巨大声 人声...
-
Page 203: Instrument Ranges 乐器范围
Resources StudioLive™ Series III 13.5 EQ Setting Suggestions Owner’s Manual Instrument Ranges 乐器范围 13.4.2 BOOST • • harder bass to low vocalpresence frequency • kick & tom attack instruments (kick, • tom, bass) morefingersound • • on bass brighten vocals, guitar and snare •... - Page 204 Pop Male Vocals 流行乐男声 LOW ON/OFF LOW SHELF LOW FREQ (Hz) LOW Q LOW GAIN LOW MID Q LOW MID GAIN LOW MID LOW MID ON/OFF FREQ (Hz) HIGH ON/OFF HI MID FREQ HIGH MID Q HIGH MID GAIN HIGH SHELF HIGH FREQ HIGHQ HIGH GAIN...
-
Page 205: Keyboards 键盘
Resources StudioLive™ Series III 13.5 EQ Setting Suggestions Owner’s Manual 13.5.3 Fretted Instruments 指挥乐器 Electric Bass 电吉他 LOW ON/OFF LOW SHELF LOW FREQ (Hz) LOW Q LOW GAIN LOW MID Q LOW MID GAIN LOW MID LOW MID ON/OFF FREQ (Hz) HIGH ON/OFF HI MID FREQ HIGH MID Q... -
Page 206: Using Input Delay
Resources StudioLive™ Series III 13.6 Using Input Delay Owner’s Manual Using Input Delay 使用输入延时 13.6 When one of the input channels is selected, you can set an input delay up to 85 ms in 0.1 ms increments. An input delay has many uses. 当选择输入通道时,你可以设置一个输入延迟,以0.1毫秒为增量,最高可达85 毫秒。输入延迟有很多用途。... - Page 207 Resources StudioLive™ Series III 13.6 Using Input Delay Owner’s Manual Press the guitar channel’s Select button. 按吉他通道的 "Select"按钮。 Press the Input button in the Fat Channel. 按Fat Channel中的 Input 按钮。 Press the Next Page button in the Fat Channel to move to the second page of the Fat Channel Input layer.
- Page 208 Resources StudioLive™ Series III 13.7 Using Output Delay Owner’s Manual 1 To begin, press the Solo edit button. 要想开始,请按下Solo edit按钮。 2 On the , select Solo In Place and Latching Solo Mode. 选择Touch Display 上的Solo In Place 和 Latching Solo Mode模式。 Solo both the Direct Input channel and the microphone channel.
-
Page 209: Front-Of-House 观众席
In small venues where the guitar amp and the drum kit can be clearly heard over the Main Front-of-House system, an output delay can“move back” the Front-of-House system to the backline. This will sharpen the attack of the instruments and prevent phasing issues. - Page 210 4. Use your Main mix level to set the level on the Front-of-house system as closely to the acoustic level of the snare drum as possible. 使用Main mix level电平,将观众席系统的电平,设置得尽可能接近小军鼓 的声学电平。 5. Listen closely to the speakers and the snare and make minor adjustments to the output delay until the attack times sound as coherent as possible.
-
Page 211: Delay Systems 延迟系统
Resources StudioLive™ Series III 13.7 Using Output Delay Owner’s Manual Delay Systems 延迟系统 13.7.2 In most situations, a PA system relies on a main speaker system, positioned at the front of the room, to reproduce audio for the entire performance space. As a result, the level of the system is considerably louder at the front of the room then it is at the mix position. - Page 212 一旦你定位延时系统,测量从左前方的扬声器到最近的延时扬声器(很可 能是左侧的延时扬声器)的距离。用这个距离除以1.1(如果以英尺计算 )或0.34(如果以米计算)。 2. On your StudioLive mixer, select the FlexMix driving the output connected to your left side delay speaker and configure it as a Subgroup. 在StudioLive混音器上,选择驱动连接到左侧延迟扬声器输出的FlexMix, 并将其配置为子群。 3. Set the Output delay on your newly created subgroup to the result of your calculation.
-
Page 213: Sidechaining 侧链
Resources StudioLive™ Series III 13.7 Using Output Delay Owner’s Manual 13.7.3 Aligning Subs to Mains 将子系统与主系统对准 When your subwoofer and your full-range loudspeaker are placed some distance apart, low-frequency cancellation or reinforcement can occur when the same frequencies are reproduced by both systems. Using an alignment delay on your subwoofer system will compensate for this. - Page 214 Resources StudioLive™ Series III 13.8 Sidechaining Owner’s Manual Tighten up a Rhythm Section. You can use a sidechained key filter to tighten up a rhythm section by sidechaining the kick drum channel to the bass channel and setting the gate to open at the frequency of the kick drum. This, combined with a fast attack and release, will make your rhythm section more cohesive.
-
Page 215: Effect Types 效果类型
Resources StudioLive™ Series III 13.9 Effect Types Owner’s Manual Sidechaining the Compressor 压缩器的侧链功能 13.8.2 Sidechaining a compressor allows you to reduce the level of one input source to make room for another. This is especially useful in live broadcast or application where music and commentary are happening simultaneously. - Page 216 混响--也就是通常所说 reverb--可能是使用最广泛的效果。自然混响是由声波, 在一个或多个表面上的反射产生的。例如,当你走过大礼堂的木质舞台,声波 从地板、墙壁和天花板上反弹时,几乎瞬间就会产生成千上万的反射。这些被 称为早期反射,它们的模式为你所处空间的性质提供了心理-声学指示,即使 你看不到它。当每个反射被更多的表面反射后,声音的复杂性就会增加,同时 混响也会慢慢衰减。 The reason for the widespread use of reverb in audio recording is fairly self-evident: human beings don’t live in a vacuum. Because our brains receive cues about the nature of the space around us based partially on audio reflections, a sense of space makes an audio recording sound more natural and, therefore, more pleasing.
-
Page 217: Delayanditsparameters 延迟及其参数
StudioLive™SeriesIII Resources 13.9 Effect Types Owner’s Manual 13.9.2 Delay and its Parameters 延迟及其参数 A delay essentially creates an echo, although you can often use delays to create more complex time-based effects. The source signal is delayed so that it is heard later than it actually occurred. - Page 218 F_Frequency. Sets the center frequency in Hz for the Filter Delay. F_Gain. Sets the boost at the center frequency for the Filter Delay. 设定Filter Delay滤波器延迟的中心频率,单位为Hz。F_Gain. 设置滤波延时的 中心频率的提升。 F_Q. Sets the Q for the Filter Delay. The Q is the ratio of the center frequency to the bandwidth.
-
Page 219: Usingthertawhilemixing 混音时使用Rta
Resources StudioLive™ Series III 13.10 Using the RTA While Mixing Owner’s Manual • Delay Feedback. Variable feedback, or regeneration, produces multiple decaying repeats. Increasing the feedback value increases the number of echoes, as well as the resonance that is created as one echo disappears into another. 可变反馈,即再生,产生多个衰减的重复。增加反馈值可以增加回声的数量... -
Page 220: Specifications 技术规格
Technical Information StudioLive™ Series III 14.1 Specifications Owner’s Manual 14.1 Specifications 技术规格 Microphone Preamplifier 麦克风前置放弃 XLR Female, balanced Input Type输入类型 Frequency Response to Main Output (at unity gain) 20-20 kHz, ±0.5 dBu 对主输出的频率响应(统一增益时) Input Impedance 输入阻抗 1 kΩ THD to Main Output 主输出的THD <0.005%, +4 dBu, 20-20 kHz, unity gain, unwtd S/N Ratio to Main Output (Ref= +4 dB, 20 kHz BW, unity gain, A-wtd) 94 dB... - Page 221 Technical Information StudioLive™ Series III 14.1 Specifications Owner’s Manual System Crosstalk 系统串扰 -90 dB (Ref = +4 dBu, 20 Hz-20 kHz, unwtd) Input to Output 输入到输出 Adjacent Channels 相邻通道 -87 dB (Ref = +4 dBu, 20 Hz-20 kHz, unwtd) Digital Audio and Control 数字音频与控制 115 dB (A-wtd, 48 kHz) ADC Dynamic Range ADC动态范围...
-
Page 222: Input Source 输入信号源
Technical Information StudioLive™ Series III 14.2 Default Routing Owner’s Manual Default Routing 默认路由 14.2 Input Source 输入信号源 14.2.1 Input StudioLive64S StudioLive32S StudioLive32SX StudioLive32SC StudioLive32 StudioLive24 StudioLIve16 Channel1 Analog1 Analog1 Analog1 Analog1 Analog1 Analog1 Analog1 Channel2 Analog2 Analog2 Analog2 Analog2 Analog2 Analog2 Analog2 Channel3... - Page 223 Technical Information StudioLive™ Series III 14.2 Default Routing Owner’s Manual StudioLive64S StudioLive32S StudioLive32SX StudioLive32SC StudioLive32 StudioLive24 StudioLIve16 Input (continued) (continued) (continued) (continued) (continued) (continued) (continued) (continued) Channel45 AVB 45 Channel46 AVB 46 Channel47 AVB 47 Channel48 AVB 48 Channel49 AVB 49 Channel50 AVB 50 Channel51...
- Page 224 Technical Information StudioLive™ Series III 14.2 Default Routing Owner’s Manual StudioLive64S StudioLive32S StudioLive32SX StudioLive32SC StudioLive32 StudioLive24 StudioLIve16 Input (continued) (continued) (continued) (continued) (continued) (continued) (continued) (continued) FlexMix 16 FlexMix 16 FlexMix 16 FlexMix 17 FlexMix 17 FlexMix 18 FlexMix 18 FlexMix 19 FlexMix 19 FlexMix 20...
-
Page 225: Avb Sends Avb 发送
Technical Information StudioLive™ Series III 14.2 Default Routing Owner’s Manual 14.2.3 AVB Sends (AVB发送) AVB Send StudioLive64S StudioLive32S StudioLive32SX StudioLive32SC StudioLive32 StudioLive24 StudioLIve16 Channel1 Channel1 Channel1 Channel1 Channel1 Channel1 Channel1 AVBSend1 Channel2 Channel2 Channel2 Channel2 Channel2 Channel2 Channel2 AVB Send 2 Channel3 Channel3 Channel3... - Page 226 Technical Information StudioLive™ Series III 14.2 Default Routing Owner’s Manual AVB Send StudioLive64S StudioLive32S StudioLive32SX StudioLive32SC StudioLive32 StudioLive24 StudioLIve16 (continued) (continued) (continued) (continued) (continued) (continued) (continued) (continued) Channel45 Mix5 Mix5 Mix5 Mix5 Mix5 Mix5 AVB Send 45 Channel46 Mix6 Mix6 Mix6 Mix6 Mix6...
- Page 227 Technical Information StudioLive™ Series III 14.2 Default Routing Owner’s Manual USB Send StudioLive64S StudioLive32S StudioLive32SX StudioLive32SC StudioLive32 StudioLive24 StudioLIve16 (continued) (continued) (continued) (continued) (continued) (continued) (continued) (continued) Channel24 Channel24 Channel24 Channel24 Channel24 Channel24 Channel24 USB Send 24 Channel25 Channel25 Channel25 Channel25 Channel25 Channel25...
-
Page 228: Sd Card Sd卡
Technical Information StudioLive™ Series III 14.2 Default Routing Owner’s Manual 14.2.5 SD Card (SD卡) SD Card Send StudioLive64S StudioLive32S StudioLive32SX StudioLive32SC StudioLive32 StudioLive24 StudioLIve16 Channel1 Ch.1 (Fixed) Ch.1 (Fixed) Ch.1(Fixed) Ch.1 (Fixed) Ch.1(Fixed) Ch.1 (Fixed) SD Track 1 Channel2 Ch.2 (Fixed) Ch.2 (Fixed) Ch.2(Fixed) Ch.2 (Fixed) - Page 229 Please check the PreSonus Web site (www.presonus.com) regularly for software information and updates, firmware updates, and support documentation, including frequently asked questions. 请定期查看PreSonus网站(www.presonus.com),了解软件信息和更新、固件 升级以及支持文件,包括常见问题。 Online technical support is available to registered users through your My PreSonus account. Visit my.presonus.com to register. 注册用户可通过 "My PreSonus "账户,获得在线技术支持。注册请访问...
- Page 230 Can’t Hear Main Mix in Headphones. Verify that the Main mix is enabled as the source for the headphones and that the headphone output control is at a sufficient level. 确认Main mix被启用为耳机的信号源,并且耳机输出控制在一个足够的 电平上。 Monitor Bus Controls Not Changing Routing. Verify that your monitors are connected to the Control Room outputs on the rear panel of your StudioLive, not the Main outputs.
- Page 231 但雀鳝更好。 ©2021 PreSonusAudio Electronics, Inc.All Rights Reserved. AudioBox USB, Capture, CoActual, EarMix, Eris, FaderPort, FireStudio, MixVerb, Notion, PreSonus, PreSonus AudioBox, QMix, RedLightDist, SampleOne, Sceptre, StudioLive,Temblor, Tricomp, andWorxAudio are registered trademarks of PreSonus Audio Electronics, Inc. Studio One is a registered trademark of PreSonus Software Ltd.
- Page 232 StudioLive Series III ™ Digital Mix Console / Recorder with Motorized Faders 数字调音台/带电动推子的录音机 Owner’s Manual 用户手册 18011 Grand Bay Ct. • Baton Rouge, ® Louisiana 70809 USA• 1-225-216-7887 Part# 70-22000045-F www. presonus. com...