PRESONUS StudioLive 32R, StudioLive 24R, StudioLive 16R Manual
- Owner's manual (232 pages) ,
- Quick start manual (20 pages) ,
- Networking manual (17 pages)
Advertisement
- 1 Overview
- 2 Getting Started
- 3 Hookup
- 4 Connecting Your Audio System
- 5 Resources
- 6 Technical Specifications
- 7 Warranty
- 8 Added bonus: PreSonus' previously Top Secret recipe for...
- 9 Documents / Resources
Overview
Introduction
PreSonus Audio Electronics, Inc., has designed the StudioLive 32R, StudioLive 24R and StudioLive 16R utilizing high-grade components to ensure optimum performance that will last a lifetime. PreSonus Audio Electronics has built your StudioLive mixer with high-grade components to ensure optimum performance for many years to come. Loaded with 32, 24, or 16 high-headroom XMAX™ microphone preamplifiers, a built-in multitrack USB recording and playback interface, powerful Fat Channel signal processing, high quality effects, extensive routing, stereo SD recording, and more, StudioLive Series III rack mixers break new boundaries for music performance and production. All you need is a compatible computer with a USB connection or an SD card, a few microphones and cables, speakers, and your instruments, and you are ready to record in the studio or in front of a live audience!
We encourage you to contact us with questions or comments regarding this product. PreSonus Audio Electronics is committed to constant product improvement, and we value your suggestions highly. We believe the best way to achieve our goal of constant product improvement is by listening to the real experts: our valued customers. We appreciate the support you have shown us through the purchase of this product.

About This Manual
We suggest that you use this manual to familiarize yourself with the features and correct connection procedures for your mixer before trying to use it. This will help you avoid problems during installation and setup. Throughout this manual you will find Power User Tips. These tips provide useful hints on how to best use your StudioLive mixer and take advantage of unique workflow functions and features.
When frame size differences occur, the StudioLive 32R will be called out first, followed by the StudioLive 24R, and then the StudioLive 16R.
Features
- 34/26/18 total analog inputs
- 32/24/16 mic/line channel inputs plus 2 RCA inputs
- 16/12/6 TRS FlexMix outputs
- 2 XLR (Left/Right) Main outputs
- Stereo headphone output
- 32/32/16 input channels
- 32R and 24R: 2 stereo aux inputs (AVB or USB)
- 1 stereo digital return (SD Card, AVB, or USB)
- 26/26/10 buses:
- 16/16/6 FlexMixes
- 4/4/2 internal effects buses
- 32R and 24R: 4 dedicated subgroups
- 24/24/8 Filter DCAs
- 1 Ethernet control network port with Dynamic, Self Assigned, and Manual IP address modes
- 1 Ethercon AVB audio network port
- Onboard stereo SD recorder
- 38x38 (32R and 24R) / 18x18 (16R) USB recording interface
- 55x55 (32R and 24R) / 32x32 (16R) AVB recording interface
- Studio-quality converters with 115 dB dynamic range
- 48 kHz operation with 24-bit resolution (44.1 kHz option coming soon)
- UC Surface touch control software for Mac®, Windows®, iPad®, and Android™ available free from Apple App Store, Google Play, and Amazon App Store
- Studio One® Artist digital audio workstation software for Mac and Windows
- Capture™ multitrack recording software for Mac and Windows
- QMix®-UC aux-control software for iOS® and Android™ available free from Apple App Store, and Google Play
What is in the Box
Your StudioLive Series III rackmount mixer package contains the following:

What is not in the box:
Once you've registered your mixer, you can download UC Surface for macOS and Windows, Capture, and Studio One Artist from your My PreSonus account.
UC Surface for iPad and QMix-UC for iPhone/iPod touch can be downloaded from the Apple App Store.

UC Surface and QMix-UC for Android can be downloaded from the Google Play Store.

What You Will Need
The following items are not included with your StudioLive Series III rackmount mixer, but are needed to complete your new mixing system:
- LAN network with Internet access or an SD or SDHC card with at least 2 GB capacity for firmware updates.
- Wireless router. Visit www.PreSonus.com for recommended routers.
- UC Surface running on a computer (macOS or Windows), Android device, or iPad connected either wired or wirelessly to the same LAN network as your mixer.
Additional Resources
Software Guides:
- Networking for StudioLive Remote Control. This guide will assist you in creating a LAN network to remote control your StudioLive from a computer, tablet, or mobile device.
- Using Your StudioLive as an Audio Interface with Universal Control Reference Guide. This guide describes the features and functions Universal Control as well as how to use your StudioLive mixer as an audio interface with your favorite DAW application.
- UC Surface Reference Manual. This guide describes the features and functions of UC Surface with every StudioLive mixer model.
- QMix-UC Reference Manual. This guide describes the features and functions of QMix-UC with every StudioLive mixer model.
- Capture 2 Reference Manual. Included with StudioLive mixers is Capture, a digital-audio multitrack-recording application designed to make recording quick and easy.
- Studio One Integration Reference Manual. Studio One Artist is included with every StudioLive mixer. In addition to being a powerful DAW, Studio One provides unique routing and integration features. This manual will help you get the most from your StudioLive mixer when used with Studio One or Studio One Artist.
Additional Resources:
- StudioLive Series III AVB Networking Guide. This manual covers advanced AVB audio networking configuration for the StudioLive Series III mixers.
- StudioLive Series III Stage Box Mode Addendum. The StudioLive Series III rackmount mixers (StudioLive 32R, StudioLive 24R, StudioLive 16R) can be used as advanced stage boxes for StudioLive Series III console mixers (StudioLive 32, StudioLive 24, StudioLive 16).
- StudioLive Series III Studio One DAW Control Addendum. StudioLive Series III console mixers (StudioLive 32, StudioLive 24, StudioLive 16) can be used to control Studio One and Studio One Artist.
Getting Started
This section will guide you through registering your mixer, updating its firmware and connecting it to a network. Please review the brief networking tutorial located in : Add a Control Device Section to familiarize yourself with networking best practices. Visit www.presonus.com for the latest system requirements and an updated list of compatible hardware. In general, you will need the following:
- LAN network connection and router
- Internet connection for registration and firmware download.
- A device running UC Surface
Step 1: Register Your StudioLive Series III Rackmount Mixer
- Go to my.presonus.com and log in or create a new user account, if you don't have one.

- Once you have logged into your my PreSonus account, click the Register a Product button at the top of the page.

- Select "Hardware" from the drop-down menu in the dialog, enter the information for your mixer, and check the box stating you have read and agree to the license agreement. Click/tap the Register button when you are done to register your controller.
![]()


Step 2: Add a Control Device
Control and Audio Data Connections
You can connect your mixer to UC Surface as follows:
- Wired to a standard LAN network (control only).
- Wired to a computer via USB (control and audio).
In the sections that follow, we will describe all these configurations in detail.
 Power User Tip: WPA and WPA2 are protocols created to make wireless networks secure.
WPA stands for "Wi-Fi Protected Access," and WPA2 is a later version that conforms to the IEEE 802.11i networking standard. Most routers have settings that manage their security protocols; consult the documentation for your router to learn how to change these settings.
Wired LAN Networking (Ethernet)
The easiest way to configure your control network is to connect your mixer and devices (computer, iPad, or Android) to a wireless router. This allows you to quickly connect devices for remote control using UC Surface and QMix-UC.
- Connect your StudioLive Series III Rackmount mixer to a wireless router with an Ethernet cable.
")
- Power on the router and then power on the mixer.
- Connect your computer, Android and iOS device to the wireless network. You can also connect your computer directly to the wireless router using an Ethernet cable if you prefer.
![]() The Control LED on the front of your StudioLive mixer will turn blue once it is connected and communicating properly to the network.
The Control LED on the front of your StudioLive mixer will turn blue once it is connected and communicating properly to the network.
")
Wired to a Computer (USB)
Your StudioLive Series III rackmount mixer can be connected directly to UC Surface running on a computer using USB.
 Please note: In this configuration, you can only use one device – your computer – to control your StudioLive mixer.
To begin, you must install Universal Control on your computer. Please review the Using Your StudioLive as an Audio Interface with Universal Control Reference Guide for complete details.
Once Universal Control has been installed, connect your StudioLive mixer using USB and launch Universal Control.
")
![]()
The Control LED on the front of your StudioLive mixer will turn blue once it is connected and communicating properly to the computer.
Step 3: Update Firmware
Direct Updating over the Internet
The easiest way to update your StudioLive Series III rackmount mixer firmware is to connect your mixer to a device running UC Surface that also has Internet access
Power User Tip: Because direct updating from the Internet is the safest and fastest method of updating your mixer's firmware, it is highly recommended that you use this method whenever possible.

To use Internet updates, your PreSonus hardware must be registered to your My PreSonus account.
From UC Surface

- Connect both your mixer and your UC Surface device to a network with Internet access (wired or wireless).
- Open UC Surface and connect to your mixer.
- Click or touch the Settings icon at the top right of the UC Surface window.
![]()
- On the Device Settings tab, click "Check Firmware Update."

- You will be asked if you would like to proceed with the firmware update. Click "OK."
- progress bar will be shown in UC Surface during the first part of the firmware update. Once it is complete, UC Surface will inform you that it is finished and will ask you to power-cycle the mixer.\
- When you restart your mixer, verify that the last four digits of the firmware version on it are the same as the firmware files you downloaded.


Manual Firmware Updates
To manually update your mixer's firmware, you will need a computer with Internet access and a method to transfer the file from one computer to another (USB Thumb drive, SD card, etc.).
- Log in to your my.presonus.com account.
- Once you have logged in, click the My Products button at the top of the page.
![]()
- Click on the Hardware tab to view your registered hardware products.
![]()
- Find your mixer model on the page and click the View More Details link.
![]()
- Click on the update Firmware button to download the files to your computer.
![]()
- When the download completes, open your Downloads folder. Depending on your computer's system preferences, the firmware .zip archive file might not automatically decompress. If it doesn't, double-click the file, and it will decompress. You will find a single .img file inside. Drag it to your removable media.
![]()
- On the computer connected to your mixer, launch UC Surface and click on the Settings page button.
![]()
- Drag the .img file into the Firmware Update section.
The firmware update will start automatically.
![]()


Step 4: Set Up an AVB Network
The StudioLive Series III Rackmount mixers can be used as a stagebox for the StudioLive Series III console mixers over an AVB network with or without DSP processing engaged.
While connected to a console mixer either directly or over an AVB network, a Series III rackmount mixer supports sending and receiving audio as well as remotely controlling preamp levels and phantom power.
For complete information on using your StudioLive Series III Rackmount mixer as a stagebox or remote I/O for a StudioLive Series III console mixer, please review the StudioLive Series III Stagebox Mode Addendum.
Hookup
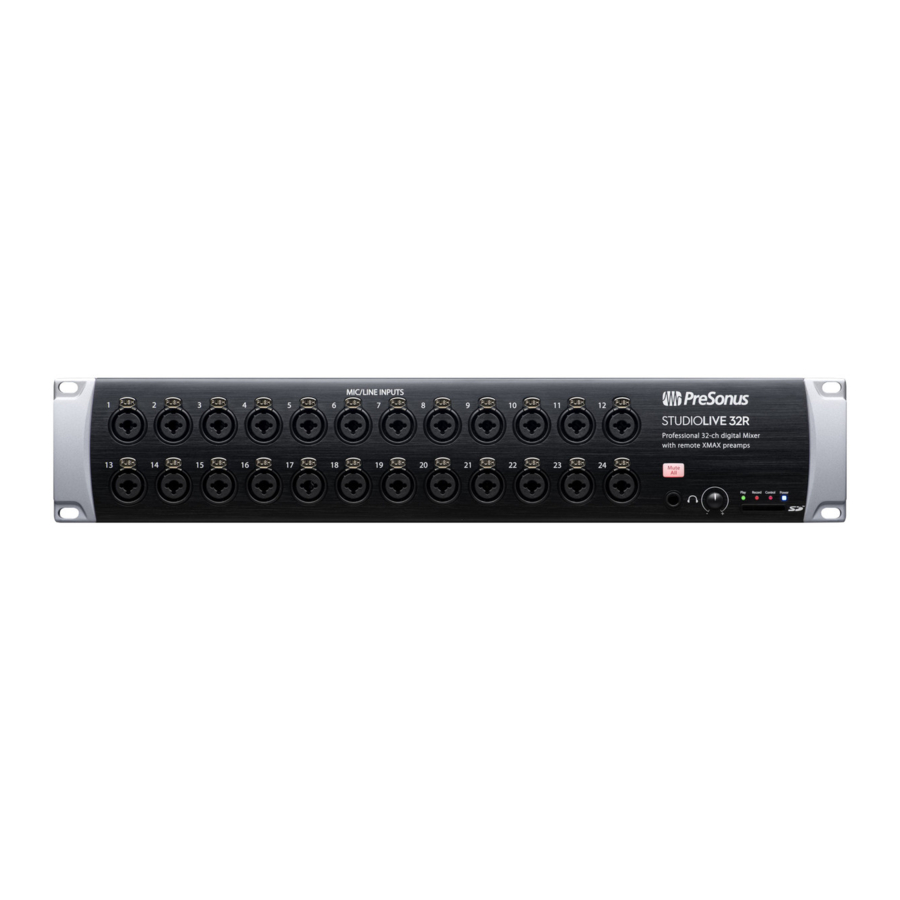
Front Panel

Power/Status LED.

This displays the current state of your StudioLive Series III rackmount mixer:
- Off. The mixer is not turned on.
- Blue. The mixer is powered on and operating normally.
- Flashing Red. There was an error booting the mixer.
- Flashing Yellow. The mixer is in the process of updating firmware.
- Green. The mixer has completed loading new firmware.
Control LED.
![]()
This displays the status of the LAN network you are using to control your mixer.
- Off. The mixer is not turned on.
- Blue. The mixer is powered on and a control device is connected.
- Red. The mixer is powered on and no control device is connected.
SD Card Record Indicator.

This LED displays the recording status of the SD recorder. When the SD Card is recording, this LED will illuminate Red. When it is not, it will be off.
SD Card Playback Indicator.

This LED displays the playback status of the SD recorder. When the SD Card is recording or playing back, the LED will illuminate green. When it is not, it will be off.
Headphones. This ¼-inch TRS connection is for use with headphones. The Phones knob controls the level.

Mute All. Mutes all inputs and mix outputs. This button is linked with the Mute All button in the Global Settings view of UC Surface software.

Power User Tip: The Mute All button is both latching and momentary. When the button is pressed and immediately released, it will latch in the "on" state. When the button is pressed and held it, will turn on while held and off when released.
Power User Tip: The mute state of each channel and bus is retained while Mute All is active. In this way, if a channel was muted before Mute All was enabled, it will still be muted when Mute All is turned off
Mic/Line Inputs. These inputs use TRS-XLR combo jacks that can accept both XLR and balanced or unbalanced 1/4" cables. The ¼-inch TRS connectors bypass the gain stage and are scaled to accept line-level signals up to +18 dBFS.

Power User Tip: When the line inputs are engaged, the microphone preamp circuit is bypassed completely, and no trim control is available. Typical examples of line-level connections are synthesizer outputs, signal processors, and stand-alone mic preamps and channel strips. Use the output level control on your line-level device to adjust its level.
Note: As with many audio devices, plugging a microphone or line-level device, or enabling/disabling phantom power can create a momentary noise spike in the audio output of your StudioLive mixer. It is highly recommended that you mute or turn down a channel's fader before changing connections or toggling phantom power on or off.
Rear Panel

Mic/Line Inputs (StudioLive 32R and 16R). On the StudioLive 32R and 16R, the first 24/12 inputs are located on the front panel, the last 8/4 inputs are located on the rear panel. These inputs use TRS-XLR combo jacks that can accept both XLR and balanced or unbalanced 1/4" cables. The ¼-inch TRS connectors bypass the gain stage and are scaled to accept line-level signals up to +18 dBFS.

RCA Inputs. The last two inputs on the StudioLive Series III rackmount mixers also feature RCA inputs for connecting consuming line level devices like DVD players. These inputs are summed with their mic/line counterparts.

Mix Outputs. Your StudioLive features 16/12/6 Mix Outputs.

These Mix Outputs may be used to output Aux, Subgroup, or Matrix mixes depending on how you configure their dedicated mix buses. More information about configuring FlexMixes can be found in the UC Surface Reference Manual.
Main Outputs. The StudioLive features stereo main outputs on XLR jacks.

Audio Network. This connection accepts both Ethercon and RJ-45 connections and is used for AVB audio networking.

Ethernet Port. This RJ-45 port is used to connect your StudioLive to a standard LAN network for control applications only.

More information about AVB and control networking can be found in Set Up an AVB Network Section.
USB Port. This female USB-B jack provides connection to a computer for audio interfacing, control, and file transfer duties.

Power Input and Switch. Connect the provided IEC power cable to this input. Push the top of the switch to power your StudioLive on, and the bottom to switch power off.

Connecting Your Audio System
Before you begin, here are a few rules to get you started:
- Always turn down the Main and Mix faders in UC Surface as well as the Phones level before making connections. Conversely, you can also enable Mute All.
- Before plugging or unplugging a microphone while other channels are active, mute the channel to which you are connecting.
- Your faders in UC Surface should be set on or near the "U" mark whenever possible. The "U" indicates unity gain, meaning the signal is neither boosted nor attenuated.
- Do not allow your inputs to clip. Watch the level meters; when signal nears Clipping, the channel LED illuminates red, indicating that the analog-to-digital converters are in danger of being overdriven. Overdriving the converters will cause digital distortion, which has a negative effect on sound quality.
Your P.A. and studio equipment should be powered on in the following order:
- Sound sources (keyboards, direct boxes, microphones, etc.) connected to the StudioLive inputs.
- StudioLive mixer
- Computer (if applicable)
- Power amplifiers or powered loudspeakers
When it is time to power down, your system should be turned off in the reverse order. Now that you know what not to do, let's get started!
Level Setting Procedure
Note: This section assumes that you've already installed and configured your mixer to work with UC Surface on your computer, iPad, or Android device. Please review Getting Started Section.
- Plug a microphone into a mic cable and plug the cable into the StudioLive Channel 1 mic input.
![]()
- Connect the Main Outputs of your mixer to your power amplifier or powered monitors. If you're using passive speakers, connect them to your power amplifier using speaker cables.
- Plug your mixer into a power outlet and turn it on.
- Power on your powered speakers or speaker amplifier.
![]()


- Select Channel 1 in UC Surface.
![]()
- If your microphone requires phantom power, engage +48V button.
![]()
- Speak or sing into your microphone at approximately the same volume you expect during the performance.
![]()
- Adjust the input trim in UC Surface while watching the input meter. Adjust the input gain until the meter reaches a little more than halfway up. The meter should never turn red.
![]()
- Raise the Channel 1 fader in UC Surface until it reaches 0 dB (unity gain).
- In UC Surface, bring up the Main mix level fader until you can comfortably listen to your microphone through your speakers.
![]()
From this point, you can use the Fat Channel to add dynamics processing and EQ as needed. For details on using UC Surface and the Fat Channel, please review the UC Surface Reference Manual.


Typical Setup Diagrams
Typical Band Setup (StudioLive 32R)
")
Typical Band Setup (StudioLive 16R)
")
Typical Church Setup (StudioLive 32R)
")
Typical Church Setup (StudioLive 16R)
")
Resources
Stereo Microphone Placement
The following are a few recording applications to help you get started with your StudioLive. These are by no means the only ways to record these instruments. Microphone selection and placement is an art. For more information, visit your library or local bookstore, as there are many books and magazines about recording techniques. The Internet is also a great source of recording information, as are instructional videos. Some of these microphone-placement suggestions can be used in live applications, as well as for studio recording.
Grand Piano
Place one microphone above the high strings and one microphone above the low strings. Experiment with distance (the farther back the more room you will capture). This technique can be used for live and studio applications.

Electric Guitar
Place a dynamic microphone an inch or two away from the speaker of the guitar amplifier. Experiment with exact location. If you are recording an amp with multiple speakers, experiment with each one to see if one sounds better than the others. Place a condenser microphone approximately six feet away, pointed at the amp. Experiment with distance. Also experiment with inverting the phase of the room microphone to check for phase cancellation and reinforcement. (Select the "fuller"-sounding position.) To use this technique in a live application, omit the condenser microphone.

Acoustic Guitar
Point a small-diaphragm condenser microphone at the 12th fret, approximately 8 inches away. Point a large-diaphragm condenser microphone at the bridge of the guitar, approximately 12 inches from the guitar. Experiment with distances and microphone placement. Another popular method is using an XY microphone placement with two small-diaphragm condenser microphones. (See drum overheads picture below.)

Bass Guitar (Direct and Speaker)
Plug the electric bass guitar into a passive direct box. Connect the instrument output from the passive direct box to a bass amplifier. Place a dynamic microphone an inch or two away from the speaker and connect it to a StudioLive microphone input. Connect the line output from the passive direct box to a line input on a different channel of the StudioLive. For recording, place these signals on separate tracks. During mixing, you can blend the direct and amplifier signal to taste. This technique can also be used in live applications.

Drum Overheads (XY example)
Place two small-diaphragm condenser microphones on an XY stereo-microphone holder (bar).

Position the microphones so that each one is at a 45-degree angle, pointed down at the drum kit, approximately 7 or 8 feet above the floor or drum riser. Experiment with height. This technique can be used in live applications as well.

Snare Drum (top and bottom)
Point a dynamic microphone at the center of the snare, making sure it is placed so that the drummer will not hit it. Place a small-diaphragm condenser microphone under the drum, pointed at the snares. Experiment with the placement of both microphones. Also experiment with inverting the phase of the bottom microphone. This technique can be used in live applications.

Compression Setting Suggestions
The following are the compression presets that were used in the PreSonus BlueMax. We have included them as a jumping off point for setting up compression on the StudioLive.
Vocals
Soft. This is an easy compression with a low ratio setting for ballads, allowing a wider dynamic range. It's good for live use. This setting helps the vocal "sit in the track."
| THRESHOLD | RATIO | ATTACK | RELEASE |
| -8.2 dB | 1.8:1 | 0.002 ms | 38 ms |
Medium. This setting has more limiting than the Soft compression setting, producing a narrower dynamic range. It moves the vocal more up front in the mix.
| THRESHOLD | RATIO | ATTACK | RELEASE |
| -3.3 dB | 2.8:1 | 0.002 ms | 38 ms |
Screamer. This setting is for loud vocals. It is a fairly hard compression setting for a vocalist who is on and off the microphone a lot. It puts the voice "in your face."
| THRESHOLD | RATIO | ATTACK | RELEASE |
| -1.1 dB | 3.8:1 | 0.002 ms | 38 ms |
Percussion
Snare/Kick. This setting allows the first transient through and compresses the rest of the signal, giving a hard "snap" up front and a longer release.
| THRESHOLD | RATIO | ATTACK | RELEASE |
| -2.1 dB | 3.5:1 | 78 ms | 300 ms |
Left/Right (Stereo) Overheads. The low ratio and threshold in this setting gives a "fat" contour to even out the sound from overhead drum mics. Low end is increased, and the overall sound is more present and less ambient. You get more "boom" and less "room."
| THRESHOLD | RATIO | ATTACK | RELEASE |
| -13.7 dB | 1.3:1 | 27 ms | 128 ms |
Fretted Instruments
Electric Bass. The fast attack and slow release in this setting will tighten up the electric bass and give you control for a more consistent level.
| THRESHOLD | RATIO | ATTACK | RELEASE |
| -4.4 dB | 2.6:1 | 45.7 ms | 189 ms |
Acoustic Guitar. This setting accentuates the attack of the acoustic guitar and helps maintain an even signal level, keeping the acoustic guitar from disappearing in the track.
| THRESHOLD | RATIO | ATTACK | RELEASE |
| -6.3 dB | 3.4:1 | 188 ms | 400 ms |
Electric Guitar. This is a setting for "crunch" electric rhythm guitar. A slow attack helps to get the electric rhythm guitar "up close and personal" and gives punch to your crunch.
| THRESHOLD | RATIO | ATTACK | RELEASE |
| -0.1 dB | 2.4:1 | 26 ms | 193 ms |
Keyboards
Piano. This is a special setting for an even level across the keyboard. It is designed to help even up the top and bottom of an acoustic piano. In other words, it helps the left hand to be heard along with the right hand.
| THRESHOLD | RATIO | ATTACK | RELEASE |
| -10.8 dB | 1.9:1 | 108 ms | 112 ms |
Synth. The fast attack and release on this setting can be used for synthesizer horn stabs or for bass lines played on a synthesizer.
| THRESHOLD | RATIO | ATTACK | RELEASE |
| -11.9 dB | 1.8:1 | 0.002 ms | 85 ms |
Orchestral. Use this setting for string pads and other types of synthesized orchestra parts. It will decrease the overall dynamic range for easier placement in the mix.
| THRESHOLD | RATIO | ATTACK | RELEASE |
| 3.3 dB | 2.5:1 | 1.8 ms | 50 ms |
Stereo Mix
Stereo Limiter. Just as the name implies, this is a hard limiter, or "brickwall," setting— ideal for controlling the level to a two-track mixdown deck or stereo output.
| THRESHOLD | RATIO | ATTACK | RELEASE |
| 5.5 dB | 7.1:1 | 0.001 ms | 98 ms |
Contour. This setting fattens up the main mix.
| THRESHOLD | RATIO | ATTACK | RELEASE |
| -13.4 dB | 1.2:1 | 0.002 ms | 182 ms |
Effects
Squeeze. This is dynamic compression for solo work, especially electric guitar. It gives you that glassy "Tele/Strat" sound. It is a true classic.
| THRESHOLD | RATIO | ATTACK | RELEASE |
| -4.6 dB | 2.4:1 | 7.2 ms | 93 ms |
Pump. This is a setting for making the compressor "pump" in a desirable way. This effect is good for snare drums to increase the length of the transient by bringing the signal up after the initial spike.
| THRESHOLD | RATIO | ATTACK | RELEASE |
| 0 dB | 1.9:1 | 1 ms | 0.001 ms |
EQ Frequency Guides
Table 1

Table 2

EQ Setting Suggestions
As with the compression settings in Compression Setting Suggestions Section, the right EQ setting for any given instrument will depend upon the room and the tonality of the instrument.
Vocals
Pop Female Vocals
| LOW ON/OFF | LOW SHELF | LOW FREQ (Hz) | LOW Q | LOW GAIN | LOW MID ON/OFF | LOW MID FREQ (Hz) | LOW MID Q | LOW MID GAIN |
| ON | OFF | 130 | 0.6 | -2 | ON | 465 | 0.6 | -2 |
| HIGH MID ON/ OFF | HI MID FREQ (kHz) | HIGH MID Q | HIGH MID GAIN | HIGH ON/OFF | HIGH SHELF | HIGH FREQ (kHz) | HIGH Q | HIGH GAIN |
| ON | 2.4 | 0.4 | +2 | ON | OFF | 6.0 | 0.3 | +8 |
Rock Female Vocals
| LOW ON/OFF | LOW SHELF | LOW FREQ (Hz) | LOW Q | LOW GAIN | LOW MID ON/OFF | LOW MID FREQ (Hz) | LOW MID Q | LOW MID GAIN |
| ON | ON | 155 | N/A | +4 | ON | 465 | 0.4 | +6 |
| HIGH MID ON/ OFF | HI MID FREQ (kHz) | HIGH MID Q | HIGH MID GAIN | HIGH ON/OFF | HIGH SHELF | HIGH FREQ (kHz) | HIGH Q | HIGH GAIN |
| ON | 1.4 | 0.6 | +6 | ON | OFF | 4.2 | 0.5 | +2 |
Pop Male Vocals
| LOW ON/OFF | LOW SHELF | LOW FREQ (Hz) | LOW Q | LOW GAIN | LOW MID ON/OFF | LOW MID FREQ (Hz) | LOW MID Q | LOW MID GAIN |
| ON | OFF | 225 | 0.3 | -2 | ON | 960 | 0.3 | 0 |
| HIGH MID ON/ OFF | HI MID FREQ (kHz) | HIGH MID Q | HIGH MID GAIN | HIGH ON/OFF | HIGH SHELF | HIGH FREQ (kHz) | HIGH Q | HIGH GAIN |
| ON | 2.0 | 0.6 | +2 | ON | OFF | 7.2 | 0.5 | +4 |
Rock Male Vocals
| LOW ON/OFF | LOW SHELF | LOW FREQ (Hz) | LOW Q | LOW GAIN | LOW MID ON/OFF | LOW MID FREQ (Hz) | LOW MID Q | LOW MID GAIN |
| ON | OFF | 155 | 0.5 | +2 | ON | 265 | 0.3 | -6 |
| HIGH MID ON/ OFF | HI MID FREQ (kHz) | HIGH MID Q | HIGH MID GAIN | HIGH ON/OFF | HIGH SHELF | HIGH FREQ (kHz) | HIGH Q | HIGH GAIN |
| ON | 2.4 | 0.6 | -2 | ON | ON | 7.2 | 0.6 | +4 |
Percussion
Snare
| LOW ON/OFF | LOW SHELF | LOW FREQ (Hz) | LOW Q | LOW GAIN | LOW MID ON/OFF | LOW MID FREQ (Hz) | LOW MID Q | LOW MID GAIN |
| ON | OFF | 130 | 0.6 | -4 | ON | 665 | 0.5 | +4 |
| HIGH MID ON/ OFF | HI MID FREQ (kHz) | HIGH MID Q | HIGH MID GAIN | HIGH ON/OFF | HIGH SHELF | HIGH FREQ (kHz) | HIGH Q | HIGH GAIN |
| ON | 1.6 | 0.3 | +4 | ON | ON | 4.2 | N/A | +4 |
Left/Right (Stereo) Overheads
| LOW ON/OFF | LOW SHELF | LOW FREQ (Hz) | LOW Q | LOW GAIN | LOW MID ON/OFF | LOW MID FREQ (Hz) | LOW MID Q | LOW MID GAIN |
| ON | OFF | 108 | 0.6 | -2 | ON | 385 | 0.6 | -2 |
| HIGH MID ON/ OFF | HI MID FREQ (kHz) | HIGH MID Q | HIGH MID GAIN | HIGH ON/OFF | HIGH SHELF | HIGH FREQ (kHz) | HIGH Q | HIGH GAIN |
| ON | 2.9 | 0.3 | 0 | ON | ON | 8.0 | N/A | +4 |
Kick Drum
| LOW ON/OFF | LOW SHELF | LOW FREQ (Hz) | LOW Q | LOW GAIN | LOW MID ON/OFF | LOW MID FREQ (Hz) | LOW MID Q | LOW MID GAIN |
| ON | OFF | 108 | 0.4 | +4 | ON | 265 | 2.0 | -4 |
| HIGH MID ON/ OFF | HI MID FREQ (kHz) | HIGH MID Q | HIGH MID GAIN | HIGH ON/OFF | HIGH SHELF | HIGH FREQ (kHz) | HIGH Q | HIGH GAIN |
| ON | 1.6 | 0.6 | 0 | ON | OFF | 6.0 | 2.0 | +4 |
Fretted Instruments
Electric Bass
| LOW ON/OFF | LOW SHELF | LOW FREQ (Hz) | LOW Q | LOW GAIN | LOW MID ON/OFF | LOW MID FREQ (Hz) | LOW MID Q | LOW MID GAIN |
| ON | ON | 36 | N/A | -8 | ON | 130 | 0.4 | +4 |
| HIGH MID ON/ OFF | HI MID FREQ (kHz) | HIGH MID Q | HIGH MID GAIN | HIGH ON/OFF | HIGH SHELF | HIGH FREQ (kHz) | HIGH Q | HIGH GAIN |
| ON | 2.0 | 0.6 | +4 | ON | ON | 4.2 | N/A | +1 |
Acoustic Guitar
| LOW ON/OFF | LOW SHELF | LOW FREQ (Hz) | LOW Q | LOW GAIN | LOW MID ON/OFF | LOW MID FREQ (Hz) | LOW MID Q | LOW MID GAIN |
| ON | OFF | 155 | 0.4 | +4 | ON | 665 | 2.0 | +2 |
| HIGH MID ON/ OFF | HI MID FREQ (kHz) | HIGH MID Q | HIGH MID GAIN | HIGH ON/OFF | HIGH SHELF | HIGH FREQ (kHz) | HIGH Q | HIGH GAIN |
| ON | 2.0 | 0.3 | 0 | ON | ON | 6.0 | N/A | +4 |
Distorted Electric Guitar
| LOW ON/OFF | LOW SHELF | LOW FREQ (Hz) | LOW Q | LOW GAIN | LOW MID ON/OFF | LOW MID FREQ (Hz) | LOW MID Q | LOW MID GAIN |
| ON | OFF | 320 | 0.5 | +6 | ON | 960 | 0.4 | 0 |
| HIGH MID ON/ OFF | HI MID FREQ (kHz) | HIGH MID Q | HIGH MID GAIN | HIGH ON/OFF | HIGH SHELF | HIGH FREQ (kHz) | HIGH Q | HIGH GAIN |
| ON | 3.5 | 1.0 | +4 | ON | ON | 12 | N/A | 0 |
Keyboards
Piano
| LOW ON/OFF | LOW SHELF | LOW FREQ (Hz) | LOW Q | LOW GAIN | LOW MID ON/OFF | LOW MID FREQ (Hz) | LOW MID Q | LOW MID GAIN | |
| ON | ON | 108 | N/A | -2 | ON | 665 | 0.2 | +2 | |
| HIGH MID ON/ OFF | HI MID FREQ (kHz) | HIGH MID Q | HIGH MID GAIN | HIGH ON/OFF | HIGH SHELF | HIGH FREQ (kHz) | HIGH Q | HIGH GAIN | |
| ON | 2.9 | 0.4 | +2 | ON | OFF | 7.2 | 0.6 | +4 | |
Technical Specifications
Microphone Preamplifier
| Input Type | XLR Female, balanced | |||||||||
| Frequency Response to Main Output (at unity gain) | 20-20 kHz, ±0.5 dBu | |||||||||
| Input Impedance | 1 kΩ | |||||||||
| THD to Main Output | <0.005%, +4 dBu, 20-20 kHz, unity gain, unwtd | |||||||||
| S/N Ratio to Main Output (Ref = +4 dB, 20 kHz BW, unity gain, A-wtd) | 94 dB | |||||||||
| Common Mode Rejection Ratio (1 kHz at unity gain) | 65 dB | |||||||||
| Gain Control Range (±1 dB) | 0 dB to +60 dB | |||||||||
| Maximum Input Level (unity gain) | +12 dBu | |||||||||
| Phantom Power (±2 VDC) | 48 VDC, switchable per channel | |||||||||
Line Inputs
| Type | ¼" TRS Female, balanced | |||||||||
| Frequency Response to Main Output (at unity gain) | 20-20 kHz, ±0.5 dBu | |||||||||
| Input Impedance | 10 kΩ | |||||||||
| THD to Main Output | <0.005%, +4 dBu, 20-20 kHz, unity gain, unwtd | |||||||||
| S/N Ratio to Main Output (Ref = +4 dB, 20 kHz BW, unity gain, A-wtd) | 94 dB | |||||||||
| Maximum Input Level | +18 dBu | |||||||||
RCA Inputs
| Type | RCA Female, unbalanced (stereo pair) | |||||||||
| Maximum Input Level | +12 dBu, ±0.5 dBu | |||||||||
XLR Outputs
| Type | XLR Male, balanced | |||||||||
| Maximum Output Level | +24 dBu, ±0.5 dBu | |||||||||
| Output Impedance | 100Ω | |||||||||
FlexMix Line Outputs
| Type | ¼" TRS Female, balanced | |||||||||
| Maximum Output Level | +18 dBu, ±0.5 dBu | |||||||||
| Output Impedance | 100Ω | |||||||||
Headphone Output
| Type | ¼" TRS Female, active stereo | |||||
| Maximum Output | 100 mW/ch. @ 60Ω load | |||||
| Frequency Response | 20 Hz – 20 kHz (± 0.5 dB) | |||||
| THD+N | 0.01%, 1 kHz, max gain, 20 Hz BW, unwtd | |||||
| S/N Ratio | 96 dB, 1 kHz, max gain, 20 Hz BW, unwtd | |||||
System Crosstalk
| Input to Output | -90 dB (Ref = +4 dBu, 20 Hz-20 kHz, unwtd) | |||||
| Adjacent Channels | -87 dB (Ref = +4 dBu, 20 Hz-20 kHz, unwtd) | |||||
Digital Audio and Control
| ADC Dynamic Range | 115 dB (A-wtd, 48 kHz) | |||||
| DAC Dynamic Range | 115 dB (A-wtd, 48 kHz) | |||||
| USB Recording Port | USB 2.0, Type-B | |||||
| AES/EBU Output | XLR Male | |||||
| Network Control Port | RJ-45 | |||||
| AVB Audio Network Port | Ethercon | |||||
| Internal Processing | 32-bit, floating point | |||||
| Sampling Rate | 48 kHz (44.1 kHz coming soon) | |||||
| A/D/A Bit Depth | 24 | |||||
| Reference Level for 0 dBFS | +18 dBu | |||||
| Total System Latency | 1.9 ms (local routing, analog in-analog out, all processing active) | |||||
Clock
| Jitter | <20 ps RMS (20 Hz - 20 kHz) | ||||
| Jitter Attenuation | >60 dB (1 ns in, 1 ps out) | ||||
Power / Environmental
| Connector | IEC | ||||
| Input-Voltage Range | 90 to 230 VAC (±10%) | ||||
| Power Requirements (continuous) | 85W | ||||
| Recommended Ambient Operating Temperature | 0˚ to 40˚ Celsius / 32˚ to 104˚ Fahrenheit | ||||
Physical
| StudioLive 16R | StudioLive 24R | StudioLive 32R | ||||
| Dimensions (HxWxD) | 1.75" x 19" x 12" (45 mm x 483 mm x 305 mm) | 3.5" x 19" x 12" (90 mm x 483 mm x 305 mm) | 3.5" x 19" x 12" (90 mm x 483 mm x 305 mm) | |||
| Product Weight | 8.6 lbs. (3.9 kg) | 10.8 lbs. (4.9 kg) | 11.2 lbs. (5 kg) | |||
StudioLive Series III Rackmount Mixer Block Diagrams
We've finally made block diagrams too large for our printed manuals. Please visit the downloads page for each model on our Web site for the latest block diagrams of the StudioLive Series III rackmount mixers, provided in Adobe PDF format.
Warranty
How to Get Warranty Service
(USA):
- You must have an active user account with PreSonus, and your hardware must be on file with your account. If you do not have an account, please go to: http://www.presonus.com/registration and complete the registration process.
- Contact our Technical Support Department at (225) 216-7887 or log a support ticket at: http://support.presonus.com.
(outside of USA):
- You must have an active user account with PreSonus and your hardware must be on file with your account. If you do not have an account, please go to: http://www.presonus.com/registration and complete the registration process.
- Contact the Technical Support/Service Department for your region at http://www.presonus.com/buy/international_distributors and follow procedures provided by your PreSonus contact.
Added bonus: PreSonus' previously Top Secret recipe for...
Dinner is Served
Chicken and Andouille Gumbo
Serves 12
Ingredients:
- 1 C All-Purpose flour
- ¾ C Vegetable Oil
- 1 large onion (diced)
- 1 small onion (quartered)
- 6 celery stalks (diced)
- 1 large green bell pepper (diced)
- 3 cloves garlic (2 minced, 1 whole)
- 1 lb link Andouille sausage
- 4 Chicken leg quarters
- 4 qt water
- 4 bay leaves
- 1 tsp thyme
- 1 tsp Old Bay seasoning
- 1-2 C frozen okra, sliced
- ¼ C fresh parsley, minced
- 6-8 eggs (optional)
Cooking Instructions:
- In a large pot, combine whole chicken leg quarters, water, quartered onion, Old Bay, 2 bay leaves and 1 whole clove garlic. Cover and bring to a low boil. Simmer stock until chicken is falling off the bone. Remove the chicken and set aside. Discard the onion, bay leaves, and garlic, reserving the liquid.
- In a heavy saucepan, heat 1 Tbsp of the oil on medium high heat and brown the andouille until it is cooked through. Set aside sausage for later.
- In the same saucepan, add and heat remaining oil. Slowly add flour 1-2 Tbsp at a time, stirring continuously. Continue cooking and stirring the roux until it is a dark brown (it should look like melted dark chocolate). Be careful to not to get the oil too hot or the flour will burn and you'll have to start over.
- Once roux has reached the correct color, add diced onion, celery, green pepper, and minced garlic. Cook until vegetables are very tender. Do not cover.
- Slowly add 1 quart of chicken broth and bring to a low boil, stirring constantly.
- Transfer roux mixture to a soup pot and bring to low boil. Do not cover, the roux will settle on the bottom of the pot and burn.
- Add remaining chicken broth, bay leaves, and thyme. Simmer for 30 minutes.
- While gumbo is simmering, debone and shred chicken and slice the andouille.
- Add chicken and andouille to gumbo and return to a simmer. Simmer for 30-45 minutes.
- Stir in frozen okra and parsley and bring to a rolling boil.
- Optional: Crack one egg into a teacup and quickly pour into the boiling gumbo. Repeat with the other eggs being careful not to cluster them too closely. After all the eggs have risen back to the surface, reduce heat and simmer.
- Correct seasoning with salt and pepper (red, white and/or black) if necessary.
- Serve over rice with potato salad.
1-225-216-7887
Documents / Resources
References
Download manual
Here you can download full pdf version of manual, it may contain additional safety instructions, warranty information, FCC rules, etc.
Download PRESONUS StudioLive 32R, StudioLive 24R, StudioLive 16R Manual
Advertisement


Need help?
Do you have a question about the StudioLive III Series and is the answer not in the manual?
Questions and answers