
Related Manuals for Gaspardo ALIANTE


Summary of Contents for Gaspardo ALIANTE
- Page 1 GASPARDO Seminatrici S.p.A. ALIANTE USO E MANUTENZIONE USE AND MAINTENANCE GEBRAUCH UND WARTUNG EMPLOI ET ENTRETIEN EMPLEO Y MANTENIMIENTO 06 / 2005 Cod. 19502240...
-
Page 2: Table Of Contents
ITALIANO ENGLISH DEUTSCH INDICE INDEX INHALT 1.0 Introduction 1.0 Vorwort Premessa 1.1 Konformitätsenklärung 1.1 Conformity declaration Dichiarazione di conformità 1.2 Description of the seeder 1.2 Beschreibung der sämaschine Descrizione della seminatrice 1.3 Garantie 1.3 Guarantee Garanzia 1.3.1 Verfall des garantieanspruchs 1.3.1 Expiry of guarantee 1.3.1 Scadenza della garanzia 1.4 Identifizierung... - Page 3 FRANÇAIS ESPAÑOL TABLES DE MATIERES INDICE 1.0 Premisa 1.0 Introduction Declaración de conformidad 1.1 Confotmity declaratione Descripción de la sembradora 1.2 Description de la machine Garantía 1.3 Garantie 1.3.1 Vencimiento de la garantía 1.3.1 Expiration de la garantie Identificación 1.4 Identification 1.4.1 Identificación de la sembradora 1.4.1 Identification de le semoir 1.4.2 Identificación de la combinada...
- Page 4 cod. 19502200...
-
Page 5: Italiano
IT ALIANO 1.0 PREMESSA 1.2 DESCRIZIONE DELLA SEMINATRICE Questa attrezzatura agricola può operare solo tramite un trattore agricolo munito di gruppo sollevatore, con attacco universale a Questo manuale descrive le norme d’uso e di manutenzione per tre punti. Le seminatrici sono adatte per impieghi in combinazio- la seminatrice. -
Page 6: Garanzia
ITALIANO USO E MANUTENZIONE 1.3 GARANZIA 1.4 IDENTIFICAZIONE - Verificare all’atto della consegna che l’attrezzatura non abbia subito danni durante il trasporto e che gli accessori siano inte- 1.4.1 TARGHETTA D’IDENTIFICAZIONE SEMINATRICE gri e al completo. Ogni singola attrezzatura, è dotata di una targhetta di identifica- - Eventuali reclami dovranno essere presentati per iscritto entro zione (8 Fig. -
Page 7: Dati Tecnici
USO E MANUTENZIONE ITALIANO 1.5 DATI TECNICI DELLA SEMINATRICE LIVELLO SONORO DELLA COMBINAZIONE DM R - ALIANTE Rilevamenti della rumorosità a vuoto, (UNI EN 1553/2001): Livello di pressione acustica: LpAm (A) dB ......83,8 Livello di potenza acustica: LwA (A) dB ......... 103,5 I dati tecnici ed i modelli indicati si intendono non impegnativi. -
Page 8: Disegno Complessivo
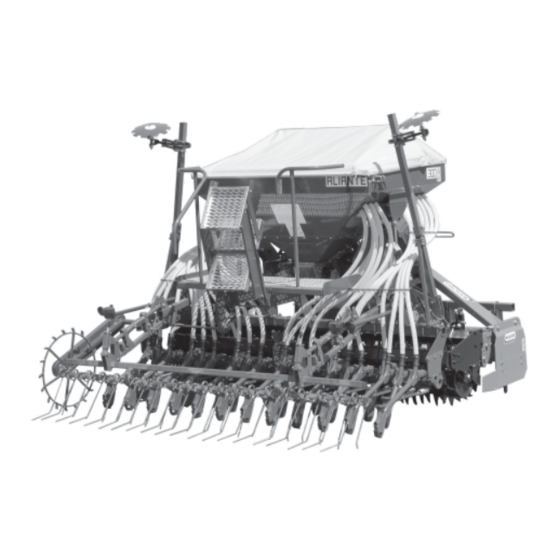
ITALIANO USO E MANUTENZIONE (Fig. 2) 1.7 DISEGNO COMPLESSIVO 1.8.2 SEGNALI DI PERICOLO 3) Pericolo di sganciamento in fase di apertura. Tenersi a distanza 1 Tramoggia semi; di sicurezza dalla macchina. 2 Ventola; 4) Livello sonoro elevato. Munirsi di adeguate protezioni acustiche. 3 Assolcatori;... - Page 9 USO E MANUTENZIONE ITALIANO 89900500 Decalcomanie avvertimento Warning stickers Abziehbilder mit Warnhinweisen Decalcomanie Calcomanias fig. 3 cod. 19502240...
-
Page 10: Norme Di Sicurezza E Prevenzione Infortuni
ITALIANO USO E MANUTENZIONE 11) Prima di iniziare il lavoro, familiarizzare con i dispositivi di coman- 2.0 NORME DI SICUREZZA E PREVENZIONE do e le loro funzioni. INFORTUNI 12) Iniziare a lavorare con l’attrezzatura solo se tutti i dispositivi di protezione sono integri, installati e in posizione di sicurezza. - Page 11 USO E MANUTENZIONE ITALIANO 46) Prima di inserire la presa di potenza, assicurarsi che non vi Circolazione su strada 29) Per la circolazione su strada, è necessario attenersi alle norma- siano persone o animali nella zona d’azione e che il regime tive del codice stradale in vigore nel relativo Paese.
-
Page 12: Norme D'uso
ITALIANO USO E MANUTENZIONE 3.0 NORME D’USO nr. 17 Per ottenere le migliori prestazioni dell’attrezzatura, seguire at- tentamente quanto di seguito riportato. ATTENZIONE Tutte le operazioni di manutenzione, regolazione e di prepara- zione al lavoro, devono essere eseguite tassativamente con trattore spento e ben fermo, chiave disinserita e seminatrice a terra. - Page 13 USO E MANUTENZIONE ITALIANO Modello Erpice Power harrow Kreiselegge Herse rotative Grada rotante A B C D 1 (mm) 2 (mm) AX 76 (1000 Giri/min.) AX 73 (1000 Giri/min.) AX 85 (540 Giri/min.) Tabella 2 cod. 19502240...
-
Page 14: Aggancio Seminatrice-Attrezzatura
ITALIANO USO E MANUTENZIONE 3.2.3 AGGANCIO SEMINATRICE-ATTREZZATURA fig. 11 PERICOLO L’applicazione della seminatrice all’attrezzatura è una fase molto pericolosa. Fare molta attenzione ad effettuare l’intera operazione seguendo le istruzioni. L’operazione deve essere eseguita su un piano orizzontale e solido, con la seminatrice posta sui puntelli di sostegno. 1) Smontare le protezioni delle pulegge e delle cinghie (A, B Fig. -
Page 15: Montaggio Cinghie Di Trasmissione
USO E MANUTENZIONE ITALIANO 3.2.4 MONTAGGIO CINGHIE DI TRASMISSIONE Quest’operazione deve essere eseguita con trattore a motore spento, freno di stazionamento inserito ed attrezzatura ap- poggiata al suolo. 1) Le cinghie vanno inserite fra la puleggia montata sulla presa di potenza posteriore dell’erpice e quella con l’innesto centri- fugo della soffiante (Fig. -
Page 16: Assetto Della Seminatrice
ITALIANO USO E MANUTENZIONE 3.2.5 ASSETTO DELLA SEMINATRICE fig. 18 È importante regolare correttamente la posizione della semina- trice sull’attrezzatura portante in campo. PERICOLO Assettare la seminatrice sull’attrezzatura è una fase molto pericolosa. Fare molta attenzione ad effettuare l’intera opera- zione seguendo le istruzioni. -
Page 17: Sgancio Della Seminatrice-Attrezzatura
USO E MANUTENZIONE ITALIANO 3.3 STABILITÀ IN TRASPORTO ATTREZZATURA 3.2.7 SGANCIO DELLA SEMINATRICE-ATTREZZATURA COMBINATA-TRATTORE Quando un’attrezzatura viene accoppiata al trattore, divenendo ai fini della circolazione stradale parte integrante dello stesso, PERICOLO la stabilità del complesso trattore-attrezzatura combinata può Lo sgancio della seminatrice dalla trattrice è una fase molto variare causando difficoltà... -
Page 18: Regolazioni
Nella situazione normale, l'agitatore rimane SEMPRE fermo. Esso entra in funzione solamante quando ci sono dei vuoti di prodot- to fra l'agitatore e il rullo. Poiché i rulli dosatori GASPARDO fig. 25 trasportano il materiale di semina SEMPRE sull'intera larghez- za, a differenza dei sistemi ad ingranaggi scorrevoli o con ruote fisse, il pericolo che si formino vuoti di semina è... -
Page 19: Rulli Dosatori
Montaggio e smontaggio del rullo dosatore Tutti i rulli dosatori della GASPARDO sono unità compatte e for- mate da un unico blocco (ad eccezione del rullo dosatore per sementi fini, giallo). Non si devono mai fissare i rulli dosatori con le viti allentando il volantino! Le ruote, che vengono calibrate dopo il montaggio, perderebbero così... -
Page 20: Tastatori
ITALIANO USO E MANUTENZIONE Durante la fase di montaggio, girare il rullo dosatore nella dire- fig. 32 zione di trascinamento e sospingerlo nel dosatore (Fig. 32), ..finché il perno di trascinamento non risulta fissato bene nel fig. 33 cambio (Fig. - Page 21 USO E MANUTENZIONE ITALIANO ... fino a poter spingere in fuori i dischi inseriti all'interno, estra- endoli dalla loro sede (Fig. 36), e spostare gli assali. Non è necessario svitare completamente i dadi, né controbilanciare con una seconda chiave! fig. 36 Procedere quindi nell'estrazione del blocco portine, prima dietro (Fig.
-
Page 22: Smontaggio Asse Agitatore
ITALIANO USO E MANUTENZIONE 4.1.5 SMONTAGGIO DELL'ASSE AGITATORE fig. 40 L'agitatore viene estratto dal suo alloggiamento senza la neces- sità di attrezzi, al fine di agevolare le operazioni di pulizia o sosti- tuire parti danneggiate. Dosatore con sportello di semina e ruota di semina smontati (Fig. - Page 23 USO E MANUTENZIONE ITALIANO Agitatore e supporto smontati (Fig. 44). Prima di procedere nuo- fig. 44 vamente al montaggio, pulire accuratamente le sedi del cusci- netto e tutte le parti. Per installare l'agitatore, sospingerlo nell'apertura del cuscinet- to (Fig. 45) ... fig.
-
Page 24: Elementi Elastici Pulenti
ITALIANO USO E MANUTENZIONE 4.1.6 ELEMENTI ELASTICI PULENTI Gli elementi elastici pulenti (A, Fig. 48) vengono usati durante la distribuzione di semi oleosi con il rullo di semina giallo mod. F25-125. L'azione principale degli elementi elastici è quella di mantenere libere le camere del rullo di semina, garantendo una regolare e costante distribuzione. - Page 25 USO E MANUTENZIONE ITALIANO 4) Estrarre l'albero degli elementi elastici dalle sedi (Fig. 52). fig. 52 5) Utilizzare la chiave multiuso in dotazione ed una chiave a brugola (nr. 3) per allentare le viti di bloccaggio degli elementi elastici, come indicato in Figura 53. fig.
-
Page 26: Distribuzione Sementi Fini
ITALIANO USO E MANUTENZIONE Riposizionare la ghiera di bloccaggio, serrare il pomello con la 4.1.7 DISTRIBUZIONE SEMENTI FINI chiave in dotazione e rimontare il rullo sull’attrezzatura. Bloccare l’elemento pulitore nella posizione di lavoro, verifican- Distribuzione di quantità inferiori a 3 kg/ha. Durante la prova di dosaggio, per il ridotto numero di giri del do che le molle aggancino i rispettivi settori precedentemente cambio legato alla bassa quantità... -
Page 27: Prova Di Dosaggio
USO E MANUTENZIONE ITALIANO fig. 56 fig. 57 4.2 PROVA DI DOSAGGIO Prima di effettuare la prova di dosaggio, accertarsi che non siano presenti corpi estranei all’interno della tramoggia e del dosatore. - Aggiungere una piccola quantità di semente all’interno del ser- batoio. - Page 28 ITALIANO USO E MANUTENZIONE cod. 19502240...
-
Page 29: Azionamento Della Soffiante
USO E MANUTENZIONE ITALIANO Tutti i componenti facenti parte dell'impianto, vanno accurata- 4.3 AZIONAMENTO DELLA SOFFIANTE mente sistemati per evitare danneggiamenti durante l'utilizzo dell'attrezzatura. L'impianto oleodinamico per l'azionamento della 4.3.1 AZIONAMENTO MECCANICO DELLA SOFFIANTE soffiante è di due tipi: La soffiante viene azionata dalla presa di potenza della trattrice. a) impianto dipendente: collegato all'impianto della trattrice;... - Page 30 ITALIANO USO E MANUTENZIONE IMPIANTO INDIPENDENTE A - serbatoio; Quando le caratteristiche della trattrice non sono tali da garanti- B - moltiplicatore; C - pompa; re il corretto azionamento della soffiante, è necessario installare D - regolatore a tre vie; un impianto oleodinamico indipendente.
- Page 31 USO E MANUTENZIONE ITALIANO Regolazione del soffiaggio: Le seminatrici vengono consegnate con la pressione relativa alla larghezza della macchina, come da Tabella (7). Pressione Soffiante Larghezza Pressione (bar) N giri di lavoro consigliata mt. 2,5 mt. 3,0 mt. 4,0 mt. 5,0 mt.
-
Page 32: Regolazione Della Profondità Di Semina
ITALIANO USO E MANUTENZIONE 4.4 REGOLAZIONE DELLA PROFONDITÀ DI SEMINA Per una buona emergenza dei germogli è importante collocare il seme alla giusta profondità nel letto di semina. Assolcatori a stivaletto, assolcatori a disco COREX La profondità di semina viene regolata, contemporaneamente per tutti gli assolcatori, tramite una manovella (A, Fig. -
Page 33: Regolazione Dischi Marcafile
USO E MANUTENZIONE ITALIANO 4.6 REGOLAZIONE DISCHI MARCAFILE Il segnafile è un dispositivo che traccia una linea di riferimento sul terreno, parallela al tragitto del trattore. Quando il trattore avrà terminato la corsa e invertito la marcia, si procederà correndo sulla linea di riferimento con una delle ruote anteriori (L1, Fig. -
Page 34: Livello Dei Semi Nella Tramoggia
ITALIANO USO E MANUTENZIONE 4.7 LIVELLO DEI SEMI NELLA TRAMOGGIA Il livello dei semi nella tramoggia può essere facilmente control- lato dall’operatore dal posto di guida tramite l’indicatore (Fig. 75). fig. 75 4.8 ERPICE COPRISEME POSTERIORE La normale posizione di lavoro dell'erpice è indicata in Figura In questa posizione, l'usura dei denti è... -
Page 35: Prima Di Iniziare Il Lavoro
USO E MANUTENZIONE ITALIANO 4.9 PRIMA DI INIZIARE IL LAVORO Prima di iniziare il lavoro ingrassare tutti i punti contrassegnati dalla decalcomania n° 14 (“GRASE”) a pag. 9 di questo manua- CAUTELA - La forma, le dimensioni e il materiale delle spine elastiche degli alberi di trasmissione sono state scelte per prevenzio- 4.10 INIZIO DEL LAVORO In presenza di un clima umido, azionare la ventola a vuoto per... -
Page 36: Manutenzione
ITALIANO USO E MANUTENZIONE 6.0 MANUTENZIONE 3.0.5 SCARICO DELLA TRAMOGGIA La saracinesca di svuotamento apre il dosatore sull'intera lar- ghezza del rullo dosatore, permettendo così lo svuotamento ve- Sono di seguito elencate le varie operazioni di manutenzione da loce e sicuro della macchina. Se la molla di ritenuta non è sgan- eseguirsi con periodicità. -
Page 37: Messa A Riposo
USO E MANUTENZIONE ITALIANO 6.0.7 MESSA A RIPOSO 7.0 DEMOLIZIONE E SMALTIMENTO A fine stagione, o nel caso si preveda un lungo periodo di riposo, è consigliabile: Operazione da eseguirsi a cura del Cliente. 1) Scaricare con cura tutte le sementi dalla tramoggia e dagli Prima di effettuare la demolizione della macchina, si raccoman- organi distributori. - Page 38 Notes cod. 19502200...
- Page 39 Notes cod. 19502200...
- Page 40 cod. 19502200...
-
Page 41: Introduction
ENGLISH 1.0 INTRODUCTION 1.2 DESCRIPTION OF THE SEEDER This farming implement, can only be operated by a farming tractor equipped with lift unit and universal three-point hitch. This booklet describes the regulations for use, maintenance for The seeder is suitable for use (by itself), or combined with equipment seeding machine. -
Page 42: Guarantee
ENGLISH USE AND MAINTENANCE 1.3 GUARANTEE 1.4 IDENTIFICATION - On delivery, check that the equipment has not been damaged during transport and that the accessories are integral and com- 1.4.1 IDENTIFICATION SEEDING MACHINE plete. Each individual machine has an identification plate (8 Fig. 2) - Possible claims must be presented in writing within eight days of indicating the following details: receipt. -
Page 43: Technical Data
USE AND MAINTENANCE ENGLISH 1.4 TECHNICAL DATA OF THE SEEDING MACHINE NOISE LEVEL OF THE DM R - ALIANTE COMBINATION Noise level measurements when running loadless, (UNI EN 1553/2001): Acoustic pressure level: LpAm (A) dB ......83,8 Acoustic power level: LwA (A) dB ......... 103,5 The technical data and the models provided must be considered as non binding. -
Page 44: Assembly Drawing
ENGLISH USE AND MAINTENANCE Part (B) (Fig. 3) acts only as a guide for the lifting cables. (Fig. 2) 1.8.2 DANGER SIGNALS 1.4 ASSEMBLY DRAWING 3) Danger of getting squashed during opening. Keep at a safe Seed hopper; distance from the machine. Fan;... - Page 45 USE AND MAINTENANCE ENGLISH 89900500 Decalcomanie avvertimento Warning stickers Abziehbilder mit Warnhinweisen Decalcomanie Calcomanias fig. 3 cod. 19502240...
-
Page 46: Safety Regulations And Accident Prevention
ENGLISH USE AND MAINTENANCE devices and their functions. 12)Only start working with the equipment if all the protective 2.0 SAFETY REGULATIONS AND ACCIDENT devices are in perfect condition, installed and in the safe PREVENTION position. 13)It is absolutely prohibited to stand within the machine’s radius Pay attention to danger signs, where shown, in this booklet. - Page 47 USE AND MAINTENANCE ENGLISH corresponds to that indicated by the sticker on the equipment. 46)Before inserting the power take-off, make sure that there are Transport on Road 29)When driving on public roads, be sure to follow the highway no people or animals nearby and that the rpm selected code of the country involved.
-
Page 48: Rules Of Use
ENGLISH USE AND MAINTENANCE 3.0 RULES OF USE nr. 17 To obtain the best performance from the equipment, carefully follow what is set out below. ATTENTION The following maintenance, adjustment, and work preparation operations must be performed with the tractor off and locked firmly in position with the key removed from the dashboard and the seeder positioned on the ground. - Page 49 USE AND MAINTENANCE ENGLISH Modello Erpice Power harrow Kreiselegge Herse rotative Grada rotante A B C D 1 (mm) 2 (mm) AX 76 (1000 Giri/min.) AX 73 (1000 Giri/min.) AX 85 (540 Giri/min.) Table 2 cod. 19502240...
-
Page 50: Hitching The Planting Unit To The Equipment
ENGLISH USE AND MAINTENANCE fig. 11 3.2.3 HITCHING THE PLANTING UNIT TO THE EQUIPMENT DANGER Hitching the planting unit to the equipment is a very dangerous operation. Be very careful in following the instructions for the whole operation. It should be carried out on a firm, horizontal surface with the planting unit placed on its support props. -
Page 51: Fitting Of Drive Belts
USE AND MAINTENANCE ENGLISH 3.2.4 FITTING OF DRIVE BELTS This operation should be carried out with the tractor engine switched off, the parking brake on and the equipment resting on the ground. 1) The belts should be inserted between the pulley fitted on the rear power take-off of the harrow and the one with the centrifugal clutch of the blower (Fig. -
Page 52: Seeder Position
ENGLISH USE AND MAINTENANCE fig. 18 3.2.5 SEEDER POSITION It is important to adjust the position of the planting unit correctly on the supporting equipment when in the field. DANGER Positioning the seeder on the equipment is an extremely dangerous phase. Proceed with extreme caution and carry out the operation scrupulously adhering to the instructions provided. -
Page 53: Unhitching The Planting Unit From The Equipment
USE AND MAINTENANCE ENGLISH 3.3 STABILITY OF PLANTING UNIT AND TRACTOR 3.2.7 UNHITCHING THE PLANTING UNIT FROM THE EQUIPMENT DURING TRANSPORT When a planting unit is coupled to a tractor, so becoming an integral part of it for the purposes of road travel, the stability of the DANGER planting unit-tractor complex may change and cause driving or Unhooking the seed drill from the tractor is a very dangerous... -
Page 54: Regulations
Under normal circumstances, the agitator ALWAYS stays still. It only comes into operation when there are product gaps between the agitator and the roller. Since the GASPARDO dosing rollers ALWAYS transport the seeds along the entire length, in contrast with sliding gear or fixed wheel systems, there is virtually fig. -
Page 55: Dosing Rollers
- High number of cells arranged in a steggered pattern to guarantee uninterrupted delivery; Assembling and disassembling the dosing roller All the GASPARDO dosing rollers are compact units constructed in a single block (except for the fine seeds dosing roller, yellow). Never fit dosing rollers with screws loosening the handwheel! -
Page 56: Feeler Pin
ENGLISH USE AND MAINTENANCE During the assembly phase, rotate the dosing roller in the driving fig. 32 direction and push it into the doser (Fig. 32), ..until the drive pin engages in the gearbox (Fig. 33). Do not fig. - Page 57 USE AND MAINTENANCE ENGLISH ... until it is becomes possible to push out the discs fitted inside, remove them from their seats (Fig. 36) and move the axles. It is not necessary to loosen the nuts completely nor to counterbalance by means of a second spanner! fig.
-
Page 58: Disassembly The Agitator Axle
ENGLISH USE AND MAINTENANCE fig. 40 4.1.5 DISASSEMBLING THE AGITATOR AXLE The agitator can be removed from its housing without the use of tools, with a view to facilitating cleaning operations and replacing damaged parts. Doser with seed hatch and seeding wheel disassembled (Fig. 40). - Page 59 USE AND MAINTENANCE ENGLISH Agitator and support disassembled (Fig. 44). Before proceeding fig. 44 to re-assemble, thoroughly clean the bearing seats and all the various parts. To install the agitator, push it into the opening in the bearing (Fig. 45) ... fig.
-
Page 60: Cleaning Spring Elements
ENGLISH USE AND MAINTENANCE 4.1.6 CLEANING SPRING ELEMENTS Cleaning spring elements (A, Fig. 48) are used during the distribution of oily seeds by means of the yellow seeding roller, mod. F25-125. The main action of these spring elements is keeping the chambers of the seeding roller clear so that seed distribution is regular and constant. - Page 61 USE AND MAINTENANCE ENGLISH 4) Extract the shaft of the spring elements from its housing (Fig. 52). fig. 52 5) Use the supplied multi-purpose wrench and an Allen wrench (no. 3) to loosen the fastening screws of the spring elements as shown in Figure 53.
-
Page 62: Distribution Of Fine Seeds
ENGLISH USE AND MAINTENANCE Re-position the lock nut, tighten the knob using the supplied 4.1.7 DISTRIBUTION OF FINE SEEDS wrench and assemble the roller back on the machine. Block the cleaning element in the operating position and make Distribution of quantities lower than 3 kg/ha. During the dosing test the number of gearbox revolutions is low sure that the springs hook the previously overturned sections (E, because the quantity of product to be distributed is small. -
Page 63: Distributor Test
USE AND MAINTENANCE ENGLISH fig. 56 fig. 57 4.2 DISTRIBUTOR TEST Adjust the doser with the unit on the ground, the motor turned off and the tractor blocked in place. Before carrying out the dosing test, make sure there are no foreign bodies inside the hopper and the doser. - Page 64 ENGLISH USE AND MAINTENANCE cod. 19502240...
-
Page 65: Blower Drive
USE AND MAINTENANCE ENGLISH All the component parts of the pressurised system should be 4.3 BLOWER DRIVE carefully installed in order to avoid damage during the use of the machinery. 4.3.1 POWER TAKE-OFF RPM There are two types of oleodynamic system for the blower drive: The blower pump is enabled by the tractor power take-off. - Page 66 ENGLISH USE AND MAINTENANCE INDEPENDENT SYSTEM A - tank; When the characteristics of the tractor are such that they cannot B - multiplier; guarantee the correct working of the blower, it is necessary to C - pump; D - three way regulator; install a self-contained oleodynamic system.
- Page 67 USE AND MAINTENANCE ENGLISH Blower pump control: Seed drills are delivered with pressure based on the machine width, as according to Table 7. Pressione Soffiante Larghezza Pressione (bar) N giri di lavoro consigliata mt. 2,5 mt. 3,0 mt. 4,0 mt. 5,0 mt.
-
Page 68: Adjusting The Seeding Depth
ENGLISH USE AND MAINTENANCE 4.4 ADJUSTING THE SEEDING DEPTH To obtain a good level at which sprouts come out, the seed needs to be placed at the right depth into the seeding bed. Hoe coulter, disc coulter COREX The seeding depth is adjusted simultaneously for all planting devices through a crank (Fig. -
Page 69: Row Marker Disk Adjustment
USE AND MAINTENANCE ENGLISH 4.6 ROW MARKER DISK ADJUSTMENT The row marker is a machine that traces a reference line parallel to the tracks of the tractor on the ground. Once the tractor has completed its run and it has turned around, follow the reference row with one of the front wheels (L1, Fig. -
Page 70: Seed Level In The Hopper
ENGLISH USE AND MAINTENANCE 4.7 SEED LEVEL IN THE HOPPER The level of seed in the hopper can be easily controlled by the operator from the driver’s seat by checking the indicator (Fig. 75). fig. 75 4.8 REAR SPRING HARROW The normal working position of the harrow is shown in Figure 76. -
Page 71: Before Starting Work
USE AND MAINTENANCE ENGLISH 4.9 BEFORE STARTING WORK Before starting the seeding operation grease all parts indicated by transfer nr. 14 (‘GRASE’) at page 45 of this leaflet. CAUTION - The form dimensions and material of the drive shaft elastic 4.10 OPERATION START pins have been chosen for safety. -
Page 72: Maintenance
ENGLISH USE AND MAINTENANCE 6.0 MAINTENANCE 6.0.6 EMPTYING THE HOPPER The emptying hatch opens the doser the entire width of the dosing roller so that the machine can be emptied quickly and effectively. Here follows a list of various maintenance operations to be carried out periodically. -
Page 73: Setting Aside
USE AND MAINTENANCE ENGLISH 6.0.7 SETTING ASIDE 7.0 DEMOLITION AND DISPOSAL At the end of the season, or if a long period of rest is for seen it is This operation is to be carried out by the customer. advisable: Before demolishing the machine, you are advised to carefully 1) Carefully empty all the seed from the hopper and distribution check its physical condition and ascertain whether there are any... - Page 74 Notes cod. 19502200...
- Page 75 Notes cod. 19502200...
- Page 76 cod. 19502200...
-
Page 77: Vorwort
DEUTSCH 1.0 VORWORT 1.2 BESCHREIBUNG DER SÄMASCHINE Dieses landwirtschaftliche Gerät, kann nur dann arbeiten, wenn es zusammen mit einem Schlepper mit Kraftheber und Dieses Heft beschreibt die Betriebs- und Wartungsanleitungen. universeller Dreipunktauffhängung verwendet wird. Die Das vorliegende Heft ist integrierender Teil des Produkts und Sämaschine eignet sich sowohl zur Bodenbearbeitung als muß... -
Page 78: Garantie
DEUTSCH GEBRAUCH UND WARTUNG 1.3 GARANTIE 1.4 IDENTIFIZIERUNG - Bei Auslieferung sicherstellen, daß das Gerät keine Transportschäden aufweist und das Zubehör unbeschädigt 1.4.1 IDENTIFIZIERUNG DER SÄMASCHINE und vollständig ist. Jedes einzelne Gerät ist mit einem Identifizierungsschild (8 Abb. 2) ausgestattet, mit folgenden Angaben: - Etwaige Reklamationen müssen innerhalb von 8 Tagen ab 1) Firmenzeichen und Adresse des Herstellers;... -
Page 79: Technisce Daten
GEBRAUCH UND WARTUNG DEUTSCH 1.5 TECHNISCE DATEN LÄRMPEGEL DER KOMBINATION DM R - ALIANTE Lärmpegelmessung bei Leerbetrieb (UNI EN 1553/2001): Schalldruckpegel: LpAm (A) dB ........83,8 Schallleistungspegel: LwA (A) dB ......... 103,5 Die Angaben bezüglich der technischen Daten und modelle sind unverbindlich. Der Hersteller behält sich das Recht vor, diese Angaben ohne Vorankündigung zu ändern. -
Page 80: Zusammenfassend
DEUTSCH GEBRAUCH UND WARTUNG (Fig. 2) 1.7 ZUSAMMENFASSEND 1.8.2 GEFAHRSIGNALE 3) Quetschgefahr bei Öffnung. Sicherheitsabstand von der 1 Saatkasten; Maschinehalten. 2 Gebläse; 4) Hoher Lärmpegel. Geeigneten Lärmschutz benützen. 3 Schleppschar; 5) Sturzgefahr. Nicht auf die Maschine steigen. 4 Arbeitsbühne; 6) Einfanggefahr. Von laufenden Teilen Abstand halten. 5 Dosiervorrichtun;... - Page 81 GEBRAUCH UND WARTUNG DEUTSCH 89900500 Decalcomanie avvertimento Warning stickers Abziehbilder mit Warnhinweisen Decalcomanie Calcomanias fig. 3 cod. 19502240...
-
Page 82: Sicherheits- Und Unfallverhütungs- Bestimmungen
DEUTSCH GEBRAUCH UND WARTUNG in den sich drehenden und bewegenden Teilen der Maschine 2.0 SICHERHEITS- UND UNFALLVERHÜTUNGS- verfangen können. BESTIMMUNGEN 11) Vor Arbeitsbeginn hat man sich mit den Steuervorrichtungen und deren Funktionen vertraut zu machen. 12) Die Arbeit mit der Maschine erst beginnen, wenn alle Das Gefahrsignals in diesem Heft besonders beachten. - Page 83 GEBRAUCH UND WARTUNG DEUTSCH 28) Das zulässige Achshöchst-gewicht, das bewegbare 44) Den Kardanwellenschutz oft und regelmäßig prüfen; dieser Gesamtgewicht sowie die Transport- und Straßen- muß immer in einwandfreiem Zustand sein. verkehrsordnung beachten. 45) Vor dem Einschalten der Zapfwelle muß die Solldrehzahl erreicht sein.
-
Page 84: Betriebs-Anleitungen
DEUTSCH GEBRAUCH UND WARTUNG 3.0 BETRIEBS-ANLEITUNGEN Um die besten Leistungen des Geräts zu erhalten, immer die nr. 17 folgenden Anleitungen beachten. ACHTUNG Alle folgenden Wartungs-, Einstellun und Vorbereitungsarbeiten dürfen ausschließlich bei ausgeschaltetem und gut blockiertem Schlepper, herausgezogenem Schlüssel und auf dem Boden liegender Sämaschine durchgeführt werden. - Page 85 GEBRAUCH UND WARTUNG DEUTSCH Modello Erpice Power harrow Kreiselegge Herse rotative Grada rotante A B C D 1 (mm) 2 (mm) AX 76 (1000 Giri/min.) AX 73 (1000 Giri/min.) AX 85 (540 Giri/min.) Tabelle 2 cod. 19502240...
-
Page 86: Anschluss Sämaschine-Ausrüstung
DEUTSCH GEBRAUCH UND WARTUNG 3.2.3 ANSCHLUSS SÄMASCHINE-AUSRÜSTUNG fig. 11 GEFAHR Das Ankuppeln der Sämaschine an die Ausrüstung ist ein sehr gefährlicher Eingriff. Bei der Ausführung dieser Arbeit sehr vorsichtig sein und die Anleitungen befolgen. Dieser Eingriff muss auf einer soliden ebenen Fläche bei auf ihren Abstützungen liegender Sämaschine ausgeführt werden. -
Page 87: Montage Der Treibriemen
GEBRAUCH UND WARTUNG DEUTSCH 3.2.4 MONTAGE DER KEILRIEMEN Dieser Eingriff muss bei abgestelltem Schleppermotor, gezogener Standbremse und auf dem Boden aufliegender Ausrüstung ausgeführt werden. 1) Die Riemen werden zwischen die an dem hinteren Leistungsabgreifpunkt Egge Zentrifugalanschluss Gebläses angebrachten Riemenscheiben eingelegt (Abb. 14). fig. -
Page 88: Position Der Sämaschine
DEUTSCH GEBRAUCH UND WARTUNG 3.2.5 POSITION DER SÄMASCHINE fig. 18 Es ist wichtig die Position der Sämaschine auf der tragenden Ausrüstung korrekt auf dem Feld einzustellen. GEFAHR Das Positionieren der Sämaschine auf der Ausrüstung ist ein sehr gefährlicher Eingriff. Daher sind bei der Ausführung dieses Eingriffes die nachstehenden Anleitungen genau zu befolgen. -
Page 89: Abkuppeln Sämaschine-Ausrüstung
GEBRAUCH UND WARTUNG DEUTSCH 3.2.7 ABKUPPELN SÄMASCHINE-AUSRÜSTUNG 3.3 STABILITÄT VON SÄMASCHINE-SCHLEPPER BEIM TRANSPORT Wenn eine Sämaschine an den Schlepper angekuppelt wird, und somit gemäß Straßenverkehrsordnung zu einem Teil des GEFAHR Schleppers wird, kann die Stabilität der Einheit Schlepper- Das Abkuppeln der Säemaschine vom Schlepper ist ein sehr Sämaschine schwanken und zu Schwierigkeiten beim Fahren gefährlicher Eingriff. -
Page 90: Monoblock-Rahmen
Saatgut erneut blockiert wird. Dies bedeutet einen schonenden Umgang mit dem Saatgut, die Ruhrwelle arbeitet nur wenn sie gebraucht wird. Dadurch, das die GASPARDO-Dosierraeder IMMER ueber die ganze Dosierradbreite foerdern, (anders als bei Schubradsystemen oder Systemen mit stillstehenden Raedern) besteht jedoch kaum die Gefahr einer Brueckenbildung, auch nicht bei Dinkel oder Gras. - Page 91 - Hohe Zellenanzahl. Die Zellen sind versetzt angeordnet, um eine durchgehende Dosierung zu gewährleisten. Ein- und Ausbau des Dosierrades Alle GASPARDO Dosierraeder sind einteilige, kompakte Einheiten. (Ausnahme: Feindosierrad, Gelb) Auf keinen Fall Dosierraeder durch Loesen des Handrades aufschrauben! Die Raeder werden nach der Montage kalibriert und wuerden dadurch...
- Page 92 DEUTSCH GEBRAUCH UND WARTUNG Beim Einbau das Dosierrad in Foerderrichtung drehen und in fig. 32 das Dosiergeraet einschieben (Abb. 32), ... fig. 33 ... bis der Mitnahmebolzen ganz in der Kupplung sitzt (Abb. 33). Nicht vergessen vorher den Treibriemen (falls entnommen oder getauscht) der Ruehrwelle einsetzen! Soll die Ruehrwelle angetrieben werden, den Riemen erst auf fig.
- Page 93 GEBRAUCH UND WARTUNG DEUTSCH ... das die innenliegenden Scheiben aus ihrem Sitz nach aussen gedrueckt werden koennen (Abb. 36) und die Achsen freigeben. Ein vollstaendiges Loesen oder Gegenhalten mit einem zweiten Schluessel ist nicht erforderlich! fig. 36 Danach die Bodenklappeneinheit erst hinten (Abb. 37) ... fig.
-
Page 94: Ausbau Der Ruehrwelle
DEUTSCH GEBRAUCH UND WARTUNG 4.1.5 AUSBAU DER RUEHRWELLE fig. 40 Die Ruehrwelle kann werkzeuglos aus dem Gehauese entnommen werden um Reinigungsarbeiten zu erleichtern oder beschaedigte Teile zu ersetzen. Dosiergeraet mit ausgebauter Bodenklappe und demontiertem Saerad (Abb. 40). Alle Ruehrelemente aus der Ruehrwelle ziehen (Abb. 41). fig. - Page 95 GEBRAUCH UND WARTUNG DEUTSCH Ruehrwelle mit Lagerung ausgebaut (Abb. 44). Vor dem Einbau fig. 44 die Lagersitze und alle Teile gut reinigen. Zum Einbau Ruehrwelle durch die Lagerbohrung schieben (Abb. 45) ... fig. 45 ... Lager und Deckscheibe der linken Seite aufschieben, letztes Ruehrelement auf rechter Seite aufstecken (Abb.
-
Page 96: Reinigungswelle
DEUTSCH GEBRAUCH UND WARTUNG 4.1.6 REINIGUNGSWELLE Die Reinigungsfedern zur Saeuberung des Zellenrades (A, Fig. 48) werden benutzt wenn die Gefahr der Oelbildung des Saatgutes (z.B. Raps) besteht. Sinnvoll ist der Einsatz nur beim Feinsaerad F25-125 (gelb). Die Reinigungswelle befindet sich ausserhalb des Dosierbereiches und kann somit jederzeit dur Sichtkontrolle auf Verschleiss und Funktionueberprueft werden. - Page 97 GEBRAUCH UND WARTUNG DEUTSCH 4) Reinigungswelle nach vorne ziehen und aus dem Dosiergeraet entnehmen. (Fig.52). fig. 52 5) Mit dem Universalschluessel und einem zusaetzlichen Sechskantschluessel (nr. 3) wie im Bild gezeigt die Halteschrauben loesen, ein vollstaendiges Abschrauben ist nicht erforderlich. (Fig.53). fig.
-
Page 98: Streuung Feines Saatgut
DEUTSCH GEBRAUCH UND WARTUNG Das Reinigungselement in der Arbeitsposition festspannen und 4.1.7 STREUUNG FEINES SAATGUT sicherstellen, dass die Federn an den entsprechenden, zuvor umgedrehten Elementen (E, Abb. 55) befestigt sind, um deren Streuung einer unter 3 kg/ha liegenden Saatgutmenge. Bei der Abdrehprobe kann es aufgrund der an die geringe Drehung und folglich die Streuung zu verhindern. - Page 99 GEBRAUCH UND WARTUNG DEUTSCH fig. 56 fig. 57 4.2 DOSIERPRÜFUNG Vor der Ausführung des Dosierungstests ist sicherzustellen, dass keine Fremdkörper im Trichter und Dosierer vorhanden sind. - Eine geringe Menge Saatgut in den Behälter geben. - Den Bogen unter dem Einspritzerkanal entfernen (A, Fig, 56), durch Loesen des Schnellverschlusses ab.
- Page 100 DEUTSCH GEBRAUCH UND WARTUNG cod. 19502240...
-
Page 101: Antrieb Des Gebläses
GEBRAUCH UND WARTUNG DEUTSCH Alle Komponenten der Hydraulikanlage müssen gewissenhaft 4.3 ANTRIEB DES GEBLÄSES angebracht werden, um Beschädigungen bei Betrieb des Geräts zu vermeiden. Die Hydraulik zum Antrieb des Gebläses gibt es in 4.3.1 MECHANISCHER ANTRIEB DES GEBLÄSE zwei Ausführungen: Die Gebläsemaschine wird von der Zapfwelle des Schleppers a) Abhängige Hydraulik: Anschluß... - Page 102 DEUTSCH GEBRAUCH UND WARTUNG SEPARATE HYDRAULIKANLAGE A- Ölvorratsbehälter Wenn die Schlepperhydraulik keinen vorschriftsgemäßen Antrieb B- Getriebe C- Ölpumpe des Gebläses ermöglicht, muß eine separate Hydraulikanlage D- D r e i w e g e - installiert werden. Druckregelventil; E- Manometer; F- Hydromotor;...
- Page 103 GEBRAUCH UND WARTUNG DEUTSCH Druckeinstellung Die Sämaschinen werden mit einem Druck je nach der Maschinenbreite geliefert, wie in Tabelle (7) vorgegeben wird. Druck Arbeitsbreite Druckleistung (bar) (N giri) mt. 2,5 mt. 3,0 mt. 4,0 mt. 5,0 mt. 6,0 - 9,0 Wenn man die Gebläseumdrehungen für die Verteilung von fig.
-
Page 104: Einstellung Der Aussaattiefe
DEUTSCH GEBRAUCH UND WARTUNG 4.4 EINSTELLUNG DER AUSSAATTIEFE Für ein korrektes Keinem des Saatgutes ist es wichtig, daß das Saatgut mit der richtigen Tiefe im Saatbeet ausgesät wird. Schleppschar und Scheibenschar COREX Die Aussaattiefe wird mit einer Kurbel gleichzeitig für alle Scharren eingestellt. -
Page 105: Einstellung Der Spurreisserscheiben
GEBRAUCH UND WARTUNG DEUTSCH 4.6 EINSTELLUNG DER SPURREISSERSCHEIBEN Der Spurreisser ist eine Vorrichtung, die eine parallel zum Schlepperlauf liegende Bezugslinie auf dem Boden zieht. Wenn der Traktor den Lauf beendet und gewendet hat, fährt man mit einem der Vorderräder (L1, Abb. 70) oder mit der Traktormitte (L2, Abb. -
Page 106: Samenstand Im Trichter
DEUTSCH GEBRAUCH UND WARTUNG 4.7 SAMENSTAND IM TRICHTER Der Samenstand im Trichter kann vom Fahrerplatz aus leicht mittels des Anzeigers (Abb. 75) durch den Fahrer kontrolliert werden. fig. 75 4.8 RÜCKWÄRTIGE EGGE MIT FEDERUNG Die normale Arbeitsposition der Egge wird auf Abb. 76 illustriert. In dieser Position ist der Verschleiß... -
Page 107: Vor Arbeitsbeginn
GEBRAUCH UND WARTUNG DEUTSCH 4.9 VOR ARBEITSBEGINN Vor Arbeitsbeginn sind alle auf dem Abziehbild Nr. 14 (“GREASE”) auf Seite 81 dieses Heftes gekennzeichneten Schmierpunkte zu VORSICHT schmieren. - Die Form, Ausmasse und das Material der Spannhülsen der 4.10 ARBEITSBEGINN Antriebswellen wurden als SicherheitsmaBnahme aus gewählt. Bei feuchtem Wetter ist das Laufrad einige Minuten im Leerlauf Der Gebrauch von nicht Original- oder widerstands fähigeren einzuschalten, um die Rohrleitungen zu trocknen. -
Page 108: Bei Neuer Maschine
DEUTSCH GEBRAUCH UND WARTUNG 6.0 WARTUNG 6.0.6 ABLASSEN DES SAATGUTES AUS DEM TRICHTER Der Entleerschieber oeffnet das Dosiergeraet ueber die ganze Dosierradbreite und erlaubt so ein schnelles und sicheres Hier folgend sind verschiedenen, regelmässig Entleeren der Maschine. auszuführenden Wartung-sarbeiten aufgeführt. Die geringeren Wird die Zuhaltefeder nicht ausgehaengt, kann durch leichtes Betriebskosten und die lange Lebensdauer des Geräts hängen Anheben des Schiebers auch eine beliebige Teilmenge des... -
Page 109: Ratschläge Bei Störungen
GEBRAUCH UND WARTUNG DEUTSCH 6.0.7 RUHEPERIODEN 7.0 ZERLEGEN UND ENTSORGEN DER Am Ende der Saison oder wenn eine lange Ruhezeit vorgesehen MASCHINE ist, wird folgendes empfohlen: 1) Das Saatgut mit Sorgfalt aus dem Trichter und allen Für das Zerlegen und Entsorgen der Maschine hat der Kunde zu Verteilunsorganen entfernen. - Page 110 Notes cod. 19502200...
- Page 111 Notes cod. 19502200...
- Page 112 cod. 19502200...
-
Page 113: Introduction
FRANÇAIS 1.0 INTRODUCTION 1.2 DESCRIPTION DE LA MACHINE Cet équipement agricole, peut traveiller uniquement au moyen d’un tracteur muni de groupe de relevage, avec n’importe quel Cette brochure décrit les normes d’utilisation, d’entretien pour type de semis sur sols labourés. Le semoir est indiqué pour être le semoir. -
Page 114: Garantie
FRANÇAIS EMPLOI ET ENTRETIEN 1.3 GARANTIE 1.4 IDENTIFICATION - Au moment de la livraison de votre machine vérifiez si elle n’a pas été endommagée pendant le transport et si tous les 1.4.1 IDENTIFICATION DE LE SEMOIR accessoires sont en bon état. Chaque herse est identifiée par une plaque (8 Fig. -
Page 115: Donnes Techniques
EMPLOI ET ENTRETIEN FRANÇAIS 1.5 DONNES TECHNIQUES NIVEAU SONORE DE L'ASSOCIATION DM R - ALIANTE Niveaux de bruit à vide (UNI EN 1553/2001): Niveau de pression acoustique : LpAm (A) dB ......83,8 Niveau de puissance acoustique : LwA (A) dB ......103,5 Les données techiques et les modéles indiqués ne sont pas contraignants. -
Page 116: Dessin Global
FRANÇAIS EMPLOI ET ENTRETIEN (Fig. 2) 1.7 DESSIN GLOBAL 1.8.2 SIGNAUX DE DANGER 3) Risque d’écrasement en phase d’ouverture. Maintenir une Trémie; distance de sécurité de la machine. Soufflerie; 4) Niveu sonore élevé. Se munir de protections acoustiques Soc à sabot; adéquates. - Page 117 EMPLOI ET ENTRETIEN FRANÇAIS 89900500 Decalcomanie avvertimento Warning stickers Abziehbilder mit Warnhinweisen Decalcomanie Calcomanias fig. 3 cod. 19502240...
-
Page 118: Normes De Securite Et De Prevention Des Accidents
FRANÇAIS EMPLOI ET ENTRETIEN 11) Avant de commencer le travail, apprendre à utiliser les 2.0 NORMES DE SECURITE ET DE PREVENTION dispositifs de commande et leurs fonctions. DES ACCIDENTS 12) Il ne faut commencer à travailler avec l’équipement que si tous les dispositifs de protection sont dans des conditions Faire attention au signal de danger quand il apparaît dans cette parfaites, installés et en position de sécurité. - Page 119 EMPLOI ET ENTRETIEN FRANÇAIS 44) Contrôler souvent et régulièrement la protection de l’arbre à 28) Respecter le poids maximum prévu sur l’essieu, le poids mobile total, les règlements sur le transport et le code de la cardans; elle doit être toujours en parfait état. route.
-
Page 120: Normes D'emploi
FRANÇAIS EMPLOI ET ENTRETIEN 3.0 NORMES D’EMPLOI nr. 17 Pour obtenir les meilleures performances de l’équipement, respecter soigneusement les instructions suivantes. ATTENTION Il faut absolumnt effectuer toutes les opérations suivantes d’entretien, de réglage et de préparation au travail quand le tracteur est arrêté... - Page 121 EMPLOI ET ENTRETIEN FRANÇAIS Modello Erpice Power harrow Kreiselegge Herse rotative Grada rotante A B C D 1 (mm) 2 (mm) AX 76 (1000 Giri/min.) AX 73 (1000 Giri/min.) AX 85 (540 Giri/min.) Tableau 2 cod. 19502240...
-
Page 122: Attelage Semoir-Equipement
FRANÇAIS EMPLOI ET ENTRETIEN 3.2.3 ATTELAGE SEMOIR-EQUIPEMENT fig. 11 DANGER Cette opération doit être effectuée sur une surface horizontale et solide et le semoir doit reposer sur les pieds de support. 1) Démonter les protections des poulies et des courroies (A, B Fig. -
Page 123: Montage Courroies De Transmission
EMPLOI ET ENTRETIEN FRANÇAIS 3.2.4 4 MONTAGE COURROIES DE TRANSMISSION Cette opération doit être effectuée avec moteur du tracteur éteint, frein de stationnement tiré et équipement reposant au sol. 1) Les courroies doivent être introduites entre la poulie montée sur la prise de puissance arrière de la herse et la poulie avec l'embrayage centrifuge du souffleur (Fig. -
Page 124: Position Du Semoir
FRANÇAIS EMPLOI ET ENTRETIEN 3.2.5 POSITION DU SEMOIR fig. 18 Il est important de régler correctement la position du semoir sur l'équipement de support sur le terrain. DANGER Positionner le semoir sur l'équipement est une phase très dangereuse. Faire très attention au cours de toute cette opération et s'en tenir aux instructions. -
Page 125: Detelage Du Semoir - Equipement
EMPLOI ET ENTRETIEN FRANÇAIS 3.2.7 DETELAGE DU SEMOIR - EQUIPEMENT 3.3 STABILITE PENDANT LE TRANSPORT SEMOIR- TRACTEUR Lorsqu'un semoir est attelé à un tracteur, devenant pour la circulation routière partie intégrante de ce dernier, la stabilité de DANGER l'ensemble tracteur-semoir peut varier entraînant des difficultés Le décrochage de l’élément semeur du tracteur est une phase de conduite ou de travail (cabrage ou embardée du tracteur). -
Page 126: Distribution De Graines
Il n'entre en fonction que lorsqu'il y a des vides de produit entre l'agitateur et le rouleau. Étant donné que les rouleaux doseurs GASPARDO transportent TOUJOURS le matériel de fig. 25 semis sur la largeur entière, contrairement aux systèmes à... -
Page 127: Rouleaux Doseurs
- Grand normbre de cellules décalées afin de garantir un dosage continu. Montage et démontage du rouleau doseur : Tous les rouleaux doseurs de la société GASPARDO sont des unités compactes formées d'un seul bloc (à l'exception du rouleau doseur pour les graines fines, jaune). Ne jamais fixer les rouleaux doseurs avec les vis en desserrant le volant! Les roues qui sont calibrées après le montage perdraient ainsi leur précision ra-... -
Page 128: Tâteurs
FRANÇAIS EMPLOI ET ENTRETIEN Durant la phase de montage, tourner le rouleau doseur dans la fig. 32 direction d'entraînement et le pousser dans le doseur (Fig. 32), fig. 33 ... jusqu'à ce que le pivot d'entraînement soit bien fixé à la boîte de vitesse (Fig. - Page 129 EMPLOI ET ENTRETIEN FRANÇAIS ... jusqu'à pouvoir pousser à l'extérieur les disques introduits à l'intérieur, les extraire de leur logement (Fig. 36), et déplacer les essieux. Il n'est pas nécessaire de dévisser complètement les écrous, ni de contrebalancer avec une deuxième clé! fig.
-
Page 130: Démontage De L'axe Agitateur
FRANÇAIS EMPLOI ET ENTRETIEN 4.1.5 DÉMONTAGE DE L'AXE AGITATEUR fig. 40 L'agitateur peut être extrait de son logement sans aucun outil, afin de faciliter les opérations de nettoyage ou pour remplacer les parties endommagées. Doseur avec portillon de semis et roue de semis démontés (Fig. 40). - Page 131 EMPLOI ET ENTRETIEN FRANÇAIS Agitateur et support démontés (Fig. 44). Avant de procéder à fig. 44 nouveau au montage, nettoyer minutieusement les logements du palier et toutes les parties. Pour installer l'agitateur, le pousser dans l'ouverture du palier (Fig. 45)... fig.
-
Page 132: Èlèments Elastiques Nettoyants
FRANÇAIS EMPLOI ET ENTRETIEN 4.1.6 ÉLÉMENTS ELASTIQUES NETTOYANTS Les éléments élastiques nettoyants (A, Fig. 48) sont employés pendant la distribution de graines oleagineuses avec le roulement de encemencement jaune mod. F25- 125. L'action principale des éléments élastiques est celle de maintenir libres chambres... - Page 133 EMPLOI ET ENTRETIEN FRANÇAIS 4) Extraire l'arbre des éléments élastiques des sièges (Fig. 52). fig. 52 5) Utiliser la clé à usage multiple en dotation et une clé alan' (nr. 3) pour desserrer les vis de blocage des éléments élastiques, comme indiqué...
-
Page 134: Distribution Semences Fines
FRANÇAIS EMPLOI ET ENTRETIEN Monter l'embout de blocage, serrer la pommette avec la clé en 2.1.7 DISTRIBUTION SEMENCES FINES dotation et monter le roulement sur l'équipement. Bloquer l'élément nettoyant dans la position de travail, en vérifiant Distribution de quantité inférieurs à 3 kg/a. Pendant l'épreuve de dosage, pour réduire le nombre de tours que les ressorts crochètent les respectifs secteurs de la boite de vitesse lié... -
Page 135: Essai De Dosage
EMPLOI ET ENTRETIEN FRANÇAIS fig. 56 fig. 57 4.2 ESSAI DE DOSAGE Régler le doseur avec l’équipement au sol, le moteur éteint et le tracteur bloqué. Avant d'effectuer l'essai de dosage, veiller à ce qu'il n'y ait pas de corps étrangers à l'intérieur de la trémie et du doseur. - Page 136 FRANÇAIS EMPLOI ET ENTRETIEN cod. 19502240...
-
Page 137: Actionnement De La Soufflante
EMPLOI ET ENTRETIEN FRANÇAIS Tous les composants qui font partie de l’installation doivent être 4.3 ACTIONNEMENT DE LA SOUFFLANTE placés avec soin afin d’éviter des dommages pendant l’utilisation de l’outil. L’installation oléodynamique pour l’actionnement de 4.3.1 NOMBRE DE TOURS DE LA PRISE DE FORCE la soufflante est de deux types: La pompe pneumophore est actionnée par la prise de force du a) installation dépendante: raccordée à... - Page 138 FRANÇAIS EMPLOI ET ENTRETIEN INSTALLATION INDEPENDANTE A - serbatoio; Si les caractéristiques du tracteur n’assurent pas un B - moltiplicatore; C - pompa; actionnement correct de la soufflante, il faut installer une D - regolatore a tre vie; installation oléodynamique indépendante. E - manometro;...
- Page 139 EMPLOI ET ENTRETIEN FRANÇAIS Réglage de la pression: Le semoir est livré avec la pression correspondante à la largeur de la machine (Tableau 7). Pressione Soffiante Larghezza Pressione (bar) N giri di lavoro consigliata mt. 2,5 mt. 3,0 mt. 4,0 mt.
-
Page 140: Reglage De La Profondeur De
FRANÇAIS EMPLOI ET ENTRETIEN REGLAGE PROFON-DEUR L’ENSEMENCEMENT De manière à ce que les pousses dépassent suffisamment du terrain, il est important de placer la semence à la juste profondeur dans le lit d’ensemencement. Socs à sabot, socs à disque COREX La profondeur d’ensemencement est réglée en même temps pour tous les rayonneurs moyennant une manivelle (Fig. -
Page 141: Reglage Des Disques A Tracer
EMPLOI ET ENTRETIEN FRANÇAIS 4.6 REGLAGE DES DISQUES A TRACER Le disque à tracer est un dispositif qui trace une /igne de repére sur le terrain parallélement au trajet du tracteur. Quand le tracteur aura terminé la course et invertit la marche, on procèdera en courant sur la ligne de référence avec une des roues avant (L1, Fig. -
Page 142: Niveau Des Graines Dans La Tremie
FRANÇAIS EMPLOI ET ENTRETIEN 4.7 NIVEAU DES GRAINES DANS LA TREMIE Le niveau des graines dans la trémie peut être contrôlé facilement à partir du poste opérateur par l’indicateur (Fig. 42). fig. 75 4.8 HERSE ARRIERE A RESSORTS La position de travail normale de la herse est indiquée sur la Figure 43. -
Page 143: Avant De Commencer Le Travail
EMPLOI ET ENTRETIEN FRANÇAIS 4.9 AVANT DE COMMENCER LE TRAVAIL Avant de commencer à travailler, graisser tous les points marqués par la décalcomanie n° 14 (GREASE) à la page 117 de la présente brochure. IMPORTANT - La forme, les dimensions et le matériau des chevilles 4.10 DEBUT DU TRAVAIL élastiques des arbres de transmission ont été... -
Page 144: Entretien
FRANÇAIS EMPLOI ET ENTRETIEN 6.0 ENTRETIEN 6.0.6 DECHARGE DES SEMENCES DE LA TREMIE Sur toute la largeur du rouleau doseur, le rideau de vidange ouvre le doseur permettant ainsi d'effectuer la vidange rapide et Nous décrivons ci-dessous les différentes opérations d’entretien fiable de la machine. -
Page 145: Remissage
EMPLOI ET ENTRETIEN FRANÇAIS 6.0.7 REMISSAGE 7.0 DEMANTELEMENT ET ELIMINATION A la fin de la saison, ou si l’on prévoit une longue période d’arrét, nous conseillons de: Opération que doit effectuer le Client. 1) Décharger avec soin toutes les semences de la trémie et des organes Avant d'effectuer le démantèlement de la machine, il est distributeurs. - Page 146 Notes cod. 19502200...
- Page 147 Notes cod. 19502200...
- Page 148 cod. 19502200...
-
Page 149: Premisa
ESP AÑOL 1.0 PREMISA 1.2 DESCRIPCIÓN DE LA SEMBRADORA Este apero agrícola, puede operar sólo mediante un tractor agrícola con grupo elevador, con enganche universal de tres Este opúsculo describe las normas de manejo y mantenimiento puntos. La sembradora puede emplearse ,o combinada con de la sembradora. -
Page 150: Garantía
ESPAÑOL EMPLEO Y MANTENIMIENTO 1.3 GARANTÍA 1.4 IDENTIFICACIÓN - Verificar durante la entrega que el equipo no haya sufrido daños en el transporte, que todos los accesorios estén íntegros y que 1.4.1 IDENTIFICACIÓN DE LA SEMBRADORA no falte ninguno de ellos. Cada equipo está... -
Page 151: Datos Tecnicos
EMPLEO Y MANTENIMIENTO ESPAÑOL 1.5 DATOS TECNICOS NIVEL SONORO DE LA COMBINACIÓN DM R - ALIANTE Detección del nivel de ruido al vacío, (UNI EN 1553/2001): Nivel de presión acústica: LpAm (A) dB ........83,8 Nivel de potencia acústica: LwA (A) dB ......... 103,5 Los datos técnicos y los modelos no se entienden vinculantes. -
Page 152: Diseño General
ESPAÑOL EMPLEO Y MANTENIMIENTO (Fig. 2) 1.7 DISEÑO GENERAL 1.8.2 SEÑALES DE PELIGRO 3) Peligro de aplastamiento en fase de apertura. Mantenerse a Tolva semillas; la distancia de seguridad de la máquina. Soplador; 4) Nivel sonoro elevado. Equiparse con las protecciones Surcador a reja;... - Page 153 EMPLEO Y MANTENIMIENTO ESPAÑOL 89900500 Decalcomanie avvertimento Warning stickers Abziehbilder mit Warnhinweisen Decalcomanie Calcomanias fig. 3 cod. 19502240...
-
Page 154: Normas De Seguri-Dad Y Prevención Contra Los Accidentes
ESPAÑOL EMPLEO Y MANTENIMIENTO 12)Comenzar a trabajar con el equipo únicamente si todos los 2.0 NORMAS DE SEGURI-DAD Y PREVENCIÓN dispositivos de protección están intactos, instalados y en CONTRA LOS ACCIDENTES posición de seguridad. 13)Es absolutamente prohibido aparcarse en el área de acción de Tener cuidado a las señales de peligro que se indican en este la máquina, en donde se encuentren partes en movimiento. - Page 155 EMPLEO Y MANTENIMIENTO ESPAÑOL 46)Antes de insertar la toma de fuerza, cerciorarse que no hayan Circulación por carretera 29)Para la circulación por carretera, será necesario atenerse a las personas o animales en la zona de acción y que el régimen normas del código de circulación en vigor en el país seleccionado corresponda al permitido.
-
Page 156: Normas De Manejo
ESPAÑOL EMPLEO Y MANTENIMIENTO 3.0 NORMAS DE MANEJO nr. 17 Para obtener las mejores prestaciones del equipo, seguir minuciosamente lo que se indica a continuación: CUIDADO Todas las operaciones siguientes de mantenimiento, regulación y preparación para el trabajo, se tienen que efectuar absolutamente con el tractor apagado y bien parado, la lave desinsertada y la sembradora en el suelo. - Page 157 EMPLEO Y MANTENIMIENTO ESPAÑOL Modello Erpice Power harrow Kreiselegge Herse rotative Grada rotante A B C D 1 (mm) 2 (mm) AX 76 (1000 Giri/min.) AX 73 (1000 Giri/min.) AX 85 (540 Giri/min.) Tabla 2 cod. 19502240...
-
Page 158: Enganche Sembradora-Equipo
ESPAÑOL EMPLEO Y MANTENIMIENTO 3.2.3 ENGANCHE SEMBRADORA-EQUIPO fig. 11 PELIGRO La aplicación de la sembradora al equipo es un trabajo muy peligroso. Tener mucho cuidado de efectuar toda la operación siguiendo las instrucciones. Ejecute esta operación en un plano horizontal y resistente, con la sembradora apoyada sobre los pies de apoyo. -
Page 159: Montaje De Las Correas De Transmisión
EMPLEO Y MANTENIMIENTO ESPAÑOL 3.2.4 MONTAJE DE LAS CORREAS DE TRANSMISIÓN Esta operación se debe hacer con el motor del tractor apagado, freno de estacionamiento puesto y equipo apoyado sobre el suelo. 1) Las correas se introducen entre la polea montada en la toma de fuerza trasera de la grada y aquella con el acoplamiento centrífugo del soplador (Fig. -
Page 160: Ajuste De La Sembradora
ESPAÑOL EMPLEO Y MANTENIMIENTO 3.2.5 AJUSTE DE LA SEMBRADORA fig. 18 Es importante regular correctamente en el campo la posición de la sembradora sobre el equipo portador. PELIGRO La graduación de la sembradora sobre la herramienta es una fase muy peligrosa. Por lo tanto hay que prestar mucha atención al efectuar la entera operación y seguir las siguientes instrucciones. -
Page 161: Transmisión
EMPLEO Y MANTENIMIENTO ESPAÑOL 3.2.7 DESENGANCHE DE LA SEMBRADORA-EQUIPO 3.3 ESTABILIDAD DURANTE EL TRANSPORTE DE LA SEMBRADORA -TRACTOR Cuando una sembradora se acopla a un tractor, convirtiéndose así en parte integrante del mismo para la circulación por la vía PELIGRO pública, la estabilidad del grupo tractor-sembradora puede va- El desganche de la sembradora del tractor es una fase muy riar causando dificultad durante la conducción o el trabajo... -
Page 162: Regulacion Dosificador
25 de los sistemas con engranajes corredizos o ruedas fijas, los rodillos dosificadores GASPARDO SIEMPRE transportan el material de siembra a lo largo de toda la anchura, por lo cual el riesgo de que se formen vacíos de siembra es casi inexistente, incluso en el caso de cizaña, cañuela o hierba (en todo caso, se... -
Page 163: Rodillo Dosificador
- numerosos depósitos colocados de manera escalonada para garantizar una dosificación continuativa. Montaje y desmontaje del rodillo dosificador Todos los rodillos dosificadores de GASPARDO son unidades compactas y formadas por un solo bloque (a excepción del rodillo dosificador para semillas finas, de color amarillo). Nunca fije los rodillos dosificadores con los tornillos aflojando el volante, ya que las ruedas, que se calibran tras el montaje, perderían así... -
Page 164: Palpadores
ESPAÑOL EMPLEO Y MANTENIMIENTO Durante la fase de montaje, gire el rodillo dosificador en la fig. 32 dirección de arrastre y empújelo en el dosificador (Fig. 32)..hasta que el perno de arrastre no quede bien fijado en el fig. - Page 165 EMPLEO Y MANTENIMIENTO ESPAÑOL ... hasta poder empujar hacia afuera los discos situados en el interior, extrayéndolos de su alojamiento (Fig. 36), y desplazar los ejes. No es necesario aflojar por completo las tuercas, ni contrabalancear con otra llave! fig. 36 Proceda entonces con la extracción del bloque de las puertas, moviendo el mismo primero hacia atrás y (Fig.
-
Page 166: Desmontaje Del Eje Agitador
ESPAÑOL EMPLEO Y MANTENIMIENTO 4.1.5 DESMONTAJE DEL EJE AGITADOR: fig. 40 El agitador puede extraerse de su alojamiento sin utilizar herramientas, facilitando así las operaciones de limpieza o sustitución de piezas dañadas. Dosificador con puerta de siembra y rueda de siembra desmontadas (Fig. - Page 167 EMPLEO Y MANTENIMIENTO ESPAÑOL Agitador y soporte desmontados (Fig. 44). Antes de volver a montar fig. 44 el agitador, limpie cuidadosamente los alojamientos del cojinete y todas las piezas. Para instalar el agitador, introdúzcalo en la apertura del cojinete (Fig. 45) ... fig.
-
Page 168: Elementos Limpiadores Elásticos
ESPAÑOL EMPLEO Y MANTENIMIENTO 4.1.6 ELEMENTOS LIMPIADORES ELÁSTICOS Los elementos limpiadores elásticos (A, Fig. 48) se utilizan du- rante la distribución de las semillas oleosas por medio del rodillo de siembra amarillo mod. F25-125. La función principal de los elementos elásticos es la de mante- ner libres las cámaras del rodillo de siembra para garantizar una distribución constante y regular. - Page 169 EMPLEO Y MANTENIMIENTO ESPAÑOL 4) Extraer el árbol de los elementos elásticos de los asientos (Fig. 52). fig. 52 5) Utilice la llave multiuso en dotación y una llave de allen (n.° 3) para aflojar los tornillos de bloqueo de los elementos elásticos, como indicado en la Figura 53.
-
Page 170: Distribución De Semillas Finas
ESPAÑOL EMPLEO Y MANTENIMIENTO Coloque nuevamente la rosca de bloqueo, apriete el pomo con 4.1.7 DISTRIBUCIÓN DE SEMILLAS FINAS la llave en dotación e instale nuevamente el rodillo en la máquina. Bloquear el elemento limpiador en la posición de funcionamiento Distribución de cantidades inferiores a 3 kg/ha. -
Page 171: Prueba De Dosificación
EMPLEO Y MANTENIMIENTO ESPAÑOL fig. 56 fig. 57 4.2 PRUEBA DE DOSIFICACIÓN Efectuar la graduación del dosificador con l’equipo en el suelo, motor apagado y tractor bien parado. Antes de efectuar el ensayo de dosificación, compruebe que no haya cuerpos extraños adentro de la tolva y del dosificador. - Page 172 ESPAÑOL EMPLEO Y MANTENIMIENTO cod. 19502240...
-
Page 173: Accionamiento Del Soplador
EMPLEO Y MANTENIMIENTO ESPAÑOL Acomode todos los componentes que forman parte de la 4.3 ACCIONAMIENTO DEL SOPLADOR instalación, para evitar averías durante el uso del equipo. 4.3.1 ACCIONAMIENTO MECANICO DEL SOPLADOR La instalación hidráulica para el accionamiento del soplador es La toma de fuerza del tractor acciona la bomba. - Page 174 ESPAÑOL EMPLEO Y MANTENIMIENTO INSTALACIÓN INDEPENDIENTE A - depósito; Cuando las características del tractor no logran garantizar el B- multiplicador; C- bomba; accionamiento correcto del soplador, hay que montar una D- regulador de tres vías; instalación hidráulica independiente. E- manómetro; F- motor;...
- Page 175 EMPLEO Y MANTENIMIENTO ESPAÑOL Regolación de la presion: La sembradora se entrega con la pression relativa alla anchura de trabajo, como da Tabla 7. Pressione Soffiante Larghezza Pressione (bar) N giri di lavoro consigliata mt. 2,5 mt. 3,0 mt. 4,0 mt.
-
Page 176: Graduación De La Profundidad Del Siembra
ESPAÑOL EMPLEO Y MANTENIMIENTO 4.4 GRADUACIÓN DE LA PROFUNDIDAD DEL SIEMBRA Para que los gérmenes broten es importante que la semilla venga colocada a la correcta profundidad en la cama de la siembra. La profundidad de la siembra viene graduada, simultaneamen- te por todos los surcadores, mediante una manivela (A Fig. -
Page 177: Regulacion De Los Discos Marcadores De Hileras
del trattore. Quando l impianto non viene utilizzato, proteggere gli innesti rapidi con gli appositi cappucci. ESPAÑOL EMPLEO Y MANTENIMIENTO 4.6 REGULACION DE LOS DISCOS MARCADORES DE HILERAS El marcador de hileras es un dispositivo que traza una línea de referencia en el terreno, paralela al recorrido del tractor. -
Page 178: Nivel De Las Semillas En La Tolva
ESPAÑOL EMPLEO Y MANTENIMIENTO 4.7 NIVEL DE LAS SEMILLAS EN LA TOLVA El nivel de las semillas en la tolva puede ser controlado con facilidad por el operador desde el puesto de conducir mediante el indicador (Fig. 75). fig. 75 4.8 GRADA POSTERIOR DE MUELLE La posición de trabajo normal de la grada se indica en la Figura 76. -
Page 179: Antes De Iniciar El Trabajo
EMPLEO Y MANTENIMIENTO ESPAÑOL 4.9 ANTES DE INICIAR EL TRABAJO Antes de iniciar el trabajo engrasar todos los puntos señalados con la calcomanía n° 14 (“GRASE”) en la pág. 153 de este catálogo. CUIDADO - La forma, las dimensiones y el material de las clavijas elásticas 4.10 INICIO DEL TRABAJO de los ejes de transmisión, fueron elegidas por prevención. -
Page 180: Mantenimiento
ESPAÑOL EMPLEO Y MANTENIMIENTO 6.0 MANTENIMIENTO 6.0.6 DESCARGA DE LAS SEMILLAS DESDE LA TOLVA La compuerta de vaciado abre el dosificador por todo el ancho del rodillo dosificador, permitiendo así un vaciado rápido y seguro de A continuación se indican las distintas operaciones de la máquina. -
Page 181: Puesta En Reposo
EMPLEO Y MANTENIMIENTO ESPAÑOL 6.0.7 PUESTA EN REPOSO 7.0 DESGUACE Y ELIMINACIÓN Al final de la estación o en caso de que se prevea un largo periodo de reposo, se aconseja: Trabajos que deben ser llevados a cabo por el cliente. 1) Descargar con cuidado todas las semíllas de la tolva y de los Antes de desguazar la máquina, se recomienda controlar con órganos de distribucíon. - Page 182 Notes cod. 19502200...
- Page 183 Notes cod. 19502200...
- Page 184 Ph. +1 309 794-2310 MASCHIO-GASPARDO CANADA Inc Tel. +49 (0) 9173 79000 Tel. +33 (0) 2.38.64.12.12 Tel. +34 93.81.99.058 Fax +1 309 788-1610 Fax +49 (0) 9173 790079 Fax +33 (0) 2.38.64.66.79 Fax +34 93.81.99.059 Ufficio Tecnico GASPARDO Seminatrici S.p.A.
Need help?
Do you have a question about the ALIANTE and is the answer not in the manual?
Questions and answers