Table of Contents
Advertisement
Quick Links
MASCHIO GASPARDO S.p.A.
ALIANTE DD
IT
USO E MANUTENZIONE
EN
USE AND MAINTENANCE
DE
GEBRAUCH UND WARTUNG
FR
EMPLOI ET ENTRETIEN
ES
EMPLEO Y MANTENIMIENTO
Cod. G19503240
2010-05
*)
*) Valido per Paesi UE
*) Valid for EU member countries
*) Valable dans les Pays UE
*) Gilt für EU-Mitgliedsländer
*) Válido para Países UE
Advertisement
Table of Contents

Related Manuals for Gaspardo ALIANTE DD


Summary of Contents for Gaspardo ALIANTE DD
- Page 1 MASCHIO GASPARDO S.p.A. ALIANTE DD USO E MANUTENZIONE USE AND MAINTENANCE GEBRAUCH UND WARTUNG EMPLOI ET ENTRETIEN EMPLEO Y MANTENIMIENTO *) Valido per Paesi UE *) Valid for EU member countries *) Valable dans les Pays UE *) Gilt für EU-Mitgliedsländer Cod.
-
Page 2: Table Of Contents
ITALIANO ENGLISH DEUTSCH INDICE INDEX INHALT Introduction Vorwort Premessa Guarantee Garantie Garanzia 1.1.1 Expiry of guarantee 1.1.1 Verfall des garantieanspruchs 1.1.1 Scadenza della garanzia Description of the seeder Beschreibung der sämaschine Descrizione della seminatrice Technical data Technisce daten Dati tecnici Identification Identifizierung Identificazione... - Page 3 FRANÇAIS ESPAÑOL TABLES DE MATIERES INDICE Introduction Premisa Garantie Garantía 1.1.1 Expiration de la garantie 1.1.1 Vencimiento de la garantía Description de la machine Descripción de la sembradora Donnes techniques Datos tecnicos Identification Identificación Movimentation Manipulación Identification des piéces Identificación de las piezas Signaux de securite d’indication Señales de seguridad y de identicacion 166 Normes de securite et de prevention...
- Page 4 ACCOPPIAMENTI - CONNECTIONS - KUPPLUNGEN - ACCOUPLEMENTS - ACOPLAMIENTOS MASCHIO S p A 35011 C ampodarsego PADOVA IT ALY R accomanded AGIP ROTRA MP 85W/140 O il : AGIP G R MU EP 2 TIPO MOD. MATR. ANNO DI FABBRICAZIONE MASCHIO S p A 35011 C ampodarsego PADOVA ITALY...
- Page 5 ACCOPPIAMENTI - CONNECTIONS - KUPPLUNGEN - ACCOUPLEMENTS - ACOPLAMIENTOS MASCHIO S p A 35011 C ampodarsego PADOVA IT ALY R accomanded AGIP ROTRA MP 85W/140 O il : AGIP G R MU EP 2 TIPO MOD. MATR. ANNO DI FABBRICAZIONE MASCHIO S p A 35011 C ampodarsego PADOVA ITALY...
- Page 6 ACCOPPIAMENTI - CONNECTIONS - KUPPLUNGEN - ACCOUPLEMENTS - ACOPLAMIENTOS MASCHIO S p A 35011 C ampodarsego PADOVA IT ALY R accomanded AGIP ROTRA MP 85W/140 O il : AGIP G R MU EP 2 TIPO VITO MOD. MATR. ANNO DI FABBRICAZIONE R500 R600 MASCHIO S p A...
- Page 7 ACCOPPIAMENTI - CONNECTIONS - KUPPLUNGEN - ACCOUPLEMENTS - ACOPLAMIENTOS cod. G19503240...
- Page 8 cod. G19503240...
-
Page 9: Italiano
L'acquirente potrà far valere i suoi diritti sulla garanzia solo quan- riportate nel presente manuale; do egli abbia rispettato le condizioni concernenti la prestazione • l'uso esclusivo di ricambi originali GASPARDO. della garanzia, riportate nel contratto di fornitura. Dal corretto uso e dall’adeguata manutenzione dipende il rego- 1.1.1 SCADENZA GARANZIA... -
Page 10: Dati Tecnici
ITALIANO USO E MANUTENZIONE 1.3 DATI TECNICI DELLA SEMINATRICE U.M. ALIANTE 300 DD Larghezza di trasporto 3,00 Larghezza di lavoro 3,00 Velocità di lavoro [Km/h] 8 (max) Numero max file [nr.] Interfila [cm] 12,5 Capacità tramoggia seme 1000 Rialzo tramoggia seme Giri P. -
Page 11: Identificazione
ITALIANO USO E MANUTENZIONE fig. 1 1.4 TARGHETTA D’IDENTIFICAZIONE Ogni singola attrezzatura, è dotata di una targhetta di identifica- zione (Fig. 1), i cui dati riportano: A- Seminatrice B- Combinazione 1) Marchio ed indirizzo del Costruttore; 2) Tipo e modello della macchina; 3) Matricola della macchina;... -
Page 12: Identificazione Delle Parti
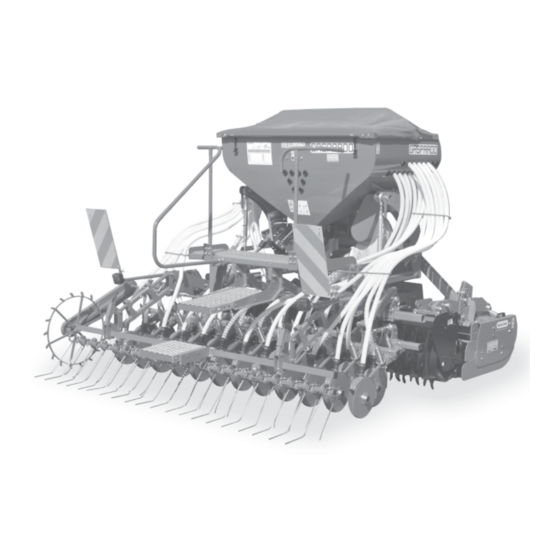
ITALIANO USO E MANUTENZIONE 1.6 IDENTIFICAZIONE DELLE PARTI Tramoggia semi; 14 Distributore 32 Uscite; Soffiante; 15 Distributore 24 Uscite con esclusori elettrici delle file; Assolcatori; 16 Griglia protezione dosatore; Pedana; 17 Gruppo dosatore e cambio; Dosatore; 18 Rullo dosatore per sementi NORMALI; Attacco rapido;... - Page 13 ITALIANO USO E MANUTENZIONE G1000 N500 cod. G19503240...
-
Page 14: Segnali Di Sicurezza E Indicazione
ITALIANO USO E MANUTENZIONE 1.7 SEGNALI DI SICUREZZA E INDICAZIONE 6) Possibilità di cesoiamento per gli arti inferiori. Tenersi a distanza di sicurezza dalla macchina. I segnali descritti sono riportati sulla macchina (Fig. 4). Tenerli 7) Pericolo di cesoiamento delle mani. State lontani dagli organi puliti e sostituirli se staccati o illeggibili. -
Page 15: Norme Di Sicurezza E Prevenzione Infortuni
ITALIANO USO E MANUTENZIONE 2.0 NORME DI SICUREZZA E PREVENZIONE Norme generali 1) Fare attenzione ai simboli di pericolo riportati in questo ma- INFORTUNI nuale e sulla seminatrice. 2) Le etichette con le istruzioni, applicate sulla macchina, dan- Fare attenzione al segnale di pericolo riportato nei vari capitoli no gli opportuni consigli in forma essenziale per evitare gli di questo manuale. - Page 16 ITALIANO USO E MANUTENZIONE Aggancio al trattore fig. 5 1) Agganciare l’attrezzatura, come previsto, su di un trattore di ade- guata potenza e configurazione mediante l’apposito dispositi- vo (sollevatore), conforme alle norme. 2) La categoria dei perni di attacco dell’attrezzatura deve corri- spondere a quella dell’attacco del sollevatore.
- Page 17 ITALIANO USO E MANUTENZIONE Sicurezza relativa all’idraulica Manutenzione in sicurezza 1) Al momento dell’allacciamento dei tubi idraulici all’impianto Durante le operazioni di lavoro e manutenzione, utilizzare gli idraulico del trattore, fare attenzione che gli impianti idraulici idonei dispositivi di protezione individuale (es.): della macchina operatrice e della trattrice non siano in pres- sione.
-
Page 18: Norme D'uso
ITALIANO USO E MANUTENZIONE 3.0 NORME D’USO Per ottenere le migliori prestazioni dell’attrezzatura, seguire attentamente quanto di seguito riportato. ATTENZIONE Tutte le operazioni di manutenzione, regolazione e di preparazione al lavoro, devono essere eseguite tassativamente con trattore spento e ben fermo, chiave disinserita e seminatrice a terra. 3.1 COMPLETAMENTO MACCHINA Alla spedizione, la seminatrice viene configurata con i puntelli di sostegno in posizione di trasporto. - Page 19 ITALIANO USO E MANUTENZIONE ERPICE COPRISEME POSTERIORE LIMITATORE BRACCIO OSCILLANTE ERPIPE COPRISEME POSTERIORE (OPTIONAL) cod. G19503240...
-
Page 20: Applicazione All'attrezzatura
ITALIANO USO E MANUTENZIONE 3.2 APPLICAZIONE ALL’ATTREZZATURA 3.2.1 APPLICAZIONE DELL’ATTACCO RAPIDO Con la seminatrice viene fornito il triangolo per l’aggancio e lo sgancio rapido della seminatrice dall’attrezzatura a cui viene ac- coppiata. Il triangolo viene montato stabilmente sull’attrezzatura (Fig. 9). Per garantire il corretto accoppiamento della seminatri- ce alle attrezzature MASCHIO registrare la lunghezza (L) del ti- rante terzo punto come indicato in Figura 9 (vedi accoppiamento esemplificativo di pagina 20). -
Page 21: Montaggio Della Puleggia Conduttrice
ITALIANO USO E MANUTENZIONE 3.2.2 MONTAGGIO DELLA PULEGGIA CONDUTTRICE fig. 10 SULL’ATTREZZATURA Inserire la puleggia conduttrice, con mozzo, sull’albero posterio- re della presa di potenza dell’attrezzatura (Fig. 10). Bloccarla con l’apposita vite di fissaggio in corrispondenza della scanalatura presente sull’albero. Dopo le prime tre ore di servizio è impor- tante verificare che i bulloni (A, B Fig. -
Page 22: Montaggio Cinghie Di Trasmissione
ITALIANO USO E MANUTENZIONE 3.2.4 MONTAGGIO CINGHIE DI TRASMISSIONE Quest’operazione deve essere eseguita con trattore a motore spento, freno di stazionamento inserito ed attrezzatura ap- poggiata al suolo. 1) Le cinghie vanno inserite fra la puleggia montata sulla presa di potenza posteriore dell’erpice (A, Fig. 14) e quella con l’in- nesto centrifugo della soffiante (B, Fig. -
Page 23: Assetto Della Seminatrice
ITALIANO USO E MANUTENZIONE 3.2.5 ASSETTO DELLA SEMINATRICE fig. 18 È importante regolare correttamente in campo la posizione della seminatrice sull’attrezzatura portante. PERICOLO Assettare la seminatrice sull’attrezzatura è una fase molto pericolosa. Fare molta attenzione ad effettuare l’intera opera- zione seguendo le istruzioni. 1) Prima di assettare la seminatrice, è... -
Page 24: Sgancio Della Seminatrice-Attrezzatura
ITALIANO USO E MANUTENZIONE 3.2.7 SGANCIO DELLA SEMINATRICE-ATTREZZATURA PERICOLO Lo sgancio della seminatrice dalla trattrice è una fase molto pericolosa. Quest’operazione deve essere eseguita con trattore a motore spento, freno di stazionamento inserito ed attrezzatura appoggiata al suolo. Fare molta attenzione ad effettuare l’intera operazione seguendo le istruzioni. -
Page 25: Trasporto Stradale
ITALIANO USO E MANUTENZIONE 3.4 TRASPORTO STRADALE Se si rendesse necessario trasportare la macchina su di un lungo percorso, questa può essere caricata sia su vagoni ferroviari che su autocarri. A tale scopo consultare «Dati tecnici», per il peso e le dimensioni specifiche. Queste ultime sono molto utili per controllare la possibilità... -
Page 26: Regolazioni
ITALIANO USO E MANUTENZIONE 3.5 REGOLAZIONI 3.5.1 DOSATORE (Fig. 26) Il dosatore volumetrico GRINTA è composto essenzialmente da quattro elementi per la distribuzione della semente: A) telaio monoblocco in alluminio; B) elemento agitatore; C) rulli dosatori; D) tastatore. TELAIO MONOBLOCCO Il telaio monoblocco è... - Page 27 ITALIANO USO E MANUTENZIONE Vengono forniti in dotazione alla macchina tre tipi di rulli dosatori: fig. 29 rossi: 5 elementi, 8 camere per ruota, (mod. G1000) (A Fig. 29). verdi: 5 elementi, 16 camere per ruota (mod. N500) (A Fig. 29). gialli: 5 elementi, 32 camere per ruota, (rullo dosatore sementi fini) (mod.
- Page 28 ITALIANO USO E MANUTENZIONE TASTATORE Anche il gruppo dei tastatori può essere facilmente smontato in pochi minuti, per effettuare operazioni di pulizia. Esso è composto da 5 portine indipendenti, controllate da molle regolabili. I separatori fissati tra una portina e l'altra permettono di azionare ogni singolo elemento in modo indipendentemente. Inoltre la forma stessa dei separatori offre uno scudo contro i corpi estranei che potrebbero danneggiare il rullo dosatore.
- Page 29 ITALIANO USO E MANUTENZIONE SMONTAGGIO DELL'ASSE AGITATORE L'agitatore viene montato e smontato dal suo alloggiamento senza l’utilizzo di attrezzi, al fine di agevolare le operazioni di pulizia o sostituzioni di parti danneggiate. 1) Dosatore con gruppo tastatori e rullo dosatore smontati (Fig. 41). 2) Estrarre tutte le spille curvate dall'asse agitatore (Fig.
- Page 30 ITALIANO USO E MANUTENZIONE ELEMENTI ELASTICI PULENTI Gli elementi elastici pulenti (A, Fig. 49) vengono usati con il rullo dosatore di colore giallo (mod. F25-125) durante la distribuzione di semi oleosi. L'azione principale degli elementi elastici è quella di mantenere libere le camere del rullo dosatore, garantendo una regolare e costante distribuzione.
- Page 31 ITALIANO USO E MANUTENZIONE DISTRIBUZIONE SEMENTI FINI Distribuzione di quantità inferiori a 3 kg/ha. Durante la prova di dosaggio, per il ridotto numero di giri del cambio legato alla bassa quantità di prodotto da distribuire, l'utilizzatore può riscontrare una distribuzione irregolare del prodotto. In tal caso è possibile intervenire come di seguito indicato. Premesso che ogni settore (A, Fig.
-
Page 32: Dosatore
ITALIANO USO E MANUTENZIONE 3.5.2 PROVA DI DOSAGGIO Prima di effettuare la prova di dosaggio, accertarsi che non siano presenti corpi estranei all’interno della tramoggia e del dosatore. 1) Aggiungere una piccola quantità di semente all’interno del serbatoio. 2) Togliere la curva posta sotto il canale dell’iniettore (A, Fig, 55), allentando la chiusura rapida. - Page 33 ITALIANO USO E MANUTENZIONE Tabella 3 Cod. G19707240 cod. G19503240...
-
Page 34: Azionamento Della Soffiante
ITALIANO USO E MANUTENZIONE 3.5.3 AZIONAMENTO DELLA SOFFIANTE AZIONAMENTO OLEODINAMICO DELLA SOFFIANTE La soffiante è una degli organi principali per ottenere una distri- Norme di Sicurezza buzione ottimale delle sementi. L'attrezzatura è idonea esclusivamente per l'impiego indica- Dopo la prima fase della distribuzione, in cui la selezione della to. - Page 35 ITALIANO USO E MANUTENZIONE Descrizione del funzionamento Se occorre aumentare il numero di giri della ventola per la distri- Il flusso dell’olio necessario all’azionamento della soffiante, è buzione di sementi più pesanti, agire con prudenza ed attenzio- condotto dal distributore del trattore, attraverso il tubo di manda- ne nel seguente modo (Fig.
-
Page 36: Regolazione Della Profondità Di Semina
ITALIANO USO E MANUTENZIONE 3.5.4 REGOLAZIONE DELLA PROFONDITÀ DI SEMINA fig.63 Per una buona emergenza dei germogli è importante collocare il seme alla giusta profondità nel letto di semina. La profondità di semina viene ottenuta agendo sui regolatori laterali del parallelogramma (A, Fig. 63). ATTENZIONE: L’indicatore graduato (B, Fig. -
Page 37: Sollevamento Idraulico Telaio Porta
ITALIANO USO E MANUTENZIONE 3.5.5 SOLLEVAMENTO IDRAULICO DEL TELAIO PORTA ASSOLCATORI A richiesta, la seminatrice può essere dotata del dispositivo di sollevamento oleodinamico (Fig. 66) del telaio porta assolcatori (9 Fig. 3). Il dispositivo viene montato al posto del tirante di regolazione manuale (A Fig. -
Page 38: Regolazione Dischi Marcafile
ITALIANO USO E MANUTENZIONE 3.5.7 REGOLAZIONE DISCHI MARCAFILE Il segnafile è un dispositivo che traccia una linea di riferimento sul terreno, parallela al tragitto del trattore. Quando il trattore avrà terminato la corsa e invertito la marcia, si procederà correndo sulla linea di riferimento con il centro della trattrice (L, Fig. - Page 39 ITALIANO USO E MANUTENZIONE REGOLAZIONE DEGL’IMPIANTI fig. 73 L'impianto idraulico viene fornito privo d’olio. Pertanto, prima dell’utilizzo è indispensabile accertarsi che tutti i cilindri idraulici vengano azionati lentamente in entrambe le direzioni, fino a quando le condotte ed i cilindri stessi si riempia- no d’olio.
-
Page 40: Prima Di Iniziare Il Lavoro
ITALIANO USO E MANUTENZIONE 3.5.8 PRIMA DI INIZIARE IL LAVORO 3.5.10 DURANTE IL LAVORO Prima di iniziare il lavoro ingrassare tutti i punti contrassegnati È importante ricordare che variando la velocità del trattore non si dalla decalcomania n° 14 (“GRASE”) a pag. 14 di questo manua- varia la quantità... -
Page 41: Fine Lavoro
ITALIANO USO E MANUTENZIONE 3.5.11 FINE LAVORO Concluso il lavoro, arrestare in sicurezza tutte le parti meccani- che in movimento, appoggiare la macchina al suolo, arrestare il motore del trattore, disinserire la chiave ed attivare il freno di stazionamento. SCARICO DELLA TRAMOGGIA La saracinesca di svuotamento apre il dosatore sull'intera lar- ghezza del rullo dosatore, permettendo così... -
Page 42: Manutenzione
ITALIANO USO E MANUTENZIONE 4.0 MANUTENZIONE IMPIANTI OLEODINAMICI - Interventi di manutenzione sugli impianti oleodinamici devo- no essere eseguiti solamente da personale preparato. Sono di seguito elencate le varie operazioni di manutenzione da - In caso di intervento sull'impianto oleodinamico, scaricare eseguirsi con periodicità. -
Page 43: Piano Di Manutenzione
ITALIANO USO E MANUTENZIONE 4.1 PIANO DI MANUTENZIONE - Tabella Riassuntiva PERIODO INTERVENTO A MACCHINA NUOVA - Lubrificare le catene di trasmissione (Fig. 80). - Ingrassare tutti i punti contrassegnati dalla decalcomania n° 14 ("GRASE") a pag. 14 di questo manuale. - Dopo le prime ore di funzionamento, occorre verificare il serraggio di tutte le viti e bulloni. - Page 44 ITALIANO USO E MANUTENZIONE PERIODO INTERVENTO OGNI 50 ORE DI LAVORO - Ingrassare il perno del braccio segnafile (Fig. 86). - Pulire con getto d'aria la frizione della soffiante (Fig. 87). - Ingrassare la coppia conica degli alberi cardanici (Fig. 88). - Verificare il livello di olio nella scatola cambio, eventualmente ripristinarlo fino al livello (1, Fig.
-
Page 45: Suggerimenti In Caso D'inconvenienti
ITALIANO USO E MANUTENZIONE 4.2 SUGGERIMENTI IN CASO D’INCONVENIENTI CAUSE RIMEDI INTASAMENTO DEI TUBI DI DISCESA SEME - Sulla base della tabella della prova di rotazione, verificare la posizione della valvola a farfalla (Fig. 60, pag. 34). - I falcioni sono intasati di terra umida - I tubi di distribuzione sono piegati in qualche punto. - Page 46 cod. G19503240...
-
Page 47: Introduction
• performance of inspection and maintenance operations guarantee, set out in the supply contract. described in this manual; • exclusive use of genuine GASPARDO spare parts. 1.1.1 EXPIRY OF GUARANTEE Besides what has already been set out in the supply contract,... -
Page 48: Technical Data
ENGLISH USE AND MAINTENANCE 1.3 TECHNICAL DATA OF THE SEEDING MACHINE U.M. ALIANTE 300 DD Transport width 3,00 Working width 3,00 Working speed [Km/h] 8 (max) Max. row number [nr.] Row distance [cm] 12,5 Seed hopper capacity 1000 Seed hopper extension PTO (r.p.m.) [r.p.m.] 1000... -
Page 49: Identification
ENGLISH USE AND MAINTENANCE fig. 1 1.4 IDENTIFICATION Each individual machine has an identification plate (Fig. 1) indicating the following details: A- Seeding machine B- Combined 1) Mark and address of the Manufacturer; 2) Type and model of machine; 3) Registration of the machine; 4) Year of manufacture;... -
Page 50: Parts Identification
ENGLISH USE AND MAINTENANCE 1.6 PARTS IDENTIFICATION Seed hopper; 14 32 output distributor Fan; 15 24 output distributor with electric row disabling devices; Shoe coulter; 16 Metering unit protection grid Footboard; 17 Metering unit and gearbox Seed distributor; 18 Dosing roller for STANDARD seeds Triangular quick connector;... - Page 51 ENGLISH USE AND MAINTENANCE G1000 N500 cod. G19503240...
-
Page 52: Danger And Indicator Signals
ENGLISH USE AND MAINTENANCE 1.7 DANGER AND INDICATOR SIGNALS 6) Danger of possible shearing of lower limbs. Keep a safe distance from the machine. The signs described are reproduced on the machine (Fig. 4). 7) Danger of injury to the hands. Keep away from the mowing keep them clean and replace them if they should come off or parts. -
Page 53: Safety Regulations And Accident Prevention
ENGLISH USE AND MAINTENANCE 2.0 SAFETY REGULATIONS AND ACCIDENT General norms 1) Pay close attention to the danger signs in this manual and on PREVENTION the seeder. 2) The labels with the instructions attached to the machine give Pay attention to danger signs, where shown, in this booklet. abbreviated advice for avoiding accidents. - Page 54 ENGLISH USE AND MAINTENANCE Tractor hitch fig. 5 1) Hook the equipment to a suitable, sufficiently-powered tractor by means of the appropriate device (lifter), in conformity with applicable standards. 2) The class of the equipment attachment pins must be the same as that of the lifter attachment.
- Page 55 ENGLISH USE AND MAINTENANCE Safety measures concerning the hydraulics Maintenance in safety 1) At the moment of connecting the hydraulic tubes to the During work and maintenance operations, use suitable perso- hydraulic system of the tractor, make sure that the hydraulic nal protection gear: systems of the operating machine and the tractor are not under pressure.
-
Page 56: Rules Of Use
ENGLISH USE AND MAINTENANCE 3.0 RULES OF USE To obtain the best performance from the equipment, carefully follow what is set out below. ATTENTION The following maintenance, adjustment, and work preparation operations must be performed with the tractor off and locked firmly in position with the key removed from the dashboard and the seeder positioned on the ground. - Page 57 ENGLISH USE AND MAINTENANCE REAR SEED-COVERING HARROW DANCER ARM LIMITER FOR REAR SEED-COVERING HARROW (OPTIONAL) cod. G19503240...
-
Page 58: Attachment To The Equipment
ENGLISH USE AND MAINTENANCE 3.2 ATTACHMENT TO THE EQUIPMENT 3.2.1 ATTACHING THE TRIANGULAR QUICK CONNECTOR The triangle for quick connecting and disconnecting the seeder and the equipment to which it is coupled can be supplied with the seeder (COMBINE). The triangle is fitted permanently to the equipment (Fig. -
Page 59: Fitting Of The Drive Pulley On The Equipment
ENGLISH USE AND MAINTENANCE 3.2.2 FITTING OF THE DRIVE PULLEY ON THE EQUIPMENT fig. 10 Insert the drive pulley with hub on the rear shaft of the power take- off of the equipment (Fig. 10). Lock it next to the groove of the shaft with the fastening screw provided. -
Page 60: Fitting Of Drive Belts
ENGLISH USE AND MAINTENANCE 3.2.4 FITTING OF DRIVE BELTS This operation should be carried out with the tractor engine switched off, the parking brake on and the equipment resting on the ground. 1) The belts should be inserted between the pulley fitted on the rear power take-off of the harrow (A, Fig. -
Page 61: Seeder Position
ENGLISH USE AND MAINTENANCE 3.2.5 SEEDER POSITION fig. 18 It is important to adjust the position of the planting unit correctly on the supporting equipment when in the field. DANGER Positioning the seeder on the equipment is an extremely dangerous phase. Proceed with extreme caution and carry out the operation scrupulously adhering to the instructions provided. -
Page 62: Unhitching The Planting Unit From The
ENGLISH USE AND MAINTENANCE 3.2.7 UNHITCHING THE PLANTING UNIT FROM THE EQUIPMENT DANGER Unhooking the seed drill from the tractor is a very dangerous operation. This operation should be carried out with the tractor engine switched off, the parking brake on and the equipment resting on the ground. Great caution must be used and the whole operation must be carried out following the instructions. -
Page 63: Transport
ENGLISH USE AND MAINTENANCE 3.4 TRANSPORT If it becomes necessary to transport the machine for a long distance, it can be loaded onto a railway wagon or a truck. For this purpose, consult «Technical Data» for weight and specific dimensions. The latter are very useful to check the possibility of driving along all types of roads. -
Page 64: Regulations
ENGLISH USE AND MAINTENANCE 3.5 REGULATIONS 3.5.1 DISTRIBUTOR (Fig. 26) The volumetric distributing device, GRINTA, is essentially composed of four elements for seeds distribution: A) aluminium monobloc frame; B) agitator element; C) dosing rollers; D) Feeler pin. MONOBLOC FRAME The monobloc frame is made of aluminium and offers the following main advantages: - realization of very high precision and high quality over time;... - Page 65 ENGLISH USE AND MAINTENANCE There are various types of wheels for a wide range of applications, fig. 29 in three different product families: red: 5 elements, 8 chambers per wheel, (mod. G1000) (A, Fig. 29); green: 5 elements, 16 chambers per wheel, (mod. N500) (B, Fig.
- Page 66 ENGLISH USE AND MAINTENANCE FEELER PIN The feeler unit may also be easily disassembled in a single block in a matter of minutes for cleaning purposes. It consists of 5 single hatches that are spring-loaded to ensure tight closing. The hatches do not touch the seeding wheel while it is in operation! Thanks to the separators fixed between one hatch and the next, it is possible to activate each element independently of the others.
- Page 67 ENGLISH USE AND MAINTENANCE DISASSEMBLING THE AGITATOR AXLE The agitator can be removed from its housing without the use of tools, with a view to facilitating cleaning operations and replacing damaged parts. 1) Doser with seed hatch and seeding wheel disassembled (Fig. 41). 2) Remove the various parts of the agitator (Fig.
- Page 68 ENGLISH USE AND MAINTENANCE CLEANING SPRING ELEMENTS Cleaning spring elements (A, Fig. 49) are used during the distribution of oily seeds by means of the yellow seeding roller, mod. F25-125. The main action of these spring elements is keeping the chambers of the seeding roller clear so that seed distribution is regular and constant.
- Page 69 ENGLISH USE AND MAINTENANCE DISTRIBUTION OF FINE SEEDS Distribution of quantities lower than 3 kg/ha. During the dosing test the number of gearbox revolutions is low because the quantity of product to be distributed is small. This can result in irregular distribution of the product. If the operator notes this, he should follow the instructions below. Considering that every section (A, Fig.
-
Page 70: Distributor Test
ENGLISH USE AND MAINTENANCE 3.5.2 DISTRIBUTOR TEST Adjust the doser with the unit on the ground, the motor turned off and the tractor blocked in place. Before carrying out the dosing test, make sure there are no foreign bodies inside the hopper and the doser. - Page 71 ENGLISH USE AND MAINTENANCE Table 3 Cod. G19707240 cod. G19503240...
-
Page 72: Blower Drive
ENGLISH USE AND MAINTENANCE 3.5.3 BLOWER DRIVE OLEO-DYNAMIC BLOWER DRIVE The blower is one of the main parts of the machine and enables Safety optimised seed distribution. The equipment is suitable only for the use indicated. Any use After the first distribution phase, during which a seed metering other than that described in these instructions can cause unit selects the amount of seeds to be spread, the second phase damage to the machine and constitute a serious danger to the... - Page 73 ENGLISH USE AND MAINTENANCE Working description If you wish to increase the number of revolutions of the fan for The oil flow necessary to drive the blower, is taken from the tractor distributing heavier seeds, carefully proceed as follows (Fig. 62): distributor, through a pressure tube to a three-way regulator.
-
Page 74: Adjusting The Seeding Depth
ENGLISH USE AND MAINTENANCE 3.5.4 ADJUSTING THE SEEDING DEPTH fig.63 To obtain a good level at which sprouts come out, the seed needs to be placed at the right depth into the seeding bed. The planting depth is obtained mainly by moving the side adjusters of the parallelogram (A, Fig. -
Page 75: Hydraulic Lifting Of The Furrow Opener Bearing
ENGLISH USE AND MAINTENANCE 3.5.5 HYDRAULIC LIFTING OF THE FURROW OPENER BEARING FRAME On request, the planting unit can be equipped with a hydraulic lifting device (Fig. 66) for the furrow opener bearing frame (9 Fig. 3). This device is fitted in place of the manual adjustment tie rod (A Fig. -
Page 76: Row Marker Disk Adjustment
ENGLISH USE AND MAINTENANCE 3.5.7 ROW MARKER DISK ADJUSTMENT The row marker is a machine that traces a reference line parallel to the tracks of the tractor on the ground. Once the tractor has completed its run and it has turned around, follow the reference row with one of the centre of the tractor (L, Fig. - Page 77 ENGLISH USE AND MAINTENANCE SYSTEM REGULATION fig. 73 The hydraulic system is supplied oil-free. For this reason, before using the machine, make sure that all the hydraulic cylinders are engaged slowly in both directions until the piping and cylinders are filled with oil. When the system is operated for the first time and at the beginning of each season, proceed as follows: - Keep the row marker closed (Fig.
-
Page 78: Before Starting Work
ENGLISH USE AND MAINTENANCE 3.5.8 BEFORE STARTING WORK 3.5.10 DURING WORK Before starting the seeding operation grease all parts indicated Bear in mind that a variation in tractor speed does not lead to a by transfer nr. 14 (‘GRASE’) at page 52 of this leaflet. corresponding variation in seed sown per hectare. -
Page 79: The End Of Operation
ENGLISH USE AND MAINTENANCE 3.5.11 THE END OF OPERATION At the end of the work processes, stop all the mechanical moving parts in safe conditions. Let the machine sit on the ground, stop the engine, remove the ignition key and engage the parking brake. EMPTYING THE HOPPER The emptying hatch opens the doser the entire width of the dosing roller so that the machine can be emptied quickly and effectively. -
Page 80: Maintenance
ENGLISH USE AND MAINTENANCE 4.0 MAINTENANCE HYDRAULIC SYSTEMS - Hydraulic systems must be maintained exclusively by skilled operators. Here follows a list of various maintenance operations to be carried - The hydraulic system is under high pressure; because of out periodically. Lowered operating costs and a longer lasting the accident risk, when searching for leakage points special seeding machine depend, among others, on the methodical and auxiliary instruments should be used. -
Page 81: Maintenance Plan
ENGLISH USE AND MAINTENANCE 4.1 MAINTENANCE PLAN - Summary table INTERVAL TYPE OF WORK WHEN THE MACHINE lS NEW - Grease the transmission chains (Fig. 80). - Grease all parts indicated by transfer nr. 14 (‘GRASE’) at page 52 of this leaflet. - After the first hours of work check that all the bolts are still tight. - Page 82 ENGLISH USE AND MAINTENANCE INTERVAL TYPE OF WORK EVERY 50 WORKING HOURS - Grease the row marker arm pin (Fig. 86). - Clean the blower clutch with a jet of air (Fig. 87). - Grease the bevel gear pair of the Cardan shaft (Fig. 88). - Check the oil level in the gearbox and top up to level (1, Fig.
-
Page 83: Suggestions In Case Of Inconveniences
ENGLISH USE AND MAINTENANCE 4.2 SUGGESTIONS IN CASE OF INCONVENIENCES CAUSES REMEDYS CLOGGING OF THE PIPES - Check, on the basis of the rotation test chart, the position of the butterfly valves (Fig. 60, page 72). - The blades are clogged with wet soil - The distribution pipes are bent somewhere. - Page 84 cod. G19503240...
-
Page 85: Vorwort
Liefervertrag aufgeführten Garantiebedingungen diesem Handbuch aufgeführt sind; eingehalten hat. • die ausschließliche Verwendung von Original-Ersatzteilen von GASPARDO. 1.1.1 VERFALL DES GARANTIEANSPRUCHS Die richtige Betriebsweise des Geräts hängt vom korrekten Gebrauch und der regelmässigen Wartung ab. Über das im Liefervertrag beschrieb-ene hinaus, verfällt die Das hier beschriebenen Anleitungen müssen daher zur Verhütung... -
Page 86: Technisce Daten
DEUTSCH GEBRAUCH UND WARTUNG 1.3 TECHNISCE DATEN DER SÄMASCHINE U.M. ALIANTE 300 DD Transportbreite 3,00 Arbeitsbretie 3,00 Arbeitsgang [Km/h] 8 (max) Reihenanzahl [nr.] Reihenabstand [cm] 12,5 Inhalt des Saatgutbehalter 1000 Tankaufsatz Zapfwelle-Drehzahl [r.p.m.] 1000 Kraftbedarf [kw] Gewicht (Version mit Standardsporn) [kg] Schalldruckpegel LpAm (A) (*) -
Page 87: Identifizierung
DEUTSCH GEBRAUCH UND WARTUNG fig. 1 1.4 IDENTIFIZIERUNG Jedes einzelne Gerät ist mit einem Identifizierungsschild (Abb. 1) ausgestattet, mit folgenden Angaben: A- Identifizierung der Sämaschine B- Identifizierung Kombination 1) Firmenzeichen und Adresse des Herstellers; 2) Typ und Modell der Maschine; 3) Serien-Nummer der Maschine;... -
Page 88: Identifizierung Der Teile
DEUTSCH GEBRAUCH UND WARTUNG 1.6 IDENTIFIZIERUNG DER TEILE 14 Verteiler 32 Ausgänge; Saatkasten; 15 Verteiler Ausgänge elektrischen Gebläse; Reihenabsperrvorrichtungen; Schleppschar; 16 Schutzgitter Dosierer; Arbeitsbühne; 17 Dosier- und Getriebeeinheit; Dosiervorrichtun; 18 Dosierrolle für NORMALES Saatgut; Dreieckiger Schnellanschluß; 19 Dosierrolle für KLEINES Saatgut; Antriebsrad;... - Page 89 DEUTSCH GEBRAUCH UND WARTUNG G1000 N500 cod. G19503240...
-
Page 90: Warnsignale Und Anzeigesignale
DEUTSCH GEBRAUCH UND WARTUNG 1.7 WARNSIGNALE UND ANZEIGESIGNALE 7) Gefahr für Abtrennen der Hände. Nähern Sie sich nicht den laufenden Teilen. Die auf Abb. 4 beschriebenen Signale sind an der Maschine 8) Mitschleppgefahr. Bei laufender Maschine (Maschinenorgane angebracht. Sauber halten und wechseln, falls sie abfallen oder in Bewegung) darf die Schutzabdeckung nicht entfernt werden. -
Page 91: Sicherheits- Und Unfallverhütungs- Bestimmungen
DEUTSCH GEBRAUCH UND WARTUNG 2.0 SICHERHEITS- UND UNFALLVERHÜTUNGS- Allgemeine Vorschriften 1) Auf die Gefahrzeichen achten, die in diesem Heft aufgeführt BESTIMMUNGEN und an der Sämaschine angebracht sind. 2) Die an der Maschine angebrachten Aufkleber mit den Das Gefahrsignals in diesem Heft besonders beachten. Hinweisen geben in knapper Form Anweisungen zur Vermeidung von Unfällen. - Page 92 DEUTSCH GEBRAUCH UND WARTUNG Schlepperanschluß fig. 5 1) Die Maschine mittels der dazu bestimmten, den Normen entsprechenden Hubvorrichtung wie vorgesehen an einen Schlepper mit geeigneter Zugkraft und Konfiguration ankuppeln. 2) Die Kategorie der Anschlußbolzen des Geräts muß mit dem Anschluß der Hubvorrichtung übereinstimmen. 3) Vorsicht beim Arbeiten im Bereich der Hebearme.
- Page 93 DEUTSCH GEBRAUCH UND WARTUNG 14) Die Kardanwelle in ihre spezielle Halterung legen, wenn sie Sichere Wartung nicht verwendet wird. Bei der Arbeit und der Wartung sind geeignete individuelle 15) Nach dem Ausbau der Kardanwelle den Zapfwellenanschluß Schutzmittel anzuwenden: wieder mit dem Stutzen verschliessen. Sicherheitsmaßnahmen bezüglich des Hydrauliksystems 1) Beim Anschließen der Hydraulikschläuche an die Hydraulikanlage des Schleppers ist darauf zu achten, dass...
-
Page 94: Betriebs-Anleitungen
DEUTSCH GEBRAUCH UND WARTUNG 3.0 BETRIEBS-ANLEITUNGEN Um die besten Leistungen des Geräts zu erhalten, immer die folgenden Anleitungen beachten. ACHTUNG Alle folgenden Wartungs-, Einstellun und Vorbereitungsarbeiten dürfen ausschließlich bei ausgeschaltetem und gut blockiertem Schlepper, herausgezogenem Schlüssel und auf dem Boden liegender Sämaschine durchgeführt werden. 3.1 ERGÄNZENDER AUSBAU DER MASCHINE Beim Versand wird die Sämaschine mit Stützfüßen in Transportposition konfiguriert. - Page 95 DEUTSCH GEBRAUCH UND WARTUNG HINTERE SAATGUTABDECKEGGE BEGRENZER SCHWENKVORRICHTUNG HINTERE SAATGUTABDECKEGGE (OPTIONAL) cod. G19503240...
-
Page 96: Einbau Am Landwirt-Schaftsmaschine
DEUTSCH GEBRAUCH UND WARTUNG 3.2 EINBAU AM LANDWIRT-SCHAFTSMASCHINE 3.2.1 Montage des dreieckigen Schnellanschlusses Gemeinsam mit der Sämaschine kann auf Wunsch des Kunden ein Dreieck zum schnellen an und abhängen der Sämaschine an die damit kombinierte Landwirt-schaftsmaschine geliefert werden. Dieses Dreieck wird fix auf die Landwirtschaftsmaschine montiert (Abb. -
Page 97: Montage Der Leitriemenscheibe An Der Ausrüstung
DEUTSCH GEBRAUCH UND WARTUNG 3.2.2 MONTAGE DER KEILRIEMENSCHEIBE AN DER fig. 10 AUSRÜSTUNG Die Keilriemenscheibe mit der Nabe an der hinteren Welle des Leistungsabgreifpunktes der Ausrüstung (Abb. 10) anbringen und mit der speziellen Feststellschraube an der Nut der o.g. Welle befestigen. Nach den ersten drei Betriebsstunden ist sicherzustellen, dass die Schraubbolzen (A, B Abb. -
Page 98: Montage Der Treibriemen
DEUTSCH GEBRAUCH UND WARTUNG 3.2.4 MONTAGE DER KEILRIEMEN Dieser Eingriff muss bei abgestelltem Schleppermotor, gezogener Standbremse und auf dem Boden aufliegender Ausrüstung ausgeführt werden. 1) Die Riemen werden zwischen die an dem hinteren Leistungsabgreifpunkt Egge Zentrifugalanschluss Gebläses angebrachten Riemenscheiben eingelegt (Abb. 14). fig. -
Page 99: Position Der Sämaschine
DEUTSCH GEBRAUCH UND WARTUNG 3.2.5 POSITION DER SÄMASCHINE fig. 18 Es ist wichtig die Position der Sämaschine auf der tragenden Ausrüstung korrekt auf dem Feld einzustellen. GEFAHR Das Positionieren der Sämaschine auf der Ausrüstung ist ein sehr gefährlicher Eingriff. Daher sind bei der Ausführung dieses Eingriffes die nachstehenden Anleitungen genau zu befolgen. -
Page 100: Abkuppeln Sämaschine-Ausrüstung
DEUTSCH GEBRAUCH UND WARTUNG 3.2.7 ABKUPPELN SÄMASCHINE-AUSRÜSTUNG GEFAHR Das Abkuppeln der Säemaschine vom Schlepper ist ein sehr gefährlicher Eingriff. Dieser Eingriff muss bei abgestelltem Schleppermotor, gezogener Standbremse und auf dem Boden aufliegender Ausrüstung ausgeführt werden. Deshalb ist bei der Durchführung dieses Eingriffes größte Vorsicht geboten und es sind die entsprechenden Anweisungen genau zu befolgen. Für ein korrektes Abkuppeln der Säemaschine ist es wichtig, daß... -
Page 101: Transport
DEUTSCH GEBRAUCH UND WARTUNG 3.4 TRANSPORT Sollte sich ein Transport der Maschine über längere Strecken als nötig erweisen, so kann diese sowohl auf einen Transportwagon oder einen Lastwagenanhänger aufgeladen werden. Die Angaben und Hinweise hinsichtlich Gewicht und Ausmaße der Maschine (besonders wichtig bei Transport auf engen Straßen) finden Sie unter dem Abschnitt «Technische Daten». -
Page 102: Einstellung
DEUTSCH GEBRAUCH UND WARTUNG 3.5 EINSTELLUNG 3.5.1 DOSIER (Abb. 26) Der volumetrische Dosierer GRINTA besteht im wesentlichen aus vier Elementen zur Saatgutstreung: A) Monoblock-Rahmen aus Aluminium; B) Rührelement; C) Dosierrollen; D) Abtaster. MONOBLOCK-RAHMEN Der Monoblock-Rahmen aus Aluminium bietet folgende Vorteile: - Höchste Präzision und hohe Qualität über einen langen Zeitraum;... - Page 103 DEUTSCH GEBRAUCH UND WARTUNG Standardraeder sind doppelt versetzt ausgefuehrt, es existieren fig. 29 mehrere Raeder fuer verschiedenste Verwendung in 2 Familien: Rot: 5-teilig, 8 Kammern pro Rad, (mod. G1000) (A, Abb. 29). Grün: 5-teilig, 16 Kammern pro Rad, (mod. N500) (B, Abb. 29). Gelb: 5-teilig, 32 Kammern pro Rad, (Feindosierrad) (mod.
- Page 104 DEUTSCH GEBRAUCH UND WARTUNG ABTASTER Auch die Bodenklappe kann zur Reinigung als komplette Baugruppe in wenigen Minuten ausgebaut werden. Sie besteht aus 5 einzelnen Klappen mit einer fest eingestellten Vorspannkraft durch Federdruck. Die Bodenklappen beruehren das Saerad im Betrieb nicht! Zwischen den Klappen sind feststehende Zwischenwaende angeordnet, die ein unabhaengiges Arbeiten der einzelnen Klappen ermoeglichen.
- Page 105 DEUTSCH GEBRAUCH UND WARTUNG AUSBAU DER RUEHRWELLE Die Ruehrwelle kann werkzeuglos aus dem Gehauese entnommen werden um Reinigungsarbeiten zu erleichtern oder beschaedigte Teile zu ersetzen. 1) Dosiergeraet mit ausgebauter Bodenklappe und demontiertem Saerad (Abb. 41). 2) Alle Ruehrelemente aus der Ruehrwelle ziehen (Abb. 42). 3) Ruehrwelle (Abb.
- Page 106 DEUTSCH GEBRAUCH UND WARTUNG REINIGUNGSWELLE Die Reinigungsfedern zur Saeuberung des Zellenrades (A, Fig. 49) werden benutzt wenn die Gefahr der Oelbildung des Saatgutes (z.B. Raps) besteht. Sinnvoll ist der Einsatz nur beim Feinsaerad F25-125 (gelb). Die Reinigungswelle befindet sich ausserhalb des Dosierbereiches und kann somit jederzeit dur Sichtkontrolle auf Verschleiss und Funktionueberprueft werden.
- Page 107 DEUTSCH GEBRAUCH UND WARTUNG STREUUNG FEINES SAATGUT Streuung einer unter 3 kg/ha liegenden Saatgutmenge. Bei der Abdrehprobe kann es aufgrund der an die geringe auszustreuende Produktmenge gebundenen reduzierten Getriebedrehzahl zu einer ungleichmäßigen Streuung des Produkts kommen. In diesem Fall ist wie nachfolgend beschrieben vorzugehen. Vorausgesetzt, dass jedes Element (A, Abb.
-
Page 108: Abdrehprobe
DEUTSCH GEBRAUCH UND WARTUNG 3.5.2 DOSIERPRÜFUNG Vor der Ausführung des Dosierungstests ist sicherzustellen, dass keine Fremdkörper im Trichter und Dosierer vorhanden sind. 1) Eine geringe Menge Saatgut in den Behälter geben. 2) Den Bogen unter dem Einspritzerkanal entfernen (A, Fig, 55), durch Loesen des Schnellverschlusses ab. - Page 109 DEUTSCH GEBRAUCH UND WARTUNG Tabelle 3 Cod. G19707240 cod. G19503240...
-
Page 110: Antrieb Des Gebläses
DEUTSCH GEBRAUCH UND WARTUNG 3.5.3 ANTRIEB DES GEBLÄSES HYDRAULISCHER ANTRIEB DES GEBLÄSES Sicherheit Das Gebläse ist eines der wichtigsten Organe für eine optimale Das Gerät ist ausschließlich für die hier beschriebene Saatgutstreuung. Verwendung vorgesehen. Jeder sonstige, von den Angaben Nach der ersten Verteilungsphase, in der die auszustreuende dieser Betriebsanleitung abweichende Gebrauch kann die Saatgutmenge mittels des Dosierers dosiert wird, ist in der Maschine beschädigen und stellt eine erhebliche Gefahr für... - Page 111 DEUTSCH GEBRAUCH UND WARTUNG Beschreibung der Funktionsweise Wenn man die Gebläseumdrehungen für die Verteilung von Der zum Antrieb des Gebläses erforderliche Ölstrom fließt vom schwereren Samen erhöhen will, mit Vorsicht und Achtung wie Steuergerät des Schleppers durch die Druckölleitung zu einem folgt vorgehen (Abb.
-
Page 112: Einstellung Der Aussaattiefe
DEUTSCH GEBRAUCH UND WARTUNG 3.5.4 EINSTELLUNG DER AUSSAATTIEFE fig. 63 Für ein korrektes Keinem des Saatgutes ist es wichtig, daß das Saatgut mit der richtigen Tiefe im Saatbeet ausgesät wird. Die Sätiefe wird hauptsächlich mittels der seitlichen Einstellvorrichtungen des Parallelogramms (A, Abb. 63). ACHTUNG: Die Messanzeige (B, Abb. -
Page 113: Bearing Frame
DEUTSCH GEBRAUCH UND WARTUNG 3.5.5 HYDRAULISCHES ANHEBEN DES FURCHE ÖFFNER-LAGER- RAHMENS Vorrichtung wird anstatt manuellen Justageverbindungsstange Fig. gepaßt angeschlossen durch spezielle hydraulische Schläuche an den Traktorverteiler (doppelter Effekt). Die mitgelieferten öldynamischen Anlagen sind mit Flußreglern (Abb. 66-67) ausgestattet, die eine Einstellung der Ölmenge beim Öffnen oder Schließen je nach Montagerichtung derselben ermöglichen: Fluß... -
Page 114: Einstellung Der Spurreisserscheiben
DEUTSCH GEBRAUCH UND WARTUNG 3.5.7 EINSTELLUNG DER SPURREISSERSCHEIBEN Der Spurreisser ist eine Vorrichtung, die eine parallel zum Schlepperlauf liegende Bezugslinie auf dem Boden zieht. Wenn der Traktor den Lauf beendet und gewendet hat, fährt man mit der Traktormitte (L, Abb. 70) auf der Richtlinie, je nach benutztem Spurreißer. - Page 115 DEUTSCH GEBRAUCH UND WARTUNG EINREGULIERUNG DER ANLAGEN fig. 73 Die Hydraulikanlage wird ohne Öl geliefert. Daher ist vor dem Gebrauch unbedingt sicherzustellen, dass sich alle Hydraulikzylinder langsam in beide Richtungen bewegen, bis die Leitungen und die Zylinder selbst sich mit Öl gefüllt haben.
-
Page 116: Vor Arbeitsbeginn
DEUTSCH GEBRAUCH UND WARTUNG 3.5.8 VOR ARBEITSBEGINN 3.5.10 WÄHREND DES BETRIEBS Vor Arbeitsbeginn sind alle auf dem Abziehbild Nr. 14 (“GREASE”) Es ist zu beachten, daß durch Veränderung der Schlepperge- auf Seite 90 dieses Heftes gekennzeichneten Schmierpunkte zu schwindigkeit die pro Hektar verteilte Samenmenge nicht schmieren. -
Page 117: Am Ende Der Aussaat
DEUTSCH GEBRAUCH UND WARTUNG 3.5.11 AM ENDE DER AUSSAAT Nach beendeter Arbeit alle beweglichen mechanischen Teile sichern, die Maschine auf den Boden abstellen, den Schleppermotor ausschalten, den Schlüssel entfernen und die Standbremse anziehen. ABLASSEN DES SAATGUTES AUS DEM TRICHTER Der Entleerschieber oeffnet das Dosiergeraet ueber die ganze Dosierradbreite und erlaubt so ein schnelles und sicheres Entleeren der Maschine. -
Page 118: Wartung
DEUTSCH GEBRAUCH UND WARTUNG 4.0 WARTUNG ÖLHYDRAULISCHE ANLAGEN - Wartungsarbeiten auf den ölhydraulischen Anlagen dürfen nur von geschultem Personal ausgeführt werden. Hier folgend sind die verschiedenen, regelmässig auszuführenden - Falls von der Teilnahme auf der Hydraulikanlage, den Wartung-sarbeiten aufgeführt. Die geringeren Betriebskosten und hydrostatischen Druck leeren, der alle hydraulischen die lange Lebensdauer des Geräts hängen unteranderem von Kommandos in allen Positionen einige Male, trägt den Motor... -
Page 119: Wartungsplan
DEUTSCH GEBRAUCH UND WARTUNG 4.1 WARTUNGSPLAN - Übersichtstabelle ZEITRAUM TÄTIGKEIT BEI NEUER MASCHINE - Die Antriebsketten schmieren (Abb. 80). - Dem Abziehbild Nr. 14 (“GREASE”) auf Seite 90 dieses Heftes gekennzeichneten Schmierpunkte zu schmieren. - Nach den ersten acht Betriebsstunden den Anzug aller Schrauben prufen. - Den Anzug der Mutterschrauben der Säscharenreisser überprüfen (A-B, Abb. - Page 120 DEUTSCH GEBRAUCH UND WARTUNG ZEITRAUM TÄTIGKEIT ALLE 50 RBEITSSTUNDEN - Den Bolzen des Spurreisserarms schmleren (Fig. 86). - Die Rutschkupplung des Gebläses mit einem Luftstrahl reinigen (Abb. 87). - Die Antriebsübersetzung der Gelenkwellen schmieren (Fig. 88). - Den Ölstand im Getriebegehäuse überprüfen und gegebenenfalls bis zum Stand auffüllen (1, Abb.
-
Page 121: Ratschläge Bei Störungen
DEUTSCH GEBRAUCH UND WARTUNG 4.2 RATSCHLÄGE BEI STÖRUNGEN URSACHEN BEHEBUNG VERSTOPFUNG DER ROHRE - Entsprechend der Tebelle der Rotationsprobe die Position der Drosselklappen überprüfen (Abb. 60, Seite 110). - Die Pflugmesser sind mit feuchter Erde verstopf. - Die Verteilerrohre sind auf irgendeiner Stelle gebogen. - Fremdkörper befinden sich im Säapparat oder am Pflugmesser. - Page 122 cod. G19503240...
-
Page 123: Introduction
• l'utilisation exclusive des pièces de rechange originales contrat de fourniture. GASPARDO. 1.1.1 EXPIRATION DE LA GARANTIE Le fonctionnement régulier de l’équipement dépend de son Les conditions du contrat de garantie demeurant valables, la utilisation correcte et de son entretien adéquat. -
Page 124: Donnes Techniques
FRANÇAIS EMPLOI ET ENTRETIEN 1.5 DONNES TECHNIQUES DE LA SEMOIR U.M. ALIANTE 300 DD Largeur de transport 3,00 Largeur de travail 3,00 Vitesse de travail [Km/h] 8 (max) Nombre de rangs [nr.] Ecartement [cm] 12,5 Capacité de la trémie graines 1000 Rehausse trémie Tour prise de force... -
Page 125: Identification
FRANÇAIS EMPLOI ET ENTRETIEN fig. 1 1.4 IDENTIFICATION Chaque herse est identifiée par une plaque (Fig. 1) sur laquelle sont indiqués: (A) Identification de la semoir; (B) Identification de la combinaison 1) Marque et adresse du Constructeur; 2) Type de machine; 3) Matricule de la machine;... -
Page 126: Identification Des Piéces
FRANÇAIS EMPLOI ET ENTRETIEN 1.6 IDENTIFICATION DES PIÈCES 14 Distributeur 32 sorties; Trémie; 15 Distributeur 24 sorties avec dispositif électrique Soufflerie; d'exclusion des rangs; Soc à sabot; 16 Grille de protection doseur; Plate-forme; 17 Groupe doseur et boîte de vitesse; Doseur;... - Page 127 FRANÇAIS EMPLOI ET ENTRETIEN G1000 N500 cod. G19503240...
-
Page 128: Signaux De Securite D'indication
FRANÇAIS EMPLOI ET ENTRETIEN 1.7 SIGNAUX DE SECURITE D’INDICATION 6) Danger de cisaillement des jambes. Maintenez une distance de sécurité de la machine. Les signaux décrits dans sont indiqués sur la machine (Fig. 4). 7) Danger de cisaillement des mains. Ne vous approchez pas Nettoyer et remplacer ces signaux s’ils sont détachés ou illisibles. -
Page 129: Normes De Securite Et De Prevention Des Accidents
FRANÇAIS EMPLOI ET ENTRETIEN 2.0 NORMES DE SECURITE ET DE PREVENTION Normes générales 1) Faire attention aux symboles de danger indiqués dans ce DES ACCIDENTS manuel et sur la machine. 2) Les étiquettes avec les instructions, appliquées sur la Faire attention au signal de danger quand il apparaît dans cette machine, donnent les conseils utiles essentiels pour éviter brochure. - Page 130 FRANÇAIS EMPLOI ET ENTRETIEN Attelage au tracteur fig. 5 1) Atteler l’équipement, selon les instructions, à un tracteur ayant une puissance et une configuration adéquates par le dispositif “ad hoc” (élévateur) conforme aux normes. 2) La catégorie des pivots d’attelage de l’équipement doit correspondre à...
- Page 131 FRANÇAIS EMPLOI ET ENTRETIEN Mesures de sécurité concernant la commande hydraulique Entretien en conditions de securite 1) Au moment du raccordement des tubes hydrauliques à Bei der Arbeit und der Wartung sind geeignete individuelle l'installation hydraulique du tracteur, s'assurer que les Schutzmittel anzuwenden: installations hydrauliques de la machine agricole et du tracteur ne sont pas sous pression.
-
Page 132: Normes D'emploi
FRANÇAIS EMPLOI ET ENTRETIEN 3.0 NORMES D’EMPLOI Pour obtenir les meilleures performances de l’équipement, respecter soigneusement les instructions suivantes. ATTENTION Il faut absolumnt effectuer toutes les opérations suivantes d’entretien, de réglage et de préparation au travail quand le tracteur est arrêté et bloqué, après avoir enlevé la clef et avec la machine posée par terre. 3.1 MONTAGE DE LA MACHINE Au moment de l'expédition, le semoir est configuré... - Page 133 FRANÇAIS EMPLOI ET ENTRETIEN HERSE DE RECOUVREMENT ARRIÈRE LIMITEUR BRAS OSCILLANT HERSE DE RECOUVREMENT ARRIÈRE (EN OPTION) cod. G19503240...
-
Page 134: Attelage Au Equipement
FRANÇAIS EMPLOI ET ENTRETIEN 3.2 ATTELAGE AU EQUIPEMENT 3.2.1 APPLICATION DU TRIANGLE RACCORD RAPIDE Le triangle pour l’accrochage et le décrochage rapide du semoir de la machine à laquelle il est assemblé peut être fourni avec la machine. Le triangle est monté de façon stable sur la machine (Fig. -
Page 135: Montage De La Poulie Conductrice
FRANÇAIS EMPLOI ET ENTRETIEN 3.2.2 MONTAGE DE LA POULIE CONDUCTRICE SUR fig. 10 L'EQUIPEMENT Insérer la poulie conductrice équipée de moyeu sur l'arbre arrière de la prise de puissance de l'équipement (Fig. 10). La bloquer moyennant la vis de fixation située à la hauteur de la rainure de l'arbre en question. -
Page 136: Montage Courroies De Transmission
FRANÇAIS EMPLOI ET ENTRETIEN 3.2.4 MONTAGE COURROIES DE TRANSMISSION Cette opération doit être effectuée avec moteur du tracteur éteint, frein de stationnement tiré et équipement reposant au sol. 1) Les courroies doivent être introduites entre la poulie montée sur la prise de puissance arrière de la herse (A) et la poulie avec l'embrayage centrifuge du souffleur (B) (Fig. -
Page 137: Position Du Semoir
FRANÇAIS EMPLOI ET ENTRETIEN 3.2.5 POSITION DU SEMOIR fig. 18 Il est important de régler correctement la position du semoir sur l'équipement de support sur le terrain. DANGER Positionner le semoir sur l'équipement est une phase très dangereuse. Faire très attention au cours de toute cette opération et s'en tenir aux instructions. -
Page 138: Detelage Du Semoir - Equipement
FRANÇAIS EMPLOI ET ENTRETIEN 3.2.7 DETELAGE DU SEMOIR - EQUIPEMENT DANGER Le décrochage de l’élément semeur du tracteur est une phase très dangereuse. Cette opération doit être effectuée avec moteur du tracteur éteint, frein de stationnement tiré et équipement reposant au sol. Faire très attention au cours de toute cette opération et s’en tenir aux instructions. -
Page 139: Transport
FRANÇAIS EMPLOI ET ENTRETIEN 3.4 TRANSPORT S’il faut transporter le machine sur un long parcours, on peut le charger aussi bien sur un wagon de chemin de fer que sur un camion. Dans ce but, consulter les «Donnes Techniques» pour le poids et les dimensions spécifiques. Ces dernières sont très utiles pour contrôler si la machine peut passer dans des endroits étroits. -
Page 140: Distribution De Graines
FRANÇAIS EMPLOI ET ENTRETIEN 3.5 RÉGLAGES 3.5.1 DOSEUR (Fig. 26) Il doseur volumétrique GRINTA est essentiellement composé de quatre éléments pour la distribution de graines: A) Châssis monobloc en aluminium; B) Agitateur; C) Rouleaux doseurs; D) Tâteur CHÂSSIS MONOBLOC Le châssis monobloc costruit en aluminium, offro les avantages suivants: - réalisation de haute précision et qualité... - Page 141 FRANÇAIS EMPLOI ET ENTRETIEN Les roues standard sont décalées sur deux lignes. Il existe fig. 29 plusieurs roues permettant différentes utilisations, elles sont regroupées en trois familles de produit: rouges: 5 éléments, 8 chambres par roue (mod. G1000) (A, Fig. 29).
- Page 142 FRANÇAIS EMPLOI ET ENTRETIEN TÂTEURS Le groupe des tâteurs est également simple à effectuer étant donné qu'il s'agit d'un bloc unique. Réalisé en l'espace de quelques minutes, le démontage permet d'effectuer les opérations de nettoyage. Le groupe est composé de 5 portes simples et la pression à...
- Page 143 FRANÇAIS EMPLOI ET ENTRETIEN DÉMONTAGE DE L'AXE AGITATEUR L'agitateur peut être extrait de son logement sans aucun outil, afin de faciliter les opérations de nettoyage ou pour remplacer les parties endommagées. 1) Doseur avec portillon de semis et roue de semis démontés (Fig. 41). 2) Extraire tous les éléments de l'agitateur (Fig.
- Page 144 FRANÇAIS EMPLOI ET ENTRETIEN ÉLÉMENTS ELASTIQUES NETTOYANTS Les éléments élastiques nettoyants (A, Fig. 49) sont employés pendant la distribution de graines oleagineuses avec le roulement de encemencement jaune mod. F25- 125. L'action principale des éléments élastiques est celle de maintenir libres chambres roulement...
- Page 145 FRANÇAIS EMPLOI ET ENTRETIEN DISTRIBUTION SEMENCES FINES Distribution de quantité inférieurs à 3 kg/a. Pendant l'épreuve de dosage, pour réduire le nombre de tours de la boite de vitesse lié à la petit quantité de produit de distribuer, l'utilisateur peut relever une distribution irrégulière de produit. Dans cette situation il est possible intervenir comme de suivi indiqué. Dit d'abord que chaque secteur (A, Fig.
-
Page 146: Essai De Dosage
FRANÇAIS EMPLOI ET ENTRETIEN 3.5.2 ESSAI DE DOSAGE Régler le doseur avec l’équipement au sol, le moteur éteint et le tracteur bloqué. Avant d'effectuer l'essai de dosage, veiller à ce qu'il n'y ait pas de corps étrangers à l'intérieur de la trémie et du doseur. - Page 147 FRANÇAIS EMPLOI ET ENTRETIEN Tableau 3 Cod. G19707240 cod. G19503240...
-
Page 148: Actionnement De La Soufflante
FRANÇAIS EMPLOI ET ENTRETIEN 3.5.3 ACTIONNEMENT DE LA SOUFFLANTE INSTALLATION D’ACTIONNEMENT DE LA SOUFFLANTE Sécurité Le souffleur représente l'un des principaux organes qui permet L’outil est adapté uniquement pour l’utilisation indiquée. Toute d'obtenir une parfaite distribution des graines. utilisation autre que celle décrite dans ces instructions peut Après la première phase de la distribution, durant laquelle le endommager la machine et entraîner de graves risques pour doseur détermine la quantité... - Page 149 FRANÇAIS EMPLOI ET ENTRETIEN Description du fonctionnement Si vous voulez augmenter la vitesse de rotation de la turbine Le flux de l’huile nécessaire pour l’actionnement de la soufflante pour le semis de semences plus lourdes agir avec grande est amené par le distributeur du tracteur, à travers le tuyau prudence en opérant comme suit (Fig.
-
Page 150: Reglage De La Profondeur De
FRANÇAIS EMPLOI ET ENTRETIEN 3.5.4 REGLAGE DE LA PROFONDEUR DE L’ENSEMENCEMENT fig. 63 De manière à ce que les pousses dépassent suffisamment du terrain, il est important de placer la semence à la juste profondeur dans le lit d’ensemencement. La profondeur de semence est obtenue en jouant sur les régulateurs latéraux du parallélogramme (A, fig. -
Page 151: Levage Hydraulique Chassis Porte-Socs
FRANÇAIS EMPLOI ET ENTRETIEN 3.5.5 LEVAGE HYDRAULIQUE CHASSIS PORTE-SOCS Sur demande, le semoir peut être équipé d'un dispositif de levage hydraulique (Fig. 66) du châssis porte-socs (9 Fig. 3). Ce dispositif est monté à la place du tirant de réglage manuel (A Fig. 66) et il est raccordé... -
Page 152: Reglage Des Disques A Tracer
FRANÇAIS EMPLOI ET ENTRETIEN 3.5.7 REGLAGE DES DISQUES A TRACER Le disque à tracer est un dispositif qui trace une /igne de repére sur le terrain parallélement au trajet du tracteur. Quand le tracteur aura terminé la course et invertit la marche, on procèdera en courant sur la ligne de référence avec le centre du tracteur (L, Fig. - Page 153 FRANÇAIS EMPLOI ET ENTRETIEN RÉGLAGE DES INSTALLATIONS fig. 73 L'installation hydraulique ne contient pas d'huile au moment de la livraison. Par conséquent, avant de l'utiliser, s'assurer que tous les cylindres hydrauliques sont activés lentement dans les deux directions jusqu'à ce que les conduites et les cylindres se remplissent d'huile. Au premier démarrage de l'installation et au début de chaque station, agir de la façon suivante: - Le traceur fermé...
-
Page 154: Avant De Commencer Le Travail
FRANÇAIS EMPLOI ET ENTRETIEN 3.5.8 AVANT DE COMMENCER LE TRAVAIL 3.5.10 DURANT LE TRAVAIL Avant de commencer à travailler, graisser tous les points marqués Nous rappelons que le changement de la vitesse du tracteur ne par la décalcomanie n° 14 (GREASE) à la page 128 de la modifie pas la quantité... -
Page 155: Fin De Travail
FRANÇAIS EMPLOI ET ENTRETIEN 3.5.11 FIN DE TRAVAIL Une fois le travail terminé, arrêter en toute sécurité toutes les pièces mécaniques en mouvement, appuyer la machine sur le sol, arrêter le moteur du tracteur, retirer la clé et activer le frein de stationnement. -
Page 156: Entretien
FRANÇAIS EMPLOI ET ENTRETIEN 4.0 ENTRETIEN INSTALLATIONS OLÉODYNAMIQUES - Les interventions d'entretien sur les installations oléodynamiques doivent être effectuées exclusivement par Nous décrivons ci-dessous les différentes opérations d’entretien un personnel formé à cet effet. à effectuer periodiquement. Le coût d’emploi réduit et une - En cas de participation sur le circuit hydraulique, pour durabilité... -
Page 157: Plan D'entretien
FRANÇAIS EMPLOI ET ENTRETIEN 4.1 PLAN D'ENTRETIEN - Tableau récapitulatif PÉRIODE INTERVENTION QUAND LA MACHINE EST NEUVE Graisser la chaîne de transmission (Fig. 80). - Graisser tous les points marqués par la décalcomanie n° 14 (GREASE) à la page 128 de la présente brochure. - Page 158 FRANÇAIS EMPLOI ET ENTRETIEN PÉRIODE INTERVENTION TOUTES LES 50 HEURES - Graisser la cheville du bras à tracer (Fig. 86). - Nettoyer la friction du souffleur au moyen d'un jet d'air (Fig. 87). - Gaisser le couple conique des arbres à cardans (Fig. 88). - Controler le niveau d’huile dans la boîte de vitesse, et remplir le cas échéant jusqu’au niveau prévu (1, Fig.
-
Page 159: Conseils En Cas D'inconvenients
FRANÇAIS EMPLOI ET ENTRETIEN 4.2 CONSEILS EN CAS D’INCONVENIENTS CAUSES REMÈDES OBSTRUCTION DES TUBES - A partir du tableau de l’essai de rotation, vérifier la position des vannes papillon (Fig. 60, page 148). - Les buttoirs sont obstrués par de la terre humide. - Les tubes de distribution sont pliés à... - Page 160 cod. G19503240...
-
Page 161: Premisa
• el uso exclusivo de repuestos originales GASPARDO. 1.1.1 VENCIMIENTO DE LA GARANTÍA Del uso correcto y el mantenimiento adecuado depende el Aparte de lo mencionado en el contrato de provisión, la garantía funcionamiento regular del equipo;... -
Page 162: Datos Tecnicos
ESPAÑOL EMPLEO Y MANTENIMIENTO 1.3 DATOS TECNICOS DE LA SEMBRADORA U.M. ALIANTE 300 DD Anchura de transporte 3,00 Anchura de trabajo 3,00 Velocidad para el labrado [Km/h] 8 (max) Numero de hileras [nr.] Distancia entre las lineas [cm] 12,5 Capacidad del deposito de la semilla 1000 Realce del deposito Vuelta toma de fuerza... -
Page 163: Identificación
ESPAÑOL EMPLEO Y MANTENIMIENTO fig. 1 1.4 IDENTIFICACIÓN Cada equipo está provisto de una tarjeta de identificación (Fig. 1), en la que se encuentran: (A) Identificación de la sembradora (B) Identificación de la combinada 1) Marca y dirección del Fabricante. 2) Tipo de la máquina. -
Page 164: Identificación De Las Piezas
ESPAÑOL EMPLEO Y MANTENIMIENTO 1.6 IDENTIFICACIÓN DE LAS PIEZAS 14 Distribuidor 32 Salidas; Tolva semillas; 15 Distribuidor 24 Salidas con dispositivos eléctricos de Soplador; exclusión de hileras; Surcador a reja; 16 Rejilla de protección del dosificador; Plataforma; 17 Grupo dosificador y cambio; Dosificador;... - Page 165 ESPAÑOL EMPLEO Y MANTENIMIENTO G1000 N500 cod. G19503240...
-
Page 166: Señales De Seguridad Y De Identicacion
ESPAÑOL EMPLEO Y MANTENIMIENTO 1.7 SEÑALES DE SEGURIDAD Y DE IDENTICACION 6) Peligro de corte para las piernas. Mantenerse a distancia de seguridad de la máquina. Las señales descritas están colocadas en la máquina (Fig. 4). 7) Peligro de corte para las manos. No acercarse con órganos Mantenerlas limpias y reemplazarlas si se desprenden o se de la maquina en movimento. -
Page 167: Normas De Seguri-Dad Y Prevención Contra Los Accidentes
ESPAÑOL EMPLEO Y MANTENIMIENTO 2.0 NORMAS DE SEGURI-DAD Y PREVENCIÓN Normas generales 1) Poner atención a los símbolos de peligro indicados en este CONTRA LOS ACCIDENTES manual y en la sembradora. 2) Las etiquetas con las instrucciones, aplicadas a la máquina, Tener cuidado a las señales de peligro que se indican en este proporcionan, en forma concisa, los consejos adecuados opúsculo. - Page 168 ESPAÑOL EMPLEO Y MANTENIMIENTO Conexión al tractor fig. 5 1) Enganchar el equipo, como previsto, a un tractor cuya potencia y configuración sean las adecuadas, utilizando el respectivo dispositivo (elevador) conforme a las normas. 2) La categoría de los pernos de enganche del equipo tiene que corresponder a la del gancho del elevador.
- Page 169 ESPAÑOL EMPLEO Y MANTENIMIENTO 14)Cuando no es necesario, apoyar el árbol cardán sobre el Mantenimiento en seguridad soporte previsto para ser utilizado en dicha operación. Durante los trabajos de mantenimiento, utilice los elementos 15)Después del desmontaje del árbol cardán, reponer el de protección personal adecuados: casquillo protector en el eje de la toma de fuerza.
-
Page 170: Normas De Manejo
ESPAÑOL EMPLEO Y MANTENIMIENTO 3.0 NORMAS DE MANEJO Para obtener las mejores prestaciones del equipo, seguir minuciosamente lo que se indica a continuación: CUIDADO Todas las operaciones siguientes de mantenimiento, regulación y preparación para el trabajo, se tienen que efectuar absolutamente con el tractor apagado y bien parado, la lave desinsertada y la sembradora en el suelo. - Page 171 ESPAÑOL EMPLEO Y MANTENIMIENTO GRADA CUBRESEMILLAS TRASERA LIMITADOR DEL BRAZO OSCILANTE DE LA GRADA CUBRESEMILLAS TRASERA (OPCIONAL) cod. G19503240...
-
Page 172: Aplicación Al Equipo
ESPAÑOL EMPLEO Y MANTENIMIENTO 3.2 APLICACIÓN AL EQUIPO 3.2.1 APLICACIÓN DEL TRIÁNGULO PARA EL ACOPLAMIENTO RÁPIDO Con la sembradora puede suministrarse el triángulo para el enganche y desenganche rápido de la sembradora al equipo con el cual se la acopla. El triángulo se monta de manera fija al equipo (Fig. -
Page 173: Montaje De La Polea Conductora En
ESPAÑOL EMPLEO Y MANTENIMIENTO 3.2.2 MONTAJE DE LA POLEA CONDUCTORA EN EL EQUIPO fig. 10 Monte la polea conductora con el cubo en el árbol trasero de la toma de fuerza del equipo (Fig. 10). Bloquéela con el tornillo de fijación respectivo en correspondencia de la ranura de dicho árbol. -
Page 174: Montaje De Las Correas De Transmisión
ESPAÑOL EMPLEO Y MANTENIMIENTO 3.2.4 MONTAJE DE LAS CORREAS DE TRANSMISIÓN Esta operación se debe hacer con el motor del tractor apagado, freno de estacionamiento puesto y equipo apoyado sobre el suelo. 1) Las correas se introducen entre la polea montada en la toma de fuerza trasera de la grada (A) y aquella con el acoplamiento centrífugo del soplador (B) (Fig. -
Page 175: Ajuste De La Sembradora
ESPAÑOL EMPLEO Y MANTENIMIENTO 3.2.5 AJUSTE DE LA SEMBRADORA fig. 18 Es importante regular correctamente en el campo la posición de la sembradora sobre el equipo portador. PELIGRO La graduación de la sembradora sobre la herramienta es una fase muy peligrosa. Por lo tanto hay que prestar mucha atención al efectuar la entera operación y seguir las siguientes instrucciones. -
Page 176: Transmisión
ESPAÑOL EMPLEO Y MANTENIMIENTO 3.2.7 DESENGANCHE DE LA SEMBRADORA-EQUIPO PELIGRO El desganche de la sembradora del tractor es una fase muy peligrosa. Esta operación se debe hacer con el motor del tractor apagado, freno de estacionamiento puesto y equipo apoyado sobre el suelo. Atenerse cuidadosamente a las instrucciones al momento de efectuar toda la operación. -
Page 177: Transporte
ESPAÑOL EMPLEO Y MANTENIMIENTO 3.4 TRANSPORTE Si fuera necesario transportar la máquina por un trayecto largo, puede cargárselo tanto sobre un vagón ferroviario como sobre camión. A tal fin, consulte las «Datos Técnicos» para el peso y dimensiones específicas. Éstas últimas son muy útiles para controlar la posibilidad de paso en zonas estrechas. -
Page 178: Regulacion
ESPAÑOL EMPLEO Y MANTENIMIENTO 3.5 REGULACION 3.5.1 DOSIFICADOR (Fig. 26) El dosificador volumétricco GRINTA consta esencialmente de cuatro elementos para la distribución de la semilla: A) Bastidor monobloque en aluminio; B) Elemento agitador; C) Rodillos dosificadores; D) Palpador. BASTIDOR MONOBLOQUE El bastidor monobloque, fabricado en aluminio, ofrece las siguientes ventajas: - realización de altísima precisión y elevada calidad en el tiempo;... - Page 179 ESPAÑOL EMPLEO Y MANTENIMIENTO Las ruedas estándar se producen desalineadas en dos filas y fig. 29 existen diferentes ruedas para los empleos más variados subdivididas en tres grupos de productos: rojas: 5 elementos, 8 cámaras por rueda, (mod. G1000) (A, Fig.
- Page 180 ESPAÑOL EMPLEO Y MANTENIMIENTO PALPADORES El grupo de los palpadores también puede desmontarse fácilmente en pocos minutos, como un bloque único, para efectuar operaciones de limpieza. Dicho grupo está compuesto por 5 puertas individuales y la presión del muelle garantiza una sólida fuerza de cierre.
- Page 181 ESPAÑOL EMPLEO Y MANTENIMIENTO DESMONTAJE DEL EJE AGITADOR: El agitador puede extraerse de su alojamiento sin utilizar herramientas, facilitando así las operaciones de limpieza o sustitución de piezas dañadas. 1) Dosificador con puerta de siembra y rueda de siembra desmontadas (Fig. 41). 2) Extraiga todos los elementos del agitador (Fig.
- Page 182 ESPAÑOL EMPLEO Y MANTENIMIENTO ELEMENTOS LIMPIADORES ELÁSTICOS Los elementos limpiadores elásticos (A, Fig. 49) se utilizan du- rante la distribución de las semillas oleosas por medio del rodillo de siembra amarillo mod. F25-125. La función principal de los elementos elásticos es la de mante- ner libres las cámaras del rodillo de siembra para garantizar una distribución constante y regular.
- Page 183 ESPAÑOL EMPLEO Y MANTENIMIENTO DISTRIBUCIÓN DE SEMILLAS FINAS Distribución de cantidades inferiores a 3 kg/ha. Dado el número reducido de giros del cambio relacionado con la baja cantidad de producto a distribuir, durante la prueba de dosificación el usuario podría hallar una distribución irregular del producto. En ese caso es posible intervenir de la siguiente manera: Considerando que cada sector (A, Fig.
-
Page 184: Prueba De Dosificación
ESPAÑOL EMPLEO Y MANTENIMIENTO 3.5.2 PRUEBA DE DOSIFICACIÓN Efectuar la graduación del dosificador con l’equipo en el suelo, motor apagado y tractor bien parado. Antes de efectuar el ensayo de dosificación, compruebe que no haya cuerpos extraños adentro de la tolva y del dosificador. 1) Colocar en el tanque una pequeña cantidad de semillas. - Page 185 ESPAÑOL EMPLEO Y MANTENIMIENTO Tabla 3 Cod. G19707240 cod. G19503240...
-
Page 186: Accionamiento Del Soplador
ESPAÑOL EMPLEO Y MANTENIMIENTO 3.5.3 ACCIONAMIENTO DEL SOPLADOR ACCIONAMIENTO HIDRÁULICO DEL SOPLADOR El soplador es uno de los órganos principales para obtener una Seguridad distribución ideal de las semillas. El equipo es idóneo exclusivamente para el empleo indicado. Después de la primera fase de distribución, donde el dosificador Un uso diferente de aquél descripto en estas instrucciones selecciona la cantidad de semillas, se lleva a cabo la segunda, puede producir averías a la máquina y ser muy peligroso para... - Page 187 ESPAÑOL EMPLEO Y MANTENIMIENTO Descripción del funcionamiento Se es necesario aumentar incrementar el número de El caudal de aceite que se requiere para accionar el soplador es revoluciones de la toma para la distribucion de semillas mayor, conducido por el distribuidor del tractor, a través del tubo de moviendo con prudencia y atencion como segue (Fig.
-
Page 188: Graduación De La Profundidad Del Siembra188
ESPAÑOL EMPLEO Y MANTENIMIENTO 3.5.4 GRADUACIÓN DE LA PROFUNDIDAD DEL SIEMBRA fig. 63 Para que los gérmenes broten es importante que la semilla venga colocada a la correcta profundidad en la cama de la siembra. La profundidad de siembra se obtiene, utilizando los reguladores laterales del paralelogramo (A, Fig. -
Page 189: Elevación Hidráulica Del Bastidor
ESPAÑOL EMPLEO Y MANTENIMIENTO 3.5.5 ELEVACIÓN HIDRÁULICA DEL BASTIDOR PORTA- SURCADORES A pedido, la sembradora se puede equipar con el dispositivo de elevación hidráulica (Fig. 66) del bastidor porta-surcadores (9 Fig. 3). El dispositivo se monta en lugar del tirante de regulación manual (A Fig. -
Page 190: Regulacion De Los Discos Marcadores
ESPAÑOL EMPLEO Y MANTENIMIENTO 3.5.7 REGULACION DE LOS DISCOS MARCADORES DE HILERAS El marcador de hileras es un dispositivo que traza una línea de referencia en el terreno, paralela al recorrido del tractor. Cuando el tractor habrá acabado la carrera e invertido la marcha, procederá... -
Page 191: De Hileras
ESPAÑOL EMPLEO Y MANTENIMIENTO REGULACIÓN DE LAS INSTALACIONES fig. 73 La instalación hidráulica se suministra sin aceite. Por lo tanto, antes del uso, es indispensable cerciorarse que todos los cilindros hidráulicos se accionen lentamente en ambas direcciones hasta que los conductos y los propios cilindros se llenen de aceite. -
Page 192: Antes De Iniciar El Trabajo
ESPAÑOL EMPLEO Y MANTENIMIENTO 3.5.8 ANTES DE INICIAR EL TRABAJO 3.5.10 DURANTE EL TRABAJO Antes de iniciar el trabajo engrasar todos los puntos señalados Es importante recordar que variando la velocidad del tractor no con la calcomanía n° 14 (“GRASE”) en la pág. 166 de este se varía la cantidad de semillas distribuidas por hectárea. -
Page 193: Final Del Trabajo
ESPAÑOL EMPLEO Y MANTENIMIENTO 3.5.11 FINAL DEL TRABAJO Al finalizar el trabajo, detenga todas las piezas mecánicas de movimiento en condiciones de seguridad, apoye la máquina en el suelo, detenga el motor del tractor, extraiga la llave y active el freno de estacionamiento. -
Page 194: Mantenimiento
ESPAÑOL EMPLEO Y MANTENIMIENTO 4.0 MANTENIMIENTO INSTALACIONES HIDRÁULICAS - Las operaciones de mantenimiento en las instalaciones hidráulicas deben ser realizadas exclusivamente por perso- A continuación se indican las distintas operaciones de nal capacitado. mantenimiento a ejecutarse periódicamente. El menor costo de - En caso de que de la participación en el sistema hydráulico, explotación y una larga duración de la sembradora depende, descargar la presión hydráulica que lleva a todos los... -
Page 195: Plan De Mantenimiento
ESPAÑOL EMPLEO Y MANTENIMIENTO 4.1 PLAN DE MANTENIMIENTO - Tabla de Resumen PERIODO OPERACIÓN CUANDO LA MAQUINA - Engrasar las cadenas de transmisión (Fig. 80). ESTA NUEVA - Engrasar todos los puntos señalados con la calcomanía n° 14 (“GRASE”) en la pág. 166 de este catálogo. - Page 196 ESPAÑOL EMPLEO Y MANTENIMIENTO PERIODO OPERACIÓN CADA 50 HORAS DE TRABAJO - Engrasar el perno del brazo marcador de hileras (Fig. 86). - Limpie con un chorro de aire el embrague del soplador (Fig. 87). - Engrasar el par cónico de los árboles cardán (Fig. 88). - Verificar el nivel del aceite en la caja del cambio, eventualmente restablecerlo hasta alcanzar el nivel (1, Fig.
-
Page 197: Sugerencias En Caso De Inconvenientes
ESPAÑOL EMPLEO Y MANTENIMIENTO 4.2 SUGERENCIAS EN CASO DE INCONVENIENTES CAUSAS SOLUCIÓNS ATASCAMIENTO DE LOS TUBOS - Controle, de acuerdo con la tabla de la prueba de rotación, la posición de las válvulas de mariposa (Fig. 60, pág. 186). - Las guadañadoras están atascadas de tierra húmeda. - Los tubos de distribución están plegados en algún punto. -
Page 198: Declaración De Conformidad
Û‚‹ÒÌÂÚ - **—Ò¸ÙıðÔ ðÔı ˜ÒÁÛÈÏÔðÔÈÂflÙ·È Ï¸ÌÔ „È· ÍÔðÙÈÍ›Ú ÏÁ˜·Ì›Ú - ***—Ò¸ÙıðÔ ðÔı para a trinchadora - ***Norma utilizada apenas para máquinas combinadas ˜ÒÁÛÈÏÔðÔÈÂflÙ·È Ï¸ÌÔ „È· Ûð·ÒÙÈÍ›Ú ÏÁ˜·Ì›Ú Û Ûı̉ı·Ûϸ Ï ۂ‹ÒÌÂÚ. TYPE MODEL PLACE SERIAL NUMBER DATE Cod. F07040035 (06-2010) – Uff. Tecnico MASCHIO GASPARDO S.p.A. Il Presidente Maschio Egidio... -
Page 199: Dichiarazione Di Conformità
Egidio Maschio – Ühise Peakorteri poolt specyfikacje techniczne ISO 11684:1995. Dokumentacja techniczna zostala sporz dzona przez Egidio Maschio – Zarz d Grupy Maschio Gaspardo. *Standard kehtib ainult kultivaatoritele ja kultivaatorikäppadele - **Standard kehtib ainult *Norma stosowana wy cznie do kultywatorów oraz spulchniarek - **Norma stosowana lõikuritele - ***Standard kehtib ainult kombineeritud masinatele... - Page 200 404126 Волжский 315100 Chisineu-Cris (Arad) - România GASPARDO BIELORUSSIA MASCHIO-GASPARDO CINA Волгоградская область Tel. +40 257 307030 Тел. +7 8443 525065 MASCHIO MIDDLE EAST MASCHIO-GASPARDO KOREA Fax +40 257 307040 факс. +7 8443 525064 e-mail: maschio@maschio.ro Ufficio Tecnico MASCHIO GASPARDO S.p.A.
Need help?
Do you have a question about the ALIANTE DD and is the answer not in the manual?
Questions and answers