Infineon XMC4800 Relax EtherCAT Getting Started
Generic slave example
Hide thumbs
Also See for XMC4800 Relax EtherCAT:
- Getting started (61 pages) ,
- Manual (20 pages) ,
- Manual (28 pages)
Advertisement
Quick Links
Advertisement

Related Manuals for Infineon XMC4800 Relax EtherCAT


Summary of Contents for Infineon XMC4800 Relax EtherCAT
- Page 1 XMC4800 EtherCAT ® generic slave example Getting started V1.0 July 2016...
- Page 2 Agenda Overview and requirements Setup Description How to test Copyright © Infineon Technologies AG 2016. All rights reserved.
- Page 3 Agenda Overview and requirements Setup Description How to test Copyright © Infineon Technologies AG 2016. All rights reserved.
- Page 4 Relax Kit. You will observe inside code how you can modify the mapping of the generic data structures to the I/Os for your own evaluations and testing. Copyright © Infineon Technologies AG 2016. All rights reserved.
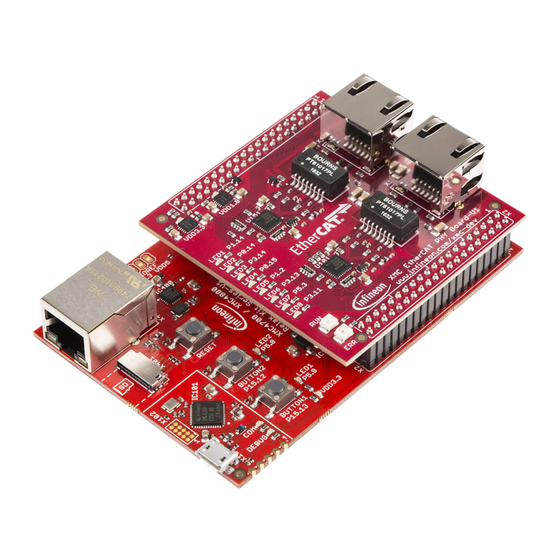
- Page 5 Requirements XMC4800 Relax EtherCAT ® RJ45 Ethernet Cable Windows Laptop installed - DAVE™ v4 (Version4.1.4 or higher) - TwinCAT2 or TwinCAT3 Master PLC Micro USB Cable (Debugger connector) Copyright © Infineon Technologies AG 2016. All rights reserved.
- Page 6 TwinCAT2 (30 day trial) (used inside this document as reference) Link: Download TwinCAT2 TwinCAT3 (no trial period; usability limited) Link: Download TwinCAT3 DAVE™ (v4.1.4 or higher) Link: Download DAVE (Version 4) Copyright © Infineon Technologies AG 2016. All rights reserved.
- Page 7 Agenda Overview and requirements Setup Description How to test Copyright © Infineon Technologies AG 2016. All rights reserved.
-
Page 8: Setup Hardware
Setup Hardware Micro usb cable Ethernet cable debugger connected to connected to in-port X101 debug connector Copyright © Infineon Technologies AG 2016. All rights reserved. - Page 9 Setup Import example project into DAVE™ & build Copyright © Infineon Technologies AG 2016. All rights reserved.
- Page 10 2. Copy the device description file to your TwinCAT installation: C:\TwinCAT\Io\EtherCAT 3. If TwinCAT System Manager is currently running already, exit TwinCAT. 4. Start TwinCAT. You should see device description cache being re-worked automatically because the new device is added. Copyright © Infineon Technologies AG 2016. All rights reserved.
- Page 11 Agenda Overview and requirements Setup Description How to test Copyright © Infineon Technologies AG 2016. All rights reserved.
- Page 12 Established tool providers may help you in your product development and certification. A list of vendors can be found here: https://www.ethercat.org/en/prod ucts.html Copyright © Infineon Technologies AG 2016. All rights reserved.
- Page 13 To register a callback. Inside the callback the I/O data from/to master is processed and e.g. connected to hardware (ports, timers, PWM,…) 3. ECAT_main_loop Main loop called inside while(1) to process the state machine Copyright © Infineon Technologies AG 2016. All rights reserved.
- Page 14 Description Generic EtherCAT slave library ® The size of generic data in both directions is 4x16-bit and 8x1- bit. Check the types IN_object / OUT_object inside the headerfile ECAT_GenericNode.h for details. Copyright © Infineon Technologies AG 2016. All rights reserved.
- Page 15 For the example provided, the configuration is fixed to the LQFP144 which fits to the XMC4800 Relax EtherCAT ® Kit. Inside main() during initialization the port configuration is set in place by calling ECAT0_Init. Copyright © Infineon Technologies AG 2016. All rights reserved.
- Page 16 500 Hz and the initial duty cycle is set to 50%. The pin P5.8 is allocated to channel1 of CCU8 inside manual pin allocator (right-click PWM_CCU8 APP). Copyright © Infineon Technologies AG 2016. All rights reserved.
- Page 17 LED1 to 8 of the „XMC™ EtherCAT ® PHY Board“. Finally the generic EtherCAT slave node is initialized, the callback is registered ® and the ECAT_main_loop is called cyclic to process the state machine. Copyright © Infineon Technologies AG 2016. All rights reserved.
- Page 18 PHY Board“. The integer output data is used to set the duty cycle of the dimmable LED2. Finally the states of the buttons are checked and propagated to the input data (slave->master). Copyright © Infineon Technologies AG 2016. All rights reserved.
- Page 19 Agenda Overview and requirements Setup Description How to test Copyright © Infineon Technologies AG 2016. All rights reserved.
- Page 20 1. The ERR-LED on the "XMC™ EtherCAT ® PHY Board" will turn on and immediately turn off again. 2. The LED2 on the "XMC4800 Relax EtherCAT ® Kit" will remain turned Copyright © Infineon Technologies AG 2016. All rights reserved.
- Page 21 Start the TwinCAT 2 master to run (1/4) ACTIONS After starting the TwinCAT System Manager from windows start menu: 1 Right Click I/O-Devices and select „Append Device…“ 2 Create an EtherCAT ® master device by double click Copyright © Infineon Technologies AG 2016. All rights reserved.
- Page 22 In case the device is not found please install the respective device driver by following the instructions given by TwinCAT through the „Compatible Devices…“ button. 4 Right Click EtherCAT master ® and select „Scan Boxes…“. Copyright © Infineon Technologies AG 2016. All rights reserved.
- Page 23 How to test Start the TwinCAT 2 master to run (3/4) OBSERVATIONS The slave appears as a node on the bus of the EtherCAT ® master. The RUN-LED is flashing indicating PREOP-state. Copyright © Infineon Technologies AG 2016. All rights reserved.
- Page 24 PREOP state. EtherCAT slave view: ® The PREOP-state of the slave is indicated within the TwinCAT system manager. Copyright © Infineon Technologies AG 2016. All rights reserved.
- Page 25 ® Online status of master shows the slave in OP state. Frames are no more queued. Cyclic counter is incrementing. „XMC™ EtherCAT ® Board“: RUN-LED is static turned on indicating OP-state. Copyright © Infineon Technologies AG 2016. All rights reserved.
- Page 26 While pushing Button1 on „XMC4800 Relax EtherCAT Kit“ button state ® is updated on host. OBSERVATIONS State of IN_GEN_Bit1 changes according state of BUTTON1. Same is true for IN_GEN_Bit2 and BUTTON2. Copyright © Infineon Technologies AG 2016. All rights reserved.
- Page 27 Write…“ inside the context menu. Change the value from 0 to 1 to switch on LED1/ from 1 to 0 to switch off LED1. OBSERVATION LED1 „XMC EtherCAT PHY Board“ is turned on/off according to ™ ® OUT_GEN_Bit1 setting. Copyright © Infineon Technologies AG 2016. All rights reserved.
- Page 28 1. Right click on OUT_GEN_INT1 of the slave node and select „Online Write…“ inside the context menu. Change the value from 0 to 50000. OBSERVATION 1. Brightness of LED2 on „XMC4800 Relax EtherCAT Kit“ is ® dimmed. Setting OUT_GEN_INT1 to 65535 the LED2 is turned off.
-
Page 29: Support Material
PCB Design Data › Videos Technical Videos Infineon Media Center › › Product Information XMC Mediathek › › Videos Contact Forums Infineon Forums › › Product Support Technical Assistance Center (TAC) › › Copyright © Infineon Technologies AG 2016. All rights reserved. - Page 30 Disclaimer The information given in this training materials is given as a hint for the implementation of the Infineon Technologies component only and shall not be regarded as any description or warranty of a certain functionality, condition or quality of the Infineon Technologies component.
Need help?
Do you have a question about the XMC4800 Relax EtherCAT and is the answer not in the manual?
Questions and answers