Advertisement
Quick Links
Advertisement

Subscribe to Our Youtube Channel
Related Manuals for gofanco Matrix88HD20-Pro


Summary of Contents for gofanco Matrix88HD20-Pro
- Page 1 8x8 HDMI 2.0 Matrix Pro User's Guide P/N: Matrix88HD20-Pro G4-0121A...
- Page 2 Thank you for purchasing from gofanco. Our products aim to meet all your connectivity needs wherever you go. For optimum performance and safety, please read the instructions carefully and keep this User’s Guide for future reference. If you need more information about our products, please visit www.gofanco.com.
- Page 3 Package Contents • 8x8 HDMI 2.0 Matrix Pro • IR remote control and IR Receiver cable • Power adapter (24VDC/ 2.71A) • RS-232 cable • Mounting accessories and Plastic cushions (4pcs) • User's guide Introduction The 8x8 HDMI 2.0 Matrix Pro allows you to connect up to eight HDMI source devices and independently distribute any source to any of the eight HDMI displays.
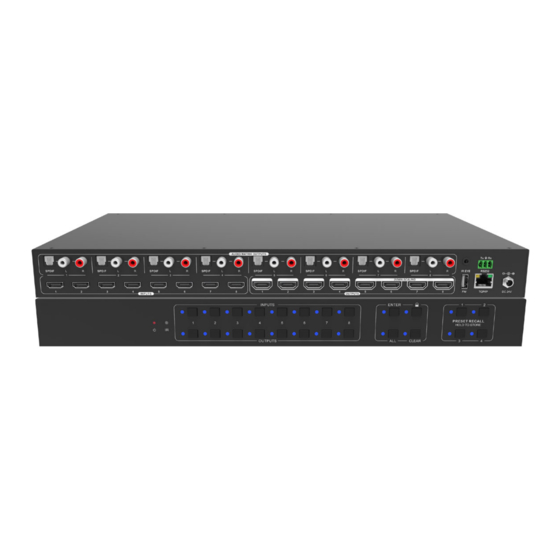
- Page 4 Product Layout Figure 1: Front Panel Layout Power LED: Green when the Matrix is powered on. Red when the Matrix is in standby mode IR Sensor: Receives IR signals from the included remote control Select Buttons (x16): Input Select Button (x8): Each button includes 1 LED, one for each source input Output Select Button (x8): Each button includes 1 LED, one for each display output...
- Page 5 Figure 2: Rear Panel Layout HDMI In (1-8): Connects to your HDMI sources HDMI Out (1-8): Connects to your HDMI displays. HDMI Out 5-8 supports auto downscaling feature Audio Matrix Outputs: SPDIF (x8): Digital audio outputs for de-embedded HDMI audio, 8 in total RCA/ L+R (x8): Analog audio outputs for de- embedded HDMI audio, 8 pairs in total IR Input: Connects to the included IR Receiver...
- Page 6 Hardware Installation Power off all devices including your HDMI sources and HDMI displays. Connect your HDMI source devices to the HDMI IN (1-8) connectors with HDMI cables (HDMI cables not included). Connect your HDMI displays to the HDMI OUT (1- 8) connectors with HDMI cables (HDMI cables not included).
-
Page 7: Connection Diagram
Connection Diagram Figure 3: Connection Diagram... - Page 8 Device Control Front Panel Control Buttons Input Select/ Output Select The front panel features eight input and eight output selection buttons for switching sources and displays. Please see the device switching examples below. To configure 1 input to 1 output Example: Source device on Input 1 to display on Output 3 - Press Inputs 1 + Outputs 3 + Enter button...
- Page 9 Memory Save/ Memory Recall Stores the Matrix' current status into memory. Allows for one button access to your favorite source to display setup. Memory Save: Press and hold button 1-4 to save the current configuration into memory. Memory Recall. Press button 1-4 to recall the configuration saved to memory.
- Page 10 IR Remote Control • Press the Standby (1) button to enter or exit Standby mode • To switch an input to one or more outputs, first press the number corresponding to the desired INPUTS (2), then press one or more OUTPUTS (3) or the ALL (4) button, then press the Enter (4) button to execute the...
- Page 11 Examples Send the source device on HDMI In 3 to the display on HDMI Out 2 INPUTS: Press button 3 OUTPUTS: Press button 2 Press Enter to execute the change Send the source device on HDMI In 1 to the displays on HDMI Out 1 &...
- Page 12 TCP/IP Control The Matrix Pro can be controlled by web GUI via TCP/IP port. The Matrix Pro's default IP settings are: IP address: 192.168.0.178 Subnet mask: 255.255.255.0 Change the IP address of your PC Configure your PC as follows: 1. Click Start / Control Panel / Network and Sharing Center.
- Page 13 Click Properties. Select Use the following IP Address, and then enter the IP address. Note: You can use any IP address in the range: 192.168.0.2 to 192.168.0.254 (excluding 192.168.0.168). Click OK to save the changes. Click Close to exit.
- Page 14 Web GUI Control Connect your PC to the Matrix Pro's RJ45 port. Open the GUI by typing in 192.168.0.178 into your browser and the login interface, as shown below, will open. Username: admin Password: admin Type in the user name and password and click Login to enter the GUI.
- Page 15 Switching Tab...
- Page 16 Audio Tab Audio Setting •SPDIF & Analog audio outputs can be chosen from 16 sources...
- Page 17 Audio Volume Configuration Tab EDID Copy...
- Page 18 EDID Setting...
- Page 19 CEC Tab CEC enabled source devices and display devices can be controlled using this interface. Input Device Control Output Device Control...
- Page 20 RS232 Tab Interface Tab...
- Page 21 Network Tab Access Tab...
- Page 22 RS232 Control Connect the control PC's RS232 serial port to the Matrix Pro's RS232 port using the included RS232 cable. RS232 Control Software The 8x8 Matrix Pro can be controlled from a Windows PC using an RS232 connection with a 3rd party RS232 control software such as CommWatch shown below.
- Page 23 Control Software Interface Set the COM port, Baud rate, data bit, stop bit, and parity. Enter command into the Command Sending Area.
- Page 24 RS232 Commands • Default settings: Baud rate: 9600, Data bit: 8, Stop bit: 1, Parity bit: none • Commands are case sensitive • Command inside "[ ]" are for easy recognition only and not added to the real command. Other symbols including, ".", ",", "/", "%", "^", are parts of the command •...
- Page 25 Control Management...
- Page 26 Query Commands...
- Page 27 Query Commands Continued...
- Page 28 Lock/Unlock Commands Audio Commands...
- Page 29 HDCP Compliance...
- Page 30 EDID Management...
- Page 31 EDID Management Continued...
- Page 32 CEC Control Compatible with CEC supported source devices and display devices through HDMI connection. Source Device Commands...
- Page 33 Display Device Commands Video Resolution Downscaling The Matrix Pro supports resolution downscaling, various 4K inputs can be dowscaled to 1080p to support 1080p monitors, as shown in the table below. Note: Only the last 4 HDMI Outputs (5,6,7,8) support video resolution downscaling.
-
Page 34: Specifications
Specifications... - Page 35 Disclaimer The product name and brand name may be registered trademarks of related manufacturers. TM and ® may be omitted on the user's guide. The pictures on the user's guide are just for reference, and there may be some slight differences with the acutal products.
- Page 36 Thank you for choosing gofanco www.gofanco.com...
Need help?
Do you have a question about the Matrix88HD20-Pro and is the answer not in the manual?
Questions and answers