Otto Bock 24H1 MyCRO Band Instructions For Use Manual
Hide thumbs
Also See for 24H1 MyCRO Band:
- Instructions for use manual (40 pages) ,
- Instructions for use manual (21 pages) ,
- Instructions for use manual (25 pages)
Advertisement
Available languages
Available languages
Quick Links
24H1 MyCRO Band
Gebrauchsanweisung (Fachpersonal) ..............................................................................
Instructions for use (qualified personnel) ...........................................................................
Instructions d'utilisation (Personnel spécialisé) ..................................................................
Gebruiksaanwijzing (Vakmensen) .....................................................................................
Návod k použití (Odborný personál) .................................................................................
2
11
20
29
38
Advertisement

Subscribe to Our Youtube Channel
Related Manuals for Otto Bock 24H1 MyCRO Band


Summary of Contents for Otto Bock 24H1 MyCRO Band
-
Page 1: Table Of Contents
24H1 MyCRO Band Gebrauchsanweisung (Fachpersonal) ................Instructions for use (qualified personnel) ................Instructions d'utilisation (Personnel spécialisé) ..............Gebruiksaanwijzing (Vakmensen) ..................Návod k použití (Odborný personál) ................. - Page 2 Deutsch 1 Vorwort INFORMATION Datum der letzten Aktualisierung: 2022-02-25 Lesen Sie dieses Dokument vor Gebrauch des Produkts aufmerksam durch und beachten ► Sie die Sicherheitshinweise. Weisen Sie den Benutzer in den sicheren Gebrauch des Produkts ein. ► Wenden Sie sich an den Hersteller, wenn Sie Fragen zum Produkt haben oder Probleme ►...
- Page 3 3.3 Kontraindikationen Nicht zur Verwendung an Kindern mit präoperativer Kraniosynostose oder Hydrocephalus. 4 Sicherheit 4.1 Allgemeine Sicherheitshinweise WARNUNG! Gefahr von schweren Verletzungen ► Das Produkt darf nur von der Person verwendet werden, für die es angefertigt wurde. ► Beachten Sie die Hinweise zur bestimmungsgemäßen Verwendung und zum Gebrauch des Produkts.
-
Page 4: Gebrauchsanweisung (Fachpersonal)
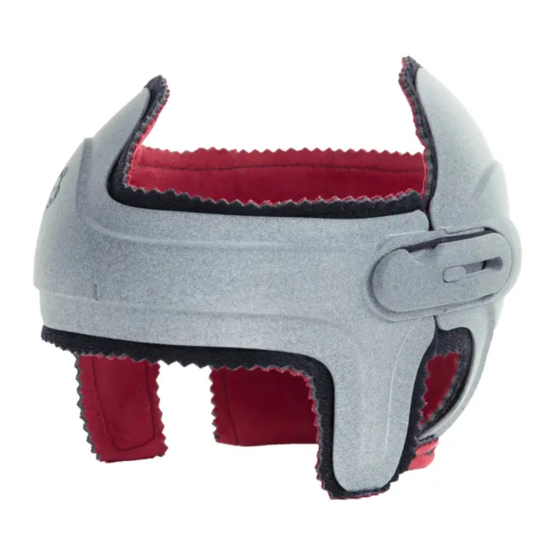
5 Lieferumfang Menge Benennung Kennzeichen – Gebrauchsanweisung (Fachpersonal) – Gebrauchsanweisung (Benutzer) – MyCRO Band mit Polster – Polster zum Wechseln (weitere Polster sind möglich, wenn sie bestellt wurden) Elastische Ersatzverschlussbänder 24Z2 6 Bearbeiten Die Orthese ist aus Polyamid PA12 hergestellt. Schleifgeräte und Wärme können für kleine An passungen an der Orthese verwendet werden. - Page 5 Schleifen • Empfohlene Werkzeuge: Schleifmaschine (Schleifgeschwindigkeit maximal 1500 rpm, andernfalls könnte das Material überhitzen und schmelzen.) Schleifkegel Feines Sandpapier 1) Die Kanten nach der Bearbeitung mit feinem Sandpapier glätten. 2) Die Kanten der Orthese von der Innenseite zur Außenseite glätten. 3) Vor der Abgabe der Orthese sicherstellen, dass keine scharfen Kanten vorhanden sind. 7 Handhabung Die Orthese wird zur Eingewöhnung in den ersten Tagen über einen verkürzten Zeitraum getra...
- Page 6 → Das Kind befindet sich in einer stabilen Position, ohne störende Objekte oder Gegenstän de in der Nähe des Kopfes. → Möglicherweise verwendete Lotionen oder Cremes sind in die Haut eingezogen. → Die Orthese ist in einwandfreiem Zustand und weist keine Risse oder sonstige Schäden auf.
- Page 7 4) Die Orthese ausrichten und auf den Kopf des Kindes setzen (siehe Abb. 3). 5) Den Sitz der Orthese überprüfen: → Die Pfeilspitze auf der Vorderseite bil det eine senkrechte Linie mit der Mitte der Nase. → Die Ohren sitzen frei in den Ausschnit ten in der Orthese.
- Page 8 7.3 Polster wechseln Das Polster ist mit Klettverschlüssen mit der Orthese verbunden. Es muss faltenfrei in der Orthe se sitzen und auf der gesamten Fläche mit der Orthese Kontakt haben. Polster entfernen 1) Das umgeschlagene Polster im Nackenbereich lösen. 2) Das Polster vom Verschluss her umlaufend von der Orthese lösen. Polster einsetzen 1) Das Polster zu einer festen Rolle zusam...
- Page 9 4) Das Polster im Nackenbereich nach außen umschlagen andrücken (siehe Abb. 7). 7.4 Verschlussband wechseln INFORMATION Die Elastizität des Gummibands, das den mitwachsenden Verschluss zusammenhält, lässt mit der Zeit nach. Tauschen Sie das Gummiband bei jedem Kontrolltermin aus. Voraussetzung: Die Orthese ist abgelegt. >...
- Page 10 5) Ein neues Gummiband in die Führung des Verschlusses einlegen und die Lasche auf die Klebestelle drücken. 6) Den Klebstoff aushärten lassen. 7) Überprüfen, ob das neue Gummiband kor rekt verklebt ist und richtig in der Führung des Verschlusses sitzt. 8 Reinigung HINWEIS Falsche Reinigung...
- Page 11 English 1 Foreword INFORMATION Date of last update: 2022-02-25 Please read this document carefully before using the product and observe the safety ► notices. Instruct the user in the safe use of the product. ► Please contact the manufacturer if you have questions about the product or in case of prob ►...
- Page 12 4 Safety 4.1 General safety instructions WARNING! Risk of severe injuries ► The product may be used only by the person it was made for. ► Observe the notices regarding intended use and the use of the product. ► Check the product for damage prior to each application. ►...
-
Page 13: Instructions For Use (Qualified Personnel)
5 Scope of delivery Quantity Designation Reference number – Instructions for use (qualified personnel) – Instructions for use (user) – MyCRO Band with padding – Spare padding (additional padding if ordered) 24Z2 Spare elastic fastening straps 6 Modification The orthosis is made from polyamide PA12. Grinders and heat may be used to make small adjust ments to the orthosis. - Page 14 Grinding • Recommended tools: Sander (The grinding speed should not exceed 1500 rpm, or the material may overheat and melt.) Abrasive sanding cone Fine grit sandpaper 1) Once complete, use fine grit sandpaper to smooth the edges. 2) Sand the edge of the orthosis, moving from the inside to the outside of the orthosis. 3) Make sure there are no sharp edges before dispensing the orthosis.
- Page 15 → The child is in a stable position with no interfering objects or items near the head. → Any lotions or creams used have been absorbed by the skin. → The orthosis is in proper condition with no cracks or other damage. →...
- Page 16 4) Align the orthosis and place it onto the child's head (see fig. 3). 5) Check the fit of the orthosis: → The arrowhead on the front should form a vertical line with the middle of the nose. → The ears should fit uncovered in the openings in the orthosis.
- Page 17 7.3 Changing the lining The lining is attached to the orthosis with micro-hook. It has to fit inside the orthosis without wrinkles and must be in contact with the orthosis over the entire surface area. Removing the lining 1) Detach the folded lining in the neck area. 2) Starting at the closure, detach the lining all around the orthosis.
- Page 18 4) In the neck area, fold over the lining to the outside and press it into place (see fig. 7). 7.4 Replacing the fastening strap INFORMATION The elasticity of the elastic band holding together the closure, which grows with the child, decreases over time.
- Page 19 5) Insert a new elastic band into the guide of the closure and press the flap onto the adhesive surface. 6) Allow the adhesive to cure fully. 7) Make sure the new elastic band is glued correctly and fits properly in the guide of the closure.
- Page 20 Français 1 Avant-propos INFORMATION Date de la dernière mise à jour : 2022-02-25 Veuillez lire attentivement l’intégralité de ce document avant d’utiliser le produit ainsi que ► respecter les consignes de sécurité. Apprenez à l’utilisateur comment utiliser son produit en toute sécurité. ►...
- Page 21 3.3 Contre-indications Non destinée à une utilisation sur des bébés présentant une craniosynostose préopératoire ou une hydrocéphalie. 4 Sécurité 4.1 Consignes générales de sécurité AVERTISSEMENT ! Risque de blessures graves ► Le produit ne doit être utilisé que par la personne pour laquelle il a été confectionné. ►...
-
Page 22: Instructions D'utilisation (Personnel Spécialisé)
5 Contenu de la livraison Quantité Désignation Référence – Notice d’utilisation (personnel spécialisé) – Notice d’utilisation (utilisateur) – MyCRO Band avec rembourrage – Rembourrage de rechange (d’autres rembourrages sont disponibles sur commande) Bandes de fermeture élastique de rechange 24Z2 6 Usinage L’orthèse est fabriquée en polyamide PA12. - Page 23 Ponçage • Outils recommandés : Ponceuse (vitesse de ponçage : max. 1500 t/min, le matériau peut dans le cas contraire pré senter une surchauffe et fondre.) Cône abrasif Papier de verre fin 1) Lisser les bords à l’aide d’un papier de verre fin suite à l’usinage. 2) Lisser les arêtes de l’orthèse de l’intérieur vers l’extérieur.
- Page 24 Cesser d’utiliser le produit en cas de problèmes d’adaptation de la forme. ► 1) Prière de vérifier les points suivants avant la pose de l’orthèse : → L’enfant se trouve dans une position stable sans objet perturbateur ou à proximité de la tête.
- Page 25 4) Ajuster l’orthèse et la poser sur la tête de l’enfant (voir ill. 3). 5) Vérifier le positionnement de l’orthèse : → La pointe de la flèche sur la face avant forme une ligne perpendiculaire par rapport au milieu du nez. → Les oreilles sont placées dans les en coches de l’orthèse et ne sont pas re...
- Page 26 7.3 Changement du rembourrage Le rembourrage est fixé à l’orthèse au moyen de fermetures Velcro. Il doit être positionné sans pli dans l’orthèse et doit être en contact avec toute la surface de l’orthèse. Retrait du rembourrage 1) Retirer le rembourrage retourné au niveau de la nuque. 2) Retirer le rembourrage de l’orthèse en faisant le tour à...
- Page 27 4) Rabattre le rembourrage vers l’extérieur au niveau de la nuque et le comprimer (voir ill. 7). 7.4 Remplacement de la bande de fermeture INFORMATION L’élasticité de la bande élastique qui assure la cohésion de la fermeture évolutive décroît au fil du temps.
- Page 28 5) Insérer une nouvelle bande élastique dans la rainure de la fermeture et appuyer la lan guette sur la zone de collage. 6) Laisser durcir la colle. 7) S’assurer que la nouvelle bande élastique est correctement collée et qu’elle est bien positionnée dans la rainure de la ferme...
- Page 29 Nederlands 1 Voorwoord INFORMATIE Datum van de laatste update: 2022-02-25 Lees dit document aandachtig door voordat u het product in gebruik neemt en neem de vei ► ligheidsinstructies in acht. Leer de gebruiker hoe hij veilig met het product moet omgaan. ►...
- Page 30 3.3 Contra-indicaties Niet te gebruiken bij kinderen met een pre-operatieve craniosynostose of hydrocefalus. 4 Veiligheid 4.1 Algemene veiligheidsvoorschriften WAARSCHUWING! Gevaar voor zware verwondingen ► Het product mag alleen worden gebruikt bij de persoon waarvoor het op maat is gemaakt. ► Neem de aanwijzingen omtrent het gebruik van het product in overeenstemming met waar het voor bestemd is in acht.
-
Page 31: Gebruiksaanwijzing (Vakmensen)
5 Inhoud van de levering Aantal Omschrijving Referentienummer – Gebruiksaanwijzing (deskundig personeel) – Gebruiksaanwijzing (gebruiker) – MyCRO Band met voering – Voering om te wisselen (meer voeringen kunnen wor den besteld) Vervangende elastische sluitbanden 24Z2 6 Bewerken De orthese is gemaakt van Polyamide PA12. Schuurmachines en warmte kunnen worden gebruikt voor kleinere aanpassingen aan de orthese. - Page 32 Slijpen • Aanbevolen gereedschap: Schuurmachine (schuursnelheid maximaal 1500 rpm, anders kan het materiaal oververhit raken en smelten.) Schuurkegel Fijn schuurpapier 1) Maak de randen na het bewerken met fijn schuurpapier glad. 2) Maak de randen glad van binnen naar buiten. 3) Zorg er voor het overhandigen van de orthese voor dat er geen scherpe randen aan zitten. 7 Gebruik De orthese wordt als gewenning de eerste dagen korte tijd gedragen (zie navolgende tabel).
- Page 33 → Het kind bevindt zich in een stabiele positie, zonder storende objecten of voorwerpen in de buurt van het hoofd. → Eventueel gebruikte lotions of crèmes zijn in de huid getrokken. → De orthese vertoont geen problemen en heeft geen scheuren of andere schade. →...
- Page 34 4) Positioneer de orthese en plaats hem op het hoofd van het kind (zie afb. 3). 5) Controleer of de orthese goed zit: → De pijlpunt aan de voorkant vormt een loodrechte lijn met het midden van de neus. → De oren bevinden zich comfortabel in de uitsparingen van de orthese.
- Page 35 7.3 Voering verwisselen De voering is met klittenbandsluitingen aan de orthese vastgemaakt. Deze moet zonder plooien in de orthese zitten en over het gehele oppervlak contact maken met de orthese. Voering verwijderen 1) Maak de omgeslagen voering bij de nek los. 2) Maak de voering beginnend bij de sluiting rondom los.
- Page 36 4) Sla de voering bij de nek naar buiten om en druk hem aan (zie afb. 7). 7.4 Sluitingsband verwisselen INFORMATIE De elasticiteit van de rubberen ring die de meegroeiende sluiting bijeen houdt wordt in de loop van de tijd minder. Vervang bij elke controle deze rubberen ring. Voorwaarde: De orthese is afgedaan.
- Page 37 5) Plaats een nieuwe rubberen ring in de uit sparing van de sluiting en druk de lip op de plek die gelijmd wordt. 6) Laat de lijm uitharden. 7) Controleer of de rubberen ring correct ver lijmd is en correct in de uitsparing van de sluiting zit.
- Page 38 Česky 1 Předmluva INFORMACE Datum poslední aktualizace: 2022-02-25 Před použitím produktu si pozorně přečtěte tento dokument a dodržujte bezpečnostní poky ► Poučte uživatele o bezpečném použití produktu. ► Budete-li mít nějaké dotazy ohledně produktu, nebo se vyskytnou nějaké problémy, obraťte ►...
- Page 39 4 Bezpečnost 4.1 Všeobecné bezpečnostní pokyny VAROVÁNÍ! Nebezpečí těžkého úrazu ► Produkt smí používat pouze osoba, pro kterou byl vyroben. ► Dodržujte upozornění ohledně zamýšleného použití a používání produktu. ► Před každým použitím zkontrolujte, zda není produkt poškozený. ► Informujte pečující osobu, že produkt nesmí být používán jako ochranná přilba (např. pro jízdu na kole).
-
Page 40: Návod K Použití (Odborný Personál)
5 Rozsah dodávky Množství Název Označení – Návod k použití (odborný personál) – Návod k použití (uživatel) – MyCRO Band Kraniální helma s polstrováním – Polstrování na výměnu (může být dodáno další polstro vání, pokud bylo objednáno) Náhradní elastické zapínací pásky 24Z2 6 Zpracování... - Page 41 Broušení • Doporučené nástroje: Bruska (rychlost broušení maximálně 1500 ot./min., jinak by se materiál mohl přehřát a začít se tavit) Brusný kužel Jemný brusný papír 1) Hrany po zpracování vyhlaďte jemným brusným papírem. 2) Hrany ortézy vyhlazujte směrem od vnitřní k vnější straně. 3) Před předáním ortézy zajistěte, aby na ortéze nebyly žádné ostré hrany. 7 Manipulace Během prvních dnů...
- Page 42 → Ortéza je v bezvadném stavu a nevykazuje žádné trhliny ani jiná poškození. → Polstrování je v ortéze bez vrásek a všude trochu přečnívá přes tvrdý okraj. 2) Rozepněte gumový pásek uzávěru (viz obr. 1). 3) Ortézu v místě uzávěru opatrně rozevřete a otočte (viz obr. 2).
- Page 43 4) Vyrovnejte ortézu a nasaďte ji dítěti na hla vu (viz obr. 3). 5) Zkontrolujte, zda ortéza dobře sedí: → Šipka na přední straně leží na svislé ose vedoucí středem nosu. → Uši sedí volně ve výřezech v ortéze. → Ortéza nezakrývá dítěti oči. →...
- Page 44 7.3 Výměna polstrování Polstrování je připojené k ortéze na suché zipy. Musí v ortéze sedět, aniž by se tvořily sklady, a být s ortézou v kontaktu po celé ploše. Sejmutí polstrování 1) Uvolněte polstrování složené v oblasti šíje. 2) Odepněte polstrování vedoucí po celém obvodu ortézy od uzávěru. Nasazení...
- Page 45 4) V oblasti šíje ohrňte polstrování ven a při máčkněte ho (viz obr. 7). 7.4 Výměna zapínacího pásku INFORMACE Elasticita gumového pásku sloužícího k zajištění uzávěru adaptabilního podle růstu dítěte po ně jaké době používání ochabne. Při každém kontrolním termínu proveďte výměnu gumového pás Předpoklad: Ortéza je sejmutá.
- Page 46 5) Vložte do vedení uzávěru nový gumový pá sek a přitlačte jazýček na místo lepení. 6) Nechte lepidlo vytvrdit. 7) Zkontrolujte, zda je nový gumový pásek správně přilepený a zda správně sedí ve vedení uzávěru. 8 Čištění UPOZORNĚNÍ Nesprávný způsob čištění Poškození produktu v důsledku nesprávného čištění K čištění...
Need help?
Do you have a question about the 24H1 MyCRO Band and is the answer not in the manual?
Questions and answers