Otto Bock 24H1 MyCRO Band Instructions For Use Manual
Hide thumbs
Also See for 24H1 MyCRO Band:
- Instructions for use manual (48 pages) ,
- Instructions for use manual (40 pages) ,
- Instructions for use manual (21 pages)

Subscribe to Our Youtube Channel
Related Manuals for Otto Bock 24H1 MyCRO Band


Summary of Contents for Otto Bock 24H1 MyCRO Band
- Page 1 24H1 MyCRO Band (For prescription use only) Instructions for use (qualified personnel) ................
-
Page 2: Product Description
English 1 Foreword INFORMATION Date of last update: 2022-08-11 Please read this document carefully before using the product and observe the safety ► notices. Instruct the user in the safe use of the product. ► Please contact the manufacturer if you have questions about the product or in case of prob ►... -
Page 3: Indications For Use And Contraindications
3 Indications for use and Contraindications 3.1 Indications for use Intended for medical purposes for use on children from 3 to 18 months of age, with moderate-to- severe non-synostotic positional plagiocephaly, including children with plagiocephalic, brachy cephalic, and scaphocephalic shaped heads by applying mild pressure to prominent regions of a child’s cranium in order to improve cranial symmetry and/or shape. -
Page 4: Scope Of Delivery
Risk of product damage and limited functionality ► During normal use, the product should not be exposed to temperatures lower than -10 °C (14 °F) and higher than +45 °C (113 °F). ► Clean the product if it was in contact with salt water or water containing chlorine. ►... - Page 5 → The surface temperature of the plastic should be heated to between 70 °C (158 °F) and 95 °C (203 °F). This process should take approximately 5 to 8 minutes. 2) Reshape the malleable material on the anvil. If necessary, a hammer can be used to apply pressure.
- Page 6 INFORMATION Remove the shipping latch (placed inside of the clasp) prior to fitting the orthosis. 1) Check the following points before putting on the orthosis: → The child is in a stable position with no interfering objects or items near the head. →...
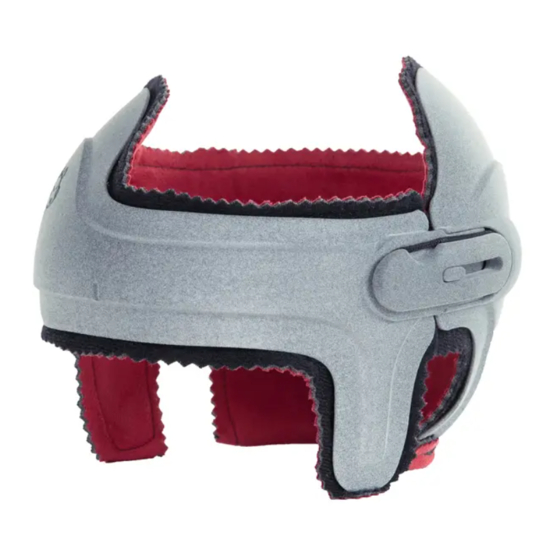
- Page 7 4) Align the orthosis and place it onto the child’s head (see fig. 3). 5) Check the fit of the orthosis: → The arrowhead on the front should form a vertical line with the middle of the nose. → The ears should sit freely in the open ings in the orthosis.
- Page 8 Inserting the lining 1) Roll up the lining into a tight roll (see fig. 4). 2) WARNING! Ensure that the lining is smooth and securely fastened to the microhooks, to avoid pressure points due to bunching of the lining. Position the lining at the closure of the orthosis.
- Page 9 4) In the neck area, fold over the lining to the outside and press it into place (see fig. 6). 7.4 Replacing the elastic band INFORMATION The elastic band that holds the closure is intended to last the lifetime of the orthosis. If the elast ic band needs to be replaced during treatment, use the following instructions.
- Page 10 4) Outside the orthosis: Push a new elastic band through the opening. 5) Inside the orthosis: Push the new elastic band in place around the pin. 6) Outside the orthosis: Pull on the elastic band to test if it is secured properly. 7) Re-attach the lining (see page 7).
-
Page 11: Legal Information
8 Cleaning NOTICE Improper cleaning Damage to the product due to improper cleaning Only clean the product with the approved cleaning agents. ► Only clean the product by hand. ► INFORMATION Remove the lining from the orthosis before cleaning. Clean the lining and the shell of the orthos is separately. - Page 12 Otto Bock HealthCare LP 3820 West Great Lakes Drive Salt Lake City, UT 84120 · USA T +1 800 328 4058 · F +1 800 655 4963...
Need help?
Do you have a question about the 24H1 MyCRO Band and is the answer not in the manual?
Questions and answers