Otto Bock 24H1 MyCRO Band Instructions For Use Manual
Hide thumbs
Also See for 24H1 MyCRO Band:
- Instructions for use manual (48 pages) ,
- Instructions for use manual (20 pages) ,
- Instructions for use manual (21 pages)
Advertisement
Available languages
Available languages
Quick Links
24H1 MyCRO Band
Gebrauchsanweisung (Benutzer) .....................................................................................
Instructions for use (user) ...............................................................................................
Instructions d'utilisation (Utilisateur) .................................................................................
Gebruiksaanwijzing (Gebruiker) .......................................................................................
Návod k použití (Uživatel) ................................................................................................
2
9
16
24
31
Advertisement

Subscribe to Our Youtube Channel
Related Manuals for Otto Bock 24H1 MyCRO Band


Summary of Contents for Otto Bock 24H1 MyCRO Band
- Page 1 24H1 MyCRO Band Gebrauchsanweisung (Benutzer) ..................Instructions for use (user) ....................Instructions d'utilisation (Utilisateur) ................. Gebruiksaanwijzing (Gebruiker) ..................Návod k použití (Uživatel) ....................
- Page 2 Deutsch 1 Produktbeschreibung INFORMATION Datum der letzten Aktualisierung: 2022-02-25 Lesen Sie dieses Dokument vor Gebrauch des Produkts aufmerksam durch und beachten ► Sie die Sicherheitshinweise. Lassen Sie sich durch das Fachpersonal in den sicheren Gebrauch des Produkts einwei ► sen. Wenden Sie sich an das Fachpersonal, wenn Sie Fragen zum Produkt haben oder Proble...
- Page 3 ► Überprüfen Sie die strukturelle Unversehrtheit und die Passform der Orthese, um die Mög lichkeit eines Verrutschens zu reduzieren. Eine verrutschte Orthese könnte Erstickung oder Verletzungen der Haut oder Augen des Kindes zur Folge haben. ► Verwenden Sie ein beschädigtes Produkt nicht weiter und kontaktieren Sie Ihren Orthopädie techniker.
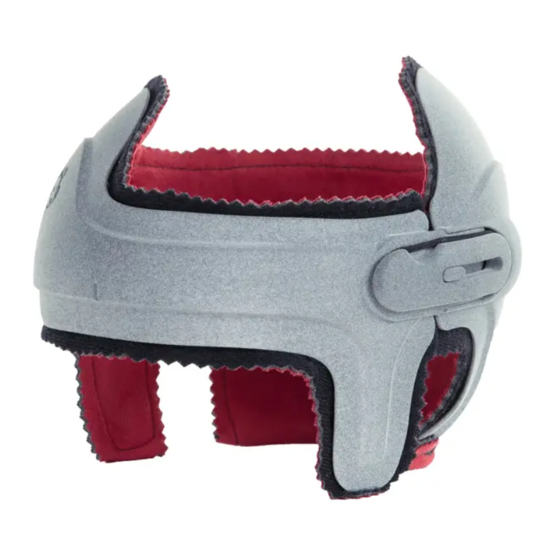
- Page 4 Menge Benennung Kennzeichen – Gebrauchsanweisung (Benutzer) – MyCRO Band mit Polster – Polster zum Wechseln (weitere Polster sind möglich, wenn sie bestellt wurden) Elastische Ersatzverschlussbänder 24Z2 5 Handhabung WARNUNG Nichteinhaltung der Kontrollintervalle Verletzungsgefahr durch falsche Verwendung des Produkts Halten Sie die mit Ihrem Orthopädietechniker festgelegten Kontrollintervalle ein, um den si ►...
- Page 5 WARNUNG Tragen der Orthese bei Fieber Verletzungsgefahr durch Überhitzung ► Unterbrechen Sie das Tragen der Orthese bei Fieber. WARNUNG Falsches oder zu festes Anliegen des Produkts am Körper Druckerscheinungen und Einengungen an Blutgefäßen und Nerven durch falsches Anlegen Stellen Sie das korrekte Anlegen und den korrekten Sitz des Produkts sicher. ►...
- Page 6 3) Die Orthese am Verschluss vorsichtig aus einanderziehen (siehe Abb. 2). 4) Die Orthese ausrichten und auf den Kopf des Babys setzen (siehe Abb. 3). 5) Den Sitz der Orthese überprüfen: → Die Pfeilspitze auf der Vorderseite bil det eine senkrechte Linie mit der Mitte der Nase.
- Page 7 5.2 Ablegen INFORMATION Hautrötung nach dem Ablegen der Orthese ist nicht ungewöhnlich. Die Rötung sollte nach spä testens 2 Stunden verschwunden sein. Wenn die Rötung bestehen bleibt oder sich Druckstellen bilden, kontaktieren Sie Ihren Orthopädietechniker. Voraussetzung: Das Kind befindet sich in einer stabilen Position, ohne störende Objekte >...
- Page 8 2) Das Polster am Verschluss der Orthese ansetzen. Dabei die Rolle vorsichtig abrol len und das Polster faltenfrei in die Orthe se eindrücken (siehe Abb. 6). 3) Sicherstellen, dass das Polster überall ein kleines Stück über den harten Rand steht. 4) Das Polster im Nackenbereich nach außen umschlagen andrücken (siehe...
- Page 9 3) Das Produkt mit einem weichen Tuch abtrocknen. 4) Die Restfeuchtigkeit an der Luft trocknen lassen. 7 Entsorgung Das Produkt zur Entsorgung an den Orthopädietechniker zurückgeben. 8 Rechtliche Hinweise Alle rechtlichen Bedingungen unterliegen dem jeweiligen Landesrecht des Verwenderlandes und können dementsprechend variieren. 8.1 Haftung Der Hersteller haftet, wenn das Produkt gemäß...
- Page 10 3 Safety 3.1 General safety instructions WARNING! Risk of severe injuries ► The product may be used only by the person it was made for. ► Observe the notices regarding intended use and the use of the product. ► Do not use the product as a protective helmet (e.g. for cycling). The product has no protective effect.
- Page 11 4 Scope of delivery Quantity Designation Reference number – Instructions for use (user) – MyCRO Band with lining – Spare lining (additional lining if ordered) 24Z2 Spare elastic closure band 5 Handling WARNING Failure to comply with the examination intervals Risk of injury due to improper use of the product Comply with the examination intervals established with your O&P professional in order to ►...
- Page 12 Day of use Daily duration of use 2 hours 4 hours 6 hours (including naps) 8 hours (including naps) Day and night (at least 23 hours) 5.1 Application WARNING Fastening strap not glued to the orthosis Danger of suffocation or swallowing if the fastening strap gets into the mouth Do not use the orthosis, and contact your O&P professional to have the fastening strap ►...
- Page 13 3) Carefully pull the orthosis apart at the clos ure (see fig. 2). 4) Align the orthosis and place it onto the baby’s head (see fig. 3). 5) Check the fit of the orthosis: → The arrowhead on the front should form a vertical line with the middle of the nose.
- Page 14 5.2 Removal INFORMATION Redness of the skin after removing the orthosis is not unusual, and should go away within 2 hours. If the redness does not go away, or if pressure points develop, contact your O&P profes sional. Prerequisite: The child is in a stable position with no interfering objects or items near the >...
- Page 15 2) Position the lining at the closure of the orthosis. Carefully unroll the lining, press ing it into the orthosis without wrinkles (see fig. 6). 3) Ensure that the lining projects slightly bey ond the hard edge all around. 4) In the neck area, fold over the lining to the outside and press it into place (see fig. 7).
- Page 16 3) Dry the product with a soft cloth. 4) Allow to air dry fully before donning. 7 Disposal Return the product to the O&P professional for disposal. 8 Legal information All legal conditions are subject to the respective national laws of the country of use and may vary accordingly.
- Page 17 2.3 Contre-indications Non destinée à une utilisation sur des bébés présentant une craniosynostose préopératoire ou une hydrocéphalie. 3 Sécurité 3.1 Consignes générales de sécurité AVERTISSEMENT ! Risque de blessures graves ► Le produit ne doit être utilisé que par la personne pour laquelle il a été confectionné. ►...
- Page 18 4 Contenu de la livraison Quantité Désignation Référence – Notice d’utilisation (personnel spécialisé) – Notice d’utilisation (utilisateur) – MyCRO Band avec rembourrage – Rembourrage de rechange (d’autres rembourrages sont disponibles sur commande) Bande de fermeture élastique de rechange 24Z2 5 Manipulation AVERTISSEMENT Non-respect des intervalles de contrôle Risque de blessures occasionnées par une utilisation incorrecte du produit...
- Page 19 INFORMATION : prendre le plus rapidement possible un rendez-vous avec un orthopro thésiste en cas de problème. Prière de ne pas attendre le prochain rendez-vous régulier. Il est important que le produit soit porté. Jour de port Durée de port quotidienne 2 heures 4 heures 6 heures (y compris le temps de sommeil)
- Page 20 2) Ouvrir l’élastique de la fermeture (voir ill. 1). 3) Étirer l’orthèse avec précaution au niveau de la fermeture (voir ill. 2). 4) Ajuster l’orthèse et la poser sur la tête du bébé (voir ill. 3). 5) Vérifier le positionnement de l’orthèse : → La pointe de la flèche sur la face avant forme une ligne perpendiculaire par rapport au milieu du nez.
- Page 21 6) Lorsque l’orthèse est correctement po sitionnée : tenir l’orthèse avec précaution afin qu’elle ne puisse bouger et verrouiller la fermeture. La présence d’une fente dans la fermeture est normale et ne doit pas in quiéter. 7) Tirer la languette de la bande élastique vers le haut et s’assurer qu’elle est correc...
- Page 22 Pose du rembourrage 1) Enrouler le rembourrage pour en faire un rouleau rigide (voir ill. 5). 2) Poser le rembourrage au niveau de la fer meture de l’orthèse. Dérouler le rouleau avec prudence et enfoncer le rembourrage dans l’orthèse sans former de pli (voir ill. 6).
- Page 23 4) Rabattre le rembourrage vers l’extérieur au niveau de la nuque et le comprimer (voir ill. 7). 6 Nettoyage AVIS Nettoyage inadapté Dégradation du produit occasionnée par un nettoyage inadapté Nettoyer le produit uniquement avec les détergents autorisés. ► Ne nettoyer le produit qu’à la main. ►...
- Page 24 Nederlands 1 Productbeschrijving INFORMATIE Datum van de laatste update: 2022-02-25 Lees dit document aandachtig door voordat u het product in gebruik neemt en neem de vei ► ligheidsinstructies in acht. Laat u door een vakspecialist uitleggen hoe u veilig met het product moet omgaan. ►...
- Page 25 ► Gebruik een beschadigd product niet en neem contact op met uw orthopedisch instrument maker. ► De rekbare sluiting is gemaakt om zich aan te passen aan de groei van de baby. Neem con tact op met uw orthopedisch instrumentmaker voor een controleafspraak wanneer de sluiting tijdens de behandeling de maximale rek bereikt.
- Page 26 5 Gebruik WAARSCHUWING Niet aanhouden van de controle-intervallen Gevaar voor verwonding door een verkeerd gebruik van het product Houd u aan de door de orthopedisch instrumentmaker vastgelegde controle-intervallen, om ► gegarandeerd te zijn van een veilige werking van het product. INFORMATIE Het dragen van de orthese in een autokinderzitje is toegestaan.
- Page 27 1) Controleer voor het aandoen van de orthese de volgende punten: → De baby bevindt zich in een stabiele positie, zonder storende objecten of voorwerpen in de buurt van het hoofd. → Eventueel gebruikte lotions of crèmes zijn in de huid getrokken. →...
- Page 28 4) Positioneer de orthese en plaats hem op het hoofd van de baby (zie afb. 3). 5) Controleer of de orthese goed zit: → De pijlpunt aan de voorkant vormt een loodrechte lijn met het midden van de neus. → De orthese laat de oren en ogen vrij. →...
- Page 29 5.3 Voering verwisselen De voering is met klittenbandsluitingen aan de orthese vastgemaakt. Deze moet zonder plooien in de orthese zitten en over het gehele oppervlak contact maken met de orthese. Voering verwijderen 1) Maak de omgeslagen voering bij de nek los. 2) Maak de voering beginnend bij de sluiting rondom los.
- Page 30 4) Sla de voering bij de nek naar buiten om en druk hem aan (zie afb. 7). 6 Reiniging LET OP Verkeerde reiniging Beschadiging van het product door onjuiste reiniging Reinig het product uitsluitend met de toegestane reinigingsmiddelen. ► Reinig het product alleen met de hand. ►...
- Page 31 Česky 1 Popis produktu INFORMACE Datum poslední aktualizace: 2022-02-25 Před použitím produktu si pozorně přečtěte tento dokument a dodržujte bezpečnostní poky ► Nechte se poučit odborným personálem ohledně bezpečného použití produktu. ► Budete-li mít nějaké dotazy ohledně produktu, nebo se vyskytnou nějaké problémy, obraťte ►...
- Page 32 ► V pravidelných intervalech kontrolujte, zda dítě nemá na kůži známky podráždění nebo poraně ní. ► Před každým použitím a po každém použití produktu zkontrolujte oblasti pokožky, které přichá zejí s produktem do styku. ► Produkt se smí používat pouze na neporušené pokožce. ►...
- Page 33 5 Manipulace VAROVÁNÍ Nedodržení intervalů kontrol Nebezpečí zranění v důsledku nesprávného používání produktu Dodržujte intervaly kontrol stanovené ortotikem-protetikem, abyste zajistili bezpečné používá ► ní produktu. INFORMACE Nošení ortézy v dětské autosedačce je povoleno. K tomu je třeba nastavit dětskou sedačku tak, aby se v ní...
- Page 34 → Dítě je ve stabilní poloze a v blízkosti hlavy nejsou žádné objekty nebo předměty, které by dítě omezovaly. → Případně používané pleťové vody nebo krémy se již vstřebaly do pokožky. → Ortéza je v perfektním stavu a nejsou v ní žádné trhliny ani jiná poškození. →...
- Page 35 4) Vyrovnejte ortézu a nasaďte ji dítěti na hla vu (viz obr. 3). 5) Zkontrolujte, zda ortéza dobře sedí: → Šipka na přední straně leží na svislé ose vedoucí středem nosu. → Ortéza nezakrývá uši a oči. → Polstrování kolem dokola přesahuje okraj ortézy a chrání pokožku před sty kem s plastem.
- Page 36 5.3 Výměna polstrování Polstrování je připojené k ortéze na suché zipy. Musí v ortéze sedět, aniž by se tvořily sklady, a být s ortézou v kontaktu po celé ploše. Sejmutí polstrování 1) Uvolněte polstrování složené v oblasti šíje. 2) Odepněte polstrování vedoucí po celém obvodu ortézy od uzávěru. Nasazení...
- Page 37 4) V oblasti šíje ohrňte polstrování ven a při máčkněte ho (viz obr. 7). 6 Čištění UPOZORNĚNÍ Nesprávný způsob čištění Poškození produktu v důsledku nesprávného čištění K čištění produktu používejte pouze schválené čisticí prostředky. ► Produkt čistěte jen ručně. ► INFORMACE Před čištěním z ortézy odstraňte polstrování. Polstrování a skořepinu ortézy čistěte zvlášť. Doporučený...
Need help?
Do you have a question about the 24H1 MyCRO Band and is the answer not in the manual?
Questions and answers