
Related Manuals for Otto Bock Centro S1


Summary of Contents for Otto Bock Centro S1
- Page 1 Centro S1 Instructions for use ....................
- Page 2 Centro S1...
-
Page 3: Table Of Contents
Installing and adjusting the lap belt ....................... Delivery ................................Final inspection ..........................Transport to the customer ........................Handing over the product ........................................................... Instructions for use ..........................Getting in and transferring ........................Legrests ............................9.3.1 Attaching and removing the leg support ....................Centro S1... - Page 4 Legal information .............................. 12.1 Liability .............................. 12.2 Warranty ............................12.3 Service life ............................Technical data ..............................Appendices ................................ 14.1 Threshold values for wheelchairs transportable by train ................14.2 Required tools ............................ 14.3 Torque values of the screw connections ....................Centro S1...
-
Page 5: Foreword
Your product may differ from the models shown. In particular, not all the options described in these instruc tions for use will be installed on your product. • The manufacturer reserves the right to make technical changes to the model described in these instructions for use. Centro S1... -
Page 6: Product Description
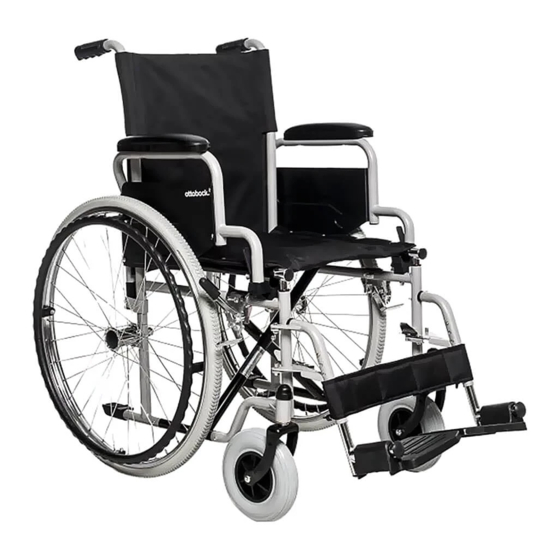
The wheelchair is intended exclusively for transporting one person on the seat. The wheelchair can be used on solid ground both indoors and outdoors. 2.2 Product overview Centro S1 Maximum load: 100 kg 1 Push handle 8 Leg support, segmented, removable... -
Page 7: Intended Use
► Do not modify the settings established by the qualified personnel. Only the settings described in the section “Use” in these instructions for use may be adjusted independently. ► In case of problems with the settings, please contact the qualified personnel who adjusted your product. Centro S1... - Page 8 ► Never cross obstacles at an angle. Always approach obstacles head on (at an angle of 90°). ► Raise the front wheels before crossing obstacles. ► Avoid collisions with obstacles and dropping off curbs/ledges. ► Avoid riding cross-country. Centro S1...
- Page 9 Hypothermia or burns due to contact with components, failure of components ► Do not expose the product to any extreme temperatures (e.g. direct sunlight, sauna, extreme cold). ► Do not leave the product in the immediate vicinity of heaters. Centro S1...
-
Page 10: Side Effects
INFORMATION Even in the event of compliance with all applicable guidelines and standards, alarm systems (e.g. in department stores) may respond to your product. Should this happen, remove your product from the area where the alarm was triggered. Centro S1... -
Page 11: Nameplate
(e.g. in the vicinity of radiators or in case of exposure to strong sunlight behind glass), the tyres may become permanently deformed. During extended storage, the knee lever wheel lock on wheelchairs with PU tyres (= tubeless tyres) must be released since tyre deformation may otherwise result. Centro S1... -
Page 12: Preparing The Product For Use
→ The quick-release axles must not be removable after releasing the push-button. 2) Unfold the wheelchair (see fig. 3; see fig. 4). 3) Attach the leg supports (see Page 19). 4) If necessary: Fit the seat cushion. The seat cushion is secured against sliding by being pressed on to the hook-and-loop closure. Centro S1... -
Page 13: Settings And Assembly Instructions
Improper assembly of removable wheels Tipping, falling over of the user due to wheels coming off ► After each assembly, verify the proper fit of the removable wheels. The quick-release axles must be firmly locked in the wheel attachment. Centro S1... -
Page 14: Adjusting The Drive Wheels
► Ensure that the user can operate the wheel lock without great effort. The force required to do so must not exceed 60 N. ► Only use original drive wheels with a verified maximum radial out-of-round of 1 mm. This adjustment must be made for fine adjustment of the wheel lock. Centro S1... -
Page 15: Adjusting The Back Support Upholstery / Seat Upholstery
1) Loosen the thumb screw on the leg support (see fig. 9). 2) Press in the push-button on the leg support and adjust the leg support height (see fig. 10). → The ball engages at the chosen level. 3) Hand-tighten the thumb screw on the leg support (see fig. 9). Centro S1... -
Page 16: Adjusting The Posterior Lower Leg Pad On The Elevating Leg Support
3) Install the supplied side panel in place of the old side panel (see fig. 12, item 1/2). If a lap belt was installed: Reinstall the lap belt in the same position. 4) Firmly tighten the screw connection. Make sure that the side panel can be folded over. Centro S1... -
Page 17: Installing And Adjusting The Anti-Tipper
► Adjusting the belt system too tightly may lead to unnecessary pain or user discomfort. ► Adjusting the belt system too loosely can cause the user to slide into a dangerous position. In addition, the fastening snaps could open unintentionally if they slide against hard parts of clothing (e.g. buttons). Centro S1... -
Page 18: Delivery
The user and any attendants must be instructed in the safe use of the product. In particular, the enclosed instructions for use are to be used. • The instructions for use must be given to the user/attendant upon delivery of the wheelchair. Centro S1... -
Page 19: Use
Removing the leg support 1) Fold the foot plate up. 2) Push the release lever to the inside (see fig. 19). 3) Fold the leg support out by 90° and remove it from the leg support holder (see fig. 17). Centro S1... -
Page 20: Special Features Of The "Elevating" Leg Support
Use the fine grid to adjust the angle (see fig. 21, item 1) 3) Push the release lever back (see fig. 21, item 2). The new angle setting is locked. 9.3.3 Adjusting the leg supports Further adjustments may be made only by qualified personnel. Centro S1... -
Page 21: Seat And Back Upholstery
2) Install and tighten the Phillips head screws on each side (see fig. 23, item 1). 9.5 Seat cushion The seat cushion can be removed for cleaning. After cleaning, the seat cushion is placed on the seat upholstery and secured against sliding by pressing it onto the hook-and-loop fastener on the seat upholstery. Centro S1... -
Page 22: Side Panels
Improper assembly of removable wheels Tipping, falling over of the user due to wheels coming off ► After each assembly, verify the proper fit of the removable wheels. The quick-release axles must be firmly locked in the wheel attachment. Centro S1... -
Page 23: Removing And Mounting The Drive Wheels
4) Remove or mount the drive wheel. After mounting: The drive wheels must not be removable after releasing the push-button on the quick-release axle. Rear wheels with threaded axle Rear wheels with permanent screw connections cannot be removed in the course of everyday use. Centro S1... -
Page 24: Caster Wheels And Caster Forks
1) Push the handle of the knee lever wheel lock forward (see fig. 29). → The wheel lock bolt secures the wheel. 2) Pull the wheel lock lever upwards (see fig. 30). → The wheel lock lever releases the wheel. Centro S1... -
Page 25: Anti-Tipper/Tip-Assist
3) Allow the pushbutton to engage. → The anti-tipper is activated. Deactivation 1) Press in the pushbutton on the anti-tipper (see fig. 31, item 1). 2) Rotate the anti-tipper upwards by 180° (see fig. 31, item 2). 3) Allow the pushbutton to engage. Centro S1... -
Page 26: Using The Tip-Assist
Using the lap belt 1) Open the buckle. 2) Place the user in an upright, 90° seated position (if physiologically possible). Ensure that the back is up against the back support pad (if physiologically possible). 3) Close the buckle. Centro S1... -
Page 27: Transfer Version
Crushing, pinching due to incorrect handling ► When folding the wheelchair out or together, only grip by the specified components. NOTICE Deformation when folded Damage to the product, problems unfolding due to unallowable loads ► Never place heavy objects on the folded product. Centro S1... -
Page 28: Use In Vehicles For Transporting Persons With Reduced Mobility
► Information on the current status of our measures is available from the qualified personnel. The Centro S1 wheelchair has not been approved by the manufacturer for use as a seat in vehicles for transporting persons with reduced mobility. -
Page 29: Cleaning In A Washing Chamber/Wheelchair Washing System
For more information on cleaning seat cushions, see the care instructions on the product or the supplied instructions for use. 9.16.1.4 Cleaning belts/straps Cleaning a belt system with metal closure INFORMATION Observe the washing recommendations on the product and the information in the corresponding instructions for use provided for the product. Centro S1... -
Page 30: Disinfection
The functions described below must be checked by the user or an attendant at the specified intervals: Inspection task Before each use Monthly Quarterly Functional test of the wheel locks Sagging of the seat or back support upholstery Stability of the leg supports Centro S1... -
Page 31: Maintenance Tasks
3) Repair the tube according to the directions in the repair kit or replace it with a new tube. 4) Before fitting the tyre again, inspect the rim bed and tyre inner wall for foreign objects. This could have caused the puncture. Centro S1... - Page 32 If not, let some air out and realign the tyre. 4) Inflate the tube to the maximum pressure specified by the tyre manufacturer (see information printed on the tyre sidewall). 5) Firmly screw the valve cap onto the valve. Centro S1...
-
Page 33: Disposal
– cannot be adjusted in the mm range but only in increments of approx. 0.5 cm or 1 cm. ► Note that the values achieved during adjustment may deviate from the values specified below. The deviation can be ±10 mm and ±2°. Centro S1 Max. load (in kg) Weight [kg]... -
Page 34: Appendices
Appendices Centro S1 Overall width [mm] 530–680 (with drive wheels) Overall length [mm] 1,030 (with 24" drive wheel) Overall width, folded Overall length, folded 1,030 Overall height, folded [mm] 3)4)5) Maximum permissible inclination [°]/[%] 7/12.3 The specified weights vary according to the selected options and model. -
Page 35: Torque Values Of The Screw Connections
14.3 Torque values of the screw connections Unless otherwise specified, screw connections are tightened with the following torque values: • Thread diameter M4: 3 Nm • Thread diameter M5: 5 Nm • Thread diameter M6: 10 Nm • Thread diameter M8: 25 Nm Centro S1... - Page 36 Centro S1...
- Page 37 Centro S1...
- Page 38 Centro S1...
- Page 39 · www.ottobock.de 143441 Moscow Region/Krasnogorskiy Rayon info@ottobock.com.co · www.ottobock.com.co Russian Federation Otto Bock Healthcare Products GmbH Otto Bock de Mexico S.A. de C.V. T +7 495 564 8360 · F +7 495 564 8363 Brehmstraße 16 · 1110 Wien · Austria Prolongación Calle 18 No. 178-A info@ottobock.ru · www.ottobock.ru F +43 1 5267985...
- Page 40 Ihr Fachhändler | Your specialist dealer Otto Bock Mobility Solutions GmbH Lindenstraße 13 · 07426 Königsee/Germany www.ottobock.com...
Need help?
Do you have a question about the Centro S1 and is the answer not in the manual?
Questions and answers