Otto Bock Start M1 Instructions For Use Manual
Hide thumbs
Also See for Start M1:
- Instructions for use (qualified personnel (24 pages) ,
- Instructions for use manual (40 pages) ,
- Instructions for use manual (28 pages)

Related Manuals for Otto Bock Start M1


Summary of Contents for Otto Bock Start M1
- Page 1 Start M1 Instructions for use (user) ..................
- Page 2 2 | Ottobock Start M1...
-
Page 3: Table Of Contents
........................6.17 Use in vehicles for transporting persons with reduced mobility ..............6.17.1 Required accessories .......................... 6.17.2 Mounting the belt loops ........................6.17.3 Using the product in the vehicle ......................6.17.4 Restrictions for use ..........................Start M1 Ottobock | 3... - Page 4 Disposal ................................Disposal Information ..........................Legal Information .............................. Service Life ............................Liability .............................. CE Conformity ............................ Warranty ............................Trademarks ............................Appendices ................................ 10.1 Technical data ............................ 10.2 Threshold values for wheelchairs transportable by train ................4 | Ottobock Start M1...
-
Page 5: Foreword
The wheelchair is designed solely for individual use by persons who are unable to walk or who have a walking impediment, and can be operated either by the patient or by another person. The wheelchair can be used on solid ground both indoors and outdoors. Start M1 Ottobock | 5... -
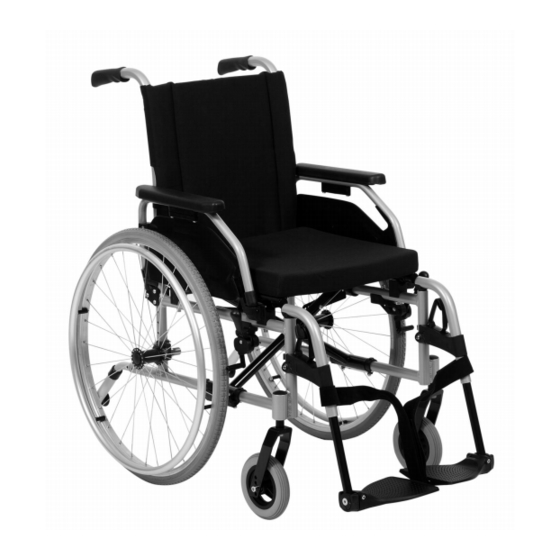
Page 6: Product Overview
Safety 2.2 Product Overview Start M1 1 Back, back upholstery 7 Caster wheel 2 Side panel with armrest 8 Quick-release axle release button 3 Seat cushion 9 Push ring 4 Wheel lock (here: knee lever wheel lock) 10 Frame 5 Footrest, divided, detachable... -
Page 7: Safety Instructions For Use
Tipping over, falling due to errors in handling the product ► Practice on level, open ground first. ► Learn with the support of an assistant how the wheelchair reacts to changes in the centre of gravity. Start M1 Ottobock | 7... - Page 8 Risk of collisions with other traffic participants due to lack of lighting ► Wear bright clothing or clothing with reflectors. ► Install active lighting on your product. ► Ensure that the reflectors on the product are clearly visible. 8 | Ottobock Start M1...
- Page 9 Damage to product due to corrosion or abrasion ► Do not use the product in salt water. ► Also avoid – if possible – sand or other dirt particles that may damage the wheel bearings. Start M1 Ottobock | 9...
-
Page 10: Further Information
During extended storage, the knee lever wheel lock on wheelchairs with PU tyres (= tubeless tyres) must be released since tyre deformation may otherwise result. Tyres contain chemical substances that can react with other chemical substances (such as cleaning agents, acids, etc.). 10 | Ottobock Start M1... -
Page 11: Preparation For Use
4) If required: pull the part of the flap that can be fastened forwards and fasten tightly to the seat upholstery (see fig. 4). 5) If necessary: Fit the seat cushion. The seat cushion is secured against sliding by being pressed on to the hook-and-loop fastener (see Page 15). Start M1 Ottobock | 11... -
Page 12: Use
If an assistant is required, the steps described here should be performed analogously with support: 1) Manoeuvre the wheelchairs such that they are positioned at an angle of approx. 45° to each other (see fig. 5). Ensure that the wheel locks do not become entangled. 12 | Ottobock Start M1... -
Page 13: Footrests
The height of the footrest and the footrest angle can be adjusted by qualified personnel if needed. 6.4.1 Attaching/removing the footrests The footrests can be removed to make it easier for the user to get in and out. Start M1 Ottobock | 13... -
Page 14: Fastening/Removing The Calf Strap
3) Thread the other end through the footrest (see fig. 15). 4) Adjust the length and fasten the hook-and-loop closure (see fig. 16). Removing the calf strap 1) Open all hook-and-loop closures. 2) Remove the calf strap from the frame tube. 14 | Ottobock Start M1... -
Page 15: Seat And Back Upholstery
1) Lay the seat cushion onto the seat upholstery and secure it against sliding by pressing it onto the hook-and- loop fastener (see fig. 17). 2) To remove, detach the seat cushion from the hook-and-loop fastener on the upholstery. Start M1 Ottobock | 15... -
Page 16: Fastening And Removing The Back Padding
The installed armrests offer the user additional support for the forearms. Depending on the equipment, the following side panels can be installed: Version 1: Height-adjustable side panel (see fig. 20) • Version 2: Height-adjustable side panel (see fig. 21) • 16 | Ottobock Start M1... -
Page 17: Folding Down The Side Panels
1) Insert the side panel in the adapter. 2) Press in the pushbutton and allow the side panel to engage in the adapter (see fig. 25). 3) Fold the side panel forward and lock it (see previous section). Start M1 Ottobock | 17... -
Page 18: Adjusting The Armrest Height
1) Push the release button (see fig. 26, item 1). 2) Adjust the armrest height (see fig. 26, item 2). 6.7 Push handles The push handles make pushing the wheelchair easier for the attendant. The wheelchair is equipped with fixed push handles (see fig. 27). 18 | Ottobock Start M1... -
Page 19: Rear Wheels
3) Use your thumb to press the push-button on the quick-release axle. 4) Pull off/push on the rear wheel. The quick-release axles must not be able to be removed after the push-button has been released. Start M1 Ottobock | 19... -
Page 20: Caster Wheels And Caster Forks
1) Remove dirt (e.g. hairs) from the caster wheel axle between the caster wheel and caster fork (see fig. 29, item 1). 2) Lubricate the caster axle between the caster wheel and caster fork with a few drops of thin, resin-free oil (sew ing machine oil). 20 | Ottobock Start M1... -
Page 21: Wheel Locks
► If only 1 accompanying person helps in overcoming steps, the accompanying person must first adjust the anti- tipper so that it cannot collide with the steps during transport. ► The accompanying person must adjust the anti-tipper again correctly after overcoming the steps. Start M1 Ottobock | 21... -
Page 22: Activating And Deactivating The Anti-Tipper
For this wheelchair type the tip-assist is integrated into the frame (see fig. 33). 1) At an obstacle, place one foot on the tip-assist and push down. 2) Slightly tip the wheelchair by simultaneously pressing down on the push handles. 22 | Ottobock Start M1... -
Page 23: Lap Belt
The hips of the user have slipped forward, the user is not sitting upright in the seat. This does not apply if the user cannot assume a 90° seating position. • If the lap belt is too loose, the user can shift/slide out to the front. 60° Start M1 Ottobock | 23... -
Page 24: Transport Wheels
3) Pull up the seat upholstery until the wheelchair folds together (see fig. 36). Fasten the safety strap (not illus trated). 4) Remove the rear wheels (see Page 19). 5) Place the disassembled wheelchair in the vehicle (see fig. 37). 24 | Ottobock Start M1... -
Page 25: Use In Vehicles For Transporting Persons With Reduced Mobility
3) Insert 1 belt loop at the left and right, respectively, between the upper frame section and seat tube (see fig. 39, item 1). 4) Attach the hooks of the safety belt system to the belt loops (see fig. 39, item 2). 5) Before tightening the safety belt system, verify the correct position of the belt loops. Start M1 Ottobock | 25... -
Page 26: Using The Product In The Vehicle
► Stow all dismantled components securely in the vehicle for transporting persons with reduced mobility. ► Please note that certain settings on the product exclude the use of the product in a vehicle for transporting persons with reduced mobility. 26 | Ottobock Start M1... -
Page 27: Care
If the product is used by more than one person, using a conventional disinfectant is required. • Only use colourless water-based disinfectants. Observe the instructions for use provided by the manufacturer. 7 Maintenance • The function of the product should be checked before each use. Start M1 Ottobock | 27... -
Page 28: Maintenance Intervals
The design, manufacturing and requirements for the intended use of the product are based on the expected ser vice life. These also include the requirements for maintenance, ensuring effectiveness and the safety of the product. 28 | Ottobock Start M1... -
Page 29: Liability
– cannot be adjusted in the mm range but only in increments of approx. 0.5 cm or 1 cm. ► Note that the values achieved during adjustment may deviate from the values specified below. The deviation can be ±10 mm and ±2°. General information Start M1 Max. load capacity (in kg) Weight [kg] from approx. 14.7... -
Page 30: Threshold Values For Wheelchairs Transportable By Train
Appendices Additional information Start M1 Minimum Maximum Total weight 14.4 Mass of the heaviest component [kg] Overall length with footrests [mm] 1015 Overall width [mm] Length (folded) [mm] 1015 Width (folded) [mm] Height (folded) [mm] Seat bottom angle [°] Effective seat depth [mm]... - Page 31 · www.ottobock.com.au Otto Bock Bulgaria Ltd. info@ottobock.sk · www.ottobock.sk 41 Tzar Boris III‘ Blvd. · 1612 Sofia · Bulgaria Beijing Otto Bock Orthopaedic Industries Co., Ltd. T +359 2 80 57 980 · F +359 2 80 57 982 Otto Bock Sava d.o.o. B12E, Universal Business Park info@ottobock.bg · www.ottobock.bg Industrijska bb ·...
- Page 32 Ihr Fachhändler | Your specialist dealer Otto Bock Mobility Solutions GmbH Lindenstraße 13 · 07426 Königsee-Rottenbach/Germany www.ottobock.com Ottobock has a certified Quality Management System in accordance with ISO 13485.
Need help?
Do you have a question about the Start M1 and is the answer not in the manual?
Questions and answers