KaVo DIAGNOcam Vision Full HD Instructions For Use Manual
Hide thumbs
Also See for DIAGNOcam Vision Full HD:
- Instructions for use manual (50 pages) ,
- Quick reference (2 pages)
Table of Contents
Advertisement
Quick Links
Advertisement
Table of Contents

Related Manuals for KaVo DIAGNOcam Vision Full HD


Summary of Contents for KaVo DIAGNOcam Vision Full HD
- Page 1 Instructions for use DIAGNOcam Vision Full HD...
- Page 2 Distributed by: Manufacturer: KaVo Dental GmbH KaVo Dental GmbH Bismarckring 39 Bismarckring 39 88400 Biberach 88400 Biberach Germany Germany Phone +49 7351 56-0 www.kavo.com Fax +49 7351 56-1488...
-
Page 3: Table Of Contents
Instructions for use DIAGNOcam Vision Full HD Table of contents Table of contents 1 User instructions ........................ 5 1.1 Transport and storage....................7 1.1.1 Damage in transit ....................1.2 Disposal........................9 1.2.1 Current packaging law ..................1.3 Disposal of electronic and electrical devices ..............9 1.4 Terms and conditions of warranty ................... - Page 4 Instructions for use DIAGNOcam Vision Full HD Table of contents 7.1 Overview of the reprocessing options................37 7.2 Preparations at the site of use..................37 7.3 Disassembly........................37 7.4 Manual Reprocessing ..................... 38 7.4.1 Manual external cleaning ..................38 7.4.2 Manual internal cleaning ..................
-
Page 5: User Instructions
All other trademarks are property of their respective owners. KaVo Original Factory Repair In the event of a repair, please ship your product to the KaVo Original Factory Repair using www.kavobox.com. Please direct all questions regarding the product, service, and maintenance to the following addresses. - Page 6 Instructions for use DIAGNOcam Vision Full HD 1 User instructions | Explanation brevi- ation Processing instructions Abbreviation Explanation Camera DIAGNOcam Vision Full HD Tip Vision Full HD Fluorescence Cover Fluorescence Cover Vision Full HD Sheath Sheath Vision Full HD Foot control...
-
Page 7: Transport And Storage
Instructions for use DIAGNOcam Vision Full HD 1 User instructions | 1.1 Transport and storage Follow the instructions for use VDE mark MET mark Transportation and storage conditions (Temperature range) Transportation and storage conditions (Air pressure) Transportation and storage conditions... - Page 8 Terms and Conditions, Art. 28). Outside Germany Note KaVo shall not be held liable for damage arising from transportation. The shipment must be checked on arrival. If the packaging is visibly damaged on delivery, please proceed as follows: 1. The recipient of the package must record the loss or damage on the delivery receipt.
-
Page 9: Disposal
Any waste which is generated must be recycled or disposed of in strict com- pliance with all applicable national regulations in a manner which is safe both for people and the environment. If you have any questions regarding proper disposal of the KaVo product, please contact the KaVo branch. 1.2.1 Current packaging law Dispose of and recycle the packaging appropriately in accordance with current packaging law, employing waste management / recycling companies. -
Page 10: Terms And Conditions Of Warranty
1 User instructions | 1.4 Terms and conditions of warranty 1.4 Terms and conditions of warranty KaVo provides the final customer with a warranty that the product cited in the handover certificate will function properly and guarantees zero defects in the... -
Page 11: Safety
Instructions for use DIAGNOcam Vision Full HD 2 Safety | 2.1 Infection hazard 2 Safety Note All serious events occurring in relation to the product must be reported to the manufacturer and the competent authority of the member state, in which the user and/or patient resides. -
Page 12: Qualification Of Personnel
Instructions for use DIAGNOcam Vision Full HD 2 Safety | 2.4 Qualification of personnel ▶ The USB cable of the camera must not be changed or extended. This may damaged the tips. ▶ When you attach the tip please make sure to attach the tip carefully to the camera. -
Page 13: Led Light
KaVo spare parts comply with the specification. Note If a repair is done with NON-KaVo original spare parts, this may constitute a product modification that leads to the loss of CE conformity. In the event of damage, the responsibility is with the service company or the operator. -
Page 14: Product Description
The camera enables various applications in health facilities/dental offices, dental clinics, orthodontics and oral and maxillary surgery. Connected to a computer, a monitor and imaging software, the DIAGNOcam Vision Full HD can be used to create and save images and videos. -
Page 15: Intended Use
The images support diagnosis by detection of smooth surface caries, oc- clusal caries, proximal caries, initial caries, secondary caries, and tooth frac- tures. The DIAGNOcam Vision Full HD is designed for use by a trained profes- sional in the field of dentistry. -
Page 16: Symbols On Product And Rating Plate
Instructions for use DIAGNOcam Vision Full HD 3 Product description | 3.2 Symbols on product and rating plate 3.2 Symbols on product and rating plate ① Rating plate ④ Date of manufacture ② Serial number ⑤ Material number ③ HIBC Code... -
Page 17: Product Configurations
Instructions for use DIAGNOcam Vision Full HD 3 Product description | 3.3 Product configurations Disposal instructions, see user instructions 3.3 Product configurations The camera is available with two different lengths of cable: Standard configuration Cable length 2.5 m (1.011.1213) Used in combination with treatment Cable length 1.30 m... - Page 18 Instructions for use DIAGNOcam Vision Full HD 3 Product description | 3.4 Technical Specifications Operating conditions Ambient temperature +10 to + 30 Air pressure 800 to 1060 hPa Rel. humidity 5% to 95% non-condensing Max. altitude for operation max. 2000 m...
-
Page 19: Scope Of Delivery
④ Control panel The USB cable is used to connect the camera to the computer and to send the captured image to the imaging software. The DIAGNOcam Vision Full HD needs an imaging software that is released for connection to the camera. -
Page 20: System Components
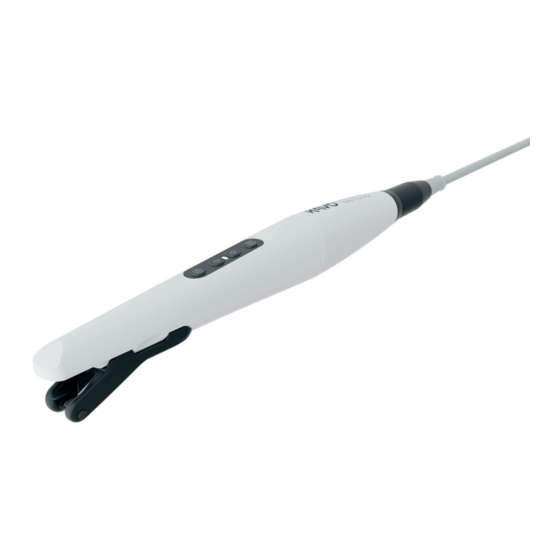
Instructions for use DIAGNOcam Vision Full HD 3 Product description | 3.6 System components 3.6 System components Camera ① Window with 2 LEDs each for Intraoral Mode and Fluorescence Mode ② Tip holder ③ Control panel See also: 2 6 Operation, Page 26 Camera with tip attached ①... -
Page 21: Control Panel
Instructions for use DIAGNOcam Vision Full HD 3 Product description | 3.7 Control panel Wall mount The wall mount is used for storage of the camera and can be at- tached to vertical surfaces. Once the camera is placed in the wall mount, it shuts off automatic- ally. -
Page 22: Installation Of The Wall Mount
Instructions for use DIAGNOcam Vision Full HD 4 Installation of the wall mount 4 Installation of the wall mount The wall mount can either be screwed to the wall or glued to the treatment unit or to another surface. Screw the wall mount to wall ▶... - Page 23 Instructions for use DIAGNOcam Vision Full HD 4 Installation of the wall mount ▶ Slide the wall bracket onto the mounting rail and place the DIAGNOcam Vision Full HD in the wall mount. 23 / 52...
-
Page 24: Startup And Shut Down
Directive and must be subjected to special disposal within Europe. Before disassembly / disposal, the product must be completely reprocessed (disinfected, sterilised) according to the chapter on "Reprocessing methods". For more information, please contact KaVo (www.kavo.com) or your special- ised dental dealer. 5.1 Recommended PC requirements Operating system ... -
Page 25: Installation And Software Start Up
Instructions for use DIAGNOcam Vision Full HD 5 Startup and shut down | 5.2 Installation and software start up 5.2 Installation and software start up Note For software installation and start up note the installation instructions and in- structions for use of the software in use. -
Page 26: Operation
Instructions for use DIAGNOcam Vision Full HD 6 Operation | 6.1 Start up of the camera 6 Operation 6.1 Start up of the camera ▶ Use the USB cable to connect the camera to the computer. ▶ Start up the imaging software. - Page 27 Instructions for use DIAGNOcam Vision Full HD 6 Operation | 6.2 Use a sheath Note For optimum image quality of the system, there must be no air present between the clear view window of the sheath and the exposure window of the camera.
-
Page 28: Snap-In And Detach The Tip
Instructions for use DIAGNOcam Vision Full HD 6 Operation | 6.3 Snap-in and detach the tip ▶ Then reprocess the camera and accessories according to recommendations. See also: 2 7 Reprocessing steps in accordance with ISO 17664, Page 37 6.3 Snap-in and detach the tip... -
Page 29: Recording Images
Possibly hazardous optical radiation emitted by product. Risk of injury. Do not look into the active light source. The DIAGNOcam Vision Full HD camera houses an lens system with a perman- ent autofocus, which focuses permanently between the macro range and facial images. - Page 30 This mode can be used to record intraoral images. Recording an image in Intraoral mode The DIAGNOcam Vision Full HD can be used to record still images and videos. The possible recording modes depend on the imaging software. ▶ Connect the camera to the computer.
-
Page 31: Fluorescence Mode
In Fluorescence mode, it is recommended to plug the Fluorescence Cover onto the camera to be able to record optimally illuminated images. In this mode, the DIAGNOcam Vision Full HD camera records images in the fluorescence range for the detection of occlusal caries. - Page 32 Instructions for use DIAGNOcam Vision Full HD 6 Operation | 6.4 Recording images ▪ Metabolic products of cariogenic bacteria are shown in a reddish colour Recording an image in Fluorescence mode ▶ Connect the camera to the computer. ▶ Start up the imaging software.
-
Page 33: Transillumination Mode
Proximal caries Occlusal caries Secondary caries The DIAGNOcam Vision Full HD can detect caries in the enamel, but not in the dentin. Healthy dental enamel is shown bright in the image, whereas carious sites are shown as dark spots. In Transillumination mode, the tip must be attached. - Page 34 Instructions for use DIAGNOcam Vision Full HD 6 Operation | 6.4 Recording images ð The tip is connected automatically to the camera while it is being plugged on, and switches it into Transillumination mode. Note Do not damage the sheath when you attach the tip.
-
Page 35: Combined Intraoral + Fluorescence Mode
Instructions for use DIAGNOcam Vision Full HD 6 Operation | 6.4 Recording images 6.4.4 Combined Intraoral + Fluorescence mode CAUTION Possibly hazardous optical radiation emitted by product. Risk of injury. Do not look into the active light source. ▶ Connect the camera to the computer. -
Page 36: Combined Mode Intraoral + Fluorescence + Transillumination
Instructions for use DIAGNOcam Vision Full HD 6 Operation | 6.5 Switching the camera off 6.4.5 Combined mode Intraoral + Fluorescence + Transillumination CAUTION Possibly hazardous optical radiation emitted by product. Risk of injury. Do not look into the active light source. -
Page 37: Reprocessing Steps In Accordance With Iso 17664
Instructions for use DIAGNOcam Vision Full HD 7 Reprocessing steps in accordance with ISO 17664 | 7.1 Overview of the reprocessing options 7 Reprocessing steps in accordance with ISO 17664 7.1 Overview of the reprocessing options Components Single use Manual... -
Page 38: Manual Reprocessing
Malfunction and material damage. 7.4.1 Manual external cleaning ▶ Clean the DIAGNOcam Vision Full HD, the tip and the Fluorescence Cover for at least 1 minute per item under running potable water at a flow rate of 2l/min and a temperature of 30 °C ± 5 °C (86 °F ± 9 °F). -
Page 39: Manual Internal Disinfection
Instructions for use DIAGNOcam Vision Full HD 7 Reprocessing steps in accordance with ISO 17664 | 7.4 Manual Reprocessing ▶ Spray the disinfectant on a cloth, then wipe down the medical device and allow the disinfectant to act according to the instructions of the disinfectant manufacturer. -
Page 40: Automated Reprocessing
Malfunction and material damage. 7.5.1 pre-cleaning ▶ Clean the DIAGNOcam Vision Full HD, the tip and the Fluorescence Cover for at least 1 minute per item under running potable water at a flow rate of 2l/min and a temperature of 30 °C ± 5 °C (86 °F ± 9 °F). -
Page 41: Packaging
Damage to product. Immediately remove the product from the steam steriliser after the sterilisation cycle. The KaVo medical device has a maximum temperature resistance up to 138 ℃ (280.4 °F). Sterilisation parameters: Select a suitable process from the following sterilisation processes (depending... -
Page 42: Accessories
Instructions for use DIAGNOcam Vision Full HD 8 Accessories | 8.1 Foot Control Vision Full HD 8 Accessories Product Material number DIAGNOcam Vision Full HD 1.011.1213 (Standard version camera, cable length: 2.5 m) DIAGNOcam Vision Full HD 1.013.1500 (for use on the treatment unit) Tip Vision Full HD (1 pc) 1.013.5708... -
Page 43: Technical Specifications Foot Control
Instructions for use DIAGNOcam Vision Full HD 8 Accessories | 8.1 Foot Control Vision Full HD 8.1.4 Technical Specifications foot control Data transmitter Operating voltage U 3 VDC 2 x AAA Battery Transmission Bluetooth 4.0 Low Energy Switching function... -
Page 44: Operate Foot Control
Instructions for use DIAGNOcam Vision Full HD 8 Accessories | 8.1 Foot Control Vision Full HD ▶ If the automatic installation is aborted, the device drivers have to be manu- ally installed. ð The installation can take up to several minutes depending on the system. -
Page 45: Cleaning And Servicing Foot Control
Instructions for use DIAGNOcam Vision Full HD 8 Accessories | 8.1 Foot Control Vision Full HD ð The receiver receives the signal from the foot control. ð The LED lights up as long as the foot control is pressed. 8.1.7 Cleaning and servicing foot control ▶... -
Page 46: Information Concerning The Electromagnetic Compatibility According To En Iec 60601-1-2
EN IEC 60601-1-2 9.1 Electromagnetic Transmissions The DIAGNOcam Vision Full HD is designed for use in an environment of the kind specified below. The customer or the user of the DIAGNOcam Vision Full HD should ensure that the device is used in an environment of the specified type. -
Page 47: Immunity To Electromagnetic Interference
9.2 Immunity to electromagnetic interference The DIAGNOcam Vision Full HD is designed for use in an environment of the kind specified below. The customer or the user of the DIAGNOcam Vision Full HD should ensure that the device is used in an environment of the specified type. -
Page 48: Immunity To Electromagnetic Interference
9.3 Immunity to electromagnetic interference The DIAGNOcam Vision Full HD is designed for use in an environment of the kind specified below. The customer or the user of the DIAGNOcam Vision Full HD should ensure that the device is used in an environment of the specified type. -
Page 49: Recommended Safe Distance Between Portable And Mobile Hf Telecommunications Equipment And The Treatment Device
HF telecommunications equipment and the treatment device electromagnetic environment in terms of stationary transmitters. If the meas- ured field strength at the site, at which the DIAGNOcam Vision Full HD is used, exceeds the compliance levels shown above, the DIAGNOcam Vision Full HD should be monitored to demonstrate proper function.
Need help?
Do you have a question about the DIAGNOcam Vision Full HD and is the answer not in the manual?
Questions and answers