Table of Contents
Advertisement
Quick Links
Advertisement
Table of Contents

Related Manuals for Marshall Electronics CV610-U3-V2


Summary of Contents for Marshall Electronics CV610-U3-V2
- Page 1 B r o a d c a s t A / V D i v i s i o n CV610-U3-V2 HD PTZ USB Camera User Manual...
-
Page 2: Table Of Contents
Table of Contents 1. Important Information 2. What’s In The Box 3. Features 4. Camera Diagrams 4.1 Camera 4.2 Remote Controller 4.3 Extension Module 5. System Configuration 5.1 Connection 5.2 Obtain Video Signal 5.3 Obtain Audio Signal 5.4 Camera Control Methods and System Configurations 6. -
Page 3: Important Information
CV610-U3-V2 Manual 1. Important Information Legal notice The contents of this document are subject to change without prior notice. Updates will be added to the new version of this manual. We will readily improve or update the products or procedures described in the manual. - Page 4 Maintenance Precautions • If there is dust on the front glass surface, remove the dust gently using an oil-free brush or a rubber dust blowing ball. • If there is grease or a dust stain on the front glass surface, clean the glass surface gently from the center outward using anti-static gloves or an oil-free cloth.
-
Page 5: What's In The Box
CV610-U3-V2 Manual 2. What’s In The Box www.marshall-usa.com... -
Page 6: Features
3. Features • HD resolution allows for high- definition resolution with superior picture quality. • 10X optical zoom combined with 12X digital zoom, allows to zoom up to 120X totally. • 62.5 - degrees horizontal angle zoom lens. • USB2.0 and USB3.0 compatibility. •... -
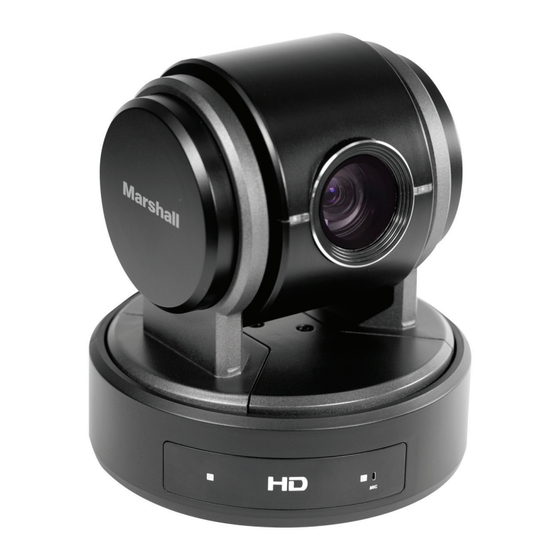
Page 7: Camera Diagrams
CV610-U3-V2 Manual 4. Camera Diagrams 4.1 Camera 1. 12V DC Power Port Connect the supplied AC power adaptor and cord. 2. Extension Module Port Composite port for extra features to provide RS-232, RS-422/RS-485, CVBS, HDMI, Audio Line functionalities 3. USB 3.0 and USB2.0 Port Outputs the images from this unit as a USB3.0 and USB2.0 video signal. -
Page 8: Remote Controller
4.2 Remote Controller 1. Power • Power ON/OFF the camera. • When the camera is powered OFF, the camera turns to the back and would be on standby mode. • When the camera is powered ON, the camera turns to the front. •... -
Page 9: Extension Module
CV610-U3-V2 Manual 4.3 Extension Module 1. Extension Port (Connect to the camera body) 2. Audio line in (3.5mm jack) 1. Extension Port (Connect to the camera body) 3. RS232 Port 4. CVBS (Inactive) 2. Audio line in (3.5mm jack) 5. RS422/485 Port 3. -
Page 10: System Configuration
5. System Configuration 5.1 Connection When the camera is connected to a computer and joystick keyboard via Extension Module with a VISCA cable (cross type, RS-232), you can operate the camera with the computer and the joystick keyboard. When the camera is connected to a joystick keyboard via Extension Module with a control cable (cross type, RS-422/485), you can operate the camera’s pan, tilt, zoom with the joystick keyboard. -
Page 11: Obtain Video Signal
4. Open the video client software (Here, we use VLC Media Player for example), under “Media”, select “Capture Device”. Under Video device name, “MEI CV610-U3-V2” will be listed. Under the Audio device name, “Digital Audio Interface (MEI CV610-U3-V2)” will be listed. Select both devices to use. - Page 12 The camera is compatible with PC USB2.0 and USB3.0 ports. The camera USB port will output at the lower resolution while connecting PC USB2.0 port. The following tables are lists of all available output formats for USB2.0 and USB3.0. When the camera setting HDMI video format at 1080P60/1080P30/720P60, USB2.0 and USB3.0 resolution with frame rate are available as following list.
- Page 13 CV610-U3-V2 Manual When the camera setting HDMI video format at 1080P50/1080P25/750P50, USB2.0 and USB3.0 resolution with frame rate are available as following list. USB2.0 USB3.0 HDMI FORMAT Frame Rate Frame Rate Resolution Resolution 1920x1080 1920x1080 1280x720 1280x720 1024x768 1024x768 960x540...
-
Page 14: Obtain Audio Signal
1. The camera has built in Mic. It generates audio signal to the video client software. In the software Audio section find Microphone setting. “Digital Audio Interface (MEI CV610-U3-V2)” will be listed. Once you select it as software audio device, you can use the built-in Mic for communicating. - Page 15 4. Open the video client software (Here, we use ZOOM ROOM for example), on left bottom under “Stop Video” setting, select video device from Camera list “MEI CV610-U3-V2”. 5. On left bottom under “Mute” Audio setting, select video device from Microphone list “Digital Audio Interface (MEI CV610-U3-V2)”.
- Page 16 Use RS-232 (VISCA), RS-422(VISCA)/485 (PELCO P/D) Control via Extension Module. The Extension Module is required when using RS-232 / RS-422/485 signals with external control devices. You can use RS-232 port or RS-422/485 port on Extension Module to connect to optional controllers, such as joystick control keyboard, control PC station, to operate the camera.
- Page 17 CV610-U3-V2 Manual RS232 Connection 1. Set Bottom Dip Switch SW1-B6 to OFF. (See page 18). 2. Set Baud Rate on Bottom Dip Switch to the same as Baud Rate setting on the keyboard you are using. (See page 18). 3. Reboot the camera by turning it Off/On after the Bottom Dip Switch has been set up correctly.
- Page 18 Use RS-422(VISCA) / RS485 (PELCO P/D) You can use RS-422/485 port connect to optional controllers, such as joystick control keyboard, control PC station, to operate the camera. To perform pan/tilt and zoom operations using the joystick of the control keyboard, and to perform the Preset operation using the control buttons.
- Page 19 CV610-U3-V2 Manual Marshall Keyboard RS422 Connection PELCO P/D Keyboard RS485 Connection 1. Use PELCO P/D compatible keyboard. 2. Use preset 95# on the keyboard to bring up/exit camera OSD menu. 3. Use joystick and Button “OPEN” or “CLOSE” to navigate OSD menu.
- Page 20 Operating Multiple Cameras Using RS-422/485 • Using RS-422 (VISCA), you can connect up to 7 cameras. • Using RS-485 (PELCO), you can connect up to 255 cameras. • Using RS-485 (PELCO), all camera addresses must be set up before the connection. You can set the camera address by operating OSD menu.
-
Page 21: Bottom Dip Switch Settings
CV610-U3-V2 Manual Precautions for Preventing Access to the Camera by an Unintended Third Party The camera can be fraudulently accessed in a network environment where a device is connected or connectable to the network without the administrator’s permission, or a PC or other network device connected to the network can be used without any permission. - Page 22 1. Camera Address setting for VISCA protocol: When just one camera is used, system takes the camera ID address that is set on Bottom DIP Switch. When more than one camera is used, cameras will be automatically issued ID addresses by system via VISCA protocol. The ID address setting on Bottom DIP Switch will be ignored by system.
-
Page 23: Adjusting And Setting With Menus
CV610-U3-V2 Manual 7. Adjusting and Setting with Menus About On-Screen Menus You can change various settings, such as shooting conditions and system setup of the camera, while observing menus displayed on a connected computer screen. This section explains how to read the on-screen menus before starting menu operations. - Page 24 Setting Menu The setting menu selected on the main menu is displayed. 1. Setting Menu The name of the setting menu currently selected is displayed here. 2. Selected Item Selects a setting item. The selected item is shown by the cursor. Move the cursor up or down by pressing the “...
-
Page 25: Exposure Menu
CV610-U3-V2 Manual 7.1 EXPOSURE Menu The EXPOSURE menu is used to set the items related to exposure. MODE (Exposure Mode) FULL AUTO: The exposure is adjusted automatically using the sensitivity, electronic shutter speed, and iris. BRIGHT: Adjust the brightness level (LEVEL:0~27) manually. -
Page 26: White Balance Menu
EX-COMP (Exposure Compensation) When MODE is set to one of FULL AUTO, SHUTTER PRI or IRIS PRI, set this item to ON to enable exposure compensation. When you set EX-COMP to ON, LEVEL appear and you can select the exposure compensation level from the following: –7, –6, –5, –4, –3, –2, –1, 0, +1, +2, +3, +4, +5, +6, +7 If you set the level to 0, no exposure compensation effect to the image. -
Page 27: Picture Menu
CV610-U3-V2 Manual 7.3 PICTURE Menu The PICTURE menu is used to set the items related to the picture. SHARPNESS: Picture sharpness value ranges from 0 to 15. You can enjoy emphasized edge and high- resolution images. EFFECT: (Picture Effect) It consists of the following functions: Neg: Negative/Positive Reversal Black &... -
Page 28: Pan / Tilt / Zoom Menu
7.4 PAN / TILT / ZOOM Menu The PAN TILT ZOOM menu is used to select the pan/tilt/ zoom mode. DIGITAL ZOOM: Set to DIGITAL ZOOM ON, 12X digital zoom is activated. You can set digital zoom to ON or OFF. When set to OFF, digital zoom does not operate, and only optical zoom is available. -
Page 29: System Menu
CV610-U3-V2 Manual 7.5 SYSTEM Menu PELCO ID When using RS485 (PELCO P/D) control, Set Camera ID to the address that you want to control to. This value is from 001-255. IR-RECEIVE (Infrared Signal Reception) When this is set to OFF, the camera does not receive the signal from the infrared remote controller. -
Page 30: Operation Using The Infrared Remote Controller
8. Operation Using the Infrared Remote Controller 8.1 Pan/Tilt and Zoom Operation Panning and Tilting 1. Press the POWER switch. The camera will turn on and perform the pan/tilt reset operation automatically. 2. Press the arrow button to pan or tilt the camera. While checking the picture on the screen, press the desired arrow button. - Page 31 CV610-U3-V2 Manual To reset the setting To reset the setting, press the 1 (STD) button while holding down the L/R DIRECTION SET button. Movement of the Arrow button Setting camera While holding down Press Note The above setting only changes the signal emitted from the infrared remote controller, and does not change the setting of the camera itself.
-
Page 32: Operating Multiple Cameras With The Infrared Remote Controller
Zooming Press either of the ZOOM buttons. Note When you perform pan/tilt operation while the camera is in the telephoto mode, the moving speed of the image on the screen may be a little jerky. 8.2 Operating Multiple Cameras with the Infrared Remote Controller 1. -
Page 33: Storing The Camera Settings In Memory - The Presetting Feature
CV610-U3-V2 Manual 8.4 Storing the Camera Settings in Memory — the Presetting Feature Memory (Preset) Using the preset function, 6 sets of camera shooting conditions can be stored and recalled. 6 sets of camera shooting conditions can be stored and recalled by using remote controller. Up to 128 presets via protocol programming. - Page 34 Recalling the stored settings Press any of the POSITION buttons, 1 to 6, in which you have stored the settings. Cancelling the preset memory While holding down the RESET button, press the POSITION button from which you want to cancel the settings.
-
Page 35: Menu Confirguration
CV610-U3-V2 Manual 9. Menu Configuration DATA SCREEN EXPOSURE MODE FULL AUTO CLOSE, F14, F11, F9.6, F8.0, F6.8, F5.6, F4.8, F4.0, F3.4, F2.8, IRIS PRI F2.4, F2.0, F1.6 1/1, 1/2, 1/4, 1/8, 1/15, 1/30, 1/60, 1/90, 1/100, 1/125, 1/180, 1/250, 1/350, 1/500, 1/725, 1/1000, 1/1500, 1/2000, 1/3000, SHUTTER 1/4000, 1/6000, 1/10000 sec. -
Page 36: Troubleshooting
10. Troubleshooting Check the following as a guide for troubleshooting the problem. If the problem cannot be corrected, consult your dealer. Symptom Cause Remedy The AC power adaptor is not connected to the The power of the camera is not turned on. Insert the power cord firmly as far as it will go. -
Page 37: Dimensions
The audio device setting on video client Select the device listed as “Digital audio There is no audio. software is not set correct. device, MEI CV610-U3-V2”, reconnect it. The image is upside down. The Flip function is not set. Set the Flip function on OSD menu. - Page 38 If there is no proof of purchase provided with a warranty claim, Marshall Electronics reserves the right not to honor the warranty set forth above. Therefore, labor and parts may be charged to the consumer. This warranty does not apply to the product exterior or cosmetics.
Need help?
Do you have a question about the CV610-U3-V2 and is the answer not in the manual?
Questions and answers