Advertisement
Quick Links
© Panduit Corp. 2019
Location Footprint
FOR TECHNICAL SUPPORT www.panduit.com/resources/install_maintain.asp
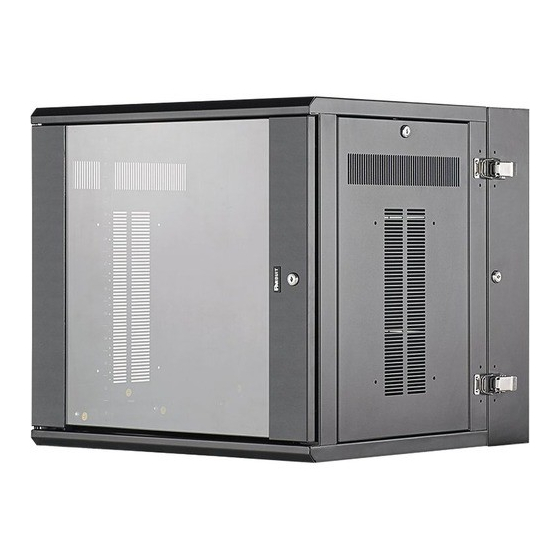
INSTRUCTIONS CM315E
A
Footprint with Cabinet Open
25.0"
Cabinet Width
16.0"
Mounting Holes
P
Z
Wall Mount Cabinet
AN
ONE
Part Numbers: PZWMC
PZWMC12W
Cabinet with Windowed Door
4.5"
Page 1 of 11
Parts Included:
(1) - Extra Door Spacer
(8) - Keys
(1) - Roll of Tak-Ty
(12) - #12-24 Screws
(1) - Removable Top Vent Cover Panel
CABINET
DEPTH
RU
12
18
26
0.8"
B
C
Mounting
Holes
DIM "A"
25.0
45.1
30.0
50.1
DIM "B" DIM "C"
20.7"
23.8"
31.2"
34.3"
45.2"
48.3"
Advertisement

Related Manuals for Panduit PANZONE PZWMC


Summary of Contents for Panduit PANZONE PZWMC
- Page 1 Wall Mount Cabinet Part Numbers: PZWMC © Panduit Corp. 2019 INSTRUCTIONS CM315E Parts Included: (1) - Extra Door Spacer (8) - Keys (1) - Roll of Tak-Ty (12) - #12-24 Screws (1) - Removable Top Vent Cover Panel PZWMC12W Cabinet with Windowed Door...
- Page 2 (see below). M5 Thread forming M4 Thread forming Hinge screws & lock- Latch screws washers Lock Hole Grommet Lock Lock in downward rotation For Technical Support: www.panduit.com/resources/install_maintain.asp Page 2 of 11...
- Page 3 Recommended for traditional patching with standard patch cords. Use PZBR4 Bend Radius Posts. Mounting Rail Installation (PZWMC12RR) Mounting Rail To install mounting rail use (2) M6 thread forming screws & lockwashers at desired location as shown below Mounting Hardware For Technical Support: www.panduit.com/resources/install_maintain.asp Page 3 of 11...
- Page 4 . Route to the desired patch panel after securing the cables with a T at point 3 or 4. Point 4 Point 2 Point 3 Point 1 Cables Extend to Patch Panel For Technical Support: www.panduit.com/resources/install_maintain.asp Page 4 of 11...
-
Page 5: Optional Accessories
Rail Kits 4” Bend Radius Post Kit PZWMCFKHF PZBR3 3” Bend Fan Kit Radius Post Kit High Flow PZCHSM2 PZBR3.5 Horizontal PZCFR 3.5” Bend Slack Manager Fan Media Radius Post Kit Replacement Kit For Technical Support: www.panduit.com/resources/install_maintain.asp Page 5 of 11... - Page 6 Top Panel Blank Fan Kit Fan Kit Blank #10-32 Screws and Lockwashers (8 Places) Note: When using switches with side air intake and opposite side exhaust use one fan without fan blank For Technical Support: www.panduit.com/resources/install_maintain.asp Page 6 of 11...
- Page 7 Figure 1. Post can be customized by removing tabs as show in Figure 2. Note: Post may be installed over active equipment mounting locations. Figure 1 Figure 2 Bend Radius Post Score Line #12-24 x 2.5" Screw For Technical Support: www.panduit.com/resources/install_maintain.asp Page 7 of 11...
-
Page 8: Kit Contents
Washer, and Direction Setting Washer. • Pull the Lock Head from the cylinder and rotate until oriented in the desired direction. (Figures 5-7) Cam will Cam will rotate rotate left right Direction Setting Washer Figure 7 For Technical Support: www.panduit.com/resources/install_maintain.asp Page 8 of 11... - Page 9 Reinstall the direction setting washer, cam, flat washer, lock washer, and retaining screw. (Figure Figure 11 Figure 10 Lock Washer (saved) from pre- Retaining vious lock) Screw Flat Washer Direction Setting Washer Figure 12 For Technical Support: www.panduit.com/resources/install_maintain.asp Page 9 of 11...
- Page 10 PZCHSM2 2 RU of Active Equipment 2 RU of 24 Port Patch Panels PZCHSM2 2 RU of 24 Port Patch Panels PZCHSM2 2 RU of Active Equipment 2 RU of Blanking Panel For Technical Support: www.panduit.com/resources/install_maintain.asp Page 10 of 11...
- Page 11 Routed to top Horizontal to lower slack manager. Slack Manager For instuctions in Local Languages E-mail: and Technical Support: techsupport@panduit.com Phone: www.panduit.com/resources/install_maintain.asp 866-405-6654 www.panduit.com Page 11 of 11...
Need help?
Do you have a question about the PANZONE PZWMC and is the answer not in the manual?
Questions and answers