
Related Manuals for Hogtunes WILD BOAR AUDIO WBARG KIT 2R


Summary of Contents for Hogtunes WILD BOAR AUDIO WBARG KIT 2R
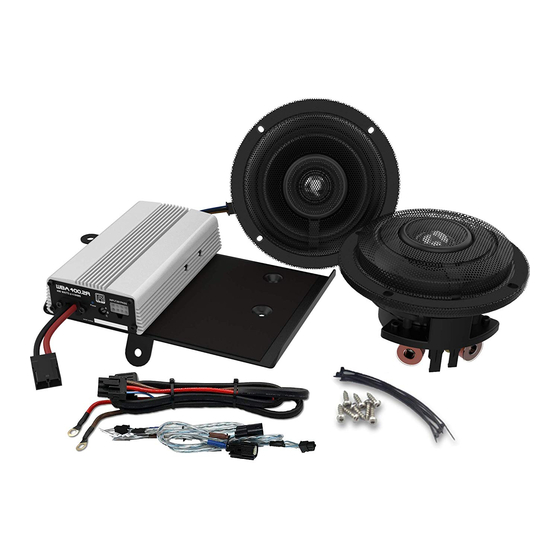
- Page 2 Thank you for choosing the Hogtunes Wild Boar Audio WBARG Kit.2R for 2015+ Rushmore Platform Road Glides. Since positive word of mouth is the best way to grow our business, we want your new system to work as well as it was designed to.
-
Page 3: Speaker Installation
se ct io n 1 SP EA KER I NS T A LLA T I ON Step #1: Remove the bikes seat, and undo the main (+ and -) connectors from the battery. Remove the outer fairing/headlamp assembly and set aside. Refer to a service manual if you need help with this. - Page 4 Step #4: Removing the Factory Speakers: With the grills off the bike remove the 4 screws that secure the factory speaker to bike. Gently pull up each factory speaker so it’s coming away from the bike and carefully remove the speaker wires. Put the factory speakers aside.
-
Page 5: Amplifier Installation
se ct i o n 2 A M PLI FI ER INST AL LATI ON Figure 1.1 Before proceeding, please locate the points in the fairing identified by the letters in Figure 1.1. A= mounting points for Headlight assembly B= Wire passage from fairing to bike C= Brake side speaker harness (Pink and Pink with Black Stripe wires) D= Clutch Side Speaker harness (Pink and Pink with Black Stripe wires) Step #1: Out of the box, the amplifier comes... - Page 6 Step #2: Locate the power harness for the amplifier. One end has ring terminals and a fuse and the other has a 2 pin connector. Using Fig 1.1 on Page 4 for reference, you want to run the “ring terminal end” of the power harness through “B”.
- Page 7 Step #5: As shown by “C” in Figure 1.1, on the brake side of the bike, there is a 2 pin connector with pink/pink with black stripe wires going through it. The plug is close to where the wires enter the brake side speaker cabinet.
- Page 8 sec tio n 3 RA DI O FL A S H I NFO R MA T I ON This section is VITAL to the correct operation of the system, please make sure you read and understand it, or contact us! The correct flash required for this system is the exact same one that comes in FLH Ultra Classics (non CVO Models).
- Page 9 F ina l i n st a l l at ion Not e s Many users will store music on a hand held type player and use that as the music source for the bikes audio. PLEASE NOTE: If you “borrow” music files from certain sites, they typically sound VERY POOR.
- Page 10 w iring gu id e WBA 400.2R QUICK REFERENCE WIRING GUIDE (IF ONLY AMP ON BIKE) Note: From the factory, the plugs at indicators “A” and “B”, and “C” and “D” are plugged together but get separated for this install. Amplifiers Clutch Side Input (Yellow Heatshrink) Amplifiers Clutch Side Output (Brown Heatshrink) Amplifiers Brake Side Input (Green Heatshrink)
- Page 11 Please contact Hogtunes head office for all warranty claims. Products found to be defective during the warranty period will be repaired or replaced (with a product deemed to be equivalent) at Hogtunes sole discretion. Hogtunes/Wild Boar Audio’s complete warranty policy is available on our website at www.hogtunes.com...
- Page 12 Original Equipment, which can be a distraction to the rider and/or passenger. Please use caution when adjusting or playing your stereo at high volume, especially in traffic. You are a valued customer so please: Ride Alert Arrive Alive! www.wildboaraudio.com www.hogtunes.com...
Need help?
Do you have a question about the WILD BOAR AUDIO WBARG KIT 2R and is the answer not in the manual?
Questions and answers