
Related Manuals for Hogtunes Wild Boar Audio WBA 400.2R


Summary of Contents for Hogtunes Wild Boar Audio WBA 400.2R
- Page 2 We want your new amp to work as well as it was designed to, so if you have any questions or concerns, please email: tech@hogtunes.com or call us during regular business hours at 705-719-6361 (EST). If you still need help, please consider a professional installation by your dealer.
- Page 3 The WBA 400.2R amplifier is a Class D design. It should be understood that ALL Class D amplifiers, RegARDLess of BRAnD, cause a reduction in fM reception. The WBA 400.2R features a proprietary circuit design called R.e.M.I.T. (Reduced electro Magnetic Interference Technology) that Wild Boar Audio believes gives the BesT fM reception available for any Class D Amplifier designed for a motorcycle.
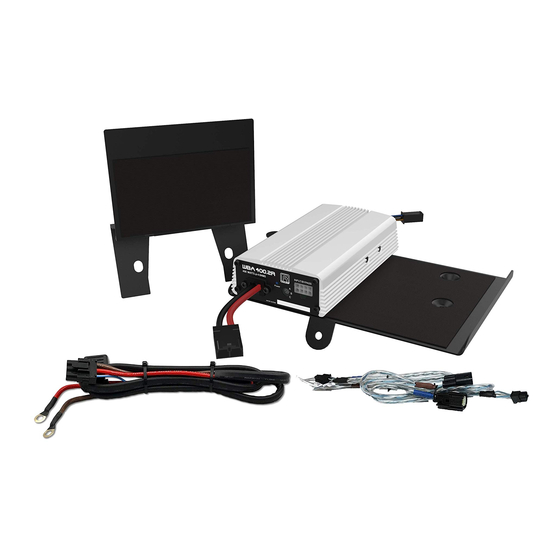
- Page 4 Step #4: The WBA 400.2R amp comes “stuck” to a black steel mounting plate. Separate the amp from the mounting plate. Sit the amplifier plate over top of the radio noting the 4 holes in the plate will line up with the 4 holes left by the factory screws just removed.
- Page 5 up and over the gas tank, but under the tank console. There is a provi- sion on the front of the tank console for wires to pass. When correctly installed, the power and ground wires are the right length to connect on to the battery.
- Page 6 road Glide / road Glide Ultra inStrUctionS Important radIo re-flash InformatIon If InstallIng on a road glIde Ultra From a sonic point of view, Road Glide Ultra has the correct factory flash, however, the factory flash in Road Glide Ultra makes the radio play considerably QUIETER than it could.
- Page 7 Step #1: Out of the box, the amplifier comes on a black mounting plate used for Street Glide and Ultra fairings only. Separate the amp for the plate and put that plate aside. As shown in Fig 1.2, locate the Road Glide specific plate and adhere the amp to the plate so it is in the same orientation as shown.
- Page 8 Step #5: As shown by “C” in Figure 1.1 on Page 4, on the brake side of the bike, there is a 2 pin connector with pink/pink with black stripe wires going through it. The plug is close to where the wires enter the brake side speaker cabinet.
- Page 9 fina l S y S t e m a d j U St me nt PLEASE NOTE: IN ALL CASES, HAVING THE RADIO FLASHED TO “4 SPEAKERS –NO AMP” WILL GIVE THE BEST PERFORMANCE As explained at the beginning of this manual, in order for the system to work properly you will need to have the correct “flash”...
- Page 10 From time to time, the “Motor Company” will release software updates on their website which can be downloaded, and installed on the bike. For best performance of your audio system, please make the downloads are up to date! Earlier versions of the software could cause any brand of aftermarket amplifier to distort prematurely so this is an important point! How the system sounds when the bike is running is going to differ from how it sounds when the bike is not running.
-
Page 11: Warranty Information
What Is not Covered: 1) Any expense related to the removal or re-installation of products. 2) Repairs to these products performed by anyone other than Hogtunes, Inc. 3) Subsequent damage to any other components. 4) Any product purchased from a non-authorized Wild Boar Audio dealer. - Page 12 Original Equipment, which can be a distraction to the rider and/or passenger. Please use caution when adjusting or playing your stereo at high volume, especially in traffic. You are a valued customer so please: ride alert arrive alive! www.wildboaraudio.com www.hogtunes.com...
Need help?
Do you have a question about the Wild Boar Audio WBA 400.2R and is the answer not in the manual?
Questions and answers